
บริการเติมข้อความอัตโนมัติใน Places SDK สำหรับ iOS จะแสดงการคาดคะเนสถานที่ ในการตอบกลับคำค้นหาของผู้ใช้ ขณะที่ผู้ใช้พิมพ์ บริการเติมข้อความอัตโนมัติจะแสดงคำแนะนำสำหรับสถานที่ต่างๆ เช่น ธุรกิจ ที่อยู่ โค้ด Plus และจุดที่น่าสนใจ
คุณเพิ่มการเติมข้อความอัตโนมัติลงในแอปได้ด้วยวิธีต่อไปนี้
- เพิ่มตัวควบคุม UI การเติมข้อความอัตโนมัติเพื่อประหยัด เวลาในการพัฒนาและรับประกันประสบการณ์ของผู้ใช้ที่สอดคล้องกัน
- รับการคาดคะเนสถานที่โดยอัตโนมัติเพื่อสร้าง ประสบการณ์ของผู้ใช้ที่ปรับแต่งแล้ว
การเพิ่มตัวควบคุม UI การเติมข้อความอัตโนมัติ
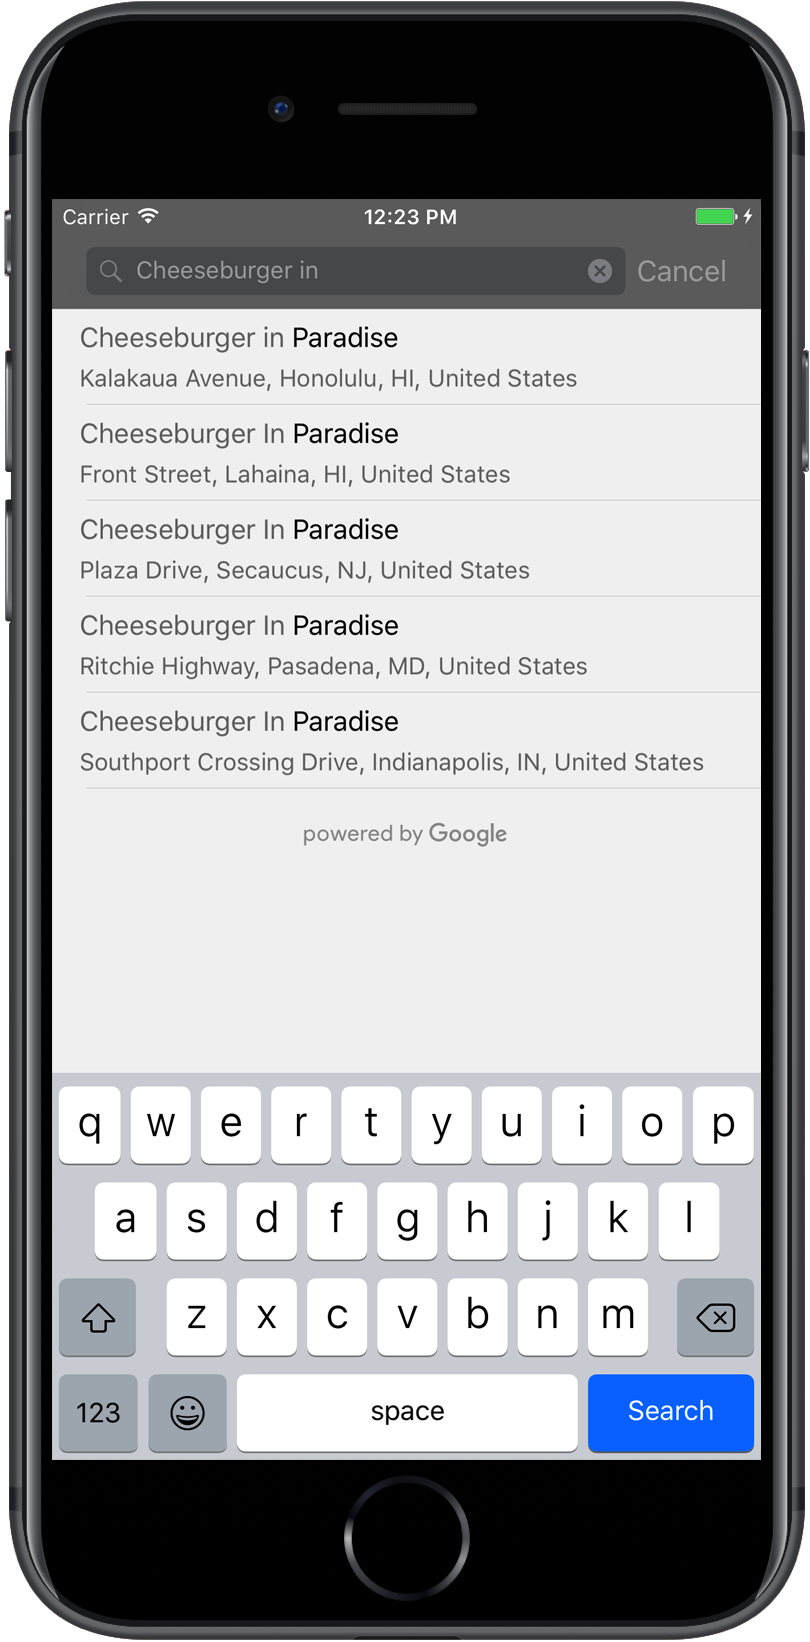
ตัวควบคุม UI การเติมข้อความอัตโนมัติคือกล่องโต้ตอบการค้นหาที่มีฟังก์ชันการเติมข้อความอัตโนมัติในตัว เมื่อผู้ใช้ป้อนคำค้นหา ตัวควบคุมจะแสดงรายการสถานที่ที่คาดการณ์ไว้ให้เลือก เมื่อผู้ใช้เลือกแล้ว ระบบจะแสดงอินสแตนซ์ของ
GMSPlace
ซึ่งแอปของคุณจะใช้เพื่อดูรายละเอียดเกี่ยวกับสถานที่ที่เลือกได้
คุณเพิ่มตัวควบคุม UI ของการเติมข้อความอัตโนมัติลงในแอปได้ด้วยวิธีต่อไปนี้
การเพิ่มตัวควบคุมแบบเต็มหน้าจอ
ใช้การควบคุมแบบเต็มหน้าจอเมื่อต้องการบริบทโมดัล ซึ่ง UI ของการเติมข้อความอัตโนมัติจะแทนที่ UI ของแอปชั่วคราวจนกว่าผู้ใช้จะเลือก ฟังก์ชันนี้ให้บริการโดยคลาส
GMSAutocompleteViewController
เมื่อผู้ใช้เลือกสถานที่ แอปของคุณจะได้รับการเรียกกลับ
วิธีเพิ่มการควบคุมแบบเต็มหน้าจอลงในแอป
- สร้างองค์ประกอบ UI ในแอปหลักเพื่อเปิดตัวควบคุม UI การเติมข้อความอัตโนมัติ
เช่น ตัวแฮนเดิลการแตะใน
UIButton - ใช้โปรโตคอล
GMSAutocompleteViewControllerDelegateใน ViewController ของคอนเทนเนอร์ - สร้างอินสแตนซ์ของ
GMSAutocompleteViewControllerและกำหนดตัวควบคุมมุมมองหลักเป็นพร็อพเพอร์ตี้ delegate - สร้าง
GMSPlaceFieldเพื่อกำหนดประเภทข้อมูลสถานที่ที่จะแสดง - เพิ่ม
GMSAutocompleteFilterเพื่อจำกัดการค้นหาให้เหลือเฉพาะประเภทสถานที่ที่ต้องการ - นำเสนอ
GMSAutocompleteViewControllerโดยใช้[self presentViewController...] - จัดการการเลือกของผู้ใช้ในเมธอด
didAutocompleteWithPlacedelegate - ปิดตัวควบคุมในเมธอด
didAutocompleteWithPlace,didFailAutocompleteWithErrorและwasCancelledของผู้มอบสิทธิ์
ตัวอย่างต่อไปนี้แสดงวิธีที่เป็นไปได้วิธีหนึ่งในการเปิดGMSAutocompleteViewController
เมื่อผู้ใช้แตะปุ่ม
Swift
import UIKit
import GooglePlaces

class ViewController: UIViewController {

  override func viewDidLoad() {
    makeButton()
  }

  // Present the Autocomplete view controller when the button is pressed.
  @objc func autocompleteClicked(_ sender: UIButton) {
    let autocompleteController = GMSAutocompleteViewController()
    autocompleteController.delegate = self

    // Specify the place data types to return.
    let fields: GMSPlaceField = GMSPlaceField(rawValue: UInt(GMSPlaceField.name.rawValue) |
      UInt(GMSPlaceField.placeID.rawValue))!
    autocompleteController.placeFields = fields

    // Specify a filter.
    let filter = GMSAutocompleteFilter()
    filter.types = [kGMSPlaceTypeCollectionAddress]
    autocompleteController.autocompleteFilter = filter

    // Display the autocomplete view controller.
    present(autocompleteController, animated: true, completion: nil)
  }

  // Add a button to the view.
  func makeButton() {
    let btnLaunchAc = UIButton(frame: CGRect(x: 5, y: 150, width: 300, height: 35))
    btnLaunchAc.backgroundColor = .blue
    btnLaunchAc.setTitle("Launch autocomplete", for: .normal)
    btnLaunchAc.addTarget(self, action: #selector(autocompleteClicked), for: .touchUpInside)
    self.view.addSubview(btnLaunchAc)
  }

}

extension ViewController: GMSAutocompleteViewControllerDelegate {

  // Handle the user's selection.
  func viewController(_ viewController: GMSAutocompleteViewController, didAutocompleteWith place: GMSPlace) {
    print("Place name: \(place.name)")
    print("Place ID: \(place.placeID)")
    print("Place attributions: \(place.attributions)")
    dismiss(animated: true, completion: nil)
  }

  func viewController(_ viewController: GMSAutocompleteViewController, didFailAutocompleteWithError error: Error) {
    // TODO: handle the error.
    print("Error: ", error.localizedDescription)
  }

  // User canceled the operation.
  func wasCancelled(_ viewController: GMSAutocompleteViewController) {
    dismiss(animated: true, completion: nil)
  }

  // Turn the network activity indicator on and off again.
  func didRequestAutocompletePredictions(_ viewController: GMSAutocompleteViewController) {
    UIApplication.shared.isNetworkActivityIndicatorVisible = true
  }

  func didUpdateAutocompletePredictions(_ viewController: GMSAutocompleteViewController) {
    UIApplication.shared.isNetworkActivityIndicatorVisible = false
  }

}
Objective-C
#import "ViewController.h"
@import GooglePlaces;

@interface ViewController () <GMSAutocompleteViewControllerDelegate>

@end

@implementation ViewController {
  GMSAutocompleteFilter *_filter;
}

-   (void)viewDidLoad {
  [super viewDidLoad];
  [self makeButton];
}

  // Present the autocomplete view controller when the button is pressed.
-   (void)autocompleteClicked {
  GMSAutocompleteViewController *acController = [[GMSAutocompleteViewController alloc] init];
  acController.delegate = self;

  // Specify the place data types to return.
  GMSPlaceField fields = (GMSPlaceFieldName | GMSPlaceFieldPlaceID);
  acController.placeFields = fields;

  // Specify a filter.
  _filter = [[GMSAutocompleteFilter alloc] init];
  _filter.types = @[ kGMSPlaceTypeBank ];
  acController.autocompleteFilter = _filter;

  // Display the autocomplete view controller.
  [self presentViewController:acController animated:YES completion:nil];
}

  // Add a button to the view.
-   (void)makeButton{
  UIButton *btnLaunchAc = [UIButton buttonWithType:UIButtonTypeCustom];
  [btnLaunchAc addTarget:self
             action:@selector(autocompleteClicked) forControlEvents:UIControlEventTouchUpInside];
  [btnLaunchAc setTitle:@"Launch autocomplete" forState:UIControlStateNormal];
  btnLaunchAc.frame = CGRectMake(5.0, 150.0, 300.0, 35.0);
  btnLaunchAc.backgroundColor = [UIColor blueColor];
  [self.view addSubview:btnLaunchAc];
}

  // Handle the user's selection.
-   (void)viewController:(GMSAutocompleteViewController *)viewController
didAutocompleteWithPlace:(GMSPlace *)place {
  [self dismissViewControllerAnimated:YES completion:nil];
  // Do something with the selected place.
  NSLog(@"Place name %@", place.name);
  NSLog(@"Place ID %@", place.placeID);
  NSLog(@"Place attributions %@", place.attributions.string);
}

-   (void)viewController:(GMSAutocompleteViewController *)viewController
didFailAutocompleteWithError:(NSError *)error {
  [self dismissViewControllerAnimated:YES completion:nil];
  // TODO: handle the error.
  NSLog(@"Error: %@", [error description]);
}

  // User canceled the operation.
-   (void)wasCancelled:(GMSAutocompleteViewController *)viewController {
  [self dismissViewControllerAnimated:YES completion:nil];
}

  // Turn the network activity indicator on and off again.
-   (void)didRequestAutocompletePredictions:(GMSAutocompleteViewController *)viewController {
  [UIApplication sharedApplication].networkActivityIndicatorVisible = YES;
}

-   (void)didUpdateAutocompletePredictions:(GMSAutocompleteViewController *)viewController {
  [UIApplication sharedApplication].networkActivityIndicatorVisible = NO;
}

@end
การเพิ่มตัวควบคุมผลการค้นหา
ใช้ตัวควบคุมผลลัพธ์เมื่อต้องการควบคุม UI ของการป้อนข้อความได้มากขึ้น ตัวควบคุมผลลัพธ์จะสลับการแสดงรายการผลลัพธ์แบบไดนามิกตามโฟกัส UI ของอินพุต
วิธีเพิ่มตัวควบคุมผลลัพธ์ลงในแอป
- สร้าง
GMSAutocompleteResultsViewController- ใช้โปรโตคอล
GMSAutocompleteResultsViewControllerDelegateในตัวควบคุมมุมมองหลักและกำหนดตัวควบคุมมุมมองหลักเป็น พร็อพเพอร์ตี้ผู้รับมอบสิทธิ์
- ใช้โปรโตคอล
- สร้างออบเจ็กต์
UISearchControllerโดยส่งGMSAutocompleteResultsViewControllerเป็นอาร์กิวเมนต์ของตัวควบคุมผลลัพธ์ - ตั้งค่า
GMSAutocompleteResultsViewControllerเป็นพร็อพเพอร์ตี้searchResultsUpdaterของUISearchController - เพิ่ม
searchBarสำหรับUISearchControllerลงใน UI ของแอป - จัดการการเลือกของผู้ใช้ในเมธอด
didAutocompleteWithPlacedelegate
คุณวางแถบค้นหาของ UISearchController ใน UI ของแอปได้หลายวิธี ดังนี้
การเพิ่มแถบค้นหาลงในแถบนำทาง
ตัวอย่างโค้ดต่อไปนี้แสดงการเพิ่มตัวควบคุมผลลัพธ์ การเพิ่ม searchBar ลงในแถบนำทาง และการจัดการการเลือกของผู้ใช้
Swift
class ViewController: UIViewController {

  var resultsViewController: GMSAutocompleteResultsViewController?
  var searchController: UISearchController?
  var resultView: UITextView?

  override func viewDidLoad() {
    super.viewDidLoad()

    resultsViewController = GMSAutocompleteResultsViewController()
    resultsViewController?.delegate = self

    searchController = UISearchController(searchResultsController: resultsViewController)
    searchController?.searchResultsUpdater = resultsViewController

    // Put the search bar in the navigation bar.
    searchController?.searchBar.sizeToFit()
    navigationItem.titleView = searchController?.searchBar

    // When UISearchController presents the results view, present it in
    // this view controller, not one further up the chain.
    definesPresentationContext = true

    // Prevent the navigation bar from being hidden when searching.
    searchController?.hidesNavigationBarDuringPresentation = false
  }
}

// Handle the user's selection.
extension ViewController: GMSAutocompleteResultsViewControllerDelegate {
  func resultsController(_ resultsController: GMSAutocompleteResultsViewController,
                         didAutocompleteWith place: GMSPlace) {
    searchController?.isActive = false
    // Do something with the selected place.
    print("Place name: \(place.name)")
    print("Place address: \(place.formattedAddress)")
    print("Place attributions: \(place.attributions)")
  }

  func resultsController(_ resultsController: GMSAutocompleteResultsViewController,
                         didFailAutocompleteWithError error: Error){
    // TODO: handle the error.
    print("Error: ", error.localizedDescription)
  }

  // Turn the network activity indicator on and off again.
  func didRequestAutocompletePredictions(_ viewController: GMSAutocompleteViewController) {
    UIApplication.shared.isNetworkActivityIndicatorVisible = true
  }

  func didUpdateAutocompletePredictions(_ viewController: GMSAutocompleteViewController) {
    UIApplication.shared.isNetworkActivityIndicatorVisible = false
  }
}
Objective-C
-   (void)viewDidLoad {
  _resultsViewController = [[GMSAutocompleteResultsViewController alloc] init];
  _resultsViewController.delegate = self;

  _searchController = [[UISearchController alloc]
                       initWithSearchResultsController:_resultsViewController];
  _searchController.searchResultsUpdater = _resultsViewController;

  // Put the search bar in the navigation bar.
  [_searchController.searchBar sizeToFit];
  self.navigationItem.titleView = _searchController.searchBar;

  // When UISearchController presents the results view, present it in
  // this view controller, not one further up the chain.
  self.definesPresentationContext = YES;

  // Prevent the navigation bar from being hidden when searching.
  _searchController.hidesNavigationBarDuringPresentation = NO;
}

// Handle the user's selection.
-   (void)resultsController:(GMSAutocompleteResultsViewController *)resultsController
  didAutocompleteWithPlace:(GMSPlace *)place {
    _searchController.active = NO;
    // Do something with the selected place.
    NSLog(@"Place name %@", place.name);
    NSLog(@"Place address %@", place.formattedAddress);
    NSLog(@"Place attributions %@", place.attributions.string);
}

-   (void)resultsController:(GMSAutocompleteResultsViewController *)resultsController
didFailAutocompleteWithError:(NSError *)error {
  [self dismissViewControllerAnimated:YES completion:nil];
  // TODO: handle the error.
  NSLog(@"Error: %@", [error description]);
}

// Turn the network activity indicator on and off again.
-   (void)didRequestAutocompletePredictionsForResultsController:
    (GMSAutocompleteResultsViewController *)resultsController {
  [UIApplication sharedApplication].networkActivityIndicatorVisible = YES;
}

-   (void)didUpdateAutocompletePredictionsForResultsController:
    (GMSAutocompleteResultsViewController *)resultsController {
  [UIApplication sharedApplication].networkActivityIndicatorVisible = NO;
}
การเพิ่มแถบค้นหาที่ด้านบนของมุมมอง
ตัวอย่างโค้ดต่อไปนี้แสดงการเพิ่ม searchBar ที่ด้านบนของมุมมอง
Swift
import UIKit
import GooglePlaces

class ViewController: UIViewController {

  var resultsViewController: GMSAutocompleteResultsViewController?
  var searchController: UISearchController?
  var resultView: UITextView?

  override func viewDidLoad() {
    super.viewDidLoad()

    resultsViewController = GMSAutocompleteResultsViewController()
    resultsViewController?.delegate = self

    searchController = UISearchController(searchResultsController: resultsViewController)
    searchController?.searchResultsUpdater = resultsViewController

    let subView = UIView(frame: CGRect(x: 0, y: 65.0, width: 350.0, height: 45.0))

    subView.addSubview((searchController?.searchBar)!)
    view.addSubview(subView)
    searchController?.searchBar.sizeToFit()
    searchController?.hidesNavigationBarDuringPresentation = false

    // When UISearchController presents the results view, present it in
    // this view controller, not one further up the chain.
    definesPresentationContext = true
  }
}

// Handle the user's selection.
extension ViewController: GMSAutocompleteResultsViewControllerDelegate {
  func resultsController(_ resultsController: GMSAutocompleteResultsViewController,
                         didAutocompleteWith place: GMSPlace) {
    searchController?.isActive = false
    // Do something with the selected place.
    print("Place name: \(place.name)")
    print("Place address: \(place.formattedAddress)")
    print("Place attributions: \(place.attributions)")
  }

  func resultsController(_ resultsController: GMSAutocompleteResultsViewController,
                         didFailAutocompleteWithError error: Error){
    // TODO: handle the error.
    print("Error: ", error.localizedDescription)
  }

  // Turn the network activity indicator on and off again.
  func didRequestAutocompletePredictions(forResultsController resultsController: GMSAutocompleteResultsViewController) {
    UIApplication.shared.isNetworkActivityIndicatorVisible = true
  }

  func didUpdateAutocompletePredictions(forResultsController resultsController: GMSAutocompleteResultsViewController) {
    UIApplication.shared.isNetworkActivityIndicatorVisible = false
  }
}
Objective-C
-   (void)viewDidLoad {
    [super viewDidLoad];

    _resultsViewController = [[GMSAutocompleteResultsViewController alloc] init];
    _resultsViewController.delegate = self;

    _searchController = [[UISearchController alloc]
                             initWithSearchResultsController:_resultsViewController];
    _searchController.searchResultsUpdater = _resultsViewController;

    UIView *subView = [[UIView alloc] initWithFrame:CGRectMake(0, 65.0, 250, 50)];

    [subView addSubview:_searchController.searchBar];
    [_searchController.searchBar sizeToFit];
    [self.view addSubview:subView];

    // When UISearchController presents the results view, present it in
    // this view controller, not one further up the chain.
    self.definesPresentationContext = YES;
}

// Handle the user's selection.
-   (void)resultsController:(GMSAutocompleteResultsViewController *)resultsController
didAutocompleteWithPlace:(GMSPlace *)place {
  [self dismissViewControllerAnimated:YES completion:nil];
  // Do something with the selected place.
  NSLog(@"Place name %@", place.name);
  NSLog(@"Place address %@", place.formattedAddress);
  NSLog(@"Place attributions %@", place.attributions.string);
}

-   (void)resultsController:(GMSAutocompleteResultsViewController *)resultsController
didFailAutocompleteWithError:(NSError *)error {
  [self dismissViewControllerAnimated:YES completion:nil];
  // TODO: handle the error.
  NSLog(@"Error: %@", [error description]);
}

// Turn the network activity indicator on and off again.
-   (void)didRequestAutocompletePredictionsForResultsController:
    (GMSAutocompleteResultsViewController *)resultsController {
  [UIApplication sharedApplication].networkActivityIndicatorVisible = YES;
}

-   (void)didUpdateAutocompletePredictionsForResultsController:
    (GMSAutocompleteResultsViewController *)resultsController {
  [UIApplication sharedApplication].networkActivityIndicatorVisible = NO;
}
โดยค่าเริ่มต้น
UISearchController
จะซ่อนแถบนำทางเมื่อนำเสนอ (ปิดใช้ได้) ในกรณีที่แถบนำทางมองเห็นได้และทึบแสง UISearchController จะตั้งค่าตําแหน่ง
ไม่ถูกต้อง
ใช้วิธีแก้ปัญหาชั่วคราวโดยใช้โค้ดต่อไปนี้
Swift
navigationController?.navigationBar.translucent = false
searchController?.hidesNavigationBarDuringPresentation = false

// This makes the view area include the nav bar even though it is opaque.
// Adjust the view placement down.
self.extendedLayoutIncludesOpaqueBars = true
self.edgesForExtendedLayout = .top
Objective-C
self.navigationController.navigationBar.translucent = NO;
_searchController.hidesNavigationBarDuringPresentation = NO;

// This makes the view area include the nav bar even though it is opaque.
// Adjust the view placement down.
self.extendedLayoutIncludesOpaqueBars = YES;
self.edgesForExtendedLayout = UIRectEdgeTop;
การเพิ่มแถบค้นหาโดยใช้ผลลัพธ์ป๊อปโอเวอร์
ตัวอย่างโค้ดต่อไปนี้แสดงการวางแถบค้นหาทางด้านขวาของ แถบนำทาง และการแสดงผลลัพธ์ในป๊อปโอเวอร์
Swift
import UIKit
import GooglePlaces

class ViewController: UIViewController {

  var resultsViewController: GMSAutocompleteResultsViewController?
  var searchController: UISearchController?
  var resultView: UITextView?

  override func viewDidLoad() {
    super.viewDidLoad()

    resultsViewController = GMSAutocompleteResultsViewController()
    resultsViewController?.delegate = self

    searchController = UISearchController(searchResultsController: resultsViewController)
    searchController?.searchResultsUpdater = resultsViewController

    // Add the search bar to the right of the nav bar,
    // use a popover to display the results.
    // Set an explicit size as we don't want to use the entire nav bar.
    searchController?.searchBar.frame = (CGRect(x: 0, y: 0, width: 250.0, height: 44.0))
    navigationItem.rightBarButtonItem = UIBarButtonItem(customView: (searchController?.searchBar)!)

    // When UISearchController presents the results view, present it in
    // this view controller, not one further up the chain.
    definesPresentationContext = true

    // Keep the navigation bar visible.
    searchController?.hidesNavigationBarDuringPresentation = false
    searchController?.modalPresentationStyle = .popover
  }
}
// Handle the user's selection.
extension ViewController: GMSAutocompleteResultsViewControllerDelegate {
  func resultsController(_ resultsController: GMSAutocompleteResultsViewController,
                         didAutocompleteWith place: GMSPlace) {
    searchController?.isActive = false
    // Do something with the selected place.
    print("Place name: \(place.name)")
    print("Place address: \(place.formattedAddress)")
    print("Place attributions: \(place.attributions)")
  }

  func resultsController(_ resultsController: GMSAutocompleteResultsViewController,
                         didFailAutocompleteWithError error: Error){
    // TODO: handle the error.
    print("Error: ", error.localizedDescription)
  }

  // Turn the network activity indicator on and off again.
  func didRequestAutocompletePredictions(forResultsController resultsController: GMSAutocompleteResultsViewController) {
    UIApplication.shared.isNetworkActivityIndicatorVisible = true
  }

  func didUpdateAutocompletePredictions(forResultsController resultsController: GMSAutocompleteResultsViewController) {
    UIApplication.shared.isNetworkActivityIndicatorVisible = false
  }
}
Objective-C
-   (void)viewDidLoad {
  [super viewDidLoad];

  _resultsViewController = [[GMSAutocompleteResultsViewController alloc] init];
  _resultsViewController.delegate = self;

  _searchController = [[UISearchController alloc]
                           initWithSearchResultsController:_resultsViewController];
  _searchController.searchResultsUpdater = _resultsViewController;

  // Add the search bar to the right of the nav bar,
  // use a popover to display the results.
  // Set an explicit size as we don't want to use the entire nav bar.
  _searchController.searchBar.frame = CGRectMake(0, 0, 250.0f, 44.0f);
  self.navigationItem.rightBarButtonItem =
  [[UIBarButtonItem alloc] initWithCustomView:_searchController.searchBar];

  // When UISearchController presents the results view, present it in
  // this view controller, not one further up the chain.
  self.definesPresentationContext = YES;

  // Keep the navigation bar visible.
  _searchController.hidesNavigationBarDuringPresentation = NO;

  _searchController.modalPresentationStyle = UIModalPresentationPopover;
}

// Handle the user's selection.
-   (void)resultsController:(GMSAutocompleteResultsViewController *)resultsController
didAutocompleteWithPlace:(GMSPlace *)place {
  [self dismissViewControllerAnimated:YES completion:nil];
  NSLog(@"Place name %@", place.name);
  NSLog(@"Place address %@", place.formattedAddress);
  NSLog(@"Place attributions %@", place.attributions.string);
}

-   (void)resultsController:(GMSAutocompleteResultsViewController *)resultsController
didFailAutocompleteWithError:(NSError *)error {
  [self dismissViewControllerAnimated:YES completion:nil];
  // TODO: handle the error.
  NSLog(@"Error: %@", [error description]);
}

// Turn the network activity indicator on and off again.
-   (void)didRequestAutocompletePredictionsForResultsController:
    (GMSAutocompleteResultsViewController *)resultsController {
  [UIApplication sharedApplication].networkActivityIndicatorVisible = YES;
}

-   (void)didUpdateAutocompletePredictionsForResultsController:
    (GMSAutocompleteResultsViewController *)resultsController {
  [UIApplication sharedApplication].networkActivityIndicatorVisible = NO;
}
การใช้แหล่งข้อมูลตาราง
หากแอปมี UI ข้อความค้นหาที่กำหนดเอง คุณสามารถใช้คลาส
GMSAutocompleteTableDataSource
เพื่อขับเคลื่อนมุมมองตารางที่แสดงผลลัพธ์ในตัวควบคุมมุมมองได้
หากต้องการใช้
GMSAutocompleteTableDataSource
เป็นแหล่งข้อมูลและผู้มอบสิทธิ์ของ
UITableView
ในตัวควบคุมมุมมอง ให้ทำดังนี้
- ใช้โปรโตคอล
GMSAutocompleteTableDataSourceDelegateและUISearchBarDelegateในตัวควบคุมมุมมอง - สร้างอินสแตนซ์
GMSAutocompleteTableDataSourceและกำหนดตัวควบคุมมุมมองเป็นพร็อพเพอร์ตี้ผู้รับมอบสิทธิ์ - ตั้งค่า
GMSAutocompleteTableDataSourceเป็นแหล่งข้อมูลและมอบสิทธิ์พร็อพเพอร์ตี้ของอินสแตนซ์UITableViewในตัวควบคุมมุมมอง - ในตัวแฮนเดิลสำหรับการป้อนข้อความค้นหา ให้เรียกใช้
sourceTextHasChangedในGMSAutocompleteTableDataSource- จัดการการเลือกของผู้ใช้ในเมธอด
didAutocompleteWithPlacedelegate
- จัดการการเลือกของผู้ใช้ในเมธอด
- ยกเลิกตัวควบคุมในเมธอด
didAutocompleteWithPlace,didFailAutocompleteWithError,wasCancelleddelegate
ตัวอย่างโค้ดต่อไปนี้แสดงการใช้คลาส
GMSAutocompleteTableDataSource
เพื่อขับเคลื่อนมุมมองตารางของ UIViewController เมื่อมีการเพิ่ม UISearchBar แยกกัน
Swift
// Copyright 2020 Google LLC
//
// Licensed under the Apache License, Version 2.0 (the "License");
// you may not use this file except in compliance with the License.
// You may obtain a copy of the License at
//
//      http://www.apache.org/licenses/LICENSE-2.0
//
// Unless required by applicable law or agreed to in writing, software
// distributed under the License is distributed on an "AS IS" BASIS,
// WITHOUT WARRANTIES OR CONDITIONS OF ANY KIND, either express or implied.
// See the License for the specific language governing permissions and
// limitations under the License.

import GooglePlaces
import UIKit

class PlaceAutocompleteViewController: UIViewController {

  private var tableView: UITableView!
  private var tableDataSource: GMSAutocompleteTableDataSource!

  override func viewDidLoad() {
    super.viewDidLoad()

    let searchBar = UISearchBar(frame: CGRect(x: 0, y: 20, width: self.view.frame.size.width, height: 44.0))
    searchBar.delegate = self
    view.addSubview(searchBar)

    tableDataSource = GMSAutocompleteTableDataSource()
    tableDataSource.delegate = self

    tableView = UITableView(frame: CGRect(x: 0, y: 64, width: self.view.frame.size.width, height: self.view.frame.size.height - 44))
    tableView.delegate = tableDataSource
    tableView.dataSource = tableDataSource

    view.addSubview(tableView)
  }
}

extension PlaceAutocompleteViewController: UISearchBarDelegate {
  func searchBar(_ searchBar: UISearchBar, textDidChange searchText: String) {
    // Update the GMSAutocompleteTableDataSource with the search text.
    tableDataSource.sourceTextHasChanged(searchText)
  }
}

extension PlaceAutocompleteViewController: GMSAutocompleteTableDataSourceDelegate {
  func didUpdateAutocompletePredictions(for tableDataSource: GMSAutocompleteTableDataSource) {
    // Turn the network activity indicator off.
    UIApplication.shared.isNetworkActivityIndicatorVisible = false
    // Reload table data.
    tableView.reloadData()
  }

  func didRequestAutocompletePredictions(for tableDataSource: GMSAutocompleteTableDataSource) {
    // Turn the network activity indicator on.
    UIApplication.shared.isNetworkActivityIndicatorVisible = true
    // Reload table data.
    tableView.reloadData()
  }

  func tableDataSource(_ tableDataSource: GMSAutocompleteTableDataSource, didAutocompleteWith place: GMSPlace) {
    // Do something with the selected place.
    print("Place name: \(place.name)")
    print("Place address: \(place.formattedAddress)")
    print("Place attributions: \(place.attributions)")
  }

  func tableDataSource(_ tableDataSource: GMSAutocompleteTableDataSource, didFailAutocompleteWithError error: Error) {
    // Handle the error.
    print("Error: \(error.localizedDescription)")
  }

  func tableDataSource(_ tableDataSource: GMSAutocompleteTableDataSource, didSelect prediction: GMSAutocompletePrediction) -> Bool {
    return true
  }
}
Objective-C
// Copyright 2020 Google LLC
//
// Licensed under the Apache License, Version 2.0 (the "License");
// you may not use this file except in compliance with the License.
// You may obtain a copy of the License at
//
//      http://www.apache.org/licenses/LICENSE-2.0
//
// Unless required by applicable law or agreed to in writing, software
// distributed under the License is distributed on an "AS IS" BASIS,
// WITHOUT WARRANTIES OR CONDITIONS OF ANY KIND, either express or implied.
// See the License for the specific language governing permissions and
// limitations under the License.

#import "PlaceAutocompleteViewController.h"
@import GooglePlaces;
@import UIKit;

@interface PlaceAutocompleteViewController () <GMSAutocompleteTableDataSourceDelegate, UISearchBarDelegate>

@end

@implementation PlaceAutocompleteViewController {
  UITableView *tableView;
  GMSAutocompleteTableDataSource *tableDataSource;
}

- (void)viewDidLoad {
  [super viewDidLoad];

  UISearchBar *searchBar = [[UISearchBar alloc] initWithFrame:CGRectMake(0, 20, self.view.frame.size.width, 44)];
  searchBar.delegate = self;

  [self.view addSubview:searchBar];

  tableDataSource = [[GMSAutocompleteTableDataSource alloc] init];
  tableDataSource.delegate = self;

  tableView = [[UITableView alloc] initWithFrame:CGRectMake(0, 64, self.view.frame.size.width, self.view.frame.size.height - 44)];
  tableView.delegate = tableDataSource;
  tableView.dataSource = tableDataSource;

  [self.view addSubview:tableView];
}

#pragma mark - GMSAutocompleteTableDataSourceDelegate

- (void)didUpdateAutocompletePredictionsForTableDataSource:(GMSAutocompleteTableDataSource *)tableDataSource {
  // Turn the network activity indicator off.
  UIApplication.sharedApplication.networkActivityIndicatorVisible = NO;

  // Reload table data.
  [tableView reloadData];
}

- (void)didRequestAutocompletePredictionsForTableDataSource:(GMSAutocompleteTableDataSource *)tableDataSource {
  // Turn the network activity indicator on.
  UIApplication.sharedApplication.networkActivityIndicatorVisible = YES;

  // Reload table data.
  [tableView reloadData];
}

- (void)tableDataSource:(GMSAutocompleteTableDataSource *)tableDataSource didAutocompleteWithPlace:(GMSPlace *)place {
  // Do something with the selected place.
  NSLog(@"Place name: %@", place.name);
  NSLog(@"Place address: %@", place.formattedAddress);
  NSLog(@"Place attributions: %@", place.attributions);
}

- (void)tableDataSource:(GMSAutocompleteTableDataSource *)tableDataSource didFailAutocompleteWithError:(NSError *)error {
  // Handle the error
  NSLog(@"Error %@", error.description);
}

- (BOOL)tableDataSource:(GMSAutocompleteTableDataSource *)tableDataSource didSelectPrediction:(GMSAutocompletePrediction *)prediction {
  return YES;
}

#pragma mark - UISearchBarDelegate

- (void)searchBar:(UISearchBar *)searchBar textDidChange:(NSString *)searchText {
  // Update the GMSAutocompleteTableDataSource with the search text.
  [tableDataSource sourceTextHasChanged:searchText];
}

@end
การปรับแต่งสีข้อความและพื้นหลัง
คุณสามารถตั้งค่าสีของข้อความและพื้นหลังทั้งหมดใน UI ของการเติมข้อความอัตโนมัติ เพื่อควบคุมให้วิดเจ็ตเข้ากับลักษณะที่ปรากฏของแอปได้มากขึ้น การตั้งค่าสีของตัวควบคุม UI ทำได้ 2 วิธี ดังนี้
- โดยใช้โปรโตคอล UIAppearance ใน iOS ที่มีอยู่เพื่อจัดรูปแบบการควบคุม UI ทั่วโลกหากเป็นไปได้ การตั้งค่าเหล่านี้มีผลกับตัวควบคุม UI หลายรายการ แต่ไม่ใช่ทั้งหมด
- โดยใช้เมธอด SDK ในคลาสวิดเจ็ตเพื่อตั้งค่าพร็อพเพอร์ตี้ที่โปรโตคอล UIAppearance ไม่รองรับ
โดยปกติแล้ว แอปจะใช้โปรโตคอล UIAppearance และเมธอด SDK ร่วมกัน แผนภาพต่อไปนี้แสดงองค์ประกอบที่จัดรูปแบบได้
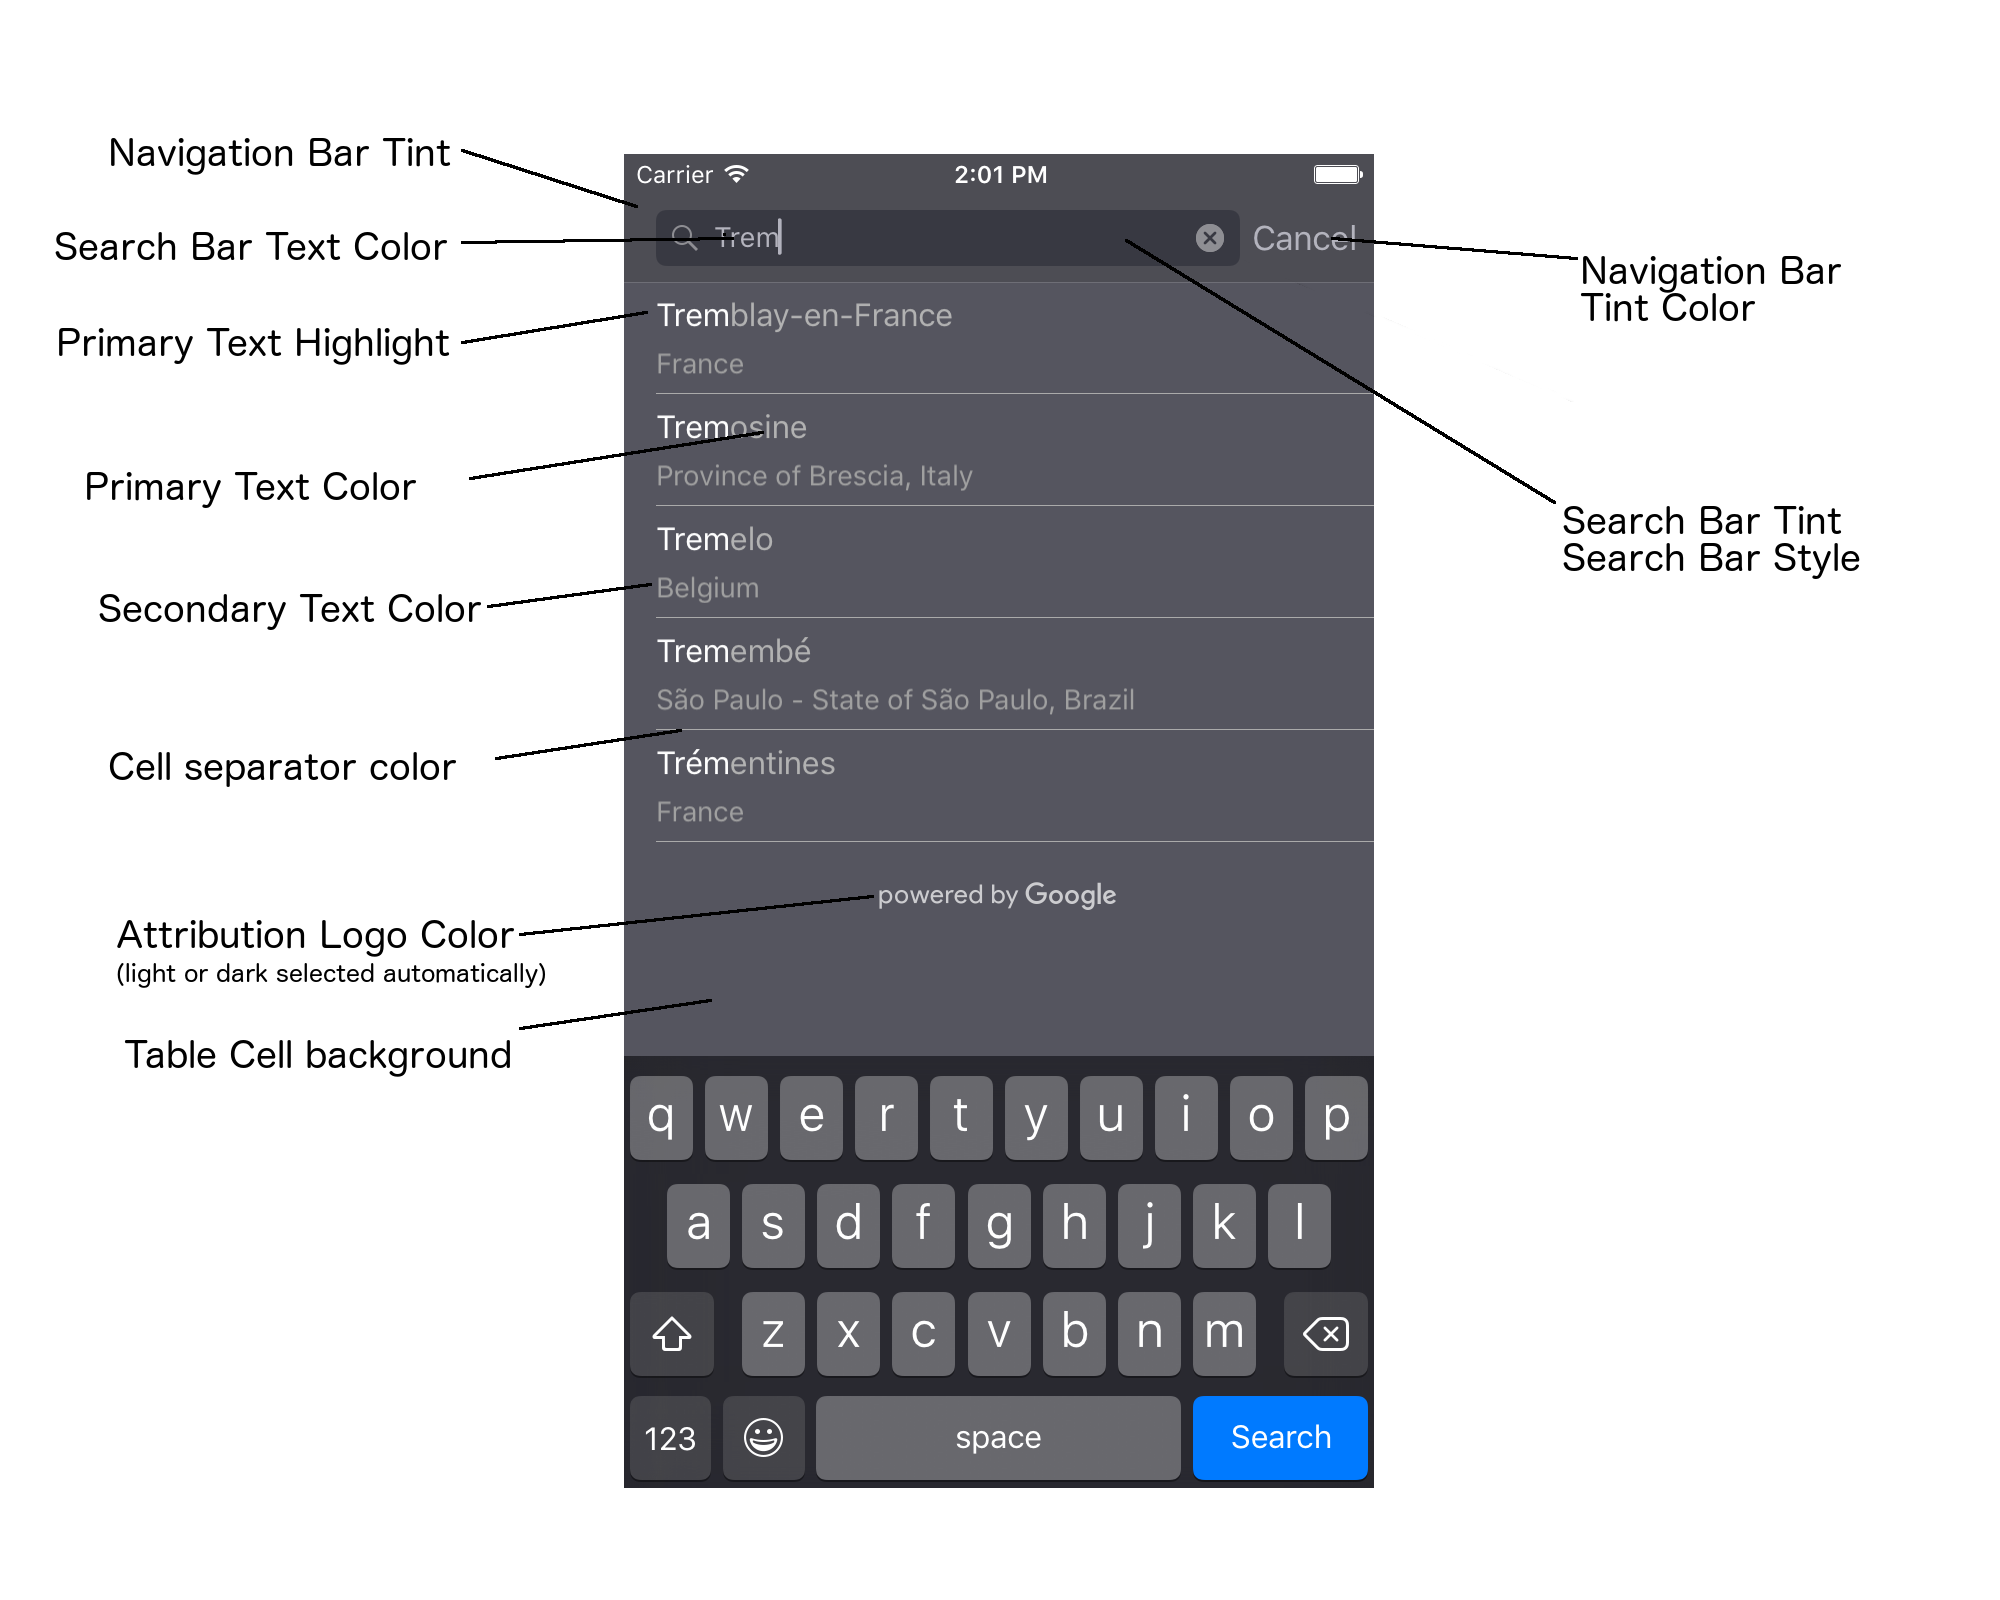
ตารางต่อไปนี้แสดงรายการองค์ประกอบ UI ทั้งหมด และระบุวิธีจัดรูปแบบแต่ละองค์ประกอบ (โปรโตคอล UIAppearance หรือเมธอด SDK)
| องค์ประกอบ UI | วิธีการ | วิธีการแต่งตัว |
|---|---|---|
| สีของแถบนำทาง (พื้นหลัง) | โปรโตคอล UIAppearance | โทรหา setBarTintColor ที่พร็อกซี UINavigationBar |
| สีของแถบการนำทาง (เครื่องหมายแทรกข้อความในแถบค้นหาและปุ่มยกเลิก) | โปรโตคอล UIAppearance | โทรหา setTintColor ที่พร็อกซี UINavigationBar |
| สีข้อความในแถบค้นหา | โปรโตคอล UIAppearance | ตั้งค่า NSForegroundColorAttributeName ใน searchBarTextAttributes |
| สีแต้มของแถบค้นหา | ไม่มี | แถบค้นหาจะโปร่งแสงและแสดงเป็นเวอร์ชันที่มีเฉดสี ของแถบนำทาง |
| สีข้อความตัวยึดตำแหน่งของแถบค้นหา (ข้อความค้นหาเริ่มต้น) | โปรโตคอล UIAppearance | ตั้งค่า NSForegroundColorAttributeName ใน placeholderAttributes |
| ข้อความหลัก (ใช้กับข้อความแสดงข้อผิดพลาดและข้อความด้วย) | วิธีการ SDK | โทรมาที่ primaryTextColor |
| ไฮไลต์ข้อความหลัก | วิธีการ SDK | โทรมาที่ primaryTextHighlightColor |
| ข้อความรอง | วิธีการ SDK | โทรมาที่ secondaryTextColor |
| ข้อความแสดงข้อผิดพลาดและข้อความ | วิธีการ SDK | โทรมาที่ primaryTextColor |
| พื้นหลังของเซลล์ในตาราง | วิธีการ SDK | โทรมาที่ tableCellBackgroundColor |
| สีตัวคั่นเซลล์ในตาราง | วิธีการ SDK | โทรมาที่ tableCellSeparatorColor |
| ปุ่ม "ลองอีกครั้ง" | วิธีการ SDK | โทรมาที่ tintColor |
| ตัวบ่งชี้กิจกรรม (วงกลมแสดงความคืบหน้า) | โปรโตคอล UIAppearance | โทรหา setColor ที่พร็อกซี UIActivityIndicatorView |
| โลโก้ "ขับเคลื่อนโดย Google", รูปภาพก้อนเมฆเศร้า | ไม่มี | ระบบจะเลือกเวอร์ชันสีขาวหรือสีเทาโดยอัตโนมัติตามคอนทราสต์ของพื้นหลัง |
| ไอคอนแว่นขยายและไอคอนล้างข้อความในช่องข้อความของแถบค้นหา | ไม่มี | หากต้องการจัดรูปแบบ ให้แทนที่รูปภาพเริ่มต้นด้วยรูปภาพสีที่ต้องการ |
การใช้โปรโตคอล UIAppearance
คุณสามารถใช้โปรโตคอล UIAppearance
เพื่อรับพร็อกซีลักษณะที่ปรากฏสำหรับองค์ประกอบ UI ที่ต้องการ จากนั้นคุณจะใช้พร็อกซีดังกล่าวเพื่อ
ตั้งค่าสีสำหรับองค์ประกอบ UI ได้ เมื่อมีการแก้ไข องค์ประกอบ UI ที่ระบุทั้งหมดจะได้รับผลกระทบ
ตัวอย่างเช่น ตัวอย่างต่อไปนี้จะเปลี่ยนสีข้อความของคลาส UITextField เป็นสีเขียวเมื่ออยู่ใน UISearchBar ทั่วโลก
[[UITextField appearanceWhenContainedIn:[UISearchBar class], nil]
    setDefaultTextAttributes:@{NSForegroundColorAttributeName:[UIColor greenColor]}];
ดูข้อมูลเพิ่มเติมเกี่ยวกับการกำหนดค่าสีได้ที่การอ้างอิงคลาส UIColor
ข้อมูลโค้ดต่อไปนี้แสดงคำสั่งพร็อกซีทั้งหมดที่คุณต้องใช้เพื่อ
จัดรูปแบบทุกอย่างในตัวควบคุม UI ของการเติมข้อความอัตโนมัติแบบเต็มหน้าจอ เพิ่มโค้ดนี้ลงในเมธอด didFinishLaunchingWithOptions ใน Appdelegate.m
// Define some colors.
UIColor *darkGray = [UIColor darkGrayColor];
UIColor *lightGray = [UIColor lightGrayColor];

// Navigation bar background.
[[UINavigationBar appearance] setBarTintColor:darkGray];
[[UINavigationBar appearance] setTintColor:lightGray];

// Color of typed text in the search bar.
NSDictionary *searchBarTextAttributes = @{
                                          NSForegroundColorAttributeName: lightGray,
                                          NSFontAttributeName : [UIFont systemFontOfSize:[UIFont systemFontSize]]
                                          };
[UITextField appearanceWhenContainedInInstancesOfClasses:@[[UISearchBar class]]]
    .defaultTextAttributes = searchBarTextAttributes;

// Color of the placeholder text in the search bar prior to text entry.
NSDictionary *placeholderAttributes = @{
                                        NSForegroundColorAttributeName: lightGray,
                                        NSFontAttributeName : [UIFont systemFontOfSize:[UIFont systemFontSize]]
                                        };

// Color of the default search text.
// NOTE: In a production scenario, "Search" would be a localized string.
NSAttributedString *attributedPlaceholder =
[[NSAttributedString alloc] initWithString:@"Search"
                                attributes:placeholderAttributes];
[UITextField appearanceWhenContainedInInstancesOfClasses:@[[UISearchBar class]]]
    .attributedPlaceholder = attributedPlaceholder;

// Color of the in-progress spinner.
[[UIActivityIndicatorView appearance] setColor:lightGray];

// To style the two image icons in the search bar (the magnifying glass
// icon and the 'clear text' icon), replace them with different images.
[[UISearchBar appearance] setImage:[UIImage imageNamed:@"custom_clear_x_high"]
                  forSearchBarIcon:UISearchBarIconClear
                            state:UIControlStateHighlighted];
[[UISearchBar appearance] setImage:[UIImage imageNamed:@"custom_clear_x"]
                  forSearchBarIcon:UISearchBarIconClear
                            state:UIControlStateNormal];
[[UISearchBar appearance] setImage:[UIImage imageNamed:@"custom_search"]
                    forSearchBarIcon:UISearchBarIconSearch
                            state:UIControlStateNormal];

// Color of selected table cells.
UIView *selectedBackgroundView = [[UIView alloc] init];
selectedBackgroundView.backgroundColor = [UIColor lightGrayColor];
[UITableViewCell appearanceWhenContainedIn:[GMSAutocompleteViewController class], nil]
    .selectedBackgroundView = selectedBackgroundView;
การตั้งค่าพร็อพเพอร์ตี้สไตล์ตัวควบคุม UI
ตัวควบคุม UI บางส่วนมีพร็อพเพอร์ตี้ที่ไม่ได้รับผลกระทบจากโปรโตคอล UIAppearance จึงต้องตั้งค่าโดยตรง ตัวอย่างโค้ดต่อไปนี้ แสดงการกำหนดสีเบื้องหน้าและพื้นหลัง และการนำไปใช้กับอินสแตนซ์ของตัวควบคุม UI ที่ชื่อ acController เพิ่มโค้ดนี้ลงในเมธอด onLaunchClicked
ใน ViewController.m
UIColor *darkGray = [UIColor darkGrayColor];
UIColor *lightGray = [UIColor lightGrayColor];

acController.secondaryTextColor = [UIColor colorWithWhite:1.0f alpha:0.5f];
acController.primaryTextColor = lightGray;
acController.primaryTextHighlightColor = [UIColor grayColor];
acController.tableCellBackgroundColor = darkGray;
acController.tableCellSeparatorColor = lightGray;
acController.tintColor = lightGray;
รับการคาดคะเนสถานที่โดยใช้โปรแกรม
คุณสามารถสร้าง UI การค้นหาที่กำหนดเองเพื่อใช้แทน UI ที่วิดเจ็ตเติมข้อความอัตโนมัติมีให้ หากต้องการทำเช่นนี้ แอปของคุณต้องรับการคาดคะเนสถานที่ โดยอัตโนมัติ แอปของคุณจะรับรายการชื่อสถานที่และ/หรือที่อยู่ที่คาดการณ์ได้ด้วยวิธีใดวิธีหนึ่งต่อไปนี้
กำลังโทรหา GMSPlacesClient findAutocompletePredictionsFromQuery:
หากต้องการดูรายการชื่อสถานที่และ/หรือที่อยู่ที่คาดการณ์ไว้ ให้สร้างอินสแตนซ์
GMSPlacesClient ก่อน
จากนั้นเรียกใช้เมธอด GMSPlacesClient
findAutocompletePredictionsFromQuery:
โดยใช้พารามิเตอร์ต่อไปนี้
- สตริง
autocompleteQueryที่มีข้อความที่ผู้ใช้พิมพ์ - A
GMSAutocompleteSessionTokenซึ่งใช้เพื่อระบุเซสชันแต่ละรายการ แอปควรส่งโทเค็นเดียวกันสำหรับการเรียกคำขอเติมข้อความอัตโนมัติแต่ละครั้ง จากนั้นส่งโทเค็นดังกล่าวพร้อมกับรหัสสถานที่ในการเรียกครั้งถัดไปไปยังfetchPlacefromPlaceID:เพื่อดึงรายละเอียดสถานที่สำหรับสถานที่ที่ผู้ใช้เลือก - A
GMSAutocompleteFilterถึง:- เอนเอียงหรือจำกัดผลการค้นหาให้แสดงเฉพาะภูมิภาคที่เจาะจง
- จำกัดผลการค้นหาให้แสดงเฉพาะประเภทสถานที่ที่เฉพาะเจาะจง
GMSPlaceLocationBias/ออบเจ็กต์การจำกัดที่เอนเอียงผลลัพธ์ไปยัง พื้นที่ที่เฉพาะเจาะจงซึ่งระบุโดยขอบเขตละติจูดและลองจิจูด
- เมธอด Callback เพื่อจัดการการคาดการณ์ที่แสดงผล
ตัวอย่างโค้ดด้านล่างแสดงการเรียกใช้ findAutocompletePredictionsFromQuery:
Swift
/**
 *   Create a new session token. Be sure to use the same token for calling
 *   findAutocompletePredictions, as well as the subsequent place details request.
 *   This ensures that the user's query and selection are billed as a single session.
 */
let token = GMSAutocompleteSessionToken.init()

// Create a type filter.
let filter = GMSAutocompleteFilter()
filter.types = [kGMSPlaceTypeBank]
filter.locationBias = GMSPlaceRectangularLocationOption( northEastBounds,
                                   southWestBounds);

placesClient?.findAutocompletePredictions(fromQuery: "cheesebu",

                                          filter: filter,
                                          sessionToken: token,
                                          callback: { (results, error) in
    if let error = error {
      print("Autocomplete error: \(error)")
      return
    }
    if let results = results {
      for result in results {
        print("Result \(result.attributedFullText) with placeID \(result.placeID)")
      }
    }
})
Objective-C
/**
 *   Create a new session token. Be sure to use the same token for calling
 *   findAutocompletePredictionsFromQuery:, as well as the subsequent place details request.
 *   This ensures that the user's query and selection are billed as a single session.
 */
GMSAutocompleteSessionToken *token = [[GMSAutocompleteSessionToken alloc] init];

// Create a type filter.
GMSAutocompleteFilter *_filter = [[GMSAutocompleteFilter alloc] init];
_filter.types = @[ kGMSPlaceTypeBank ];

[_placesClient findAutocompletePredictionsFromQuery:@"cheesebu"
filter:_filter sessionToken:token callback:^(NSArray<GMSAutocompletePrediction *> * _Nullable results, NSError * _Nullable error) {
  if (error != nil) {
    NSLog(@"An error occurred %@", [error localizedDescription]);
    return;
  }
  if (results != nil) {
    for (GMSAutocompletePrediction *result in results) {
      NSLog(@"Result %@ with PlaceID %@", result.attributedFullText, result.placeID);
    }
  }
}];
API จะเรียกใช้เมธอด Callback ที่ระบุ โดยส่งอาร์เรย์ของออบเจ็กต์
GMSAutocompletePrediction
ออบเจ็กต์
GMSAutocompletePrediction
แต่ละรายการจะมีข้อมูลต่อไปนี้
attributedFullText- ข้อความทั้งหมดของการคาดการณ์ในรูปแบบของNSAttributedStringเช่น "Sydney Opera House, Sydney, New South Wales, Australia" ช่วงข้อความทุกช่วงที่ตรงกับข้อมูลจากผู้ใช้จะมีแอตทริบิวต์kGMSAutocompleteMatchAttributeคุณสามารถใช้แอตทริบิวต์นี้เพื่อ ไฮไลต์ข้อความที่ตรงกันในคำค้นหาของผู้ใช้ เช่น ดังที่แสดง ด้านล่างplaceID– รหัสสถานที่ของสถานที่ที่คาดการณ์ รหัสสถานที่คือตัวระบุที่เป็นข้อความซึ่งระบุสถานที่โดยไม่ซ้ำกัน ดูข้อมูลเพิ่มเติม เกี่ยวกับรหัสสถานที่ได้ที่ภาพรวม รหัสสถานที่distanceMeters- ระยะทางเป็นเส้นตรงจากoriginที่ระบุไปยังจุดหมาย หากไม่ได้ตั้งค่าพร็อพเพอร์ตี้originระบบจะไม่แสดงค่าระยะทาง
ตัวอย่างโค้ดต่อไปนี้แสดงวิธีไฮไลต์ข้อความตัวหนาในส่วนของผลลัพธ์ที่ตรงกับข้อความในคำค้นหาของผู้ใช้โดยใช้ enumerateAttribute
Swift
let regularFont = UIFont.systemFont(ofSize: UIFont.labelFontSize)
let boldFont = UIFont.boldSystemFont(ofSize: UIFont.labelFontSize)

let bolded = prediction.attributedFullText.mutableCopy() as! NSMutableAttributedString
bolded.enumerateAttribute(kGMSAutocompleteMatchAttribute, in: NSMakeRange(0, bolded.length), options: []) {
  (value, range: NSRange, stop: UnsafeMutablePointer<ObjCBool>) -> Void in
    let font = (value == nil) ? regularFont : boldFont
    bolded.addAttribute(NSFontAttributeName, value: font, range: range)
}

label.attributedText = bolded
Objective-C
UIFont *regularFont = [UIFont systemFontOfSize:[UIFont labelFontSize]];
UIFont *boldFont = [UIFont boldSystemFontOfSize:[UIFont labelFontSize]];

NSMutableAttributedString *bolded = [prediction.attributedFullText mutableCopy];
[bolded enumerateAttribute:kGMSAutocompleteMatchAttribute
                   inRange:NSMakeRange(0, bolded.length)
                   options:0
                usingBlock:^(id value, NSRange range, BOOL *stop) {
                  UIFont *font = (value == nil) ? regularFont : boldFont;
                  [bolded addAttribute:NSFontAttributeName value:font range:range];
                }];

label.attributedText = bolded;
การใช้ตัวดึงข้อมูล
หากต้องการสร้างการควบคุมการเติมข้อความอัตโนมัติของคุณเองตั้งแต่ต้น คุณสามารถใช้
GMSAutocompleteFetcher ซึ่ง
จะรวมเมธอด autocompleteQuery ไว้ใน
GMSPlacesClient ตัวดึงข้อมูลจะ
จำกัดคำขอ โดยจะแสดงเฉพาะผลลัพธ์สำหรับข้อความค้นหาที่ป้อนล่าสุด
เท่านั้น โดยไม่มีองค์ประกอบ UI
หากต้องการติดตั้งใช้งาน
GMSAutocompleteFetcher
ให้ทำตามขั้นตอนต่อไปนี้
- ใช้โปรโตคอล
GMSAutocompleteFetcherDelegate - สร้างออบเจ็กต์
GMSAutocompleteFetcher - เรียกใช้
sourceTextHasChangedในตัวดึงข้อมูลขณะที่ผู้ใช้พิมพ์ - จัดการการคาดคะเนและข้อผิดพลาดโดยใช้วิธีการของโปรโตคอล
didAutcompleteWithPredictionsและdidFailAutocompleteWithError
ตัวอย่างโค้ดต่อไปนี้แสดงการใช้ตัวดึงข้อมูลเพื่อรับข้อมูลจากผู้ใช้และแสดงสถานที่ที่ตรงกันในมุมมองข้อความ เราได้ละเว้นฟังก์ชันการทำงานสำหรับการเลือกสถานที่
FetcherSampleViewController มาจาก UIViewController ใน
FetcherSampleViewController.h
Swift
import UIKit
import GooglePlaces

class ViewController: UIViewController {

  var textField: UITextField?
  var resultText: UITextView?
  var fetcher: GMSAutocompleteFetcher?

  override func viewDidLoad() {
    super.viewDidLoad()

    view.backgroundColor = .white
    edgesForExtendedLayout = []

    // Set bounds to inner-west Sydney Australia.
    let neBoundsCorner = CLLocationCoordinate2D(latitude: -33.843366,
                                                longitude: 151.134002)
    let swBoundsCorner = CLLocationCoordinate2D(latitude: -33.875725,
                                                longitude: 151.200349)

    // Set up the autocomplete filter.
    let filter = GMSAutocompleteFilter()
    filter.locationRestriction = GMSPlaceRectangularLocationOption(neBoundsCorner, swBoundsCorner)

    // Create a new session token.
    let token: GMSAutocompleteSessionToken = GMSAutocompleteSessionToken.init()

    // Create the fetcher.
    fetcher = GMSAutocompleteFetcher(bounds: nil, filter: filter)
    fetcher?.delegate = self
    fetcher?.provide(token)

    textField = UITextField(frame: CGRect(x: 5.0, y: 10.0,
                                          width: view.bounds.size.width - 5.0,
                                          height: 64.0))
    textField?.autoresizingMask = .flexibleWidth
    textField?.addTarget(self, action: #selector(textFieldDidChange(textField:)),
                         for: .editingChanged)
    let placeholder = NSAttributedString(string: "Type a query...")

    textField?.attributedPlaceholder = placeholder

    resultText = UITextView(frame: CGRect(x: 0, y: 65.0,
                                          width: view.bounds.size.width,
                                          height: view.bounds.size.height - 65.0))
    resultText?.backgroundColor = UIColor(white: 0.95, alpha: 1.0)
    resultText?.text = "No Results"
    resultText?.isEditable = false

    self.view.addSubview(textField!)
    self.view.addSubview(resultText!)
  }

  @objc func textFieldDidChange(textField: UITextField) {
    fetcher?.sourceTextHasChanged(textField.text!)
  }

}

extension ViewController: GMSAutocompleteFetcherDelegate {
  func didAutocomplete(with predictions: [GMSAutocompletePrediction]) {
    let resultsStr = NSMutableString()
    for prediction in predictions {
      resultsStr.appendFormat("\n Primary text: %@\n", prediction.attributedPrimaryText)
      resultsStr.appendFormat("Place ID: %@\n", prediction.placeID)
    }

    resultText?.text = resultsStr as String
  }

  func didFailAutocompleteWithError(_ error: Error) {
    resultText?.text = error.localizedDescription
  }
}
Objective-C
#import "FetcherSampleViewController.h"
#import <GooglePlaces/GooglePlaces.h>

@interface FetcherSampleViewController () <GMSAutocompleteFetcherDelegate>

@end

@implementation FetcherSampleViewController {
  UITextField *_textField;
  UITextView *_resultText;
  GMSAutocompleteFetcher* _fetcher;
}

-   (void)viewDidLoad {
  [super viewDidLoad];

  self.view.backgroundColor = [UIColor whiteColor];
  self.edgesForExtendedLayout = UIRectEdgeNone;

  // Set bounds to inner-west Sydney Australia.
  CLLocationCoordinate2D neBoundsCorner = CLLocationCoordinate2DMake(-33.843366, 151.134002);
  CLLocationCoordinate2D swBoundsCorner = CLLocationCoordinate2DMake(-33.875725, 151.200349);

  GMSAutocompleteFilter *autocompleteFilter = [[GMSAutocompleteFilter alloc] init];
  autocompleteFilter.locationRestriction =
        GMSPlaceRectangularLocationOption(neBoundsCorner, swBoundsCorner);

  // Create the fetcher.
  _fetcher = [[GMSAutocompleteFetcher alloc] initWithBounds:nil
                                                     filter:filter];
  _fetcher.delegate = self;

  // Set up the UITextField and UITextView.
  _textField = [[UITextField alloc] initWithFrame:CGRectMake(5.0f,
                                                             0,
                                                             self.view.bounds.size.width - 5.0f,
                                                             44.0f)];
  _textField.autoresizingMask = UIViewAutoresizingFlexibleWidth;
  [_textField addTarget:self
                 action:@selector(textFieldDidChange:)
       forControlEvents:UIControlEventEditingChanged];
  _resultText =[[UITextView alloc] initWithFrame:CGRectMake(0,
                                                            45.0f,
                                                            self.view.bounds.size.width,
                                                            self.view.bounds.size.height - 45.0f)];
  _resultText.backgroundColor = [UIColor colorWithWhite:0.95f alpha:1.0f];
  _resultText.text = @"No Results";
  _resultText.editable = NO;
  [self.view addSubview:_textField];
  [self.view addSubview:_resultText];
}

-   (void)textFieldDidChange:(UITextField *)textField {
  NSLog(@"%@", textField.text);
  [_fetcher sourceTextHasChanged:textField.text];
}

#pragma mark - GMSAutocompleteFetcherDelegate
-   (void)didAutocompleteWithPredictions:(NSArray *)predictions {
  NSMutableString *resultsStr = [NSMutableString string];
  for (GMSAutocompletePrediction *prediction in predictions) {
      [resultsStr appendFormat:@"%@\n", [prediction.attributedPrimaryText string]];
  }
  _resultText.text = resultsStr;
}

-   (void)didFailAutocompleteWithError:(NSError *)error {
  _resultText.text = [NSString stringWithFormat:@"%@", error.localizedDescription];
}

@end
โทเค็นของเซสชัน
โทเค็นเซสชันจะจัดกลุ่มระยะการค้นหาและการเลือกของการค้นหาที่เติมข้อความอัตโนมัติของผู้ใช้ เป็นเซสชันที่ไม่ต่อเนื่องเพื่อวัตถุประสงค์ในการเรียกเก็บเงิน เซสชันจะเริ่มเมื่อผู้ใช้เริ่มพิมพ์คำค้นหา และสิ้นสุดเมื่อผู้ใช้เลือกสถานที่ แต่ละเซสชัน สามารถมีคำค้นหาหลายรายการ ตามด้วยการเลือกสถานที่ 1 รายการ เมื่อเซสชันสิ้นสุดลง โทเค็นจะใช้ไม่ได้อีกต่อไป แอปของคุณต้องสร้างโทเค็นใหม่ สำหรับแต่ละเซสชัน เราขอแนะนำให้ใช้โทเค็นเซสชันสำหรับเซสชันการเติมข้อความอัตโนมัติแบบเป็นโปรแกรมทั้งหมด (เมื่อคุณใช้ตัวควบคุมแบบเต็มหน้าจอหรือตัวควบคุมผลลัพธ์ API จะจัดการเรื่องนี้ให้โดยอัตโนมัติ)
Places SDK สำหรับ iOS ใช้
GMSAutocompleteSessionToken
เพื่อระบุแต่ละเซสชัน แอปของคุณควรส่งโทเค็นของเซสชันใหม่เมื่อเริ่มเซสชันใหม่แต่ละครั้ง จากนั้นส่งโทเค็นเดียวกันนั้นพร้อมกับรหัสสถานที่ในการเรียกครั้งต่อๆ ไปยัง fetchPlacefromPlaceID: เพื่อดึงรายละเอียดสถานที่สำหรับสถานที่ที่ผู้ใช้เลือก
ดูข้อมูลเพิ่มเติมเกี่ยวกับโทเค็น เซสชัน
ใช้โค้ดต่อไปนี้เพื่อสร้างโทเค็นเซสชันใหม่
let token: GMSAutocompleteSessionToken = GMSAutocompleteSessionToken.init()
ขีดจำกัดการใช้งาน
- การใช้เมธอด
GMSPlacesClient findAutocompletePredictionsFromQueryจะขึ้นอยู่กับขีดจำกัดการค้นหาแบบแบ่งระดับ ดูเอกสารประกอบเกี่ยวกับโควต้า การใช้งาน
การแสดงการระบุแหล่งที่มาในแอป
- หากแอปใช้บริการเติมข้อความอัตโนมัติโดยอัตโนมัติ UI ของคุณต้องแสดงการระบุแหล่งที่มา "ขับเคลื่อนโดย Google" หรือปรากฏภายในแผนที่ที่มีการสร้างแบรนด์ของ Google
- หากแอปใช้ตัวควบคุม UI ของการเติมข้อความอัตโนมัติ คุณไม่จำเป็นต้องดำเนินการใดๆ เพิ่มเติม (การระบุแหล่งที่มาที่จำเป็นจะแสดงโดยค่าเริ่มต้น)
- หากดึงและแสดงข้อมูลสถานที่เพิ่มเติมหลังจากรับสถานที่ตามรหัส คุณต้องแสดงการระบุแหล่งที่มาของบุคคลที่สามด้วย
ดูรายละเอียดเพิ่มเติมได้ในเอกสารประกอบเกี่ยวกับการระบุแหล่งที่มา
การควบคุมตัวบ่งชี้กิจกรรมเครือข่าย
หากต้องการควบคุมตัวบ่งชี้กิจกรรมเครือข่ายในแถบสถานะของแอปพลิเคชัน คุณ ต้องใช้เมธอดตัวแทนที่ไม่บังคับที่เหมาะสมสำหรับคลาสการเติมข้อความอัตโนมัติ ที่คุณใช้ และเปิดและปิดตัวบ่งชี้เครือข่ายด้วยตนเอง
- สำหรับ
GMSAutocompleteViewControllerคุณต้องใช้เมธอดตัวแทนdidRequestAutocompletePredictions:และdidUpdateAutocompletePredictions: - สำหรับ
GMSAutocompleteResultsViewControllerคุณต้องใช้เมธอดตัวแทนdidRequestAutocompletePredictionsForResultsController:และdidUpdateAutocompletePredictionsForResultsController: - สำหรับ
GMSAutocompleteTableDataSourceคุณต้องใช้เมธอดตัวแทนdidRequestAutocompletePredictionsForTableDataSource:และdidUpdateAutocompletePredictionsForTableDataSource:
การใช้วิธีการเหล่านี้และการตั้งค่า [UIApplication
sharedApplication].networkActivityIndicatorVisible เป็น YES และ NO
ตามลำดับจะทำให้แถบสถานะตรงกับ UI การเติมข้อความอัตโนมัติอย่างถูกต้อง
จำกัดผลการเติมข้อความอัตโนมัติ
คุณสามารถตั้งค่าตัวควบคุม UI ของการเติมข้อความอัตโนมัติเพื่อจำกัดผลลัพธ์ให้แสดงเฉพาะภูมิภาคทางภูมิศาสตร์ที่เฉพาะเจาะจง และ/หรือกรองผลลัพธ์ให้แสดงเฉพาะประเภทสถานที่อย่างน้อย 1 ประเภท หรือแสดงเฉพาะประเทศที่เฉพาะเจาะจง หากต้องการจำกัดผลลัพธ์ คุณสามารถทำสิ่งต่อไปนี้ได้
- หากต้องการต้องการ (ให้น้ำหนักพิเศษ) ผลลัพธ์ภายในภูมิภาคที่กำหนด ให้ตั้งค่า
locationBiasเป็นเปิด ในGMSAutocompleteFilter(ระบบอาจยังแสดงผลลัพธ์บางอย่างจากภายนอกภูมิภาคที่กำหนด) หากตั้งค่าlocationRestrictionด้วย ระบบจะเพิกเฉยต่อlocationBias หากต้องการแสดงเท่านั้น (จำกัด) ผลลัพธ์ภายในภูมิภาคที่กำหนด ให้ตั้งค่า
locationRestrictionในGMSAutocompleteFilter(ระบบจะแสดงเฉพาะผลลัพธ์ภายใน ภูมิภาคที่กำหนด)- หมายเหตุ: ข้อจำกัดนี้ใช้กับเส้นทางทั้งหมดเท่านั้น ระบบอาจแสดงผลลัพธ์สังเคราะห์ ที่อยู่นอกขอบเขตสี่เหลี่ยมผืนผ้าตามเส้นทางที่ทับซ้อนกับข้อจำกัดด้านสถานที่ตั้ง
หากต้องการแสดงเฉพาะผลลัพธ์ที่สอดคล้องกับประเภทสถานที่หนึ่งๆ ให้ตั้งค่า
typesในGMSAutocompleteFilter(เช่น การระบุ kGMSPlaceTypeCollectionAddress จะ ทําให้วิดเจ็ตแสดงเฉพาะผลลัพธ์ที่มีที่อยู่ที่แน่นอน)หากต้องการแสดงเฉพาะผลลัพธ์ภายในประเทศที่ระบุสูงสุด 5 ประเทศ ให้ตั้งค่า
countriesในGMSAutocompleteFilter
เอนเอียงผลการค้นหาไปยังภูมิภาคที่เฉพาะเจาะจง
หากต้องการต้องการ (เอนเอียง) ผลลัพธ์ภายในภูมิภาคที่กำหนด ให้ตั้งค่า locationBias ใน
GMSAutocompleteFilter ดังที่แสดงที่นี่
northEast = CLLocationCoordinate2DMake(39.0, -95.0);  southWest =
CLLocationCoordinate2DMake(37.5, -100.0);  GMSAutocompleteFilter *filter =
[[GMSAutocompleteFilter alloc] init];  filter.locationBias =
GMSPlaceRectangularLocationOption(northEast, southWest);
จำกัดผลลัพธ์ไว้เฉพาะภูมิภาคที่เฉพาะเจาะจง
หากต้องการแสดงเท่านั้น (จำกัด) ผลลัพธ์ภายในภูมิภาคที่กำหนด ให้ตั้งค่า
locationRestriction ใน GMSAutocompleteFilter ดังที่แสดงที่นี่
northEast = CLLocationCoordinate2DMake(39.0, -95.0);  southWest =
CLLocationCoordinate2DMake(37.5, -100.0);  GMSAutocompleteFilter *filter =
[[GMSAutocompleteFilter alloc] init];  filter.locationRestriction =
GMSPlaceRectangularLocationOption(northEast, southWest);
กรองผลลัพธ์ตามประเทศ
หากต้องการกรองผลลัพธ์ภายในประเทศที่ระบุสูงสุด 5 ประเทศ ให้ตั้งค่า countries ใน
GMSAutocompleteFilter ดังที่แสดงที่นี่
GMSAutocompleteFilter *filter = [[GMSAutocompleteFilter alloc] init];
filter.countries = @[ @"au", @"nz" ];
กรองผลลัพธ์ตามประเภทสถานที่หรือประเภทคอลเล็กชัน
จำกัดผลลัพธ์ให้เป็นประเภทหรือคอลเล็กชันประเภทหนึ่งโดยการตั้งค่าพร็อพเพอร์ตี้
types ของ
GMSAutoCompleteFilter
ใช้พร็อพเพอร์ตี้นี้เพื่อระบุตัวกรองที่แสดงในตารางที่ 1, 2 และ 3 ในประเภทสถานที่ หากไม่ได้ระบุอะไร ระบบจะแสดงผลประเภททั้งหมด
วิธีกําหนดตัวกรองประเภทหรือคอลเล็กชันประเภท
ใช้พร็อพเพอร์ตี้
typesเพื่อระบุค่า type สูงสุด 5 ค่าจากตารางที่ 1 และตารางที่ 2 ที่แสดงในประเภทสถานที่ ค่าประเภทจะกำหนดโดยค่าคงที่ในGMSPlaceTypeใช้พร็อพเพอร์ตี้
typesเพื่อระบุคอลเล็กชันประเภทจากตารางที่ 3 ที่แสดงในประเภทสถานที่ ค่าของคอลเล็กชันประเภทจะกำหนดโดย ค่าคงที่ในGMSPlaceTypeอนุญาตให้ใช้ประเภทเดียวจากตารางที่ 3 ในคำขอ หากระบุค่าจากตารางที่ 3 คุณจะระบุค่าจากตารางที่ 1 หรือตารางที่ 2 ไม่ได้ หากทำเช่นนั้น ระบบจะแสดงข้อผิดพลาด
เช่น หากต้องการแสดงเฉพาะผลลัพธ์ที่เป็นไปตามประเภทสถานที่หนึ่งๆ ให้ตั้งค่า types ใน GMSAutocompleteFilter ตัวอย่างต่อไปนี้แสดงการตั้งค่าตัวกรองให้แสดงเฉพาะผลการค้นหาที่มีที่อยู่ที่แน่นอน
GMSAutocompleteFilter *filter = [[GMSAutocompleteFilter alloc] init];
filter.types = @[ kGMSPlaceTypeAirport, kGMSPlaceTypeAmusementPark ];
การเพิ่มประสิทธิภาพ Place Autocomplete (เดิม)
ส่วนนี้อธิบายแนวทางปฏิบัติแนะนำที่จะช่วยให้คุณใช้ประโยชน์จากบริการ Place Autocomplete (เดิม) ได้อย่างเต็มที่
หลักเกณฑ์ทั่วไปมีดังนี้
- วิธีที่เร็วที่สุดในการพัฒนาอินเทอร์เฟซผู้ใช้ที่ใช้งานได้คือการใช้ Maps JavaScript API Place Autocomplete (เดิม) Places SDK สำหรับ Android Place Autocomplete (เดิม) หรือ Places SDK สำหรับ iOS ตัวควบคุม UI Place Autocomplete (เดิม)
- ทำความเข้าใจฟิลด์ข้อมูลที่สำคัญของ Place Autocomplete (เดิม) ตั้งแต่เริ่มต้น
- ฟิลด์การเอนเอียงตามสถานที่ตั้งและข้อจำกัดด้านสถานที่ตั้งเป็นฟิลด์ที่ไม่บังคับ แต่ก็อาจ ส่งผลอย่างมากต่อประสิทธิภาพการเติมข้อความอัตโนมัติ
- ใช้การจัดการข้อผิดพลาดเพื่อให้แน่ใจว่าแอปของคุณจะลดประสิทธิภาพลงอย่างราบรื่น หาก API แสดงข้อผิดพลาด
- ตรวจสอบว่าแอปของคุณจัดการเมื่อไม่มีการเลือกและเสนอวิธีให้ผู้ใช้ ดำเนินการต่อ
แนวทางปฏิบัติแนะนำในการใช้ต้นทุนให้เกิดประโยชน์สูงสุด
การเพิ่มประสิทธิภาพต้นทุนขั้นพื้นฐาน
หากต้องการเพิ่มประสิทธิภาพค่าใช้จ่ายในการใช้บริการ Place Autocomplete (เดิม) ให้ใช้มาสก์ฟิลด์ในวิดเจ็ตรายละเอียดสถานที่ (เดิม) และ Place Autocomplete (เดิม) เพื่อแสดงเฉพาะ ฟิลด์ข้อมูล Place Autocomplete (เดิม) ที่คุณต้องการ
การเพิ่มประสิทธิภาพต้นทุนขั้นสูง
พิจารณาการติดตั้งใช้งาน Place Autocomplete (เดิม) แบบเป็นโปรแกรมเพื่อเข้าถึง SKU: Autocomplete - การกำหนดราคาต่อคำขอ และขอผลลัพธ์ Geocoding API เกี่ยวกับสถานที่ที่เลือกแทนรายละเอียดสถานที่ (เดิม) การกำหนดราคาต่อคำขอที่ใช้ร่วมกับ Geocoding API จะคุ้มค่ากว่าการกำหนดราคาต่อเซสชัน (อิงตามเซสชัน) หากตรงตามเงื่อนไขต่อไปนี้ทั้ง 2 ข้อ
- หากต้องการเพียงละติจูด/ลองจิจูดหรือที่อยู่ของสถานที่ที่ผู้ใช้เลือก Geocoding API จะให้ข้อมูลนี้โดยใช้เวลาไม่ถึงการเรียก Place Details (เดิม)
- หากผู้ใช้เลือกการคาดคะเนการเติมข้อความอัตโนมัติภายในคำขอ Place Autocomplete (เดิม) โดยเฉลี่ย 4 รายการหรือน้อยกว่านั้น การกำหนดราคาต่อคำขออาจคุ้มค่ากว่าการกำหนดราคาต่อเซสชัน
แอปพลิเคชันของคุณต้องใช้ข้อมูลอื่นนอกเหนือจากที่อยู่และละติจูด/ลองจิจูดของการคาดคะเนที่เลือกไหม
ใช่ ต้องระบุรายละเอียดเพิ่มเติม
ใช้ Place Autocomplete ตามเซสชัน (เดิม) กับรายละเอียดสถานที่ (เดิม)
เนื่องจากแอปพลิเคชันของคุณต้องใช้รายละเอียดสถานที่ (เดิม) เช่น ชื่อสถานที่ สถานะธุรกิจ
หรือเวลาทําการ การติดตั้งใช้งาน Place Autocomplete (เดิม) จึงควรใช้โทเค็นเซสชัน
(โดยการเขียนโปรแกรมหรือสร้างไว้ใน
วิดเจ็ต JavaScript,
Android
หรือ iOS
) ต่อเซสชัน
รวมถึง SKU ข้อมูลสถานที่ที่เกี่ยวข้อง
ขึ้นอยู่กับฟิลด์ข้อมูลสถานที่ที่คุณขอ1
การติดตั้งใช้งานวิดเจ็ต
ระบบจะสร้างการจัดการเซสชันลงในวิดเจ็ต
JavaScript
Android
หรือ iOS
โดยอัตโนมัติ ซึ่งรวมถึงทั้งคำขอ Place Autocomplete (เดิม) และคำขอรายละเอียดสถานที่ (เดิม)
ในการคาดคะเนที่เลือก อย่าลืมระบุพารามิเตอร์ fields เพื่อให้มั่นใจว่าคุณขอเฉพาะฟิลด์ข้อมูล
Place Autocomplete (เดิม)
ที่คุณต้องการ
การติดตั้งใช้งานแบบเป็นโปรแกรม
ใช้
โทเค็นของเซสชัน
กับคำขอ Place Autocomplete (เดิม) เมื่อขอรายละเอียดสถานที่ (เดิม) เกี่ยวกับการคาดคะเนที่เลือก ให้รวมพารามิเตอร์ต่อไปนี้
- รหัสสถานที่จากการตอบกลับของ Place Autocomplete (เดิม)
- โทเค็นของเซสชันที่ใช้ในคำขอ Place Autocomplete (เดิม)
- พารามิเตอร์
fieldsที่ระบุ ฟิลด์ข้อมูล ของ Place Autocomplete (เดิม) ที่คุณต้องการ
ไม่ ไม่จำเป็น ต้องใช้แค่ที่อยู่และสถานที่
Geocoding API อาจเป็นตัวเลือกที่คุ้มค่ากว่ารายละเอียดสถานที่ (เดิม) สำหรับแอปพลิเคชันของคุณ ทั้งนี้ขึ้นอยู่กับประสิทธิภาพของการใช้งาน Place Autocomplete (เดิม) ประสิทธิภาพของ Place Autocomplete (เดิม) ของแต่ละแอปพลิเคชันจะแตกต่างกันไปตามสิ่งที่ผู้ใช้ป้อน สถานที่ที่ใช้แอปพลิเคชัน และมีการใช้แนวทางปฏิบัติแนะนำในการเพิ่มประสิทธิภาพหรือไม่
หากต้องการตอบคำถามต่อไปนี้ ให้วิเคราะห์จำนวนอักขระโดยเฉลี่ยที่ผู้ใช้พิมพ์ก่อนเลือกการคาดคะเน Place Autocomplete (เดิม) ในแอปพลิเคชัน
โดยเฉลี่ยแล้ว ผู้ใช้เลือกการคาดคะเน Place Autocomplete (เดิม) ในคำขอไม่เกิน 4 รายการใช่ไหม
ใช่
ใช้โปรแกรม Place Autocomplete (เดิม) โดยไม่ต้องใช้โทเค็นเซสชัน และเรียกใช้ Geocoding API ในการคาดคะเนสถานที่ที่เลือก
Geocoding API จะแสดงที่อยู่และพิกัดละติจูด/ลองจิจูด
การส่งคำขอ 4 รายการ
Autocomplete - ต่อคำขอ
รวมถึงการเรียกใช้ Geocoding API
เกี่ยวกับข้อมูลการคาดคะเนสถานที่ที่เลือกมีค่าใช้จ่ายต่อเซสชันน้อยกว่า Place Autocomplete (เดิม) ต่อเซสชัน1
ลองใช้แนวทางปฏิบัติแนะนำด้านประสิทธิภาพเพื่อช่วยให้ผู้ใช้ได้รับคำที่ระบบคาดคะเนซึ่งกำลังมองหาด้วยจำนวนอักขระที่น้อยลง
ไม่
ใช้ Place Autocomplete ตามเซสชัน (เดิม) กับรายละเอียดสถานที่ (เดิม)
เนื่องจากจำนวนคำขอเฉลี่ยที่คุณคาดว่าจะทำก่อนที่ผู้ใช้จะเลือกการคาดคะเน
Place Autocomplete (เดิม) เกินกว่าต้นทุนของการกำหนดราคาต่อเซสชัน การติดตั้งใช้งาน
Place Autocomplete (เดิม) ควรใช้โทเค็นของเซสชันสำหรับทั้งคำขอ Place Autocomplete (เดิม)
และคำขอรายละเอียดสถานที่ (เดิม) ที่เกี่ยวข้อง
ต่อเซสชัน
1
การติดตั้งใช้งานวิดเจ็ต
ระบบจะสร้างการจัดการเซสชันลงใน
วิดเจ็ต JavaScript
Android
หรือ iOS
โดยอัตโนมัติ ซึ่งรวมทั้งคำขอ Place Autocomplete (เดิม) และคำขอรายละเอียดสถานที่ (เดิม)
ในการคาดคะเนที่เลือก อย่าลืมระบุพารามิเตอร์ fields
เพื่อให้มั่นใจว่าคุณขอเฉพาะช่องที่ต้องการเท่านั้น
การติดตั้งใช้งานแบบเป็นโปรแกรม
ใช้
โทเค็นของเซสชัน
กับคำขอ Place Autocomplete (เดิม)
เมื่อขอรายละเอียดสถานที่ (เดิม) เกี่ยวกับการคาดคะเนที่เลือก
ให้รวมพารามิเตอร์ต่อไปนี้
- รหัสสถานที่จากการตอบกลับของ Place Autocomplete (เดิม)
- โทเค็นของเซสชันที่ใช้ในคำขอ Place Autocomplete (เดิม)
- พารามิเตอร์
fieldsที่ระบุ ฟิลด์ข้อมูลพื้นฐาน เช่น ที่อยู่และเรขาคณิต
พิจารณาการหน่วงเวลาคำขอ Place Autocomplete (เดิม)
คุณสามารถใช้กลยุทธ์ต่างๆ เช่น การหน่วงเวลาคำขอ Place Autocomplete (เดิม) จนกว่าผู้ใช้จะพิมพ์อักขระ 3-4 ตัวแรก เพื่อให้แอปพลิเคชันของคุณส่งคำขอน้อยลง เช่น การส่งคำขอ Place Autocomplete (เดิม) สำหรับอักขระแต่ละตัวหลังจากที่ผู้ใช้พิมพ์อักขระตัวที่ 3 หมายความว่าหากผู้ใช้พิมพ์อักขระ 7 ตัว แล้วเลือกการคาดคะเนที่คุณส่งคำขอ Geocoding API 1 รายการ ค่าใช้จ่ายทั้งหมดจะเป็นค่าใช้จ่ายสำหรับ Place Autocomplete (เดิม) 4 รายการต่อคำขอ + Geocoding1
หากการหน่วงเวลาคำขอช่วยให้คำขอแบบเป็นโปรแกรมโดยเฉลี่ยต่ำกว่า 4 ได้ คุณสามารถทำตามคำแนะนำในการติดตั้งใช้งาน Place Autocomplete (เดิม) ที่มีประสิทธิภาพด้วย Geocoding API โปรดทราบว่าการหน่วงเวลาคำขออาจทำให้ผู้ใช้มองว่าเป็นการตอบสนองที่ช้า เนื่องจากผู้ใช้อาจคาดหวังที่จะเห็นคำทำนายทุกครั้งที่กดแป้นพิมพ์
ลองใช้แนวทางปฏิบัติแนะนำด้านประสิทธิภาพเพื่อช่วยให้ผู้ใช้ได้รับคำทำนายที่ต้องการโดยใช้จำนวนอักขระน้อยลง
-
ดูค่าใช้จ่ายได้ที่รายการราคาของ Google Maps Platform
แนวทางปฏิบัติแนะนำด้านประสิทธิภาพ
หลักเกณฑ์ต่อไปนี้อธิบายวิธีเพิ่มประสิทธิภาพ Place Autocomplete (เดิม)
- เพิ่มข้อจำกัดด้านประเทศ การกำหนดค่าตำแหน่ง และ (สำหรับการติดตั้งใช้งานแบบเป็นโปรแกรม) ค่ากำหนดภาษาลงในการติดตั้งใช้งาน Place Autocomplete (เดิม) ไม่จำเป็นต้องตั้งค่าภาษาที่ต้องการ ในวิดเจ็ต เนื่องจากวิดเจ็ตจะเลือกภาษาที่ต้องการจากเบราว์เซอร์หรืออุปกรณ์เคลื่อนที่ของผู้ใช้
- หาก Place Autocomplete (เดิม) มาพร้อมกับแผนที่ คุณสามารถกำหนดตำแหน่งตามวิวพอร์ตของแผนที่ได้
- ในกรณีที่ผู้ใช้ไม่เลือกการคาดคะเนจาก Place Autocomplete (เดิม) โดยทั่วไป
เนื่องจากการคาดคะเนเหล่านั้นไม่ใช่ที่อยู่ผลลัพธ์ที่ต้องการ คุณสามารถนำข้อมูลจากผู้ใช้ที่ป้อนไว้เดิมมาใช้ซ้ำเพื่อพยายามรับผลลัพธ์ที่เกี่ยวข้องมากขึ้นได้โดยทำดังนี้
- หากคาดว่าผู้ใช้จะป้อนเฉพาะข้อมูลที่อยู่ ให้ใช้ข้อมูลที่ผู้ใช้ป้อนเดิมอีกครั้ง ในการเรียก Geocoding API
- หากคาดว่าผู้ใช้จะป้อนคำค้นหาสำหรับสถานที่ที่เฉพาะเจาะจงตามชื่อหรือที่อยู่ ให้ใช้คำขอรายละเอียดสถานที่ (เดิม) หากคาดหวังผลลัพธ์ในภูมิภาคที่เฉพาะเจาะจงเท่านั้น ให้ใช้การเอนเอียงตามตำแหน่ง
- ผู้ใช้ที่ป้อนที่อยู่ของสถานที่ย่อย เช่น ที่อยู่ของยูนิตหรืออพาร์ตเมนต์ที่เฉพาะเจาะจง ภายในอาคาร เช่น ที่อยู่ "Stroupežnického 3191/17, Praha" ในเช็ก จะให้การคาดคะเนบางส่วนในการเติมข้อความอัตโนมัติของสถานที่ (เดิม)
- ผู้ใช้ที่ป้อนที่อยู่ที่มีคำนำหน้าส่วนของถนน เช่น "23-30 29th St, Queens" ใน นิวยอร์กซิตี้ หรือ "47-380 Kamehameha Hwy, Kaneohe" บนเกาะคาไวในฮาวาย
การให้น้ำหนักพิเศษกับบางตำแหน่ง
เอนเอียงผลลัพธ์ไปยังพื้นที่ที่ระบุโดยส่งพารามิเตอร์ location และพารามิเตอร์ radius
ซึ่งจะสั่งให้ Place Autocomplete (เดิม) แสดงผลลัพธ์ภายในพื้นที่ที่กำหนด ผลลัพธ์ที่อยู่นอกพื้นที่ที่กำหนดอาจยังคง
แสดงอยู่ คุณใช้พารามิเตอร์ includedRegionCodes เพื่อกรองผลลัพธ์
ให้แสดงเฉพาะสถานที่ภายในประเทศที่ระบุได้
การจำกัดตำแหน่ง
จำกัดผลลัพธ์ให้อยู่ในพื้นที่ที่ระบุโดยส่งพารามิเตอร์ locationRestriction
นอกจากนี้ คุณยังจำกัดผลลัพธ์ให้แสดงเฉพาะภูมิภาคที่กำหนดโดย location
และพารามิเตอร์ radius ได้ด้วยโดยการเพิ่มพารามิเตอร์
strictbounds
ซึ่งจะสั่งให้ Place Autocomplete (เดิม) แสดงผลลัพธ์เฉพาะ
ภายในภูมิภาคนั้น
การแก้ปัญหา
แม้ว่าอาจเกิดข้อผิดพลาดได้หลากหลาย แต่ข้อผิดพลาดส่วนใหญ่ที่แอปของคุณมีแนวโน้มที่จะพบมักเกิดจากข้อผิดพลาดในการกำหนดค่า (เช่น มีการใช้คีย์ API ที่ไม่ถูกต้อง หรือกำหนดค่าคีย์ API ไม่ถูกต้อง) หรือข้อผิดพลาดเกี่ยวกับโควต้า (แอปของคุณใช้โควต้าเกิน) ดูข้อมูลเพิ่มเติมเกี่ยวกับโควต้าได้ที่ขีดจำกัด การใช้งาน
ข้อผิดพลาดที่เกิดขึ้นในการใช้ตัวควบคุมการเติมข้อความอัตโนมัติจะแสดงในเมธอด didFailAutocompleteWithError() ของโปรโตคอลการมอบสิทธิ์ต่างๆ ระบบจะตั้งค่าพร็อพเพอร์ตี้ code ของออบเจ็กต์ NSError ที่ระบุเป็นค่าใดค่าหนึ่งของการแจงนับ GMSPlacesErrorCode