
Quando compili un indirizzo di consegna, i dati di fatturazione o le informazioni sull'evento, l'attivazione dei moduli con Place Autocomplete aiuta gli utenti a ridurre i tasti premuti e gli errori durante l'inserimento dei dati dell'indirizzo. Questo tutorial illustra i passaggi necessari per attivare un campo di immissione con Place Autocomplete, compilare i campi del modulo dell'indirizzo con i componenti dell'indirizzo selezionato dall'utente e mostrare l'indirizzo selezionato su una mappa per facilitare la conferma visiva.
Video: migliorare i moduli per l'indirizzo con Place Autocomplete
Moduli dell'indirizzo
Android
iOS
Web
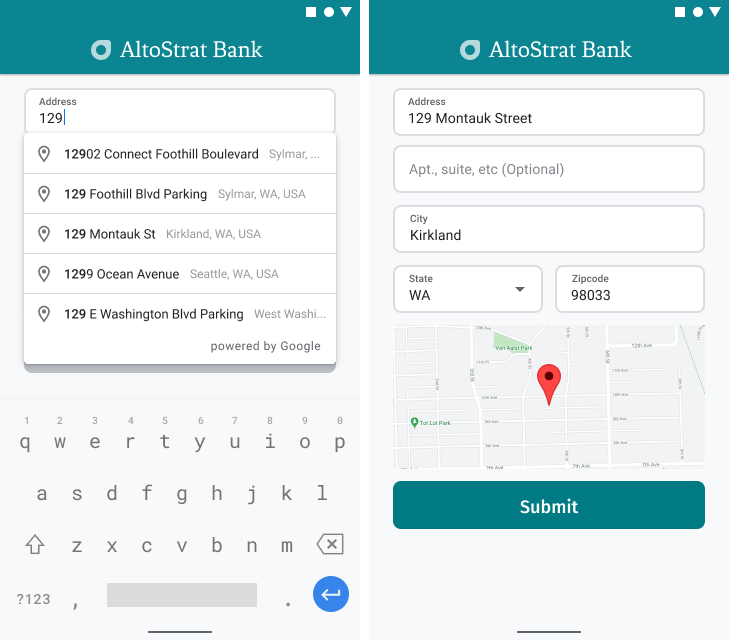
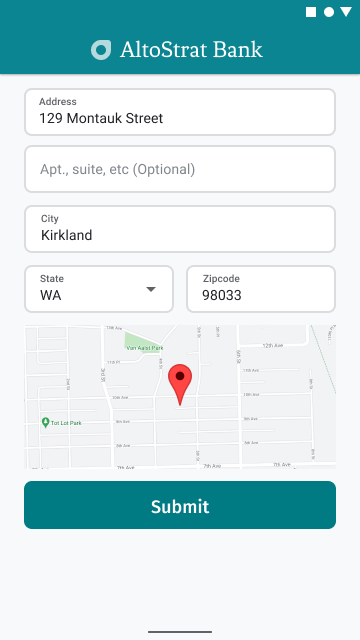
Google Maps Platform fornisce un widget Place Autocomplete per le piattaforme mobile e il web. Il widget, mostrato nelle figure precedenti, fornisce una finestra di dialogo di ricerca con funzionalità di completamento automatico integrata che puoi persino ottimizzare per la ricerca con ambito geografico.
Ottieni il codice
Clona o scarica il repository Google Places SDK for Android Demos da GitHub.
Visualizza la versione Java dell'attività:
    /*
 * Copyright 2022 Google LLC
 *
 * Licensed under the Apache License, Version 2.0 (the "License");
 * you may not use this file except in compliance with the License.
 * You may obtain a copy of the License at
 *
 *     https://www.apache.org/licenses/LICENSE-2.0
 *
 * Unless required by applicable law or agreed to in writing, software
 * distributed under the License is distributed on an "AS IS" BASIS,
 * WITHOUT WARRANTIES OR CONDITIONS OF ANY KIND, either express or implied.
 * See the License for the specific language governing permissions and
 * limitations under the License.
 */

package com.example.placesdemo;

import android.annotation.SuppressLint;
import android.app.Activity;
import android.content.Intent;
import android.content.pm.PackageManager;
import android.content.res.Resources;
import android.os.Bundle;
import android.util.Log;
import android.view.View;
import android.view.ViewStub;
import android.widget.Button;
import android.widget.CheckBox;
import android.widget.Toast;

import androidx.activity.result.ActivityResultLauncher;
import androidx.activity.result.contract.ActivityResultContracts;
import androidx.annotation.NonNull;
import androidx.annotation.Nullable;
import androidx.appcompat.app.AppCompatActivity;
import androidx.core.content.ContextCompat;

import com.example.placesdemo.databinding.AutocompleteAddressActivityBinding;
import com.google.android.gms.location.FusedLocationProviderClient;
import com.google.android.gms.location.LocationServices;
import com.google.android.gms.maps.CameraUpdateFactory;
import com.google.android.gms.maps.GoogleMap;
import com.google.android.gms.maps.GoogleMapOptions;
import com.google.android.gms.maps.OnMapReadyCallback;
import com.google.android.gms.maps.SupportMapFragment;
import com.google.android.gms.maps.model.LatLng;
import com.google.android.gms.maps.model.MapStyleOptions;
import com.google.android.gms.maps.model.Marker;
import com.google.android.gms.maps.model.MarkerOptions;
import com.google.android.libraries.places.api.Places;
import com.google.android.libraries.places.api.model.AddressComponent;
import com.google.android.libraries.places.api.model.AddressComponents;
import com.google.android.libraries.places.api.model.Place;
import com.google.android.libraries.places.api.model.PlaceTypes;
import com.google.android.libraries.places.api.net.PlacesClient;
import com.google.android.libraries.places.widget.Autocomplete;
import com.google.android.libraries.places.widget.model.AutocompleteActivityMode;

import java.util.Arrays;
import java.util.List;

import static android.Manifest.permission.ACCESS_FINE_LOCATION;
import static com.google.maps.android.SphericalUtil.computeDistanceBetween;
import androidx.activity.EdgeToEdge;

/**
 * Activity for using Place Autocomplete to assist filling out an address form.
 */
@SuppressWarnings("FieldCanBeLocal")
public class AutocompleteAddressActivity extends AppCompatActivity implements OnMapReadyCallback {

    private static final String TAG = "ADDRESS_AUTOCOMPLETE";
    private static final String MAP_FRAGMENT_TAG = "MAP";
    private LatLng coordinates;
    private boolean checkProximity = false;
    private SupportMapFragment mapFragment;
    private GoogleMap map;
    private Marker marker;
    private PlacesClient placesClient;
    private View mapPanel;
    private LatLng deviceLocation;
    private static final double acceptedProximity = 150;

    private AutocompleteAddressActivityBinding binding;

    View.OnClickListener startAutocompleteIntentListener = view -> {
        view.setOnClickListener(null);
        startAutocompleteIntent();
    };

    private final ActivityResultLauncher<Intent> startAutocomplete = registerForActivityResult(
            new ActivityResultContracts.StartActivityForResult(),
            result -> {
                if (result.getResultCode() == Activity.RESULT_OK) {
                    Intent intent = result.getData();
                    if (intent != null) {
                        Place place = Autocomplete.getPlaceFromIntent(intent);

                        // Write a method to read the address components from the Place
                        // and populate the form with the address components
                        Log.d(TAG, "Place: " + place.getAddressComponents());
                        fillInAddress(place);
                    }
                } else if (result.getResultCode() == Activity.RESULT_CANCELED) {
                    // The user canceled the operation.
                    Log.i(TAG, "User canceled autocomplete");
                }
            });

    @Override
    protected void onActivityResult(int requestCode, int resultCode, @Nullable Intent intent) {
        super.onActivityResult(requestCode, resultCode, intent);
        binding.autocompleteAddress1.setOnClickListener(startAutocompleteIntentListener);
    }

    @Override
    protected void onCreate(Bundle savedInstanceState) {
        // Enable edge-to-edge display. This must be called before calling super.onCreate().
        EdgeToEdge.enable(this);
        super.onCreate(savedInstanceState);

        binding = AutocompleteAddressActivityBinding.inflate(getLayoutInflater());
        setContentView(binding.getRoot());

        // Retrieve a PlacesClient (previously initialized - see MainActivity)
        placesClient = Places.createClient(this);

        // Attach an Autocomplete intent to the Address 1 EditText field
        binding.autocompleteAddress1.setOnClickListener(startAutocompleteIntentListener);

        // Update checkProximity when user checks the checkbox
        CheckBox checkProximityBox = findViewById(R.id.checkbox_proximity);
        checkProximityBox.setOnCheckedChangeListener((view, isChecked) -> {
            // Set the boolean to match user preference for when the Submit button is clicked
            checkProximity = isChecked;
        });

        // Submit and optionally check proximity
        Button saveButton = findViewById(R.id.autocomplete_save_button);
        saveButton.setOnClickListener(v -> saveForm());

        // Reset the form
        Button resetButton = findViewById(R.id.autocomplete_reset_button);
        resetButton.setOnClickListener(v -> clearForm());
    }

    private void startAutocompleteIntent() {

        // Set the fields to specify which types of place data to
        // return after the user has made a selection.
        List<Place.Field> fields = Arrays.asList(Place.Field.ADDRESS_COMPONENTS,
                Place.Field.LOCATION, Place.Field.VIEWPORT);

        // Build the autocomplete intent with field, country, and type filters applied
        Intent intent = new Autocomplete.IntentBuilder(AutocompleteActivityMode.OVERLAY, fields)
                .setCountries(List.of("US"))
                .setTypesFilter(List.of("establishment"))
                .build(this);
        startAutocomplete.launch(intent);
    }

    @Override
    public void onMapReady(@NonNull GoogleMap googleMap) {
        map = googleMap;
        try {
            // Customise the styling of the base map using a JSON object defined
            // in a string resource.
            boolean success = map.setMapStyle(
                    MapStyleOptions.loadRawResourceStyle(this, R.raw.style_json));

            if (!success) {
                Log.e(TAG, "Style parsing failed.");
            }
        } catch (Resources.NotFoundException e) {
            Log.e(TAG, "Can't find style. Error: ", e);
        }
        map.moveCamera(CameraUpdateFactory.newLatLngZoom(coordinates, 15f));
        marker = map.addMarker(new MarkerOptions().position(coordinates));
    }

    private void fillInAddress(Place place) {
        AddressComponents components = place.getAddressComponents();
        StringBuilder address1 = new StringBuilder();
        StringBuilder postcode = new StringBuilder();

        // Get each component of the address from the place details,
        // and then fill-in the corresponding field on the form.
        // Possible AddressComponent types are documented at https://goo.gle/32SJPM1
        if (components != null) {
            for (AddressComponent component : components.asList()) {
                String type = component.getTypes().get(0);
                switch (type) {
                    case "street_number": {
                        address1.insert(0, component.getName());
                        break;
                    }

                    case "route": {
                        address1.append(" ");
                        address1.append(component.getShortName());
                        break;
                    }

                    case "postal_code": {
                        postcode.insert(0, component.getName());
                        break;
                    }

                    case "postal_code_suffix": {
                        postcode.append("-").append(component.getName());
                        break;
                    }

                    case "locality":
                        binding.autocompleteCity.setText(component.getName());
                        break;

                    case "administrative_area_level_1": {
                        binding.autocompleteState.setText(component.getShortName());
                        break;
                    }

                    case "country":
                        binding.autocompleteCountry.setText(component.getName());
                        break;
                }
            }
        }

        binding.autocompleteAddress1.setText(address1.toString());
        binding.autocompletePostal.setText(postcode.toString());

        // After filling the form with address components from the Autocomplete
        // prediction, set cursor focus on the second address line to encourage
        // entry of sub-premise information such as apartment, unit, or floor number.
        binding.autocompleteAddress2.requestFocus();

        // Add a map for visual confirmation of the address
        showMap(place);
    }

    private void showMap(Place place) {
        coordinates = place.getLocation();

        // It isn't possible to set a fragment's id programmatically so we set a tag instead and
        // search for it using that.
        mapFragment = (SupportMapFragment)
                getSupportFragmentManager().findFragmentByTag(MAP_FRAGMENT_TAG);

        // We only create a fragment if it doesn't already exist.
        if (mapFragment == null) {
            mapPanel = ((ViewStub) findViewById(R.id.stub_map)).inflate();
            GoogleMapOptions mapOptions = new GoogleMapOptions();
            mapOptions.mapToolbarEnabled(false);

            // To programmatically add the map, we first create a SupportMapFragment.
            mapFragment = SupportMapFragment.newInstance(mapOptions);

            // Then we add it using a FragmentTransaction.
            getSupportFragmentManager()
                    .beginTransaction()
                    .add(R.id.confirmation_map, mapFragment, MAP_FRAGMENT_TAG)
                    .commit();
            mapFragment.getMapAsync(this);
        } else {
            updateMap(coordinates);
        }
    }

    private void updateMap(LatLng latLng) {
        marker.setPosition(latLng);
        map.moveCamera(CameraUpdateFactory.newLatLngZoom(latLng, 15f));
        if (mapPanel.getVisibility() == View.GONE) {
            mapPanel.setVisibility(View.VISIBLE);
        }
    }

    private void saveForm() {
        Log.d(TAG, "checkProximity = " + checkProximity);
        if (checkProximity) {
            checkLocationPermissions();
        } else {
            Toast.makeText(
                            this,
                            R.string.autocomplete_skipped_message,
                            Toast.LENGTH_SHORT)
                    .show();
        }
    }

    private void clearForm() {
        binding.autocompleteAddress1.setText("");
        binding.autocompleteAddress2.getText().clear();
        binding.autocompleteCity.getText().clear();
        binding.autocompleteState.getText().clear();
        binding.autocompletePostal.getText().clear();
        binding.autocompleteCountry.getText().clear();
        if (mapPanel != null) {
            mapPanel.setVisibility(View.GONE);
        }
        binding.autocompleteAddress1.requestFocus();
    }

    // Register the permissions callback, which handles the user's response to the
    // system permissions dialog. Save the return value, an instance of
    // ActivityResultLauncher, as an instance variable.
    private final ActivityResultLauncher<String> requestPermissionLauncher =
            registerForActivityResult(new ActivityResultContracts.RequestPermission(), isGranted -> {
                if (isGranted) {
                    // Since ACCESS_FINE_LOCATION is the only permission in this sample,
                    // run the location comparison task once permission is granted.
                    // Otherwise, check which permission is granted.
                    getAndCompareLocations();
                } else {
                    // Fallback behavior if user denies permission
                    Log.d(TAG, "User denied permission");
                }
            });

    private void checkLocationPermissions() {
        if (ContextCompat.checkSelfPermission(this, ACCESS_FINE_LOCATION)
                == PackageManager.PERMISSION_GRANTED) {
            getAndCompareLocations();
        } else {
            requestPermissionLauncher.launch(
                    ACCESS_FINE_LOCATION);
        }
    }

    @SuppressLint("MissingPermission")
    private void getAndCompareLocations() {
        // TODO: Detect and handle if user has entered or modified the address manually and update
        // the coordinates variable to the Lat/Lng of the manually entered address. May use
        // Geocoding API to convert the manually entered address to a Lat/Lng.
        LatLng enteredLocation = coordinates;
        map.setMyLocationEnabled(true);

        FusedLocationProviderClient fusedLocationClient =
                LocationServices.getFusedLocationProviderClient(this);

        fusedLocationClient.getLastLocation()
                .addOnSuccessListener(this, location -> {
                    // Got last known location. In some rare situations this can be null.
                    if (location == null) {
                        return;
                    }

                    deviceLocation = new LatLng(location.getLatitude(), location.getLongitude());
                    Log.d(TAG, "device location = " + deviceLocation);
                    Log.d(TAG, "entered location = " + enteredLocation.toString());

                    // Use the computeDistanceBetween function in the Maps SDK for Android Utility Library
                    // to use spherical geometry to compute the distance between two Lat/Lng points.
                    double distanceInMeters = computeDistanceBetween(deviceLocation, enteredLocation);
                    if (distanceInMeters <= acceptedProximity) {
                        Log.d(TAG, "location matched");
                        // TODO: Display UI based on the locations matching
                    } else {
                        Log.d(TAG, "location not matched");
                        // TODO: Display UI based on the locations not matching
                    }
                });
    }
}
Abilitazione delle API in corso…
Per implementare questi suggerimenti, devi abilitare le seguenti API nella console Google Cloud:
- Maps SDK for Android (o l'API per la piattaforma che preferisci)
- API Places
Per saperne di più sulla configurazione, vedi Configurare il progetto Google Cloud.
Aggiungere il completamento automatico ai campi di input
Questa sezione descrive come aggiungere Place Autocomplete a un modulo per l'indirizzo.
Aggiungere il widget Place Autocomplete
In Android, puoi aggiungere il widget di completamento automatico utilizzando un intent di completamento automatico che avvia Place Autocomplete dal campo di immissione Indirizzo 1, in cui l'utente inizierà a inserire il proprio indirizzo. Quando iniziano a digitare, potranno selezionare il loro indirizzo dall'elenco dei suggerimenti del completamento automatico.
Innanzitutto, prepara un launcher di attività utilizzando
ActivityResultLauncher,
che ascolterà un risultato
dall'attività avviata. Il callback dei risultati conterrà un oggetto Place
corrispondente all'indirizzo selezionato dall'utente tra le previsioni
di completamento automatico.
    private final ActivityResultLauncher<Intent> startAutocomplete = registerForActivityResult(
            new ActivityResultContracts.StartActivityForResult(),
            result -> {
                if (result.getResultCode() == Activity.RESULT_OK) {
                    Intent intent = result.getData();
                    if (intent != null) {
                        Place place = Autocomplete.getPlaceFromIntent(intent);

                        // Write a method to read the address components from the Place
                        // and populate the form with the address components
                        Log.d(TAG, "Place: " + place.getAddressComponents());
                        fillInAddress(place);
                    }
                } else if (result.getResultCode() == Activity.RESULT_CANCELED) {
                    // The user canceled the operation.
                    Log.i(TAG, "User canceled autocomplete");
                }
            });
Successivamente, definisci i campi, la posizione e le proprietà del tipo dell'intent
Place Autocomplete e crealo con
Autocomplete.IntentBuilder.
Infine, avvia l'intent utilizzando ActivityResultLauncher definito nell'esempio di codice precedente.
    private void startAutocompleteIntent() {

        // Set the fields to specify which types of place data to
        // return after the user has made a selection.
        List<Place.Field> fields = Arrays.asList(Place.Field.ADDRESS_COMPONENTS,
                Place.Field.LOCATION, Place.Field.VIEWPORT);

        // Build the autocomplete intent with field, country, and type filters applied
        Intent intent = new Autocomplete.IntentBuilder(AutocompleteActivityMode.OVERLAY, fields)
                .setCountries(List.of("US"))
                .setTypesFilter(List.of("establishment"))
                .build(this);
        startAutocomplete.launch(intent);
    }
Gestire l'indirizzo restituito da Place Autocomplete
La definizione di ActivityResultLauncher in precedenza ha anche definito cosa deve essere
fatto quando il risultato dell'attività viene restituito nel callback. Se l'utente
ha selezionato una previsione, questa verrà fornita nell'intent contenuto
nell'oggetto risultato. Poiché l'intent è stato creato da Autocomplete.IntentBuilder,
il metodo Autocomplete.getPlaceFromIntent() può estrarre l'oggetto Place
da esso.
    private final ActivityResultLauncher<Intent> startAutocomplete = registerForActivityResult(
            new ActivityResultContracts.StartActivityForResult(),
            result -> {
                if (result.getResultCode() == Activity.RESULT_OK) {
                    Intent intent = result.getData();
                    if (intent != null) {
                        Place place = Autocomplete.getPlaceFromIntent(intent);

                        // Write a method to read the address components from the Place
                        // and populate the form with the address components
                        Log.d(TAG, "Place: " + place.getAddressComponents());
                        fillInAddress(place);
                    }
                } else if (result.getResultCode() == Activity.RESULT_CANCELED) {
                    // The user canceled the operation.
                    Log.i(TAG, "User canceled autocomplete");
                }
            });
Da qui, chiama Place.getAddressComponents() e abbina ogni componente dell'indirizzo al corrispondente campo di immissione nel modulo dell'indirizzo, compilando il campo con il valore del luogo selezionato dall'utente.
Un'implementazione di esempio per compilare i campi del modulo dell'indirizzo è condivisa nel metodo fillInAddress del codice campione fornito nella sezione Ottieni il codice di questa pagina.
L'acquisizione dei dati dell'indirizzo dalla previsione anziché da un indirizzo inserito manualmente contribuisce a garantire l'accuratezza dell'indirizzo, assicura che l'indirizzo sia noto e che possa essere recapitato e riduce i tasti premuti dall'utente.
Considerazioni sull'implementazione di Place Autocomplete
Place Autocomplete offre una serie di opzioni che consentono di implementarlo in modo flessibile se vuoi utilizzare più del semplice widget. Puoi utilizzare una combinazione di servizi per ottenere esattamente ciò che ti serve per trovare una posizione nel modo corretto.
Per un modulo ADDRESS, imposta il parametro types su
addressper limitare le corrispondenze agli indirizzi completi. Scopri di più sui tipi supportati nelle richieste di Place Autocomplete.Imposta le limitazioni e i bias appropriati se non devi eseguire ricerche in tutto il mondo. Esistono diversi parametri che possono essere utilizzati per orientare o limitare qualsiasi corrispondenza solo a regioni specifiche.
Utilizza
RectangularBoundsper impostare i limiti rettangolari da vincolare per un'area, utilizzasetLocationRestriction()per assicurarti che vengano restituiti solo gli indirizzi in queste aree.Utilizza
setCountries()per limitare le risposte a un determinato insieme di paesi.
Lascia i campi modificabili nel caso in cui alcuni campi non vengano inclusi nella corrispondenza e consenti ai clienti di aggiornare l'indirizzo, se necessario. Poiché la maggior parte degli indirizzi restituiti da Place Autocomplete non contiene numeri di unità secondarie come appartamenti, suite o unità, puoi spostare il focus su Indirizzo 2 per incoraggiare l'utente a compilare queste informazioni, se necessario.
Fornire una conferma visiva dell'indirizzo
Durante l'inserimento dell'indirizzo, fornisci agli utenti una conferma visiva dell'indirizzo su una mappa. In questo modo, gli utenti hanno un'ulteriore garanzia che l'indirizzo sia corretto.
La figura seguente mostra una mappa sotto l'indirizzo con un segnaposto in corrispondenza dell'indirizzo inserito.
L'esempio seguente segue i passaggi di base per aggiungere una mappa in Android. Per ulteriori dettagli, consulta la documentazione.
- Aggiunta di
SupportMapFragment(in questo caso, aggiunta dinamica di un frammento) - Ottenere un handle per il fragment e registrare il callback
- Stilizzazione e aggiunta di un indicatore alla mappa
- Disattivazione dei controlli della mappa
Aggiunta di SupportMapFragment in corso…
Innanzitutto, aggiungi un frammento SupportMapFragment al
file XML di layout.
    <fragment
        android:name="com.google.android.gms.maps.SupportMapFragment"
        android:id="@+id/confirmation_map"
        android:layout_width="match_parent"
        android:layout_height="match_parent"/>
Poi, aggiungi il frammento in modo programmatico se non esiste ancora.
    private void showMap(Place place) {
        coordinates = place.getLocation();

        // It isn't possible to set a fragment's id programmatically so we set a tag instead and
        // search for it using that.
        mapFragment = (SupportMapFragment)
                getSupportFragmentManager().findFragmentByTag(MAP_FRAGMENT_TAG);

        // We only create a fragment if it doesn't already exist.
        if (mapFragment == null) {
            mapPanel = ((ViewStub) findViewById(R.id.stub_map)).inflate();
            GoogleMapOptions mapOptions = new GoogleMapOptions();
            mapOptions.mapToolbarEnabled(false);

            // To programmatically add the map, we first create a SupportMapFragment.
            mapFragment = SupportMapFragment.newInstance(mapOptions);

            // Then we add it using a FragmentTransaction.
            getSupportFragmentManager()
                    .beginTransaction()
                    .add(R.id.confirmation_map, mapFragment, MAP_FRAGMENT_TAG)
                    .commit();
            mapFragment.getMapAsync(this);
        } else {
            updateMap(coordinates);
        }
    }
Ottenere un handle per il frammento e registrare il callback
Per ottenere un handle per il fragment, chiama il metodo
FragmentManager.findFragmentByIde trasmetti l'ID risorsa del fragment nel file di layout. Se hai aggiunto il frammento in modo dinamico, salta questo passaggio perché hai già recuperato l'handle.Chiama il metodo
getMapAsyncper impostare il callback sul fragmento.
Ad esempio, se hai aggiunto il frammento in modo statico:
Kotlin
val mapFragment = supportFragmentManager
    .findFragmentById(R.id.map) as SupportMapFragment
mapFragment.getMapAsync(this)
Java
SupportMapFragment mapFragment = (SupportMapFragment) getSupportFragmentManager()
    .findFragmentById(R.id.map);
mapFragment.getMapAsync(this);
Stilizzazione e aggiunta di un indicatore alla mappa
Quando la mappa è pronta, imposta lo stile, centra la videocamera e aggiungi un indicatore alle coordinate dell'indirizzo inserito. Il seguente codice utilizza la personalizzazione definita in un oggetto JSON oppure puoi caricare un ID mappa definito con personalizzazione delle mappe basata su cloud.
    @Override
    public void onMapReady(@NonNull GoogleMap googleMap) {
        map = googleMap;
        try {
            // Customise the styling of the base map using a JSON object defined
            // in a string resource.
            boolean success = map.setMapStyle(
                    MapStyleOptions.loadRawResourceStyle(this, R.raw.style_json));

            if (!success) {
                Log.e(TAG, "Style parsing failed.");
            }
        } catch (Resources.NotFoundException e) {
            Log.e(TAG, "Can't find style. Error: ", e);
        }
        map.moveCamera(CameraUpdateFactory.newLatLngZoom(coordinates, 15f));
        marker = map.addMarker(new MarkerOptions().position(coordinates));
    }
(Visualizza l'esempio di codice completo)
Disattivare i controlli della mappa
Per semplificare la mappa mostrando la posizione senza controlli aggiuntivi della mappa (come bussola, barra degli strumenti o altre funzionalità integrate), valuta la possibilità di disattivare i controlli della mappa che non ritieni necessari. Su Android, un'altra opzione è attivare la modalità Lite per fornire un'interattività limitata.