Page Summary
-
Immersions offer the most custom user experience but involve the most development work.
-
Immersions use standard Android activities and UI elements integrated with the GDK for Glass-specific features.
-
Immersions display outside the timeline and require users to swipe down to exit.
-
Immersions are best for experiences requiring prolonged user attention and when needing to override timeline-specific functionality.
-
Immersions are created using standard Android activities with specific considerations for Glass UI design and interaction patterns.
Immersions give you more ways to consume user input and create user interfaces. This allows you to create the most custom experience, but involves the most work.
If this is your first time developing for Glass, read the Immersion guide instead. That document goes over how to build a complete Glassware with immersions, following our design best practices.
How they work
Immersions display outside of the timeline, giving you complete control over the user experience from the time Glass launches the immersion.
You build immersions with standard Android activities, layouts, UI widgets, and the rest of the Android platform. You then use the GDK to integrate into the Glass experience such as integrating voice commands, Glass-styled cards, and more.
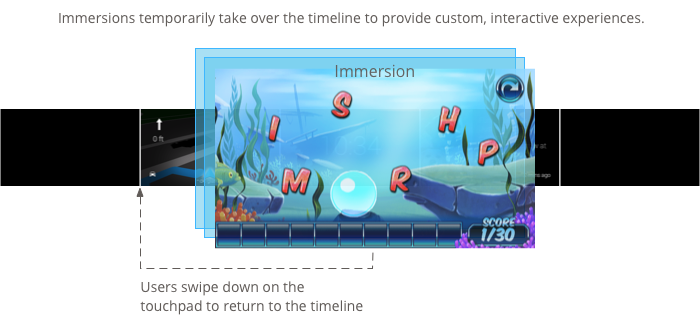
When immersions start, they appear on top of the timeline. When users are done with an immersion, they back out by swiping down.
When to use them
Immersions are great for experiences that require prolonged user attention. They let you create a specialized UI that appears outside of the timeline, so users can delve deeper into a customized experience.
Immersions are also necessary when you need to overwrite timeline-specific functionality such as forward and backward swipes and controlling the screen timeout.
However, use immersions only if you have to, because they require more work to build and more time to design well. Live cards offer enough features and capability for most types of Glassware.
Creating immersions
You create immersions using standard Android activities, but keep the following in mind when writing activities for Glass:
- Design your UIs for a 640 × 360 pixel screen.
- Design interactions that make sense on Glass instead of porting over activities from other Android devices.
- Don't rely on complex touch gestures or UI patterns.
- Swiping down always goes back in the activity stack until users reach the timeline. It should function much like the Android back button on smartphones and tablets.
- Create a 50 × 50 pixel icon and specify it for the
android:iconattribute of the<activity>element in your Android manifest. Also specify text forandroid:label. This allows a voice or touch menu item that is associated with multiple Glassware to show your Glassware's name and icon as an option. - Specify
android:immersive="true"for your<activity>element to give immersions focus after a screen sleeps and wakes up.
Creating and displaying a menu
Glass displays the correct styling for menus if you build them with the standard Android menu APIs inside of an activity.
To display a menu for an activity, create menu resources and then display them on a user action, such as a tap when your activity has focus.
Creating menu resources
Creating menu resources is the same as on the Android platform, but follow these guidelines:
- For each menu item, provide a 50 × 50 pixel menu item icon. The menu icon must be white in color on a transparent background. Download the Glass menu icons for use or as an example.
- Use a short phrase that describes the action and is in sentence case. An imperative verb works well (for example, "Share" or "Reply all").
Here's a simple one to get you started:
<menu xmlns:android="http://schemas.android.com/apk/res/android">
    <item
        android:id="@+id/reply_menu_item"
        android:title="@string/reply"                <!-- imperative verb -->
        android:icon="@drawable/icons_50_reply" />   <!-- white in color on
                                                     transparent background
                                                     -->
</menu>
For more information about creating Android menus, see the Menu topic in the Android SDK documentation.
Handling menu callbacks
The Activity
class contains callbacks that you override to handle menu creation, display, and teardown:
onCreateOptionsMenu()inflates the XML menu resource.onPrepareOptionsMenu()shows or hides menu items if required. For example, you can show different menu items based on what users are doing.onOptionsItemSelected()handles user selection.public class MyActivity extends Activity { @Override protected void onCreate(Bundle savedInstanceState) { super.onCreate(savedInstanceState); } @Override public boolean onCreateOptionsMenu(Menu menu) { MenuInflater inflater = getMenuInflater(); inflater.inflate(R.menu.stopwatch, menu); return true; } @Override public boolean onPrepareOptionsMenu(Menu menu) { // Implement if needed } @Override public boolean onOptionsItemSelected(MenuItem item) { // Handle item selection. Menu items typically start another // activity, start a service, or broadcast another intent. switch (item.getItemId()) { case R.id.stop: startActivity(new Intent(this, StopStopWatchActivity.class)); return true; default: return super.onOptionsItemSelected(item); } } }
Displaying the menu
To display the menu, call
openOptionsMenu()
when required, such as a tap on the touchpad. The following examples detects
a tap gesture on an activity and then calls openOptionsMenu().
public class MainActivity extends Activity {
    // ...
    @Override
    public boolean onKeyDown(int keyCode, KeyEvent event) {
          if (keyCode == KeyEvent.KEYCODE_DPAD_CENTER) {
              openOptionsMenu();
              return true;
          }
          return super.onKeyDown(keyCode, event);
    }
}
Menu utilities
Some helper methods are available to modify the look and behavior of menus. See
MenuUtils
for more information.