การ์ดที่เผยแพร่อยู่จะปรากฏในส่วนปัจจุบันของไทม์ไลน์ และ แสดงข้อมูลที่เกี่ยวข้อง ณ เวลาปัจจุบัน
การ์ดสดเหมาะสำหรับเวลาที่ผู้ใช้กำลังตั้งใจ มีส่วนร่วมในงาน แต่ต้องการตรวจสอบ Glass เป็นระยะ สำหรับข้อมูลเพิ่มเติม เช่น ตรวจสอบเวลาของตนเอง ระหว่างเรียกใช้ทุกๆ 2-3 นาทีหรือควบคุมโปรแกรมเล่นเพลงเมื่อ พวกเขาต้องการข้ามหรือหยุดเพลงชั่วคราว
หากนี่เป็นครั้งแรกที่คุณพัฒนาสำหรับ Glass อ่าน คู่มืองานต่อเนื่อง ก่อน เอกสารดังกล่าวกล่าวถึงวิธีสร้าง เครื่องแก้วที่มีการ์ดออนไลน์ซึ่งเป็นไปตามแนวทางปฏิบัติแนะนำในการออกแบบของเรา
วิธีการทำงาน
การ์ดที่เผยแพร่อยู่ช่วยให้การ์ดมีความต่อเนื่องในโลกปัจจุบัน ในไทม์ไลน์ได้ตราบเท่าที่ยังมีความเกี่ยวข้อง ซึ่งต่างจากการ์ดคงที่ การ์ดที่เผยแพร่อยู่ไม่ปรากฏในเส้นควบคุมเวลา และผู้ใช้ ให้ลบเขาออกหลังจากเสร็จแล้ว
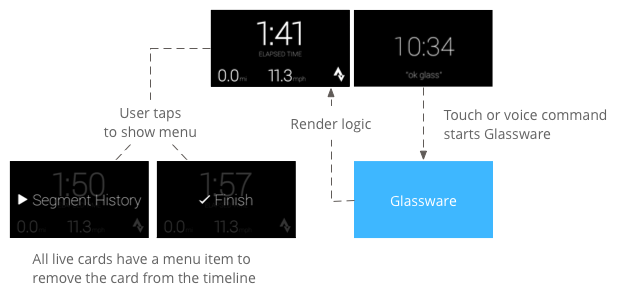
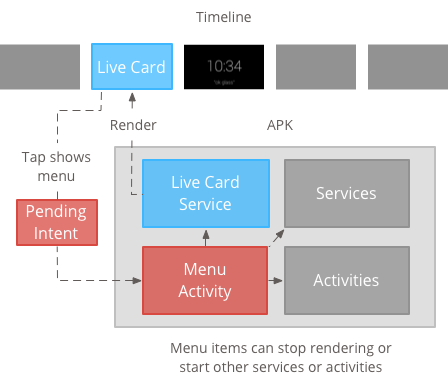
โดยปกติ ผู้ใช้จะเริ่มการ์ดแบบสดด้วยการพูดคำสั่งเสียง ที่เมนูหลัก ซึ่งเริ่มบริการในเบื้องหลังที่แสดงผลการ์ด จากนั้นผู้ใช้ก็จะแตะการ์ดเพื่อแสดงรายการในเมนูที่สามารถดำเนินการได้ บนการ์ด เช่น การปิดการ์ดจากไทม์ไลน์
ควรใช้ในกรณีใด
การ์ดเรียลไทม์ออกแบบมาเพื่องานต่อเนื่องที่ผู้ใช้สามารถเข้าร่วมได้ และจากความถี่บ่อยๆ เช่น จอแสดงผลที่แสดงสถานะการทำงาน ของการกระทำ แผนที่เคลื่อนไหวระหว่างการนำทาง หรือโปรแกรมเล่นเพลง
ประโยชน์อีกข้อของการ์ดสดคือ UI ที่ต้องมีการโต้ตอบกับผู้ใช้แบบเรียลไทม์ และการอัปเดตแบบเรียลไทม์ ลงใน UI
เมื่อใช้การ์ดแบบสด ไทม์ไลน์จะยังคงควบคุมผู้ใช้ได้ ดังนั้น การปัดไปข้างหน้าหรือข้างหลังบนการ์ดแบบสด จะไปยังส่วนต่างๆ ของไทม์ไลน์แทนที่จะดำเนินการกับการ์ดที่เผยแพร่อยู่ นอกจากนี้ หน้าจอจะเปิดและปิดตามลักษณะการทำงานของระบบ (หลังจาก 5 วินาทีโดยที่ผู้ใช้ไม่มีการโต้ตอบหรือในระหว่างขยับศีรษะ)
อย่างไรก็ตาม การ์ดสดสามารถเข้าถึงฟีเจอร์ เดียวกันหลายอย่าง แบบสมจริง เช่น เซ็นเซอร์หรือ ข้อมูล GPS คุณจึงยังคงสร้างประสบการณ์ที่น่าสนใจ ในขณะเดียวกันก็ให้ผู้ใช้อยู่ในไทม์ไลน์เพื่อทำสิ่งอื่นๆ เช่น ตรวจสอบข้อความ
สถาปัตยกรรม
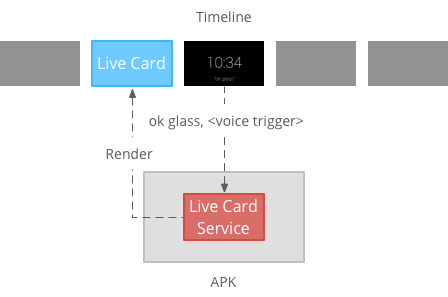
การ์ดแบบสดต้องใช้บริบทที่ยาวนานในการเป็นเจ้าของไว้ตลอดระยะเวลา แสดงอยู่ ดังนั้นให้จัดการในบริการในเบื้องหลัง
จากนั้นคุณจะสามารถเผยแพร่และแสดงผลการ์ดสดทันทีที่บริการ เริ่มต้นหรือตอบสนองต่อเหตุการณ์อื่นๆ ที่บริการตรวจสอบ คุณสามารถแสดงผลการ์ดแบบสดด้วยความถี่ต่ำ (1 ครั้งทุกๆ 2-3 วินาที) หรือความถี่สูง (สูงสุดเท่าที่ระบบจะรีเฟรชได้)
เมื่อการ์ดที่เผยแพร่อยู่ไม่เกี่ยวข้องอีกต่อไป ให้ทำลายบริการเพื่อ หยุดแสดงผล
การแสดงผลความถี่ต่ำ
การแสดงผลความถี่ต่ำจะจำกัดเฉพาะ Android กลุ่มเล็กๆ เท่านั้น และจะอัปเดตจอแสดงผลได้เพียงครั้งเดียวเมื่อ ไม่กี่วินาที
ฟีเจอร์นี้เป็นวิธีง่ายๆ ในการสร้างการ์ดสดด้วย เนื้อหาแบบเรียบง่ายที่ ไม่ต้องแสดงผลอย่างต่อเนื่อง หรือ การอัปเดตเป็นประจำ
การแสดงผลที่มีความถี่สูง
การแสดงผลความถี่สูงช่วยให้คุณใช้ตัวเลือกได้มากขึ้น ซึ่งมีให้ในเฟรมเวิร์กกราฟิกของ Android
ระบบจะแสดงพื้นหลังจริงของ การ์ดสดที่คุณวาดลงในเกมโดยตรงโดยใช้ 2 มิติ มุมมองและการจัดวาง หรือแม้กระทั่งกราฟิก 3 มิติที่ซับซ้อนด้วย OpenGL
การสร้างการ์ดถ่ายทอดสดที่มีความถี่ต่ำ
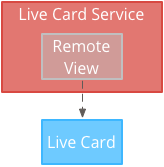
การแสดงผลความถี่ต่ำต้องใช้ UI ที่จัดเตรียมโดย RemoteViews ซึ่งรองรับชุดย่อยของเลย์เอาต์และมุมมอง Android ต่อไปนี้
ใช้การแสดงผลความถี่ต่ำในกรณีต่อไปนี้
- คุณต้องใช้เฉพาะ API มุมมอง Android แบบมาตรฐานที่แสดงอยู่ในรายการก่อนหน้านี้เท่านั้น
- คุณต้องการการอัปเดตไม่บ่อยนักเท่านั้น (ในเวลาไม่กี่วินาที ใหม่)
ข้อควรทราบ
- การ์ดที่เผยแพร่อยู่จะต้องมี
PendingIntentประกาศด้วยsetAction()เพื่อดูลำดับเวลาในการเผยแพร่การ์ด - หากต้องการเปลี่ยนแปลงการ์ดหลังจากเผยแพร่แล้ว โทร
setViews()ในการ์ดที่มี RemoteViews ที่อัปเดตแล้ว ก่อนที่จะเผยแพร่อีกครั้ง
วิธีสร้างการ์ดถ่ายทอดสดที่มีความถี่ต่ำ
สร้างเลย์เอาต์หรือมุมมองที่ต้องการแสดงผล ตัวอย่างต่อไปนี้ แสดงเลย์เอาต์ของเกมบาสเกตบอลในจินตนาการ
 <TextView
     android:id="@+id/home_team_name_text_view"
     android:layout_width="249px"
     android:layout_height="wrap_content"
     android:layout_alignParentRight="true"
     android:gravity="center"
     android:textSize="40px" />

 <TextView
     android:id="@+id/away_team_name_text_view"
     android:layout_width="249px"
     android:layout_height="wrap_content"
     android:layout_alignParentLeft="true"
     android:gravity="center"
     android:textSize="40px" />

 <TextView
     android:id="@+id/away_score_text_view"
     android:layout_width="249px"
     android:layout_height="wrap_content"
     android:layout_alignLeft="@+id/away_team_name_text_view"
     android:layout_below="@+id/away_team_name_text_view"
     android:gravity="center"
     android:textSize="70px" />

 <TextView
     android:id="@+id/home_score_text_view"
     android:layout_width="249px"
     android:layout_height="wrap_content"
     android:layout_alignLeft="@+id/home_team_name_text_view"
     android:layout_below="@+id/home_team_name_text_view"
     android:gravity="center"
     android:textSize="70px" />

 <TextView
     android:id="@+id/footer_text"
     android:layout_width="wrap_content"
     android:layout_height="wrap_content"
     android:layout_alignParentBottom="true"
     android:layout_alignParentLeft="true"
     android:layout_marginBottom="33px"
     android:textSize="26px" />
สร้างบริการที่จัดการการ์ดแบบสดและแสดงผลเลย์เอาต์หรือมุมมอง บริการตัวอย่างนี้อัปเดตคะแนนการแข่งขันบาสเกตบอลในจินตนาการทุกๆ 30 วินาที
import java.util.Random;

import com.google.android.glass.timeline.LiveCard;
import com.google.android.glass.timeline.LiveCard.PublishMode;

import android.app.PendingIntent;
import android.app.Service;
import android.content.Intent;
import android.os.Handler;
import android.os.IBinder;
import android.widget.RemoteViews;

public class LiveCardService extends Service {

    private static final String LIVE_CARD_TAG = "LiveCardDemo";

    private LiveCard mLiveCard;
    private RemoteViews mLiveCardView;

    private int homeScore, awayScore;
    private Random mPointsGenerator;

    private final Handler mHandler = new Handler();
    private final UpdateLiveCardRunnable mUpdateLiveCardRunnable =
        new UpdateLiveCardRunnable();
    private static final long DELAY_MILLIS = 30000;

    @Override
    public void onCreate() {
        super.onCreate();
        mPointsGenerator = new Random();
    }

    @Override
    public int onStartCommand(Intent intent, int flags, int startId) {
        if (mLiveCard == null) {

            // Get an instance of a live card
            mLiveCard = new LiveCard(this, LIVE_CARD_TAG);

            // Inflate a layout into a remote view
            mLiveCardView = new RemoteViews(getPackageName(),
                    R.layout.main_layout);

            // Set up initial RemoteViews values
            homeScore = 0;
            awayScore = 0;
            mLiveCardView.setTextViewText(R.id.home_team_name_text_view,
                    getString(R.string.home_team));
            mLiveCardView.setTextViewText(R.id.away_team_name_text_view,
                    getString(R.string.away_team));
            mLiveCardView.setTextViewText(R.id.footer_text,
                    getString(R.string.game_quarter));

            // Set up the live card's action with a pending intent
            // to show a menu when tapped
            Intent menuIntent = new Intent(this, MenuActivity.class);
            menuIntent.addFlags(Intent.FLAG_ACTIVITY_NEW_TASK |
                    Intent.FLAG_ACTIVITY_CLEAR_TASK);
            mLiveCard.setAction(PendingIntent.getActivity(
                    this, 0, menuIntent, 0));

            // Publish the live card
            mLiveCard.publish(PublishMode.REVEAL);

            // Queue the update text runnable
            mHandler.post(mUpdateLiveCardRunnable);
        }
        return START_STICKY;
    }

    @Override
    public void onDestroy() {
        if (mLiveCard != null && mLiveCard.isPublished()) {
            //Stop the handler from queuing more Runnable jobs
            mUpdateLiveCardRunnable.setStop(true);

            mLiveCard.unpublish();
            mLiveCard = null;
        }
        super.onDestroy();
    }

    /**
     * Runnable that updates live card contents
     */
    private class UpdateLiveCardRunnable implements Runnable{

        private boolean mIsStopped = false;

        /*
         * Updates the card with a fake score every 30 seconds as a demonstration.
         * You also probably want to display something useful in your live card.
         *
         * If you are executing a long running task to get data to update a
         * live card(e.g, making a web call), do this in another thread or
         * AsyncTask.
         */
        public void run(){
            if(!isStopped()){
                // Generate fake points.
                homeScore += mPointsGenerator.nextInt(3);
                awayScore += mPointsGenerator.nextInt(3);

                // Update the remote view with the new scores.
                mLiveCardView.setTextViewText(R.id.home_score_text_view,
                        String.valueOf(homeScore));
                mLiveCardView.setTextViewText(R.id.away_score_text_view,
                        String.valueOf(awayScore));

                // Always call setViews() to update the live card's RemoteViews.
                mLiveCard.setViews(mLiveCardView);

                // Queue another score update in 30 seconds.
                mHandler.postDelayed(mUpdateLiveCardRunnable, DELAY_MILLIS);
            }
        }

        public boolean isStopped() {
            return mIsStopped;
        }

        public void setStop(boolean isStopped) {
            this.mIsStopped = isStopped;
        }
    }

    @Override
    public IBinder onBind(Intent intent) {
      /*
       * If you need to set up interprocess communication
       * (activity to a service, for instance), return a binder object
       * so that the client can receive and modify data in this service.
       *
       * A typical use is to give a menu activity access to a binder object
       * if it is trying to change a setting that is managed by the live card
       * service. The menu activity in this sample does not require any
       * of these capabilities, so this just returns null.
       */
       return null;
    }
}
การสร้างการ์ดถ่ายทอดสดที่มีความถี่สูง
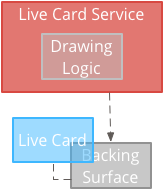
การแสดงผลความถี่สูงให้คุณวาดรูปได้โดยตรง บนพื้นหลัง Surface ของการ์ดที่พร้อมใช้งาน
ใช้การแสดงผลความถี่สูงในกรณีต่อไปนี้
- คุณจำเป็นต้องอัปเดตการ์ดสดบ่อยๆ (หลายครั้งต่อวินาที)
- คุณจำเป็นต้องมีความยืดหยุ่นในสิ่งที่แสดงผลได้ การแสดงผลความถี่สูงช่วยให้คุณ ใช้มุมมองและเลย์เอาต์ของ Android เพื่อสร้างกราฟิก OpenGL ที่ซับซ้อน
ข้อควรทราบ
- คุณควรสร้างบริการพื้นหลังเพื่อแสดงผลบนพื้นผิวของการ์ดแบบสดเสมอ
- การ์ดที่เผยแพร่อยู่จะต้องมี
PendingIntentประกาศด้วยsetAction() - ใช้
GLRendererหากใช่ การแสดงผล OpenGL และDirectRenderingCallbackสำหรับกรณีอื่นๆ ทั้งหมด
การใช้ DirectRenderingCallback
วิธีสร้างการ์ดแบบสดที่มีมุมมองมาตรฐานของ Android และตรรกะการวาด
สร้างชั้นเรียนที่นำไปใช้
DirectRenderingCallbackการใช้ Callback ในอินเทอร์เฟซเหล่านี้ช่วยให้คุณดำเนินการต่างๆ ในระหว่างเหตุการณ์สำคัญของวงจรแพลตฟอร์มของการ์ดแบบสดได้ตัวอย่างต่อไปนี้สร้าง Thread ในเบื้องหลังเพื่อแสดงผลเป็นระยะๆ แต่คุณ สามารถอัปเดตการ์ดเพื่อตอบสนองต่อเหตุการณ์ภายนอก (เช่น การอัปเดตเซ็นเซอร์หรือตำแหน่ง)
public class LiveCardRenderer implements DirectRenderingCallback {

    // About 30 FPS.
    private static final long FRAME_TIME_MILLIS = 33;

    private SurfaceHolder mHolder;
    private boolean mPaused;
    private RenderThread mRenderThread;

    @Override
    public void surfaceChanged(SurfaceHolder holder, int format,
            int width, int height) {
        // Update your views accordingly.
    }

    @Override
    public void surfaceCreated(SurfaceHolder holder) {
        mPaused = false;
        mHolder = holder;
        updateRendering();
    }

    @Override
    public void surfaceDestroyed(SurfaceHolder holder) {
        mHolder = null;
        updateRendering();
    }

    @Override
    public void renderingPaused(SurfaceHolder holder, boolean paused) {
        mPaused = paused;
        updateRendering();
    }

    /**
     * Start or stop rendering according to the timeline state.
     */
    private void updateRendering() {
        boolean shouldRender = (mHolder != null) && !mPaused;
        boolean rendering = mRenderThread != null;

        if (shouldRender != rendering) {
            if (shouldRender) {
                mRenderThread = new RenderThread();
                mRenderThread.start();
            } else {
                mRenderThread.quit();
                mRenderThread = null;
            }
        }
    }

    /**
     * Draws the view in the SurfaceHolder's canvas.
     */
    private void draw() {
        Canvas canvas;
        try {
            canvas = mHolder.lockCanvas();
        } catch (Exception e) {
            return;
        }
        if (canvas != null) {
            // Draw on the canvas.
            mHolder.unlockCanvasAndPost(canvas);
        }
    }

    /**
     * Redraws in the background.
     */
    private class RenderThread extends Thread {
        private boolean mShouldRun;

        /**
         * Initializes the background rendering thread.
         */
        public RenderThread() {
            mShouldRun = true;
        }

        /**
         * Returns true if the rendering thread should continue to run.
         *
         * @return true if the rendering thread should continue to run
         */
        private synchronized boolean shouldRun() {
            return mShouldRun;
        }

        /**
         * Requests that the rendering thread exit at the next
         opportunity.
         */
        public synchronized void quit() {
            mShouldRun = false;
        }

        @Override
        public void run() {
            while (shouldRun()) {
                draw();
                SystemClock.sleep(FRAME_TIME_MILLIS);
            }
        }
    }
}
ตั้งค่าอินสแตนซ์ของ
DirectRenderingCallbackเป็นLiveCardการติดต่อกลับของSurfaceHolderช่วงเวลานี้ ช่วยให้การ์ดแบบเรียลไทม์รู้ว่าควรใช้ตรรกะใดในการแสดงภาพ// Tag used to identify the LiveCard in debugging logs. private static final String LIVE_CARD_TAG = "my_card"; // Cached instance of the LiveCard created by the publishCard() method. private LiveCard mLiveCard; private void publishCard(Context context) { if (mLiveCard == null) { mLiveCard = new LiveCard(this, LIVE_CARD_TAG); // Enable direct rendering. mLiveCard.setDirectRenderingEnabled(true); mLiveCard.getSurfaceHolder().addCallback( new LiveCardRenderer()); Intent intent = new Intent(context, MenuActivity.class); mLiveCard.setAction(PendingIntent.getActivity(context, 0, intent, 0)); mLiveCard.publish(LiveCard.PublishMode.SILENT); } else { // Card is already published. return; } } private void unpublishCard(Context context) { if (mLiveCard != null) { mLiveCard.unpublish(); mLiveCard = null; } }
การใช้ OpenGL
สร้างชั้นเรียนที่นำไปใช้
GlRendererการใช้ Callback ในอินเทอร์เฟซนี้ช่วยให้คุณดําเนินการต่างๆ ในระหว่างเหตุการณ์สำคัญได้ ของวงจรการใช้งาน แพลตฟอร์มของบัตรแบบสด ตัวอย่างนี้วาดลูกบาศก์หมุนสีimport com.google.android.glass.timeline.GlRenderer; import android.opengl.GLES20; import android.opengl.Matrix; import android.os.SystemClock; import java.util.concurrent.TimeUnit; import javax.microedition.khronos.egl.EGLConfig; /** * Renders a 3D OpenGL Cube on a {@link LiveCard}. */ public class CubeRenderer implements GlRenderer { /** Rotation increment per frame. */ private static final float CUBE_ROTATION_INCREMENT = 0.6f; /** The refresh rate, in frames per second. */ private static final int REFRESH_RATE_FPS = 60; /** The duration, in milliseconds, of one frame. */ private static final float FRAME_TIME_MILLIS = TimeUnit.SECONDS.toMillis(1) / REFRESH_RATE_FPS; private final float[] mMVPMatrix; private final float[] mProjectionMatrix; private final float[] mViewMatrix; private final float[] mRotationMatrix; private final float[] mFinalMVPMatrix; private Cube mCube; private float mCubeRotation; private long mLastUpdateMillis; public CubeRenderer() { mMVPMatrix = new float[16]; mProjectionMatrix = new float[16]; mViewMatrix = new float[16]; mRotationMatrix = new float[16]; mFinalMVPMatrix = new float[16]; // Set the fixed camera position (View matrix). Matrix.setLookAtM(mViewMatrix, 0, 0.0f, 0.0f, -4.0f, 0.0f, 0.0f, 0.0f, 0.0f, 1.0f, 0.0f); } @Override public void onSurfaceCreated(EGLConfig config) { // Set the background frame color GLES20.glClearColor(0.0f, 0.0f, 0.0f, 1.0f); GLES20.glClearDepthf(1.0f); GLES20.glEnable(GLES20.GL_DEPTH_TEST); GLES20.glDepthFunc(GLES20.GL_LEQUAL); mCube = new Cube(); } @Override public void onSurfaceChanged(int width, int height) { float ratio = (float) width / height; GLES20.glViewport(0, 0, width, height); // This projection matrix is applied to object coordinates in the onDrawFrame() method. Matrix.frustumM(mProjectionMatrix, 0, -ratio, ratio, -1.0f, 1.0f, 3.0f, 7.0f); // modelView = projection x view Matrix.multiplyMM(mMVPMatrix, 0, mProjectionMatrix, 0, mViewMatrix, 0); } @Override public void onDrawFrame() { GLES20.glClear(GLES20.GL_COLOR_BUFFER_BIT | GLES20.GL_DEPTH_BUFFER_BIT); // Apply the rotation. Matrix.setRotateM(mRotationMatrix, 0, mCubeRotation, 1.0f, 1.0f, 1.0f); // Combine the rotation matrix with the projection and camera view Matrix.multiplyMM(mFinalMVPMatrix, 0, mMVPMatrix, 0, mRotationMatrix, 0); // Draw cube. mCube.draw(mFinalMVPMatrix); updateCubeRotation(); } /** Updates the cube rotation. */ private void updateCubeRotation() { if (mLastUpdateMillis != 0) { float factor = (SystemClock.elapsedRealtime() - mLastUpdateMillis) / FRAME_TIME_MILLIS; mCubeRotation += CUBE_ROTATION_INCREMENT * factor; } mLastUpdateMillis = SystemClock.elapsedRealtime(); } }สร้างบริการที่จัดการบัตรและเซ็ตแบบสด คลาส
CubeRendererเป็นโหมดแสดงภาพการ์ดแบบเรียลไทม์import com.google.android.glass.timeline.LiveCard; import com.google.android.glass.timeline.LiveCard.PublishMode; import android.app.PendingIntent; import android.app.Service; import android.content.Intent; import android.os.IBinder; /** * Creates a {@link LiveCard} rendering a rotating 3D cube with OpenGL. */ public class OpenGlService extends Service { private static final String LIVE_CARD_TAG = "opengl"; private LiveCard mLiveCard; @Override public IBinder onBind(Intent intent) { return null; } @Override public int onStartCommand(Intent intent, int flags, int startId) { if (mLiveCard == null) { mLiveCard = new LiveCard(this, LIVE_CARD_TAG); mLiveCard.setRenderer(new CubeRenderer()); mLiveCard.setAction( PendingIntent.getActivity(this, 0, new Intent(this, MenuActivity.class), 0)); mLiveCard.publish(PublishMode.REVEAL); } else { mLiveCard.navigate(); } return START_STICKY; } @Override public void onDestroy() { if (mLiveCard != null && mLiveCard.isPublished()) { mLiveCard.unpublish(); mLiveCard = null; } super.onDestroy(); } }
import android.opengl.GLES20;

import java.nio.ByteBuffer;
import java.nio.ByteOrder;
import java.nio.FloatBuffer;

/**
 * Renders a 3D Cube using OpenGL ES 2.0.
 *
 * For more information on how to use OpenGL ES 2.0 on Android, see the
 * <a href="//developer.android.com/training/graphics/opengl/index.html">
 * Displaying Graphics with OpenGL ES</a> developer guide.
 */
public class Cube {

    /** Cube vertices */
    private static final float VERTICES[] = {
        -0.5f, -0.5f, -0.5f,
        0.5f, -0.5f, -0.5f,
        0.5f, 0.5f, -0.5f,
        -0.5f, 0.5f, -0.5f,
        -0.5f, -0.5f, 0.5f,
        0.5f, -0.5f, 0.5f,
        0.5f, 0.5f, 0.5f,
        -0.5f, 0.5f, 0.5f
    };

    /** Vertex colors. */
    private static final float COLORS[] = {
        0.0f, 1.0f, 1.0f, 1.0f,
        1.0f, 0.0f, 0.0f, 1.0f,
        1.0f, 1.0f, 0.0f, 1.0f,
        0.0f, 1.0f, 0.0f, 1.0f,
        0.0f, 0.0f, 1.0f, 1.0f,
        1.0f, 0.0f, 1.0f, 1.0f,
        1.0f, 1.0f, 1.0f, 1.0f,
        0.0f, 1.0f, 1.0f, 1.0f,
    };


    /** Order to draw vertices as triangles. */
    private static final byte INDICES[] = {
        0, 1, 3, 3, 1, 2, // Front face.
        0, 1, 4, 4, 5, 1, // Bottom face.
        1, 2, 5, 5, 6, 2, // Right face.
        2, 3, 6, 6, 7, 3, // Top face.
        3, 7, 4, 4, 3, 0, // Left face.
        4, 5, 7, 7, 6, 5, // Rear face.
    };

    /** Number of coordinates per vertex in {@link VERTICES}. */
    private static final int COORDS_PER_VERTEX = 3;

    /** Number of values per colors in {@link COLORS}. */
    private static final int VALUES_PER_COLOR = 4;

    /** Vertex size in bytes. */
    private final int VERTEX_STRIDE = COORDS_PER_VERTEX * 4;

    /** Color size in bytes. */
    private final int COLOR_STRIDE = VALUES_PER_COLOR * 4;

    /** Shader code for the vertex. */
    private static final String VERTEX_SHADER_CODE =
            "uniform mat4 uMVPMatrix;" +
            "attribute vec4 vPosition;" +
            "attribute vec4 vColor;" +
            "varying vec4 _vColor;" +
            "void main() {" +
            "  _vColor = vColor;" +
            "  gl_Position = uMVPMatrix * vPosition;" +
            "}";

    /** Shader code for the fragment. */
    private static final String FRAGMENT_SHADER_CODE =
            "precision mediump float;" +
            "varying vec4 _vColor;" +
            "void main() {" +
            "  gl_FragColor = _vColor;" +
            "}";


    private final FloatBuffer mVertexBuffer;
    private final FloatBuffer mColorBuffer;
    private final ByteBuffer mIndexBuffer;
    private final int mProgram;
    private final int mPositionHandle;
    private final int mColorHandle;
    private final int mMVPMatrixHandle;

    public Cube() {
        ByteBuffer byteBuffer = ByteBuffer.allocateDirect(VERTICES.length * 4);

        byteBuffer.order(ByteOrder.nativeOrder());
        mVertexBuffer = byteBuffer.asFloatBuffer();
        mVertexBuffer.put(VERTICES);
        mVertexBuffer.position(0);

        byteBuffer = ByteBuffer.allocateDirect(COLORS.length * 4);
        byteBuffer.order(ByteOrder.nativeOrder());
        mColorBuffer = byteBuffer.asFloatBuffer();
        mColorBuffer.put(COLORS);
        mColorBuffer.position(0);

        mIndexBuffer = ByteBuffer.allocateDirect(INDICES.length);
        mIndexBuffer.put(INDICES);
        mIndexBuffer.position(0);

        mProgram = GLES20.glCreateProgram();
        GLES20.glAttachShader(mProgram, loadShader(GLES20.GL_VERTEX_SHADER, VERTEX_SHADER_CODE));
        GLES20.glAttachShader(
                mProgram, loadShader(GLES20.GL_FRAGMENT_SHADER, FRAGMENT_SHADER_CODE));
        GLES20.glLinkProgram(mProgram);

        mPositionHandle = GLES20.glGetAttribLocation(mProgram, "vPosition");
        mColorHandle = GLES20.glGetAttribLocation(mProgram, "vColor");
        mMVPMatrixHandle = GLES20.glGetUniformLocation(mProgram, "uMVPMatrix");
    }

    /**
     * Encapsulates the OpenGL ES instructions for drawing this shape.
     *
     * @param mvpMatrix The Model View Project matrix in which to draw this shape
     */
    public void draw(float[] mvpMatrix) {
        // Add program to OpenGL environment.
        GLES20.glUseProgram(mProgram);

        // Prepare the cube coordinate data.
        GLES20.glEnableVertexAttribArray(mPositionHandle);
        GLES20.glVertexAttribPointer(
                mPositionHandle, 3, GLES20.GL_FLOAT, false, VERTEX_STRIDE, mVertexBuffer);

        // Prepare the cube color data.
        GLES20.glEnableVertexAttribArray(mColorHandle);
        GLES20.glVertexAttribPointer(
                mColorHandle, 4, GLES20.GL_FLOAT, false, COLOR_STRIDE, mColorBuffer);

        // Apply the projection and view transformation.
        GLES20.glUniformMatrix4fv(mMVPMatrixHandle, 1, false, mvpMatrix, 0);

        // Draw the cube.
        GLES20.glDrawElements(
                GLES20.GL_TRIANGLES, INDICES.length, GLES20.GL_UNSIGNED_BYTE, mIndexBuffer);

        // Disable vertex arrays.
        GLES20.glDisableVertexAttribArray(mPositionHandle);
        GLES20.glDisableVertexAttribArray(mColorHandle);
    }

    /** Loads the provided shader in the program. */
    private static int loadShader(int type, String shaderCode){
        int shader = GLES20.glCreateShader(type);

        GLES20.glShaderSource(shader, shaderCode);
        GLES20.glCompileShader(shader);

        return shader;
    }
}
เน้นการ์ดแบบสด
เมื่อเผยแพร่การ์ดสดด้วย LiveCard.publish() จะเป็นการส่งพารามิเตอร์
เพื่อควบคุมว่าจะโฟกัสทันทีหรือไม่
หากต้องการให้ไทม์ไลน์ข้ามไปยังการ์ดทันทีหลังจากที่เผยแพร่ ให้ใช้
LiveCard.PublishMode.REVEAL
หากต้องการเผยแพร่การ์ดแบบเงียบและทำให้ผู้ใช้ไปยังการ์ดด้วยตนเอง ให้ใช้
LiveCard.PublishMode.SILENT
นอกจากนี้ LiveCard.navigate()
จะให้คุณข้ามไปยังการ์ด
หลังจากเผยแพร่แล้ว ตัวอย่างเช่น หากผู้ใช้พยายามเริ่มต้น
การถ่ายทอดสดจากเมนูเสียงหลักและเริ่มแสดงแล้ว คุณข้ามไปยังการถ่ายทอดสดได้
ด้วยวิธีนี้
การสร้างและการแสดงเมนู
การ์ดแบบสดไม่สามารถแสดงระบบเมนูของตัวเองได้ คุณจึงต้องสร้างกิจกรรมเพื่อแสดงเมนู สำหรับการ์ดสด
กิจกรรมเมนูอาจมีรายการสำหรับหยุดการ์ดถ่ายทอดสด โดยเริ่มต้น การจดจ่อ หรือการทำงานอื่นๆ ที่คุณต้องการทำ นอกจากนี้ คุณยังเพิ่ม กิจกรรมการตั้งค่าระบบ เช่น การควบคุมระดับเสียง เป็นรายการเมนู สำหรับข้อมูลเพิ่มเติม ดูข้อมูลได้ที่ การเริ่มต้นการตั้งค่า
กำลังสร้างแหล่งข้อมูลเมนู
การสร้างทรัพยากรเมนูนั้นเหมือนกับการสร้างบนแพลตฟอร์ม Android แต่โปรดทำตามสิ่งเหล่านี้ หลักเกณฑ์สำหรับ Glass
- แสดงรายการเมนูแต่ละรายการในเมนูขนาด 50 × 50 พิกเซล เมนู ไอคอนต้องเป็นสีขาวบนพื้นหลังโปร่งใส โปรดดู ไอคอนรายการเมนู Glass สำหรับ ตัวอย่างหรือดาวน์โหลดเพื่อนำไปใช้ก็ได้
- ใช้ชื่อย่อที่อธิบายการดำเนินการและใช้อักษรตัวพิมพ์ใหญ่/เล็กของหัวข้อ ใช้คำกริยาแสดงความจำเป็น (เช่น แชร์หรือตอบกลับทั้งหมด)
- Glass ไม่แสดงการ์ดแบบสดโดยไม่มีรายการในเมนู อย่างน้อยที่สุด แสดงรายการในเมนูหยุด เพื่อให้ผู้ใช้นำการ์ดที่เผยแพร่อยู่ออกจาก ในไทม์ไลน์
วิดเจ็ต CheckBox ไม่ได้รับการสนับสนุน
<menu xmlns:android="http://schemas.android.com/apk/res/android">
    <item
        android:id="@+id/menu_item_1"
        android:title="@string/Menu_Item_1"       <!-- must have "Stop" menu item -->
        android:icon="@drawable/menu_item_1_icon" />   <!-- white on transparent icon -->
</menu>
การสร้างกิจกรรมเพื่อจัดการ Callback ของเมนู
คุณต้องกำหนดกิจกรรมในเมนูที่การ์ดสดของคุณเรียกใช้เมื่อผู้ใช้แตะที่การ์ดสด
ลบล้างรายการต่อไปนี้
เมธอด Callback Activity รายการ
เพื่อให้สามารถสร้าง แสดง และปิดเมนูในกิจกรรมเมนูได้อย่างเหมาะสม
onCreateOptionsMenu()ขยายทรัพยากรเมนู XMLonAttachedToWindow()แสดงเมนูเมื่อกิจกรรมอยู่ในโฟกัสonPrepareOptionsMenu()แสดงหรือซ่อนรายการในเมนูหากจำเป็น ตัวอย่างเช่น คุณสามารถแสดงรายการในเมนูที่แตกต่างกัน ตามสิ่งที่ผู้ใช้กำลังทำ ตัวอย่างเช่น คุณสามารถแสดงรายการในเมนูที่แตกต่างกันตาม เกี่ยวกับข้อมูลบริบทบางอย่างonOptionsItemSelected()จะจัดการการเลือกของผู้ใช้onOptionsMenuClosed()เพื่อดำเนินการกิจกรรมให้เสร็จสิ้น เพื่อให้กิจกรรมนั้นไม่ปรากฏบนการ์ดที่เผยแพร่อยู่อีกต่อไป
คุณต้องทำกิจกรรมที่นี่ให้เสร็จ เพื่อให้กิจกรรมเสร็จสมบูรณ์อย่างเหมาะสมเมื่อเมนูปิดโดยการเลือกหรือปัดลง
/**
 * Activity showing the options menu.
 */
public class MenuActivity extends Activity {

    @Override
    public void onAttachedToWindow() {
        super.onAttachedToWindow();
        openOptionsMenu();
    }

    @Override
    public boolean onCreateOptionsMenu(Menu menu) {
        MenuInflater inflater = getMenuInflater();
        inflater.inflate(R.menu.stopwatch, menu);
        return true;
    }

    @Override
    public boolean onOptionsItemSelected(MenuItem item) {
        // Handle item selection.
        switch (item.getItemId()) {
            case R.id.stop:
                stopService(new Intent(this, StopwatchService.class));
                return true;
            default:
                return super.onOptionsItemSelected(item);
        }
    }

    @Override
    public void onOptionsMenuClosed(Menu menu) {
        // Nothing else to do, closing the activity.
        finish();
    }
}
การทำให้กิจกรรมในเมนูมีความโปร่งใส
สร้างกิจกรรมของเมนูเพื่อให้สอดคล้องกับรูปแบบ Glass โปร่งแสงเพื่อให้การ์ดแสดงผลยังมองเห็นได้ที่ด้านล่าง เมนู
สร้างไฟล์
res/values/styles.xmlและประกาศรูปแบบ ที่ทำให้พื้นหลังของกิจกรรมโปร่งใส<resources> <style name="MenuTheme" parent="@android:style/Theme.DeviceDefault"> <item name="android:windowBackground">@android:color/transparent</item> <item name="android:colorBackgroundCacheHint">@null</item> <item name="android:windowIsTranslucent">true</item> <item name="android:windowAnimationStyle">@null</item> </style> </resources>ในไฟล์
AndroidManifest.xmlให้กำหนดธีมให้กับกิจกรรมเมนู ดังนี้<?xml version="1.0" encoding="utf-8"?> <manifest ... > ... <application ... > ... <activity android:name=".MenuActivity" android:theme="@style/MenuTheme" ...> </activity> </application> </manifest>
กำลังแสดงเมนู
โปรดระบุ
PendingIntent
สำหรับการดำเนินการของการ์ดโดยใช้ setAction() ระบบจะใช้ความตั้งใจที่รอดำเนินการเพื่อเริ่มต้น
กิจกรรมเมนูเมื่อผู้ใช้แตะการ์ด
Intent menuIntent = new Intent(this, MenuActivity.class);
mLiveCard.setAction(PendingIntent.getActivity(this, 0, menuIntent, 0));
mLiveCard.publish(LiveCard.PublishMode.REVEAL); // or SILENT
การรองรับคำสั่งเสียงตามบริบท
ระบุว่า
MenuActivityของคุณรองรับ คำสั่งเสียงตามบริบท:// Initialize your LiveCard as usual. mLiveCard.setVoiceActionEnabled(true); mLiveCard.publish(LiveCard.PublishMode.REVEAL); // or SILENTแก้ไข
MenuActivityให้รองรับการเรียกใช้ผ่านการสั่งงานด้วยเสียงดังนี้/** * Activity showing the options menu. */ public class MenuActivity extends Activity { private boolean mFromLiveCardVoice; private boolean mIsFinishing; @Override protected void onCreate(Bundle savedInstanceState) { super.onCreate(savedInstanceState); mFromLiveCardVoice = getIntent().getBooleanExtra(LiveCard.EXTRA_FROM_LIVECARD_VOICE, false); if (mFromLiveCardVoice) { // When activated by voice from a live card, enable voice commands. The menu // will automatically "jump" ahead to the items (skipping the guard phrase // that was already said at the live card). getWindow().requestFeature(WindowUtils.FEATURE_VOICE_COMMANDS); } } @Override public void onAttachedToWindow() { super.onAttachedToWindow(); if (!mFromLiveCardVoice) { openOptionsMenu(); } } @Override public boolean onCreatePanelMenu(int featureId, Menu menu) { if (isMyMenu(featureId)) { getMenuInflater().inflate(R.menu.stopwatch, menu); return true; } return super.onCreatePanelMenu(featureId, menu); } @Override public boolean onPreparePanel(int featureId, View view, Menu menu) { if (isMyMenu(featureId)) { // Don't reopen menu once we are finishing. This is necessary // since voice menus reopen themselves while in focus. return !mIsFinishing; } return super.onPreparePanel(featureId, view, menu); } @Override public boolean onMenuItemSelected(int featureId, MenuItem item) { if (isMyMenu(featureId)) { // Handle item selection. switch (item.getItemId()) { case R.id.stop_this: stopService(new Intent(this, StopwatchService.class)); return true; } } return super.onMenuItemSelected(featureId, item); } @Override public void onPanelClosed(int featureId, Menu menu) { super.onPanelClosed(featureId, menu); if (isMyMenu(featureId)) { // When the menu panel closes, either an item is selected from the menu or the // menu is dismissed by swiping down. Either way, we end the activity. isFinishing = true; finish(); } } /** * Returns {@code true} when the {@code featureId} belongs to the options menu or voice * menu that are controlled by this menu activity. */ private boolean isMyMenu(int featureId) { return featureId == Window.FEATURE_OPTIONS_PANEL || featureId == WindowUtils.FEATURE_VOICE_COMMANDS; } }
โปรดดู คำสั่งเสียงตามบริบท เพื่อดูข้อมูลเพิ่มเติม
ยูทิลิตีของเมนู
คุณสามารถใช้วิธีการที่เป็นตัวช่วย 2-3 วิธีเพื่อแก้ไขรูปลักษณ์และลักษณะการทำงานของเมนูได้ โปรดดู
MenuUtils
เพื่อดูข้อมูลเพิ่มเติม