

Cloud Run 是代管運算平台,能夠讓您執行可透過 HTTP 要求叫用的無狀態容器。Cloud Run 採用無伺服器技術,可為您省去管理基礎架構的麻煩,讓您專心處理最重要的工作,也就是建構出色的應用程式。這項服務是以 Knative 打造而成,可讓您選擇透過 Cloud Run (全代管) 或 Cloud Run for Anthos 執行容器。本程式碼研究室的目標是協助您建構容器映像檔,並部署至 Cloud Run。
必要條件
無
自行設定環境
如果您還沒有 Google 帳戶 (Gmail 或 Google 應用程式),請先建立帳戶。登入 Google Cloud Platform 主控台 (console.cloud.google.com),然後建立新專案:


請記住專案 ID,這是所有 Google Cloud 專案中不重複的名稱 (上述名稱已遭占用,因此不適用於您,抱歉!)。本程式碼研究室稍後會將其稱為 PROJECT_ID。
接著,您必須在 Cloud 控制台中啟用帳單,才能使用 Google Cloud 資源。
完成本程式碼研究室的費用不應超過數美元,但如果您決定使用更多資源,或是將資源繼續執行 (請參閱本文件結尾的「清除」一節),則可能會增加費用。
Google Cloud Platform 新使用者享有價值 $300 美元的免費試用期。
Cloud Shell
雖然您可以透過筆電遠端操作 Google Cloud,但您會使用 Cloud Shell,這是 Google Cloud 中執行的指令列環境。
這種以 Debian 為基礎的虛擬機器,搭載各種您需要的開發工具。提供永久的 5 GB 主目錄,而且在 Google Cloud 中運作,可大幅提升網路效能和驗證。也就是說,您只需要瀏覽器 (Chromebook 也可以) 就能完成本程式碼研究室。
如要啟用 Google Cloud Shell,只要在開發人員控制台中按一下右上方的按鈕即可 (系統應該只需要幾分鐘就能佈建及連線至環境):

按一下「Start Cloud Shell」(啟動 Cloud Shell) 按鈕:


連線至 Cloud Shell 後,您應會發現自己通過驗證,且專案已設為您的 PROJECT_ID:
gcloud auth list
指令輸出
Credentialed accounts:
 - <myaccount>@<mydomain>.com (active)
gcloud config list project
指令輸出
[core]
project = <PROJECT_ID>
Cloud Shell 也會預設設定一些環境變數,這些變數在您執行後續指令時可能很有用。
echo $GOOGLE_CLOUD_PROJECT
指令輸出
<PROJECT_ID>
如果專案未設定,請發出下列指令:
gcloud config set project <PROJECT_ID>
要尋找 PROJECT_ID 嗎?請檢查您在設定步驟中使用的 ID,或在控制台資訊主頁中查詢:

重要事項:最後,請設定預設可用區和專案:
gcloud config set compute/zone us-central1-f
您可以選擇各種不同區域。詳情請參閱區域和可用區說明文件。
啟用 Cloud Run API
在 Cloud Shell 中啟用 Cloud Run API。
gcloud services enable run.googleapis.com
這時應該會顯示類似以下的成功訊息:
Operation "operations/acf.cc11852d-40af-47ad-9d59-477a12847c9e" finished successfully.
您將建構以 Express 為基礎的簡易型 Node.js 應用程式,用於回應 HTTP 要求。
如要建構應用程式,請使用 Cloud Shell 建立名為 helloworld-nodejs 的新目錄,然後將目錄變更為該目錄。
mkdir helloworld-nodejs
cd helloworld-nodejs
建立 package.json 檔案,並加入以下內容:
{
  "name": "cloudrun-helloworld",
  "version": "1.0.0",
  "description": "Simple hello world sample in Node",
  "main": "index.js",
  "scripts": {
    "start": "node index.js"
  },
  "author": "",
  "license": "Apache-2.0",
  "dependencies": {
    "express": "^4.17.1"
  }
}
最重要的是,上述檔案包含 start 指令碼,以及 Express 網頁應用程式架構的依附元件。
接著,在同一個目錄中建立 index.js 檔案,然後將下列內容複製到檔案中:
const express = require('express');
const app = express();

app.get('/', (req, res) => {
  console.log('Hello world received a request.');

  const target = process.env.TARGET || 'World';
  res.send(`Hello ${target}!`);
});

const port = process.env.PORT || 8080;
app.listen(port, () => {
  console.log('Hello world listening on port', port);
});
這段程式碼會建立基本的網路伺服器,用於監聽 PORT 環境變數定義的通訊埠。應用程式現已就緒,您可以開始將應用程式容器化、測試,並上傳至 Container Registry。
如要將範例應用程式容器化,請在來源檔案所在的目錄中建立名為 Dockerfile 的新檔案,然後複製下列內容:
# Use the official lightweight Node.js 12 image.
# https://hub.docker.com/_/node
FROM node:12-slim

# Create and change to the app directory.
WORKDIR /usr/src/app

# Copy application dependency manifests to the container image.
# A wildcard is used to ensure both package.json AND package-lock.json are copied.
# Copying this separately prevents re-running npm install on every code change.
COPY package*.json ./

# Install production dependencies.
RUN npm install --only=production

# Copy local code to the container image.
COPY . ./

# Run the web service on container startup.
CMD [ "npm", "start" ]
接著,從含有 Dockerfile 的目錄執行下列指令,使用 Cloud Build 建構容器映像檔:
gcloud builds submit --tag gcr.io/$GOOGLE_CLOUD_PROJECT/helloworld
$GOOGLE_CLOUD_PROJECT 是環境變數,在 Cloud Shell 中執行時包含 Google Cloud 專案 ID。您也可以執行 gcloud config get-value project 取得。
容器推送到 Artifact Registry 後,您會看到包含映像檔名稱 (gcr.io/$GOOGLE_CLOUD_PROJECT/helloworld) 的 SUCCESS 訊息。映像檔會儲存在 Container Registry 中,日後如有需要,可以重複使用。
使用以下指令,列出與當前專案相關聯的所有容器映像檔:
gcloud container images list
如要透過 Cloud Shell 在本機執行及測試應用程式,請使用下列標準 docker 指令啟動應用程式:
docker run -d -p 8080:8080 gcr.io/$GOOGLE_CLOUD_PROJECT/helloworld
在 Cloud Shell 中,按一下「網頁預覽」 ,然後選取「透過以下通訊埠預覽:8080」。
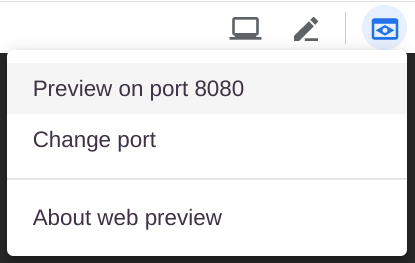
系統會開啟瀏覽器視窗,顯示「Hello World!」 。

您也可以直接使用 curl localhost:8080。
如要將容器化應用程式部署至 Cloud Run,請執行下列指令 (請務必根據您建構的應用程式調整為正確的映像檔名稱,或使用gcr.io/cloudrun/hello預先建構的映像檔):
gcloud run deploy helloworld \
  --image gcr.io/$GOOGLE_CLOUD_PROJECT/helloworld \
  --platform managed \
  --region us-central1 \
  --allow-unauthenticated
--allow-unauthenticated 部署選項可讓您不必驗證就能使用應用程式。--platform managed \ 部署選項表示您要求的是全代管環境 (而非透過 Anthos 取得 Kubernetes 基礎架構)。
稍候片刻,等待部署作業完成。完成後,指令列會顯示服務網址。
Service [helloworld] revision [helloworld-00001] has been deployed
and is serving traffic at https://helloworld-wdl7fdwaaa-uc.a.run.app
您現在可以在網路瀏覽器中開啟服務網址,造訪您所部署的容器:

Cloud Run 會自動水平擴充您的容器映像檔,以處理收到的要求,然後在需求減少時縮減規模。您只需要支付處理要求期間使用的 CPU、記憶體和網路費用。
不使用服務時,Cloud Run 不會收費,但您可能仍須支付儲存所建構之容器映像檔的費用。
如要避免產生費用,您可以刪除 Google Cloud 專案,這樣一來,系統就會停止對該專案中使用的所有資源計費。此外,也可以直接執行下列指令刪除 helloworld 映像檔:
gcloud container images delete gcr.io/$GOOGLE_CLOUD_PROJECT/helloworld
如要刪除 Cloud Run 服務,請使用下列指令:
gcloud run services delete helloworld \
  --platform managed \
  --region us-central1
恭喜!您已將一個封裝在容器映像檔中的應用程式部署到 Cloud Run。
瞭解詳情
建議您接下來參閱「快速入門:部署至 Google Cloud 中的 Cloud Run for Anthos」。
如要進一步瞭解如何從程式碼來源建構適用於 Cloud Run 的無狀態 HTTP 容器,並推送至 Container Registry,請參閱下列資源:
如要進一步瞭解基礎開放原始碼專案 Knative,請參閱 Knative。