
在本程式碼研究室中,我們將瞭解如何建立相機應用程式,使用 CameraX 顯示觀景窗、拍攝相片,以及分析相機的圖片串流。
為此,我們將介紹 CameraX 中的用途概念,可用於各種相機作業,從顯示觀景窗到即時分析影格皆可。
學習內容
- 如何新增 CameraX 依附元件。
- 如何在活動中顯示攝影機預覽畫面。(預覽用途)
- 如何拍照並儲存到儲存空間。(ImageCapture 用途)
- 如何即時分析攝影機的影格。(ImageAnalysis 應用實例)
所需硬體
- Android 裝置 (Android Studio 的模擬器也沒問題)。支援的最低 API 級別為 21。
所需軟體
- Android Studio 3.3 以上版本。
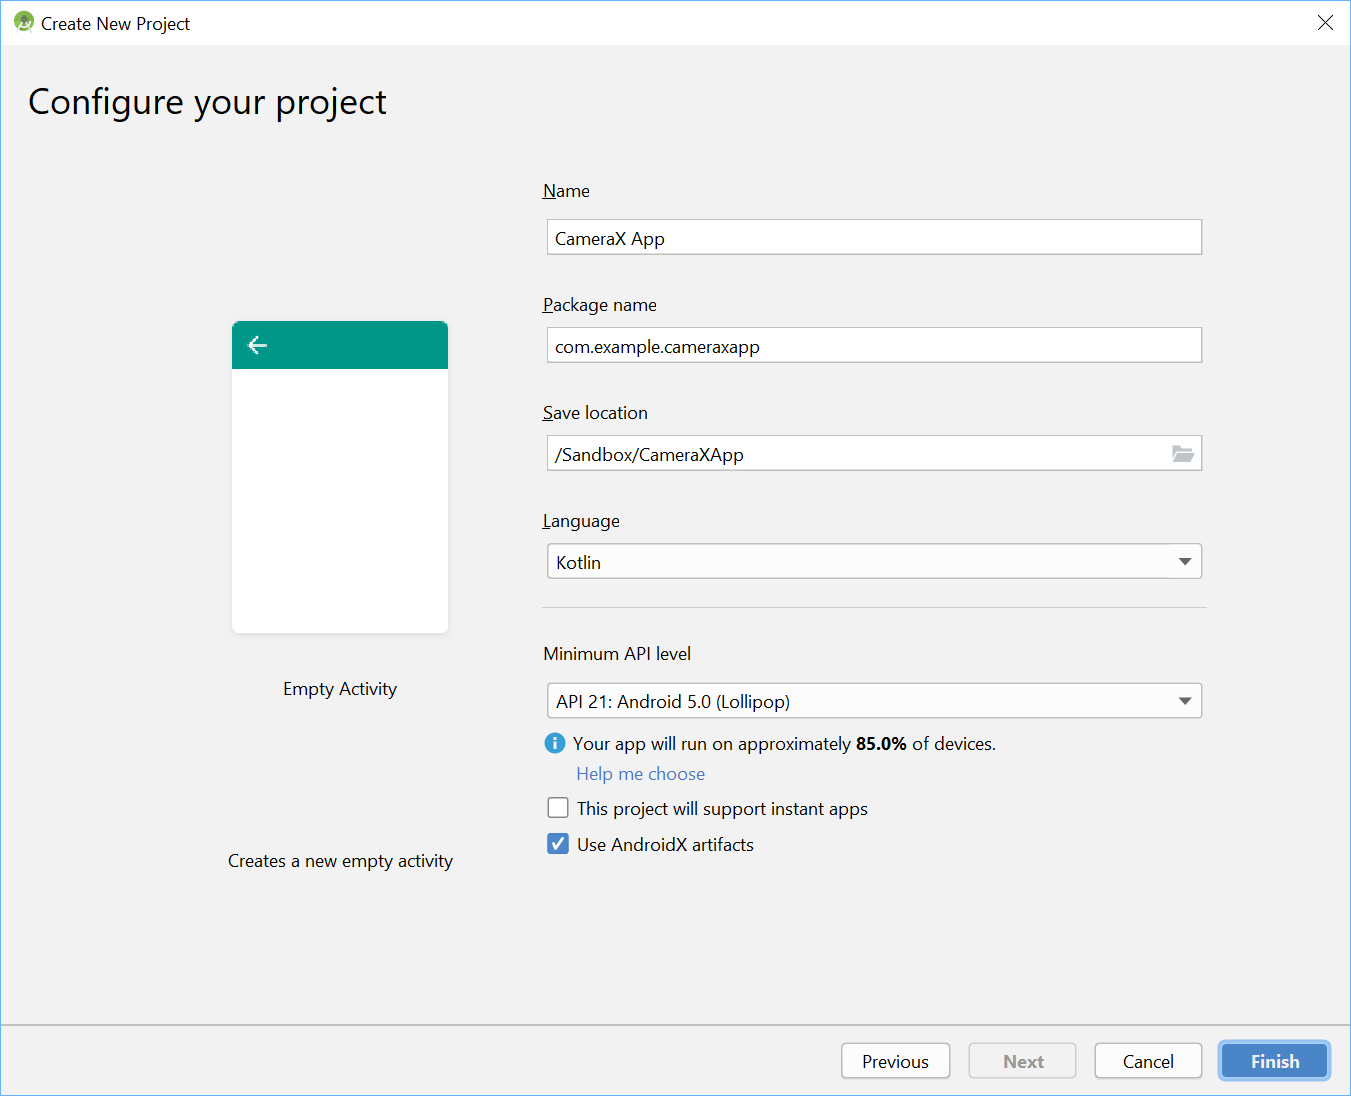
使用 Android Studio 選單啟動新專案,並在系統提示時選取「Empty Activity」。

接著,我們可以選擇任何想要的名稱,我們巧妙地選擇了「CameraX App」。請務必將語言設為 Kotlin,最低 API 級別設為 21 (這是 CameraX 的最低需求),並使用 AndroidX 構件。
首先,請在應用程式 Gradle 檔案的依附元件 部分中,加入 CameraX 依附元件:

// Use the most recent version of CameraX, currently that is alpha04
def camerax_version = "1.0.0-alpha04"
implementation "androidx.camera:camera-core:${camerax_version}"
implementation "androidx.camera:camera-camera2:${camerax_version}"出現提示時,按一下「立即同步」,即可在應用程式中使用 CameraX。
我們將使用 SurfaceTexture 顯示相機觀景窗。在本程式碼研究室中,我們會以固定大小的正方形格式顯示觀景窗。如需顯示回應式觀景窗的更完整範例,請參閱官方範例。
編輯 res > layout > activity_main.xml 下的 activity_main 版面配置檔案:

<?xml version="1.0" encoding="utf-8"?>
<androidx.constraintlayout.widget.ConstraintLayout
        xmlns:android="http://schemas.android.com/apk/res/android"
        xmlns:tools="http://schemas.android.com/tools"
        xmlns:app="http://schemas.android.com/apk/res-auto"
        android:layout_width="match_parent"
        android:layout_height="match_parent"
        tools:context=".MainActivity">

    <TextureView
            android:id="@+id/view_finder"
            android:layout_width="640px"
            android:layout_height="640px"
            app:layout_constraintTop_toTopOf="parent"
            app:layout_constraintBottom_toBottomOf="parent"
            app:layout_constraintStart_toStartOf="parent"
            app:layout_constraintEnd_toEndOf="parent" />

</androidx.constraintlayout.widget.ConstraintLayout>
在專案中新增任何使用相機的功能時,要求適當的 CAMERA 權限是至關重要的一環。首先,我們必須在資訊清單中宣告這些權限,且必須在 Application 標記之前:
<uses-permission android:name="android.permission.CAMERA" />接著,我們需要在 MainActivity 內要求執行階段權限。我們將在「java」>「com.example.cameraxapp」>「MainActivity.kt」下的 MainActivity 檔案中進行變更:

在檔案頂端的 MainActivity 類別定義之外,新增下列常數和匯入項目:
// Your IDE likely can auto-import these classes, but there are several
// different implementations so we list them here to disambiguate
import android.Manifest
import android.util.Size
import android.graphics.Matrix
import java.util.concurrent.TimeUnit

// This is an arbitrary number we are using to keep tab of the permission
// request. Where an app has multiple context for requesting permission,
// this can help differentiate the different contexts
private const val REQUEST_CODE_PERMISSIONS = 10

// This is an array of all the permission specified in the manifest
private val REQUIRED_PERMISSIONS = arrayOf(Manifest.permission.CAMERA)
在 MainActivity 類別中,加入下列欄位和輔助方法,用於要求權限,並在確認所有權限都已授予後觸發程式碼:
class MainActivity : AppCompatActivity(), LifecycleOwner {

    override fun onCreate(savedInstanceState: Bundle?) {
        ...
    }

    // Add this after onCreate

    private lateinit var viewFinder: TextureView

    private fun startCamera() {
        // TODO: Implement CameraX operations
    }

    private fun updateTransform() {
        // TODO: Implement camera viewfinder transformations
    }

    /**
     * Process result from permission request dialog box, has the request
     * been granted? If yes, start Camera. Otherwise display a toast
     */
    override fun onRequestPermissionsResult(
        requestCode: Int, permissions: Array<String>, grantResults: IntArray) {
        if (requestCode == REQUEST_CODE_PERMISSIONS) {
            if (allPermissionsGranted()) {
                viewFinder.post { startCamera() }
            } else {
                Toast.makeText(this,
                    "Permissions not granted by the user.",
                    Toast.LENGTH_SHORT).show()
                finish()
            }
        }
    }

    /**
     * Check if all permission specified in the manifest have been granted
     */
    private fun allPermissionsGranted() = REQUIRED_PERMISSIONS.all {
        ContextCompat.checkSelfPermission(
               baseContext, it) == PackageManager.PERMISSION_GRANTED
    }
}
最後,我們將所有內容放在 onCreate 中,在適當時間觸發權限要求:
override fun onCreate(savedInstanceState: Bundle?) {
    ...

    // Add this at the end of onCreate function

    viewFinder = findViewById(R.id.view_finder)

    // Request camera permissions
    if (allPermissionsGranted()) {
        viewFinder.post { startCamera() }
    } else {
        ActivityCompat.requestPermissions(
            this, REQUIRED_PERMISSIONS, REQUEST_CODE_PERMISSIONS)
    }

    // Every time the provided texture view changes, recompute layout
    viewFinder.addOnLayoutChangeListener { _, _, _, _, _, _, _, _, _ ->
        updateTransform()
    }
}
現在,應用程式啟動時會檢查是否具有適當的相機權限。如果支援,就會直接呼叫 `startCamera()`。否則,系統會要求權限,並在授予權限後呼叫 `startCamera()`。
對大多數相機應用程式而言,向使用者顯示觀景窗非常重要,否則使用者很難將相機對準正確位置。您可以使用 CameraX 的 `Preview` 類別實作觀景窗。
如要使用「預覽」,我們需要先定義設定,然後用來建立用途的執行個體。產生的執行個體就是我們需要繫結至 CameraX 生命週期的項目。我們會在 `startCamera()` 方法中執行這項操作,請填寫下列程式碼來實作:
private fun startCamera() {

    // Create configuration object for the viewfinder use case
    val previewConfig = PreviewConfig.Builder().apply {
        setTargetAspectRatio(Rational(1, 1))
        setTargetResolution(Size(640, 640))
    }.build()

    // Build the viewfinder use case
    val preview = Preview(previewConfig)

    // Every time the viewfinder is updated, recompute layout
    preview.setOnPreviewOutputUpdateListener {

        // To update the SurfaceTexture, we have to remove it and re-add it
        val parent = viewFinder.parent as ViewGroup
        parent.removeView(viewFinder)
        parent.addView(viewFinder, 0)

        viewFinder.surfaceTexture = it.surfaceTexture
        updateTransform()
    }

    // Bind use cases to lifecycle
    // If Android Studio complains about "this" being not a LifecycleOwner
    // try rebuilding the project or updating the appcompat dependency to
    // version 1.1.0 or higher.
    CameraX.bindToLifecycle(this, preview)
}
此時,我們需要實作神秘的 `updateTransform()` 方法。`updateTransform()` 的目標是補償裝置方向的變化,以直向旋轉顯示觀景窗:
private fun updateTransform() {
    val matrix = Matrix()

    // Compute the center of the view finder
    val centerX = viewFinder.width / 2f
    val centerY = viewFinder.height / 2f

    // Correct preview output to account for display rotation
    val rotationDegrees = when(viewFinder.display.rotation) {
        Surface.ROTATION_0 -> 0
        Surface.ROTATION_90 -> 90
        Surface.ROTATION_180 -> 180
        Surface.ROTATION_270 -> 270
        else -> return
    }
    matrix.postRotate(-rotationDegrees.toFloat(), centerX, centerY)

    // Finally, apply transformations to our TextureView
    viewFinder.setTransform(matrix)
}如要實作可供發布的應用程式,請參閱官方範例,瞭解還需要處理哪些事項。為縮短本程式碼研究室的長度,我們將採取一些捷徑。舉例來說,我們不會追蹤某些設定變更,例如 180 度的裝置旋轉,因為這不會觸發版面配置變更監聽器。非正方形觀景窗也需要補償裝置旋轉時的長寬比變化。
建構並執行應用程式後,現在應該會看到即時預覽畫面。太棒了!

如要讓使用者拍攝圖片,我們會在 res > layout > activity_main.xml 的紋理檢視區塊後,提供按鈕做為版面配置的一部分:
<ImageButton
        android:id="@+id/capture_button"
        android:layout_width="72dp"
        android:layout_height="72dp"
        android:layout_margin="24dp"
        app:srcCompat="@android:drawable/ic_menu_camera"
        app:layout_constraintBottom_toBottomOf="parent"
        app:layout_constraintEnd_toEndOf="parent"
        app:layout_constraintStart_toStartOf="parent" />
其他用途的運作方式與「預覽」非常相似。首先,我們必須定義設定物件,用於例項化實際的用途物件。如要拍攝相片,當按下拍攝按鈕時,我們需要更新 `startCamera()` 方法,並在呼叫 CameraX.bindToLifecycle 之前,在結尾處新增幾行程式碼:
private fun startCamera() {

    ...

    // Add this before CameraX.bindToLifecycle

    // Create configuration object for the image capture use case
    val imageCaptureConfig = ImageCaptureConfig.Builder()
        .apply {
            setTargetAspectRatio(Rational(1, 1))
            // We don't set a resolution for image capture; instead, we
            // select a capture mode which will infer the appropriate
            // resolution based on aspect ration and requested mode
            setCaptureMode(ImageCapture.CaptureMode.MIN_LATENCY)
    }.build()

    // Build the image capture use case and attach button click listener
    val imageCapture = ImageCapture(imageCaptureConfig)
    findViewById<ImageButton>(R.id.capture_button).setOnClickListener {
        val file = File(externalMediaDirs.first(),
            "${System.currentTimeMillis()}.jpg")
        imageCapture.takePicture(file,
            object : ImageCapture.OnImageSavedListener {
            override fun onError(error: ImageCapture.UseCaseError,
                                 message: String, exc: Throwable?) {
                val msg = "Photo capture failed: $message"
                Toast.makeText(baseContext, msg, Toast.LENGTH_SHORT).show()
                Log.e("CameraXApp", msg)
                exc?.printStackTrace()
            }

            override fun onImageSaved(file: File) {
                val msg = "Photo capture succeeded: ${file.absolutePath}"
                Toast.makeText(baseContext, msg, Toast.LENGTH_SHORT).show()
                Log.d("CameraXApp", msg)
            }
        })
    }

    // Bind use cases to lifecycle
    // If Android Studio complains about "this" being not a LifecycleOwner
    // try rebuilding the project or updating the appcompat dependency to
    // version 1.1.0 or higher.
    CameraX.bindToLifecycle(this, preview)
}
接著,更新對 CameraX.bindToLifecycle 的呼叫,加入新的用途:
CameraX.bindToLifecycle(this, preview, imageCapture)這樣就實作了可正常運作的拍照按鈕。

CameraX 的 ImageAnalysis 類別是一項非常有趣的功能。我們可以定義實作 ImageAnalysis.Analyzer 介面的自訂類別,並使用傳入的攝影機影格呼叫該類別。與 CameraX 的核心願景一致,我們不必擔心管理相機工作階段狀態,甚至不必處置圖片;只要繫結至應用程式所需的生命週期,就足以像其他生命週期感知元件一樣運作。
首先,我們會實作自訂圖片分析器。我們的分析器相當簡單,只會記錄圖片的平均亮度,但可做為任意複雜用途的範例。我們只需要在實作 ImageAnalysis.Analyzer 介面的類別中,覆寫 `analyze` 函式即可。我們可以將實作內容定義為 MainActivity 中的內部類別:
private class LuminosityAnalyzer : ImageAnalysis.Analyzer {
    private var lastAnalyzedTimestamp = 0L

    /**
     * Helper extension function used to extract a byte array from an
     * image plane buffer
     */
    private fun ByteBuffer.toByteArray(): ByteArray {
        rewind()    // Rewind the buffer to zero
        val data = ByteArray(remaining())
        get(data)   // Copy the buffer into a byte array
        return data // Return the byte array
    }

    override fun analyze(image: ImageProxy, rotationDegrees: Int) {
        val currentTimestamp = System.currentTimeMillis()
        // Calculate the average luma no more often than every second
        if (currentTimestamp - lastAnalyzedTimestamp >=
            TimeUnit.SECONDS.toMillis(1)) {
            // Since format in ImageAnalysis is YUV, image.planes[0]
            // contains the Y (luminance) plane
            val buffer = image.planes[0].buffer
            // Extract image data from callback object
            val data = buffer.toByteArray()
            // Convert the data into an array of pixel values
            val pixels = data.map { it.toInt() and 0xFF }
            // Compute average luminance for the image
            val luma = pixels.average()
            // Log the new luma value
            Log.d("CameraXApp", "Average luminosity: $luma")
            // Update timestamp of last analyzed frame
            lastAnalyzedTimestamp = currentTimestamp
        }
    }
}
由於我們的類別實作了 ImageAnalysis.Analyzer 介面,因此我們只需要像其他用途一樣例項化 ImageAnalysis,然後再次更新 `startCamera()` 函式,再呼叫 CameraX.bindToLifecycle:
private fun startCamera() {

    ...

    // Add this before CameraX.bindToLifecycle

    // Setup image analysis pipeline that computes average pixel luminance
    val analyzerConfig = ImageAnalysisConfig.Builder().apply {
        // Use a worker thread for image analysis to prevent glitches
        val analyzerThread = HandlerThread(
            "LuminosityAnalysis").apply { start() }
        setCallbackHandler(Handler(analyzerThread.looper))
        // In our analysis, we care more about the latest image than
        // analyzing *every* image
        setImageReaderMode(
            ImageAnalysis.ImageReaderMode.ACQUIRE_LATEST_IMAGE)
    }.build()

    // Build the image analysis use case and instantiate our analyzer
    val analyzerUseCase = ImageAnalysis(analyzerConfig).apply {
        analyzer = LuminosityAnalyzer()
    }

    // Bind use cases to lifecycle
    // If Android Studio complains about "this" being not a LifecycleOwner
    // try rebuilding the project or updating the appcompat dependency to
    // version 1.1.0 or higher.
    CameraX.bindToLifecycle(this, preview, imageCapture)
}
我們也會更新對 CameraX.bindtoLifecycle 的呼叫,以繫結新的用途:
CameraX.bindToLifecycle(
    this, preview, imageCapture, analyzerUseCase)
現在執行應用程式時,logcat 大約每秒會產生類似以下的訊息:
D/CameraXApp: Average luminosity: ...如要測試應用程式,只需在 Android Studio 中按一下「Run」按鈕,專案就會在所選裝置或模擬器中建構、部署及啟動。應用程式載入後,我們應該會看到觀景窗,即使旋轉裝置,觀景窗也會保持直立,這要歸功於我們稍早新增的方向處理程式碼,而且應該也能使用按鈕拍照:

您已順利完成程式碼研究室!回顧一下,您從頭開始,在新 Android 應用程式中實作了下列項目:
- 在專案中加入 CameraX 依附元件。
- 顯示相機觀景窗 (使用預覽用途)
- 實作相片擷取功能,將圖片儲存至儲存空間 (使用 ImageCapture 用途)
- 即時分析攝影機的影格 (使用 ImageAnalysis 應用實例)