
Il tipo Collegamento OAuth supporta due flussi OAuth 2.0 standard di settore, i flussi implicito e codice di autorizzazione.
Nel flusso del codice implicito, Google apre il tuo endpoint di autorizzazione nel browser dell'utente. Dopo aver eseguito l'accesso, restituisci a Google un token di accesso di lunga durata. Questo token di accesso è ora incluso in ogni richiesta inviata dall'assistente alla tua azione.
Nel flusso del codice di autorizzazione, sono necessari due endpoint:
- L'endpoint di autorizzazione, che è responsabile della presentazione dell'interfaccia utente di accesso agli utenti che non hanno ancora eseguito l'accesso, nonché della registrazione del consenso all'accesso richiesto sotto forma di codice di autorizzazione di breve durata.
- L'endpoint token scambio, che è responsabile di due tipi di scambi:
- Scambia un codice di autorizzazione con un token di aggiornamento di lunga durata e un token di accesso di breve durata. Questo scambio avviene quando l'utente esegue il flusso di collegamento dell'account.
- Scambia un token di aggiornamento di lunga durata con un token di accesso di breve durata. Questa piattaforma di scambio avviene quando Google ha bisogno di un nuovo token di accesso perché quello scaduto.
Anche se il flusso del codice implicito è più facile da implementare, Google consiglia che i token di accesso emessi utilizzando il flusso implicito non scadano mai, perché l'uso della scadenza del token con il flusso implicito obbliga l'utente a collegare di nuovo il proprio account. Se per motivi di sicurezza è necessaria la scadenza del token, ti consigliamo di utilizzare il flusso del codice di autenticazione.
Implementare il collegamento all'account OAuth
Configurare il progetto
Per configurare il progetto in modo che utilizzi il collegamento OAuth:
- Apri la console Actions e seleziona il progetto che vuoi utilizzare.
- Fai clic sulla scheda Sviluppa e scegli Collegamento dell'account.
- Attiva l'opzione accanto a Collegamento degli account.
- Nella sezione Creazione account, seleziona No, voglio consentire la creazione di account solo sul mio sito web.
In Tipo di collegamento, seleziona OAuth e Implicito.
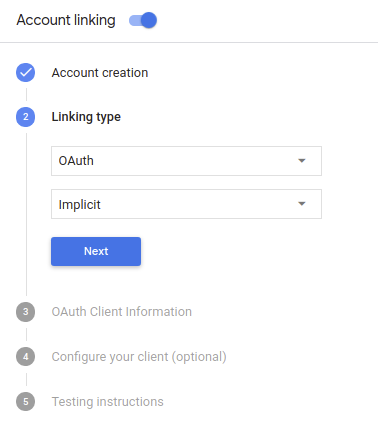
In Informazioni sul cliente:
- Assegna un valore a ID client emesso da Actions on Google per identificare le richieste provenienti da Google.
- Inserisci gli URL per gli endpoint di autorizzazione e scambio di token.
- Fai clic su Salva.
Implementa il server OAuth
Per supportare il flusso implicito OAuth 2.0, il servizio effettua un'autorizzazione endpoint disponibile tramite HTTPS. Questo endpoint è responsabile dell'autenticazione e ottenere il consenso degli utenti per l'accesso ai dati. Endpoint di autorizzazione presenta una UI di accesso agli utenti che non hanno ancora effettuato l'accesso e registra acconsentire all'accesso richiesto.
Se l'Azione deve chiamare una delle API autorizzate del tuo servizio, Google utilizza per ottenere l'autorizzazione degli utenti per chiamare queste API sui loro per conto tuo.
Una tipica sessione di flusso implicito OAuth 2.0 avviata da Google ha flusso seguente:
- Google apre il tuo endpoint di autorizzazione nel browser dell'utente. La l'utente accede se non l'ha già fatto e concede a Google l'autorizzazione ad accedere i propri dati con l'API, se non hanno già concesso l'autorizzazione.
- Il servizio crea un token di accesso e lo restituisce a Google reindirizzando il browser dell'utente a Google tramite il token di accesso in allegato alla richiesta.
- Google chiama le API del tuo servizio e collega il token di accesso con per ogni richiesta. Il tuo servizio verifica che il token di accesso conceda a Google l'autorizzazione ad accedere all'API e quindi completa la chiamata API.
Gestire le richieste di autorizzazione
Se l'azione deve eseguire il collegamento dell'account tramite un flusso implicito OAuth 2.0, Google invia l'utente al tuo endpoint di autorizzazione con una richiesta che include i seguenti parametri:
| Parametri endpoint di autorizzazione | |
|---|---|
client_id |
L'ID client che hai assegnato a Google. |
redirect_uri |
L'URL a cui invii la risposta a questa richiesta. |
state |
Un valore di riferimento che viene restituito a Google invariato nelle URI di reindirizzamento. |
response_type |
Il tipo di valore da restituire nella risposta. Per il token OAuth 2.0 implicito,
il tipo di risposta è sempre token. |
Ad esempio, se l'endpoint di autorizzazione è disponibile all'indirizzo https://myservice.example.com/auth,
una richiesta potrebbe avere il seguente aspetto:
GET https://myservice.example.com/auth?client_id=GOOGLE_CLIENT_ID&redirect_uri=REDIRECT_URI&state=STATE_STRING&response_type=token
Affinché l'endpoint di autorizzazione possa gestire le richieste di accesso, segui questi passaggi:
Verifica i valori
client_ideredirect_uriper evitare di concedere l'accesso ad app client indesiderate o configurate in modo errato:- Verifica che il
client_idcorrisponda all'ID cliente che hai indicato assegnati a Google. - Verifica che l'URL specificato dal
redirect_uriha il seguente formato:https://oauth-redirect.googleusercontent.com/r/YOUR_PROJECT_ID
- Verifica che il
Verifica se l'utente ha eseguito l'accesso al tuo servizio. Se l'utente non ha firmato completa la procedura di accesso o registrazione al servizio.
Genera un token di accesso che Google utilizzerà per accedere alla tua API. La il token di accesso può essere qualsiasi valore di stringa, ma deve rappresentare in modo univoco l'utente e il client a cui è destinato il token e non deve essere prevedibile.
Invia una risposta HTTP che reindirizza il browser dell'utente all'URL specificato dal parametro
redirect_uri. Includi tutti i seguenti parametri nel frammento URL:access_token: il token di accesso che hai appena generatotoken_type: la stringabearerstate: il valore dello stato non modificato dell'originale richiesta Di seguito è riportato un esempio dell'URL risultante:https://oauth-redirect.googleusercontent.com/r/YOUR_PROJECT_ID#access_token=ACCESS_TOKEN&token_type=bearer&state=STATE_STRING
Il gestore del reindirizzamento OAuth 2.0 di Google riceverà il token di accesso e confermerà
che il valore state sia rimasto invariato. Dopo che Google ha ottenuto
di accesso al tuo servizio, Google lo collegherà alle chiamate successive
all'Azione nell'ambito di AppRequest.
Progettare l'interfaccia utente vocale per il flusso di autenticazione
Verifica se l'utente è verificato e avvia il flusso di collegamento degli account
- Apri il progetto Actions Builder nella console Actions.
- Crea una nuova scena per avviare il collegamento dell'account nella tua azione:
- Fai clic su Scene.
- Fai clic sull'icona Aggiungi (+) per aggiungere una nuova scena.
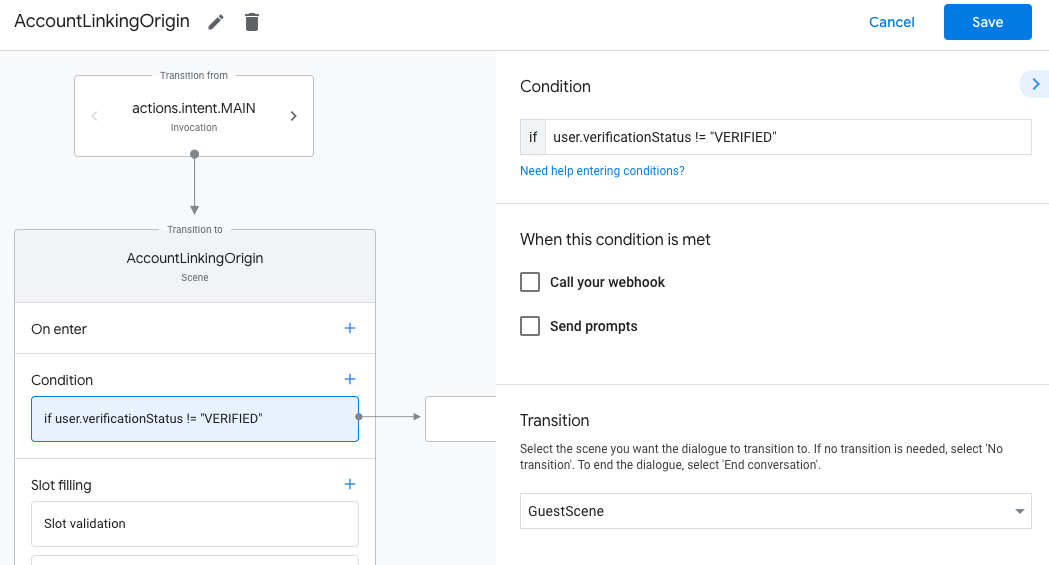
- Nella scena appena creata, fai clic sull'icona Aggiungi add per Condizioni.
- Aggiungi una condizione che verifichi se l'utente associato alla conversazione è un
utente verificato. Se il controllo non va a buon fine, l'Azione non può eseguire il collegamento dell'account
durante la conversazione e deve ripiegare sull'accesso
a funzionalità che non richiedono il collegamento dell'account.
- Nel campo
Enter new expressionin Condizione, inserisci la seguente logica:user.verificationStatus != "VERIFIED" - In Transizione, seleziona una scena che non richiede il collegamento dell'account o una scena che è il punto di accesso alla funzionalità solo per gli ospiti.
- Nel campo
- Fai clic sull'icona di aggiunta add per Condizioni.
- Aggiungi una condizione per attivare un flusso di collegamento dell'account se l'utente non ha
un'identità associata.
- Nel campo
Enter new expressionin Condizione, inserisci la seguente logica:user.verificationStatus == "VERIFIED" - Nella sezione Transizione, seleziona la scena di sistema Collegamento dell'account.
- Fai clic su Salva.
- Nel campo
![]()
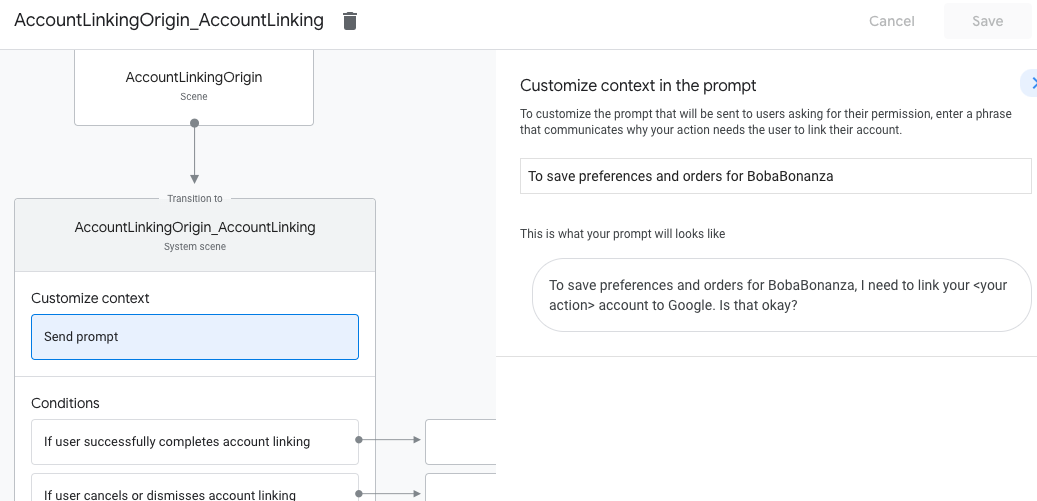
Dopo il salvataggio, al progetto viene aggiunta una nuova scena del sistema di collegamento degli account chiamata <SceneName>_AccountLinking.
Personalizzare la scena di collegamento degli account
- Nella sezione Scene, seleziona la scena del sistema di collegamento degli account.
- Fai clic su Invia prompt e aggiungi una breve frase per descrivere all'utente perché l'azione deve accedere alla sua identità (ad esempio "Per salvare le tue preferenze").
- Fai clic su Salva.
- In Condizioni, fai clic su Se l'utente completa correttamente il collegamento degli account.
- Configura la modalità di avanzamento del flusso se l'utente accetta di collegare il proprio account. Ad esempio, chiama il webhook per elaborare qualsiasi logica di business personalizzata richiesta e torna alla scena di origine.
- Fai clic su Salva.
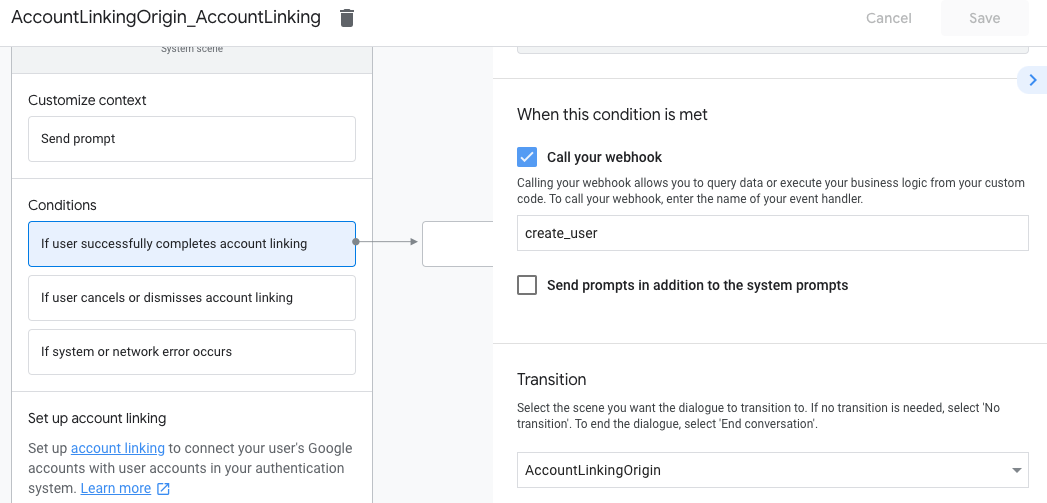
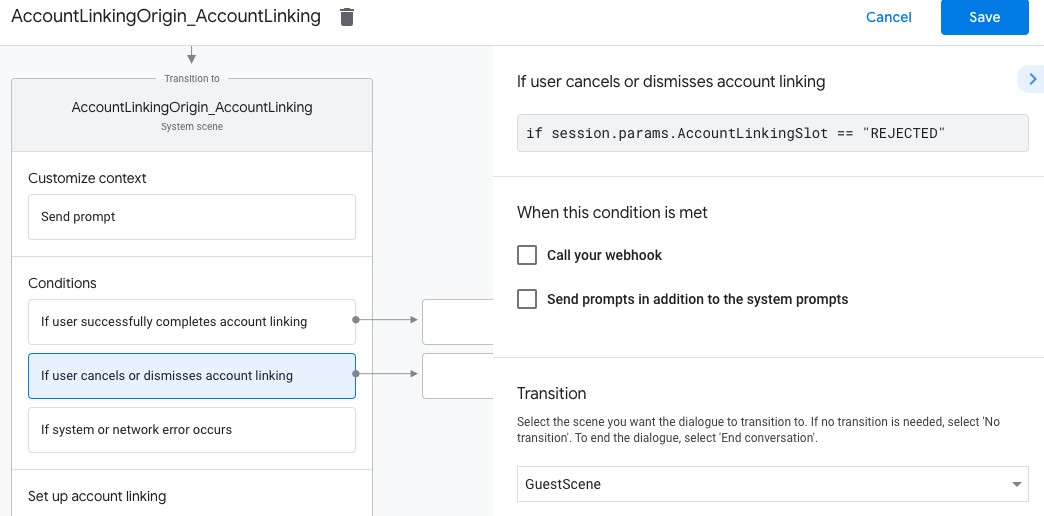
- Nella sezione Condizioni, fai clic su Se l'utente annulla o ignora il collegamento all'account.
- Configura la modalità di procedere del flusso se l'utente non accetta di collegare il proprio account. Ad esempio, invia un messaggio di conferma e reindirizza alle scene che forniscono funzionalità che non richiedono il collegamento dell'account.
- Fai clic su Salva.
- Nella sezione Condizioni, fai clic su Se si verifica un errore di sistema o di rete.
- Configura la modalità di procedere del flusso se il flusso di collegamento dell'account non può essere completato a causa di errori di sistema o di rete. Ad esempio, invia un messaggio di conferma e reindirizza alle scene che forniscono funzionalità che non richiedono il collegamento dell'account.
- Fai clic su Salva.
Gestire le richieste di accesso ai dati
Se la richiesta dell'assistente contiene un token di accesso, verifica innanzitutto che il token di accesso sia valido (e non scaduto), quindi recupera l'account utente associato dal tuo database.