
סוג הקישור OAuth תומך בשני תהליכים מקובלים בתחום של OAuth 2.0: התהליך המרומז והתהליך של קוד הרשאה.
בתהליך הקוד המשתמע, Google פותחת את נקודת הקצה של ההרשאה בדפדפן של המשתמש. אחרי שהכניסה לחשבון תושלם בהצלחה, תקבלו מ-Google אסימון גישה לטווח ארוך. אסימון הגישה הזה כלול עכשיו בכל בקשה שנשלחת מ-Assistant לפעולה שלך.
בתהליך הקוד של ההרשאה, נדרשות שתי נקודות קצה:
- נקודת הקצה הרשאה, שאחראית להצגת ממשק המשתמש לכניסה למשתמשים שעדיין לא נכנסו לחשבון, ולתעד הסכמה לגישה המבוקשת כקוד הרשאה לטווח קצר.
- נקודת הקצה להחלפה באסימון, שאחראית לשני סוגים של חילופי הודעות:
- החלפה של קוד הרשאה באסימון רענון לטווח ארוך ובאסימון גישה לטווח קצר. ההחלפה הזו מתרחשת כשהמשתמש עובר את התהליך של קישור החשבון.
- החלפה של אסימון רענון לטווח ארוך באסימון גישה לטווח קצר. ההחלפה הזו מתרחשת כש-Google צריכה אסימון גישה חדש, כי פג התוקף של האסימון שפג תוקפו.
אומנם קל יותר להטמיע את תהליך הקוד המשתמע, אבל ב-Google מומלץ שאף פעם לא יפוג התוקף של אסימוני גישה שהונפקו באמצעות הזרימה המשתמעת, כי השימוש בתפוגת האסימון באמצעות התהליך המשתמע מחייב לאלץ את המשתמש לקשר שוב את החשבון. אם אתם זקוקים לתפוגת תוקף של אסימון מטעמי אבטחה, כדאי מאוד להשתמש בתהליך קוד האימות במקום זאת.
הטמעה של קישור לחשבון OAuth
הגדרת הפרויקט
כדי להגדיר את הפרויקט לשימוש בקישור OAuth, פועלים לפי השלבים הבאים:
- פותחים את Actions Console ובוחרים את הפרויקט שרוצים להשתמש בו.
- לוחצים על הכרטיסייה פיתוח ובוחרים באפשרות קישור חשבונות.
- מפעילים את המתג לצד קישור חשבונות.
- בקטע יצירת חשבון, בוחרים באפשרות לא, אני רוצה לאפשר יצירת חשבון רק באתר שלי.
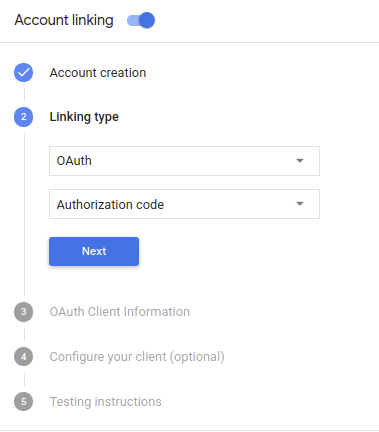
בקטע סוג הקישור, בוחרים באפשרות OAuth ואז באפשרות קוד הרשאה.
בקטע Client Information:
- מקצים ערך למזהה הלקוח שהונפק על ידי Actions on Google כדי לזהות בקשות שמגיעות מ-Google.
- חשוב לשים לב לערך של מזהה הלקוח שהונפק על ידי Google לפעולות:
- מזינים את כתובות ה-URL של נקודות הקצה של ההרשאה ושל החלפת הטוקנים.
- לוחצים על שמירה.
הטמעת שרת OAuth
הטמעה של שרת OAuth 2.0 של זרימת קוד ההרשאה מורכבת שתי נקודות קצה, שהשירות שלך מספק באמצעות HTTPS. נקודת הקצה הראשונה היא נקודת הקצה של ההרשאה, שאחראית למצוא או להשיג הסכמה של משתמשים לקבלת גישה לנתונים. נקודת הקצה להרשאה מציגה פרטי כניסה למשתמשים באתר שלכם שעדיין לא מחוברים לחשבון, ומתעדים הסכמה נשלחה בקשת גישה. נקודת הקצה השנייה היא נקודת הקצה של המרת אסימונים, שמשמשות לקבלת מחרוזות מוצפנות שנקראות אסימונים שמאשרים את המשתמש בפעולה כדי לגשת לשירות.
כשהפעולה צריכה להפעיל את אחד מממשקי ה-API של השירות, Google משתמשת בהם נקודות קצה (endpoints) יחד כדי לקבל הרשאה מהמשתמשים לקרוא לממשקי ה-API האלה בשם.
סשן זרימת קוד אימות OAuth 2.0 ש-Google יזמה:
- Google פותחת את נקודת הקצה להרשאה בדפדפן של המשתמש. אם התהליך התחיל במכשיר שמיועד לקול בלבד עבור פעולה, Google תעביר את בטלפון.
המשתמש נכנס לחשבון (אם הוא עדיין לא מחובר) ומעניק ל-Google הרשאה לגשת לנתונים שלהם באמצעות ה-API, אם הם עדיין לא העניקו הרשאה.
השירות שלכם יוצר קוד הרשאה ומחזיר אותו ל-Google באמצעות הפניה אוטומטית של דפדפן המשתמש חזרה אל Google, באמצעות קוד ההרשאה. שמצורף לבקשה.
Google שולחת את קוד ההרשאה לנקודת הקצה של המרת האסימון, מאמת את האותנטיות של הקוד ומחזיר אסימון גישה, רענון של אסימון. אסימון הגישה הוא אסימון לטווח קצר שהשירות שלך מקבל כפרטי כניסה לגישה לממשקי API. אסימון הרענון הוא לטווח ארוך אסימון ש-Google יכולה לאחסן ולהשתמש בו כדי לקבל אסימוני גישה חדשים כשהם שפג תוקפן.
אחרי שהמשתמש משלים את תהליך קישור החשבון, כל קישור שנשלחה מ-Assistant ל-webhook של מילוי הבקשה, מכילה אסימון גישה.
טיפול בבקשות הרשאה
מתי הפעולה צריכה לבצע קישור חשבונות באמצעות קוד הרשאה מסוג OAuth 2.0 Google שולחת את המשתמש לנקודת הקצה (endpoint) של ההרשאה בבקשה כוללת את הפרמטרים הבאים:
| פרמטרים של נקודת קצה להרשאה | |
|---|---|
client_id |
מזהה הלקוח ב-Google שרשמתם ב-Google. |
redirect_uri |
כתובת ה-URL שאליה שולחים את התגובה לבקשה הזו. |
state |
ערך של ניהול חשבונות שמועבר אל Google ללא שינוי URI להפניה אוטומטית. |
scope |
אופציונלי: קבוצה מופרדת ברווחים של מחרוזות היקף שמציינות את התג הנתונים ש-Google מבקשת עבורם הרשאה. |
response_type |
המחרוזת code. |
לדוגמה, אם נקודת הקצה להרשאה זמינה ב-https://myservice.example.com/auth,
בקשה עשויה להיראות כך:
GET https://myservice.example.com/auth?client_id=GOOGLE_CLIENT_ID&redirect_uri=REDIRECT_URI&state=STATE_STRING&scope=REQUESTED_SCOPES&response_type=code
כדי שנקודת הקצה להרשאה תטפל בבקשות כניסה, מבצעים את השלבים הבאים:
צריך לוודא שה-
client_idתואם למזהה הלקוח ב-Google שאיתו נרשמת של Google, ושה-redirect_uriתואם לכתובת ה-URL להפניה אוטומטית ש-Google סיפקה לשירות שלך. הבדיקות האלה חשובות כדי למנוע הענקת גישה אל אפליקציות לקוח לא מכוונות או שהוגדרו באופן שגוי.אם אתם תומכים בכמה תהליכי OAuth 2.0, צריך גם לוודא
response_typeהיאcode.לבדוק אם המשתמש נכנס לשירות. אם המשתמש לא מחובר, להשלים את תהליך הכניסה או ההרשמה לשירות.
יוצרים קוד הרשאה שישמש את Google כדי לגשת ל-API. קוד ההרשאה יכול להיות כל ערך מחרוזת, אבל הוא חייב להיות ייחודי שמייצג את המשתמש, את הלקוח שעבורו האסימון מיועד ואת תאריך התפוגה של הקוד זמן אחר, ואסור לנחש אותו. בדרך כלל אתם מנפיקים הרשאה קודים שהתוקף שלהם פג לאחר כ-10 דקות.
מוודאים שכתובת ה-URL שצוינה על ידי הפרמטר
redirect_uriנראה כך:https://oauth-redirect.googleusercontent.com/r/YOUR_PROJECT_ID
מפנים את דפדפן המשתמש לכתובת ה-URL שצוינה ב- הפרמטר
redirect_uri. מוסיפים את קוד ההרשאה שנוצר עכשיו והערך של המצב המקורי שלא השתנה כאשר מבצעים הפניה אוטומטית על ידי הוספת הפרמטריםcodeו-state. זאת דוגמה של כתובת ה-URL שתתקבל:https://oauth-redirect.googleusercontent.com/r/YOUR_PROJECT_ID?code=AUTHORIZATION_CODE&state=STATE_STRING
טיפול בבקשות להחלפת אסימונים
נקודת הקצה (endpoint) של המרת האסימונים של השירות אחראית על שני סוגים של אסימונים Exchanges:
- המרת קודי הרשאה באסימוני גישה ובאסימוני רענון
- המרת אסימוני רענון באסימוני גישה
בקשות להחלפת אסימונים כוללות את הפרמטרים הבאים:
| פרמטרים של נקודת קצה להחלפת אסימונים | |
|---|---|
client_id |
מחרוזת המזהה את מקור הבקשה כ-Google. המחרוזת הזו חייבת יהיה רשום במערכת שלך כמזהה הייחודי של Google. |
client_secret |
מחרוזת סודית שרשמתם ב-Google לשירות שלכם. |
grant_type |
סוג האסימון המוחלף. אחד משני הערכים
authorization_code או refresh_token. |
code |
כאשר grant_type=authorization_code, הקוד Google
שהתקבלו מנקודת הקצה של הכניסה או של המרת האסימון. |
redirect_uri |
כשהערך הוא grant_type=authorization_code, הפרמטר הזה
כתובת ה-URL ששימשה בבקשת ההרשאה הראשונית. |
refresh_token |
כאשר grant_type=refresh_token, אסימון הרענון Google
שהתקבלו מנקודת הקצה של המרת האסימונים. |
המרת קודי הרשאה באסימוני גישה ובאסימוני רענון
אחרי שהמשתמש נכנס לחשבון ונקודת הקצה (endpoint) של ההרשאה מחזירה הרשאה לטווח קצר. את הקוד ל-Google, Google שולחת בקשה לנקודת הקצה (endpoint) שלכם להחלפת האסימון את קוד ההרשאה של אסימון גישה ואסימון רענון.
בבקשות האלה, הערך של grant_type הוא authorization_code והערך
code הוא הערך של קוד ההרשאה שנתת ל-Google בעבר.
דוגמה לבקשה להחלפת קוד הרשאה
אסימון גישה ואסימון רענון:
POST /token HTTP/1.1
Host: oauth2.example.com
Content-Type: application/x-www-form-urlencoded

client_id=GOOGLE_CLIENT_ID&client_secret=GOOGLE_CLIENT_SECRET&grant_type=authorization_code&code=AUTHORIZATION_CODE&redirect_uri=REDIRECT_URI
כדי להחליף קודי הרשאה באסימון גישה ובאסימון רענון,
נקודת הקצה (endpoint) של המרת אסימונים מגיבה לבקשות POST שמבצעות את השלבים הבאים:
- מוודאים ש-
client_idמזהה את מקור הבקשה כמקור מורשה, ושה-client_secretתואם לערך הצפוי. - מוודאים את הפרטים הבאים:
- קוד ההרשאה חוקי ולא פג, והלקוח המזהה שצוין בבקשה תואם למזהה הלקוח שמשויך אל קוד הרשאה.
- כתובת ה-URL שצוינה על ידי הפרמטר
redirect_uriזהה לערך שנעשה בו שימוש בבקשת ההרשאה הראשונית.
- אם אין אפשרות לאמת את כל הקריטריונים שלמעלה, צריך להחזיר HTTP
שגיאה מסוג 'בקשה שגויה' 400 עם
{"error": "invalid_grant"}בגוף ההודעה. - אחרת, באמצעות מזהה המשתמש מקוד ההרשאה, צריך ליצור רענון וגם אסימון גישה. האסימונים האלה יכולים להיות כל ערכי מחרוזת, אבל הם חייבים מייצגים באופן ייחודי את המשתמש ואת הלקוח שעבורו האסימון מיועד, ואסור להם שאפשר לנחש. לאסימוני גישה, צריך לתעד גם את זמן התפוגה של האסימון (בדרך כלל שעה אחרי הנפקת האסימון). אין תפוגה לאסימוני רענון.
- מחזירים את אובייקט ה-JSON הבא בגוף תגובת ה-HTTPS:
{
"token_type": "Bearer",
"access_token": "ACCESS_TOKEN",
"refresh_token": "REFRESH_TOKEN",
"expires_in": SECONDS_TO_EXPIRATION
}
Google מאחסנת את אסימון הגישה ואת אסימון הרענון עבור המשתמש ומתעדת את של אסימון הגישה. כשפג התוקף של אסימון הגישה, Google משתמשת ברענון כדי לקבל אסימון גישה חדש מנקודת הקצה של המרת האסימון.
המרת אסימוני רענון באסימוני גישה
כשפג התוקף של אסימון הגישה, Google שולחת בקשה לנקודת הקצה (endpoint) של המרת האסימון כדי להחליף אסימון רענון באסימון גישה חדש.
בבקשות האלה, הערך של grant_type הוא refresh_token והערך
של refresh_token הוא הערך של אסימון הרענון שהענקת ל-Google בעבר.
דוגמה לבקשה להחלפת אסימון רענון
אסימון גישה:
POST /token HTTP/1.1
Host: oauth2.example.com
Content-Type: application/x-www-form-urlencoded

client_id=GOOGLE_CLIENT_ID&client_secret=GOOGLE_CLIENT_SECRET&grant_type=refresh_token&refresh_token=REFRESH_TOKEN
כדי להחליף אסימון רענון באסימון גישה, נקודת הקצה של המרת האסימון
משיב לבקשות של POST בביצוע השלבים הבאים:
- אימות שה-
client_idמזהה את מקור הבקשה בתור Google, ושהclient_secretתואם לציפיות עם ערך מסוים. - יש לוודא שאסימון הרענון חוקי, ושמזהה הלקוח שצוין ב- הבקשה תואמת למזהה הלקוח שמשויך לאסימון הרענון.
- אם אין אפשרות לאמת את כל הקריטריונים שלמעלה, צריך להחזיר HTTP
שגיאה מסוג 'בקשה שגויה' 400 עם
{"error": "invalid_grant"}בגוף ההודעה. - אחרת, משתמשים במזהה המשתמש מאסימון הרענון כדי ליצור גישה ב-Assistant. האסימונים האלה יכולים להיות כל ערכי מחרוזת, אבל הם חייבים לייצג באופן ייחודי בין המשתמש ובין הלקוח שבשבילו האסימון, ואסור לנחש אותם. לאסימוני גישה, צריך לתעד גם את זמן התפוגה של האסימון (בדרך כלל שעה אחרי הנפקת האסימון).
- החזרת אובייקט ה-JSON הבא בגוף ה-HTTPS
תגובה:
{
"token_type": "Bearer",
"access_token": "ACCESS_TOKEN",
"expires_in": SECONDS_TO_EXPIRATION
}
עיצוב ממשק המשתמש הקולי לתהליך האימות
בודקים אם המשתמש מאומת ומתחילים את תהליך קישור החשבון
- פותחים את הפרויקט ב-Actions Builder בקונסולה ל-Actions.
- כדי ליצור סצנה חדשה ולהתחיל את קישור החשבון בפעולה:
- לוחצים על סצנות.
- לוחצים על סמל ההוספה (+) כדי להוסיף סצנה חדשה.
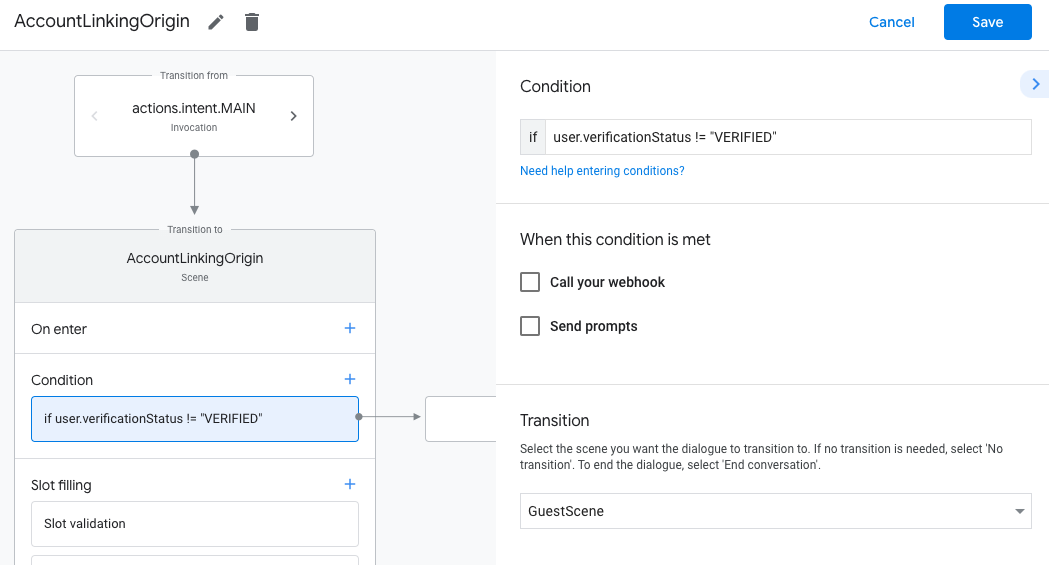
- בסצנה החדשה שנוצרה, לוחצים על סמל ההוספה add ליד תנאים.
- מוסיפים תנאי שבודק אם המשתמש שמשויך לשיחה הוא משתמש מאומת. אם הבדיקה נכשלת, הפעולה לא יכולה לבצע קישור חשבונות במהלך השיחה, והיא צריכה לחזור למצב שבו היא מספקת גישה לפונקציות שלא דורשות קישור חשבונות.
- בשדה
Enter new expressionבקטע תנאי, מזינים את הלוגיקה הבאה:user.verificationStatus != "VERIFIED" - בקטע מעבר, בוחרים סצנה שלא דורשת קישור חשבון או סצנה שהיא נקודת הכניסה לפונקציונליות שזמינה רק לאורחים.
- בשדה
- לוחצים על סמל ההוספה add לצד תנאים.
- מוסיפים תנאי להפעלת תהליך קישור החשבון אם למשתמש אין זהות משויכת.
- בשדה
Enter new expressionבקטע תנאי, מזינים את הלוגיקה הבאה:user.verificationStatus == "VERIFIED" - בקטע Transition (מעבר), בוחרים את סצנת המערכת Account Linking (קישור חשבונות).
- לוחצים על שמירה.
- בשדה
![]()
אחרי השמירה, נוספת לפרויקט סצנה חדשה של מערכת קישור חשבונות בשם <SceneName>_AccountLinking.
התאמה אישית של סצנת קישור החשבון
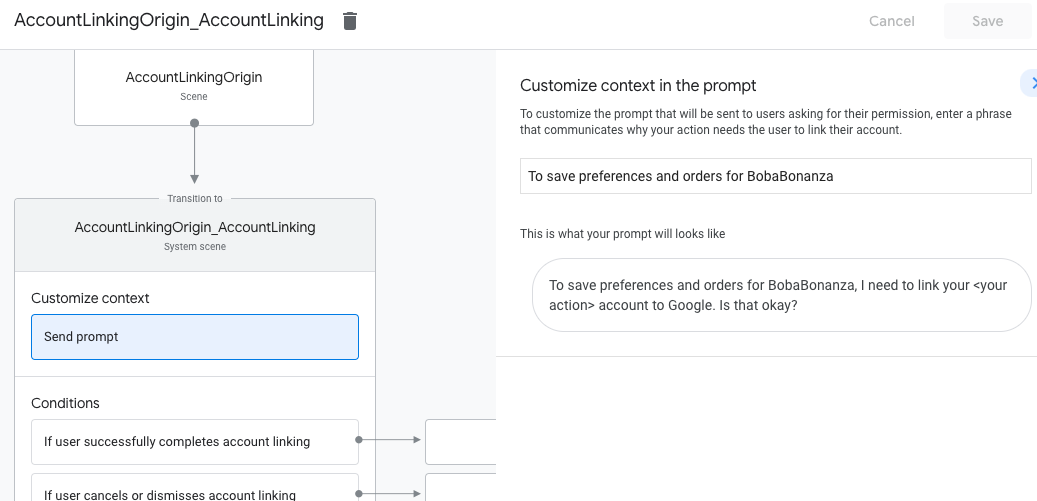
- בקטע Scenes (סצנות), בוחרים את סצנת מערכת קישור החשבונות.
- לוחצים על שליחת הנחיה ומוסיפים משפט קצר שמתאר למשתמש למה הפעולה צריכה לגשת לפרטי הזהות שלו (לדוגמה, "כדי לשמור את ההעדפות שלך").
- לוחצים על שמירה.
- בקטע תנאים, לוחצים על אם המשתמש משלים בהצלחה את קישור החשבון.
- מגדירים איך התהליך ימשיך אם המשתמש יסכים לקשר את החשבון שלו. לדוגמה, אפשר להתקשר אל ה-webhook כדי לעבד לוגיקה עסקית מותאמת אישית שנדרשת ולחזור לסצנה המקורית.
- לוחצים על שמירה.
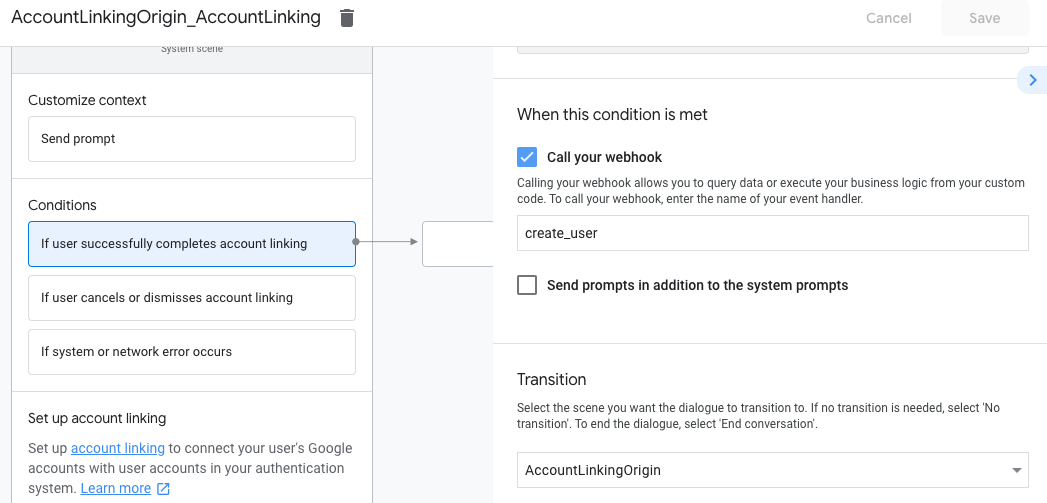
- בקטע תנאים, לוחצים על אם המשתמש מבטל את קישור החשבון או סוגר את חלון הקישור.
- הגדרת המשך התהליך אם המשתמש לא מסכים לקשר את החשבון שלו. לדוגמה, לשלוח הודעת אישור ולהפנות לסצנות שכוללות פונקציונליות שלא דורשת קישור חשבון.
- לוחצים על שמירה.
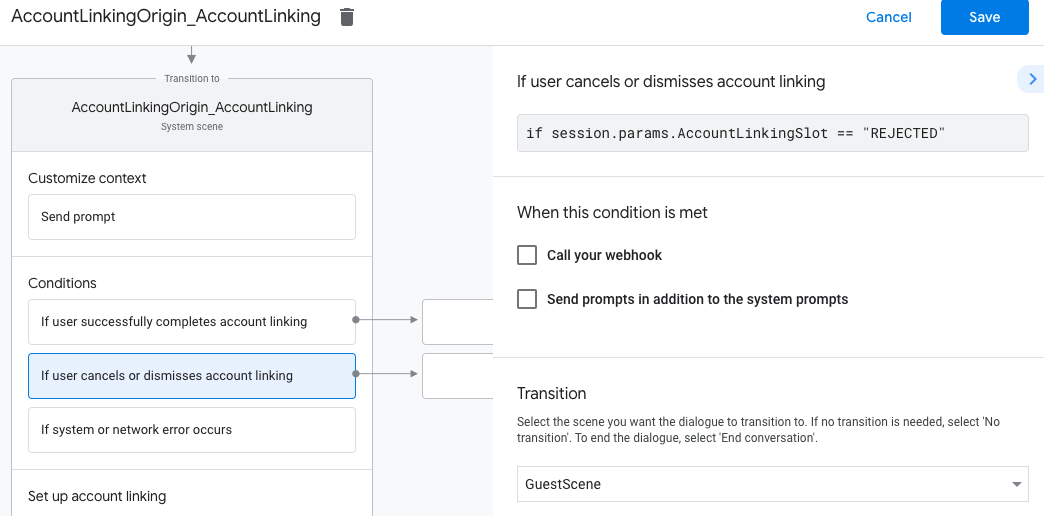
- בקטע תנאים, לוחצים על אם מתרחשת שגיאת מערכת או שגיאת רשת.
- מגדירים איך התהליך ימשיך אם לא ניתן להשלים את תהליך קישור החשבון בגלל שגיאות במערכת או ברשת. לדוגמה, לשלוח הודעת אישור ולהפנות לסצנות שכוללות פונקציונליות שלא דורשת קישור חשבון.
- לוחצים על שמירה.
טיפול בבקשות גישה לנתונים
אם הבקשה ל-Assistant מכילה טוקן גישה, צריך קודם לוודא שטוקן הגישה תקף (ולא פג התוקף שלו), ואז לאחזר את חשבון המשתמש המשויך ממסד הנתונים.