
סוג הקישור 'קישור יעיל' של כניסה לחשבון Google שמבוסס על OAuth מוסיף כניסה לחשבון Google על גבי קישור חשבון שמבוסס על OAuth. הקישור הזה מאפשר למשתמשי Google לקשר את החשבון שלהם לשירות שלכם באמצעות פקודות קוליות, וגם למשתמשים שנרשמו לשירות שלכם באמצעות זהות שאינה של Google.
סוג הקישור הזה מתחיל בכניסה באמצעות חשבון Google, שמאפשרת לבדוק אם פרטי הפרופיל של המשתמש ב-Google קיימים במערכת שלכם. אם פרטי המשתמש לא נמצאים במערכת, מתחיל תהליך OAuth רגיל. המשתמש יכול גם לבחור ליצור חשבון חדש עם פרטי הפרופיל שלו ב-Google.
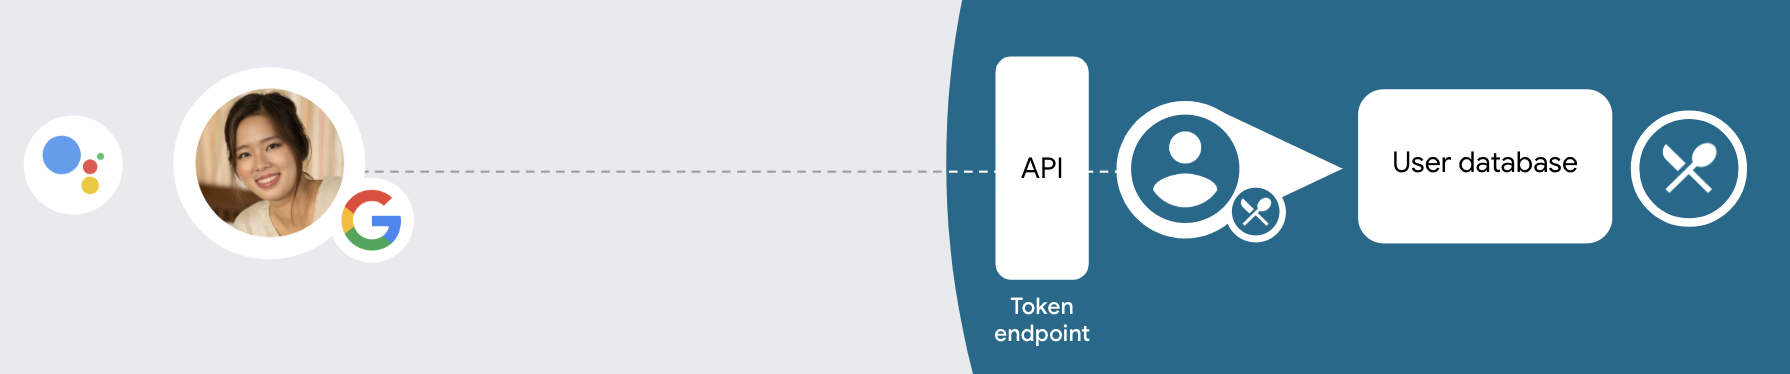
כדי לקשר חשבונות באמצעות סוג הקישור הפשוט, פועלים לפי השלבים הכלליים הבאים:
- קודם כל, מבקשים מהמשתמש להסכים לגישה לפרופיל שלו ב-Google.
- משתמשים במידע בפרופיל כדי לזהות את המשתמש.
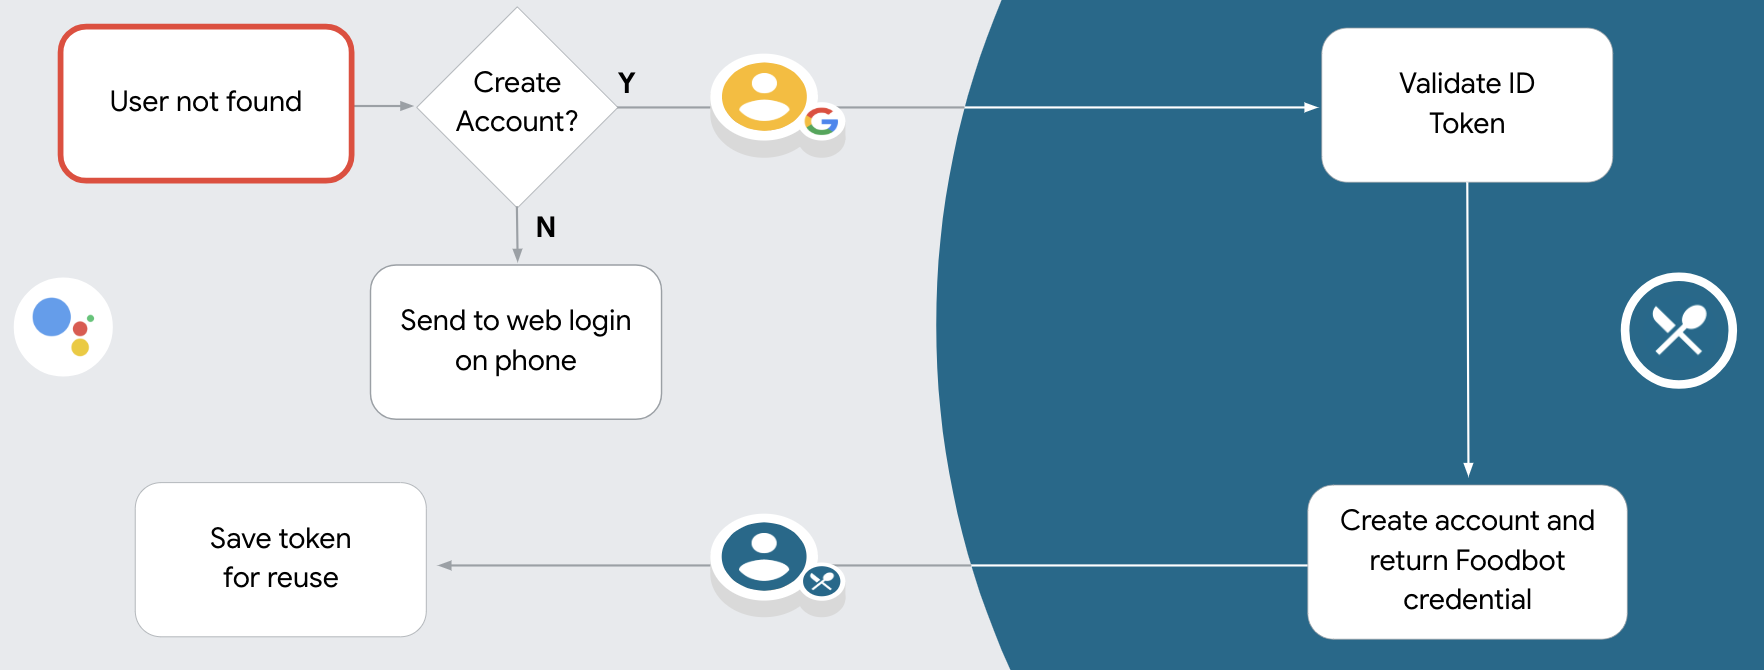
- אם לא נמצאה התאמה למשתמש Google במערכת האימות, התהליך ימשיך בהתאם להגדרות של פרויקט הפעולות במסוף הפעולות. ההגדרות קובעות אם לאפשר יצירת חשבון משתמש באמצעות קול או רק באתר.
- אם אתם מאפשרים יצירת חשבון באמצעות קול, אתם צריכים לאמת את טוקן ה-ID שמתקבל מ-Google. לאחר מכן אפשר ליצור משתמש על סמך פרטי הפרופיל שכלולים באסימון המזהה.
- אם לא מאפשרים יצירת חשבון באמצעות קול, המשתמש מועבר לדפדפן שבו הוא יכול לטעון את דף ההרשאה ולהשלים את תהליך יצירת המשתמש.
תמיכה ביצירת חשבון באמצעות הקול
אם אתם מאפשרים יצירה של חשבון משתמש באמצעות קול, Assistant שואלת את המשתמש אם הוא רוצה לבצע את הפעולות הבאות:
- ליצור חשבון חדש במערכת באמצעות פרטי חשבון Google שלהם, או
- אם יש להם חשבון קיים שאינו חשבון Google, הם יכולים להיכנס למערכת האימות באמצעות חשבון אחר.
מומלץ לאפשר יצירת חשבון באמצעות קול אם רוצים לצמצם את החיכוך בתהליך יצירת החשבון. המשתמש צריך לצאת מתהליך השיחה הקולית רק אם הוא רוצה להיכנס באמצעות חשבון קיים שאינו חשבון Google.
איסור יצירת חשבון באמצעות קול
אם השבתתם את האפשרות ליצור חשבון משתמש באמצעות קול, Assistant תפתח את כתובת ה-URL של האתר שסיפקתם לאימות המשתמש. אם האינטראקציה מתרחשת במכשיר ללא מסך, Assistant מפנה את המשתמש לטלפון כדי להמשיך בתהליך קישור החשבון.
מומלץ להשבית את האפשרות ליצור קבוצות במקרים הבאים:
אתם לא רוצים לאפשר למשתמשים עם חשבונות שאינם חשבונות Google ליצור חשבון משתמש חדש, ואתם רוצים שהם יקשרו לחשבונות המשתמשים הקיימים שלהם במערכת האימות שלכם. לדוגמה, אם אתם מציעים מועדון לקוחות, יכול להיות שתרצו לוודא שהמשתמש לא יאבד את הנקודות שצבר בחשבון הקיים שלו.
צריכה להיות לכם שליטה מלאה בתהליך יצירת החשבון. לדוגמה, תוכלו לא לאפשר יצירה אם אתם צריכים להציג למשתמש את התנאים וההגבלות שלכם במהלך יצירת החשבון.
הטמעה של קישור 'יעיל' באמצעות כניסה לחשבון Google שמבוססת על OAuth
החשבונות מקושרים באמצעות תהליכי OAuth 2.0 מקובלים בתחום. Actions on Google תומך בזרם הענקת גישה משתמע ובזרם הענקת הרשאה באמצעות קוד.
בתהליך הקוד המשתמע, Google פותחת את נקודת הקצה של ההרשאה בדפדפן של המשתמש. אחרי שהכניסה לחשבון תושלם בהצלחה, תקבלו מ-Google אסימון גישה לטווח ארוך. אסימון הגישה הזה כלול עכשיו בכל בקשה שנשלחת מ-Assistant לפעולה שלך.
בתהליך הקוד של ההרשאה, נדרשות שתי נקודות קצה:
- נקודת הקצה הרשאה, שאחראית להצגת ממשק המשתמש לכניסה למשתמשים שעדיין לא נכנסו לחשבון, ולתעד הסכמה לגישה המבוקשת כקוד הרשאה לטווח קצר.
- נקודת הקצה להחלפה באסימון, שאחראית לשני סוגים של חילופי הודעות:
- החלפה של קוד הרשאה באסימון רענון לטווח ארוך ובאסימון גישה לטווח קצר. ההחלפה הזו מתרחשת כשהמשתמש עובר את התהליך של קישור החשבון.
- החלפה של אסימון רענון לטווח ארוך באסימון גישה לטווח קצר. ההחלפה הזו מתרחשת כש-Google צריכה אסימון גישה חדש, כי פג התוקף של האסימון שפג תוקפו.
אומנם קל יותר להטמיע את תהליך הקוד המשתמע, אבל ב-Google מומלץ שאף פעם לא יפוג התוקף של אסימוני גישה שהונפקו באמצעות הזרימה המשתמעת, כי השימוש בתפוגת האסימון באמצעות התהליך המשתמע מחייב לאלץ את המשתמש לקשר שוב את החשבון. אם אתם זקוקים לתפוגת תוקף של אסימון מטעמי אבטחה, כדאי מאוד להשתמש בתהליך קוד האימות במקום זאת.
הגדרת הפרויקט
כדי להגדיר את הפרויקט לשימוש בקישור פשוט, פועלים לפי השלבים הבאים:
- פותחים את מסוף Actions ובוחרים את הפרויקט שרוצים להשתמש בו.
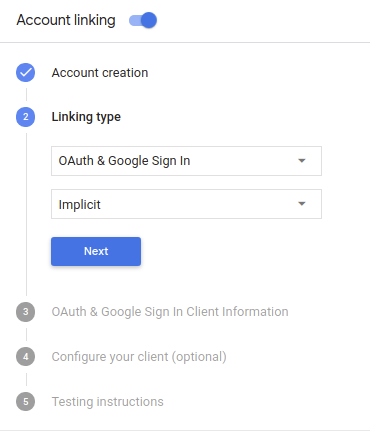
- לוחצים על הכרטיסייה פיתוח ובוחרים באפשרות קישור חשבונות.
- מפעילים את המתג לצד קישור חשבונות.
- בקטע Account creation, בוחרים באפשרות Yes.
בקטע סוג הקישור, בוחרים באפשרות OAuth & Google Sign In (OAuth וכניסה באמצעות חשבון Google) ובאפשרות Implicit (מרומז).
בקטע Client Information (פרטי הלקוח), מבצעים את הפעולות הבאות:
- מקצים ערך למזהה הלקוח שהונפק על ידי Actions on Google כדי לזהות בקשות שמגיעות מ-Google.
- מזינים את כתובות ה-URL של נקודות הקצה של ההרשאה ושל החלפת הטוקנים.
לוחצים על שמירה.
הטמעת שרת OAuth
כדי לתמוך בזרם הענקת גישה משתמע ב-OAuth 2.0, השירות שלכם יוצר הרשאה נקודת הקצה שזמינה ב-HTTPS. נקודת הקצה (endpoint) הזו אחראית לאימות קבלת הסכמה מהמשתמשים לצורך גישה לנתונים. נקודת הקצה של ההרשאה שמציג ממשק משתמש לכניסה למשתמשים שעדיין לא מחוברים לחשבון, להסכים להרשאת הגישה המבוקשת.
כשהפעולה צריכה להפעיל את אחד מממשקי ה-API המורשים של השירות שלך, Google משתמשת את נקודת הקצה הזו כדי לקבל הרשאה מהמשתמשים שלך לקרוא לממשקי ה-API האלה בשם.
בסשן זרם הענקת גישה משתמע ב-OAuth 2.0 ש-Google יזמה, התהליך הבא:
- Google פותחת את נקודת הקצה להרשאה בדפדפן של המשתמש. משתמש נכנס לחשבון אם הוא עדיין לא מחובר, ומעניק ל-Google הרשאת גישה את הנתונים שלהם באמצעות ה-API, אם הם עדיין לא העניקו הרשאה.
- השירות שלכם יוצר אסימון גישה ומחזיר אותו אל Google מפנה את דפדפן המשתמש חזרה אל Google באמצעות אסימון הגישה שמצורף לבקשה.
- Google קוראת לממשקי ה-API של השירות, ומצרפת את אסימון הגישה עם בכל בקשה. השירות שלך מאמת שאסימון הגישה מעניק ל-Google הרשאה לגשת ל-API ואז משלימה את הקריאה ל-API.
טיפול בבקשות הרשאה
כשהפעולה צריכה לבצע קישור חשבונות באמצעות זרם הענקת גישה משתמע ב-OAuth 2.0, Google שולחת את המשתמש לנקודת הקצה (endpoint) של ההרשאה עם בקשה שכוללת את הפרמטרים הבאים:
| פרמטרים של נקודת קצה להרשאה | |
|---|---|
client_id |
מזהה הלקוח שהקצית ל-Google. |
redirect_uri |
כתובת ה-URL שאליה שולחים את התגובה לבקשה הזו. |
state |
ערך של ניהול חשבונות שמועבר אל Google ללא שינוי URI להפניה אוטומטית. |
response_type |
סוג הערך שיוחזר בתשובה. ל-OAuth 2.0 משתמע
סוג התגובה הוא תמיד token. |
לדוגמה, אם נקודת הקצה להרשאה זמינה ב-https://myservice.example.com/auth,
בקשה עשויה להיראות כך:
GET https://myservice.example.com/auth?client_id=GOOGLE_CLIENT_ID&redirect_uri=REDIRECT_URI&state=STATE_STRING&response_type=token
כדי שנקודת הקצה להרשאה תטפל בבקשות כניסה, מבצעים את השלבים הבאים:
צריך לאמת את הערכים
client_idו-redirect_uriכדי למנוע הענקת גישה לאפליקציות לקוח לא מכוונות או שהוגדרו באופן שגוי:- צריך לוודא שה-
client_idתואם למזהה הלקוח שהוקצו ל-Google. - מוודאים שכתובת ה-URL שצוינה ב-
redirect_uriנראה כך:https://oauth-redirect.googleusercontent.com/r/YOUR_PROJECT_ID
- צריך לוודא שה-
לבדוק אם המשתמש נכנס לשירות. אם המשתמש לא חתום להשלים את תהליך הכניסה או ההרשמה לשירות.
יוצרים אסימון גישה שבו Google תשתמש כדי לגשת ל-API. אסימון גישה יכול להיות כל ערך מחרוזת, אבל הוא חייב לייצג באופן ייחודי את למשתמש וללקוח שבשבילם האסימון מיועד והם חייבים להיות ניתנים לניחוש.
לשלוח תגובת HTTP שמפנה מחדש את דפדפן המשתמש לכתובת ה-URL צוין על ידי הפרמטר
redirect_uri. יש לכלול את כל את הפרמטרים הבאים בקטע של כתובת ה-URL:access_token: אסימון הגישה שיצרתם כרגעtoken_type: המחרוזתbearerstate: ערך המצב ללא שינוי מהמקור בקשה הדוגמה הבאה היא של כתובת ה-URL שתתקבל:https://oauth-redirect.googleusercontent.com/r/YOUR_PROJECT_ID#access_token=ACCESS_TOKEN&token_type=bearer&state=STATE_STRING
ה-handler של Google להפניה אוטומטית ב-OAuth 2.0 יקבל את אסימון הגישה ויאשר
שהערך של state לא השתנה. לאחר ש-Google קיבלה
אסימון הגישה לשירות שלך, Google תצרף את האסימון לשיחות הבאות
לפעולה כחלק מה-AppRequest.
איך מטפלים בקישור האוטומטי
אחרי שהמשתמש מביע הסכמה לפעולה כדי לגשת לפרופיל שלו ב-Google, Google שולחת בקשה שמכילה טענת נכוֹנוּת (assertion) חתומה של זהות המשתמש ב-Google. טענת הנכוֹנוּת (assertion) מכילה מידע שכולל את מספר חשבון Google של המשתמש, את השם שלו וכתובת אימייל. נקודת הקצה להחלפת אסימונים שהוגדרה עבור כינויי הפרויקט שלך של הבקשה.
אם חשבון Google התואם כבר קיים במערכת האימות,
נקודת הקצה (endpoint) של המרת האסימון מחזירה אסימון עבור המשתמש. אם בחשבון Google לא
תואם למשתמש קיים, נקודת הקצה של המרת האסימון תחזיר את השגיאה user_not_found.
הבקשה מוצגת בפורמט הבא:
POST /token HTTP/1.1
Host: oauth2.example.com
Content-Type: application/x-www-form-urlencoded

grant_type=urn:ietf:params:oauth:grant-type:jwt-bearer&intent=get&assertion=JWT&consent_code=CONSENT_CODE&scope=SCOPES
נקודת הקצה (endpoint) של המרת האסימונים חייבת להיות מסוגלת לטפל בפרמטרים הבאים:
| פרמטרים של נקודת קצה של אסימון | |
|---|---|
grant_type |
סוג האסימון המוחלף. בבקשות האלה,
מכיל את הערך urn:ietf:params:oauth:grant-type:jwt-bearer. |
intent |
בבקשות האלה, הערך של הפרמטר הזה הוא 'get'. |
assertion |
אסימון רשת מבוסס JSON (JWT) שמספק טענת נכוֹנוּת (assertion) חתומה של זהות המשתמש. ה-JWT מכיל מידע שכולל את סמל Google של המשתמש מספר חשבון, שם וכתובת אימייל. |
consent_code |
אופציונלי: כשהוא קיים, קוד חד-פעמי שמציין המשתמש נתן את הסכמתו לפעולה כדי לגשת להיקפי ההרשאות שצוינו. |
scope |
אופציונלי: היקפי הרשאות שהגדרתם ש-Google תבקש ממשתמשים. |
כשנקודת הקצה של המרת אסימונים מקבלת את בקשת הקישור, היא צריכה לבצע את הבאים:
אימות ופענוח של טענת הנכוֹנוּת (assertion) של JWT
אפשר לאמת ולפענח את טענת הנכוֹנוּת (assertion) של JWT באמצעות ספריית פענוח קוד של JWT לשפה. להשתמש במפתחות הציבוריים של Google (זמינים ב-JWK או PEM) כדי לאמת את לחתימה.
אחרי הפענוח, טענת הנכוֹנוּת (assertion) של ה-JWT תיראה כמו הדוגמה הבאה:
{
  "sub": 1234567890,        // The unique ID of the user's Google Account
  "iss": "https://accounts.google.com",        // The assertion's issuer
  "aud": "123-abc.apps.googleusercontent.com", // Your server's client ID
  "iat": 233366400,         // Unix timestamp of the assertion's creation time
  "exp": 233370000,         // Unix timestamp of the assertion's expiration time
  "name": "Jan Jansen",
  "given_name": "Jan",
  "family_name": "Jansen",
  "email": "jan@gmail.com", // If present, the user's email address
  "locale": "en_US"
}
בנוסף לאימות החתימה של האסימון, צריך לאמת שמנפיק טענת הנכוֹנוּת (assertion)
(השדה iss) הוא https://accounts.google.com ושהקהל (שדה aud)
הוא מזהה הלקוח שהוקצה לפעולה.
בודקים אם חשבון Google כבר קיים במערכת האימות
בודקים אם אחד מהתנאים הבאים מתקיים:
- מספר חשבון Google, שמופיע בשדה
subשל טענת הנכוֹנוּת (assertion), קיים במסד הנתונים של המשתמשים. - כתובת האימייל בטענת הנכונות (assertion) תואמת למשתמש במסד הנתונים של המשתמשים.
אם אחד מהתנאים מתקיים, המשתמש כבר נרשם וניתן להנפיק אסימון גישה.
אם מספר חשבון Google או כתובת האימייל לא צוינו בטענת הנכונות (assertion)
תואם למשתמש במסד הנתונים שלכם, המשתמש עדיין לא נרשם. במקרה הזה,
נקודת הקצה (endpoint) של המרת אסימון צריכה להשיב עם שגיאת HTTP 401 שמציינת error=user_not_found,
כמו בדוגמה הבאה:
HTTP/1.1 401 Unauthorized
Content-Type: application/json;charset=UTF-8

{
  "error":"user_not_found",
}
user_not_found,
קוראת לנקודת הקצה (endpoint) של המרת האסימון עם הערך של הפרמטר intent
מוגדר כיצירה ושליחה של אסימון מזהה שמכיל את פרטי הפרופיל של המשתמש
עם הבקשה.
איך מטפלים ביצירת החשבון דרך הכניסה באמצעות חשבון Google
כשמשתמש צריך ליצור חשבון בשירות שלך, Google יוצרת
בקשה לנקודת הקצה של המרת האסימון שמציינת
intent=create, כמו בדוגמה הבאה:
POST /token HTTP/1.1
Host: oauth2.example.com
Content-Type: application/x-www-form-urlencoded

response_type=token&grant_type=urn:ietf:params:oauth:grant-type:jwt-bearer&scope=SCOPES&intent=create&consent_code=CONSENT_CODE&assertion=JWT[&NEW_ACCOUNT_INFO]
הפרמטר assertion מכיל אסימון רשת מבוסס JSON (JWT) שמספק
טענת נכוֹנוּת (assertion) חתומה על זהות המשתמש ב-Google. ה-JWT מכיל מידע
שכוללות את מספר חשבון Google, השם וכתובת האימייל של המשתמש, שבהם אפשר להשתמש
כדי ליצור חשבון חדש בשירות.
כדי להגיב לבקשות ליצירת חשבון, נקודת הקצה (endpoint) של המרת האסימונים חייבת הבאים:
אימות ופענוח של טענת הנכוֹנוּת (assertion) של JWT
אפשר לאמת ולפענח את טענת הנכוֹנוּת (assertion) של JWT באמצעות ספריית פענוח קוד של JWT לשפה. להשתמש במפתחות הציבוריים של Google (זמינים ב-JWK או PEM) כדי לאמת את לחתימה.
אחרי הפענוח, טענת הנכוֹנוּת (assertion) של ה-JWT תיראה כמו הדוגמה הבאה:
{
  "sub": 1234567890,        // The unique ID of the user's Google Account
  "iss": "https://accounts.google.com",        // The assertion's issuer
  "aud": "123-abc.apps.googleusercontent.com", // Your server's client ID
  "iat": 233366400,         // Unix timestamp of the assertion's creation time
  "exp": 233370000,         // Unix timestamp of the assertion's expiration time
  "name": "Jan Jansen",
  "given_name": "Jan",
  "family_name": "Jansen",
  "email": "jan@gmail.com", // If present, the user's email address
  "locale": "en_US"
}
בנוסף לאימות החתימה של האסימון, צריך לאמת שמנפיק טענת הנכוֹנוּת (assertion)
(השדה iss) הוא https://accounts.google.com ושהקהל (שדה aud)
הוא מזהה הלקוח שהוקצה לפעולה.
אימות פרטי המשתמש ויצירת חשבון חדש
בודקים אם אחד מהתנאים הבאים מתקיים:
- מספר חשבון Google, שמופיע בשדה
subשל טענת הנכוֹנוּת (assertion), קיים במסד הנתונים של המשתמשים. - כתובת האימייל בטענת הנכונות (assertion) תואמת למשתמש במסד הנתונים של המשתמשים.
אם אחד מהתנאים מתקיים, מבקשים מהמשתמש לקשר את החשבון הקיים עם
לחשבון Google שלהם, על ידי שליחת תגובה לבקשה עם שגיאת HTTP 401, וציון
error=linking_error וכתובת האימייל של המשתמש כ-login_hint, כמו ב-
בדוגמה הבאה:
HTTP/1.1 401 Unauthorized
Content-Type: application/json;charset=UTF-8

{
  "error":"linking_error",
  "login_hint":"foo@bar.com"
}
אם אף אחד מהתנאים לא מתקיים, צריך ליצור חשבון משתמש חדש באמצעות המידע הזה שצוינו ב-JWT. לחשבונות חדשים בדרך כלל לא מוגדרת סיסמה. זה כן מומלץ להוסיף כניסה באמצעות חשבון Google לפלטפורמות אחרות כדי לאפשר למשתמשים להתחבר דרך Google בפלטפורמות השונות של האפליקציה שלכם. לחלופין, אפשר לשלוח למשתמש קישור שמתחיל בתהליך שחזור הסיסמה כדי לאפשר לו להגדיר סיסמה לכניסה בפלטפורמות אחרות.
כשהיצירה הושלמה, צריך להנפיק אסימון גישה ומחזירים את הערכים באובייקט JSON הגוף של תגובת ה-HTTPS, כמו בדוגמה הבאה:
{
  "token_type": "Bearer",
  "access_token": "ACCESS_TOKEN",

  "expires_in": SECONDS_TO_EXPIRATION
}
עיצוב ממשק המשתמש הקולי לתהליך האימות
בודקים אם המשתמש מאומת ומתחילים את תהליך קישור החשבון
- פותחים את הפרויקט ב-Actions Builder בקונסולה ל-Actions.
- כדי ליצור סצנה חדשה ולהתחיל את קישור החשבון בפעולה:
- לוחצים על סצנות.
- לוחצים על סמל ההוספה (+) כדי להוסיף סצנה חדשה.
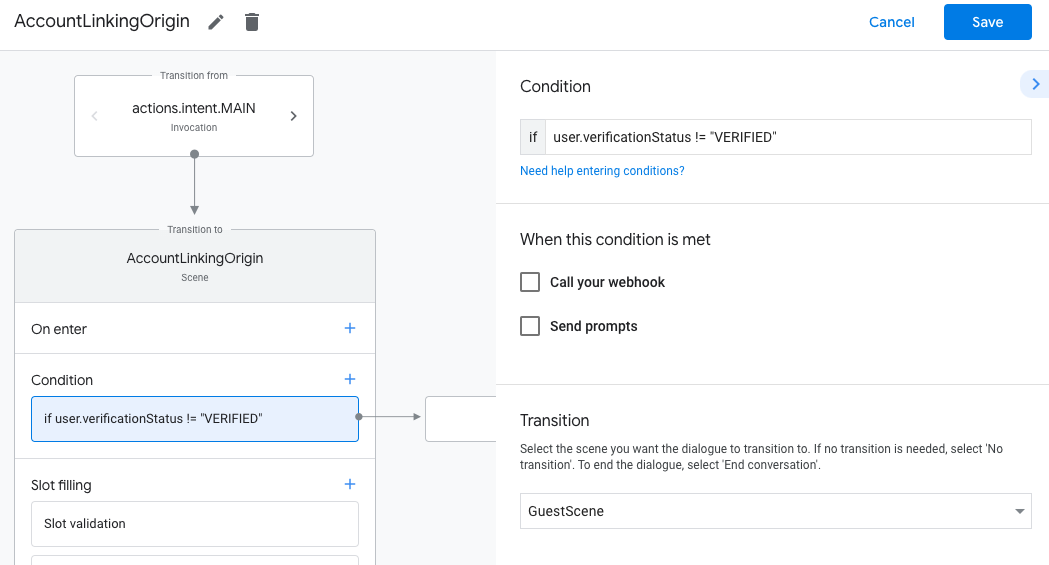
- בסצנה החדשה שנוצרה, לוחצים על סמל ההוספה add ליד תנאים.
- מוסיפים תנאי שבודק אם המשתמש שמשויך לשיחה הוא משתמש מאומת. אם הבדיקה נכשלת, הפעולה לא יכולה לבצע קישור חשבונות במהלך השיחה, והיא צריכה לחזור למצב שבו היא מספקת גישה לפונקציות שלא דורשות קישור חשבונות.
- בשדה
Enter new expressionבקטע תנאי, מזינים את הלוגיקה הבאה:user.verificationStatus != "VERIFIED" - בקטע מעבר, בוחרים סצנה שלא דורשת קישור חשבון או סצנה שהיא נקודת הכניסה לפונקציונליות שזמינה רק לאורחים.
- בשדה
- לוחצים על סמל ההוספה add לצד תנאים.
- מוסיפים תנאי להפעלת תהליך קישור החשבון אם למשתמש אין זהות משויכת.
- בשדה
Enter new expressionבקטע תנאי, מזינים את הלוגיקה הבאה:user.verificationStatus == "VERIFIED" - בקטע Transition (מעבר), בוחרים את סצנת המערכת Account Linking (קישור חשבונות).
- לוחצים על שמירה.
- בשדה
![]()
אחרי השמירה, נוספת לפרויקט סצנה חדשה של מערכת קישור חשבונות בשם <SceneName>_AccountLinking.
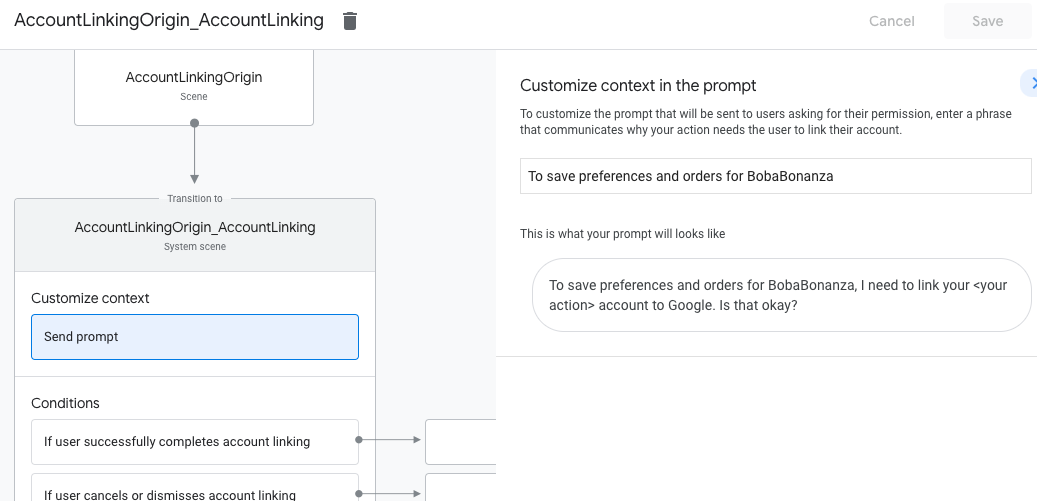
התאמה אישית של סצנת קישור החשבון
- בקטע Scenes (סצנות), בוחרים את סצנת מערכת קישור החשבונות.
- לוחצים על שליחת הנחיה ומוסיפים משפט קצר שמתאר למשתמש למה הפעולה צריכה לגשת לפרטי הזהות שלו (לדוגמה, "כדי לשמור את ההעדפות שלך").
- לוחצים על שמירה.
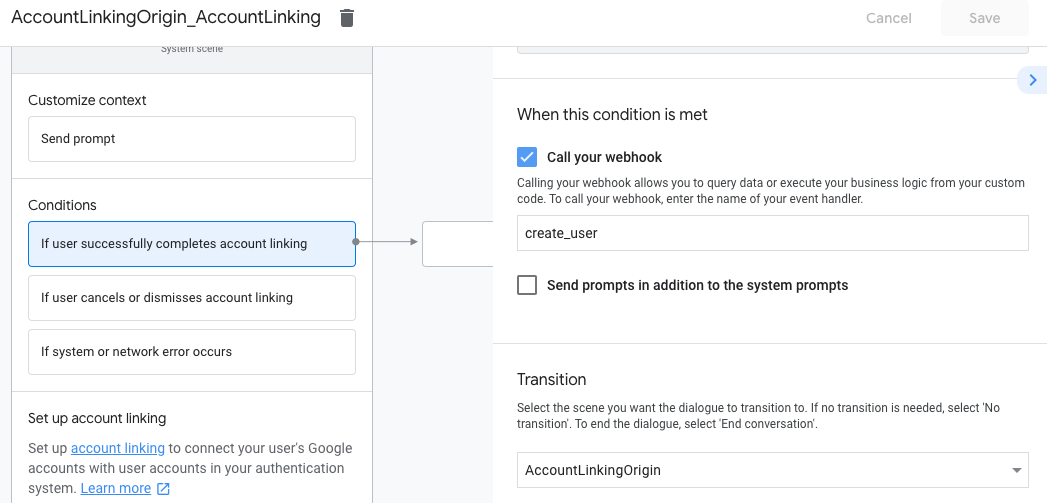
- בקטע תנאים, לוחצים על אם המשתמש משלים בהצלחה את קישור החשבון.
- מגדירים איך התהליך ימשיך אם המשתמש יסכים לקשר את החשבון שלו. לדוגמה, אפשר להתקשר אל ה-webhook כדי לעבד לוגיקה עסקית מותאמת אישית שנדרשת ולחזור לסצנה המקורית.
- לוחצים על שמירה.
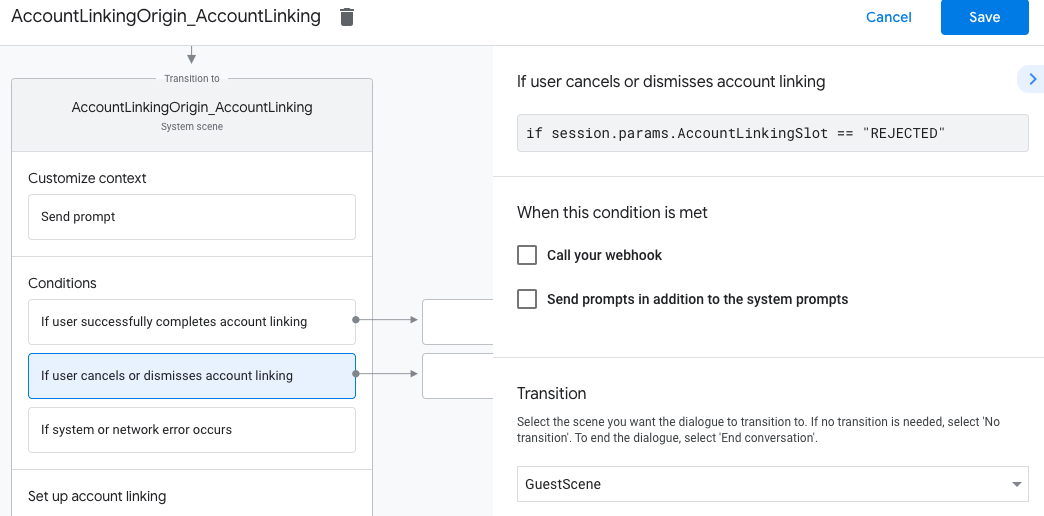
- בקטע תנאים, לוחצים על אם המשתמש מבטל את קישור החשבון או סוגר את חלון הקישור.
- הגדרת המשך התהליך אם המשתמש לא מסכים לקשר את החשבון שלו. לדוגמה, לשלוח הודעת אישור ולהפנות לסצנות שכוללות פונקציונליות שלא דורשת קישור חשבון.
- לוחצים על שמירה.
- בקטע תנאים, לוחצים על אם מתרחשת שגיאת מערכת או שגיאת רשת.
- מגדירים איך התהליך ימשיך אם לא ניתן להשלים את תהליך קישור החשבון בגלל שגיאות במערכת או ברשת. לדוגמה, לשלוח הודעת אישור ולהפנות לסצנות שכוללות פונקציונליות שלא דורשת קישור חשבון.
- לוחצים על שמירה.
טיפול בבקשות גישה לנתונים
אם הבקשה ל-Assistant מכילה טוקן גישה, צריך קודם לוודא שטוקן הגישה תקף ולא פג תוקפו, ואז לאחזר ממסד הנתונים של חשבונות המשתמשים את חשבון המשתמש שמשויך לטוקן.