
OAuth-ভিত্তিক Google সাইন-ইন "স্ট্রীমলাইনড" লিঙ্কিং টাইপ OAuth-ভিত্তিক অ্যাকাউন্ট লিঙ্কিংয়ের উপরে Google সাইন-ইন যোগ করে। এটি Google ব্যবহারকারীদের জন্য নির্বিঘ্ন ভয়েস-ভিত্তিক লিঙ্কিং প্রদান করে এবং সেইসাথে ব্যবহারকারীদের জন্য অ্যাকাউন্ট লিঙ্কিং সক্ষম করে যারা আপনার পরিষেবাতে একটি নন-Google পরিচয় সহ নিবন্ধন করেছেন।
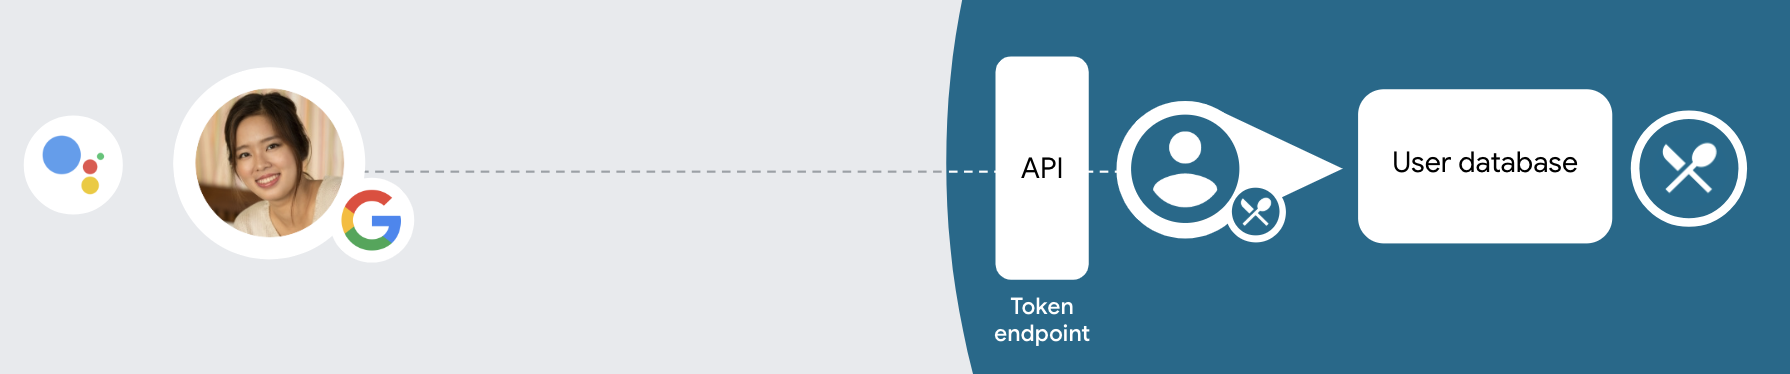
এই লিঙ্কিংয়ের ধরনটি Google সাইন-ইন দিয়ে শুরু হয়, যা আপনাকে ব্যবহারকারীর Google প্রোফাইল তথ্য আপনার সিস্টেমে বিদ্যমান কিনা তা পরীক্ষা করতে দেয়। যদি ব্যবহারকারীর তথ্য আপনার সিস্টেমে পাওয়া না যায়, একটি আদর্শ OAuth প্রবাহ শুরু হয়। ব্যবহারকারী তাদের Google প্রোফাইল তথ্য দিয়ে একটি নতুন অ্যাকাউন্ট তৈরি করতেও বেছে নিতে পারেন।
স্ট্রীমলাইনড লিঙ্কিং টাইপের সাথে অ্যাকাউন্ট লিঙ্ক করার জন্য, এই সাধারণ পদক্ষেপগুলি অনুসরণ করুন:
- প্রথমে ব্যবহারকারীকে তাদের Google প্রোফাইল অ্যাক্সেস করার জন্য সম্মতি দিতে বলুন।
- ব্যবহারকারীকে সনাক্ত করতে তাদের প্রোফাইলে তথ্য ব্যবহার করুন।
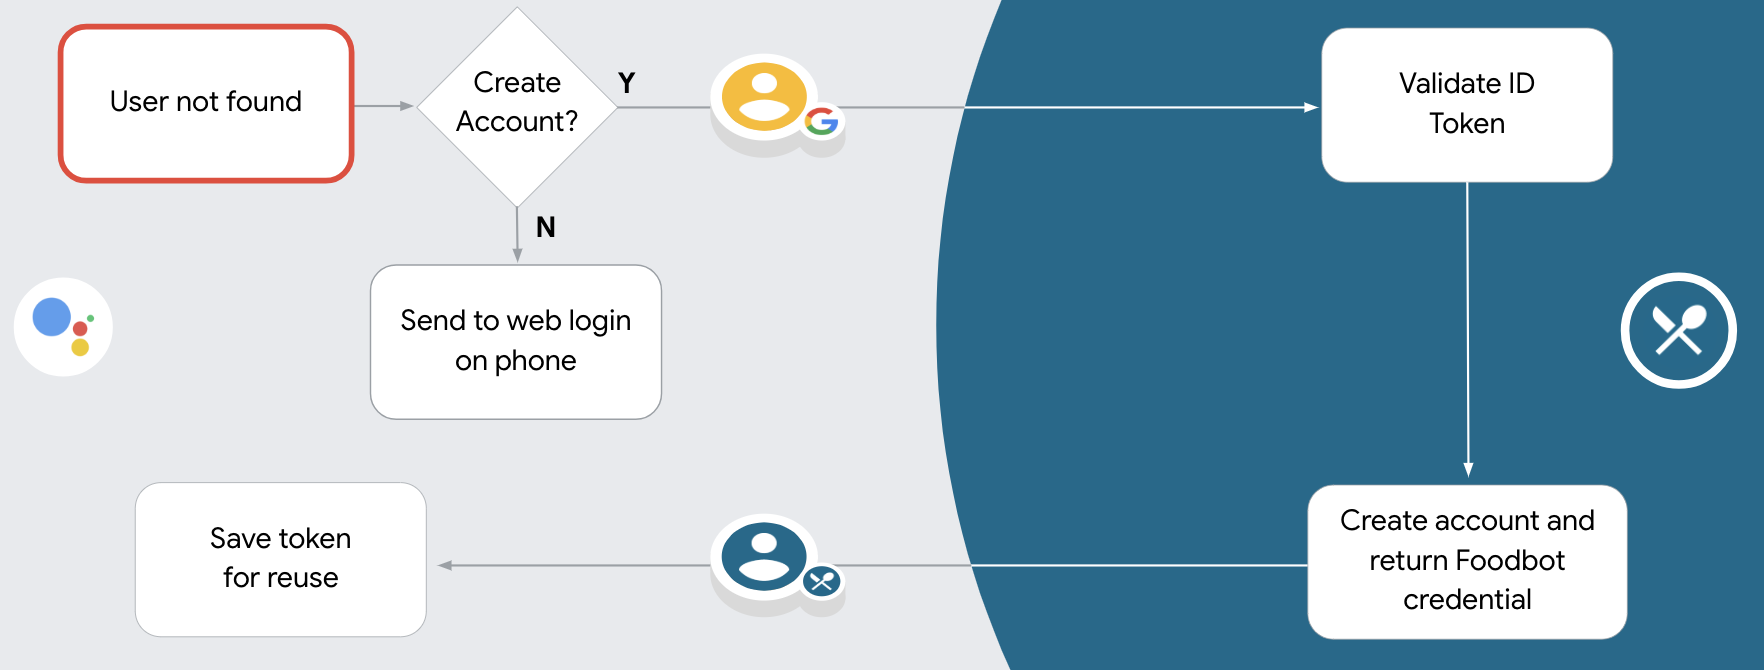
- আপনি যদি আপনার প্রমাণীকরণ সিস্টেমে Google ব্যবহারকারীর জন্য একটি মিল খুঁজে না পান, তাহলে আপনি ভয়েসের মাধ্যমে বা শুধুমাত্র আপনার ওয়েবসাইটে ব্যবহারকারীর অ্যাকাউন্ট তৈরি করার অনুমতি দেওয়ার জন্য অ্যাকশন কনসোলে আপনার অ্যাকশন প্রকল্পটি কনফিগার করেছেন কিনা তার উপর নির্ভর করে প্রবাহটি এগিয়ে যায়।
- আপনি ভয়েসের মাধ্যমে অ্যাকাউন্ট তৈরির অনুমতি দিলে, Google থেকে প্রাপ্ত আইডি টোকেন যাচাই করুন। তারপর আপনি আইডি টোকেনে থাকা প্রোফাইল তথ্যের উপর ভিত্তি করে একজন ব্যবহারকারী তৈরি করতে পারেন।
- আপনি ভয়েসের মাধ্যমে অ্যাকাউন্ট তৈরির অনুমতি না দিলে, ব্যবহারকারীকে একটি ব্রাউজারে স্থানান্তর করা হয় যেখানে তারা আপনার অনুমোদন পৃষ্ঠা লোড করতে পারে এবং ব্যবহারকারী তৈরির প্রবাহ সম্পূর্ণ করতে পারে।
ভয়েসের মাধ্যমে অ্যাকাউন্ট তৈরিতে সহায়তা করুন
আপনি ভয়েসের মাধ্যমে ব্যবহারকারীর অ্যাকাউন্ট তৈরি করার অনুমতি দিলে, সহকারী ব্যবহারকারীকে জিজ্ঞাসা করে যে তারা নিম্নলিখিতগুলি করতে চায় কিনা:
- তাদের Google অ্যাকাউন্ট তথ্য ব্যবহার করে আপনার সিস্টেমে একটি নতুন অ্যাকাউন্ট তৈরি করুন, বা৷
- যদি তাদের একটি বিদ্যমান নন-Google অ্যাকাউন্ট থাকে তবে একটি ভিন্ন অ্যাকাউন্ট দিয়ে আপনার প্রমাণীকরণ সিস্টেমে সাইন ইন করুন।
আপনি যদি অ্যাকাউন্ট তৈরির প্রবাহের ঘর্ষণ কমাতে চান তবে ভয়েসের মাধ্যমে অ্যাকাউন্ট তৈরির অনুমতি দেওয়ার পরামর্শ দেওয়া হয়। ব্যবহারকারী যদি একটি বিদ্যমান নন-Google অ্যাকাউন্ট ব্যবহার করে সাইন ইন করতে চান তবেই তাদের ভয়েস ফ্লো ছেড়ে দিতে হবে।
ভয়েসের মাধ্যমে অ্যাকাউন্ট তৈরির অনুমতি দিন
আপনি যদি ভয়েসের মাধ্যমে ব্যবহারকারীর অ্যাকাউন্ট তৈরির অনুমতি না দেন, তাহলে Assistant ব্যবহারকারীর প্রমাণীকরণের জন্য আপনার দেওয়া ওয়েব সাইটের URL খোলে। স্ক্রিন নেই এমন কোনো ডিভাইসে ইন্টারঅ্যাকশন ঘটলে, অ্যাসিস্ট্যান্ট অ্যাকাউন্ট লিঙ্কিং ফ্লো চালিয়ে যেতে ব্যবহারকারীকে একটি ফোনে নির্দেশ দেয়।
সৃষ্টির অনুমতি না দেওয়ার সুপারিশ করা হয় যদি:
আপনি এমন ব্যবহারকারীদের একটি নতুন ব্যবহারকারীর অ্যাকাউন্ট তৈরি করার অনুমতি দিতে চান না যাদের নন-Google অ্যাকাউন্ট আছে এবং তাদের পরিবর্তে আপনার প্রমাণীকরণ সিস্টেমে তাদের বিদ্যমান ব্যবহারকারী অ্যাকাউন্টের সাথে লিঙ্ক করতে চান। উদাহরণস্বরূপ, আপনি যদি একটি আনুগত্য প্রোগ্রাম অফার করেন তবে আপনি নিশ্চিত করতে চাইতে পারেন যে ব্যবহারকারী তাদের বিদ্যমান অ্যাকাউন্টে জমা হওয়া পয়েন্টগুলি হারাবেন না।
আপনার অ্যাকাউন্ট তৈরির প্রবাহের সম্পূর্ণ নিয়ন্ত্রণ থাকতে হবে। উদাহরণস্বরূপ, আপনি যদি অ্যাকাউন্ট তৈরির সময় ব্যবহারকারীকে আপনার পরিষেবার শর্তাদি দেখাতে চান তবে আপনি তৈরির অনুমতি দিতে পারেন না।
OAuth-ভিত্তিক Google সাইন-ইন "স্ট্রীমলাইনড" লিঙ্কিং প্রয়োগ করুন৷
অ্যাকাউন্টগুলি ইন্ডাস্ট্রি স্ট্যান্ডার্ড OAuth 2.0 ফ্লোগুলির সাথে লিঙ্ক করা হয়েছে৷ অ্যাকশন অন Google অন্তর্নিহিত এবং অনুমোদন কোড প্রবাহ সমর্থন করে।
অন্তর্নিহিত কোড প্রবাহে, Google ব্যবহারকারীর ব্রাউজারে আপনার অনুমোদনের শেষ পয়েন্ট খোলে। সফল সাইন ইন করার পরে, আপনি Google-এ একটি দীর্ঘস্থায়ী অ্যাক্সেস টোকেন ফেরত দেন। এই অ্যাক্সেস টোকেনটি এখন অ্যাসিস্ট্যান্ট থেকে আপনার অ্যাকশনে পাঠানো প্রতিটি অনুরোধে অন্তর্ভুক্ত করা হয়েছে।
অনুমোদন কোড প্রবাহে, আপনার দুটি শেষ পয়েন্ট প্রয়োজন:
- অনুমোদনের এন্ডপয়েন্ট, যেটি আপনার ব্যবহারকারীদের কাছে সাইন-ইন UI উপস্থাপন করার জন্য দায়ী যারা ইতিমধ্যে সাইন ইন করেনি এবং একটি স্বল্প-কালীন অনুমোদন কোডের আকারে অনুরোধ করা অ্যাক্সেসে সম্মতি রেকর্ড করে৷
- টোকেন এক্সচেঞ্জ এন্ডপয়েন্ট, যা দুই ধরনের এক্সচেঞ্জের জন্য দায়ী:
- একটি দীর্ঘস্থায়ী রিফ্রেশ টোকেন এবং একটি স্বল্পকালীন অ্যাক্সেস টোকেনের জন্য একটি অনুমোদন কোড বিনিময় করে৷ এই বিনিময়টি ঘটে যখন ব্যবহারকারী অ্যাকাউন্ট লিঙ্কিং প্রবাহের মধ্য দিয়ে যায়।
- একটি স্বল্পকালীন অ্যাক্সেস টোকেনের জন্য দীর্ঘস্থায়ী রিফ্রেশ টোকেন বিনিময় করে। এই বিনিময়টি ঘটে যখন Google এর একটি নতুন অ্যাক্সেস টোকেনের প্রয়োজন হয় কারণ এটির মেয়াদ শেষ হয়ে গেছে৷
যদিও অন্তর্নিহিত কোড ফ্লো বাস্তবায়ন করা সহজ, Google সুপারিশ করে যে অন্তর্নিহিত প্রবাহ ব্যবহার করে জারি করা অ্যাক্সেস টোকেন কখনই মেয়াদোত্তীর্ণ না হয়, কারণ অন্তর্নিহিত প্রবাহের সাথে টোকেন মেয়াদ শেষ হওয়া ব্যবহারকারীকে তাদের অ্যাকাউন্ট আবার লিঙ্ক করতে বাধ্য করে। নিরাপত্তার কারণে আপনার যদি টোকেনের মেয়াদ শেষ হওয়ার প্রয়োজন হয়, তাহলে আপনার পরিবর্তে প্রমাণীকরণ কোড প্রবাহ ব্যবহার করার বিষয়ে দৃঢ়ভাবে বিবেচনা করা উচিত।
প্রকল্পটি কনফিগার করুন
স্ট্রীমলাইন লিঙ্কিং ব্যবহার করার জন্য আপনার প্রোজেক্ট কনফিগার করতে, এই ধাপগুলি অনুসরণ করুন:
- অ্যাকশন কনসোল খুলুন এবং আপনি যে প্রকল্পটি ব্যবহার করতে চান তা নির্বাচন করুন।
- বিকাশ ট্যাবে ক্লিক করুন এবং অ্যাকাউন্ট লিঙ্কিং নির্বাচন করুন।
- অ্যাকাউন্ট লিঙ্ক করার পাশের সুইচটি সক্ষম করুন।
- অ্যাকাউন্ট তৈরি বিভাগে, হ্যাঁ নির্বাচন করুন।
লিঙ্কিং টাইপে , OAuth এবং Google সাইন ইন এবং ইমপ্লিসিট নির্বাচন করুন।
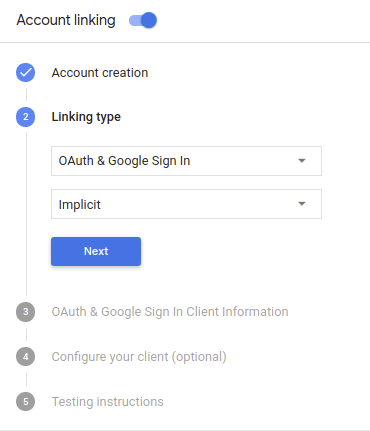
ক্লায়েন্ট তথ্যে , নিম্নলিখিতগুলি করুন:
- Google থেকে আসা অনুরোধগুলি শনাক্ত করতে Google-এ আপনার অ্যাকশন দ্বারা জারি করা ক্লায়েন্ট আইডিতে একটি মান বরাদ্দ করুন।
- আপনার অনুমোদন এবং টোকেন এক্সচেঞ্জ এন্ডপয়েন্টের জন্য URL গুলি সন্নিবেশ করুন৷
Save এ ক্লিক করুন।
আপনার OAuth সার্ভার বাস্তবায়ন করুন
OAuth 2.0 অন্তর্নিহিত প্রবাহকে সমর্থন করার জন্য, আপনার পরিষেবাটি HTTPS দ্বারা একটি অনুমোদনের শেষ পয়েন্ট উপলব্ধ করে। এই শেষ পয়েন্টটি প্রমাণীকরণ এবং ডেটা অ্যাক্সেসের জন্য ব্যবহারকারীদের কাছ থেকে সম্মতি পাওয়ার জন্য দায়ী। অনুমোদনের শেষ পয়েন্ট আপনার ব্যবহারকারীদের কাছে একটি সাইন-ইন UI উপস্থাপন করে যেগুলি ইতিমধ্যে সাইন ইন করেনি এবং অনুরোধ করা অ্যাক্সেসের সম্মতি রেকর্ড করে৷
যখন আপনার অ্যাকশন আপনার পরিষেবার অনুমোদিত APIগুলির মধ্যে একটিতে কল করার প্রয়োজন হয়, তখন Google এই এন্ডপয়েন্ট ব্যবহার করে আপনার ব্যবহারকারীদের থেকে তাদের পক্ষে এই APIগুলিকে কল করার অনুমতি পেতে৷
Google দ্বারা শুরু করা একটি সাধারণ OAuth 2.0 অন্তর্নিহিত ফ্লো সেশনের নিম্নলিখিত প্রবাহ রয়েছে:
- Google ব্যবহারকারীর ব্রাউজারে আপনার অনুমোদনের শেষ পয়েন্ট খোলে। ব্যবহারকারী ইতিমধ্যে সাইন ইন না করলে সাইন ইন করে, এবং যদি তারা ইতিমধ্যে অনুমতি না দেয় তবে আপনার API দিয়ে তাদের ডেটা অ্যাক্সেস করার জন্য Google-কে অনুমতি দেয়।
- আপনার পরিষেবা একটি অ্যাক্সেস টোকেন তৈরি করে এবং অনুরোধের সাথে সংযুক্ত অ্যাক্সেস টোকেন সহ ব্যবহারকারীর ব্রাউজারটিকে Google-এ পুনঃনির্দেশ করে Google-এ ফেরত দেয়।
- Google আপনার পরিষেবার API কল করে এবং প্রতিটি অনুরোধের সাথে অ্যাক্সেস টোকেন সংযুক্ত করে। আপনার পরিষেবা যাচাই করে যে অ্যাক্সেস টোকেন Google-কে API অ্যাক্সেস করার অনুমোদন দেয় এবং তারপর API কলটি সম্পূর্ণ করে।
অনুমোদনের অনুরোধগুলি পরিচালনা করুন
যখন আপনার অ্যাকশনকে একটি OAuth 2.0 অন্তর্নিহিত প্রবাহের মাধ্যমে অ্যাকাউন্ট লিঙ্ক করার প্রয়োজন হয়, তখন Google নিম্নলিখিত পরামিতিগুলি অন্তর্ভুক্ত করে এমন একটি অনুরোধ সহ ব্যবহারকারীকে আপনার অনুমোদনের শেষ পয়েন্টে পাঠায়:
| অনুমোদনের শেষ পয়েন্ট পরামিতি | |
|---|---|
client_id | আপনি Google এ যে ক্লায়েন্ট আইডি অ্যাসাইন করেছেন। |
redirect_uri | যে URLটিতে আপনি এই অনুরোধের প্রতিক্রিয়া পাঠান। |
state | পুনঃনির্দেশ URI-তে অপরিবর্তিত Google-এ ফেরত পাঠানো হয়। |
response_type | প্রতিক্রিয়াতে যে মানের প্রত্যাবর্তন করতে হবে। OAuth 2.0 অন্তর্নিহিত প্রবাহের জন্য, প্রতিক্রিয়া প্রকারটি সর্বদা token হয়। |
উদাহরণস্বরূপ, যদি আপনার অনুমোদনের এন্ডপয়েন্ট https://myservice.example.com/auth এ উপলব্ধ থাকে, তাহলে একটি অনুরোধ এর মতো দেখতে পারে:
GET https://myservice.example.com/auth?client_id=GOOGLE_CLIENT_ID&redirect_uri=REDIRECT_URI&state=STATE_STRING&response_type=token
সাইন-ইন অনুরোধগুলি পরিচালনা করার জন্য আপনার অনুমোদনের শেষ পয়েন্টের জন্য, নিম্নলিখিত পদক্ষেপগুলি করুন:
অনাকাঙ্ক্ষিত বা ভুল কনফিগার করা ক্লায়েন্ট অ্যাপগুলিতে অ্যাক্সেস দেওয়া প্রতিরোধ করতে
client_idএবংredirect_uriমান যাচাই করুন:- নিশ্চিত করুন যে
client_idআপনার Google-এ অ্যাসাইন করা ক্লায়েন্ট আইডির সাথে মেলে। - নিশ্চিত করুন যে
redirect_uriপ্যারামিটার দ্বারা নির্দিষ্ট করা URL-এর নিম্নলিখিত ফর্ম রয়েছে:https://oauth-redirect.googleusercontent.com/r/YOUR_PROJECT_ID
- নিশ্চিত করুন যে
ব্যবহারকারী আপনার পরিষেবাতে সাইন ইন করেছেন কিনা তা পরীক্ষা করুন৷ ব্যবহারকারী সাইন ইন না করলে, আপনার পরিষেবার সাইন-ইন বা সাইন-আপ প্রবাহ সম্পূর্ণ করুন৷
একটি অ্যাক্সেস টোকেন তৈরি করুন যা Google আপনার API অ্যাক্সেস করতে ব্যবহার করবে। অ্যাক্সেস টোকেন যেকোন স্ট্রিং মান হতে পারে, তবে এটি অবশ্যই ব্যবহারকারী এবং ক্লায়েন্টকে অনন্যভাবে উপস্থাপন করতে হবে এবং টোকেনটি অনুমানযোগ্য হতে হবে না।
একটি HTTP প্রতিক্রিয়া পাঠান যা ব্যবহারকারীর ব্রাউজারকে
redirect_uriপ্যারামিটার দ্বারা নির্দিষ্ট URL-এ পুনঃনির্দেশিত করে। URL খণ্ডে নিম্নলিখিত সমস্ত প্যারামিটার অন্তর্ভুক্ত করুন:-
access_token: আপনি এইমাত্র যে অ্যাক্সেস টোকেন তৈরি করেছেন -
token_type: স্ট্রিংbearer -
state: মূল অনুরোধ থেকে অপরিবর্তিত রাষ্ট্রের মান নিম্নোক্ত URL এর একটি উদাহরণ:https://oauth-redirect.googleusercontent.com/r/YOUR_PROJECT_ID#access_token=ACCESS_TOKEN&token_type=bearer&state=STATE_STRING
-
Google-এর OAuth 2.0 রিডাইরেক্ট হ্যান্ডলার অ্যাক্সেস টোকেন পাবে এবং নিশ্চিত করবে যে state মান পরিবর্তন হয়নি। Google আপনার পরিষেবার জন্য একটি অ্যাক্সেস টোকেন পাওয়ার পরে, Google AppRequest- এর অংশ হিসাবে আপনার অ্যাকশনের পরবর্তী কলগুলিতে টোকেনটি সংযুক্ত করবে।
স্বয়ংক্রিয় লিঙ্কিং পরিচালনা করুন
ব্যবহারকারী তাদের Google প্রোফাইল অ্যাক্সেস করার জন্য আপনার অ্যাকশন সম্মতি দেওয়ার পরে, Google একটি অনুরোধ পাঠায় যাতে Google ব্যবহারকারীর পরিচয়ের একটি স্বাক্ষরিত দাবি থাকে। দাবীতে এমন তথ্য রয়েছে যা ব্যবহারকারীর Google অ্যাকাউন্ট আইডি, নাম এবং ইমেল ঠিকানা অন্তর্ভুক্ত করে। আপনার প্রকল্পের জন্য কনফিগার করা টোকেন এক্সচেঞ্জ এন্ডপয়েন্ট সেই অনুরোধটি পরিচালনা করে।
যদি সংশ্লিষ্ট Google অ্যাকাউন্টটি ইতিমধ্যেই আপনার প্রমাণীকরণ সিস্টেমে উপস্থিত থাকে, তাহলে আপনার টোকেন এক্সচেঞ্জ এন্ডপয়েন্ট ব্যবহারকারীর জন্য একটি টোকেন প্রদান করে। যদি Google অ্যাকাউন্টটি একটি বিদ্যমান ব্যবহারকারীর সাথে মেলে না, তাহলে আপনার টোকেন এক্সচেঞ্জ এন্ডপয়েন্ট একটি user_not_found ত্রুটি প্রদান করে।
অনুরোধের নিম্নলিখিত ফর্ম আছে:
POST /token HTTP/1.1
Host: oauth2.example.com
Content-Type: application/x-www-form-urlencoded

grant_type=urn:ietf:params:oauth:grant-type:jwt-bearer&intent=get&assertion=JWT&consent_code=CONSENT_CODE&scope=SCOPES
আপনার টোকেন এক্সচেঞ্জ এন্ডপয়েন্ট অবশ্যই নিম্নলিখিত প্যারামিটারগুলি পরিচালনা করতে সক্ষম হবে:
| টোকেন এন্ডপয়েন্ট প্যারামিটার | |
|---|---|
grant_type | টোকেনের ধরন বিনিময় হচ্ছে। এই অনুরোধগুলির জন্য, এই প্যারামিটারের মান আছে urn:ietf:params:oauth:grant-type:jwt-bearer |
intent | এই অনুরোধগুলির জন্য, এই প্যারামিটারের মান হল `গেট`। |
assertion | একটি JSON ওয়েব টোকেন (JWT) যা Google ব্যবহারকারীর পরিচয়ের একটি স্বাক্ষরিত দাবী প্রদান করে। JWT-তে ব্যবহারকারীর Google অ্যাকাউন্ট আইডি, নাম এবং ইমেল ঠিকানা অন্তর্ভুক্ত তথ্য রয়েছে। |
consent_code | ঐচ্ছিক : উপস্থিত থাকাকালীন, একটি এককালীন কোড যা নির্দেশ করে যে ব্যবহারকারী নির্দিষ্ট স্কোপগুলি অ্যাক্সেস করার জন্য আপনার অ্যাকশনের জন্য সম্মতি দিয়েছেন। |
scope | ঐচ্ছিক : ব্যবহারকারীদের কাছ থেকে অনুরোধ করার জন্য আপনি Google-কে কনফিগার করেছেন এমন যেকোনো স্কোপ। |
যখন আপনার টোকেন এক্সচেঞ্জ এন্ডপয়েন্ট লিঙ্ক করার অনুরোধ পায়, তখন এটি নিম্নলিখিতগুলি করা উচিত:
JWT দাবী যাচাই এবং ডিকোড করুন
আপনি আপনার ভাষার জন্য একটি JWT-ডিকোডিং লাইব্রেরি ব্যবহার করে JWT দাবিকে যাচাই এবং ডিকোড করতে পারেন। টোকেনের স্বাক্ষর যাচাই করতে Google-এর সর্বজনীন কী ( JWK বা PEM ফর্ম্যাটে উপলব্ধ) ব্যবহার করুন।
ডিকোড করা হলে, JWT দাবী নিম্নলিখিত উদাহরণের মত দেখায়:
{
  "sub": 1234567890,        // The unique ID of the user's Google Account
  "iss": "https://accounts.google.com",        // The assertion's issuer
  "aud": "123-abc.apps.googleusercontent.com", // Your server's client ID
  "iat": 233366400,         // Unix timestamp of the assertion's creation time
  "exp": 233370000,         // Unix timestamp of the assertion's expiration time
  "name": "Jan Jansen",
  "given_name": "Jan",
  "family_name": "Jansen",
  "email": "jan@gmail.com", // If present, the user's email address
  "locale": "en_US"
}
টোকেনের স্বাক্ষর যাচাই করার পাশাপাশি, নিশ্চিত করুন যে দাবীর ইস্যুকারী ( iss ক্ষেত্র) হল https://accounts.google.com এবং দর্শক ( aud ফিল্ড) হল আপনার অ্যাকশনের জন্য নির্ধারিত ক্লায়েন্ট আইডি।
Google অ্যাকাউন্টটি ইতিমধ্যে আপনার প্রমাণীকরণ সিস্টেমে উপস্থিত আছে কিনা তা পরীক্ষা করুন
নিম্নলিখিত শর্তগুলির মধ্যে কোনটি সত্য কিনা তা পরীক্ষা করুন:
- দাবীর
subফিল্ডে পাওয়া Google অ্যাকাউন্ট আইডি আপনার ব্যবহারকারী ডাটাবেসে রয়েছে। - দাবীর ইমেল ঠিকানা আপনার ব্যবহারকারী ডাটাবেসের একজন ব্যবহারকারীর সাথে মেলে।
যদি উভয় শর্ত সত্য হয়, ব্যবহারকারী ইতিমধ্যে সাইন আপ করেছেন এবং আপনি একটি অ্যাক্সেস টোকেন ইস্যু করতে পারেন।
যদি দাবীতে উল্লেখ করা Google অ্যাকাউন্ট আইডি বা ইমেল ঠিকানার কোনোটিই আপনার ডাটাবেসের ব্যবহারকারীর সাথে মেলে না, তবে ব্যবহারকারী এখনও সাইন আপ করেননি। এই ক্ষেত্রে, আপনার টোকেন এক্সচেঞ্জ এন্ডপয়েন্ট একটি HTTP 401 ত্রুটির সাথে উত্তর দিতে হবে, যা error=user_not_found উল্লেখ করে, নিম্নলিখিত উদাহরণের মতো:
HTTP/1.1 401 Unauthorized
Content-Type: application/json;charset=UTF-8

{
  "error":"user_not_found",
}
user_not_found ত্রুটি সহ 401 ত্রুটির প্রতিক্রিয়া পায়, তখন Google অনুরোধের সাথে ব্যবহারকারীর প্রোফাইল তথ্য ধারণ করে এমন একটি আইডি টোকেন তৈরি এবং পাঠানোর জন্য সেট করা intent প্যারামিটারের মান সহ আপনার টোকেন এক্সচেঞ্জ এন্ডপয়েন্টকে কল করে।
Google সাইন-ইন এর মাধ্যমে অ্যাকাউন্ট তৈরি পরিচালনা করুন
যখন একজন ব্যবহারকারীকে আপনার পরিষেবাতে একটি অ্যাকাউন্ট তৈরি করার প্রয়োজন হয়, তখন Google আপনার টোকেন এক্সচেঞ্জ এন্ডপয়েন্টে একটি অনুরোধ করে যা intent=create নির্দিষ্ট করে, নিম্নলিখিত উদাহরণের মতো:
POST /token HTTP/1.1
Host: oauth2.example.com
Content-Type: application/x-www-form-urlencoded

response_type=token&grant_type=urn:ietf:params:oauth:grant-type:jwt-bearer&scope=SCOPES&intent=create&consent_code=CONSENT_CODE&assertion=JWT[&NEW_ACCOUNT_INFO]
assertion প্যারামিটারে একটি JSON ওয়েব টোকেন (JWT) রয়েছে যা Google ব্যবহারকারীর পরিচয়ের একটি স্বাক্ষরিত দাবি প্রদান করে। JWT-তে ব্যবহারকারীর Google অ্যাকাউন্ট আইডি, নাম এবং ইমেল ঠিকানা অন্তর্ভুক্ত তথ্য রয়েছে, যা আপনি আপনার পরিষেবাতে একটি নতুন অ্যাকাউন্ট তৈরি করতে ব্যবহার করতে পারেন।
অ্যাকাউন্ট তৈরির অনুরোধে সাড়া দিতে, আপনার টোকেন এক্সচেঞ্জ এন্ডপয়েন্টকে অবশ্যই নিম্নলিখিতগুলি করতে হবে:
JWT দাবী যাচাই এবং ডিকোড করুন
আপনি আপনার ভাষার জন্য একটি JWT-ডিকোডিং লাইব্রেরি ব্যবহার করে JWT দাবিকে যাচাই এবং ডিকোড করতে পারেন। টোকেনের স্বাক্ষর যাচাই করতে Google-এর সর্বজনীন কী ( JWK বা PEM ফর্ম্যাটে উপলব্ধ) ব্যবহার করুন।
ডিকোড করা হলে, JWT দাবী নিম্নলিখিত উদাহরণের মত দেখায়:
{
  "sub": 1234567890,        // The unique ID of the user's Google Account
  "iss": "https://accounts.google.com",        // The assertion's issuer
  "aud": "123-abc.apps.googleusercontent.com", // Your server's client ID
  "iat": 233366400,         // Unix timestamp of the assertion's creation time
  "exp": 233370000,         // Unix timestamp of the assertion's expiration time
  "name": "Jan Jansen",
  "given_name": "Jan",
  "family_name": "Jansen",
  "email": "jan@gmail.com", // If present, the user's email address
  "locale": "en_US"
}
টোকেনের স্বাক্ষর যাচাই করার পাশাপাশি, নিশ্চিত করুন যে দাবীর ইস্যুকারী ( iss ক্ষেত্র) হল https://accounts.google.com এবং দর্শক ( aud ফিল্ড) হল আপনার অ্যাকশনের জন্য নির্ধারিত ক্লায়েন্ট আইডি।
ব্যবহারকারীর তথ্য যাচাই করুন এবং নতুন অ্যাকাউন্ট তৈরি করুন
নিম্নলিখিত শর্তগুলির মধ্যে কোনটি সত্য কিনা তা পরীক্ষা করুন:
- দাবীর
subফিল্ডে পাওয়া Google অ্যাকাউন্ট আইডি আপনার ব্যবহারকারী ডাটাবেসে রয়েছে। - দাবীর ইমেল ঠিকানা আপনার ব্যবহারকারী ডাটাবেসের একজন ব্যবহারকারীর সাথে মেলে।
যদি উভয় শর্তই সত্য হয়, তাহলে ব্যবহারকারীকে একটি HTTP 401 ত্রুটি সহ অনুরোধের প্রতিক্রিয়া জানিয়ে তাদের বিদ্যমান অ্যাকাউন্টটিকে তাদের Google অ্যাকাউন্টের সাথে লিঙ্ক করতে অনুরোধ করুন, error=linking_error এবং login_hint হিসাবে ব্যবহারকারীর ইমেল ঠিকানা উল্লেখ করুন, নিম্নলিখিত উদাহরণের মতো:
HTTP/1.1 401 Unauthorized
Content-Type: application/json;charset=UTF-8

{
  "error":"linking_error",
  "login_hint":"foo@bar.com"
}
যদি কোনো শর্তই সত্য না হয়, JWT-তে দেওয়া তথ্য ব্যবহার করে একটি নতুন ব্যবহারকারী অ্যাকাউন্ট তৈরি করুন। নতুন অ্যাকাউন্টে সাধারণত পাসওয়ার্ড সেট থাকে না। এটি সুপারিশ করা হয় যে আপনি অন্যান্য প্ল্যাটফর্মে Google সাইন ইন যোগ করুন যাতে ব্যবহারকারীরা আপনার অ্যাপ্লিকেশনের সারফেস জুড়ে Google এর মাধ্যমে লগ ইন করতে সক্ষম হন। বিকল্পভাবে, আপনি ব্যবহারকারীকে একটি লিঙ্ক ইমেল করতে পারেন যা আপনার পাসওয়ার্ড পুনরুদ্ধারের প্রবাহ শুরু করে যাতে ব্যবহারকারীকে অন্য প্ল্যাটফর্মে সাইন ইন করার জন্য একটি পাসওয়ার্ড সেট করতে দেয়৷
নির্মাণ সম্পন্ন হলে, একটি অ্যাক্সেস টোকেন ইস্যু করুন এবং আপনার HTTPS প্রতিক্রিয়ার মূল অংশে একটি JSON অবজেক্টের মানগুলি ফিরিয়ে দিন, যেমন নিম্নলিখিত উদাহরণে:
{
  "token_type": "Bearer",
  "access_token": "ACCESS_TOKEN",

  "expires_in": SECONDS_TO_EXPIRATION
}
প্রমাণীকরণ প্রবাহের জন্য ভয়েস ইউজার ইন্টারফেস ডিজাইন করুন
ব্যবহারকারী যাচাই করা হয়েছে কিনা তা পরীক্ষা করুন এবং অ্যাকাউন্ট লিঙ্কিং প্রবাহ শুরু করুন
- অ্যাকশন কনসোলে আপনার অ্যাকশন বিল্ডার প্রকল্পটি খুলুন।
- আপনার অ্যাকশনে অ্যাকাউন্ট লিঙ্ক করা শুরু করতে একটি নতুন দৃশ্য তৈরি করুন:
- দৃশ্যে ক্লিক করুন।
- একটি নতুন দৃশ্য যোগ করতে যোগ (+) আইকনে ক্লিক করুন।
- সদ্য নির্মিত দৃশ্যে, শর্তগুলির জন্য যোগ add আইকনে ক্লিক করুন।
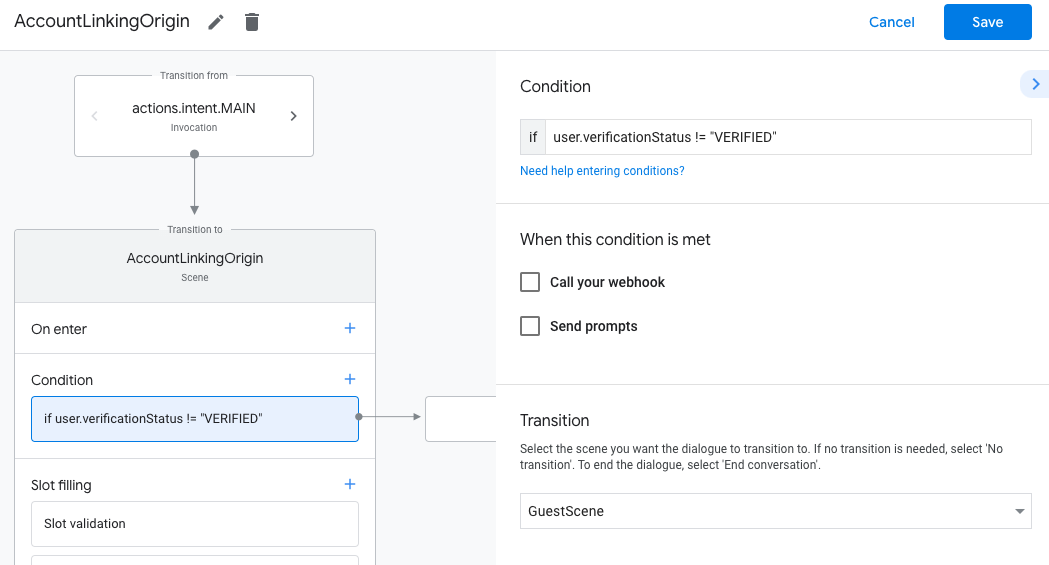
- কথোপকথনের সাথে যুক্ত ব্যবহারকারী একজন যাচাইকৃত ব্যবহারকারী কিনা তা পরীক্ষা করে এমন একটি শর্ত যোগ করুন। চেক ব্যর্থ হলে, কথোপকথনের সময় আপনার অ্যাকশন অ্যাকাউন্ট লিঙ্কিং সম্পাদন করতে পারে না, এবং অ্যাকাউন্ট লিঙ্ক করার প্রয়োজন নেই এমন কার্যকারিতাগুলিতে অ্যাক্সেস প্রদানে ফিরে আসা উচিত।
- শর্তের অধীনে
Enter new expressionক্ষেত্রটিতে, নিম্নলিখিত যুক্তিটি লিখুন:user.verificationStatus != "VERIFIED" - ট্রানজিশনের অধীনে, এমন একটি দৃশ্য নির্বাচন করুন যার জন্য অ্যাকাউন্ট লিঙ্ক করার প্রয়োজন নেই বা এমন একটি দৃশ্য যা গেস্ট-অনলি কার্যকারিতার প্রবেশ বিন্দু।
- শর্তের অধীনে
- শর্তের জন্য অ্যাড add আইকনে ক্লিক করুন।
- ব্যবহারকারীর কোনো সংশ্লিষ্ট পরিচয় না থাকলে একটি অ্যাকাউন্ট লিঙ্কিং ফ্লো ট্রিগার করার জন্য একটি শর্ত যোগ করুন।
- শর্তের অধীনে
Enter new expressionক্ষেত্রটিতে, নিম্নলিখিত যুক্তিটি লিখুন::user.verificationStatus == "VERIFIED" - ট্রানজিশনের অধীনে, অ্যাকাউন্ট লিঙ্কিং সিস্টেম দৃশ্যটি নির্বাচন করুন।
- Save এ ক্লিক করুন।
- শর্তের অধীনে
![]()
সংরক্ষণ করার পরে, আপনার প্রকল্পে <SceneName>_AccountLinking নামে একটি নতুন অ্যাকাউন্ট লিঙ্কিং সিস্টেম দৃশ্য যোগ করা হয়েছে।
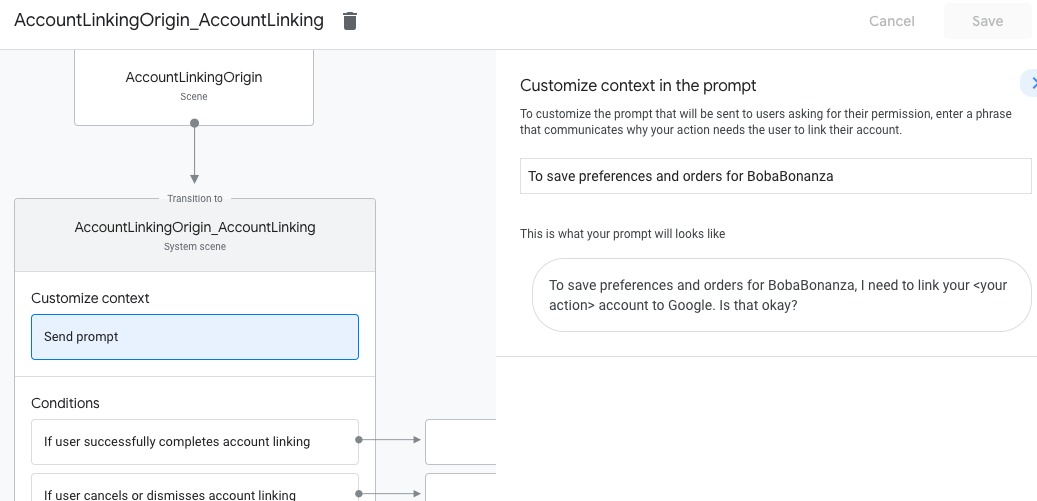
অ্যাকাউন্ট লিঙ্কিং দৃশ্য কাস্টমাইজ করুন
- দৃশ্যের অধীনে, অ্যাকাউন্ট লিঙ্কিং সিস্টেম দৃশ্য নির্বাচন করুন।
- সেন্ড প্রম্পটে ক্লিক করুন এবং ব্যবহারকারীকে বর্ণনা করতে একটি ছোট বাক্য যোগ করুন কেন অ্যাকশন তাদের পরিচয় অ্যাক্সেস করতে হবে (উদাহরণস্বরূপ "আপনার পছন্দগুলি সংরক্ষণ করতে")।
- Save এ ক্লিক করুন।
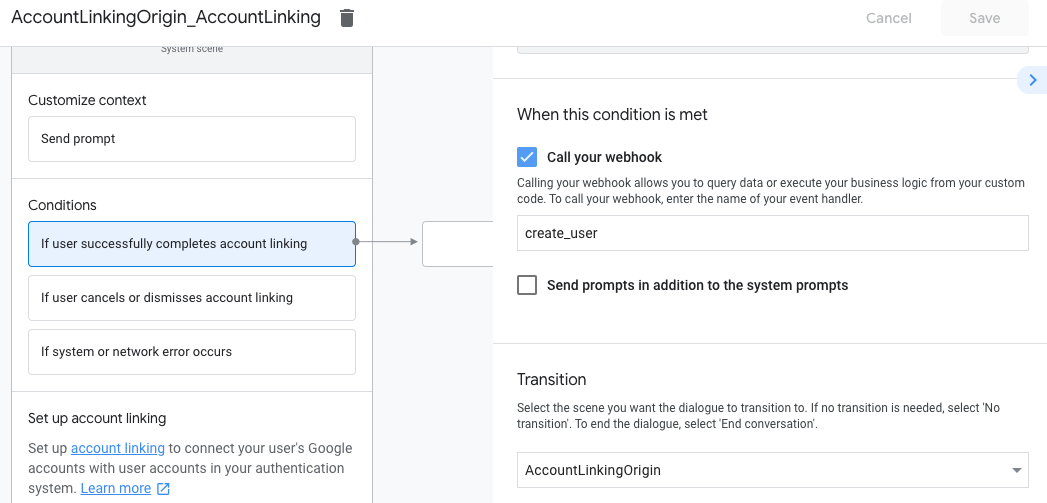
- শর্তের অধীনে, ব্যবহারকারী সফলভাবে অ্যাকাউন্ট লিঙ্কিং সম্পন্ন করলে ক্লিক করুন।
- ব্যবহারকারী যদি তাদের অ্যাকাউন্ট লিঙ্ক করতে সম্মত হন তবে কীভাবে প্রবাহটি চলবে তা কনফিগার করুন। উদাহরণ স্বরূপ, যেকোন কাস্টম বিজনেস লজিক প্রসেস করতে ওয়েবহুককে কল করুন এবং মূল দৃশ্যে ফিরে যেতে।
- Save এ ক্লিক করুন।
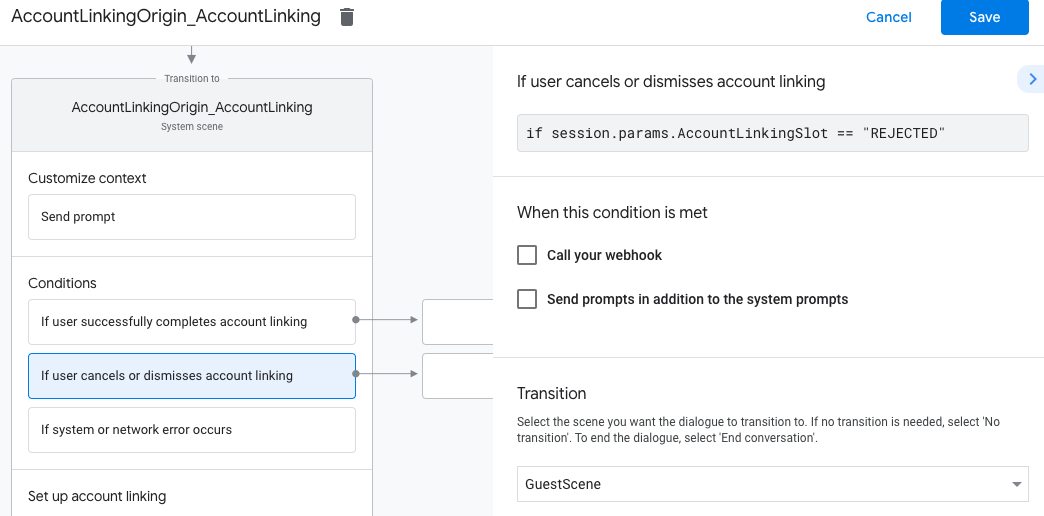
- শর্তের অধীনে, ব্যবহারকারী অ্যাকাউন্ট লিঙ্কিং বাতিল বা খারিজ করলে ক্লিক করুন।
- ব্যবহারকারী যদি তাদের অ্যাকাউন্ট লিঙ্ক করতে রাজি না হয় তবে কীভাবে প্রবাহটি চলবে তা কনফিগার করুন। উদাহরণস্বরূপ, একটি স্বীকৃতিমূলক বার্তা পাঠান এবং এমন দৃশ্যগুলিতে পুনঃনির্দেশ করুন যা কার্যকারিতা প্রদান করে যার জন্য অ্যাকাউন্ট লিঙ্ক করার প্রয়োজন নেই৷
- Save এ ক্লিক করুন।
- শর্তের অধীনে, সিস্টেম বা নেটওয়ার্ক ত্রুটি দেখা দিলে ক্লিক করুন।
- সিস্টেম বা নেটওয়ার্ক ত্রুটির কারণে অ্যাকাউন্ট লিঙ্কিং ফ্লো সম্পূর্ণ না হলে কীভাবে ফ্লো চলবে তা কনফিগার করুন। উদাহরণস্বরূপ, একটি স্বীকৃতিমূলক বার্তা পাঠান এবং এমন দৃশ্যগুলিতে পুনঃনির্দেশ করুন যা কার্যকারিতা প্রদান করে যার জন্য অ্যাকাউন্ট লিঙ্ক করার প্রয়োজন নেই৷
- Save এ ক্লিক করুন।
ডেটা অ্যাক্সেসের অনুরোধগুলি পরিচালনা করুন
অ্যাসিস্ট্যান্ট রিকোয়েস্টে যদি একটি অ্যাক্সেস টোকেন থাকে , তাহলে প্রথমে চেক করুন যে অ্যাক্সেস টোকেনটি বৈধ এবং মেয়াদ শেষ হয়নি এবং তারপর আপনার ব্যবহারকারী অ্যাকাউন্ট ডাটাবেস থেকে টোকেনের সাথে যুক্ত ব্যবহারকারী অ্যাকাউন্টটি পুনরুদ্ধার করুন।