
OAuth 기반 Google 로그인 '간소화' 연결 유형은 OAuth 기반 계정 연결 위에 Google 로그인을 추가합니다. 이를 통해 Google 사용자는 원활한 음성 기반 연결을 이용할 수 있으며, Google 이외의 ID로 서비스에 등록한 사용자는 계정 연결을 이용할 수 있습니다.
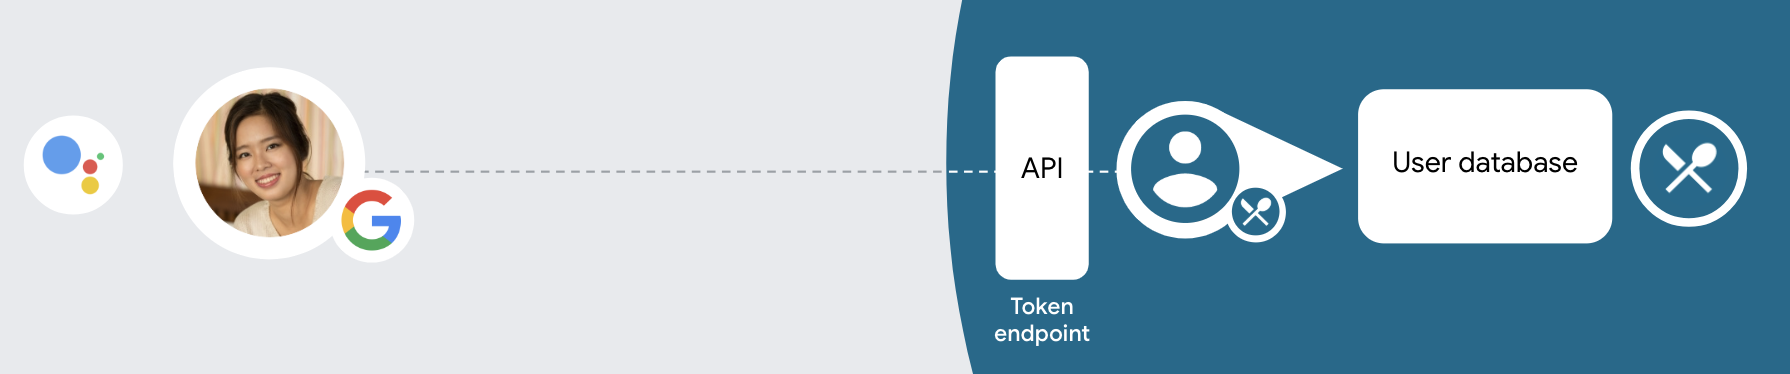
이 연결 유형은 사용자의 Google 프로필 정보가 시스템에 있는지 확인할 수 있는 Google 로그인으로 시작됩니다. 사용자의 정보가 시스템에 없으면 표준 OAuth 흐름이 시작됩니다. 사용자는 Google 프로필 정보로 새 계정을 만들 수도 있습니다.
간소화된 연결 유형으로 계정 연결을 실행하려면 다음 일반 단계를 따르세요.
- 먼저 사용자에게 Google 프로필에 액세스할 수 있도록 동의를 요청합니다.
- 프로필의 정보를 사용하여 사용자를 식별합니다.
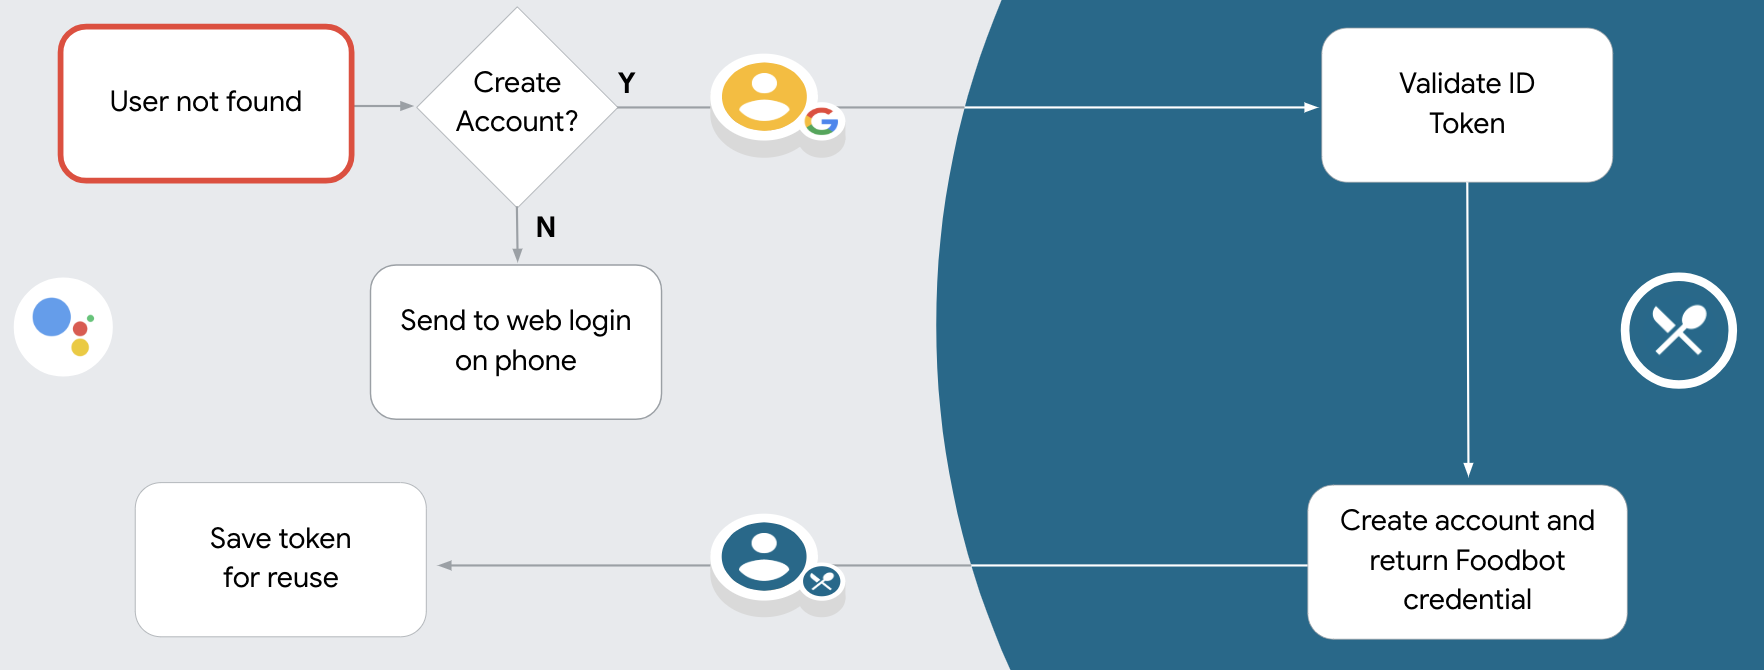
- 인증 시스템에서 Google 사용자를 찾을 수 없는 경우, 음성을 통해 또는 웹사이트에서만 사용자 계정을 만들 수 있도록 Actions 콘솔에서 Actions 프로젝트를 구성했는지에 따라 흐름이 진행됩니다.
- 음성을 통한 계정 생성을 허용하는 경우 Google에서 수신한 ID 토큰을 검증합니다. 그런 다음 ID 토큰에 포함된 프로필 정보를 기반으로 사용자를 만들 수 있습니다.
- 음성을 통한 계정 생성을 허용하지 않으면 사용자가 브라우저로 트랜스퍼되어 승인 페이지를 로드하고 사용자 생성 흐름을 완료할 수 있습니다.
음성을 통한 계정 생성 지원
음성을 통해 사용자 계정 생성을 허용하는 경우 어시스턴트는 사용자에게 다음 작업을 수행할지 묻습니다.
- Google 계정 정보를 사용하여 시스템에 새 계정을 만듭니다.
- 기존 Google 이외 계정이 있는 경우 다른 계정으로 인증 시스템에 로그인합니다.
계정 생성 흐름의 불편함을 최소화하려면 음성을 통한 계정 생성을 허용하는 것이 좋습니다. 사용자가 기존의 비 Google 계정을 사용하여 로그인하려면 음성 흐름을 종료해야 합니다.
음성을 통한 계정 생성 허용 안 함
음성을 통한 사용자 계정 생성을 허용하지 않은 경우 어시스턴트는 사용자 인증을 위해 제공한 웹사이트의 URL을 엽니다. 화면이 없는 기기에서 상호작용이 발생하는 경우 어시스턴트는 사용자에게 휴대전화로 이동하여 계정 연결 흐름을 계속 진행하도록 안내합니다.
다음과 같은 경우 생성을 허용하지 않는 것이 좋습니다.
Google 계정이 없는 사용자가 새 사용자 계정을 만들지 못하도록 하고 대신 인증 시스템의 기존 사용자 계정에 연결하도록 하려고 합니다. 예를 들어 포인트 적립 프로그램을 제공하는 경우 사용자가 기존 계정에서 적립한 포인트를 잃지 않도록 해야 할 수 있습니다.
계정 생성 흐름을 완전히 제어할 수 있어야 합니다. 예를 들어 계정 생성 중에 사용자에게 서비스 약관을 표시해야 하는 경우 생성을 허용하지 않을 수 있습니다.
OAuth 기반 Google 로그인 '간소화된' 연결 구현
계정은 업계 표준 OAuth 2.0 흐름과 연결됩니다. Actions on Google은 암시적 흐름과 승인 코드 흐름을 지원합니다.
암시적 코드 흐름에서 Google은 사용자의 브라우저에서 승인 엔드포인트를 엽니다. 로그인에 성공하면 수명이 긴 액세스 토큰을 Google에 반환합니다. 이제 어시스턴트에서 작업으로 전송되는 모든 요청에 이 액세스 토큰이 포함됩니다.
승인 코드 흐름에는 두 개의 엔드포인트가 필요합니다.
- 승인 엔드포인트: 아직 로그인하지 않은 사용자에게 로그인 UI를 표시하고 요청한 액세스에 대한 동의를 단기 승인 코드 형식으로 기록하는 역할을 합니다.
- 두 가지 유형의 교환을 담당하는 토큰 교환 엔드포인트:
- 장기 갱신 토큰과 단기 액세스 토큰으로 승인 코드를 교환합니다. 이 교환은 사용자가 계정 연결 흐름을 진행할 때 이루어집니다.
- 장기 갱신 토큰을 단기 액세스 토큰으로 교환합니다. 이 교환은 액세스 토큰이 만료되어 Google에 새 액세스 토큰이 필요할 때 발생합니다.
암시적 코드 흐름을 구현하는 것이 더 간단하지만 암시적 흐름을 사용하여 발급된 액세스 토큰은 만료되지 않는 것이 좋습니다. 토큰 만료를 암시적 흐름과 함께 사용하면 사용자가 계정을 다시 연결하게 되기 때문입니다. 보안상의 이유로 토큰 만료가 필요하다면 인증 코드 흐름을 대신 사용하는 것이 좋습니다.
프로젝트 구성
간소화된 연결을 사용하도록 프로젝트를 구성하려면 다음 단계를 따르세요.
- Actions 콘솔을 열고 사용할 프로젝트를 선택합니다.
- 개발 탭을 클릭하고 계정 연결을 선택합니다.
- 계정 연결 옆에 있는 스위치를 사용 설정합니다.
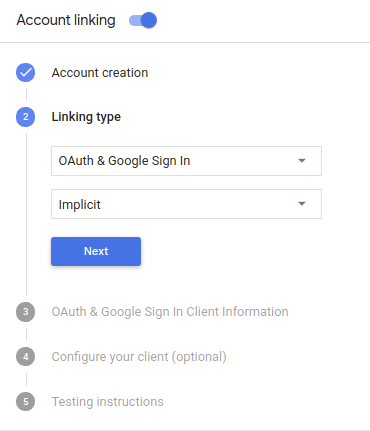
- 계정 생성 섹션에서 예를 선택합니다.
연결 유형에서 OAuth 및 Google 로그인과 암시적을 선택합니다.
클라이언트 정보에서 다음을 수행합니다.
- Google에 대한 작업에서 발급한 클라이언트 ID에 값을 할당하여 Google에서 들어오는 요청을 식별합니다.
- 승인 및 토큰 교환 엔드포인트의 URL을 삽입합니다.
저장을 클릭합니다.
OAuth 서버 구현
OAuth 2.0 암시적 흐름을 지원하기 위해 서비스 승인 사용할 수 있습니다 이 엔드포인트는 데이터 액세스에 대한 사용자의 동의 받기 승인 엔드포인트 아직 로그인하지 않은 사용자에게 로그인 UI를 표시하고 액세스할 수 있도록 합니다.
작업이 서비스의 승인된 API 중 하나를 호출해야 하는 경우 Google은 이 엔드포인트를 있습니다.
Google에서 시작한 일반적인 OAuth 2.0 암시적 흐름 세션에는 다음 흐름을 따라 하세요.
- Google은 사용자의 브라우저에서 승인 엔드포인트를 엽니다. 이 사용자가 로그인하지 않은 경우 로그인하고 Google에 액세스 권한을 부여합니다. 아직 권한을 부여하지 않은 경우 API를 통해 해당 데이터에 액세스할 수 있습니다.
- 서비스에서 액세스 토큰을 만들고 이를 액세스 토큰을 사용하여 사용자의 브라우저를 Google로 다시 리디렉션함 이 요청에 첨부됩니다.
- Google은 서비스의 API를 호출하고 실행할 수 있습니다 서비스에서 액세스 토큰이 Google에 인증한 다음 API 호출을 완료합니다.
승인 요청 처리
작업이 OAuth 2.0 암시적 흐름을 통해 계정 연결을 수행해야 하는 경우 Google은 다음을 포함한 요청과 함께 사용자를 승인 엔드포인트로 보냅니다. 다음과 같습니다.
| 승인 엔드포인트 매개변수 | |
|---|---|
client_id |
Google에 할당한 클라이언트 ID입니다. |
redirect_uri |
이 요청에 대한 응답을 보낼 URL입니다. |
state |
정해진 기간에 변경되지 않고 Google에 다시 전달되는 리디렉션 URI를 사용할 수 있습니다. |
response_type |
응답에서 반환할 값의 유형입니다. OAuth 2.0 암시적
흐름에서 응답 유형은 항상 token입니다. |
예를 들어 승인 엔드포인트를 https://myservice.example.com/auth에서 사용할 수 있는 경우
요청은 다음과 같을 수 있습니다.
GET https://myservice.example.com/auth?client_id=GOOGLE_CLIENT_ID&redirect_uri=REDIRECT_URI&state=STATE_STRING&response_type=token
승인 엔드포인트가 로그인 요청을 처리하려면 다음 단계를 따르세요.
다음과 같이
client_id및redirect_uri값을 확인합니다. 의도하지 않았거나 잘못 구성된 클라이언트 앱에 액세스 권한을 부여하지 않도록 합니다.client_id가 등록된 클라이언트 ID와 일치하는지 확인합니다. 확인할 수 있습니다redirect_uri에서 지정한 URL인지 확인합니다. 매개변수의 형식은 다음과 같습니다.https://oauth-redirect.googleusercontent.com/r/YOUR_PROJECT_ID
사용자가 서비스에 로그인했는지 확인합니다. 사용자가 로그인하지 않은 경우 서비스의 로그인 또는 가입 절차를 완료합니다.
Google에서 API에 액세스하는 데 사용할 액세스 토큰을 생성합니다. 이 액세스 토큰은 임의의 문자열 값이 될 수 있지만 클라이언트와 클라이언트에게 전달하며 추측할 수 없어야 합니다.
사용자의 브라우저를 URL로 리디렉션하는 HTTP 응답 전송
redirect_uri매개변수로 지정됩니다. 다음을 모두 포함 다음 매개변수를 포함합니다.access_token: 방금 생성한 액세스 토큰입니다.token_type: 문자열bearerstate: 원본의 수정되지 않은 상태 값입니다. 요청 다음은 결과 URL의 예입니다.https://oauth-redirect.googleusercontent.com/r/YOUR_PROJECT_ID#access_token=ACCESS_TOKEN&token_type=bearer&state=STATE_STRING
Google의 OAuth 2.0 리디렉션 핸들러가 액세스 토큰을 수신하고
state 값이 변경되지 않았음을 확인합니다. Google이
Google에서 후속 호출에 토큰을 첨부합니다.
작업을 AppRequest의 일부로 추가해야 합니다.
자동 연결 처리
사용자가 작업에서 Google 프로필에 액세스하는 데 동의하면 Google 사용자 ID의 서명된 어설션이 포함된 요청을 보냅니다. 어설션에는 사용자의 Google 계정 ID, 이름, 이메일 주소가 필요합니다. 프로젝트용으로 구성된 토큰 교환 엔드포인트는 확인할 수 있습니다
해당하는 Google 계정이 인증 시스템에 이미 있는 경우
토큰 교환 엔드포인트가 사용자의 토큰을 반환합니다. Google 계정에서
기존 사용자와 일치하면 토큰 교환 엔드포인트가 user_not_found 오류를 반환합니다.
요청의 형식은 다음과 같습니다.
POST /token HTTP/1.1
Host: oauth2.example.com
Content-Type: application/x-www-form-urlencoded

grant_type=urn:ietf:params:oauth:grant-type:jwt-bearer&intent=get&assertion=JWT&consent_code=CONSENT_CODE&scope=SCOPES
토큰 교환 엔드포인트는 다음 매개변수를 처리할 수 있어야 합니다.
| 토큰 엔드포인트 매개변수 | |
|---|---|
grant_type |
교환되는 토큰의 유형입니다. 이러한 요청의 경우
매개변수의 값은 urn:ietf:params:oauth:grant-type:jwt-bearer입니다. |
intent |
이러한 요청에서 이 매개변수의 값은 `get`입니다. |
assertion |
Google API의 서명된 어설션을 제공하는 JSON 웹 토큰 (JWT)입니다. 사용자 ID입니다. JWT에는 사용자의 Google 계정 ID, 이름, 이메일 주소 |
consent_code |
선택사항: 있는 경우 사용자가 작업이 지정된 범위에 액세스하는 데 동의했습니다. |
scope |
선택사항: 사용자에게 요청하도록 Google을 구성한 모든 범위 |
토큰 교환 엔드포인트가 연결 요청을 수신하면 다음을 수행해야 합니다. 있습니다.
JWT 어설션 검증 및 디코딩
해당 언어의 JWT 디코딩 라이브러리를 사용하여 JWT 어설션을 검증하고 디코딩할 수 있습니다. Google의 공개 키 (JWK 또는 PEM 형식)을 사용하여 토큰의 서명합니다.
JWT 어설션은 디코딩될 때 다음 예시와 같이 표시됩니다.
{
  "sub": 1234567890,        // The unique ID of the user's Google Account
  "iss": "https://accounts.google.com",        // The assertion's issuer
  "aud": "123-abc.apps.googleusercontent.com", // Your server's client ID
  "iat": 233366400,         // Unix timestamp of the assertion's creation time
  "exp": 233370000,         // Unix timestamp of the assertion's expiration time
  "name": "Jan Jansen",
  "given_name": "Jan",
  "family_name": "Jansen",
  "email": "jan@gmail.com", // If present, the user's email address
  "locale": "en_US"
}
토큰의 서명을 확인하는 것 외에도 어설션의 발급자가
(iss 필드)가 https://accounts.google.com이고 잠재고객 (aud 필드)
는 작업에 할당된 클라이언트 ID입니다.
Google 계정이 인증 시스템에 이미 있는지 확인
다음 조건 중 하나가 충족되는지 확인합니다.
- 어설션의
sub필드에 있는 Google 계정 ID는 사용자 데이터베이스에 있습니다. - 어설션의 이메일 주소가 사용자 데이터베이스의 사용자와 일치합니다.
두 가지 조건 중 하나라도 충족되면 사용자가 이미 가입한 것이므로 액세스할 수 있습니다.
Google 계정 ID와 이메일 주소가 어설션에 지정되지 않은 경우
데이터베이스의 사용자와 일치하면 사용자가 아직 가입하지 않은 것입니다. 이 경우
토큰 교환 엔드포인트가 error=user_not_found를 지정하는 HTTP 401 오류로 응답해야 합니다.
다음 예와 같이 됩니다.
HTTP/1.1 401 Unauthorized
Content-Type: application/json;charset=UTF-8

{
  "error":"user_not_found",
}
user_not_found 오류와 함께 401 오류 응답을 수신하면
intent 매개변수의 값으로 토큰 교환 엔드포인트를 호출합니다.
create로 설정하고 사용자의 프로필 정보가 포함된 ID 토큰을 전송합니다.
요청을 전달합니다.
Handle account creation via Google Sign-In
When a user needs to create an account on your service, Google makes a
request to your token exchange endpoint that specifies
intent=create, as in the following example:
POST /token HTTP/1.1
Host: oauth2.example.com
Content-Type: application/x-www-form-urlencoded

response_type=token&grant_type=urn:ietf:params:oauth:grant-type:jwt-bearer&scope=SCOPES&intent=create&consent_code=CONSENT_CODE&assertion=JWT[&NEW_ACCOUNT_INFO]
The assertion parameter contains A JSON Web Token (JWT) that provides
a signed assertion of the Google user's identity. The JWT contains information
that includes the user's Google Account ID, name, and email address, which you can use
to create a new account on your service.
To respond to account creation requests, your token exchange endpoint must do the following:
JWT 어설션 검증 및 디코딩
해당 언어의 JWT 디코딩 라이브러리를 사용하여 JWT 어설션을 검증하고 디코딩할 수 있습니다. Google의 공개 키 (JWK 또는 PEM 형식)을 사용하여 토큰의 서명합니다.
JWT 어설션은 디코딩될 때 다음 예시와 같이 표시됩니다.
{
  "sub": 1234567890,        // The unique ID of the user's Google Account
  "iss": "https://accounts.google.com",        // The assertion's issuer
  "aud": "123-abc.apps.googleusercontent.com", // Your server's client ID
  "iat": 233366400,         // Unix timestamp of the assertion's creation time
  "exp": 233370000,         // Unix timestamp of the assertion's expiration time
  "name": "Jan Jansen",
  "given_name": "Jan",
  "family_name": "Jansen",
  "email": "jan@gmail.com", // If present, the user's email address
  "locale": "en_US"
}
토큰의 서명을 확인하는 것 외에도 어설션의 발급자가
(iss 필드)가 https://accounts.google.com이고 잠재고객 (aud 필드)
는 작업에 할당된 클라이언트 ID입니다.
Validate user information and create new account
Check whether either of the following conditions are true:
- The Google Account ID, found in the assertion's
subfield, is in your user database. - The email address in the assertion matches a user in your user database.
If either condition is true, prompt the user to link their existing account with
their Google Account by responding to the request with an HTTP 401 error, specifying
error=linking_error and the user's email address as the login_hint, as in the
following example:
HTTP/1.1 401 Unauthorized
Content-Type: application/json;charset=UTF-8

{
  "error":"linking_error",
  "login_hint":"foo@bar.com"
}
If neither condition is true, create a new user account using the information provided in the JWT. New accounts do not typically have a password set. It is recommended that you add Google Sign In to other platforms to enable users to log in via Google across the surfaces of your application. Alternatively, you can email the user a link that starts your password recovery flow to allow the user to set a password for signing in on other platforms.
When the creation is completed, issue an access token and return the values in a JSON object in the body of your HTTPS response, like in the following example:
{
  "token_type": "Bearer",
  "access_token": "ACCESS_TOKEN",

  "expires_in": SECONDS_TO_EXPIRATION
}
인증 흐름의 음성 사용자 인터페이스 설계
사용자가 인증되었는지 확인하고 계정 연결 흐름 시작
- Actions 콘솔에서 Actions Builder 프로젝트를 엽니다.
- 작업에서 계정 연결을 시작할 새 장면을 만듭니다.
- 장면을 클릭합니다.
- 추가 (+) 아이콘을 클릭하여 새 장면을 추가합니다.
- 새로 만든 장면에서 조건의 추가 add 아이콘을 클릭합니다.
- 대화와 연결된 사용자가 인증된 사용자인지 확인하는 조건을 추가합니다. 확인이 실패하면 작업이 대화 중에 계정 연결을 실행할 수 없으며 계정 연결이 필요하지 않은 기능에 대한 액세스를 제공하도록 대체해야 합니다.
- 조건 아래의
Enter new expression필드에 다음 논리를 입력합니다.user.verificationStatus != "VERIFIED" - 전환에서 계정 연결이 필요하지 않은 장면이나 게스트 전용 기능의 진입점인 장면을 선택합니다.
- 조건 아래의

- 조건의 추가 add 아이콘을 클릭합니다.
- 사용자에게 연결된 ID가 없는 경우 계정 연결 흐름을 트리거하는 조건을 추가합니다.
- 조건 아래의
Enter new expression필드에 다음 논리를 입력합니다.user.verificationStatus == "VERIFIED" - 전환에서 계정 연결 시스템 장면을 선택합니다.
- 저장을 클릭합니다.
- 조건 아래의
![]()
저장하면 <SceneName>_AccountLinking라는 새 계정 연결 시스템 장면이 프로젝트에 추가됩니다.
계정 연결 장면 맞춤설정
- 장면에서 계정 연결 시스템 장면을 선택합니다.
- 프롬프트 보내기를 클릭하고 작업에서 사용자의 ID에 액세스해야 하는 이유를 설명하는 짧은 문장을 추가합니다 (예: '환경설정을 저장하기 위해').
- 저장을 클릭합니다.

- 조건에서 사용자가 계정 연결을 완료한 경우를 클릭합니다.
- 사용자가 계정 연결에 동의하는 경우 흐름이 진행되는 방식을 구성합니다. 예를 들어 필요한 맞춤 비즈니스 로직을 처리하고 원래 장면으로 다시 전환하기 위해 웹훅을 호출합니다.
- 저장을 클릭합니다.

- 조건에서 사용자가 계정 연결을 취소하거나 닫는 경우를 클릭합니다.
- 사용자가 계정 연결에 동의하지 않는 경우 흐름이 어떻게 진행되어야 하는지 구성합니다. 예를 들어 확인 메시지를 보내고 계정 연결이 필요하지 않은 기능을 제공하는 장면으로 리디렉션합니다.
- 저장을 클릭합니다.

- 조건에서 시스템 또는 네트워크 오류가 발생하는 경우를 클릭합니다.
- 시스템 또는 네트워크 오류로 인해 계정 연결 흐름을 완료할 수 없는 경우 흐름이 진행되는 방식을 구성합니다. 예를 들어 확인 메시지를 보내고 계정 연결이 필요하지 않은 기능을 제공하는 장면으로 리디렉션합니다.
- 저장을 클릭합니다.
데이터 액세스 요청 처리
어시스턴트 요청에 액세스 토큰이 포함된 경우 먼저 액세스 토큰이 유효하고 만료되지 않았는지 확인한 다음 토큰과 연결된 사용자 계정을 사용자 계정 데이터베이스에서 가져옵니다.