
OAuth पर आधारित ऐप्लिकेशन फ़्लिप लिंकिंग (ऐप्लिकेशन फ़्लिप) की मदद से, आपके उपयोगकर्ता अपने खातों को आपके पुष्टि करने वाले सिस्टम में मौजूद खातों से Google खातों में तेज़ी से लिंक कर सकते हैं. अगर उपयोगकर्ता के खाते को लिंक करने की प्रोसेस शुरू करते समय, उसके फ़ोन पर आपका ऐप्लिकेशन इंस्टॉल है, तो उसे सीधे आपके ऐप्लिकेशन पर भेज दिया जाता है. इससे वह उपयोगकर्ता की अनुमति ले पाता है.
इस तरीके से, खाता लिंक करने की प्रोसेस तेज़ी से पूरी होती है. ऐसा इसलिए, क्योंकि उपयोगकर्ता को पुष्टि करने के लिए, अपना उपयोगकर्ता नाम और पासवर्ड फिर से नहीं डालना पड़ता. इसके बजाय, ऐप्लिकेशन फ़्लिप, आपके ऐप्लिकेशन पर मौजूद उपयोगकर्ता के खाते से क्रेडेंशियल का इस्तेमाल करता है. जब कोई उपयोगकर्ता अपने Google खाते को आपके ऐप्लिकेशन से लिंक कर लेता है, तो वह आपके बनाए गए किसी भी इंटिग्रेशन का फ़ायदा ले सकता है.
iOS और Android, दोनों ऐप्लिकेशन के लिए ऐप्लिकेशन फ़्लिप की सुविधा सेट अप की जा सकती है.
ज़रूरी शर्तें
ऐप्लिकेशन फ़्लिप की सुविधा लागू करने के लिए, आपको ये ज़रूरी शर्तें पूरी करनी होंगी:
- आपके पास Android या iOS ऐप्लिकेशन होना चाहिए.
- आपके पास OAuth 2.0 सर्वर का मालिकाना हक होना चाहिए. साथ ही, आपको उसे मैनेज और बनाए रखना होगा. यह सर्वर, OAuth 2.0 के ऑथराइज़ेशन कोड के फ़्लो के साथ काम करता हो.
OAuth पर आधारित ऐप्लिकेशन फ़्लिप फ़्लो
इस क्रम के डायग्राम में, ऐप्लिकेशन फ़्लिप के लिए उपयोगकर्ता, Google ऐप्लिकेशन, आपका ऐप्लिकेशन, और आपके अनुमति सर्वर के बीच इंटरैक्शन की जानकारी दी गई है.
भूमिकाएं और ज़िम्मेदारियां
यहां दी गई टेबल में, ऐप्लिकेशन फ़्लिप फ़्लो में शामिल लोगों की भूमिकाओं और ज़िम्मेदारियों के बारे में बताया गया है.
| कार्रवाई करने वाला व्यक्ति / कॉम्पोनेंट | जीएएल की भूमिका | ज़िम्मेदारियां |
|---|---|---|
| Google ऐप्लिकेशन / सर्वर | OAuth क्लाइंट | यह कुकी, लिंक करने की प्रोसेस शुरू करती है. साथ ही, आपके मोबाइल ऐप्लिकेशन पर डीप लिंक ट्रिगर करती है. यह टोकन के लिए अनुमति कोड का आदान-प्रदान करती है और उन्हें सुरक्षित रूप से सेव करती है, ताकि आपकी सेवा के एपीआई को ऐक्सेस किया जा सके. |
| आपका ऐप्लिकेशन | अनुमति देने वाला एजेंट | यह उपयोगकर्ता की पुष्टि करता है. आम तौर पर, इसके लिए मौजूदा ऐप्लिकेशन क्रेडेंशियल का इस्तेमाल किया जाता है. साथ ही, यह सहमति लेता है और आपके सर्वर से ऑथराइज़ेशन कोड वापस पाता है. |
| आपका अनुमति देने वाला सर्वर | अनुमति देने वाला सर्वर | यह ऑथराइज़ेशन कोड और रीफ़्रेश टोकन की पुष्टि करता है. साथ ही, Google सर्वर को ऐक्सेस टोकन जारी करता है. |
OAuth लिंकिंग के ऑथराइज़ेशन कोड फ़्लो के बारे में ज़्यादा जानने के लिए, अपना OAuth सर्वर लागू करना लेख पढ़ें.
डिज़ाइन से जुड़े दिशा-निर्देश
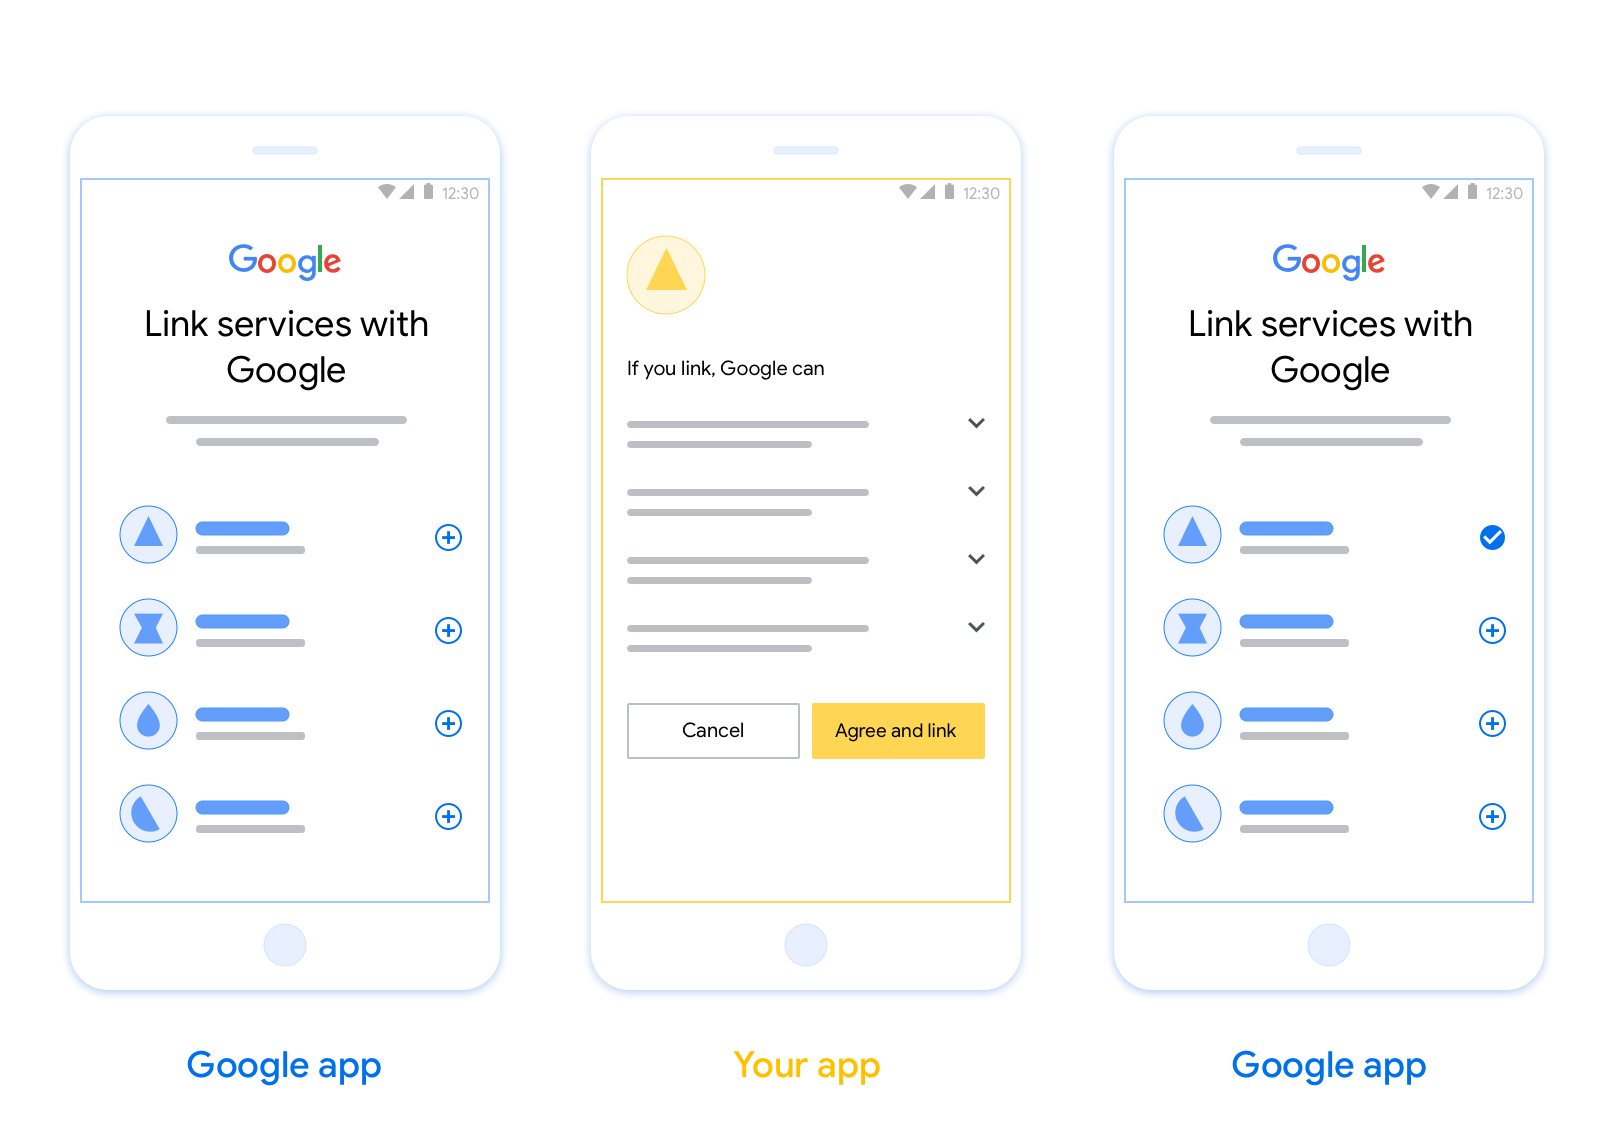
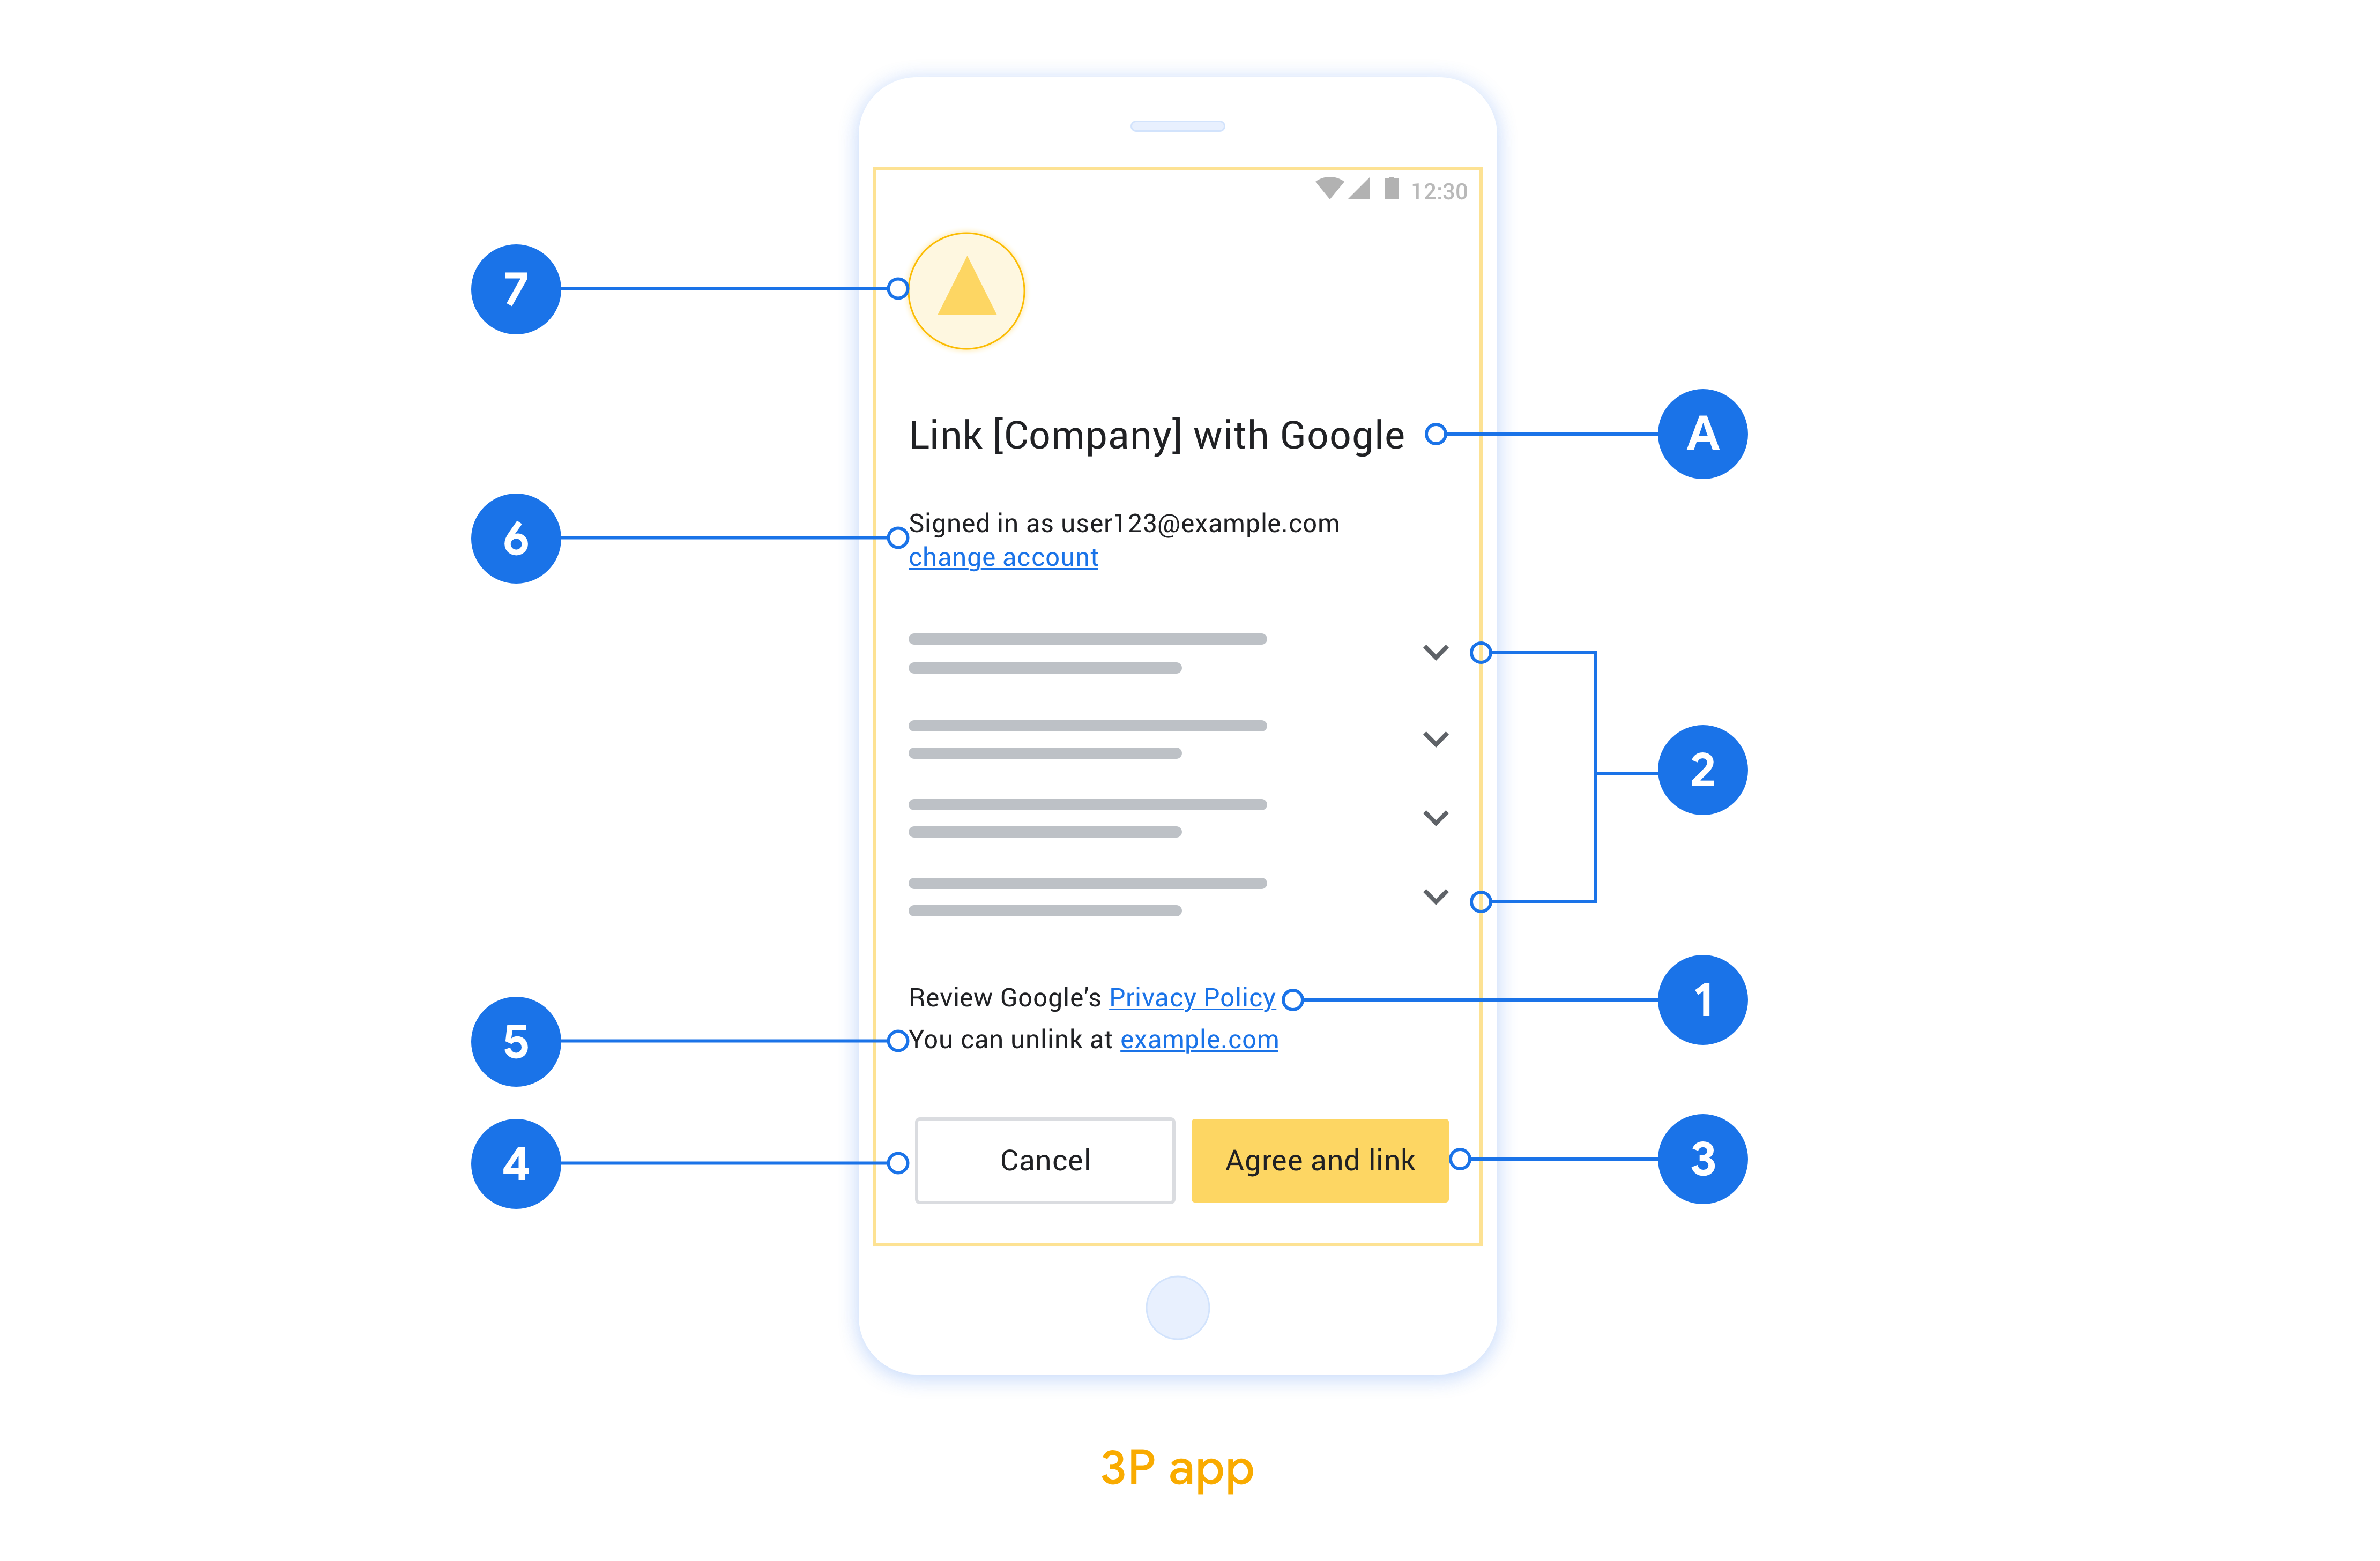
इस सेक्शन में, ऐप्लिकेशन फ़्लिप के लिए खाता लिंक करने की सहमति वाली स्क्रीन के डिज़ाइन से जुड़ी ज़रूरी शर्तों और सुझावों के बारे में बताया गया है. Google आपके ऐप्लिकेशन को कॉल करता है. इसके बाद, आपका ऐप्लिकेशन उपयोगकर्ता को सहमति वाली स्क्रीन दिखाता है.
ज़रूरी शर्तें
- आपको यह बताना होगा कि उपयोगकर्ता का खाता Google से लिंक किया जा रहा है, न कि Google के किसी खास प्रॉडक्ट से. जैसे, Google Home या Google Assistant.
सुझाव
हमारा सुझाव है कि आप ये काम करें:
Google की निजता नीति दिखाओ. सहमति वाली स्क्रीन पर, Google की निजता नीति का लिंक शामिल करें.
शेयर किया जाने वाला डेटा. उपयोगकर्ता को साफ़ तौर पर और कम शब्दों में बताएं कि Google को उसका कौनसा डेटा चाहिए और क्यों.
कॉल-टू-ऐक्शन साफ़ तौर पर बताया गया हो. सहमति लेने के लिए दिखाई जाने वाली स्क्रीन पर, कॉल-टू-ऐक्शन साफ़ तौर पर बताएं. जैसे, “सहमति दें और लिंक करें.” ऐसा इसलिए, क्योंकि उपयोगकर्ताओं को यह पता होना चाहिए कि खातों को लिंक करने के लिए, उन्हें Google के साथ कौनसा डेटा शेयर करना होगा.
अनुरोध को अस्वीकार या रद्द करने की सुविधा. अगर उपयोगकर्ता खाते लिंक नहीं करना चाहते हैं, तो उन्हें वापस जाने, अस्वीकार करने या रद्द करने का विकल्प दें.
अनलिंक करने की सुविधा. उपयोगकर्ताओं को खाता अनलिंक करने का तरीका उपलब्ध कराएं. जैसे, आपके प्लैटफ़ॉर्म पर मौजूद खाते की सेटिंग का यूआरएल. इसके अलावा, Google खाते का लिंक शामिल किया जा सकता है. इससे उपयोगकर्ता, लिंक किए गए खाते को मैनेज कर सकते हैं.
उपयोगकर्ता खाते को बदलने की सुविधा. उपयोगकर्ताओं को उनके खाते स्विच करने का तरीका सुझाएं. यह खास तौर पर तब फ़ायदेमंद होता है, जब उपयोगकर्ताओं के पास एक से ज़्यादा खाते हों.
- अगर किसी उपयोगकर्ता को खाता बदलने के लिए, सहमति वाली स्क्रीन बंद करनी पड़ती है, तो Google को ऐसी गड़बड़ी की जानकारी भेजें जिसे ठीक किया जा सकता हो. इससे उपयोगकर्ता, OAuth लिंकिंग और इंप्लिसिट फ़्लो का इस्तेमाल करके, अपने पसंदीदा खाते में साइन इन कर पाएगा.
अपना लोगो शामिल करें. सहमति वाली स्क्रीन पर, अपनी कंपनी का लोगो दिखाएं. लोगो को सही जगह पर रखने के लिए, स्टाइल से जुड़े दिशा-निर्देशों का इस्तेमाल करें. अगर आपको Google का लोगो भी दिखाना है, तो लोगो और ट्रेडमार्क देखें.
OAuth पर आधारित ऐप्लिकेशन फ़्लिप की सुविधा सेट अप करना
यहां दिए गए सेक्शन में, OAuth पर आधारित ऐप्लिकेशन फ़्लिप की ज़रूरी शर्तों के बारे में बताया गया है. साथ ही, Actions console में ऐप्लिकेशन फ़्लिप प्रोजेक्ट को कॉन्फ़िगर करने का तरीका बताया गया है.
कार्रवाई बनाना और OAuth 2.0 सर्वर सेट अप करना
ऐप्लिकेशन फ़्लिप की सुविधा कॉन्फ़िगर करने से पहले, आपको ये काम करने होंगे:
- कोई ऐक्शन बनाएं. कोई कार्रवाई बनाने के लिए, प्रोजेक्ट बनाना सेक्शन में दिए गए निर्देशों का पालन करें.
- OAuth 2.0 सर्वर सेट अप करें. OAuth सर्वर सेट अप करने के बारे में ज़्यादा जानने के लिए, OAuth की मदद से खाता लिंक करने की सुविधा लागू करना लेख पढ़ें.
Actions console में ऐप्लिकेशन फ़्लिप की सुविधा कॉन्फ़िगर करना
यहां दिए गए सेक्शन में, Actions console में ऐप्लिकेशन फ़्लिप को कॉन्फ़िगर करने का तरीका बताया गया है.
- सबसे ऊपर मौजूद नेविगेशन में जाकर, डेवलप करें पर क्लिक करें. इसके बाद, बाईं ओर मौजूद नेविगेशन में खाता लिंक करना पर क्लिक करें.
- खाता जोड़ना के बगल में मौजूद स्विच को टॉगल करके चालू करें.
- खाता बनाना में जाकर, नहीं, मुझे सिर्फ़ अपनी वेबसाइट पर खाता बनाने की अनुमति देनी है को चुनें.
- आगे बढ़ें पर क्लिक करें.
- लिंक करने का टाइप में जाकर, ड्रॉप-डाउन मेन्यू से OAuth और ऑथराइज़ेशन कोड चुनें.
- आगे बढ़ें पर क्लिक करें.
- OAuth क्लाइंट की जानकारी में दिए गए सभी फ़ील्ड भरें. (अगर ऐप्लिकेशन फ़्लिप की सुविधा काम नहीं करती है, तो फ़ॉलबैक के तौर पर सामान्य OAuth का इस्तेमाल किया जाता है.)
- आगे बढ़ें पर क्लिक करें.
- खाता लिंक करने के लिए अपने ऐप्लिकेशन का इस्तेमाल करें (ज़रूरी नहीं) में जाकर, iOS के लिए चालू करें को चुनें.
- यूनिवर्सल लिंक फ़ील्ड भरें. यूनिवर्सल लिंक के बारे में ज़्यादा जानकारी के लिए, ऐप्लिकेशन और वेबसाइटों को आपके कॉन्टेंट से लिंक करने की अनुमति देना लेख पढ़ें.
- अगर आपको अपने क्लाइंट को कॉन्फ़िगर करना है, तो स्कोप जोड़ें. इसके बाद, अपने क्लाइंट को कॉन्फ़िगर करें (ज़रूरी नहीं) में जाकर, स्कोप जोड़ें पर क्लिक करें. अगर नहीं दिखता है, तो आगे बढ़ें पर क्लिक करें.
- जांच के निर्देशों में, प्लेसहोल्डर के तौर पर
test(या कोई अन्य स्ट्रिंग) टाइप करें. (अगर आपको वाकई में अपना ऐक्शन पब्लिश करने के लिए सबमिट करना है, तो ही इस फ़ील्ड में टेस्ट खाते की जानकारी भरें.) - सेव करें पर क्लिक करें.
अब अपने iOS या Android ऐप्लिकेशन में ऐप्लिकेशन फ़्लिप की सुविधा लागू करने के लिए, अगले सेक्शन पर जाएं.
अपने नेटिव ऐप्लिकेशन में ऐप्लिकेशन फ़्लिप की सुविधा लागू करना
ऐप्लिकेशन फ़्लिप की सुविधा लागू करने के लिए, आपको अपने ऐप्लिकेशन में उपयोगकर्ता की अनुमति वाले कोड में बदलाव करना होगा, ताकि Google से डीप लिंक स्वीकार किया जा सके.
अपने डिवाइस पर ऐप्लिकेशन फ़्लिप की सुविधा आज़माना
आपने कंसोल और अपने ऐप्लिकेशन में, कार्रवाई बना ली है और ऐप्लिकेशन फ़्लिप की सुविधा कॉन्फ़िगर कर ली है. अब अपने मोबाइल डिवाइस पर ऐप्लिकेशन फ़्लिप की सुविधा की जांच की जा सकती है. ऐप्लिकेशन फ़्लिप की सुविधा को आज़माने के लिए, Google Assistant ऐप्लिकेशन का इस्तेमाल किया जा सकता है.
Assistant ऐप्लिकेशन से ऐप्लिकेशन फ़्लिप की सुविधा को आज़माने के लिए, यह तरीका अपनाएं:
- Actions console पर जाएं और अपना प्रोजेक्ट चुनें.
- सबसे ऊपर मौजूद नेविगेशन में, टेस्ट करें पर क्लिक करें.
- Assistant ऐप्लिकेशन से, खाते को लिंक करने की प्रोसेस शुरू करने के लिए:
- Google Assistant ऐप्लिकेशन खोलें.
- सेटिंग पर क्लिक करें.
- Assistant टैब पर, होम कंट्रोल पर क्लिक करें.
- जोड़ें(+) पर क्लिक करें.
- सेवा देने वाली कंपनियों की सूची में से, अपनी कार्रवाई चुनें. यह सूची में “[test]” के तौर पर दिखेगा. सूची से [test] कार्रवाई चुनने पर, आपका ऐप्लिकेशन खुलना चाहिए.
- पुष्टि करें कि आपका ऐप्लिकेशन लॉन्च हो गया है. इसके बाद, अनुमति पाने की प्रोसेस की जांच शुरू करें.