
Page Summary
-
Actions on Google development often involves Dialogflow for NLU and Dialogflow fulfillment for logic, which should be tested as separate components.
-
The Dialogflow agent can be tested as a system that takes a user query as input and outputs intent metadata and extracted parameters.
-
Dialogflow fulfillment can be tested as a system that accepts JSON requests as input and produces JSON responses as output.
-
Both unit and integration tests can be performed for the Dialogflow agent and fulfillment webhook to ensure proper functionality and interaction.
-
Load testing the fulfillment webhook is recommended before production deployment to identify performance issues under different load scenarios.
Developing an Action for the Actions on Google platform often involves implementing Dialogflow for its natural language understanding (NLU), and Dialogflow fulfillment, which handles the logic for your Action. Having tests in your codebase helps ensure that your Action performs as expected in production.
When implementing unit, integration, or end-to-end tests for your Action, you should consider your Dialogflow agent and fulfillment as separate components.
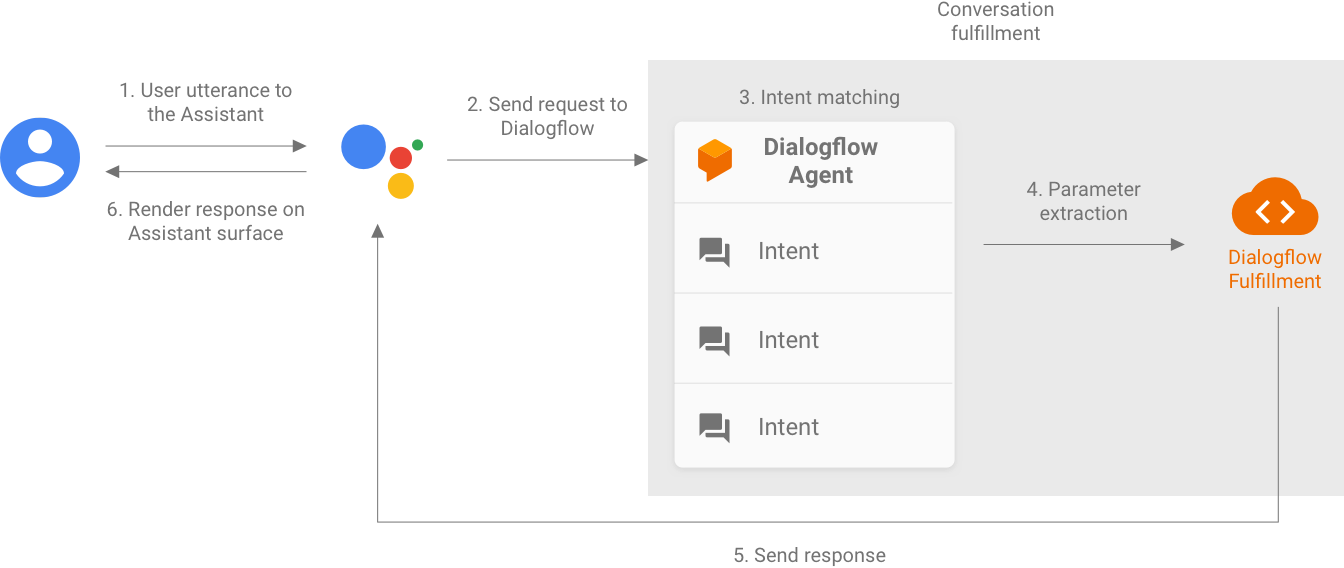
Figure 1. Flowchart describing systems to consider for testing
Testing a Dialogflow agent
The Dialogflow agent and fulfillment are tested as separate components. The following subsections describe how you can conceptualize and test the Dialogflow agent for your Action.
Dialogflow as a query-in and intent-out system
Your Dialogflow agent is responsible for taking a user's query, matching it to an intent, and extracting any predefined entities from the query. Your agent interacts with your fulfillment by passing a message containing the matched intent, its parameters, and Actions on Google metadata.
As the developer, you control the configuration of the Dialogflow agent, like the structure of intents and entities. The Actions on Google metadata comes from Actions on Google, and can be assumed to contain the correct data for testing.
When testing, focus on making your agent capable of correctly extracting intent parameters and matching queries to intents. This approach provides a quantifiable metric for assessing the performance of the agent. You can calculate this metric by preparing and using individual test cases or a validation set.

Figure 2. Representation of Dialogflow as query-in and intent-out system
Unit tests
For your Dialogflow agent, you can write tests where each case expects a text query as an input and produces intent metadata as an output. This metadata should (at minimum) contain the name of the matched intent and a list of matched parameters.
The detectIntent endpoint of the Dialogflow API
takes the text query as an input and produces a structured output that contains
the name of the resolved intent and extracted parameters. This output is useful
for assessing the intent-matching performance of the agent. For a complete
reference of other useful fields, see the QueryResult reference.
A sample test looks like this:
it('choose_fact', async function() {
  // The `dialogflow` variable is an abstraction around the API that creates
  // and sends payloads to Dialogflow.
  const resJson = await dialogflow.detectIntent(
    'Tell me about the history of Google');
  expect(resJson.queryResult).to.include.deep.keys('parameters');
  // Check that Dialogflow extracted required entities from the query.
  expect(resJson.queryResult.parameters).to.deep.equal({
    'category': 'history',
    // Put any other parameters you wish were extracted
  });
  expect(resJson.queryResult.intent.displayName).to.equal('choose_fact');
});
This snippet uses Mocha and Chai. See the full working example of the Dialogflow unit test written in Node.js for Facts About Google.
Your test files can be run in parallel because the Dialogflow API accepts a
sessionId as an argument. As a result, you can have a separate sandbox for
each conversation while using a single Dialogflow API client.
Because you're making requests against the Dialogflow API, a charge may be incurred if your quota of free calls is reached. See quotas and limits for more information.
Integration tests
The Dialogflow API's detectIntent endpoint also
triggers third-party fulfillment. As such, it's possible to write test cases
that cover the integration between the Dialogflow agent and Dialogflow
fulfillment.
The main difference between writing integration and unit tests for Dialogflow is that, in the integration test, you can assert responses coming from the webhook as well as the Dialogflow intent and entity extraction.
See the full working example of an integration test written in Node.js in the Facts About Google repository.
Testing a Dialogflow fulfillment webhook
The Dialogflow agent and Dialogflow fulfillment are tested as separate components. The following subsections describe how you can conceptualize and test fulfillment for your Action.
Fulfillment as a JSON-in and JSON-out system
Your Dialogflow fulfillment code both expects requests and produces responses in the JSON format. As a result, you can test your fulfillment code by thinking of it as a JSON-in and JSON-out system. The request contains metadata both from Dialogflow and Actions on Google, so it has everything needed to trigger a particular intent handler in your fulfillment.
To test the triggering of an intent handler, you send a JSON request (input) to your Action. This request is passed to your fulfillment, which is accessible on the internet. The fulfillment then produces a JSON response (output), which can be assessed for validation.
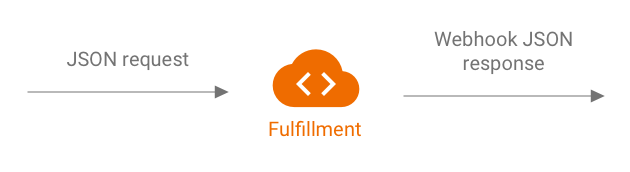
Figure 3. Representation of a fulfillment as JSON-in and JSON-out system
Unit tests
Think of the fulfillment webhook code as a system that accepts a JSON input and produces a JSON output. The process of testing an Action is then simplified to providing a request to your fulfillment and checking the resulting output JSON.
This gives you the freedom to host the fulfillment locally and send HTTP requests locally for testing. If you're using the Actions on Google Node.js client library, you can also send JSON requests directly to the client library middleware layer.
If you test the webhook code with JSON inputs and receive the expected JSON outputs, then you can say with reasonable confidence that the parts you control work properly. You can assume that Dialogflow and Actions on Google are working properly because they're generating the correct JSON payloads. This isolation provides a simplified programming model for writing tests.
Here's a general outline of the testing process:
- Use the simulator in the Actions console to get the JSON requests for each step in a use case. Save these as JSON files. Alternatively, you can build those requests yourself using information from the webhook reference documentation.
- Write tests to invoke the webhook with these payloads.
- For each test, ensure that the response JSON contains the expected items.
Additionally, this model allows you to test Dialogflow fulfillment in a continuous integration setting because the fulfillment endpoint can run locally, and the Dialogflow API has a built-in concept of sessions.
An example test looks like this:
it('yes-history', function() {
  expect(jsonRes.payload).to.have.deep.keys('google');
  expect(jsonRes.payload.google.expectUserResponse).to.be.true;
  expect(jsonRes.payload.google.richResponse.items).to.have.lengthOf(3);
  expect(jsonRes.payload.google.richResponse.suggestions).to.have
    .deep.members([
      {'title': 'Sure'}, {'title': 'No thanks'},
    ]);
});
The above snippet uses Mocha and Chai. See the full working example written in Node.js in the Facts About Google repository.
Designing unit-testable fulfillment
Webhook code often contains custom business logic that your application relies on to satisfy its needs. Additionally, the webhook code can also contain intent handlers.
To improve the granularity of unit tests for your fulfillment code, it's good practice to organize your code in such a way that the business logic is decoupled from the intent handling routines. This means having intent handlers and business logic in separate modules, so each piece can be tested independently.
For an example, refer to our shiritori sample action on GitHub.
In that sample, functions/index.js and functions/shiritori/*.js separately
contain the intent handlers and business logic, allowing for more robust test
suites.
Integration tests
For writing test cases that cover the integration between Dialogflow and your fulfillment webhook code, read the integration testing section for Dialogflow above.
Load tests
Before deploying your Action to production, we also recommend load testing your webhook fulfillment to surface performance issues that cause degradation or interruption of your fulfillment service.
Here are some examples of performance issues you may catch in load testing:
- Limited compute and memory
- Quota restrictions from your providers
- Slow data reads and writes
- Concurrency issues in the code
Load testing scenarios depend on the expected or historical usage pattern of your Action, but typical scenarios to test are sudden increases in load (spike) and sustained loads (soak).
Identify scenarios where your webhook is called and it performs resource-intensive operations. Typical resource-intensive operations include querying a database, calling another API, performing compute, and memory intensive operations like rendering a sound file.
For these scenarios, you can capture requests sent by Actions on Google servers to the webhook from your webhook logs or from Stackdriver logs. You can also capture requests from the Actions console simulator.
Once you have the requests, you can use a load testing tool to find out how your webhook responds under different load testing scenarios. The following subsections provide some examples of spike testing and soak testing using ApacheBench.
Spike testing
Spike testing requires you to send a constant number of requests to the webhook for some time and suddenly increase the load. For example, you may set up a test that sends a load of 10 queries per second (QPS) with a few spikes of 60 QPS.
You can run the following ApacheBench command to send 60 concurrent requests to your webhook:
ab -n 60 -c 60 -p ActionRequest.json -T 'application/json' https://example.com/webhookFunctionName
Assume the ActionRequest.json file contains the captured request payload sent
to your webhook.
Soak testing
Soak testing requires you to send a constant number of requests to the webhook and observe the response. For example, you may set up a test that sends a constant load of 10-20 QPS for several minutes to see if response times increase.
You can run the following ApacheBench command to send 1200 requests, with 10 concurrent requests every second:
ab -t 120 -n 1200 -p ActionRequest.json -T 'application/json' https://example.com/webhookFunctionName
Assume the ActionRequest.json file contains the captured request payload sent
to your webhook.
Analyzing load testing results
After running load tests, analyze the results for webhook response times. Indicators of issues in your webhook implementation are usually trends like a median response time that increases with every test run, or a worst-case response time that is unacceptable for your Action.
End-to-end testing
End-to-end testing prior to submitting your Action for approval uses the Actions console simulator. You can find steps for end-to-end testing via the Actions console simulator in the Actions simulator documentation. Performing these tests helps you remove potential uncertainties from the Actions on Google infrastructure component.