本指南說明如何運用程式設計最佳做法,在 iPhone X 上正確呈現廣告。
必要條件
- 完整閱讀入門指南。
橫幅廣告
橫幅廣告必須放在「安全區域」內,確保不會被螢幕圓角、俗稱「瀏海」的感應器區域或底部橫條擋住。本頁示範如何利用限制條件,將橫幅廣告置於安全區域的頂端或底部,並展示在支援 iOS 9 和 Xcode 9 以上版本的環境中,如何透過 Storyboard 與程式設定限制條件。此外,也提供適用於較早 iOS 和 Xcode 版本的替代做法。
Storyboard/Interface Builder
如果您的應用程式使用 Interface Builder,請先確認已啟用 Safe Area Layout Guides。這需要使用 Xcode 9 以上版本,並以 iOS 9 以上版本為目標。
開啟 Interface Builder 檔案,然後按一下 View Controller 場景。右側會顯示「Interface Builder Document」選項,請勾選「Use Safe Area Layout Guides」,並確認您的應用程式最低支援 iOS 9.0 以上版本。

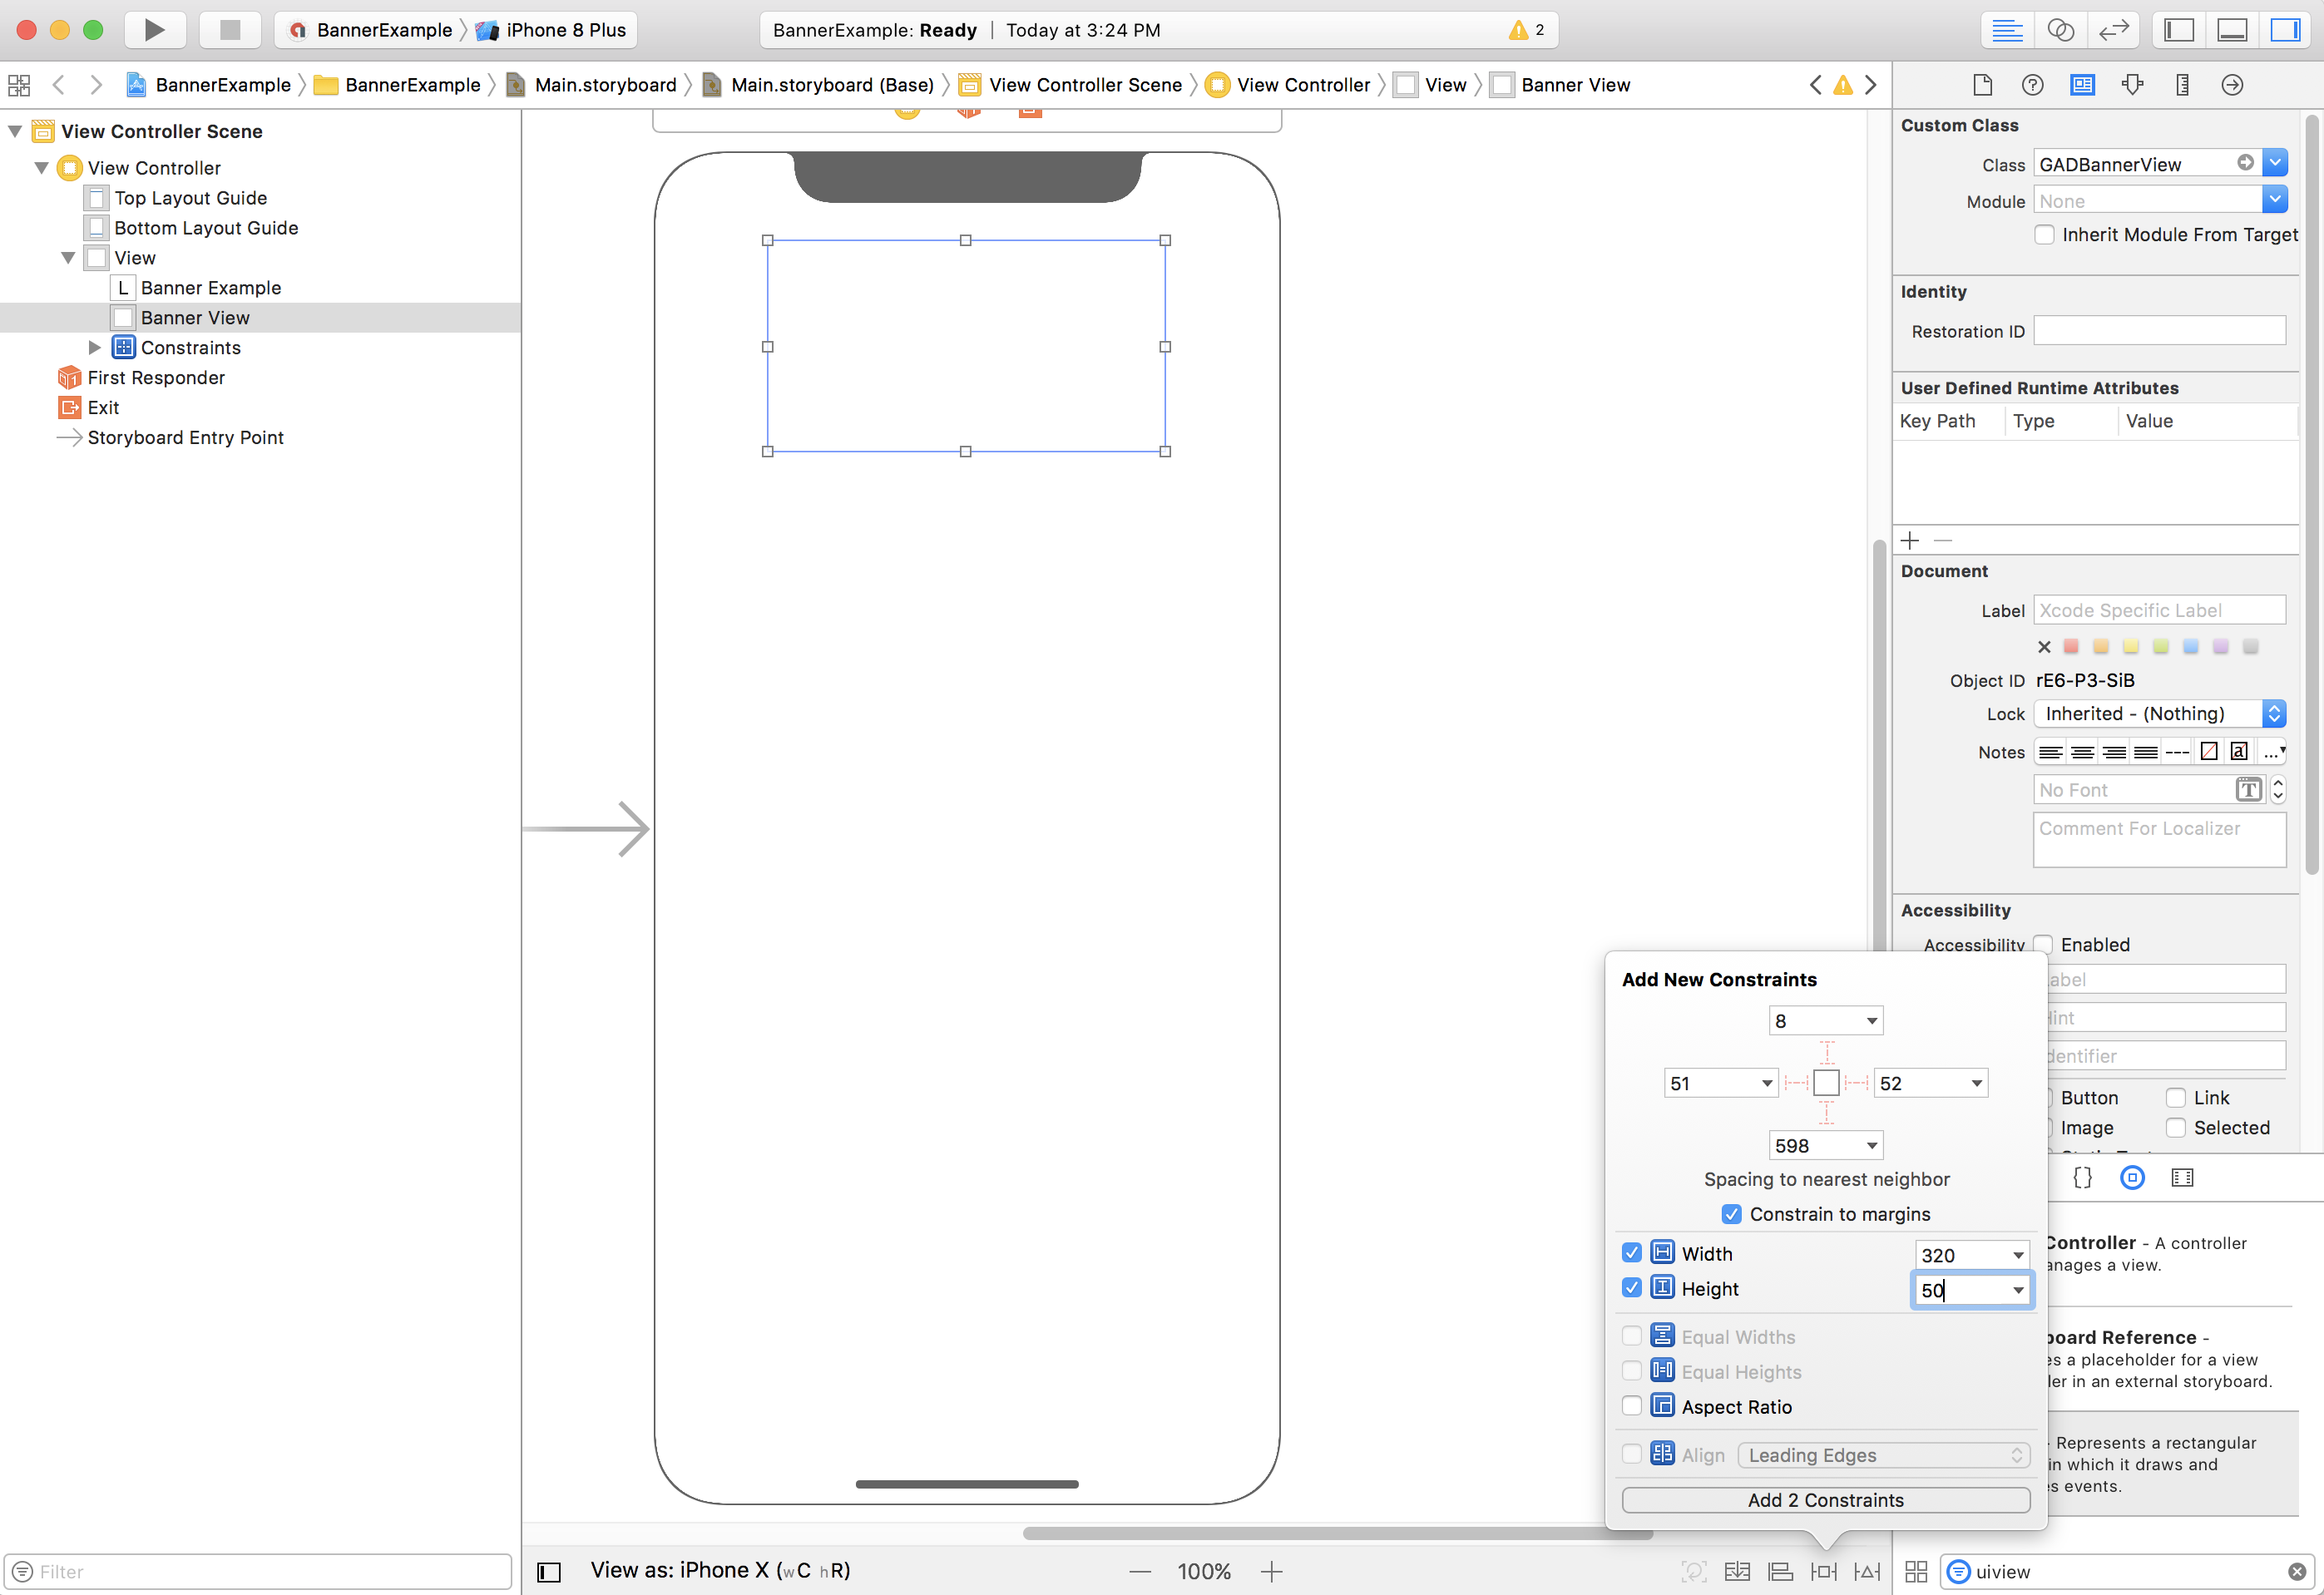
建議設定寬度和高度限制,將橫幅廣告固定為所需大小。
現在,您可以將 GAMBannerView 的 Top 屬性設為對齊安全區域頂部,讓橫幅廣告貼合安全區域上緣:

同樣地,您可以將 GAMBannerView 的 Bottom 屬性設為對齊安全區域底部,讓橫幅貼合安全區域下緣:

您的限制條件應類似下方螢幕截圖所示 (大小/位置可能不同):

ViewController
下方這段簡單的 View Controller 程式碼,展示了在 GAMBannerView 中顯示橫幅廣告所需的基本設定,對應上方的 Storyboard 設定。
Swift
class ViewController: UIViewController {

  /// The banner view.
  @IBOutlet var bannerView: AdManagerBannerView!

  override func viewDidLoad() {
    super.viewDidLoad()
    // Replace this ad unit ID with your own ad unit ID.
    bannerView.adUnitID = "/21775744923/example/adaptive-banner"
    bannerView.rootViewController = self
    bannerView.load(AdManagerRequest())
  }

}
Objective-C
@interface ViewController()

@property(nonatomic, strong) IBOutlet GAMBannerView *bannerView;

@end

@implementation ViewController

- (void)viewDidLoad {
  [super viewDidLoad];

  // Replace this ad unit ID with your own ad unit ID.
  self.bannerView.adUnitID = @"/21775744923/example/adaptive-banner";
  self.bannerView.rootViewController = self;
  GAMRequest *request = [GAMRequest request];
  [self.bannerView loadRequest:request];
}
將橫幅廣告對齊安全區域邊緣
如果希望橫幅廣告與螢幕等寬,或靠左/靠右對齊,請將橫幅廣告的左/右邊緣對齊安全區域,而不是上層檢視區塊的邊緣。
如已啟用「Use Safe Area Layout Guides」,在 Interface Builder 中新增限制條件時,預設會以安全區域的邊緣為依據。
支援 iOS 8 以下版本
如要支援 iOS 8 以下版本的裝置,使用 Interface Builder 編輯 Interface Builder 檔案和 Storyboard 時,應取消勾選「Use Safe Area Layout Guides」。
這樣一來,在新增限制條件時,就能指定對齊上方版面配置輔助線的底部,而不是安全區域上緣:

同樣地,您可以指定對齊下方版面配置輔助線的頂部,而不是安全區域下緣:

與螢幕等寬的橫幅廣告 (只在橫向模式下受到安全區域影響) 沒有這些版面配置輔助線。使用 Interface Builder 時,建議以相對於邊界的距離,來設定左右邊緣的限制條件:

這樣一來,橫幅廣告的邊緣就會與上層檢視區塊/安全區域的邊界保持一點距離,確保在 iPhone X 的橫向模式中不受遮擋。您也可以藉由程式輔助達成同樣的效果。
程式輔助
如果您的應用程式依靠程式輔助來顯示橫幅廣告,您可以在程式碼中設定限制條件來調整位置。以下示範如何將橫幅廣告水平置中,並固定在安全區域底部 (適用於 iOS 7.0 以上版本):
Swift
class ViewController: UIViewController {

  var bannerView: AdManagerBannerView!

  override func viewDidLoad() {
    super.viewDidLoad()

    // Instantiate the banner view with your desired banner size.
    bannerView = AdManagerBannerView(adSize: AdSizeBanner)
    addBannerViewToView(bannerView)
    bannerView.rootViewController = self
    // Set the ad unit ID to your own ad unit ID here.
    bannerView.adUnitID = "/21775744923/example/adaptive-banner"
    bannerView.load(AdManagerRequest())
  }

  func addBannerViewToView(_ bannerView: UIView) {
    bannerView.translatesAutoresizingMaskIntoConstraints = false
    view.addSubview(bannerView)
    if #available(iOS 11.0, *) {
      positionBannerAtBottomOfSafeArea(bannerView)
    }
    else {
      positionBannerAtBottomOfView(bannerView)
    }
  }

  @available (iOS 11, *)
  func positionBannerAtBottomOfSafeArea(_ bannerView: UIView) {
    // Position the banner. Stick it to the bottom of the Safe Area.
    // Centered horizontally.
    let guide: UILayoutGuide = view.safeAreaLayoutGuide

    NSLayoutConstraint.activate(
      [bannerView.centerXAnchor.constraint(equalTo: guide.centerXAnchor),
       bannerView.bottomAnchor.constraint(equalTo: guide.bottomAnchor)]
    )
  }

  func positionBannerAtBottomOfView(_ bannerView: UIView) {
    // Center the banner horizontally.
    view.addConstraint(NSLayoutConstraint(item: bannerView,
                                          attribute: .centerX,
                                          relatedBy: .equal,
                                          toItem: view,
                                          attribute: .centerX,
                                          multiplier: 1,
                                          constant: 0))
    // Lock the banner to the top of the bottom layout guide.
    view.addConstraint(NSLayoutConstraint(item: bannerView,
                                          attribute: .bottom,
                                          relatedBy: .equal,
                                          toItem: self.bottomLayoutGuide,
                                          attribute: .top,
                                          multiplier: 1,
                                          constant: 0))
  }

}
Objective-C
@interface ViewController()

@property(nonatomic, strong) GAMBannerView *bannerView;

@end

@implementation ViewController

- (void)viewDidLoad {
  [super viewDidLoad];

  // Instantiate the banner view with your desired banner size.
  self.bannerView = [[GAMBannerView alloc] initWithAdSize:kGADAdSizeBanner];
  [self addBannerViewToVIew:self.bannerView];

  // Replace this ad unit ID with your own ad unit ID.
  self.bannerView.adUnitID = @"/21775744923/example/adaptive-banner";
  self.bannerView.rootViewController = self;
  GAMRequest *request = [GAMRequest request];
  [self.bannerView loadRequest:request];
}

#pragma mark - view positioning

-(void)addBannerViewToView:(UIView *_Nonnull)bannerView {
  self.bannerView.translatesAutoresizingMaskIntoConstraints = NO;
  [self.view addSubview:self.bannerView];
  if (@available(ios 11.0, *)) {
    [self positionBannerViewAtBottomOfSafeArea:bannerView];
  } else {
    [self positionBannerViewAtBottomOfView:bannerView];
  }
}

- (void)positionBannerViewAtBottomOfSafeArea:(UIView *_Nonnull)bannerView NS_AVAILABLE_IOS(11.0) {
  // Position the banner. Stick it to the bottom of the Safe Area.
  // Centered horizontally.
  UILayoutGuide *guide = self.view.safeAreaLayoutGuide;
  [NSLayoutConstraint activateConstraints:@[
    [bannerView.centerXAnchor constraintEqualToAnchor:guide.centerXAnchor],
    [bannerView.bottomAnchor constraintEqualToAnchor:guide.bottomAnchor]
  ]];
}

- (void)positionBannerViewAtBottomOfView:(UIView *_Nonnull)bannerView {
  [self.view addConstraint:[NSLayoutConstraint constraintWithItem:bannerView
                                                        attribute:NSLayoutAttributeCenterX
                                                        relatedBy:NSLayoutRelationEqual
                                                           toItem:self.view
                                                        attribute:NSLayoutAttributeCenterX
                                                       multiplier:1
                                                         constant:0]];
  [self.view addConstraint:[NSLayoutConstraint constraintWithItem:bannerView
                                                        attribute:NSLayoutAttributeBottom
                                                        relatedBy:NSLayoutRelationEqual
                                                           toItem:self.bottomLayoutGuide
                                                        attribute:NSLayoutAttributeTop
                                                       multiplier:1
                                                         constant:0]];
}

@end
上述技巧也可以用來將橫幅廣告固定在安全區域的上方,只需調整所用屬性與錨點即可。
原生廣告
如果您的應用程式將原生廣告固定在畫面頂端或底部,處理方式與橫幅廣告類似。主要差別在於,需要新增限制條件的對象不是 GAMBannerView,而是 GADNativeAppInstallAdView 和 GADNativeContentAdView (或廣告的容器檢視區塊),以確保遵循安全區域版面配置規範。對於原生廣告檢視區塊,我們建議提供更明確的大小限制條件。
插頁式廣告和獎勵廣告
全螢幕廣告格式 (包括插頁式和獎勵廣告) 是由 Google Mobile Ads SDK 顯示。Google Mobile Ads SDK SDK 將推出更新,確保「關閉」按鈕等廣告元素顯示在正確位置。更新釋出後,我們會同步更新版本資訊與本說明文件。