
ประเภทการลิงก์ OAuth รองรับขั้นตอน OAuth 2.0 2 แบบที่เป็นมาตรฐานอุตสาหกรรม ได้แก่ ขั้นตอนรหัสการให้สิทธิ์และโดยนัย
ในขั้นตอนการเขียนโค้ดแบบโดยนัย Google จะเปิดปลายทางการให้สิทธิ์ในเบราว์เซอร์ของผู้ใช้ เมื่อลงชื่อเข้าใช้สําเร็จ คุณจะส่งคืนโทเค็นเพื่อการเข้าถึงที่ใช้ได้นานแก่ Google ตอนนี้โทเค็นเพื่อการเข้าถึงนี้รวมอยู่ในคําขอทุกรายการที่ส่งจาก Assistant ไปยังการดําเนินการของคุณแล้ว
ในกระบวนการรหัสการให้สิทธิ์ คุณต้องมีปลายทาง 2 จุด ได้แก่
- ปลายทางการให้สิทธิ์ ซึ่งมีหน้าที่นําเสนอ UI การลงชื่อเข้าใช้แก่ผู้ใช้ที่ไม่ได้ลงชื่อเข้าใช้ และยินยอมให้มีการเข้าถึงการเข้าถึงที่ขอในรูปของรหัสการให้สิทธิ์ระยะสั้น
- ปลายทางของการแลกเปลี่ยนโทเค็นที่มีหน้าที่รับผิดชอบการแลกเปลี่ยน 2 ประเภท ได้แก่
- แลกเปลี่ยนรหัสการให้สิทธิ์สําหรับโทเค็นการรีเฟรชที่ใช้ได้นานและโทเค็นเพื่อการเข้าถึงที่ใช้ได้นาน การแลกเปลี่ยนนี้จะเกิดขึ้นเมื่อผู้ใช้เข้าสู่ กระบวนการเชื่อมโยงบัญชี
- แลกเปลี่ยนโทเค็นการรีเฟรชที่ใช้ได้นานกับโทเค็นเพื่อการเข้าถึงที่ใช้ได้ในระยะสั้น Exchange นี้จะเกิดขึ้นเมื่อ Google ต้องการโทเค็นเพื่อการเข้าถึงใหม่เนื่องจากโทเค็นหมดอายุ
แม้ว่าขั้นตอนการใช้รหัสโดยนัยจะง่ายกว่า Google ขอแนะนําว่าโทเค็นเพื่อการเข้าถึงที่ออกโดยใช้โฟลว์โดยนัยไม่มีวันหมดอายุ เนื่องจากการใช้การหมดอายุของโทเค็นด้วยขั้นตอนโดยนัยบังคับให้ผู้ใช้ลิงก์บัญชีอีกครั้ง หากคุณต้องการใช้การหมดอายุของโทเค็นด้วยเหตุผลด้านความปลอดภัย คุณควรพิจารณาการใช้ขั้นตอนการตรวจสอบสิทธิ์แทน
ติดตั้งใช้งานการลิงก์บัญชี OAuth
เพื่อให้การตรวจสอบเป็นไปอย่างราบรื่นกำหนดค่าโปรเจ็กต์
หากต้องการกำหนดค่าโปรเจ็กต์ให้ใช้การลิงก์ OAuth ให้ทำตามขั้นตอนต่อไปนี้
- เปิด Actions Console แล้วเลือกโปรเจ็กต์ที่ต้องการใช้
- คลิกแท็บพัฒนา แล้วเลือกการลิงก์บัญชี
- เปิดสวิตช์ข้างการลิงก์บัญชี
- ในส่วนการสร้างบัญชี ให้เลือกไม่ ฉันต้องการอนุญาตให้สร้างบัญชีในเว็บไซต์ของฉันเท่านั้น
ในประเภทการลิงก์ ให้เลือก OAuth และโดยนัย
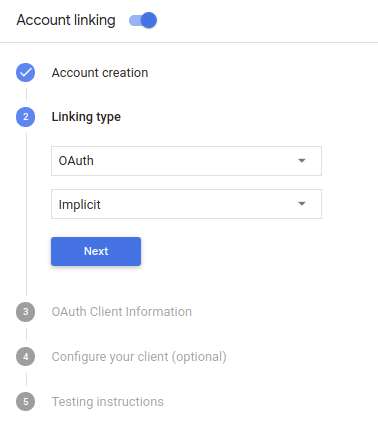
ในข้อมูลลูกค้า ให้ทำดังนี้
- กำหนดค่าให้กับรหัสไคลเอ็นต์ที่ Actions ของคุณออกให้กับ Google เพื่อระบุ คำขอที่มาจาก Google
- แทรก URL สำหรับปลายทางการให้สิทธิ์และการแลกเปลี่ยนโทเค็น
- คลิกบันทึก
ติดตั้งใช้งานเซิร์ฟเวอร์ OAuth
บริการของคุณจะให้สิทธิ์เพื่อรองรับขั้นตอนโดยนัยของ OAuth 2.0 ปลายทางที่พร้อมใช้งานผ่าน HTTPS ปลายทางนี้มีหน้าที่ในการตรวจสอบสิทธิ์และ ได้รับความยินยอมจากผู้ใช้ในการเข้าถึงข้อมูล ปลายทางการให้สิทธิ์ แสดง UI การลงชื่อเข้าใช้แก่ผู้ใช้ที่ยังไม่ได้ลงชื่อเข้าใช้และบันทึกไว้ ความยินยอมต่อการเข้าถึงที่ขอ
เมื่อการดำเนินการของคุณจำเป็นต้องเรียกใช้ API ที่ได้รับอนุญาตของบริการ Google จะใช้ ปลายทางนี้เพื่อขอสิทธิ์จากผู้ใช้เพื่อเรียกใช้ API เหล่านี้ใน แทน
เซสชันโฟลว์แบบโดยนัยของ OAuth 2.0 ทั่วไปที่ Google เป็นผู้เริ่มต้นจะมี ขั้นตอนดังต่อไปนี้
- Google จะเปิดปลายทางการให้สิทธิ์ในเบราว์เซอร์ของผู้ใช้ ผู้ใช้ ลงชื่อเข้าใช้หากยังไม่ได้ลงชื่อเข้าใช้ และให้สิทธิ์แก่ Google ในการเข้าถึง ข้อมูลของตนเองกับ API ของคุณ หากผู้ใช้ยังไม่ได้ให้สิทธิ์
- บริการของคุณจะสร้างโทเค็นเพื่อการเข้าถึงและส่งไปยัง Google โดยการเปลี่ยนเส้นทางเบราว์เซอร์ของผู้ใช้กลับไปยัง Google ด้วยโทเค็นเพื่อการเข้าถึง ที่แนบมากับคำขอ
- Google จะเรียกใช้ API ของบริการ และแนบโทเค็นเพื่อการเข้าถึงกับ คำขอแต่ละรายการ บริการของคุณยืนยันว่าโทเค็นเพื่อการเข้าถึงให้สิทธิ์ Google การอนุญาตให้เข้าถึง API จากนั้นจึงเรียก API
จัดการคำขอการให้สิทธิ์
เมื่อการดำเนินการของคุณต้องลิงก์บัญชีผ่านขั้นตอนโดยนัยของ OAuth 2.0 Google จะส่งผู้ใช้ไปยังปลายทางการให้สิทธิ์พร้อมคำขอที่มี พารามิเตอร์ต่อไปนี้
| พารามิเตอร์ปลายทางการให้สิทธิ์ | |
|---|---|
client_id |
รหัสไคลเอ็นต์ที่คุณกำหนดให้กับ Google |
redirect_uri |
URL ที่คุณส่งการตอบกลับคำขอนี้ |
state |
มูลค่าการทำบัญชีที่ส่งกลับไปยัง Google ไม่เปลี่ยนแปลงใน URI การเปลี่ยนเส้นทาง |
response_type |
ประเภทของค่าที่จะแสดงในคำตอบ สำหรับ OAuth 2.0 โดยปริยาย
ประเภทการตอบกลับจะเป็น token เสมอ |
ตัวอย่างเช่น หากปลายทางการให้สิทธิ์อยู่ที่ https://myservice.example.com/auth
คำขออาจมีลักษณะดังนี้
GET https://myservice.example.com/auth?client_id=GOOGLE_CLIENT_ID&redirect_uri=REDIRECT_URI&state=STATE_STRING&response_type=token
สำหรับปลายทางการให้สิทธิ์ในการจัดการคำขอลงชื่อเข้าใช้ ให้ทำตามขั้นตอนต่อไปนี้
ยืนยันค่า
client_idและredirect_uriเพื่อ ป้องกันการให้สิทธิ์เข้าถึงแอปไคลเอ็นต์ที่ไม่ได้ตั้งใจหรือกำหนดค่าไม่ถูกต้อง- ยืนยันว่า
client_idตรงกับรหัสไคลเอ็นต์ที่คุณ ที่มอบหมายให้กับ Google - ยืนยันว่า URL ที่ระบุโดย
redirect_uriจะมีรูปแบบต่อไปนี้https://oauth-redirect.googleusercontent.com/r/YOUR_PROJECT_ID
- ยืนยันว่า
ตรวจสอบว่าผู้ใช้ลงชื่อเข้าใช้บริการของคุณหรือไม่ หากผู้ใช้ไม่ได้เซ็น ดำเนินการตามขั้นตอนการลงชื่อเข้าใช้หรือลงชื่อสมัครใช้บริการของคุณ
สร้างโทเค็นเพื่อการเข้าถึงที่ Google จะใช้เพื่อเข้าถึง API ของคุณ โทเค็นเพื่อการเข้าถึงสามารถเป็นค่าสตริงใดก็ได้ แต่จะต้องแสดงถึง ผู้ใช้และไคลเอ็นต์ที่ใช้โทเค็นและต้องคาดเดาไม่ได้
ส่งการตอบกลับ HTTP ที่เปลี่ยนเส้นทางเบราว์เซอร์ของผู้ใช้ไปยัง URL ที่ระบุโดยพารามิเตอร์
redirect_uriรวม พารามิเตอร์ต่อไปนี้ในส่วนย่อยของ URLaccess_token: โทเค็นเพื่อการเข้าถึงที่คุณเพิ่งสร้างtoken_type: สตริงbearerstate: ค่าสถานะที่ไม่มีการแก้ไขจากค่าเดิม คำขอ ตัวอย่างของ URL ที่ได้มีดังนี้https://oauth-redirect.googleusercontent.com/r/YOUR_PROJECT_ID#access_token=ACCESS_TOKEN&token_type=bearer&state=STATE_STRING
เครื่องจัดการการเปลี่ยนเส้นทาง OAuth 2.0 ของ Google จะได้รับโทเค็นเพื่อการเข้าถึงและยืนยัน
ค่า state ยังไม่มีการเปลี่ยนแปลง หลังจากที่ Google ได้รับ
โทเค็นเพื่อการเข้าถึงสำหรับบริการของคุณ Google จะแนบโทเค็นไปกับการเรียกครั้งต่อๆ ไป
ไปยังการดำเนินการของคุณได้โดยเป็นส่วนหนึ่งของ AppRequest
ออกแบบอินเทอร์เฟซผู้ใช้ด้วยเสียงสำหรับขั้นตอนการตรวจสอบสิทธิ์
ตรวจสอบว่าผู้ใช้ได้รับการยืนยันแล้วหรือไม่ และเริ่มขั้นตอนการลิงก์บัญชี
- เปิดโปรเจ็กต์ Actions Builder ใน Actions Console
- สร้างฉากใหม่เพื่อเริ่มการลิงก์บัญชีใน Action โดยทำดังนี้
- คลิกฉาก
- คลิกไอคอนเพิ่ม (+) เพื่อเพิ่มฉากใหม่
- ในฉากที่สร้างขึ้นใหม่ ให้คลิกไอคอนเพิ่ม add สำหรับเงื่อนไข
- เพิ่มเงื่อนไขที่ตรวจสอบว่าผู้ใช้ที่เชื่อมโยงกับการสนทนาเป็นผู้ใช้ที่ยืนยันแล้วหรือไม่ หากการตรวจสอบล้มเหลว การดำเนินการของคุณจะลิงก์บัญชีไม่ได้
ระหว่างการสนทนา และควรกลับไปให้สิทธิ์เข้าถึง
ฟังก์ชันที่ไม่ต้องมีการลิงก์บัญชี
- ในช่อง
Enter new expressionในส่วนเงื่อนไข ให้ป้อนตรรกะต่อไปนี้user.verificationStatus != "VERIFIED" - ในส่วนการเปลี่ยนฉาก ให้เลือกฉากที่ไม่ต้องลิงก์บัญชีหรือฉากที่เป็นจุดเริ่มต้นของฟังก์ชันการทำงานสำหรับแขกรับเชิญเท่านั้น
- ในช่อง

- คลิกไอคอนเพิ่ม add สำหรับเงื่อนไข
- เพิ่มเงื่อนไขเพื่อทริกเกอร์โฟลว์การลิงก์บัญชีหากผู้ใช้ไม่มี
ข้อมูลประจำตัวที่เชื่อมโยง
- ในช่อง
Enter new expressionในส่วนเงื่อนไข ให้ป้อนตรรกะต่อไปนี้user.verificationStatus == "VERIFIED" - ในส่วนการเปลี่ยนฉาก ให้เลือกฉากระบบการลิงก์บัญชี
- คลิกบันทึก
- ในช่อง
![]()
หลังจากบันทึกแล้ว ระบบจะเพิ่มฉากระบบการลิงก์บัญชีใหม่ที่ชื่อ <SceneName>_AccountLinking
ลงในโปรเจ็กต์
ปรับแต่งฉากการลิงก์บัญชี
- ในส่วนฉาก ให้เลือกฉากระบบการลิงก์บัญชี
- คลิกส่งพรอมต์ แล้วเพิ่มประโยคสั้นๆ เพื่ออธิบายให้ผู้ใช้ทราบ ว่าทำไมแอ็กชันจึงต้องเข้าถึงข้อมูลประจำตัวของผู้ใช้ (เช่น "เพื่อบันทึกค่ากำหนดของคุณ")
- คลิกบันทึก

- ในส่วนเงื่อนไข ให้คลิกหากผู้ใช้ลิงก์บัญชีสำเร็จ
- กำหนดค่าว่าขั้นตอนควรดำเนินการอย่างไรหากผู้ใช้ตกลงที่จะลิงก์บัญชี เช่น เรียกใช้เว็บฮุกเพื่อประมวลผลตรรกะทางธุรกิจที่กำหนดเองที่จำเป็น และเปลี่ยนกลับไปที่ฉากต้นทาง
- คลิกบันทึก

- ในส่วนเงื่อนไข ให้คลิกหากผู้ใช้ยกเลิกหรือปิดการลิงก์บัญชี
- กำหนดค่าว่าขั้นตอนการทำงานควรเป็นอย่างไรหากผู้ใช้ไม่ยอมรับการลิงก์บัญชี เช่น ส่งข้อความรับทราบและเปลี่ยนเส้นทางไปยังฉาก ที่ให้ฟังก์ชันการทำงานที่ไม่ต้องลิงก์บัญชี
- คลิกบันทึก

- ในส่วนเงื่อนไข ให้คลิกหากเกิดข้อผิดพลาดของระบบหรือเครือข่าย
- กำหนดค่าวิธีที่โฟลว์ควรดำเนินการหากโฟลว์การลิงก์บัญชีดำเนินการไม่สำเร็จเนื่องจากข้อผิดพลาดของระบบหรือเครือข่าย เช่น ส่งข้อความรับทราบและเปลี่ยนเส้นทางไปยังฉาก ที่ให้ฟังก์ชันการทำงานที่ไม่ต้องลิงก์บัญชี
- คลิกบันทึก
จัดการคำขอเข้าถึงข้อมูล
หากคำขอของ Assistant มีโทเค็นเพื่อการเข้าถึง ให้ตรวจสอบก่อนว่าโทเค็นเพื่อการเข้าถึงนั้นถูกต้อง (และยังไม่หมดอายุ) จากนั้นดึงข้อมูลบัญชีผู้ใช้ที่เชื่อมโยงจากฐานข้อมูล