
O tipo vinculação do OAuth é compatível com dois fluxos padrão do setor do OAuth 2.0: os fluxos de código implícito e de autorização.
No fluxo de código implícito, o Google abre o endpoint de autorização no navegador do usuário. Após o login, você retorna um token de acesso de longa duração para o Google. Esse token de acesso agora está incluído em todas as solicitações enviadas do Assistente para sua ação.
No fluxo do código de autorização, você precisa de dois endpoints:
- O endpoint de autorização, responsável por apresentar a IU de login aos usuários que ainda não fizeram login e registrar o consentimento para o acesso solicitado na forma de um código de autorização de curta duração.
- O endpoint de troca de token, que é responsável por dois tipos de trocas:
- troca um código de autorização por um token de atualização de longa duração e um token de acesso de curta duração. Essa troca acontece quando o usuário passa pelo fluxo de vinculação da conta.
- Troca um token de atualização de longa duração por um token de acesso de curta duração. Essa troca acontece quando o Google precisa de um novo token de acesso porque ele expirou.
Embora o fluxo do código implícito seja mais simples de implementar, o Google recomenda que os tokens de acesso emitidos usando o fluxo implícito nunca expirem, porque o uso do token com o fluxo implícito força o usuário a vincular a conta novamente. Se você precisar da validade do token por motivos de segurança, considere o uso do fluxo do código de autenticação.
Implementar a vinculação de contas OAuth
Configurar o projeto
Para configurar seu projeto para usar a vinculação do OAuth, siga estas etapas:
- Abra o Actions Console e selecione o projeto que você quer usar.
- Clique na guia Desenvolver e escolha Vinculação de contas.
- Ative a chave ao lado de Vinculação de contas.
- Na seção Criação de conta, selecione Não, quero permitir a criação de contas apenas no meu site.
Em Tipo de vinculação, selecione OAuth e Implícito.
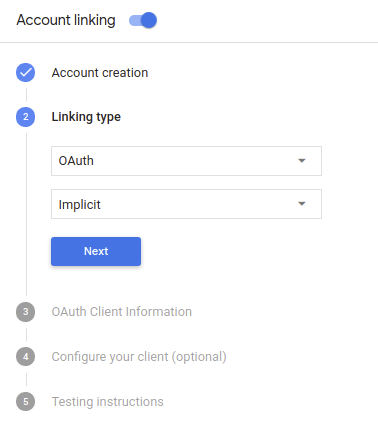
Em Informações do cliente:
- Atribua um valor a ID do cliente emitido pelo Actions on Google para identificar solicitações do Google.
- Insira os URLs dos endpoints de autorização e troca de token.
- Clique em Salvar.
Implementar seu servidor OAuth
Para oferecer suporte ao fluxo implícito do OAuth 2.0, seu serviço faz uma autorização de destino disponível por HTTPS. Esse endpoint é responsável por autenticar e obter consentimento dos usuários para acesso aos dados. O endpoint de autorização apresenta uma interface de login aos usuários que ainda não estão conectados e registra consentir com o acesso solicitado.
Quando seu Action precisa chamar uma das APIs autorizadas do serviço, o Google usa endpoint para obter permissão de seus usuários para chamar essas APIs em seus nome de usuário.
Uma sessão de fluxo implícito do OAuth 2.0 típica iniciada pelo Google tem o seguinte fluxo:
- O Google abre seu endpoint de autorização no navegador do usuário. A o usuário faz login caso ainda não tenha feito isso e concede ao Google permissão para acessar os dados dele com a API, caso ainda não tenham concedido permissão.
- Seu serviço cria um token de acesso e o retorna para o Google redirecionando o navegador do usuário de volta para o Google com o token de acesso; anexada à solicitação.
- O Google chama as APIs do seu serviço e anexa o token de acesso com cada solicitação. O serviço verifica se o token de acesso concede ao Google autorização para acessar a API e, em seguida, conclui a chamada de API.
Processar solicitações de autorização
Quando sua ação precisar vincular a conta usando um fluxo implícito do OAuth 2.0, O Google envia o usuário para seu endpoint de autorização com uma solicitação que inclui os seguintes parâmetros:
| Parâmetros de endpoint de autorização | |
|---|---|
client_id |
O ID do cliente que você atribuiu ao Google. |
redirect_uri |
O URL para o qual você envia a resposta para essa solicitação. |
state |
Um valor de contabilidade que é retornado ao Google inalterado na URI de redirecionamento. |
response_type |
O tipo de valor a ser retornado na resposta. Para a implementação implícita do OAuth 2.0
fluxo, o tipo de resposta será sempre token. |
Por exemplo, se o endpoint de autorização estiver disponível em https://myservice.example.com/auth,
uma solicitação será semelhante a esta:
GET https://myservice.example.com/auth?client_id=GOOGLE_CLIENT_ID&redirect_uri=REDIRECT_URI&state=STATE_STRING&response_type=token
Para que o endpoint de autorização processe solicitações de login, siga estas etapas:
Verifique os valores
client_ideredirect_uripara impedir a concessão de acesso a apps clientes não intencionais ou configurados incorretamente:- Confirme se o
client_idcorresponde ao ID do cliente que você atribuídas ao Google. - Confirme se o URL especificado pelo
redirect_uritem o seguinte formato:https://oauth-redirect.googleusercontent.com/r/YOUR_PROJECT_ID
- Confirme se o
Verifique se o usuário está conectado ao seu serviço. Se o usuário não tiver feito login conclua o fluxo de login ou inscrição do serviço.
Gere um token de acesso que o Google usará para acessar sua API. A token de acesso pode ser qualquer valor de string, mas deve representar exclusivamente o usuário e o cliente a que o token se destina e não pode ser adivinhado.
Envia uma resposta HTTP que redireciona o navegador do usuário para o URL especificado pelo parâmetro
redirect_uri. Inclua todos os elementos parâmetros a seguir no fragmento de URL:access_token: o token de acesso que você acabou de gerar.token_type: a stringbearer.state: o valor do estado não modificado do original. solicitação Veja a seguir um exemplo de URL resultante:https://oauth-redirect.googleusercontent.com/r/YOUR_PROJECT_ID#access_token=ACCESS_TOKEN&token_type=bearer&state=STATE_STRING
O gerenciador de redirecionamento OAuth 2.0 do Google recebe o token de acesso e confirma
que o valor state não mudou. Depois que o Google tiver
token de acesso do seu serviço, o Google o anexa às chamadas subsequentes
à sua ação como parte do AppRequest.
Projetar a interface de usuário de voz para o fluxo de autenticação
Verificar se o usuário está verificado e iniciar o fluxo de vinculação da conta
- Abra seu projeto do Actions Builder no Console do Actions.
- Crie uma nova cena para iniciar a vinculação de contas na sua ação:
- Clique em Cenas.
- Clique no ícone de adição (+) para adicionar uma nova cena.
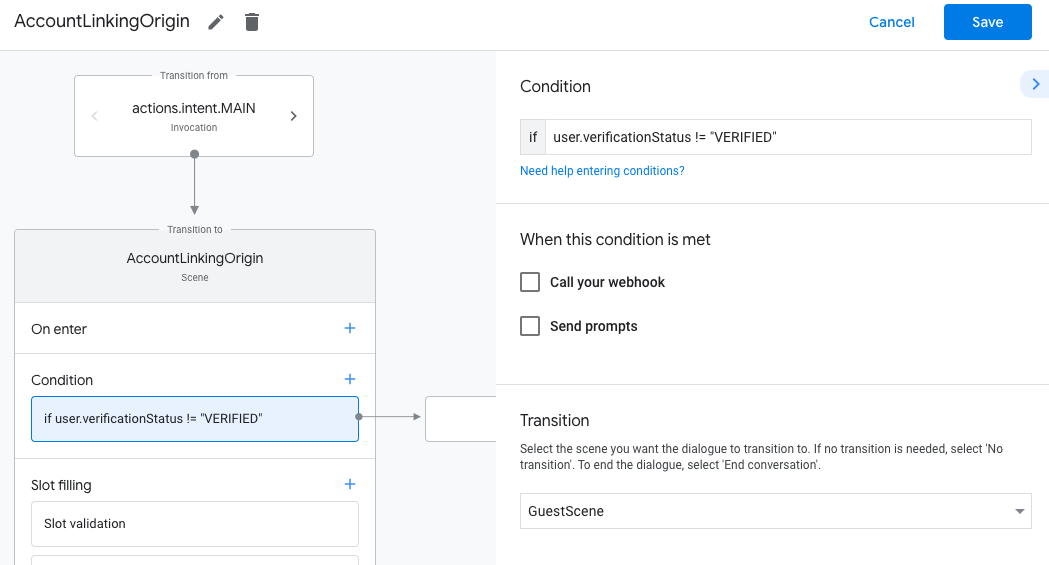
- Na cena recém-criada, clique no ícone de adição add para Condições.
- Adicione uma condição que verifique se o usuário associado à conversa é um usuário verificado. Se a verificação falhar, a Ação não poderá vincular contas
durante a conversa e precisará oferecer acesso a
funcionalidades que não exigem vinculação de contas.
- No campo
Enter new expressionem Condição, insira a seguinte lógica:user.verificationStatus != "VERIFIED" - Em Transição, selecione uma cena que não exija vinculação de conta ou uma cena que seja o ponto de entrada para a funcionalidade somente para convidados.
- No campo
- Clique no ícone de adição add em Condições.
- Adicione uma condição para acionar um fluxo de vinculação de contas se o usuário não tiver
uma identidade associada.
- No campo
Enter new expressionem Condição, insira a seguinte lógica:user.verificationStatus == "VERIFIED" - Em Transição, selecione a cena do sistema Vinculação de conta.
- Clique em Salvar.
- No campo
![]()
Depois de salvar, uma nova cena do sistema de vinculação de contas chamada <SceneName>_AccountLinking
será adicionada ao seu projeto.
Personalizar a cena de vinculação de conta
- Em Cenas, selecione a cena do sistema de vinculação de contas.
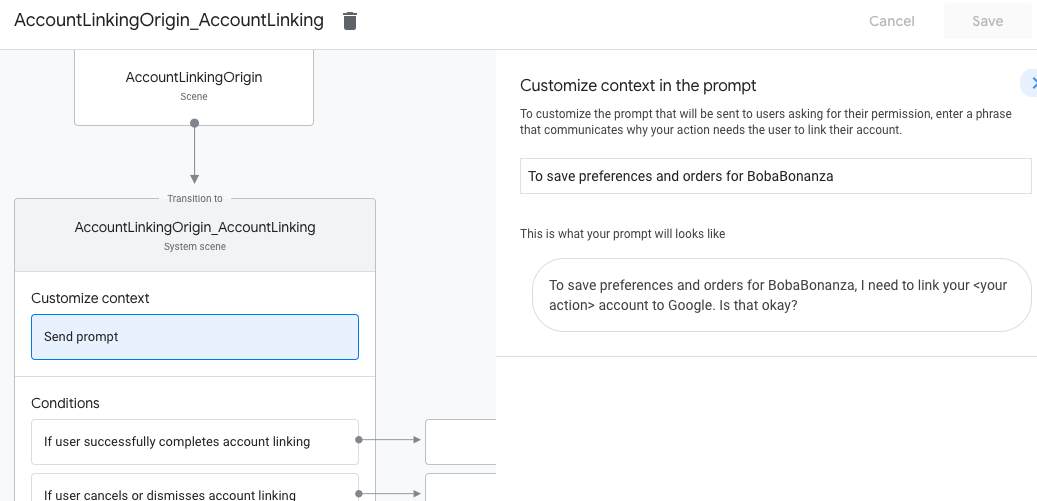
- Clique em Enviar solicitação e adicione uma frase curta para descrever ao usuário por que a ação precisa acessar a identidade dele (por exemplo, "Para salvar suas preferências").
- Clique em Salvar.
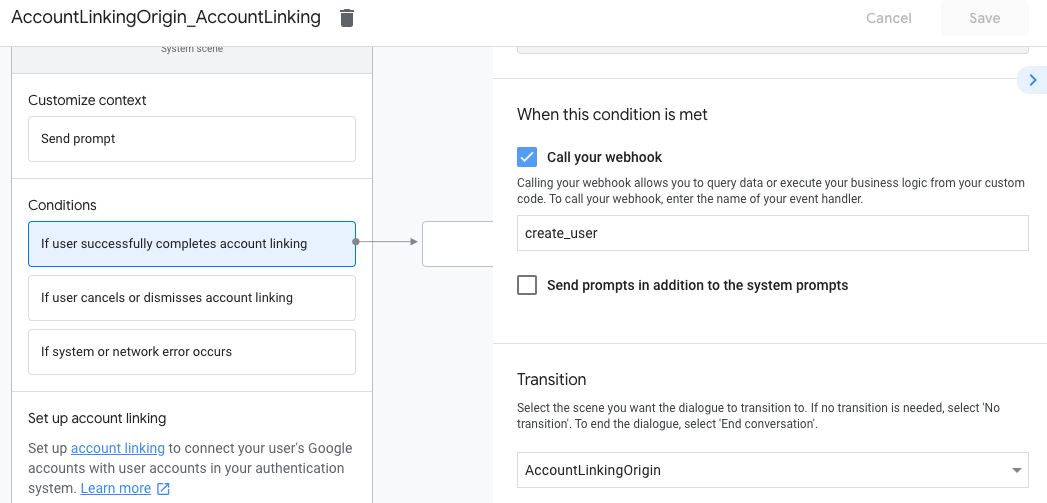
- Em Condições, clique em Se o usuário concluir a vinculação de contas.
- Configure como o fluxo vai prosseguir se o usuário concordar em vincular a conta. Por exemplo, chame o webhook para processar qualquer lógica de negócios personalizada necessária e volte para a cena de origem.
- Clique em Salvar.
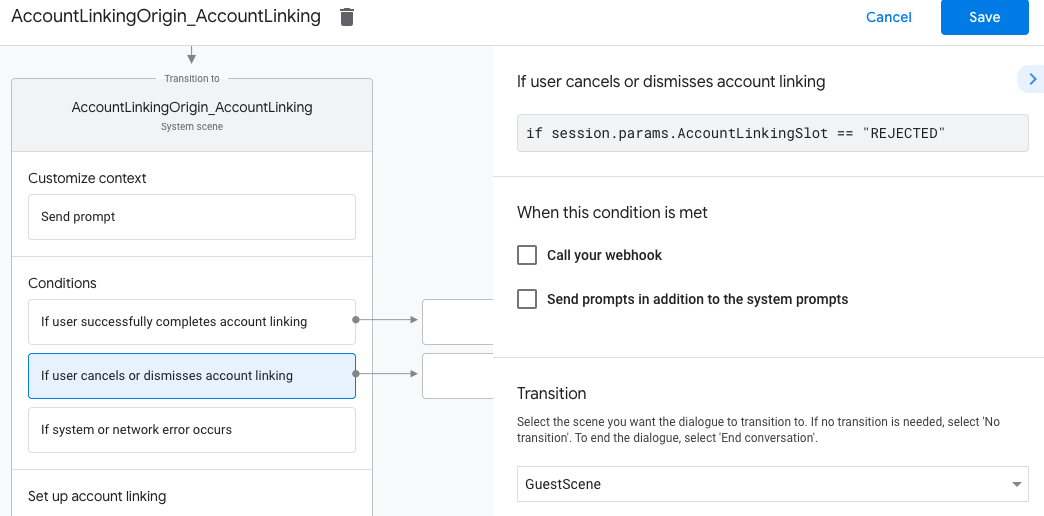
- Em Condições, clique em Se o usuário cancelar ou dispensar a vinculação de contas.
- Configure como o fluxo deve prosseguir se o usuário não concordar em vincular a conta. Por exemplo, envie uma mensagem de confirmação e redirecione para cenas que oferecem funcionalidades que não exigem vinculação de contas.
- Clique em Salvar.
- Em Condições, clique em Se ocorrer um erro de sistema ou de rede.
- Configure como o fluxo deve prosseguir se a vinculação de conta não puder ser concluída devido a erros de sistema ou de rede. Por exemplo, envie uma mensagem de confirmação e redirecione para cenas que oferecem funcionalidades que não exigem vinculação de contas.
- Clique em Salvar.
Processar solicitações de acesso a dados
Se a solicitação do Google Assistente contiver um token de acesso, primeiro verifique se o token de acesso é válido (e não expirou) e recupere a conta de usuário associada do seu banco de dados.