Overview
The Reverse Binding flow allows users to initiate and link their eWallet account to Google Pay directly from within the partner's Android mobile app, establishing a long-lived Google Payment Token (GPT).
For the complete client-side JavaScript SDK API specifications, parameter definitions, error codes, and implementation examples, refer to the Reverse Binding SDK documentation. For Sandbox verification, pre-rollout checklists, funnel metrics, and phased production ramp requirements, see the Production Rollout Process section below.
User Journey & Integration
User Journey
The following screens illustrate the end-to-end user experience when initiating reverse binding from a partner application:
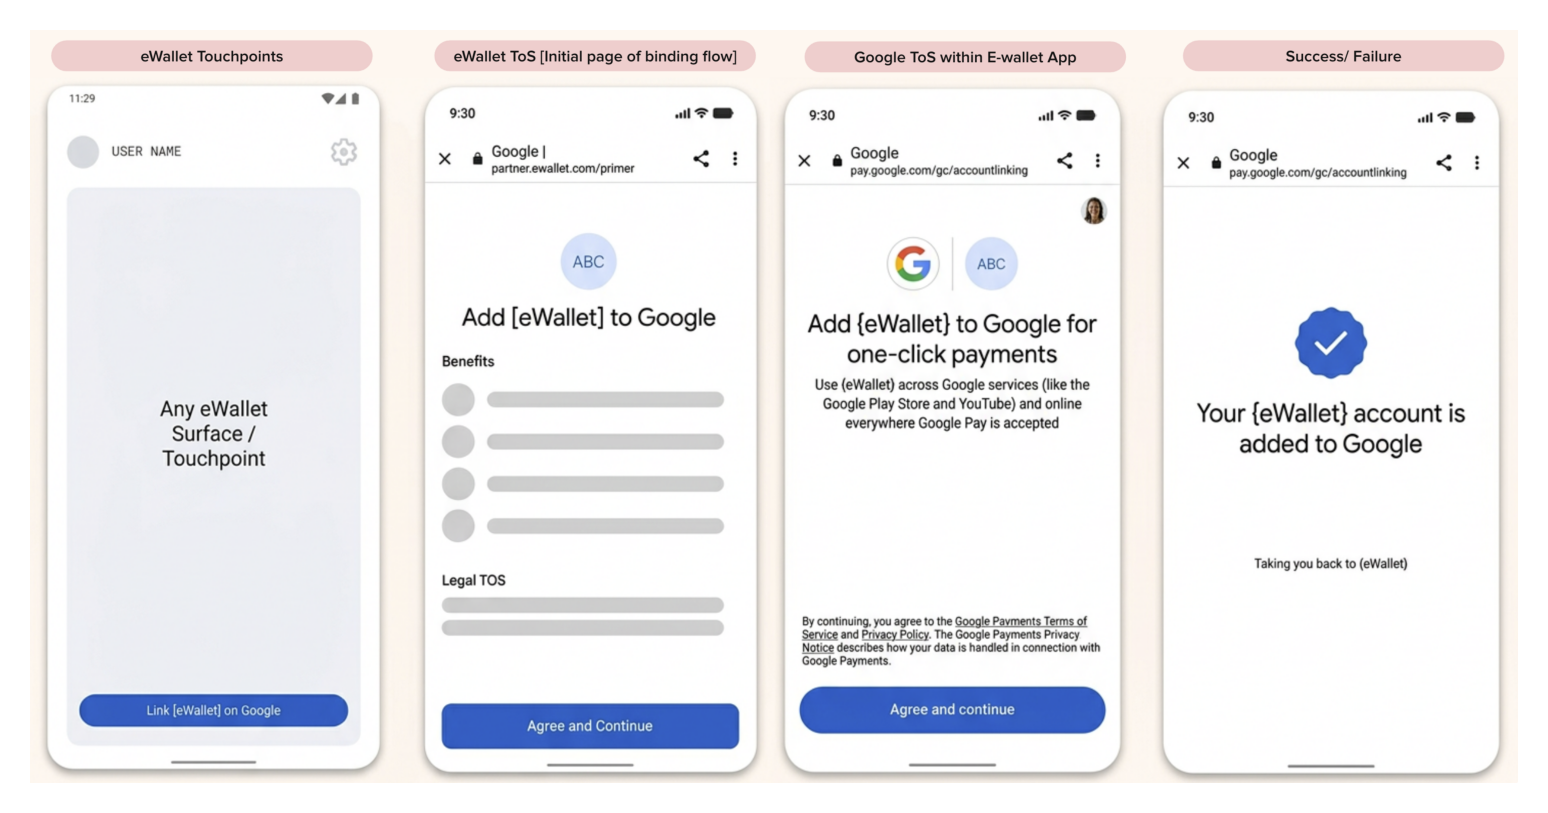
- eWallet Touchpoints: The user initiates account linking from any touchpoint within the partner app (such as account settings, promotions, or payment method management) by tapping "Link [eWallet] on Google".
- eWallet ToS: The partner web primer page opens in a Chrome Custom Tab (CCT) at
partner.ewallet.com/primer, presenting the benefits of linking and partner legal terms. The user taps "Agree and Continue". - Google ToS within E-wallet App: Google's WebApp UI loads inside the CCT at
pay.google.com/gc/accountlinking, presenting localized Google Payments Terms of Service and Account selection. The user taps "Agree and continue". - Success / Failure: Google confirms the linkage status with a success confirmation screen at
pay.google.com/gc/accountlinkingand returns the user seamlessly back to the partner application.
Sequence Diagram
The following sequence diagram depicts every message, cryptographic token exchange, and callback interaction during a successful reverse binding session:
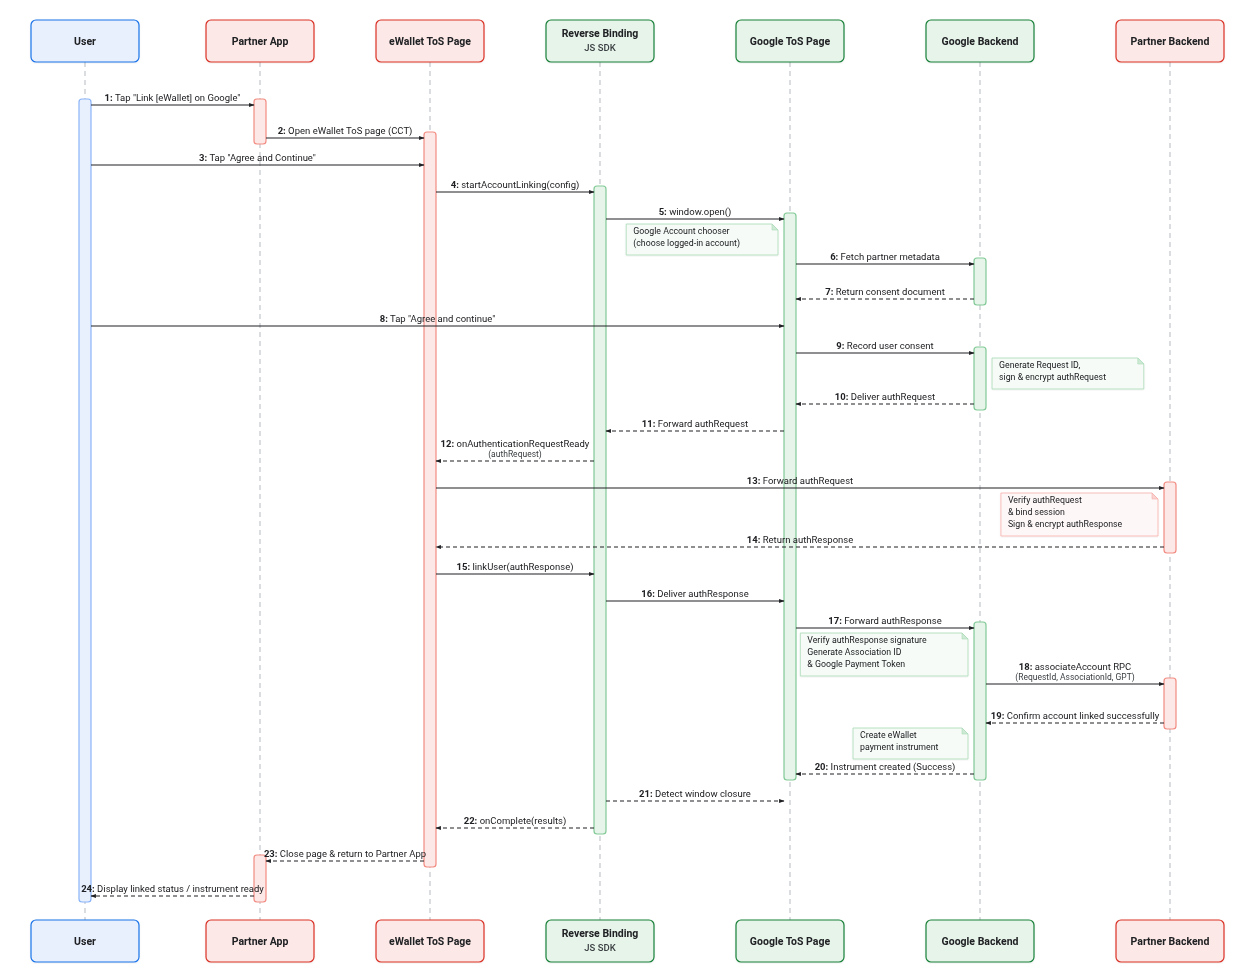
Sequence Step-by-Step Details
- User initiates linking: The user taps "Link [eWallet] on Google" from an eWallet surface/touchpoint in the partner app.
- Partner App opens eWallet ToS page: The partner Android app opens the eWallet ToS page (
partner.ewallet.com/primer) in a Chrome Custom Tab (CCT). - User reviews partner terms: The eWallet ToS page displays benefits and partner Legal ToS. The user taps "Agree and Continue".
startAccountLinking()invoked: The eWallet ToS page synchronously callswindow.googlepay.startAccountLinking()with configuration parameters.- Google ToS Page opened: The Reverse Binding JS SDK calls
window.open()to display the Google ToS Page (pay.google.com/gc/accountlinking). - Fetch partner metadata: Google ToS Page requests partner integration metadata from Google Backend.
- Consent document returned: Google Backend returns the localized Google consent document, and Google ToS Page displays the consent screen and Google Account chooser (if needed).
- User agrees to Google ToS: The user reviews the terms and taps "Agree and continue".
- Google records consent: Google ToS Page notifies Google Backend to record user consent. Google Backend generates a unique Request ID, then signs and encrypts it into an
authRequestJWS/JWE token. authRequestdelivered: Google Backend deliversauthRequestto Google ToS Page.authRequestforwarded: Google ToS Page forwardsauthRequestto the Reverse Binding JS SDK.onAuthenticationRequestReady()callback: The SDK invokes the partner's registeredonAuthenticationRequestReady()callback withauthRequest.- Forward to Partner Backend: The eWallet ToS page sends
authRequestto the partner backend. The partner backend verifies the request, binds the user session, then signs and encrypts theauthResponseJWS/JWE token. - Return
authResponse: Partner backend returns the signedauthResponsetoken to the eWallet ToS page. linkUser()called: The eWallet ToS page passesauthResponsetowindow.googlepay.linkUser(authResponse).- Deliver
authResponse: The SDK deliversauthResponseto Google ToS Page. - Forward
authResponseto backend: Google ToS Page forwardsauthResponseto Google Backend. Google Backend verifies the token signature, generates an Association ID, and creates a Google Payment Token (GPT). associateAccountRPC: Google Backend sends a server-to-serverassociateAccountRPC (with RequestId, AssociationId, and GPT) to the partner backend.- Confirm account linked: Partner backend activates the account link and confirms success to Google Backend. Google Backend creates the eWallet payment instrument.
- Instrument created: Google Backend confirms instrument creation to Google ToS Page. Google ToS Page displays the Success screen ("Your {eWallet} account is added to Google") and triggers
window.close(). - Detect window closure: The Reverse Binding JS SDK detects window closure.
onComplete()callback: The SDK invokes the partner'sonComplete()callback with the linking status.- Return to native app: Upon receiving
onComplete(), the eWallet CCT page presents a completion action (such as a partner deep-link button) or prompts the user to close the CCT tab to return to the partner Android app. - Instrument ready: The partner Android app displays the linked status to the user.
Backend Operations Context
For a complete and secure integration, your backend server must support the cryptographic verify/signing loop referenced in the integration flow:
- Decrypting the Request: Your backend must decrypt the base64url-encoded JWS/JWE token passed from the client (
authRequest) to extract therequestId. Refer to the Request Schema Reference page. - Signing the Response: Your backend must verify Google's signature, bind the
requestIdto the user account session, sign/encrypt it again, and return theauthResponsebase64url JWS/JWE string. Refer to the Response Reference page. - Handling Google Link Callback: Once the front-end calls
linkUser(authResponse, {}), Google's server will callback your backend server using theassociateAccountRPC. Your server must look up the matchingrequestIdand activate the link.
Android Client Requirement: Chrome Custom Tabs (CCT)
The reverse binding flow must be launched using Chrome Custom Tabs (CCT) rather than an in-app WebView.
Key Architectural Rationale
- Zero-Login SSO (Shared Cookies): CCT shares the user's active Chrome browser session and Google Account authentication cookies, enabling 1-tap zero-login account linking. Embedded in-app WebViews isolate cookie storage from system Chrome, forcing manual password/2FA entry on every linking attempt and triggering Google Identity OAuth policy violations (
disallowed_useragent). - Popup Blocker Prevention (User Gesture Timing): Google's
startAccountLinking()triggerswindow.open(). Mobile browsers strictly enforce Transient User Activation for pop-up windows:- Incorrect: User taps 'Continue' -> Partner app initiates an asynchronous network call to its backend ->
startAccountLinking()is invoked upon API response. The browser detects the user gesture expired during the network round-trip and blocks the pop-up window. - Best Practice: Pre-fetch all necessary parameters (such as
integratorId,serviceCountry, and attribution tags) before the primer page loads. When the user taps 'Continue', invokestartAccountLinking()immediately and synchronously.
- Incorrect: User taps 'Continue' -> Partner app initiates an asynchronous network call to its backend ->
- Alternative Fallback Flow (Native Consent Policies): For partners whose compliance or risk policies mandate that user consent must run inside a native Android screen rather than a web primer:
- User completes eWallet Terms of Service / consent on the native Android screen.
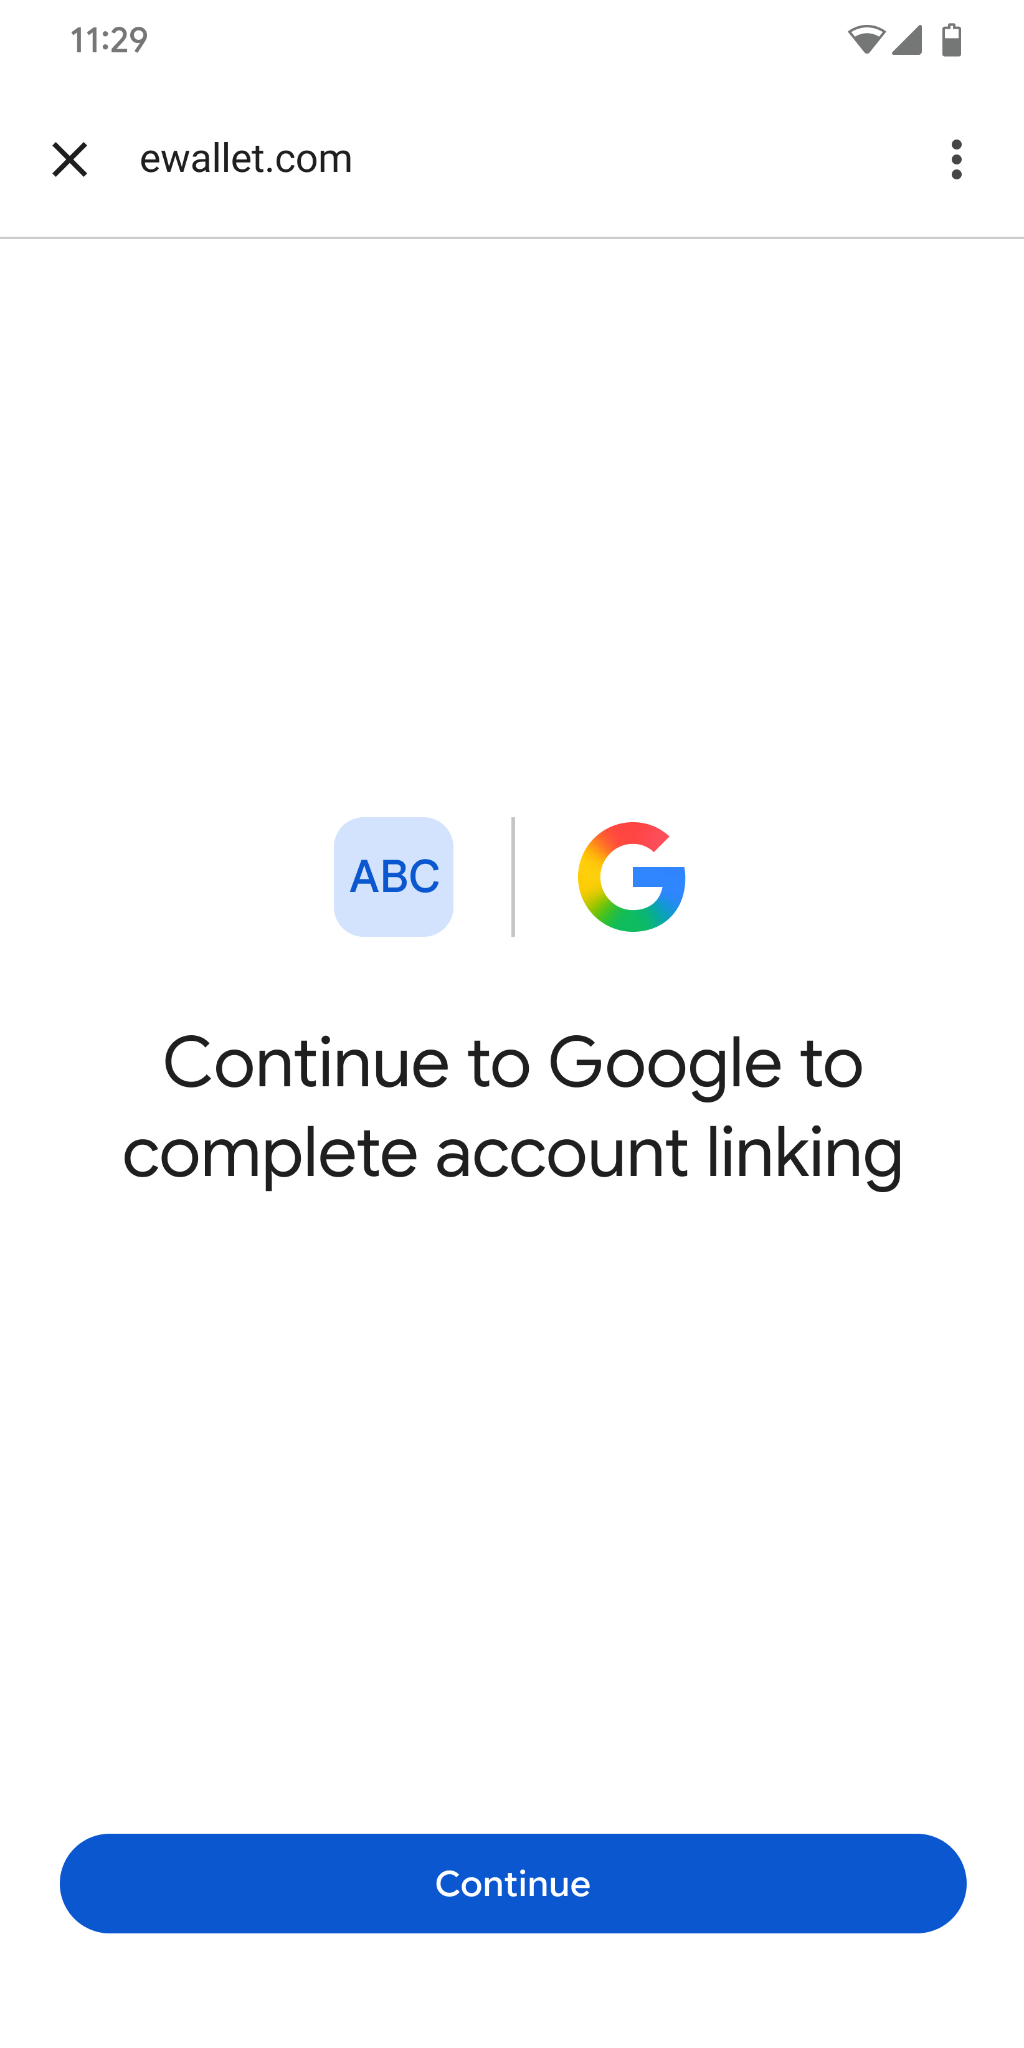
- Native app launches CCT loading a minimal 1-tap transition screen (co-branded logo lockup, headline, and "Continue" button, without extra copy, spinners, or secondary ToS).
- User taps Continue on the transition screen to immediately and synchronously call
startAccountLinking().
- Explicitly Targeting Chrome (
CustomTabsClient.getPackageName): Only Chrome (com.android.chrome) shares the Android device's signed-in Google Account session for 1-tap SSO; in other browsers, the user may have to sign in to Google separately. CallingCustomTabsIntent.launchUrl(context, uri)without a target package routes the intent to the device's default browser, which can open an external OEM browser outside your app. Resolvecom.android.chromewithCustomTabsClient.getPackageName(context, packages, true)(ignoreDefault = trueprefers Chrome over a non-Chrome default browser) and setcustomTabsIntent.intent.setPackage(packageName)when non-null. On Android 11+ (API 30+), add theCustomTabsService<queries>entry inAndroidManifest.xml; without it,getPackageName()returnsnulleven when Chrome is installed. IfpackageNameisnull(Chrome is disabled or not installed),launchUrl()opens the default browser; never fall back to an in-appWebView. CatchActivityNotFoundExceptionfor devices with no browser. Some older non-Chrome browsers can show a Google error page at sign-in; in that case, ask the user to update their browser or enable Chrome:
CustomTabsIntent customTabsIntent = new CustomTabsIntent.Builder().build();

String packageName = CustomTabsClient.getPackageName(
    context,
    Collections.singletonList("com.android.chrome"),
    /* ignoreDefault= */ true);
if (packageName != null) {
  customTabsIntent.intent.setPackage(packageName);
}
try {
  customTabsIntent.launchUrl(context, Uri.parse(url));
} catch (ActivityNotFoundException e) {
  // No app can open web links. Ask the user to install or enable a web browser.
}
<!-- AndroidManifest.xml (Required for Android 11 / API level 30+) -->
<queries>
  <intent>
    <action android:name="android.support.customtabs.action.CustomTabsService" />
  </intent>
</queries>
- Hiding the Share Button (Optional): Your Android app controls the CCT toolbar configuration when building
CustomTabsIntent. PassingCustomTabsIntent.SHARE_STATE_OFFremoves the Share button from the top-right of the CCT bar:
CustomTabsIntent customTabsIntent = new CustomTabsIntent.Builder()
    .setShareState(CustomTabsIntent.SHARE_STATE_OFF)
    .build();
- Returning to the Native App (
onComplete): When linking completes on Google's page, Google's popup auto-closes after 2 seconds and triggers youronCompletecallback on the CCT page withaccountLinkingResult: true. Because standard browser JavaScript cannot callwindow.close()on the root CCT tab directly (and Chrome blocks programmatic external intent redirects triggered without a user gesture), present a completion CTA button (such as "Return to App" linking to your partner deep link or Android App Link) or instruct the user to close the CCT tab so the user returns cleanly to your native Android app. - Desktop Web Flows: When offering reverse binding on desktop web (for non-mobile users where Chrome Custom Tabs do not apply), render your Terms of Service / primer page as a top-level browser page (by navigating in the current tab or opening a new tab/window) — never inside an
<iframe>, which can block pop-ups (E405) or propagate sandbox restrictions that break Google Account sign-in. CallstartAccountLinking()synchronously from the user's click handler on that page; the SDK opens Google's page in a pop-up window and communicates with it usingwindow.postMessage. Keep the caller page open without navigating or reloading untilonCompletefires, as the SDK'sunloadlistener automatically closes the Google pop-up if the caller page unloads.
Verification: CCT vs In-App WebView
| Check Method | Chrome Custom Tabs (CCT) | In-App WebView |
|---|---|---|
| Visual UI | Shows Chrome top bar with URL, lock icon, and 3-dot menu (⋮). | Renders full-screen or with custom app header; no Chrome top bar or 3-dot menu. |
| Codebase & Architecture | Calls CustomTabsIntent.launchUrl(...). Popups and windows are managed natively by Chrome. |
Uses android.webkit.WebView, loadUrl(), or handles popups via WebChromeClient.onCreateWindow() and setSupportMultipleWindows(true). |
| Device / ADB Check |
adb shell dumpsys activity top | grep ACTIVITYShows Chrome's CustomTabActivity:ACTIVITY com.android.chrome/org.chromium.chrome.browser.customtabs.CustomTabActivity
|
Shows your own app's internal Activity:ACTIVITY com.partner.app/.WebViewActivity
|
Production Rollout Process
This section outlines the actions required from the partner side to safely launch the integration in the production environment. Because the partner controls the final traffic routing, adherence to this phased approach is required for a smooth launch.
1. Prerequisites & Verification (Sandbox)
Before proceeding to the Production environment, the following must be verified in the Sandbox environment:
- API Verification: Successful
linkUsercalls verified for multiple consecutive test scenarios. The API must demonstrate stability without any API errors in Sandbox before advancing. - Screen Recording: A screen recording of the successful flow must be shared with your Google contact as part of frontend verification. The recording should start from the eWallet home page so the full user journey is captured. Google reviews this recording for UX approval. After approval, Google sets up the production configuration, which takes time to complete, so plan for a gap between sandbox completion and the start of production testing.
2. Pre-Rollout Checklist (Production)
Before any live traffic is sent to Google Production, the partner must complete the following:
- Production Allowlist / APK:
- Google runs its own production testing with a small group of testers before launch. Provide the Production APK or allowlist the testers that Google shares with you (for example, by Google Account email or eWallet phone number) so they can reach the entry point while it is closed to public users, for final verification checks and internal approval.
- Provide one test account for logging into the production app.
- Screen Recording: Share screen recordings of the successful production flows with your Google contact as part of frontend verification (starting from the eWallet home page) covering the following test scenarios. Google reviews these recordings for UX approval before confirming that you can open the entry point to users:
| Scenario | Test Case Steps | Expected Result |
|---|---|---|
|
New User without Google payments profile Prerequisite: Tester has a fresh Google Account with no payments profile and the eWallet app installed. |
|
Association is verified on both sides (partner eWallet appears in Google Play payment methods and Google appears in the partner app Linked Accounts screen). The user is prompted for Address/Country to create a new payments profile. |
|
Existing User with a Google payments profile (1 linked account) Prerequisite: Tester already has a Google payments profile with 1 linked payment method other than the eWallet under test, and the eWallet app installed. |
|
Association is verified on both sides alongside existing payment methods. |
|
Switch Google Profile during Reverse Binding flow Prerequisite: Tester has 2 Google Accounts signed in on the device (Account A and Account B) and the eWallet app installed. |
|
Partner eWallet is linked to the switched Google profile (Account B) on both sides. |
- Monitoring: Ensure internal monitoring and alerting are set up to track success rates and errors.
- App Release Schedule: Share any planned app release dates.
- GTM Activities & Initial Entry Point: The initial production launch is scoped to a single entry point with an approved
utmCampaignvalue configured instartAccountLinking(). Prior to launch, align on Go-To-Market (GTM) activities, timelines, and promotional mechanics, and share details of the initial entry point placement and UX assets for Google review (for subsequent entry points added after reaching 100% GA, see 5. Adding New Entry Points (Post-100% GA)).
3. Monitoring & Metrics
The integrator is required to track and report the following metrics continuously (such as daily or in near real-time) at each phase.
Review of these metrics by Google is a prerequisite to obtain mandatory sign-off for the next phase.
- Conversion Funnel (Multiple Entry Points / Campaigns):
utmCampaign: Partners must pass the approvedutmCampaignparameter instartAccountLinking()for every entry point so Google's backend telemetry can attribute downstream Google ToS drop-offs, address prompts, and API errors by originating entry point. Manual partner-side reporting cannot replaceutmCampaignin the SDK.- Sheet Reporting: If multiple entry points or campaigns are active, slice the conversion funnel metrics in the shared tracking sheet by entry point (one tab per entry point or campaign).
| Metric | Definition |
|---|---|
| Entrypoint CTA Impressions | Total impressions on the in-app "Link to Google" entrypoint banner or CTA button. |
| Entrypoint CTA Viewers | Total unique users who viewed the in-app entrypoint CTA. |
| Entrypoint CTA Clicks | Total clicks on the in-app entrypoint CTA. |
| Entrypoint CTA Clickers | Total unique users who clicked the in-app entrypoint CTA. |
| eWallet ToS Shown | Total unique users who were shown the eWallet ToS screen. |
| eWallet ToS CTA Clickers | Total unique users who clicked on the linking CTA button on the eWallet ToS screen. |
| Intermediate CTA Clickers | Total unique users who tapped the action button on the intermediate page (only if a CCT intermediate page is used). |
| Users Redirected | Total unique users redirected to Google using startAccountLinking(). |
| Link User Invoked | Total unique users for whom linkUser() is invoked. |
| Successful Linkings | Total successful linkings with Google. |
| Post-eWallet ToS CVR | Successful Linkings / eWallet ToS CTA Clickers. |
| Post-Intermediate CVR | Successful Linkings / Intermediate CTA Clickers. |
| Total Flow CVR | Successful Linkings / Entrypoint CTA Clickers. |
- SDK & App Health: Track outgoing call success/failure rates, API latency, error code frequency, and any app crashes or UI hangs during the linking flow.
- Performance Evaluation (A/B Testing or Pre-Post Comparison): Compare Entrypoint CTA Clickers, Successful Linkings, and Total Flow CVR between control and treatment groups (or against historical deep-link baselines).
4. Production Rollout Stages
The integrator controls the volume of traffic routed to Google. For the initial entry point launch, traffic routing adjustments between phases are strictly prohibited until Google reviews the phase metrics and provides explicit sign-off.
Because production traffic impacts shared infrastructure, any unannounced or unapproved traffic spikes may be treated as a security or stability incident.
- Phase 0: Production Testing (0% Public Traffic) — Keep the integration disabled for public users, complete end-to-end production testing, and share the production screen recordings, test account email, and timestamps with Google.
- Phase 1: Alpha Ramp-Up (1% – 5% Traffic) — Enable the integration for a small subset of users and closely monitor logs and dashboards (especially during the first 24–48 hours), reporting any anomalies to Google immediately.
- Phase 2: Beta Ramp-Up (10% – 50% Traffic) — Upon Phase 1 sign-off, expand traffic up to the agreed beta threshold and monitor system capacity and edge-case errors under higher load.
- Phase 3: General Availability (100% Traffic) — Upon Phase 2 sign-off, enable the integration for 100% of eligible users and formally notify Google that the integration is fully live. Continue reporting the phase metrics for at least 2 weeks after reaching 100%.
Phase Exit Criteria
| Metric | Phase 0: Testing (0%) | Phase 1: Alpha (1% – 5%) | Phase 2: Beta (10% – 50%) |
|---|---|---|---|
| Duration | Until testing is verified | Min 7 Days | Min 7 Days |
| CTA Clickers | ≥ 5 | ≥ 800 | ≥ 1,500 |
| Successful Linkings | ≥ 5 | ≥ 500 | ≥ 1,000 |
| Total Flow CVR | 100% | ≥ 40% | ≥ 40% |
| App Crashes / Hangs | None | None | None |
| API Error Rate | 0% | < 1% | < 1% |
5. Adding New Entry Points (Post-100% GA)
Once the integration has reached 100% General Availability (Phase 3) with the initial entry point, a Google-gated staged traffic ramp (Phases 1–2) is not required for subsequent entry points or campaigns. Partners should verify there are no bugs or crashes on their end, follow their internal rollout processes for a careful release, and complete the review and reporting requirements for each new entry point scenario:
| Scenario | User Flow Example | Google Review & Assets Required | utmCampaign & Funnel Metrics |
|---|---|---|---|
| New Banner/Button Routes to the Page Hosting the Zone Icon | In-App Banner → Payments / Services Page → Existing Approved Zone Icon → Dedicated Zone Page → Link with Google CTA → eWallet ToS | None after first approval since no new entry points are introduced. | No new utmCampaign needed. Reuses the 1st entry point's approved utmCampaign string and metrics tab. |
| New Banner/Button Routes Directly into the Dedicated Zone | In-App Banner → Dedicated Zone Page → Link with Google CTA → eWallet ToS | Yes (UX/Brand review + 1 end-to-end video starting from the new banner placement; no staged ramp required). | Yes. New utmCampaign + separate metrics sheet tab (report for 7 days post-launch). |
| New Banner/Button Goes Straight to eWallet ToS | In-App Banner → eWallet ToS | Yes (UX/Brand review + 1 end-to-end video starting from the new touchpoint; no staged ramp required). | Yes. New utmCampaign + separate metrics sheet tab (report for 7 days post-launch). |
6. Rollback Procedure
If critical issues, SLA breaches, or stability concerns occur during the rollout:
- Immediate Notification: Notify your Google technical and business contacts immediately through the established support channels (such as Email or Support Portal) with error details, timestamps, and logs.
- Mitigation / Action:
- For Catastrophic / Fatal Issues (such as app crashes or 100% failure rates): Immediately pause the integration (0% traffic) or revert to the previous stable stage to protect users. Do not wait for acknowledgement.
- For Moderate Issues (such as elevated latency or lower conversion): Consult with Google first to determine if a ramp-down is necessary or if a fix is being deployed.
- Data Preservation: Ensure all relevant logs and metrics are captured to aid the joint investigation.
Next Steps
To begin implementation, review the Reverse Binding SDK Reference to download the JavaScript SDK, inspect method parameter definitions, error codes, and integration code samples.