1. Before you begin
What you'll build
In this codelab, you'll build an Android app using FHIR Engine Library. Your app will use FHIR Engine Library to download FHIR resources from a FHIR server, and upload any local changes to the server.
What you'll learn
- How to create a local HAPI FHIR server using Docker
- How to integrate FHIR Engine Library into your Android application
- How to use the Sync API to set up a one-time or periodic job to download and upload FHIR resources
- How to use the Search API
- How to use the Data Access APIs to create, read, update, and delete FHIR resources locally
What you'll need
- Docker (get Docker)
- A recent version of Android Studio (v4.1.2+)
- Android Emulator or a physical Android device running Android 7.0 Nougat or later
- The sample code
- Basic knowledge of Android development in Kotlin
If you haven't built Android apps before, you can start by building your first app.
2. Set up a local HAPI FHIR server with test data
HAPI FHIR is a popular open source FHIR server. We use a local HAPI FHIR server in our codelab for the Android app to connect to.
Set up the local HAPI FHIR server
- Run the following command in a terminal to get the latest image of HAPI FHIR
docker pull hapiproject/hapi:latest - Create a HAPI FHIR container by either using Docker Desktop to run the previously download image
hapiproject/hapi, or running the following commanddocker run -p 8080:8080 hapiproject/hapi:latest - Inspect the server by opening the URL
http://localhost:8080/in a browser. You should see the HAPI FHIR web interface.
Populate the local HAPI FHIR server with test data
To test our application, we'll need some test data on the server. We'll use synthetic data generated by Synthea.
- First, we need to download sample data from synthea-samples. Download and extract
synthea_sample_data_fhir_r4_sep2019.zip. The un-zipped sample data has numerous.jsonfiles, each being a transaction bundle for an individual patient. - We'll upload test data for three patients to the local HAPI FHIR server. Run the following command in the directory containing JSON files
curl -X POST -H "Content-Type: application/json" -d @./Aaron697_Brekke496_2fa15bc7-8866-461a-9000-f739e425860a.json http://localhost:8080/fhir/ curl -X POST -H "Content-Type: application/json" -d @./Aaron697_Stiedemann542_41166989-975d-4d17-b9de-17f94cb3eec1.json http://localhost:8080/fhir/ curl -X POST -H "Content-Type: application/json" -d @./Abby752_Kuvalis369_2b083021-e93f-4991-bf49-fd4f20060ef8.json http://localhost:8080/fhir/ - To upload test data for all patients to the server, run
for f in *.json; do curl -X POST -H "Content-Type: application/json" -d @$f http://localhost:8080/fhir/ ; done - Verify that the test data is available on the server by opening the URL
http://localhost:8080/fhir/Patient/in a browser. You should see the textHTTP 200 OKand theResponse Bodysection of the page containing patient data in a FHIR Bundle as the search result with atotalcount.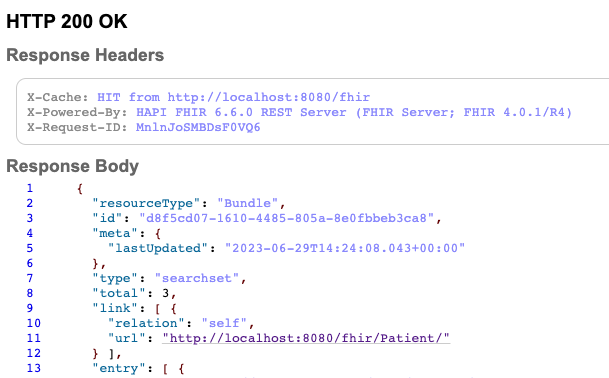
3. Set up the Android app
Download the Code
To download the code for this codelab, clone the Android FHIR SDK repository: git clone https://github.com/ohs-foundation/android-fhir.git
The starter project for this codelab is located in codelabs/engine.
Import the app into Android Studio
We start by importing the starter app into Android Studio.
Open Android Studio, select Import Project (Gradle, Eclipse ADT, etc.) and choose the codelabs/engine/ folder from the source code that you have downloaded earlier.

Sync your project with Gradle files
For your convenience, the FHIR Engine Library dependencies have already been added to the project. This allows you to integrate the FHIR Engine Library in your app. Observe the following lines to the end of the app/build.gradle.kts file of your project:
dependencies {
    // ...

    implementation("com.google.android.fhir:engine:1.1.0")
}
To be sure that all dependencies are available to your app, you should sync your project with gradle files at this point.
Select Sync Project with Gradle Files ( )from the Android Studio toolbar. You an also run the app again to check the dependencies are working correctly.
Run the starter app
Now that you have imported the project into Android Studio, you are ready to run the app for the first time.
Start the Android Studio emulator, and click Run ( ) in the Android Studio toolbar.
4. Create FHIR Engine instance
To incorporate the FHIR Engine into your Android app, you'll need to use the FHIR Engine Library and initiate an instance of the FHIR Engine. The steps outlined below will guide you through the process.
- Navigate to your Application class, which in this example is
FhirApplication.kt, located inapp/src/main/java/com/google/android/fhir/codelabs/engine. - Inside the
onCreate()method, add the following code to initialize FHIR Engine:FhirEngineProvider.init( FhirEngineConfiguration( enableEncryptionIfSupported = true, RECREATE_AT_OPEN, ServerConfiguration( baseUrl = "http://10.0.2.2:8080/fhir/", httpLogger = HttpLogger( HttpLogger.Configuration( if (BuildConfig.DEBUG) HttpLogger.Level.BODY else HttpLogger.Level.BASIC, ), ) { Log.d("App-HttpLog", it) }, ), ), )enableEncryptionIfSupported: Enables data encryption if the device supports it.RECREATE_AT_OPEN: Determines the database error strategy. In this case, it recreates the database if an error occurs upon opening.baseUrlinServerConfiguration: This is the FHIR server's base URL. The provided IP address10.0.2.2is specially reserved for localhost, accessible from the Android emulator. Learn more.
- In the
FhirApplicationclass, add the following line to lazily instantiate the FHIR Engine:private val fhirEngine: FhirEngine by lazy { FhirEngineProvider.getInstance(this) } - Add the following convenience method in the
FhirApplicationclass for easier access throughout your application:companion object { fun fhirEngine(context: Context) = (context.applicationContext as FhirApplication).fhirEngine }
5. Sync data with FHIR server
- Create a new class
DownloadWorkManagerImpl.kt. In this class, you'll define how the application fetches the next resource from the list to download.:class DownloadWorkManagerImpl : DownloadWorkManager { private val urls = LinkedList(listOf("Patient")) override suspend fun getNextRequest(): DownloadRequest? { val url = urls.poll() ?: return null return DownloadRequest.of(url) } override suspend fun getSummaryRequestUrls() = mapOf<ResourceType, String>() override suspend fun processResponse(response: Resource): Collection<Resource> { var bundleCollection: Collection<Resource> = mutableListOf() if (response is Bundle && response.type == Bundle.BundleType.SEARCHSET) { bundleCollection = response.entry.map { it.resource } } return bundleCollection } } - Create a new class
AppFhirSyncWorker.ktThis class defines how the app will sync with the remote FHIR server using a background worker.class AppFhirSyncWorker(appContext: Context, workerParams: WorkerParameters) : FhirSyncWorker(appContext, workerParams) { override fun getDownloadWorkManager() = DownloadWorkManagerImpl() override fun getConflictResolver() = AcceptLocalConflictResolver override fun getFhirEngine() = FhirApplication.fhirEngine(applicationContext) override fun getUploadStrategy() = UploadStrategy.forBundleRequest( methodForCreate = HttpCreateMethod.PUT, methodForUpdate = HttpUpdateMethod.PATCH, squash = true, bundleSize = 500, ) } - In your ViewModel,
PatientListViewModel.kt, you'll set up a one-time sync mechanism. Locate and add this code to thetriggerOneTimeSync()function:viewModelScope.launch { Sync.oneTimeSync<AppFhirSyncWorker>(getApplication()) .shareIn(this, SharingStarted.Eagerly, 10) .collect { _pollState.emit(it) } } - In the
PatientListFragment.ktfile, update the body of thehandleSyncJobStatusfunction:when (syncJobStatus) { is SyncJobStatus.Finished -> { Toast.makeText(requireContext(), "Sync Finished", Toast.LENGTH_SHORT).show() viewModel.searchPatientsByName("") } else -> {} }
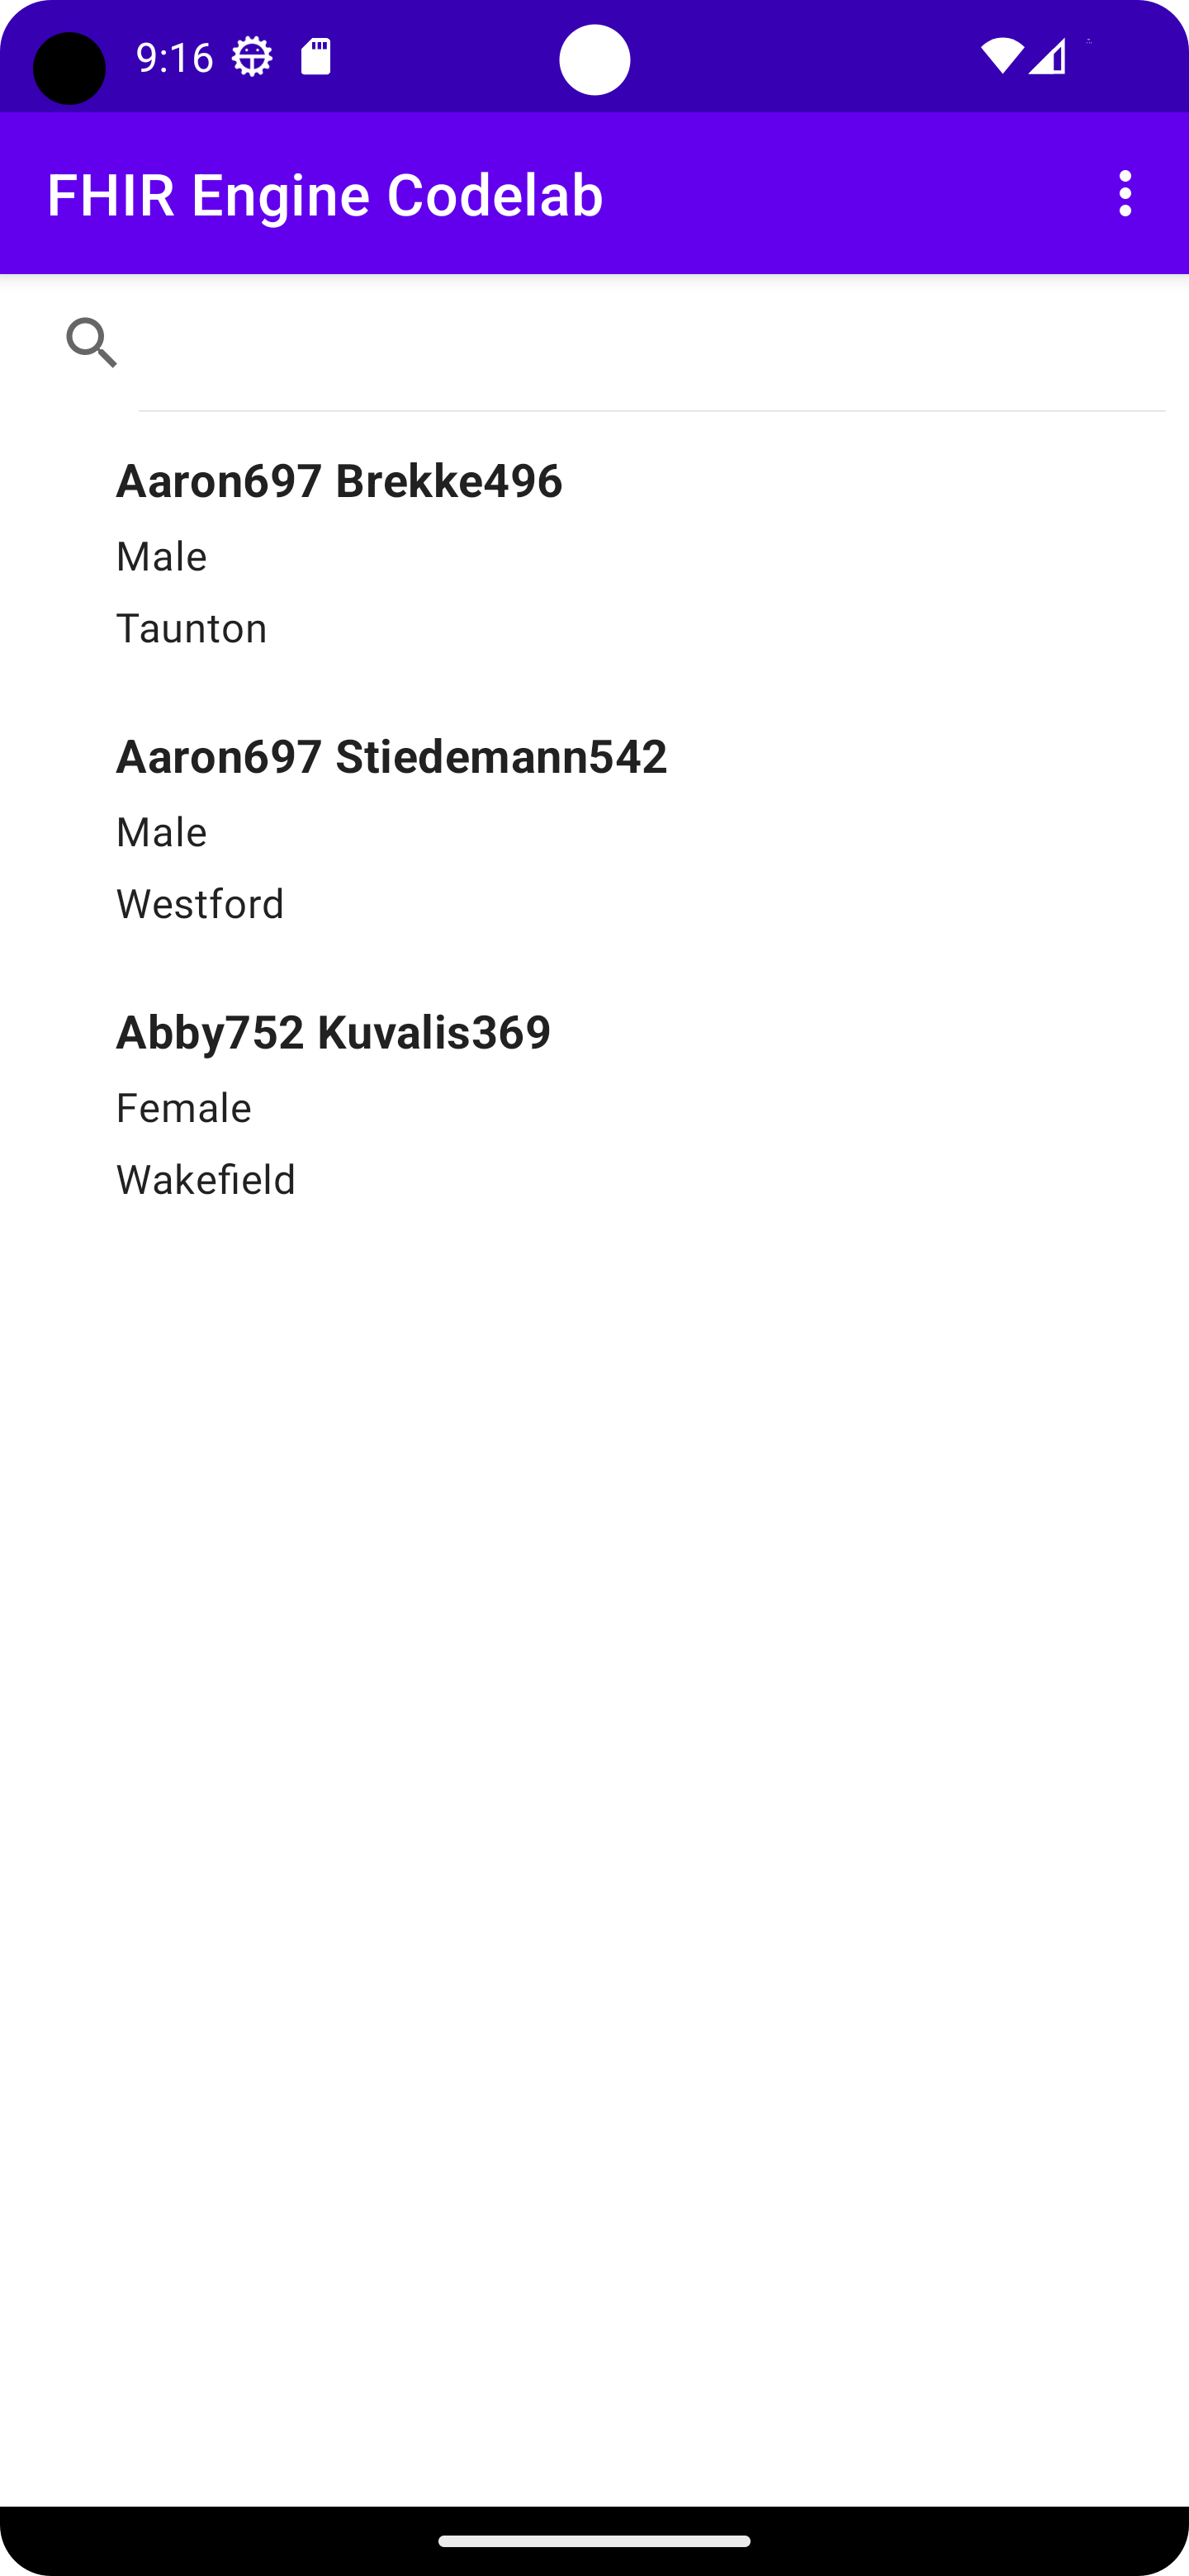
Now that everything is set up, run your app. Click the Sync button in the menu. If everything works correctly, you should see the patients from your local FHIR server being downloaded and displayed in the application.
6. Modify and Upload Patient Data
In this section, we will guide you through the process of modifying patient data based on specific criteria and uploading the updated data to your FHIR server. Specifically, we will swap the address cities for patients residing in Wakefield and Taunton.
Step 1: Set Up the Modification Logic in PatientListViewModel
The code in this section is added to the triggerUpdate function in PatientListViewModel
- Access the FHIR Engine:Start by getting a reference to the FHIR engine in the
PatientListViewModel.kt.viewModelScope.launch { val fhirEngine = FhirApplication.fhirEngine(getApplication()) - Search for Patients from Wakefield:Use the FHIR engine to search for patients with an address city of
Wakefield.val patientsFromWakefield = fhirEngine.search<Patient> { filter( Patient.ADDRESS_CITY, { modifier = StringFilterModifier.MATCHES_EXACTLY value = "Wakefield" } ) }searchmethod to filter patients based on their address city. The result will be a list of patients from Wakefield. - Search for Patients from Taunton:Similarly, search for patients with an address city of
Taunton.val patientsFromTaunton = fhirEngine.search<Patient> { filter( Patient.ADDRESS_CITY, { modifier = StringFilterModifier.MATCHES_EXACTLY value = "Taunton" } ) } - Modify Patient Addresses:Go through each patient in the
patientsFromWakefieldlist, change their city toTaunton, and update them in the FHIR engine.patientsFromWakefield.forEach { it.resource.address.first().city = "Taunton" fhirEngine.update(it.resource) }patientsFromTauntonlist to have their city changed toWakefield.patientsFromTaunton.forEach { it.resource.address.first().city = "Wakefield" fhirEngine.update(it.resource) } - Initiate Synchronization:After modifying the data locally, trigger a one-time sync to ensure the data is updated on the FHIR server.
triggerOneTimeSync() }}signifies the end of the coroutine launched at the beginning.
Step 2: Test the Functionality
- UI Testing:Run your app. Click the
Updatebutton in the menu. You should see the address cities for patientAaron697andAbby752swapped. - Server Verification:Open a browser and navigate to
http://localhost:8080/fhir/Patient/. Verify that the address city for patientsAaron697andAbby752is updated on the local FHIR server.
By following these steps, you've successfully implemented a mechanism to modify patient data and synchronize the changes with your FHIR server.
7. Search for Patients by Name
Searching for patients by their names can provide a user-friendly way of retrieving information. Here, we'll walk you through the process of implementing this feature in your application.
Step 1: Update the Function Signature
Navigate to your PatientListViewModel.kt file and find the function named searchPatientsByName. We will be adding code into this function.
To filter the results based on the provided name query, and emit the results for the UI to update, incorporate the following conditional code block:
viewModelScope.launch {
   val fhirEngine = FhirApplication.fhirEngine(getApplication())
if (nameQuery.isNotEmpty()) {
val searchResult = fhirEngine.search<Patient> {
filter(
Patient.NAME,
{
modifier = StringFilterModifier.CONTAINS
value = nameQuery
},
)
}
liveSearchedPatients.value = searchResult.map { it.resource }
}
}
Here, if the nameQuery is not empty, the search function will filter the results to only include patients whose names contain the specified query.
Step 2: Test the New Search Functionality
- Relaunch the App:After making these changes, rebuild and run your app.
- Search for Patients: On the patient list screen, use the search functionality. You should now be able to enter a name (or part of a name) to filter the list of patients accordingly.
With these steps completed, you've enhanced your application by providing users with the ability to efficiently search for patients by their names. This can significantly improve user experience and efficiency in data retrieval.
8. Congratulations!
You have used the FHIR Engine Library to manage FHIR resources in your app:
- Use Sync API to sync FHIR resources with a FHIR server
- Use Data Access API to create, read, update, and delete local FHIR resources
- Use Search API to search local FHIR resources
What we've covered
- How to set up a local HAPI FHIR server
- How to upload test data to the local HAPI FHIR Server
- How to build an Android app using the FHIR Engine Library
- How to use Sync API, Data Access API, and Search API in the FHIR Engine Library
Next Steps
- Explore the documentation for the FHIR Engine Library
- Explore the advanced features of the Search API
- Apply the FHIR Engine Library in your own Android app