
This codelab is part of the Developing Progressive Web Apps training course, developed by the Google Developers Training team. You will get the most value out of this course if you work through the codelabs in sequence.
For complete details about the course, see the Developing Progressive Web Apps overview.
Introduction
In this lab you'll use Lighthouse to audit a website for Progressive Web App (PWA) standards. You'll also add offline functionality with the service worker API.
What you'll learn
- How to audit sites with Lighthouse
- How to add offline capabilities to an application
What you should know
- Basic HTML, CSS, and JavaScript
- Familiarity with ES2015 Promises
What you will need
- Computer with terminal/shell access
- Connection to the internet
- Chrome browser (for using Lighthouse)
- A text editor
- Optional: Chrome on an Android device
Download or clone the pwa-training-labs repository from github and install the LTS version of Node.js, if needed.
Navigate into the offline-quickstart-lab/app/ directory and start a local development server:
cd offline-quickstart-lab/app
npm install
node server.js
You can terminate the server at any time with Ctrl-c.
Open your browser and navigate to localhost:8081/. You should see that the site is a simple and static web page.
Note: Unregister any service workers and clear all service worker caches for localhost so that they do not interfere with the lab. In Chrome DevTools, you can achieve this by clicking Clear site data from the Clear storage section of the Application tab.
Open the offline-quickstart-lab/app/ folder in your preferred text editor. The app/ folder is where you will be building the lab.
This folder contains:
images/folder contains sample imagesstyles/main.cssis the main stylesheetindex.htmlis the main HTML page for our sample sitepackage-lock.jsonandpackage.jsontrack app dependencies (the only dependencies in this case are for the local development server)server.jsis a local development server for testingservice-worker.jsis the service worker file (currently empty)
Before we start making changes to the site, let's audit with Lighthouse to see what can be improved.
Return to the app (in Chrome) and open the Audits tab of the Developer Tools. You should see the Lighthouse icon and configuration options. Select "Mobile" for Device, select all Audits, select either of the Throttling options, and choose to Clear storage:
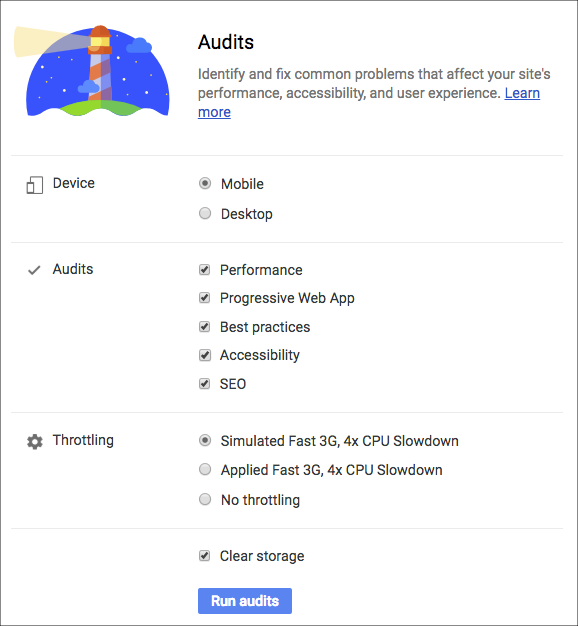
Click Run audits. The audits take a few moments to complete.
Explanation
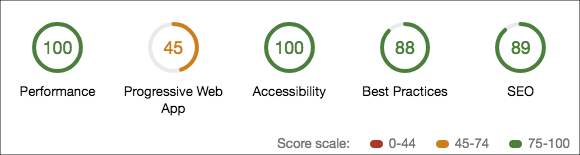
You should see a report with scores in Developer Tools once the audit is complete. It should show scores, something like this (the scores might not be exactly the same):
Note: Lighthouse scores are an approximation and can be influenced by your environment (for example, if you have a large amount of browser windows open). Your scores might not be exactly the same as those shown here.
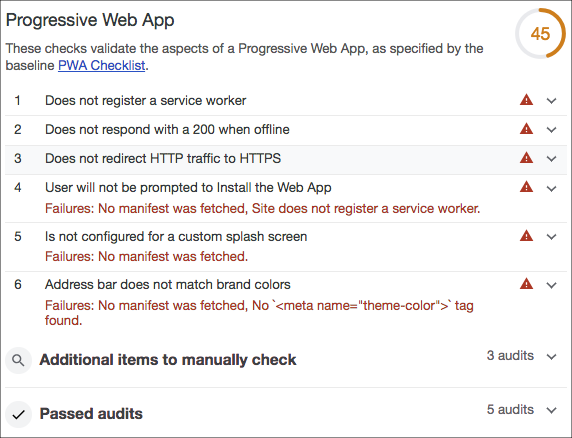
And the Progressive Web App section should look similar to this:
The report has scores and metrics in five categories:
- Progressive Web App
- Performance
- Accessibility
- Best Practices
- SEO
As you can see, our app scores poorly in the Progressive Web App (PWA) category. Let's improve our score!
Take a moment to look through the PWA section of the report and see what is missing.
Register a service worker
One of the failures listed in the report is that no service worker is registered. We currently have an empty service worker file at app/service-worker.js.
Add the following script to the bottom of index.html, just before the closing </body> tag:
<script>
if ('serviceWorker' in navigator) {
  window.addEventListener('load', function() {
    navigator.serviceWorker.register('service-worker.js')
      .then(reg => {
        console.log('Service worker registered! 😎', reg);
      })
      .catch(err => {
        console.log('😥 Service worker registration failed: ', err);
      });
  });
}
</script>
Explanation
This code registers the empty sw.js service worker file once the page has loaded. However the current service worker file is empty and won't do anything. Let's add service code in the next step.
Precache resources
Another failure listed in the report is that the app doesn't respond with a 200 status code when offline. We need to update our service worker to solve this.
Add the following code to the service worker file (sw.js):
const cacheName = 'cache-v1';
const precacheResources = [
  '/',
  'index.html',
  'styles/main.css',
  'images/space1.jpg',
  'images/space2.jpg',
  'images/space3.jpg'
];

self.addEventListener('install', event => {
  console.log('Service worker install event!');
  event.waitUntil(
    caches.open(cacheName)
      .then(cache => {
        return cache.addAll(precacheResources);
      })
  );
});

self.addEventListener('activate', event => {
  console.log('Service worker activate event!');
});

self.addEventListener('fetch', event => {
  console.log('Fetch intercepted for:', event.request.url);
  event.respondWith(caches.match(event.request)
    .then(cachedResponse => {
        if (cachedResponse) {
          return cachedResponse;
        }
        return fetch(event.request);
      })
    );
});
Now return to the browser and refresh the site. Check the console to see that the service worker:
- registered
- installed
- activated
Note: If you already registered the service worker previously, or are having trouble getting all the events to fire, unregister any service workers and refresh the page. If that fails, close all instances of the app and reopen it.
Next, terminate the local development server in your command line by running Ctrl + c. Refresh the site again and observe that it loads even though the server is offline!
Note: You may see a console error indicating that the service worker could not be fetched: An unknown error occurred when fetching the script. service-worker.js Failed to load resource: net::ERR_CONNECTION_REFUSED. This error is shown because the browser couldn't fetch the service worker script (because the site is offline), but that's expected because we can't use the service worker to cache itself. Otherwise the user's browser would be stuck with the same service worker forever!
Explanation
Once the service worker is registered by the registration script in index.html, the service worker install event occurs. During this event, the install event listener opens a named cache, and caches the files specified with the cache.addAll method. This is called "precaching" because it happens during the install event, which is typically the first time a user visits your site.
After a service worker is installed, and if another service worker is not currently controlling the page, the new service worker is "activated" (the activate event listener is triggered in the service worker) and it begins controlling the page.
When resources are requested by a page that an activated service worker controls, the requests pass through the service worker, like a network proxy. A fetch event is triggered for each request. In our service worker, the fetch event listener searches the caches and responds with the cached resource if it's available. If the resource isn't cached, the resource is requested normally.
Caching resources allows the app to work offline by avoiding network requests. Now our app can respond with a 200 status code when offline!
Note: The activate event isn't used for anything besides logging in this example. The event was included to help debug service worker lifecycle issues.
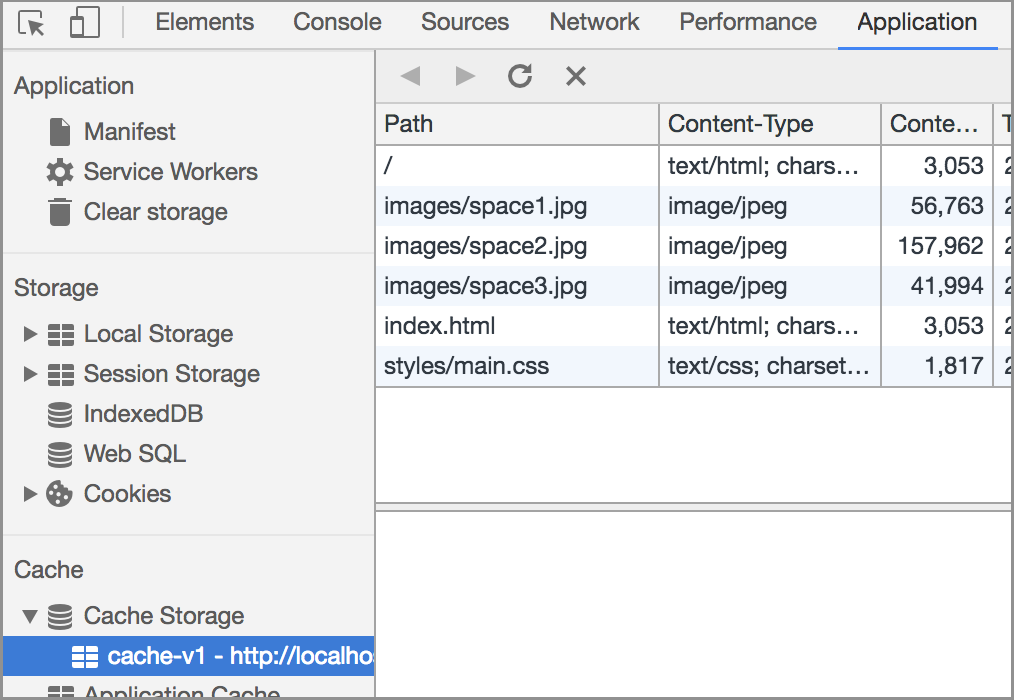
Optional: You can also see the cached resources in the Application tab of Developer Tools by expanding the Cache Storage section:
Restart the development server with node server.js and refresh the site. Then open the Audits tab in Developer Tools again, and re-run the Lighthouse audit by selecting New Audit (the plus sign in the upper left corner). When the audit is finished, you should see that our PWA score is significantly better, but could still be improved We'll continue to improve our score in the following section.
Note: This section is optional because testing the Web App Install Banner is beyond the scope of the lab. You can try it on your own by using remote debugging.
Our PWA score still isn't great. Some of the remaining failures listed in the report are that the user will not be prompted to install our web app, and that we haven't configured a splash screen or brand colors in the address bar. We can fix these issues and progressively implement Add to Home Screen by satisfying some additional criteria. Most importantly, we need to create a manifest file.
Create a Manifest file
Create a file in app/ called manifest.json, and add the following code:
{
  "name": "Space Missions",
  "short_name": "Space Missions",
  "lang": "en-US",
  "start_url": "/index.html",
  "display": "standalone",
  "theme_color": "#FF9800",
  "background_color": "#FF9800",
  "icons": [
    {
      "src": "images/touch/icon-128x128.png",
      "sizes": "128x128"
    },
    {
      "src": "images/touch/icon-192x192.png",
      "sizes": "192x192"
    },
    {
      "src": "images/touch/icon-256x256.png",
      "sizes": "256x256"
    },
    {
      "src": "images/touch/icon-384x384.png",
      "sizes": "384x384"
    },
    {
      "src": "images/touch/icon-512x512.png",
      "sizes": "512x512"
    }
  ]
}
The images referenced in the manifest are already supplied in the app.
Then add the following HTML to the bottom of the <head> tag in index.html:
<link rel="manifest" href="manifest.json">

<meta name="mobile-web-app-capable" content="yes">
<meta name="apple-mobile-web-app-capable" content="yes">
<meta name="application-name" content="Space Missions">
<meta name="apple-mobile-web-app-title" content="Space Missions">
<meta name="theme-color" content="#FF9800">
<meta name="msapplication-navbutton-color" content="#FF9800">
<meta name="apple-mobile-web-app-status-bar-style" content="black-translucent">
<meta name="msapplication-starturl" content="/index.html">
<meta name="viewport" content="width=device-width, initial-scale=1, shrink-to-fit=no">

<link rel="icon" sizes="128x128" href="/images/touch/icon-128x128.png">
<link rel="apple-touch-icon" sizes="128x128" href="/images/touch/icon-128x128.png">
<link rel="icon" sizes="192x192" href="icon-192x192.png">
<link rel="apple-touch-icon" sizes="192x192" href="/images/touch/icon-192x192.png">
<link rel="icon" sizes="256x256" href="/images/touch/icon-256x256.png">
<link rel="apple-touch-icon" sizes="256x256" href="/images/touch/icon-256x256.png">
<link rel="icon" sizes="384x384" href="/images/touch/icon-384x384.png">
<link rel="apple-touch-icon" sizes="384x384" href="/images/touch/icon-384x384.png">
<link rel="icon" sizes="512x512" href="/images/touch/icon-512x512.png">
<link rel="apple-touch-icon" sizes="512x512" href="/images/touch/icon-512x512.png">
Return to the site. In the Application tab of Developer Tools, select the Clear storage section, and click Clear site data. Then refresh the page. Now select the Manifest section. You should see the icons and configuration options that are configured in the manifest.json file. If you don't see your changes, open the site in an incognito window and check again.
Explanation
The manifest.json file tells the browser how to style and format some of the progressive aspects your app, such as the browser chrome, home screen icon, and splash screen. It can also be used to configure your web app to open in standalone mode, like a native app does (in other words, outside of the browser).
Support is still under development for some browsers as of the time of this writing, and the <meta> tags configure a subset of these features for certain browsers that don't yet have full support.
We had to Clear site data to remove our old cached version of index.html (since that version didn't have the manifest link). Try running another Lighthouse audit and see how much the PWA score improved!
Activating the install prompt
The next step to installing our app is to show users with the install prompt. Chrome 67 prompted users automatically, but starting in Chrome 68, the install prompt should be activated programmatically in response to a user gesture.
Add an "Install app" button and banner to the top of index.html (just after the <main> tag) with the following code:
<section id="installBanner" class="banner">
    <button id="installBtn">Install app</button>
</section>
Then style the banner by adding the following styles to styles/main.css:
.banner {
  align-content: center;
  display: none;
  justify-content: center;
  width: 100%;
}
Save the file. Finally, add the following script tag to index.html:
  <script>
    let deferredPrompt;
    window.addEventListener('beforeinstallprompt', event => {

      // Prevent Chrome 67 and earlier from automatically showing the prompt
      event.preventDefault();

      // Stash the event so it can be triggered later.
      deferredPrompt = event;

      // Attach the install prompt to a user gesture
      document.querySelector('#installBtn').addEventListener('click', event => {

        // Show the prompt
        deferredPrompt.prompt();

        // Wait for the user to respond to the prompt
        deferredPrompt.userChoice
          .then((choiceResult) => {
            if (choiceResult.outcome === 'accepted') {
              console.log('User accepted the A2HS prompt');
            } else {
              console.log('User dismissed the A2HS prompt');
            }
            deferredPrompt = null;
          });
      });

      // Update UI notify the user they can add to home screen
      document.querySelector('#installBanner').style.display = 'flex';
    });
  </script>
Save the file. Open the app in Chrome on an Android device, using remote debugging. When the page loads, you should see the "Install app" button (you won't see it on a desktop, so be sure you are testing on mobile). Click the button and the Add to Home Screen prompt should pop up. Follow the steps to install the app on your device. After installation, you should be able to open the web app in standalone mode (outside of the browser) by tapping the newly created home screen icon.
Explanation
The HTML & CSS code adds a hidden banner and button that we can use to allow users to activate the installation prompt.
Once the beforeinstallprompt event fires, we prevent the default experience (in which Chrome 67 and earlier automatically prompts users to install) and capture the beforeinstallevent in the global deferredPrompt variable. The "Install app" button is then configured to show the prompt with the beforeinstallevent's prompt() method. Once the user makes a choice (to install or not) the userChoice promise resolves with the user's choice (outcome). Finally, we display the install button once everything is ready.
You've learned how to audit sites with Lighthouse, and how to implement the basics of offline functionality. If you completed the optional sections, you also learned how to install web apps to the home screen!
More resources
Lighthouse is open source! You can fork it, add your own tests, and file bugs. Lighthouse is also available as a command line tool for integration with build processes.
To see all the codelabs in the PWA training course, see the Welcome codelab for the course/