
This codelab is part of the Android Kotlin Fundamentals course. You'll get the most value out of this course if you work through the codelabs in sequence. All the course codelabs are listed on the Android Kotlin Fundamentals codelabs landing page.
Introduction
In previous codelabs in this course, you used the findViewById() function to get references to views. When your app has complex view hierarchies, findViewById() is expensive and slows down the app, because Android traverses the view hierarchy, starting at the root, until it finds the desired view. Fortunately, there's a better way.
To set data in views, you've used string resources and set the data from the activity. It would be more efficient if the view knew about the data. And fortunately again, this is possible.
In this codelab, you learn how to use data binding to eliminate the need for findViewById(). You also learn how to use data binding to access data directly from a view.
What you should already know
You should be familiar with:
- What an activity is, and how to set up an activity with a layout in
onCreate(). - Creating a text view and setting the text that the text view displays.
- Using
findViewById()to get a reference to a view. - Creating and editing a basic XML layout for a view.
What you'll learn
- How to use the Data Binding Library to eliminate inefficient calls to
findViewById(). - How to access app data directly from XML.
What you'll do
- Modify an app to use data binding instead of
findViewById(), and to access data directly from the layout XML files.
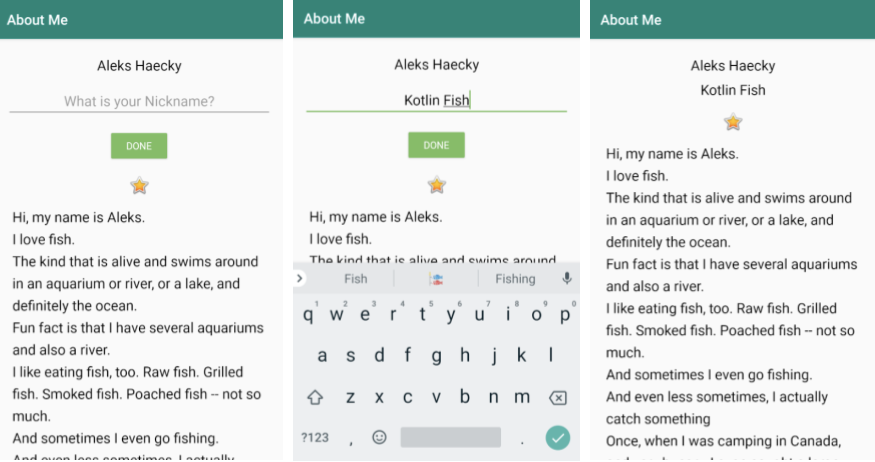
In this codelab, you start with the AboutMe app and change the app to use data binding. The app will look exactly the same when you are done!
Here's what the AboutMe app does:
- When the user opens the app, the app shows a name, a field to enter a nickname, a Done button, a star image, and scrollable text.
- The user can enter a nickname and tap the Done button. The editable field and button are replaced by a text view that shows the entered nickname.
You can use the code you built in the previous codelab, or you can download the AboutMeDataBinding-Starter code from GitHub.
The code you wrote in previous codelabs uses the findViewById() function to obtain references to views.
Every time you use findViewById() to search for a view after the view is created or recreated, the Android system traverses the view hierarchy at runtime to find it. When your app has only a handful of views, this is not a problem. However, production apps may have dozens of views in a layout, and even with the best design, there will be nested views.
Think of a linear layout that contains a scroll view that contains a text view. For a large or deep view hierarchy, finding a view can take enough time that it can noticeably slow down the app for the user. Caching views in variables can help, but you still have to initialize a variable for each view, in each namespace. With lots of views and multiple activities, this adds up, too.
One solution is to create an object that contains a reference to each view. This object, called a Binding object, can be used by your whole app. This technique is called data binding. Once a binding object has been created for your app, you can access the views, and other data, through the binding object, without having to traverse the view hierarchy or search for the data.

Data binding has the following benefits:
- Code is shorter, easier to read, and easier to maintain than code that uses
findByView(). - Data and views are clearly separated. This benefit of data binding becomes increasingly important later in this course.
- The Android system only traverses the view hierarchy once to get each view, and it happens during app startup, not at runtime when the user is interacting with the app.
- You get type safety for accessing views. (Type safety means that the compiler validates types while compiling, and it throws an error if you try to assign the wrong type to a variable.)
In this task, you set up data binding, and you use data binding to replace calls to findViewById() with calls to the binding object.
Step 1: Enable data binding
To use data binding, you need to enable data binding in your Gradle file, as it's not enabled by default. This is because data binding increases compile time and may affect app startup time.
- If you do not have the AboutMe app from a previous codelab, get the AboutMeDataBinding-Starter code from GitHub. Open it in Android Studio.
- Open the
build.gradle (Module: app)file. - Inside the
androidsection, before the closing brace, add adataBindingsection and setenabledtotrue.
dataBinding {
    enabled = true
}- When prompted, Sync the project. If you're not prompted, select File > Sync Project with Gradle Files.
- You can run the app, but you won't see any changes.
Step 2: Change layout file to be usable with data binding
To work with data binding, you need to wrap your XML layout with a <layout> tag. This is so that the root class is no longer a view group, but is instead a layout that contains view groups and views. The binding object can then know about the layout and the views in it.
- Open the
activity_main.xmlfile. - Switch to the Text tab.
- Add
<layout></layout>as the outermost tag around the<LinearLayout>.
<layout>
   <LinearLayout ... >
   ...
   </LinearLayout>
</layout>
- Choose Code > Reformat code to fix the code indentation.
The namespace declarations for a layout must be in the outermost tag.
- Cut the namespace declarations from the
<LinearLayout>and paste them into the<layout>tag. Your opening<layout>tag should look as shown below, and the<LinearLayout>tag should only contain view properties.
<layout xmlns:android="http://schemas.android.com/apk/res/android"
   xmlns:app="http://schemas.android.com/apk/res-auto">
- Build and run your app to verify that you did this correctly.
Step 3: Create a binding object in the main activity
Add a reference to the binding object to the main activity, so that you can use it to access views:
- Open the
MainActivity.ktfile. - Before
onCreate(), at the top level, create a variable for the binding object. This variable is customarily calledbinding.
The type ofbinding, theActivityMainBindingclass, is created by the compiler specifically for this main activity. The name is derived from the name of the layout file, that is,activity_main + Binding.
private lateinit var binding: ActivityMainBinding- If prompted by Android Studio, import
ActivityMainBinding. If you aren't prompted, click onActivityMainBindingand pressAlt+Enter(Option+Enteron a Mac) to import this missing class. (For more keyboard shortcuts, see Keyboard shortcuts.)
Theimportstatement should look similar to the one shown below.
import com.example.android.aboutme.databinding.ActivityMainBindingNext, you replace the current setContentView() function with an instruction that does the following:
- Creates the binding object.
- Uses the
setContentView()function from theDataBindingUtilclass to associate theactivity_mainlayout with theMainActivity. ThissetContentView()function also takes care of some data binding setup for the views.
- In
onCreate(), replace thesetContentView()call with the following line of code.
binding = DataBindingUtil.setContentView(this, R.layout.activity_main)
- Import
DataBindingUtil.
import androidx.databinding.DataBindingUtilStep 4: Use the binding object to replace all calls to findViewById()
You can now replace all calls to findViewById() with references to the views that are in the binding object. When the binding object is created, the compiler generates the names of the views in the binding object from the IDs of the views in the layout, converting them to camel case. So, for example, done_button is doneButton in the binding object, nickname_edit becomes becomes nicknameEdit, and nickname_text becomes nicknameText.
- In
onCreate(), replace the code that usesfindViewById()to find thedone_buttonwith code that references the button in the binding object.
Replace this code:findViewById<Button>(R.id.done_button)
with:binding.doneButton
Your finished code to set the click listener inonCreate()should look like this.
binding.doneButton.setOnClickListener {
   addNickname(it)
}- Do the same for all calls to
findViewById()in theaddNickname()function.
Replace all occurrences offindViewById<View>(R.id.id_view)withbinding.idView. Do this in the following way:
- Delete the definitions for the
editTextandnicknameTextViewvariables along with their calls tofindViewById(). This will give you errors. - Fix the errors by getting the
nicknameText,nicknameEdit, anddoneButtonviews from thebindingobject instead of the (deleted) variables. - Replace
view.visibilitywithbinding.doneButton.visibility. Usingbinding.doneButtoninstead of the passed-inviewmakes the code more consistent.
The result is the following code:
binding.nicknameText.text = binding.nicknameEdit.text
binding.nicknameEdit.visibility = View.GONE
binding.doneButton.visibility = View.GONE
binding.nicknameText.visibility = View.VISIBLE- There is no change in functionality. Optionally, you can now eliminate the
viewparameter and update all uses ofviewto usebinding.doneButtoninside this function.
- The
nicknameTextrequires aString, andnicknameEdit.textis anEditable. When using data binding, it is necessary to explicitly convert theEditableto aString.
binding.nicknameText.text = binding.nicknameEdit.text.toString()- You can delete the grayed out imports.
- Kotlinize the function by using
apply{}.
binding.apply {
   nicknameText.text = nicknameEdit.text.toString()
   nicknameEdit.visibility = View.GONE
   doneButton.visibility = View.GONE
   nicknameText.visibility = View.VISIBLE
}- Build and run your app...and it should look and work exactly the same as before.
You can take advantage of data binding to make a data class directly available to a view. This technique simplifies the code, and is extremely valuable for handling more complex cases.
For this example, instead of setting the name and nickname using string resources, you create a data class for the name and nickname. You make the data class available to the view using data binding.
Step 1: Create the MyName data class
- In Android Studio in the
javadirectory, open theMyName.ktfile. If you don't have this file, create a new Kotlin file and call itMyName.kt. - Define a data class for the name and nickname. Use empty strings as the default values.
data class MyName(var name: String = "", var nickname: String = "")Step 2: Add data to the layout
In the activity_main.xml file, the name is currently set in a TextView from a string resource. You need to replace the reference to the name with a reference to data in the data class.
- Open
activity_main.xmlin the Text tab. - At the top of the layout, between the
<layout>and<LinearLayout>tags, insert a<data></data>tag. This is where you will connect the view with the data.
<data>

</data>
Inside the data tags, you can declare named variables that hold a reference to a class.
- Inside the
<data>tag, add a<variable>tag. - Add a
nameparameter to give the variable a name of"myName". Add atypeparameter and set the type to a fully qualified name of theMyNamedata class (package name + variable name).
<variable
       name="myName"
       type="com.example.android.aboutme.MyName" />
Now, instead of using the string resource for the name, you can reference the myName variable.
- Replace
android:text="@string/name"with the code below.
@={} is a directive to get the data that is referenced inside the curly braces.
myName references the myName variable that you previously defined, which points to the myName data class and fetches the name property from the class.
android:text="@={myName.name}"Step 3: Create the data
You now have a reference to the data in your layout file. Next, you create the actual data.
- Open the
MainActivity.ktfile. - Above
onCreate(), create a private variable, also calledmyNameby convention. Assign the variable an instance of theMyNamedata class, passing in the name.
private val myName: MyName = MyName("Aleks Haecky")- In
onCreate(), set the value of themyNamevariable in the layout file to the value of themyNamevariable that you just declared. You can't access the variable in the XML directly. You need to access it through the binding object.
binding.myName = myName- This may show an error, because you need to refresh the binding object after making changes. Build your app, and the error should go away.
Step 4: Use the data class for the nickname in the TextView
The final step is to also use the data class for the nickname in the TextView.
- Open
activity_main.xml. - In the
nickname_texttext view, add atextproperty. Reference thenicknamein the data class, as shown below.
android:text="@={myName.nickname}"- In
ActivityMain, replacenicknameText.text = nicknameEdit.text.toString()
with code to set the nickname in themyNamevariable.
myName?.nickname = nicknameEdit.text.toString()After the nickname is set, you want your code to refresh the UI with the new data. To do this, you must invalidate all binding expressions so that they are recreated with the correct data.
- Add
invalidateAll()after setting the nickname so that the UI is refreshed with the value in the updated binding object.
binding.apply {
   myName?.nickname = nicknameEdit.text.toString()
   invalidateAll()
   ...
}- Build and run your app, and it should work exactly the same as before.
Android Studio project: AboutMeDataBinding
Steps to use data binding to replace calls to findViewById():
- Enable data binding in the android section of the
build.gradlefile:dataBinding { enabled = true } - Use
<layout>as the root view in your XML layout. - Define a binding variable:
private lateinit var binding: ActivityMainBinding - Create a binding object in
MainActivity, replacingsetContentView:binding = DataBindingUtil.setContentView(this, R.layout.activity_main) - Replace calls to
findViewById()with references to the view in the binding object. For example:findViewById<Button>(R.id.done_button) ⇒ binding.doneButton
(In the example, the name of the view is generated camel case from the view'sidin the XML.)
Steps for binding views to data:
- Create a data class for your data.
- Add a
<data>block inside the<layout>tag. - Define a
<variable>with a name, and a type that is the data class.
<data>
   <variable
       name="myName"
       type="com.example.android.aboutme.MyName" />
</data>- In
MainActivity, create a variable with an instance of the data class. For example:private val myName: MyName = MyName("Aleks Haecky")
- In the binding object, set the variable to the variable you just created:
binding.myName = myName
- In the XML, set the content of the view to the variable that you defined in the
<data>block. Use dot notation to access the data inside the data class.android:text="@={myName.name}"
Udacity course:
Android developer documentation:
This section lists possible homework assignments for students who are working through this codelab as part of a course led by an instructor. It's up to the instructor to do the following:
- Assign homework if required.
- Communicate to students how to submit homework assignments.
- Grade the homework assignments.
Instructors can use these suggestions as little or as much as they want, and should feel free to assign any other homework they feel is appropriate.
If you're working through this codelab on your own, feel free to use these homework assignments to test your knowledge.
Answer these questions
Question 1
Why do you want to minimize explicit and implicit calls to findViewById()?
- Every time
findViewById()is called, it traverses the view hierarchy. findViewById()runs on the main or UI thread.- These calls can slow down the user interface.
- Your app is less likely to crash.
Question 2
How would you describe data binding?
For example, here are some things you could say about data binding:
- The big idea about data binding is to create an object that connects/maps/binds two pieces of distant information together at compile time, so that you don't have to look for the data at runtime.
- The object that surfaces these bindings to you is called the binding object.
- The binding object is created by the compiler.
Question 3
Which of the following is NOT a benefit of data binding?
- Code is shorter, easier to read, and easier to maintain.
- Data and views are clearly separated.
- The Android system only traverses the view hierarchy once to get each view.
- Calling
findViewById()generates a compiler error. - Type safety for accessing views.
Question 4
What is the function of the <layout> tag?
- You wrap it around your root view in the layout.
- Bindings are created for all the views in a layout.
- It designates the top-level view in an XML layout that uses data binding.
- You can use the
<data>tag in inside a<layout>to bind a variable to a data class.
Question 5
Which is the correct way to reference bound data in the XML layout?
android:text="@={myDataClass.property}"android:text="@={myDataClass}"android:text="@={myDataClass.property.toString()}"android:text="@={myDataClass.bound_data.property}"
Start the next lesson:
For links to other codelabs in this course, see the Android Kotlin Fundamentals codelabs landing page.