
This codelab is part of the Android Kotlin Fundamentals course. You'll get the most value out of this course if you work through the codelabs in sequence. All the course codelabs are listed on the Android Kotlin Fundamentals codelabs landing page.
Introduction
One of the top priorities for creating a flawless user experience for your app is to make sure the UI is always responsive and runs smoothly. One way to improve UI performance is to move long-running tasks, such as database operations, into the background.
In this codelab, you implement the user-facing portion of the TrackMySleepQuality app, using Kotlin coroutines to perform database operations away from the main thread.
What you should already know
You should be familiar with:
- Building a basic user interface (UI) using an activity, fragments, views, and click handlers.
- Navigating between fragments, and using
safeArgsto pass simple data between fragments. - View models, view model factories, transformations, and
LiveData. - How to create a
Roomdatabase, create a DAO, and define entities. - It is helpful if you are familiar with threading and multiprocessing concepts.
What you'll learn
- How threads work in Android.
- How to use Kotlin coroutines to move database operations away from the main thread.
- How to display formatted data in a
TextView.
What you'll do
- Extend the TrackMySleepQuality app to collect, store, and display data in and from the database.
- Use coroutines to run long-running database operations in the background.
- Use
LiveDatato trigger navigation and the display of a snackbar. - Use
LiveDatato enable and disable buttons.
In this codelab, you build the view model, coroutines, and data-display portions of the TrackMySleepQuality app.
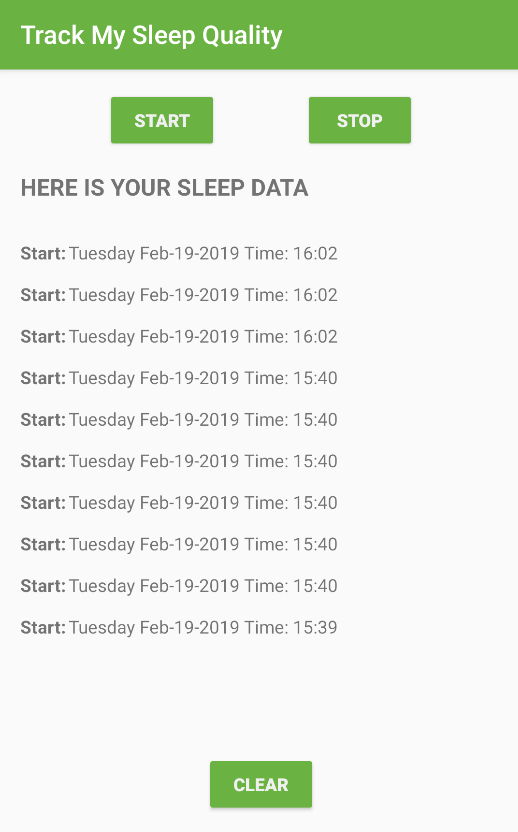
The app has two screens, represented by fragments, as shown in the figure below.

The first screen, shown on the left, has buttons to start and stop tracking. The screen shows all the user's sleep data. The Clear button permanently deletes all the data that the app has collected for the user.
The second screen, shown on the right, is for selecting a sleep-quality rating. In the app, the rating is represented numerically. For development purposes, the app shows both the face icons and their numerical equivalents.
The user's flow is as follows:
- User opens the app and is presented with the sleep-tracking screen.
- User taps the Start button. This records the starting time and displays it. The Start button is disabled, and the Stop button is enabled.
- User taps the Stop button. This records the ending time and opens the sleep-quality screen.
- User selects a sleep-quality icon. The screen closes, and the tracking screen displays the sleep-ending time and sleep quality. The Stop button is disabled and the Start button is enabled. The app is ready for another night.
- The Clear button is enabled whenever there is data in the database. When the user taps the Clear button, all their data is erased without recourse—there is no "Are you sure?" message.
This app uses a simplified architecture, as shown below in the context of the full architecture. The app uses only the following components:
- UI controller
- View model and
LiveData - A Room database

In this task, you use a TextView to display formatted sleep tracking data. (This is not the final interface. You will learn a better way in another codelab.)
You can continue with the TrackMySleepQuality app that you built in the previous codelab or download the starter app for this codelab.
Step 1: Download and run the starter app
- Download the TrackMySleepQuality-Coroutines-Starter app from GitHub.
- Build and run the app. The app shows the UI for the
SleepTrackerFragmentfragment, but no data. The buttons do not respond to taps.
Step 2: Inspect the code
The starter code for this codelab is the same as the solution code for the 6.1 Create a Room database codelab.
- Open res/layout/activity_main.xml. This layout contains the
nav_host_fragmentfragment. Also, notice the<merge>tag.
Themergetag can be used to eliminate redundant layouts when including layouts, and it's a good idea to use it. An example of a redundant layout would be ConstraintLayout > LinearLayout > TextView, where the system might be able to eliminate the LinearLayout. This kind of optimization can simplify the view hierarchy and improve app performance. - In the navigation folder, open navigation.xml. You can see two fragments and the navigation actions that connect them.
- In the layout folder, double-click the sleep tracker fragment to see its XML layout. Notice the following:
- The layout data is wrapped in a
<layout>element to enable data binding. ConstraintLayoutand the other views are arranged inside the<layout>element.- The file has a placeholder
<data>tag.
The starter app also provides dimensions, colors, and styling for the UI. The app contains a Room database, a DAO, and a SleepNight entity. If you did not complete the preceding codelab, make sure you explore these aspects of the code on your own.
Now that you have a database and a UI, you need to collect data, add the data to the database, and display the data. All this work is done in the view model. Your sleep-tracker view model will handle button clicks, interact with the database via the DAO, and provide data to the UI via LiveData. All database operations will have to be run away from the main UI thread, and you'll do that using coroutines.
Step 1: Add SleepTrackerViewModel
- In the sleeptracker package, open SleepTrackerViewModel.kt.
- Inspect the
SleepTrackerViewModelclass, which is provided for you in the starter app and is also shown below. Note that the class extendsAndroidViewModel(). This class is the same asViewModel, but it takes the application context as a parameter and makes it available as a property. You will need this later.
class SleepTrackerViewModel(
       val database: SleepDatabaseDao,
       application: Application) : AndroidViewModel(application) {
}
Step 2: Add SleepTrackerViewModelFactory
- In the sleeptracker package, open SleepTrackerViewModelFactory.kt.
- Examine the code that's provided for you for the factory, which is shown below:
class SleepTrackerViewModelFactory(
       private val dataSource: SleepDatabaseDao,
       private val application: Application) : ViewModelProvider.Factory {
   @Suppress("unchecked_cast")
   override fun <T : ViewModel?> create(modelClass: Class<T>): T {
       if (modelClass.isAssignableFrom(SleepTrackerViewModel::class.java)) {
           return SleepTrackerViewModel(dataSource, application) as T
       }
       throw IllegalArgumentException("Unknown ViewModel class")
   }
}
Take note of the following:
- The provided
SleepTrackerViewModelFactorytakes the same argument as theViewModeland extendsViewModelProvider.Factory. - Inside the factory, the code overrides
create(), which takes any class type as an argument and returns aViewModel. - In the body of
create(), the code checks that there is aSleepTrackerViewModelclass available, and if there is, returns an instance of it. Otherwise, the code throws an exception.
Step 3: Update SleepTrackerFragment
- In the
SleepTrackerFragment, get a reference to the application context. Put the reference inonCreateView(), belowbinding. You need a reference to the app that this fragment is attached to, to pass into the view-model factory provider.
TherequireNotNullKotlin function throws anIllegalArgumentExceptionif the value isnull.
val application = requireNotNull(this.activity).application- You need a reference to your data source via a reference to the DAO. In
onCreateView(), before thereturn, define adataSource. To get a reference to the DAO of the database, useSleepDatabase.getInstance(application).sleepDatabaseDao.
val dataSource = SleepDatabase.getInstance(application).sleepDatabaseDao- In
onCreateView(), before thereturn, create an instance of theviewModelFactory. You need to pass itdataSourceand theapplication.
val viewModelFactory = SleepTrackerViewModelFactory(dataSource, application)- Now that you have a factory, get a reference to the
SleepTrackerViewModel. TheSleepTrackerViewModel::class.javaparameter refers to the runtime Java class of this object.
val sleepTrackerViewModel =
       ViewModelProviders.of(
this, viewModelFactory).get(SleepTrackerViewModel::class.java)- Your finished code should look like this:
// Create an instance of the ViewModel Factory.
val dataSource = SleepDatabase.getInstance(application).sleepDatabaseDao
val viewModelFactory = SleepTrackerViewModelFactory(dataSource, application)

// Get a reference to the ViewModel associated with this fragment.
val sleepTrackerViewModel =
       ViewModelProviders.of(
               this, viewModelFactory).get(SleepTrackerViewModel::class.java)
Here's the onCreateView() method so far:
override fun onCreateView(inflater: LayoutInflater, container: ViewGroup?,
                              savedInstanceState: Bundle?): View? {

        // Get a reference to the binding object and inflate the fragment views.
        val binding: FragmentSleepTrackerBinding = DataBindingUtil.inflate(
                inflater, R.layout.fragment_sleep_tracker, container, false)

        val application = requireNotNull(this.activity).application

        val dataSource = SleepDatabase.getInstance(application).sleepDatabaseDao

        val viewModelFactory = SleepTrackerViewModelFactory(dataSource, application)

        val sleepTrackerViewModel =
                ViewModelProviders.of(
                        this, viewModelFactory).get(SleepTrackerViewModel::class.java)

        return binding.root
    }
Step 4: Add data binding for the view model
With the basic ViewModel in place, you need to finish setting up data binding in the SleepTrackerFragment to connect the ViewModel with the UI.
In the fragment_sleep_tracker.xml layout file:
- Inside the
<data>block, create a<variable>that references theSleepTrackerViewModelclass.
<data>
   <variable
       name="sleepTrackerViewModel"
       type="com.example.android.trackmysleepquality.sleeptracker.SleepTrackerViewModel" />
</data>
In SleepTrackerFragment:
- Set the current activity as the lifecycle owner of the binding. Add this code inside the
onCreateView()method, before thereturnstatement:
binding.setLifecycleOwner(this)- Assign the
sleepTrackerViewModelbinding variable to thesleepTrackerViewModel. Put this code insideonCreateView(), below the code that creates theSleepTrackerViewModel:
binding.sleepTrackerViewModel = sleepTrackerViewModel- You will probably see an error, because you have to recreate the binding object. Clean and rebuild the project to get rid of the error.
- Finally, as always, make sure your code builds and runs without errors.
In Kotlin, coroutines are the way to handle long-running tasks elegantly and efficiently. Kotlin coroutines let you convert callback-based code to sequential code. Code written sequentially is typically easier to read and can even use language features such as exceptions. In the end, coroutines and callbacks do the same thing: they wait until a result is available from a long-running task and continue execution.
Coroutines have the following properties:
- Coroutines are asynchronous and non-blocking.
- Coroutines use suspend functions to make asynchronous code sequential.
Coroutines are asynchronous.
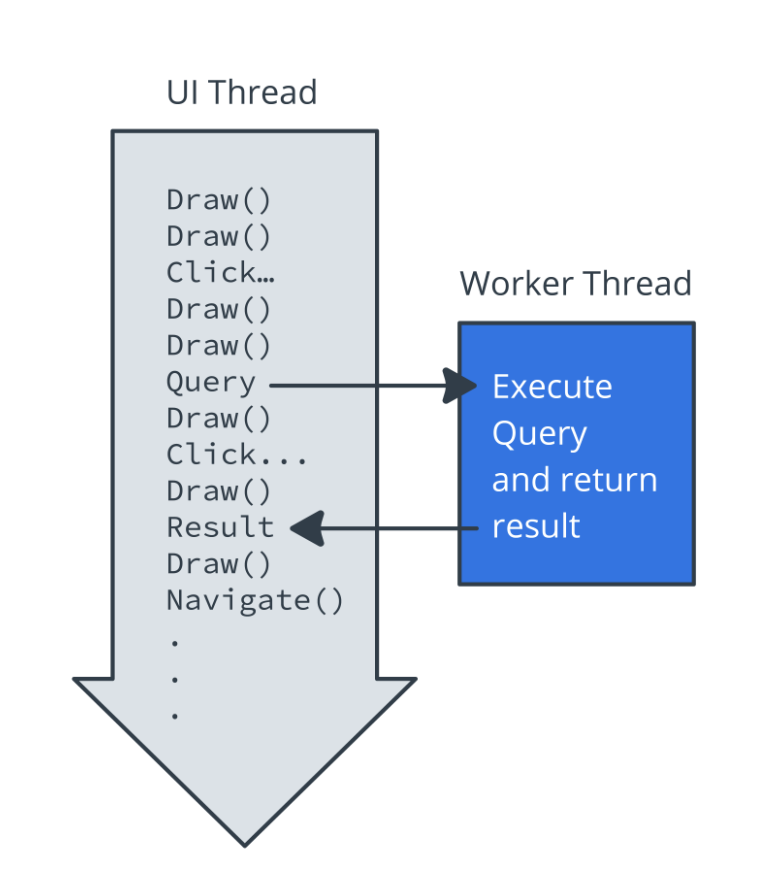
A coroutine runs independently from the main execution steps of your program. This could be in parallel or on a separate processor. It could also be that while the rest of the app is waiting for input, you sneak in a bit of processing. One of the important aspects of async is that you cannot expect that the result is available, until you explicitly wait for it.
For example, let's say you have a question that requires research, and you ask a colleague to find the answer. They go off and work on it, which is like they're doing the work "asynchronously" and "on a separate thread." You can continue to do other work that doesn't depend on the answer, until your colleague comes back and tells you what the answer is.
Coroutines are non-blocking.
Non-blocking means that a coroutine does not block the main or UI thread. So with coroutines, users always have the smoothest possible experience, because the UI interaction always has priority.
Coroutines use suspend functions to make asynchronous code sequential.
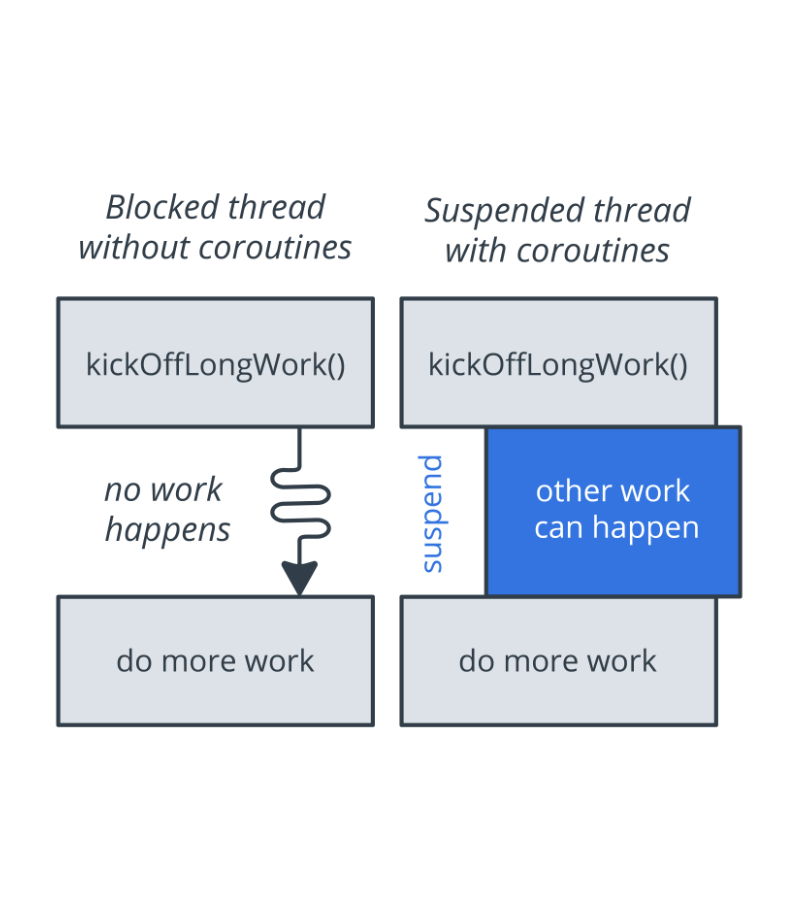
The keyword suspend is Kotlin's way of marking a function, or function type, as being available to coroutines. When a coroutine calls a function marked with suspend, instead of blocking until the function returns like a normal function call, the coroutine suspends execution until the result is ready. Then the coroutine resumes where it left off, with the result.
While the coroutine is suspended and waiting for a result, it unblocks the thread that it's running on. That way, other functions or coroutines can run.
The suspend keyword doesn't specify the thread that the code runs on. A suspend function may run on a background thread, or on the main thread.
To use coroutines in Kotlin, you need three things:
- A job
- A dispatcher
- A scope
Job: Basically, a job is anything that can be canceled. Every coroutine has a job, and you can use the job to cancel the coroutine. Jobs can be arranged into parent-child hierarchies. Canceling a parent job immediately cancels all the job's children, which is a lot more convenient than canceling each coroutine manually.
Dispatcher: The dispatcher sends off coroutines to run on various threads. For example, Dispatcher.Main runs tasks on the main thread, and Dispatcher.IO offloads blocking I/O tasks to a shared pool of threads.
Scope: A coroutine's scope defines the context in which the coroutine runs. A scope combines information about a coroutine's job and dispatcher. Scopes keep track of coroutines. When you launch a coroutine, it's "in a scope," which means that you've indicated which scope will keep track of the coroutine.
You want the user to be able to interact with the sleep data in the following ways:
- When the user taps the Start button, the app creates a new sleep night and stores the sleep night in the database.
- When the user taps the Stop button, the app updates the night with an end time.
- When the user taps the Clear button, the app erases the data in the database.
These database operations can take a long time, so they should run on a separate thread.
Step 1: Set up coroutines for database operations
When the Start button in the Sleep Tracker app is tapped, you want to call a function in the SleepTrackerViewModel to create a new instance of SleepNight and store the instance in the database.
Tapping any of the buttons triggers a database operation, such as creating or updating a SleepNight. For this reason and others, you use coroutines to implement click handlers for the app's buttons.
- Open the app-level
build.gradlefile and find the dependencies for coroutines. To use coroutines, you need these dependencies, which were added for you.
The$coroutine_versionis defined in the projectbuild.gradlefile ascoroutine_version ='1.0.0'.
implementation "org.jetbrains.kotlinx:kotlinx-coroutines-core:$coroutine_version"
implementation "org.jetbrains.kotlinx:kotlinx-coroutines-android:$coroutine_version"
- Open the
SleepTrackerViewModelfile. - In the body of the class, define
viewModelJoband assign it an instance ofJob. ThisviewModelJoballows you to cancel all coroutines started by this view model when the view model is no longer used and is destroyed. This way, you don't end up with coroutines that have nowhere to return to.
private var viewModelJob = Job()- At the end of the body of the class, override
onCleared()and cancel all coroutines. When theViewModelis destroyed,onCleared()is called.
override fun onCleared() {
   super.onCleared()
   viewModelJob.cancel()
}- Right below the definition of
viewModelJob, define auiScopefor the coroutines. The scope determines what thread the coroutine will run on, and the scope also needs to know about the job. To get a scope, ask for an instance ofCoroutineScope, and pass in a dispatcher and a job.
Using Dispatchers.Main means that coroutines launched in the uiScope will run on the main thread. This is sensible for many coroutines started by a ViewModel, because after these coroutines perform some processing, they result in an update of the UI.
private val uiScope = CoroutineScope(Dispatchers.Main + viewModelJob)- Below the definition of
uiScope, define a variable calledtonightto hold the current night. Make the variableMutableLiveData, because you need to be able to observe the data and change it.
private var tonight = MutableLiveData<SleepNight?>()- To initialize the
tonightvariable as soon as possible, create aninitblock below the definition oftonightand callinitializeTonight(). You defineinitializeTonight()in the next step.
init {
   initializeTonight()
}- Below the
initblock, implementinitializeTonight(). In theuiScope, launch a coroutine. Inside, get the value fortonightfrom the database by callinggetTonightFromDatabase(), and assign the value totonight.value. You definegetTonightFromDatabase()in the next step.
private fun initializeTonight() {
   uiScope.launch {
       tonight.value = getTonightFromDatabase()
   }
}- Implement
getTonightFromDatabase(). Define it as aprivate suspendfunction that returns a nullableSleepNight, if there is no current startedSleepNight. This leaves you with an error, because the function has to return something.
private suspend fun getTonightFromDatabase(): SleepNight? { }- Inside the function body of
getTonightFromDatabase(), return the result from a coroutine that runs in theDispatchers.IOcontext. Use the I/O dispatcher, because getting data from the database is an I/O operation and has nothing to do with the UI.
return withContext(Dispatchers.IO) {}- Inside the return block, let the coroutine get tonight (the newest night) from the database. If the start and end times are not the same, meaning that the night has already been completed, return
null. Otherwise, return the night.
       var night = database.getTonight()
       if (night?.endTimeMilli != night?.startTimeMilli) {
           night = null
       }
       night
Your completed getTonightFromDatabase() suspend function should look like this. There should be no more errors.
private suspend fun getTonightFromDatabase(): SleepNight? {
   return withContext(Dispatchers.IO) {
       var night = database.getTonight()
       if (night?.endTimeMilli != night?.startTimeMilli) {
           night = null
       }
       night
   }
}
Step 2: Add the click handler for the Start button
Now you can implement onStartTracking(), the click handler for the Start button. You need to create a new SleepNight, insert it into the database, and assign it to tonight. The structure of onStartTracking() is going to look very much like initializeTonight().
- Start with the function definition for
onStartTracking(). You can put the click handlers aboveonCleared()in theSleepTrackerViewModelfile.
fun onStartTracking() {}- Inside
onStartTracking(), launch a coroutine in theuiScope, because you need this result to continue and update the UI.
uiScope.launch {}- Inside the coroutine launch, create a new
SleepNight, which captures the current time as the start time.
val newNight = SleepNight()- Still inside the coroutine launch, call
insert()to insertnewNightinto the database. You will see an error, because you have not defined thisinsert()suspend function yet. (This is not the DAO function of the same name.)
insert(newNight)
- Also inside the coroutine launch, update
tonight.
tonight.value = getTonightFromDatabase()- Below
onStartTracking(), defineinsert()as aprivate suspendfunction that takes aSleepNightas its argument.
private suspend fun insert(night: SleepNight) {}- For the body of
insert(), launch a coroutine in the I/O context and insert the night into the database by callinginsert()from the DAO.
   withContext(Dispatchers.IO) {
       database.insert(night)
}- In the
fragment_sleep_tracker.xmllayout file, add the click handler foronStartTracking()to thestart_buttonusing the magic of data binding that you set up earlier. The@{() ->function notation creates a lambda function that takes no arguments and calls the click handler in thesleepTrackerViewModel.
android:onClick="@{() -> sleepTrackerViewModel.onStartTracking()}"- Build and run your app. Tap the Start button. This action creates data, but you cannot see anything yet. You fix that next.
fun someWorkNeedsToBeDone {
   uiScope.launch {

        suspendFunction()

   }
}

suspend fun suspendFunction() {
   withContext(Dispatchers.IO) {
       longrunningWork()
   }
}
Step 3: Display the data
In the SleepTrackerViewModel, the nights variable references LiveData because getAllNights() in the DAO returns LiveData.
It is a Room feature that every time the data in the database changes, the LiveData nights is updated to show the latest data. You never need to explicitly set the LiveData or update it. Room updates the data to match the database.
However, if you display nights in a text view, it will show the object reference. To see the contents of the object, transform the data into a formatted string. Use a Transformation map that's executed every time nights receives new data from the database.
- Open the
Util.ktfile and uncomment the code for the definition offormatNights()and the associatedimportstatements. To uncomment code in Android Studio, select all the code marked with//and pressCmd+/orControl+/. - Notice that
formatNights()returns a typeSpanned, which is an HTML-formatted string. - Open strings.xml. Notice the use of
CDATAto format the string resources for displaying the sleep data. - Open SleepTrackerViewModel. In the
SleepTrackerViewModelclass, below the definition ofuiScope, define a variable callednights. Get all the nights from the database and assign them to thenightsvariable.
private val nights = database.getAllNights()- Right below the definition of
nights, add code to transformnightsinto anightsString. Use theformatNights()function fromUtil.kt.
Passnightsinto themap()function from theTransformationsclass. To get access to your string resources, define the mapping function as callingformatNights(). Supplynightsand aResourcesobject.
val nightsString = Transformations.map(nights) { nights ->
   formatNights(nights, application.resources)
}- Open the
fragment_sleep_tracker.xmllayout file. In theTextView, in theandroid:textproperty, you can now replace the resource string with a reference tonightsString.
"@{sleepTrackerViewModel.nightsString}"- Rebuild your code and run the app. All your sleep data with start times should display now.
- Tap the Start button a few more times, and you see more data.
In the next step, you enable functionality for the Stop button.
Step 4: Add the click handler for the Stop button
Using the same pattern as in the previous step, implement the click handler for the Stop button in SleepTrackerViewModel.
- Add
onStopTracking()to theViewModel. Launch a coroutine in theuiScope. If the end time hasn't been set yet, set theendTimeMillito the current system time and callupdate()with the night data.
In Kotlin, thereturn@labelsyntax specifies the function from which this statement returns, among several nested functions.
fun onStopTracking() {
   uiScope.launch {
       val oldNight = tonight.value ?: return@launch
       oldNight.endTimeMilli = System.currentTimeMillis()
       update(oldNight)
   }
}- Implement
update()using the same pattern as you used to implementinsert().
private suspend fun update(night: SleepNight) {
   withContext(Dispatchers.IO) {
       database.update(night)
   }
}- To connect the click handler to the UI, open the
fragment_sleep_tracker.xmllayout file and add the click handler to thestop_button.
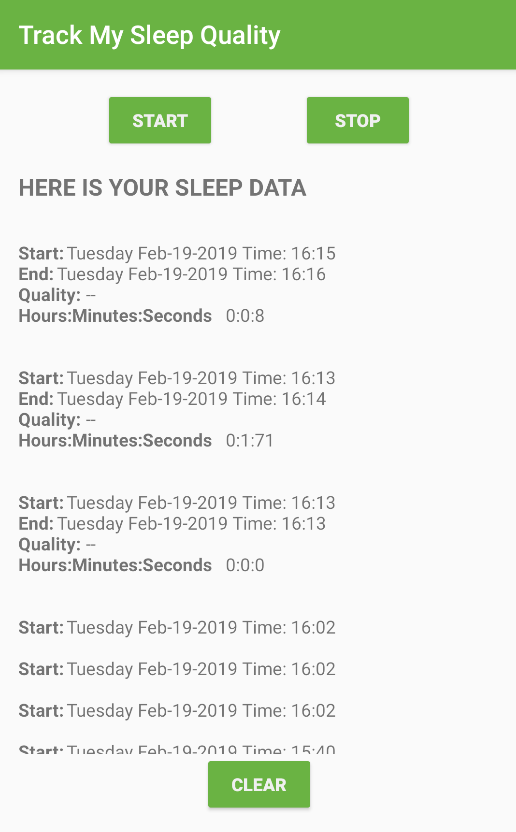
android:onClick="@{() -> sleepTrackerViewModel.onStopTracking()}"- Build and run your app.
- Tap Start, then tap Stop. You see the start time, end time, sleep quality with no value, and time slept.
Step 5: Add the click handler for the Clear button
- Similarly, implement
onClear()andclear().
fun onClear() {
   uiScope.launch {
       clear()
       tonight.value = null
   }
}

suspend fun clear() {
   withContext(Dispatchers.IO) {
       database.clear()
   }
}- To connect the click handler to the UI, open
fragment_sleep_tracker.xmland add the click handler to theclear_button.
android:onClick="@{() -> sleepTrackerViewModel.onClear()}"- Build and run your app.
- Tap Clear to get rid of all the data. Then tap Start and Stop to make new data.
Android Studio project: TrackMySleepQualityCoroutines
- Use
ViewModel,ViewModelFactory, and data binding to set up the UI architecture for the app. - To keep the UI running smoothly, use coroutines for long-running tasks, such as all database operations.
- Coroutines are asynchronous and non-blocking. They use
suspendfunctions to make asynchronous code sequential. - When a coroutine calls a function marked with
suspend, instead of blocking until that function returns like a normal function call, it suspends execution until the result is ready. Then it resumes where it left off with the result. - The difference between blocking and suspending is that if a thread is blocked, no other work happens. If the thread is suspended, other work happens until the result is available.
To launch a coroutine, you need a job, a dispatcher, and a scope:
- Basically, a job is anything that can be canceled. Every coroutine has a job, and you can use a job to cancel a coroutine.
- The dispatcher sends off coroutines to run on various threads.
Dispatcher.Mainruns tasks on the main thread, andDispartcher.IOis for offloading blocking I/O tasks to a shared pool of threads. - The scope combines information, including a job and dispatcher, to define the context in which the coroutine runs. Scopes keep track of coroutines.
To implement click handlers that trigger database operations, follow this pattern:
- Launch a coroutine that runs on the main or UI thread, because the result affects the UI.
- Call a suspend function to do the long-running work, so that you don't block the UI thread while waiting for the result.
- The long-running work has nothing to do with the UI, so switch to the I/O context. That way, the work can run in a thread pool that's optimized and set aside for these kinds of operations.
- Then call the database function to do the work.
Use a Transformations map to create a string from a LiveData object every time the object changes.
Udacity course:
Android Developer Documentation:
Other documentation and articles:
- Factory pattern
- Coroutines codelab
- Coroutines, official documentation
- Coroutine context and dispatchers
Dispatchers- Exceed the Android Speed Limit
Joblaunch- Returns and jumps in Kotlin
- CDATA stands for character data. CDATA means that the data in between these strings includes data that could be interpreted as XML markup, but should not be.
This section lists possible homework assignments for students who are working through this codelab as part of a course led by an instructor. It's up to the instructor to do the following:
- Assign homework if required.
- Communicate to students how to submit homework assignments.
- Grade the homework assignments.
Instructors can use these suggestions as little or as much as they want, and should feel free to assign any other homework they feel is appropriate.
If you're working through this codelab on your own, feel free to use these homework assignments to test your knowledge.
Answer these questions
Question 1
Which of the following are advantages of coroutines:
- They are non-blocking
- They run asynchronously.
- They can be run on a thread other than the main thread.
- They always make app runs faster.
- They can use exceptions.
- They can be written and read as linear code.
Question 2
What is a suspend function?
- An ordinary function annotated with the
suspendkeyword. - A function that can be called inside coroutines.
- While a suspend function is running, the calling thread is suspended.
- Suspend functions must always run in the background.
Question 3
What is the difference between blocking and suspending a thread? Mark all that are true.
- When execution is blocked, no other work can be executed on the blocked thread.
- When execution is suspended, the thread can do other work while waiting for the offloaded work to complete.
- Suspending is more efficient, because threads may not be waiting, doing nothing.
- Whether blocked or suspended, execution is still waiting for the result of the coroutine before continuing.
Start to the next lesson:
For links to other codelabs in this course, see the Android Kotlin Fundamentals codelabs landing page.