
Without taking the right precautions, you run the risk of exposing your systems to new vulnerabilities. Therefore, it's key to control traffic in and out of your instances on Google Cloud by creating firewall rules. In this codelab, you'll learn about firewall rules in Google Cloud and how to apply them to Compute Engine VM instances.
What are firewall rules?
Firewall rules in Google Cloud let you allow or deny traffic to and from your VM instances based on a configuration that you specify. Enabled firewall rules are always enforced, protecting your instances regardless of their configuration and operating system, regardless of whether they're started.
Every VPC network functions as a distributed firewall. While firewall rules are defined at the network level, connections are allowed or denied on a per-instance basis. You can think of the firewall rules as existing not only between your instances and other networks, but between individual instances within the same network.
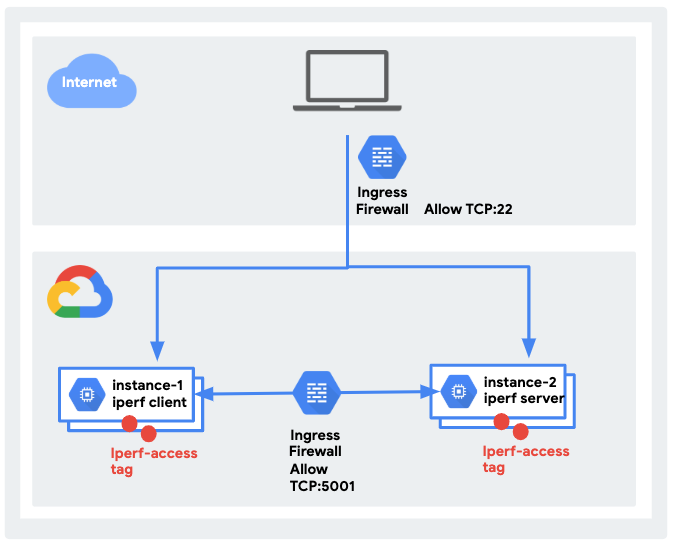
What you'll build
- Two Compute Engine instances in different subnetworks
- A network ping test
- Firewall rules using instance tags
- The following architecture:
What you'll learn
- Characteristics of firewall rules
- How to apply firewall rules to instances using instance tags
- Best practices for firewall rules
What you'll need
- A Google Account
- Two Compute Engine instances
Self-paced environment setup
If you don't already have a Google Account, then you must create one. Sign-in to Google Cloud Console and create a new project:
Remember the project ID, a unique name across all Google Cloud projects. It will be referred to in these codelabs as PROJECT_ID.
Next, you'll need to enable billing in the Cloud Console in order to use Google Cloud resources.
Running through this codelab shouldn't cost you more than a few dollars, but it could be more if you decide to use more resources or if you leave them running (see the cleanup section at the end of this codelab). New users of Google Cloud are eligible for a $300 free trial.
Initialize your project environment
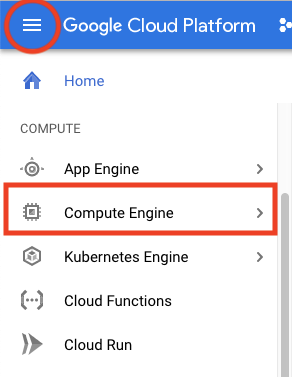
Navigate to Compute > Compute Engine > VM Instances.
After you finish enabling the Compute Engine API, you will do most of the work with Cloud Shell, which allows you to manage your infrastructure and applications from the command-line in any browser. The Debian-based VM is loaded with all the development tools that you'll need (gcloud command-line tool, Git, and others) and offers a persistent 5 GB home directory. Open Cloud Shell by clicking on the icon in the top-right section of the screen.

You can pick and choose different zones, too. For more information, see Regions & Zones.
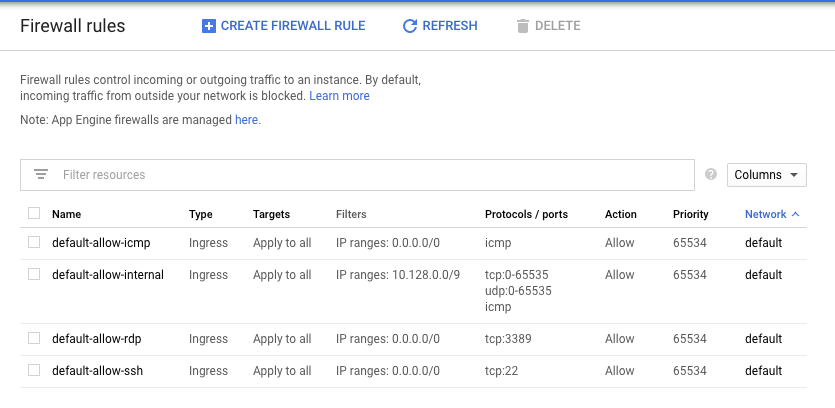
View existing firewall rules by heading to Networking > VPC network > Firewall rules.
Notice that there are only firewall rules created for the default network.
You need to create firewall rules for your existing Compute Engine instances to ssh into them given that you did not specify any firewall rules when creating custom-network1.
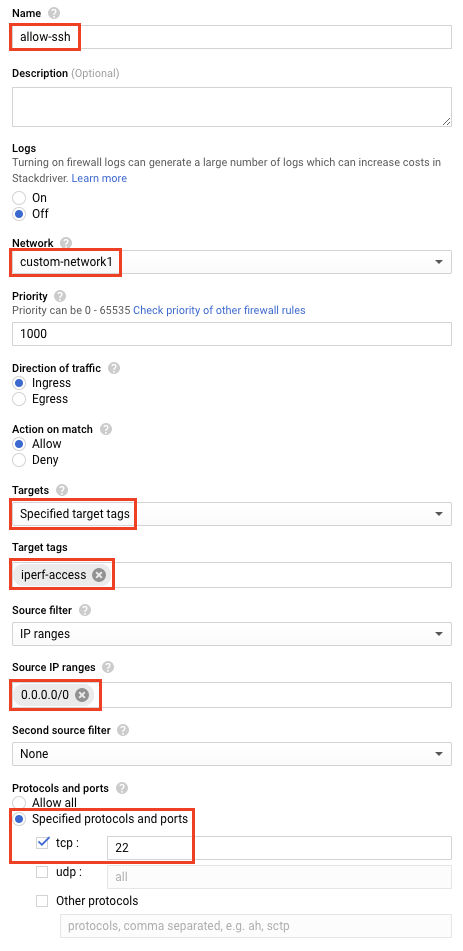
Next, create a firewall rule allowing ssh access to tagged instances.
Stay on the firewall rules page. Click Create Firewall Rule.

Add the following specifications:
- Name: allow-ssh
- Network: custom-network1
- Direction of traffic: Ingress
- Action on match: allow
- Targets: Specified target tags
- Target tags: iperf-access
- Source IP ranges: 0.0.0.0/0
- Protocols and ports: Specified protocols and ports: tcp: 22
Apply tags to your two existing instances.
Navigate to the Compute Engine instance page by going to Compute > Compute Engine > VM instances.
Click on instance-1 and view the VM instance details. Click Edit.
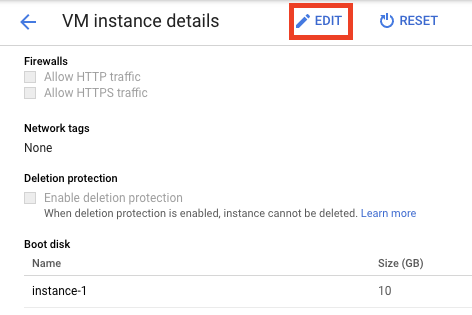
Scroll down to the network tags section and give it a tag called iperf-access.

Click Save at the bottom. Go back to the VM instances page, and repeat for instance-2 by clicking edit and again adding iperf-access as the instance tag.
iPerf
iPerf is a commonly used network-testing tool that can create TCP/UDP data streams and measure the throughput of the network that carries them. You'll use it to run a quick test between your instances in different subnetworks within custom-network1.
Install iPerf
Navigate to the Compute Engine instance page.
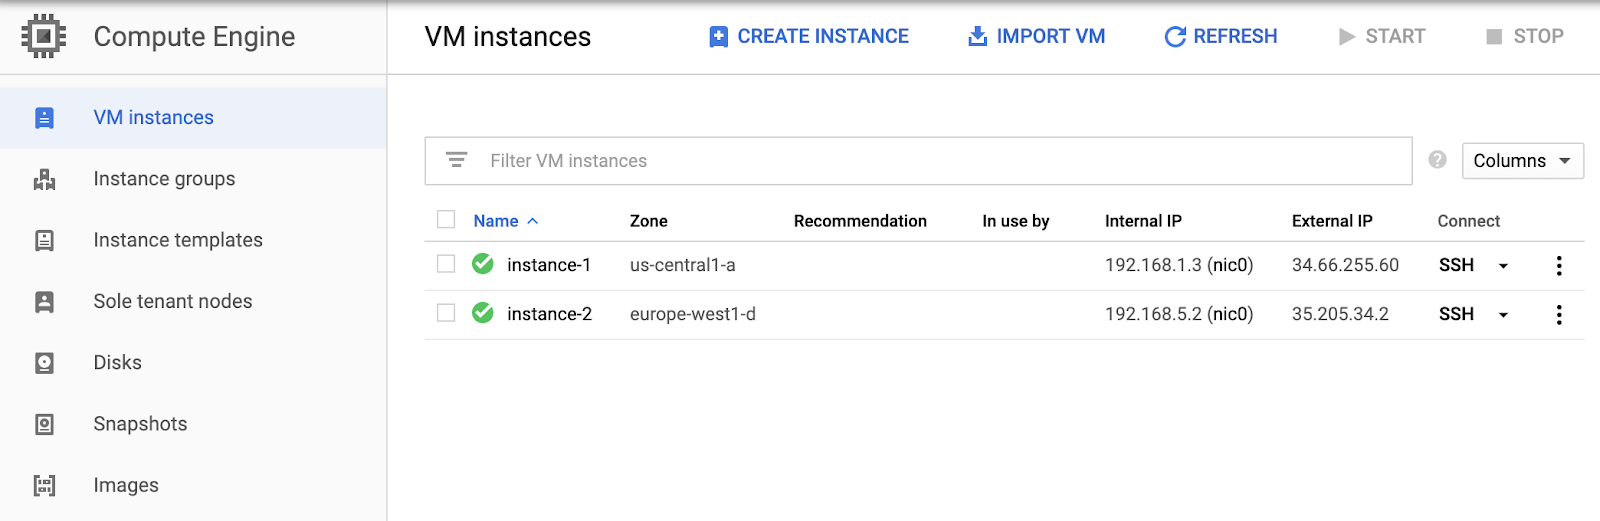
Ssh into the two VMs that you created in the last codelab by clicking on the ssh button next to each instance listing.

You should see two ssh windows pop up. Install iPerf in both of them with the following command:
sudo apt-get install iperf
Run an iPerf test
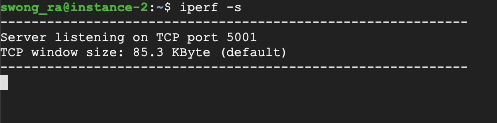
In instance-2, specify that it is the iPerf server by entering the following in the instance-2 ssh terminal:
iperf -s
In the instance-1 ssh window, enter the following command, including the internal IP of instance-2:
iperf -c [INSTANCE-2 INTERNAL IP]
It will hang because you have not implemented another firewall rule to allow communication between instance-1 and instance-2. Terminate the command by entering Control+Z (Command+Z on Macintosh).

This time, you'll create the firewall rule with Cloud Shell. 
Make sure that you are in Cloud Shell and not your instance ssh sessions. Create a firewall rule by entering the following:
gcloud compute firewall-rules create iperf-access --allow tcp:5001 \
      --source-ranges 0.0.0.0/0 \
      --network custom-network1 \
      --target-tags=iperf-access
Confirm it was created with the following:
gcloud compute firewall-rules list

NAME                         NETWORK          DIRECTION  PRIORITY  ALLOW                         DENY  DISABLED
allow-ssh                    custom-network1  INGRESS    1000      tcp:22                              False
default-allow-icmp           default          INGRESS    65534     icmp                                False
default-allow-internal       default          INGRESS    65534     tcp:0-65535,udp:0-65535,icmp        False
default-allow-rdp            default          INGRESS    65534     tcp:3389                            False
default-allow-ssh            default          INGRESS    65534     tcp:22                              False
iperf-access                 custom-network1  INGRESS    1000      tcp:5001                            False
Head back to your SSH window for instance-2. Your iperf session should still be active. If it's not, then run the following command again.
iperf -s
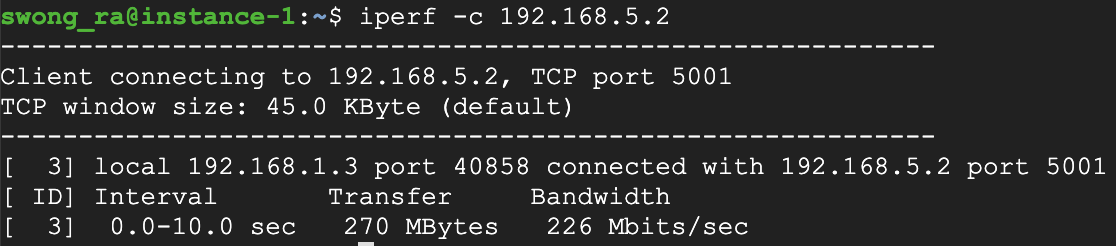
In the instance-1 ssh window, enter the following command, including the internal IP of instance-2:
iperf -c [INSTANCE-2 INTERNAL IP]
You should see iPerf establish a connection to instance-2, and return an output of internal network performance between instance-1 and instance-2.
You now know the basics of creating firewall rules in Google Cloud.
What you covered
- How instances are affected by firewall rules
- How to create a firewall rule via Cloud Console and Cloud Shell
- How to apply tags to firewall rules and instances
- How to run an iPerf test between instances
Next steps
- Learn more about firewall rules from the firewall rules overview.
Delete the Compute Engine instances by using the following commands in Cloud Shell:
gcloud compute instances delete instance-1 --zone us-central1-a

The following instances will be deleted. Any attached disks configured
 to be auto-deleted will be deleted unless they are attached to any
other instances or the `--keep-disks` flag is given and specifies them
 for keeping. Deleting a disk is irreversible and any data on the disk
 will be lost.
 - [instance-1] in [us-central1-a]
Do you want to continue (Y/n)?  y
Deleted [https://www.googleapis.com/compute/v1/projects/ypc-demo/zones/us-central1-a/instances/instance-1].
gcloud compute instances delete instance-2 --zone europe-west1-d

The following instances will be deleted. Any attached disks configured
 to be auto-deleted will be deleted unless they are attached to any
other instances or the `--keep-disks` flag is given and specifies them
 for keeping. Deleting a disk is irreversible and any data on the disk
 will be lost.
 - [instance-2] in [europe-west1-d]
Do you want to continue (Y/n)?  y
Deleted [https://www.googleapis.com/compute/v1/projects/ypc-demo/zones/europe-west1-d/instances/instance-2].
Delete the firewall rules with the following commands:
gcloud compute firewall-rules delete allow-ssh

The following firewalls will be deleted:
 - [allow-ssh]
Do you want to continue (Y/n)?  y
Deleted [https://www.googleapis.com/compute/v1/projects/vpc-demo-241520/global/firewalls/allow-ssh].
gcloud compute firewall-rules delete iperf-access

The following firewalls will be deleted:
 - [iperf-access]
Do you want to continue (Y/n)?  y
Deleted [https://www.googleapis.com/compute/v1/projects/vpc-demo-241520/global/firewalls/iperf-access].
Delete the subnetworks with the following commands:
gcloud compute networks subnets delete subnet-us-central-192 --region us-central1

The following subnetworks will be deleted:
 - [subnet-us-central-192] in [us-central1]
Do you want to continue (Y/n)?  y
Deleted [https://www.googleapis.com/compute/v1/projects/vpc-demo-241520/regions/us-central1/subnetworks/subnet-us-central-192].
gcloud compute networks subnets delete subnet-europe-west-192 --region europe-west1

The following subnetworks will be deleted:
 - [subnet-europe-west-192] in [europe-west1]
Do you want to continue (Y/n)?  y
Deleted [https://www.googleapis.com/compute/v1/projects/vpc-demo-241520/regions/europe-west1/subnetworks/subnet-europe-west-192].
Delete the custom VPC with the following command:
gcloud compute networks delete custom-network1

The following networks will be deleted:
 - [custom-network1]
Do you want to continue (Y/n)?  y
Deleted [https://www.googleapis.com/compute/v1/projects/vpc-demo-241520/global/networks/custom-network1].