
In this codelab you'll learn how to enhance job search and talent acquisition for your organization using the Cloud Talent Solution API (CTS). Using CTS you can add the power of machine learning to your job search experience!
What you'll learn
- Enable CTS in your Google Cloud project
- Create "Company" entities and jobs at those companies
What you'll need
- A Google Cloud project with Billing already set up (If you don't already have one, create one.
- About an hour
How will you use this tutorial?
How would you rate your prior experience with the Google Cloud Platform?
This tutorial is meant to run fully on the Google Cloud Platform. No downloads to your workstation are necessary.
- If you don't already have a Google account, create one and sign into it
- Create a new GCP project and enable billing. Completing codelab is well under the number of free queries you get per month.
Enable Cloud Talent Solutions API
Open your application in Cloud console and click the hamburger menu in the top left. Browse the menus to Talent Solution -> Overview.

Since this is a new project, you'll be redirected to a new screen asking you to enable the API. Click enable and wait a few minutes for the API to be turned on for this project.
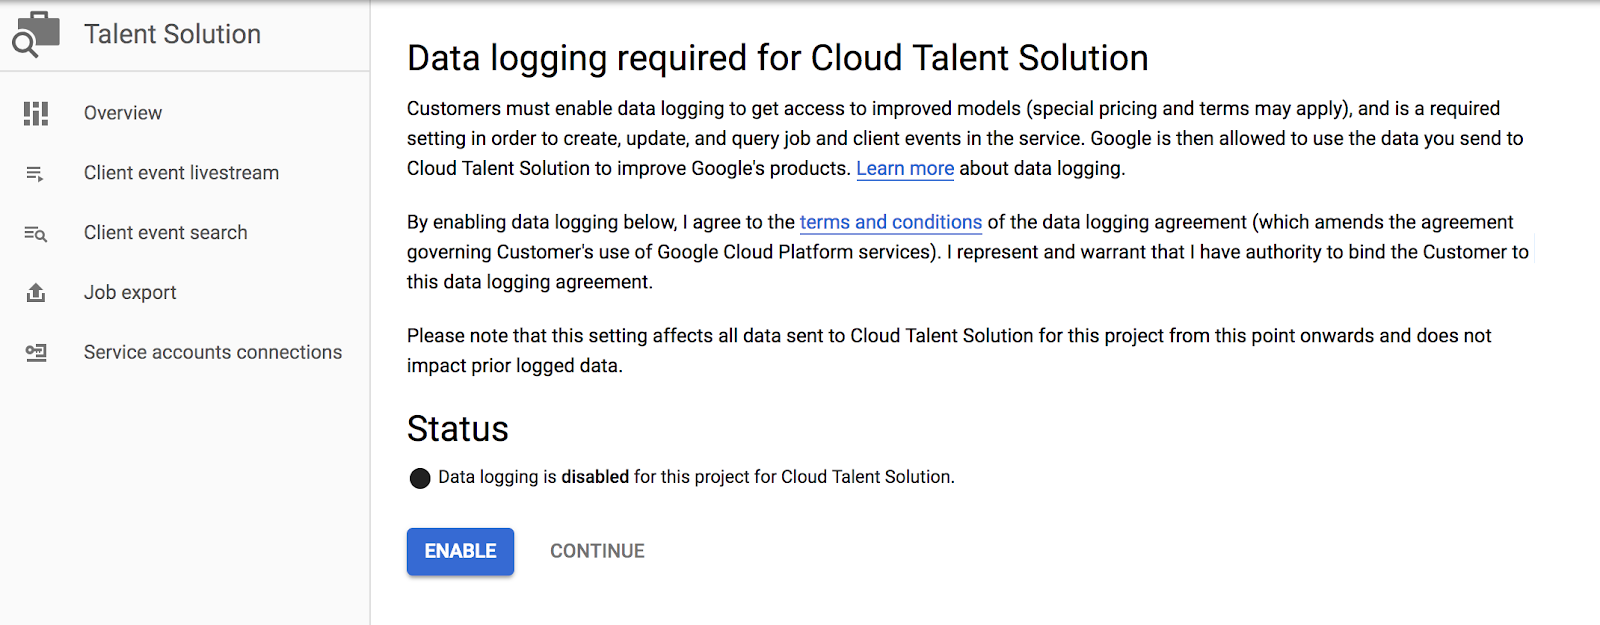
Enable Data logging
Now head back to the overview page from before. A new dialog will appear asking you to enable data logging (if it doesn't, head back to the dialog page from before). This is really just making sure you know that the Job Search API is powered by a machine learning model that needs data. As part of the integration, you'll actually be able to send over events from users who are searching to further train those models. When this is implemented through code, you can specify what information gets sent over.
We'll dive deeper into what those events are and how to send them later, but the pre-trained models will work just fine. Go ahead and enable data logging, then click on "service account connections" in the left nav of this dialog.
Setup a Service Account
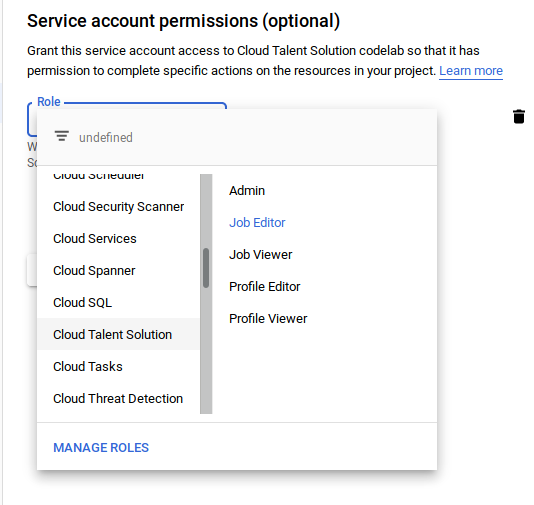
When making API requests, you'll need to make them on behalf of an actual authenticated account. Google Cloud Platform's best practices recommend setting up a service account for this. Think of service accounts as an easy way to set up authenticated users who have limited permissions. This will help you build an independent and secure system.
For example, we'll need a service account to use the Job Search API. Let's create one and give it read/write permissions using "Job Editor" under the "Cloud Talent Solution" section of the left-hand nav. It's also possible to set up a service account with just "Job Viewer" so it would only have read-only access.
The next step will ask you if you'd like to grant users access to this service account. You can skip this step, but be sure to click "Create Key" near the bottom. Select "JSON" for the key type and then "Create". A new JSON credential file is automatically downloaded. Store this file on your server, the code you write in a later section will use it to authenticate.
Set environment variables
For convenience, we'll use the Google Cloud shell. If you'd like to do this from your own development environment, great! Make sure you install the Google Cloud SDK and client libraries in the language of your choice (this codelab will be using Python.). Cloud shell will already have the cloud client libraries installed. Handy, right?
To run code using the libraries, you need to make sure two environment variables are set: One to specify your porject ID, the other to specify your service account's key file. Let's set those.
From your project, click the ">_" icon at the top right of your web console to open a cloud shell. Add the following environment variables to specify your project ID and set a path to your json key file:
export GOOGLE_CLOUD_PROJECT="your-project-id"
export GOOGLE_APPLICATION_CREDENTIALS="/path/to/key.json"
To verify that the variables were set, use `echo`.
echo $GOOGLE_CLOUD_PROJECT
echo $GOOGLE_APPLICATION_CREDENTIALS
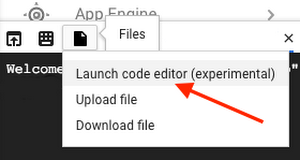
Open the code editor in Cloud Shell
From the Google Cloud console, open the Cloud Shell using the cloud shell icon in the top right.

Along the top right of the cloud shell will be a series of icons. Click File -> Launch Code Editor , as shown here:
Create a Company
Use File -> New File to create a new source file, and fill it with the contents below. Call it create_company.py.
create_company.py
import os

from googleapiclient.discovery import build
from googleapiclient.errors import Error

# Build the service object, passing in the api name and api version
client_service = build('jobs', 'v3')
project_id = 'projects/' + os.environ['GOOGLE_CLOUD_PROJECT']


# Specifying details for the company that's going to be created.
# These are the only two required fields.
# Optional fields are documented at
# http://googleapis.github.io/google-api-python-client/docs/dyn/jobs_v3.projects.companies.html#create
new_company = {
    'display_name': "FooCorp",
    'external_id': "foo_llc"
}
request = {'company': new_company}

try:

    # This is the API call that actually creates the new company.
    result = client_service.projects().companies().create(
       parent=project_id, body=request).execute()

    # You can easily just print the result as a string if you want
    print('Company created: %s' % result)

    # Or you can individual fields.  The fields returned depend on what's specified
    # in the "new_company" object.  To see possible fields of the
    # response, see the "create" documentation at:
    # http://googleapis.github.io/google-api-python-client/docs/dyn/jobs_v3.projects.companies.html#create
    print('%s: %s, %s' % (result.get('externalId'),
                       result.get('displayName'),
                       result.get('name')))

except Error as e:
    print('Got exception while creating company')
    raise e
What is this code doing? Let's explore! There are two relevant client library calls here:
client_service = build('jobs', 'v3')creates a service object using the Google API python client library.client_service.projects().companies().create(parent=project_id, body=request).execute()executes the API call to create the company. The response to this call is an object containing company information. The contents of both the request object and the response object are laid out in the documentation for the create method .
Run the file from the command prompt (which is helpfully directy below the code editor window), and you'll see something similar to the following output.
> python create_company.py
Company created: {u'externalId': u'foo_llc', u'displayName': u'FooCorp', u'name': u'projects/[PROJECT_ID]/companies/1cd6ada9-e678-49cf-80da-aaaf8876feda'}
Foo_llc, FooCorp, projects/[PROJECT_ID]/companies/1cd6ada9-e678-49cf-80da-aaaf8876feda
The name is the unique identifier generated by the Job Search API, while the external_id is the identifier you provide from your own job system. Any time you refer to an object through the API, you'll need to use the name.
Update Company
If you already have a company entity in the system and you'd like to add or change some fields, the process breaks down into the following steps:
- Create an Object with the current field values for the company
- Update that object with the new or updated fields, using the company "name" field as a key so the API knows which company to update
- Submit the new object using the "patch" method.
Note that this process requires you to have all the existing values, as it overwrites the company values all at once, regardless of which ones you actually updated. That means before we update the company information, we need to retrieve it.
Create a new file, update_company.py in your workspace. Start if off by adding the get_company method shown below.
update_company.py
import os

from googleapiclient.discovery import build
from googleapiclient.errors import Error

# Build the service object, passing in the api name and api version
client_service = build('jobs', 'v3')
project_id = 'projects/' + os.environ['GOOGLE_CLOUD_PROJECT']
company_name = 'Your company name goes here'


def get_company(company_name):
   try:
       company_existed = client_service.projects().companies().get(
           name=company_name).execute()
       print('Company existed: %s' % company_existed)
       return company_existed
   except Error as e:
       print('Got exception while getting company')
       raise e


newCompany = get_company()
One thing you'll note at this point is that the API call looks strikingly similar to creating a company. The client library is generated to match a REST interface, so the CRUD operations you're performing on companies are all going to take the form client_service.projects().companies().theMethod(argName=argValue).execute().
Now that we have the set of existing values, create a "patch" object with the field names you want updated and their new values, and use that to update your company object with new values. Here's what's fun about doing this in Python -- The client library represents the company as a dictionary object, which means the method is already built in. No fancy looping necessary! Create a dictionary object right below the code you've already written.
update_company.py
...
    patch = {
       'displayName': "The New Bar",
       'websiteUri': "http://www.example.com"
    }
    newCompany.update(patch)
    print("Debug: New company info %s " % newCompany)
...
Now the only thing left to do is create a request object (see Patch documentation for details on what can go in there) and execute the API call.
...
    request = {'company': newCompany}

    company_updated = client_service.projects().companies().patch(
        name=company_name, body=request).execute()
    print('Company updated: %s' % company_updated)
...
Alternatively, if you only want to supply the fields that you actually want to change, you can include the fields along with an update mask. This is useful in situations where you don't already have an updated company object setting around, or only have one field you want to update and don't want to send unnecessarily large objects back and forth. But how do you USE an update mask, you're asking? Where's the code that demonstrates this exciting and novel way of updating company information?
You read our minds, reader! The below snippet executes a company information update using an update mask instead of a complete entry replacement.
update_company.py
...
   # New set of fields, not the complete company object
   companyFields = {'displayName': 'The New Bar',
                    'websiteUri': 'http://shouldNotUpdate.com',
                    'externalId': 'bar_llc'}

   # Note that the mask only contains the display name, not the URL.
   # This is entirely for demonstration purposes.  This mask will tell the API
   # to update the display name, but NOT the website uri.
   mask = 'displayName'
   request = {'company': companyFields,
              'update_mask': mask}
   company_updated = client_service.projects().companies().patch(
       name=company_name,
       body=request).execute()
   print('Company updated!: %s' % company_updated)
...
Note that the API call is the same. The difference is that the request object now has two fields (company and update_mask), instead of just one (company). The update mask is a comma-delimited list of fields. If we wanted to include the "websiteUri" field in the mask, then the mask value would instead look like this:
mask = 'displayName,websiteUri'Whichever route you choose, run it from the cloud shell, and (assuming you left those print statements in) you should see output indicating both the old and new values for your company.
$ python update_company.py
Company existed: {u'externalId': u'bar_llc', u'displayName': u'The New Bar', u'name': u'projects/[PROJECT_ID]/companies/083495ad-acba-477f-a084-8be84f31692e', u'websiteUri': u'http://www.example.com'}
Company {u'externalId': u'bar_llc', u'displayName': u'The New Bar', u'name': u'projects/[PROJECT_ID]/companies/083495ad-acba-477f-a084-8be84f31692e', u'websiteUri': u'http://www.example.com'}
New company info {u'externalId': u'bar_llc', u'name': u'projects/[PROJECT_ID]/companies/083495ad-acba-477f-a084-8be84f31692e', u'displayName': 'The New Bar', u'websiteUri': 'http://www.example.com'}
Company updated: {u'externalId': u'bar_llc', u'displayName': u'The New Bar', u'name': u'projects/[PROJECT_ID]/companies/083495ad-acba-477f-a084-8be84f31692e', u'websiteUri': u'http://www.example.com'}
$
There wouldn't be much point to a job search solution without jobs to search for! In the last section we talked about creating companies. Now let's talk about how to create jobs and best practices for working with them.
Note that jobs will be attached to companies. If you don't have any companies created with the API yet (or if you successfully ran the "delete" call at the end of the section and removed your only company) go back and create a company again. Then you'll be ready to create jobs!
Create a job
Let's start by creating a job!
In order to create a job, you'll need the following pieces of data:
- The name of the company. Not the human readable "My fancy company LLC" string, but that much longer "projects/[PROJECT_ID]/companies/COMPANY_ID" string.
- A requisition id for the job. This is similar to the external_id for a company - it represents your own unique identifier for the job, to make it easier to keep the Cloud Talent Solution API in sync with your current job solution, e.g senior_llama_wrangler
- The title of the job, which is the display name for the job, e.g "Senior Llama Wrangler."
- The description of the job. Note that the description can contain embedded HTML in order for you to format it properly. Content is pretty self explanatory. "<p>Will lead team of llama wranglers.</p><p> Must have leadership ability and experience with llamas."</p>
- applicationInfo - Further information on how to apply. Can be 1+ uris, 1+ email addresses, or an HTML formatted string with further instructions. You can even include all 3 ! But you need to include at least 1.
So if we were to create a job for our previously created corporation FooCorp, this is what the fields might look like:
name |
|
requisition_id | senior_llama_wrangler |
title | Senior Llama Wrangler |
description | Experienced Llama Wrangler required for a full-time position. Leadership ability required, as you will be taking a team of llama caregivers and training them up to full-scale wranglers.<p/>Must work well with animals and occasionally be prepared to run really, like really really fast. Like REALLY fast. These are some quick llamas. |
application_info | Uris: http://www.example.com/llama_wrangler_application/ Emails: llama-apply@example.com |
If you don't have the company name anymore, you can use the "get_company" code you used in step 3 to retrieve it.
The code for creating a job is going to look very similar to the code for creating a company. The first several lines should be pretty familiar to you (import blah blah blah, instantiate client service object). Then you create a dict object (just a nested set of key/value pairs) representing your request, and send it along with the "create" API call.
Paste the following snippet in a file called create_job.py. You can actually call it whatever you want, but this tutorial will assume that filename.
create_job.py
import os

from googleapiclient.discovery import build
from googleapiclient.errors import Error

client_service = build('jobs', 'v3')
project_id = 'projects/' + os.environ['GOOGLE_CLOUD_PROJECT']

new_job = {
   'company_name': 'projects/[PROJECT_ID]/companies/083495ad-acba-477f-a084-8be84f31692e',
   'title': 'Senior Llama Wrangler',
   'description':
   """Experienced Llama Wrangler required for full-time position.
   Leadership ability required, as you will be taking a team of llama
   caregivers and training them up to full-scale wranglers.
   <p/>Must work well with animals and occasionally be prepared to run
   really, like really really fast.  Like REALLY fast.
   These are quick llamas.""",
   'requisition_id': 'senior_llama_wrangler',
   'application_info': {
       'uris': ['http://www.example.com/llama-wrangler-application'],
       'emails': ['llama-apply@example.com']
   }
}

try:
   # Nest that Job object in a "job" object.  Now it's an API request!
   request = {'job': new_job}

   # The actual API call happens here.
   result = client_service.projects().jobs().create(
       parent=project_id, body=request).execute()
   print('Job created: %s' % result)

except Error as e:
   print('Got exception while creating job')
   raise e
Run that from the cloud shell and you should get back a big blob of JSON with the job you just created.
$ python create_job.py
Job created: {u'languageCode': u'en', u'description': u'Experienced Llama Wrangler required for full-time position. Leadership ability required, as you will be taking a team of llama caregivers and training them up to full-scale wranglers.Must work well with animals and occasionally be prepared to run really, like really really fast. Like REALLY fast. These are some quick llamas.', u'applicationInfo': {u'emails': [u'llama-apply@example.com'], u'uris': [u'http://www.example.com/llama-wrangler-application']}, u'companyName': u'projects/[PROJECT_ID]/companies/083495ad-acba-477f-a084-8be84f31692e', u'requisitionId': u'senior_llama_wrangler', u'title': u'Senior Llama Wrangler', u'postingExpireTime': u'2019-09-11T16:04:48.546Z', u'visibility': u'ACCOUNT_ONLY', u'postingCreateTime': u'2019-08-12T16:04:48.546Z', u'companyDisplayName': u'Masked Panda Inc', u'postingUpdateTime': u'2019-08-12T16:04:48.611Z', u'postingPublishTime': u'2019-08-12T16:04:48.611Z', u'name': u'projects/[PROJECT_ID]/jobs/12345}
If you get back something like the above, you successfully created a job!
Jobs must be unique
As an experiment, run that last script again, and let's see what happens.
$ python create_job.py
Got exception while creating job
Traceback (most recent call last):
  File "create_job.py", line 37, in <module>
    raise e
googleapiclient.errors.HttpError: <HttpError 409 when requesting https://jobs.googleapis.com/v3/projects/[PROJECT_ID]/jobs?alt=json returned "Job projects/[PROJECT_ID]/jobs/103672929591403206 already exists. Request ID for tracking: ec94f4cb-70f1-48cf-bae6-b4dad056ac3f:APAb7ITRlgTTpVMONSSBCG4LnFzqR765Eg==. Related Job requisition ID: senior_llama_wrangler.">
What happened here? You tried to enter a duplicate job listing. Non-expired jobs must be unique in the system.
Uniqueness is determined by the following fields:
- Company name - Required when you create job, not updateable
- Requisition ID - Required when you create job, not updateable
- Language Code - Optional, defaults to en_us, updateable
If any job you try to create or update has all 3 of these fields in common with an existing, non-expired job, it's considered a duplicate, and that create/update fail, with that error message you see above.
Hooray!
Congratulations, you now have both a company AND a job listing for that company in your system! And you got all this done in less than an hour! Do you have any idea how long it took the best job listing sites on the internet to get to this point, reader? Way more than an hour. Like way more. Weeks. Months. Board meetings. There were probably spreadsheets and mission statements involved. I'm sure it got pretty real in those offices. You know what it took you? A little under an hour. Go you!
There's more, though! Let's keep going.
Updating a Job
Just like with companies, we can get a job to see it's details, and patch a job to update it.
Here's how you'd get the job details. If the below snippet looks familiar, it's because we took the "get_company" method from the previous section and replaced "company" with "job" and added in the job_name variable. Let's take a look at getting the job info first.
update_job.py
import os

from googleapiclient.discovery import build
from googleapiclient.errors import Error

client_service = build('jobs', 'v3')
project_id = 'projects/' + os.environ['GOOGLE_CLOUD_PROJECT']

# The interesting bit
def get_job():
   try:
       job_existed = client_service.projects().jobs().get(
           name=job_name).execute()
       print('Job existed: %s' % job_existed)
       return job_existed
   except Error as e:
       print('Got exception while getting job')
       raise e

job_name = "projects/[PROJECT_ID]/jobs/12345"
job_info = get_job(job_name)
In order to actually update the job, you have the same options as before when you updated the company: send a complete object with updated values to replace the old one, or submit a smaller patch with a comma-separated field mask.
update_job.py (update with full object replacement)
   # First the full-replacement method.  Update the complete job object with new field values.
   job_patch = {
       'title': "Rogue Llama Acquisition Engineer"
   }

   job_info.update(job_patch)
   request = {"job": job_info}

   job_updated = client_service.projects().jobs().patch(
       name=job_name, body=request).execute()
   print ("Updated job info : %s" % job_updated)
update_job.py (with only the new field values and an update mask)
   # Alternatively, if you know which fields have been updated, you can submit a patch with just the changes
   # and an update mask. This time let's just re-use the same job patch, and create an update mask.
   job_patch = {
       'title': "Rogue Llama Acquisition Engineer"
   }

   update_mask = "title"
   request = {"job": job_patch,
              "updateMask": update_mask
              }

   job_updated = client_service.projects().jobs().patch(
       name=job_name, body=request).execute()

   print ("Updated job info : %s" % job_updated)
The two snippets above do the exact same thing: They update a specific job listing with the job title "Rogue Llama Acquisition Engineer". Note also that the line that makes the API call is the same: The only difference is in the request object. One has a full job object that will replace the one with that job name. The other is simply a set of fields to update.
Whichever one you choose to run, the output will be the same. Give it a shot!
$ python update_job
Updated job info : {u'languageCode': u'en', u'description': u'Experienced Llama Wrangler required for full-time position. Leadership ability required, as you will be taking a team of llama caregivers and training them up to full-scale wranglers.Must work well with animals and occasionally be prepared to run really, like really really fast. Like REALLY fast. These are some quick llamas.', u'applicationInfo': {u'emails': [u'llama-apply@example.com'], u'uris': [u'http://www.example.com/llama-wrangler-application']}, u'companyName': u'projects/[PROJECT_ID]/companies/083495ad-acba-477f-a084-8be84f31692e', u'derivedInfo': {u'jobCategories': [u'SCIENCE_AND_ENGINEERING']}, u'requisitionId': u'senior_llama_wrangler', u'title': u'Rogue Llama Acquisition Engineer', u'postingExpireTime': u'2019-09-11T16:04:48.546Z', u'visibility': u'ACCOUNT_ONLY', u'postingCreateTime': u'2019-08-12T16:04:48.546Z', u'companyDisplayName': u'Masked Panda Inc', u'postingUpdateTime': u'2019-08-12T19:28:41.850Z', u'postingPublishTime': u'2019-08-12T16:04:48.611Z', u'name': u'projects/[PROJECT_ID]/jobs/12345}
Hooray! You've completed step 4!
Well now, look at you. Knocking all of this out like some sort of productivity monster. So far you can create companies, create jobs, and update both at a whim! But you may have noticed something curiously absent from these lessons. That one final operation that puts the D in C.R.U.D. What if we want to DELETE them? Don't worry, reader! The next section covers this in detail.
Let's start with companies, for reasons that will make narrative sense about 5 minutes from now.
Delete a company
Deleting a company is is pretty easy. Using the same import statements you did when creating or updating a company, just call the delete method, passing in just the name of the company (no request body necessary).
   # Yup, that's the whole thing.
   company_to_delete = "Insert company name here"
   result = client_service.projects().companies().delete(
       name=company_to_delete).execute()
To help with cleanup while you're exploring this API, here's a simple python script that takes a company name as a command line parameter and, you guessed it, deletes the company.
delete_company.py
from googleapiclient.discovery import build
from googleapiclient.errors import Error

client_service = build('jobs', 'v3')

# Name of the company to delete
company_to_delete = 'projects/[PROJECT_ID]/companies/123-abc-123'

try:
   # Yup, that's the whole thing.
   result_company = client_service.projects().companies().delete(
       name=company_to_delete).execute()

   print('Result of deleting company: %s' % result_company)

except Error as e:
   print('Got exception while deleting company')
   raise e
Call it, passing in the company name as the sole command-line argument.
$ python delete_company.py projects/[PROJECT_ID]/companies/083495ad-acba-477f-a084-8be84f31692e
Got exception while deleting company
Traceback (most recent call last):
  File "delete_company.py", line 29, in <module>
    raise e
googleapiclient.errors.HttpError: <HttpError 400 when requesting https://jobs.googleapis.com/v3/projects/[PROJECT_ID]/companies/083495ad-acba-477f-a084-8be84f31692e?alt=json returned "Company with name projects/[PROJECT_ID]/companies/083495ad-acba-477f-a084-8be84f31692e still has open jobs. Request ID for tracking: 6b9fe1a0-50ae-48b0-b33d-1622d547c363:APAb7ISnO4taWI4poffoX/EqzRCPSwpEbQ==">
And there you have it! You succee- wait a second. What's that? An error? "Still has open jobs"?
Yes! Now you know the first rule of deleting companies: It will fail as long as that company still has open jobs. How do we deal with that? Well, we have to go through and delete all the open jobs associated with that company.
Now the totally reasonable thing you're thinking is, "I'll delete the job I just created, and THEN delete the company it went with!" That makes sense, reader! Let's do that.
delete_company.py
from googleapiclient.discovery import build
from googleapiclient.errors import Error

client_service = build('jobs', 'v3')

# Replace with your actual company and job names.
company_to_delete = 'projects/[PROJECT_ID]/companies/123-abc-123'
job_to_delete = 'projects/[PROJECT_ID]/jobs/12345'

try:
   result_job = client_service.projects().jobs().delete(
       name=job_to_delete).execute()

   result_company = client_service.projects().companies().delete(
       name=company_to_delete).execute()

   print('Result of deleting job: %s' % result_job)
   print('Result of deleting company: %s' % result_company)

except Error as e:
   print('Got exception while deleting company')
   raise e
Now try running it again. The values returned from those API calls should be the current "company" and "job" entries, which is to say, should be empty.
python delete_company.py
Result of deleting job: {}
Result of deleting company: {}
Ahh. Well done.
One last thing. The above solution worked great because you, the reader,
- Already had the job name for all existing jobs for this company on-hand.
- Hadn't created "way too many to delete manually" jobs for that company.
Let's pretend that wasn't the case
There's an API call, jobs.list(), that will return jobs matching a specified project ID and parent company. This is how you'd call the method:
jobs_response = client_service.projects().jobs().list(
    parent=project_id,
    filter='companyName="' + company_name + '"').execute()
if jobs_response.get('jobs') is not None:
    for job in jobs_response.get('jobs'):
        print('- %s: %s' % (
              job.get('title'),
              job.get('name')))
You can now create and manage company and job listings using the Google Cloud Talent Solutions Job Search API!
What we've covered
- Creating and managing companies
- Creating and managing job listings for those companies
- Setting up service accounts to interact with the API on your behalf
Learn More
- Watch the Developer Channel series on Cloud Talent Solutions
- View the Github Project
- Browse the API documentation
- Post questions and find answers on Stackoverflow tagged with google-cloud-talent-solution