
Spring Integration มีกลไกการรับส่งข้อความเพื่อให้คุณแลกเปลี่ยน Messages ผ่าน MessageChannels โดยจะใช้ Channel Adapter เพื่อสื่อสารกับระบบภายนอก
ในแบบฝึกหัดนี้ เราจะสร้างแอป 2 แอปที่สื่อสารกันโดยใช้ Channel Adapter ของ Spring Integration ที่ Spring Cloud GCP จัดเตรียมไว้ให้ ซึ่งอะแดปเตอร์เหล่านี้จะทำให้ Spring Integration ใช้ Google Cloud Pub/Sub เป็นแบ็กเอนด์การแลกเปลี่ยนข้อความ
คุณจะได้ดูวิธีใช้ Cloud Shell และคำสั่ง gcloud ของ Cloud SDK
บทแนะนำนี้ใช้โค้ดตัวอย่างจากคู่มือการเริ่มต้นใช้งาน Spring Boot
สิ่งที่คุณจะได้เรียนรู้
- วิธีแลกเปลี่ยนข้อความระหว่างแอปด้วย Google Cloud Pub/Sub โดยใช้ Spring Integration และ Spring Cloud GCP
สิ่งที่ต้องมี
- โปรเจ็กต์ Google Cloud Platform
- เบราว์เซอร์ เช่น Chrome หรือ Firefox
- มีความคุ้นเคยกับโปรแกรมแก้ไขข้อความมาตรฐานของ Linux เช่น Vim, EMAC หรือ Nano
คุณจะใช้บทแนะนำนี้อย่างไร
คุณจะให้คะแนนประสบการณ์ในการสร้างเว็บแอป HTML/CSS เท่าใด
คุณจะให้คะแนนประสบการณ์การใช้บริการ Google Cloud Platform เท่าใด
การตั้งค่าสภาพแวดล้อมแบบเรียนรู้ด้วยตนเอง
หากยังไม่มีบัญชี Google (Gmail หรือ Google Apps) คุณต้องสร้างบัญชี ลงชื่อเข้าใช้คอนโซล Google Cloud Platform (console.cloud.google.com) แล้วสร้างโปรเจ็กต์ใหม่โดยทำดังนี้


โปรดจดจำรหัสโปรเจ็กต์ ซึ่งเป็นชื่อที่ไม่ซ้ำกันในโปรเจ็กต์ Google Cloud ทั้งหมด (ชื่อด้านบนถูกใช้ไปแล้วและจะใช้ไม่ได้ ขออภัย) ซึ่งจะเรียกว่า PROJECT_ID ในภายหลังใน Codelab นี้
จากนั้นคุณจะต้องเปิดใช้การเรียกเก็บเงินใน Cloud Console เพื่อใช้ทรัพยากร Google Cloud
การทำ Codelab นี้ไม่ควรมีค่าใช้จ่ายเกิน 2-3 ดอลลาร์ แต่ก็อาจมีค่าใช้จ่ายมากกว่านี้หากคุณตัดสินใจใช้ทรัพยากรเพิ่มเติมหรือปล่อยให้ทรัพยากรทำงานต่อไป (ดูส่วน "การล้างข้อมูล" ที่ท้ายเอกสารนี้)
ผู้ใช้ใหม่ของ Google Cloud Platform มีสิทธิ์ทดลองใช้ฟรี$300
Google Cloud Shell
แม้ว่าคุณจะใช้งาน Google Cloud จากแล็ปท็อประยะไกลได้ แต่ใน Codelab นี้เราจะใช้ Google Cloud Shell ซึ่งเป็นสภาพแวดล้อมบรรทัดคำสั่งที่ทำงานในระบบคลาวด์
เปิดใช้งาน Google Cloud Shell
จาก GCP Console ให้คลิกไอคอน Cloud Shell ในแถบเครื่องมือด้านขวาบน

จากนั้นคลิก "เริ่ม Cloud Shell"

การจัดสรรและเชื่อมต่อกับสภาพแวดล้อมจะใช้เวลาเพียงไม่กี่นาที

เครื่องเสมือนนี้มาพร้อมเครื่องมือพัฒนาทั้งหมดที่คุณต้องการ โดยมีไดเรกทอรีหลักขนาด 5 GB ที่คงอยู่ถาวร และทำงานบน Google Cloud ซึ่งช่วยเพิ่มประสิทธิภาพเครือข่ายและการตรวจสอบสิทธิ์ได้อย่างมาก คุณสามารถทำงานส่วนใหญ่ในแล็บนี้ได้โดยใช้เพียงเบราว์เซอร์หรือ Google Chromebook
เมื่อเชื่อมต่อกับ Cloud Shell แล้ว คุณควรเห็นว่าคุณได้รับการตรวจสอบสิทธิ์แล้วและระบบได้ตั้งค่าโปรเจ็กต์เป็น PROJECT_ID แล้ว
เรียกใช้คำสั่งต่อไปนี้ใน Cloud Shell เพื่อยืนยันว่าคุณได้รับการตรวจสอบสิทธิ์แล้ว
gcloud auth list
เอาต์พุตของคำสั่ง
Credentialed accounts:
 - <myaccount>@<mydomain>.com (active)
gcloud config list project
เอาต์พุตของคำสั่ง
[core]
project = <PROJECT_ID>
หากไม่ได้ตั้งค่าไว้ คุณตั้งค่าได้ด้วยคำสั่งนี้
gcloud config set project <PROJECT_ID>
เอาต์พุตของคำสั่ง
Updated property [core/project].
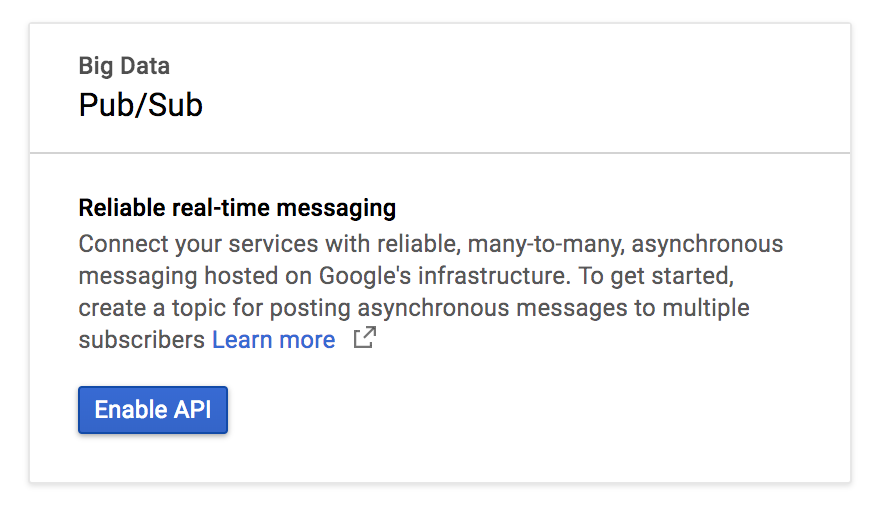
ไปที่หน้าหัวข้อ Google Cloud Pub/Sub แล้วเปิดใช้ API
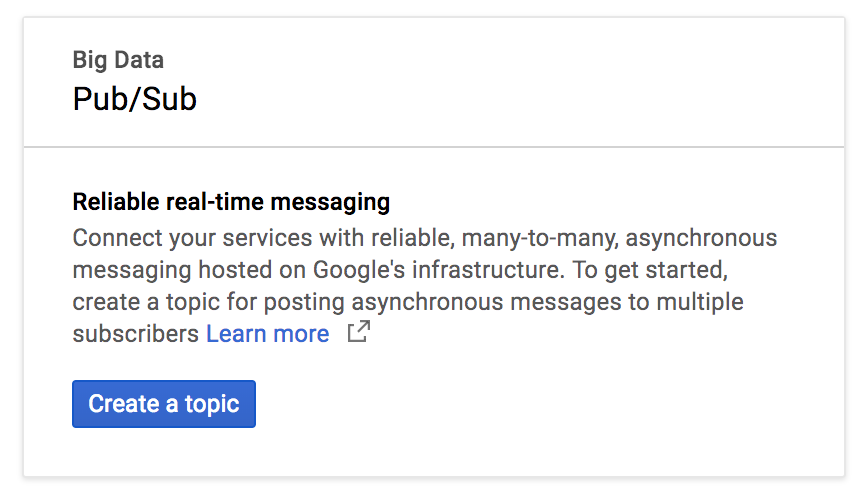
คลิกสร้างหัวข้อ
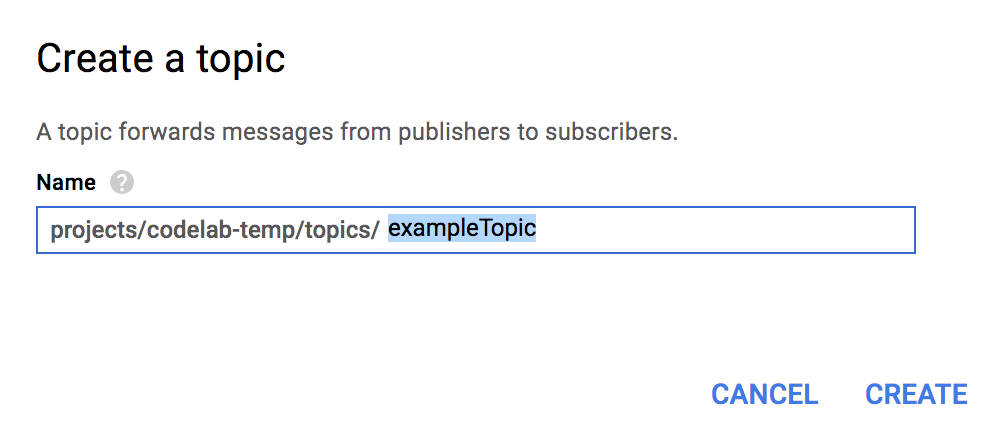
พิมพ์ exampleTopic เป็นชื่อหัวข้อ แล้วคลิกสร้าง
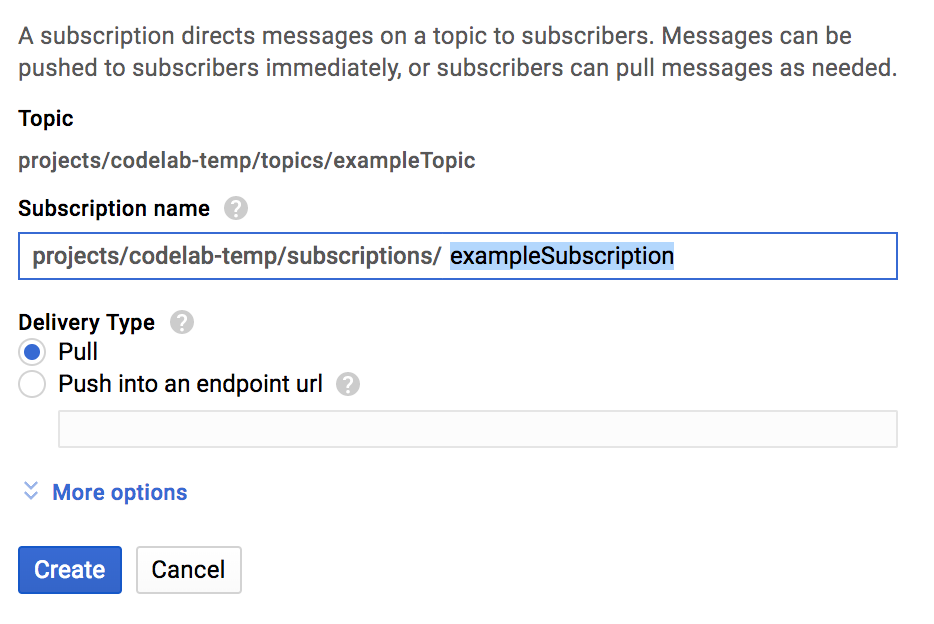
หลังจากสร้างหัวข้อแล้ว ให้อยู่ในหน้าหัวข้อ มองหาหัวข้อที่คุณเพิ่งสร้าง กดจุด 3 จุดแนวตั้งที่ท้ายบรรทัด แล้วคลิกการติดตามใหม่
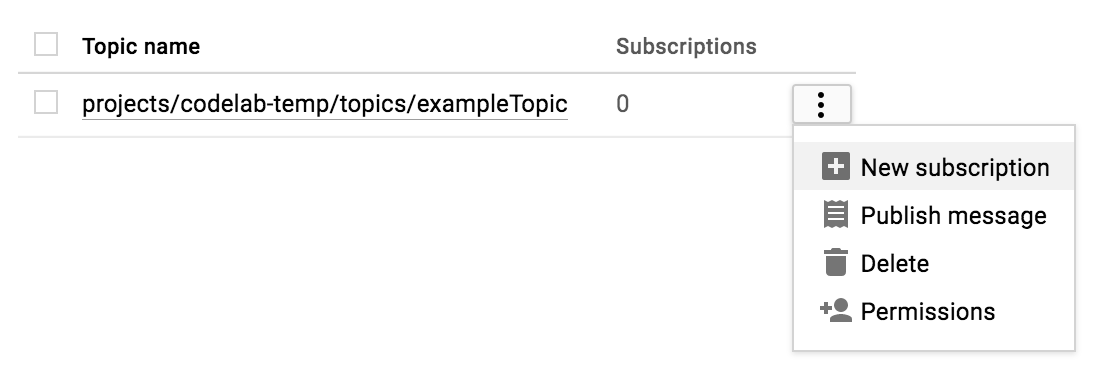
พิมพ์ exampleSubscription ในกล่องข้อความชื่อการสมัครใช้บริการ แล้วคลิกสร้าง
หลังจากเปิด Cloud Shell แล้ว คุณสามารถใช้บรรทัดคำสั่งเพื่อสร้างแอปพลิเคชัน Spring Boot ใหม่ 2 รายการด้วย Spring Initializr ได้โดยทำดังนี้
$ curl https://start.spring.io/starter.tgz \
  -d bootVersion=2.0.6.RELEASE \
  -d dependencies=web \
  -d baseDir=spring-integration-sender | tar -xzvf -
$ curl https://start.spring.io/starter.tgz \
  -d bootVersion=2.0.6.RELEASE \
  -d baseDir=spring-integration-receiver | tar -xzvf -
ตอนนี้เรามาสร้างแอปส่งข้อความกัน เปลี่ยนไปที่ไดเรกทอรีของแอปส่ง
$ cd spring-integration-senderเราต้องการให้แอปเขียนข้อความไปยังช่อง หลังจากข้อความอยู่ในแชแนลแล้ว อะแดปเตอร์แชแนลขาออกจะรับข้อความดังกล่าว ซึ่งจะแปลงจากข้อความ Spring ทั่วไปเป็นข้อความ Google Cloud Pub/Sub และเผยแพร่ไปยังหัวข้อ Google Cloud Pub/Sub
หากต้องการให้แอปเขียนไปยังแชแนล เราสามารถใช้เกตเวย์การรับส่งข้อความของ Spring Integration ได้ ใช้โปรแกรมแก้ไขข้อความจาก vim, emacs หรือ nano เพื่อประกาศอินเทอร์เฟซ PubsubOutboundGateway ภายในคลาส DemoApplication
src/main/java/com/example/demo/DemoApplication.java
...
import org.springframework.integration.annotation.MessagingGateway;

@SpringBootApplication
public class DemoApplication {

        ...

        @MessagingGateway(defaultRequestChannel = "pubsubOutputChannel")
        public interface PubsubOutboundGateway {

                void sendToPubsub(String text);
        }
}
ตอนนี้เรามีกลไกในการส่งข้อความไปยังช่องแล้ว แต่ข้อความเหล่านั้นจะไปอยู่ที่ไหนหลังจากอยู่ในช่อง
เราต้องมีอะแดปเตอร์ช่องขาออกเพื่อใช้ข้อความใหม่ในช่องและเผยแพร่ไปยังหัวข้อ Google Cloud Pub/Sub
src/main/java/com/example/demo/DemoApplication.java
...
import org.springframework.cloud.gcp.pubsub.core.PubSubTemplate;
import org.springframework.context.annotation.Bean;
import org.springframework.integration.annotation.ServiceActivator;
import org.springframework.cloud.gcp.pubsub.integration.outbound.PubSubMessageHandler;
import org.springframework.messaging.MessageHandler;

@SpringBootApplication
public class DemoApplication {

        ...

        @Bean
        @ServiceActivator(inputChannel = "pubsubOutputChannel")
        public MessageHandler messageSender(PubSubTemplate pubsubTemplate) {
                return new PubSubMessageHandler(pubsubTemplate, "exampleTopic");
        }
}
คำอธิบายประกอบ @ServiceActivator จะทำให้ระบบใช้ MessageHandler กับข้อความใหม่ใน inputChannel ในกรณีนี้ เราจะเรียกใช้ตัวดัดแปลงช่องขาออก PubSubMessageHandler เพื่อเผยแพร่ข้อความไปยังหัวข้อ exampleTopic ของ Google Cloud Pub/Sub
เมื่อมี Channel Adapter แล้ว ตอนนี้เราก็สามารถเชื่อมต่อออบเจ็กต์ PubsubOutboundGateway โดยอัตโนมัติและใช้เพื่อเขียนข้อความไปยังแชแนลได้
src/main/java/com/example/demo/DemoApplication.java
...
import org.springframework.beans.factory.annotation.Autowired;
import org.springframework.web.bind.annotation.PostMapping;
import org.springframework.web.bind.annotation.RequestParam;
import org.springframework.web.servlet.view.RedirectView;

@SpringBootApplication
public class DemoApplication {

...

        @Autowired
        private PubsubOutboundGateway messagingGateway;

        @PostMapping("/postMessage")
        public RedirectView postMessage(@RequestParam("message") String message) {
                this.messagingGateway.sendToPubsub(message);
                return new RedirectView("/");
        }
}
เนื่องจากมีคำอธิบายประกอบ @PostMapping ตอนนี้เราจึงมีปลายทางที่รับฟังคำขอ HTTP POST แต่ก็ต้องเพิ่มคำอธิบายประกอบ @RestController ลงในคลาส DemoApplication เพื่อทำเครื่องหมายเป็นตัวควบคุม REST ด้วย
src/main/java/com/example/demo/DemoApplication.java
import org.springframework.web.bind.annotation.RestController;

@SpringBootApplication
@RestController
public class DemoApplication {
  ...
}
เราเพียงแค่ต้องเพิ่มการอ้างอิงที่จำเป็นเพื่อให้แอปทำงานได้
pom.xml
<project>
  ...
  <!-- Add Spring Cloud GCP Dependency BOM -->
  <dependencyManagement>
        <dependencies>
                <dependency>
                        <groupId>org.springframework.cloud</groupId>
                        <artifactId>spring-cloud-gcp-dependencies</artifactId>
                        <version>1.0.0.RELEASE</version>
                        <type>pom</type>
                        <scope>import</scope>
                </dependency>
        </dependencies>
  </dependencyManagement>

  <dependencies>
        ...
        <!-- Add Pub/Sub Starter -->
        <dependency>
                <groupId>org.springframework.cloud</groupId>
                <artifactId>spring-cloud-gcp-starter-pubsub</artifactId>
        </dependency>

        <!-- Add Spring Integration -->
        <dependency>
                <groupId>org.springframework.integration</groupId>
                <artifactId>spring-integration-core</artifactId>
        </dependency>

  </dependencies>

</project>
เรียกใช้แอปผู้ส่ง
# Set the Project ID in environmental variable
$ export GOOGLE_CLOUD_PROJECT=`gcloud config list \
  --format 'value(core.project)'`
$ ./mvnw spring-boot:run
แอปกำลังรอคำขอ POST ที่มีข้อความในพอร์ต 8080 และปลายทาง /postMessage แต่เราจะพูดถึงเรื่องนี้ในภายหลัง
เราเพิ่งสร้างแอปที่ส่งข้อความผ่าน Google Cloud Pub/Sub ตอนนี้เราจะสร้างแอปอื่นที่รับข้อความเหล่านั้นและประมวลผล
คลิก + เพื่อเปิดเซสชัน Cloud Shell ใหม่
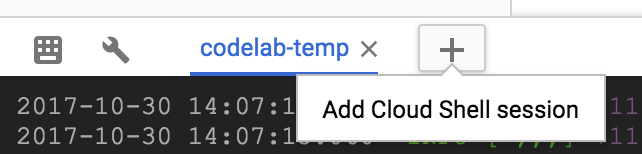
จากนั้นในเซสชัน Cloud Shell ใหม่ ให้เปลี่ยนไดเรกทอรีเป็นไดเรกทอรีของแอปตัวรับสัญญาณโดยใช้คำสั่งต่อไปนี้
$ cd spring-integration-receiverในแอปเวอร์ชันก่อน การประกาศเกตเวย์การรับส่งข้อความจะสร้างช่องขาออกให้เรา เนื่องจากเราไม่ได้ใช้เกตเวย์การรับส่งข้อความเพื่อรับข้อความ เราจึงต้องประกาศ MessageChannel ของเราเองซึ่งเป็นที่ที่ข้อความขาเข้าจะมาถึง
src/main/java/com/example/demo/DemoApplication.java
...
import org.springframework.context.annotation.Bean;
import org.springframework.integration.channel.DirectChannel;
import org.springframework.messaging.MessageChannel;

@SpringBootApplication
public class DemoApplication {

        ...

        @Bean
        public MessageChannel pubsubInputChannel() {
                return new DirectChannel();
        }
}
เราจะต้องใช้อะแดปเตอร์ช่องขาเข้าเพื่อรับข้อความจาก Google Cloud Pub/Sub และส่งต่อข้อความไปยัง pubsubInputChannel
src/main/java/com/example/demo/DemoApplication.java
...
import org.springframework.beans.factory.annotation.Qualifier;
import org.springframework.cloud.gcp.pubsub.core.PubSubTemplate;
import org.springframework.cloud.gcp.pubsub.integration.inbound.PubSubInboundChannelAdapter;

@SpringBootApplication
public class DemoApplication {
        ...

        @Bean
        public PubSubInboundChannelAdapter messageChannelAdapter(
                        @Qualifier("pubsubInputChannel") MessageChannel inputChannel,
                        PubSubTemplate pubSubTemplate) {
                PubSubInboundChannelAdapter adapter =
                                new PubSubInboundChannelAdapter(pubSubTemplate, "exampleSubscription");
                adapter.setOutputChannel(inputChannel);

                return adapter;
        }
}
อแดปเตอร์นี้จะเชื่อมโยงตัวเองกับ pubsubInputChannel และรอรับข้อความใหม่จากการสมัครใช้บริการ exampleSubscription ของ Google Cloud Pub/Sub
เรามีช่องที่ใช้โพสต์ข้อความขาเข้า แต่จะทำอย่างไรกับข้อความเหล่านั้น
มาประมวลผลด้วย @ServiceActivator ที่จะทริกเกอร์เมื่อมีข้อความใหม่มาถึง pubsubInputChannel กัน
src/main/java/com/example/demo/DemoApplication.java
...
import org.apache.commons.logging.Log;
import org.apache.commons.logging.LogFactory;
import org.springframework.integration.annotation.ServiceActivator;

@SpringBootApplication
public class DemoApplication {

        ...

        private static final Log LOGGER = LogFactory.getLog(DemoApplication.class);

        @ServiceActivator(inputChannel = "pubsubInputChannel")
        public void messageReceiver(String payload) {
                LOGGER.info("Message arrived! Payload: " + payload);
        }
}
ในกรณีนี้ เราจะบันทึกเพย์โหลดของข้อความเท่านั้น
เราต้องเพิ่มการอ้างอิงที่จำเป็น
pom.xml
<project>
  ...
  <!-- Add Spring Cloud GCP Dependency BOM -->
  <dependencyManagement>
        <dependencies>
                <dependency>
                        <groupId>org.springframework.cloud</groupId>
                        <artifactId>spring-cloud-gcp-dependencies</artifactId>
                        <version>1.0.0.RELEASE</version>
                        <type>pom</type>
                        <scope>import</scope>
                </dependency>
        </dependencies>
  </dependencyManagement>

  <dependencies>
        ...
        <!-- Add Pub/Sub Starter -->
        <dependency>
                <groupId>org.springframework.cloud</groupId>
                <artifactId>spring-cloud-gcp-starter-pubsub</artifactId>
        </dependency>

        <!-- Add Spring Integration -->
        <dependency>
                <groupId>org.springframework.integration</groupId>
                <artifactId>spring-integration-core</artifactId>
        </dependency>

  </dependencies>

</project>
เรียกใช้แอปตัวรับสัญญาณ
$ ./mvnw spring-boot:runตอนนี้ระบบจะบันทึกข้อความที่คุณส่งไปยังแอปผู้ส่งในแอปผู้รับ หากต้องการทดสอบ ให้เปิดเซสชัน Cloud Shell ใหม่และส่งคำขอ HTTP POST ไปยังแอปผู้ส่ง
$ curl --data "message=Hello world!" localhost:8080/postMessageจากนั้นตรวจสอบว่าแอปผู้รับบันทึกข้อความที่คุณส่งแล้ว
INFO: Message arrived! Payload: Hello world!ลบการสมัครใช้บริการและหัวข้อที่สร้างขึ้นเป็นส่วนหนึ่งของการออกกำลังกายนี้
$ gcloud beta pubsub subscriptions delete exampleSubscription
$ gcloud beta pubsub topics delete exampleTopic
คุณตั้งค่าแอป Spring Boot 2 แอปที่ใช้ Spring Integration Channel Adapters สำหรับ Google Cloud Pub/Sub โดยจะแลกเปลี่ยนข้อความกันเองโดยไม่ต้องโต้ตอบกับ Google Cloud Pub/Sub API
คุณได้เรียนรู้วิธีใช้ Spring Integration Channel Adapters สำหรับ Google Cloud Pub/Sub แล้ว
ดูข้อมูลเพิ่มเติม
- Google Cloud Pub/Sub: https://cloud.google.com/pubsub/
- โปรเจ็กต์ Spring ใน GCP: http://cloud.spring.io/spring-cloud-gcp/
- ที่เก็บ Spring บน GCP ใน GitHub: https://github.com/spring-cloud/spring-cloud-gcp
- Java ใน Google Cloud Platform: https://cloud.google.com/java/
ใบอนุญาต
ผลงานนี้ได้รับอนุญาตภายใต้สัญญาอนุญาตครีเอทีฟคอมมอนส์สำหรับยอมรับสิทธิของผู้สร้าง (Creative Commons Attribution License) 2.0 แบบทั่วไป