Memorystore for Redis 是適用於 Google Cloud 的全代管 Redis 服務。透過運用高擴充性、高可用性和安全的 Redis 服務,您無須費心管理複雜的 Redis 部署作業,即可讓 Google Cloud 上執行的應用程式得以發揮最佳效能。可用於資料快取後端,提升 Spring Boot 應用程式效能。程式碼研究室會說明如何設定。
課程內容
- 瞭解如何將 Memorystore 做為 Spring Boot 應用程式的快取後端。
軟硬體需求
- Google Cloud 專案
- 瀏覽器,例如 Google Chrome
- 熟悉標準 Linux 文字編輯器,例如 Vim、Emacs 和 GNU Nano
您會如何使用這個程式碼研究室?
你對 Google Cloud 服務的體驗滿意嗎?
自行設定環境
如果您還沒有 Google 帳戶 (Gmail 或 Google 應用程式),請先建立帳戶。登入 Google Cloud Platform 主控台 (console.cloud.google.com),然後建立新專案:
請記住專案 ID,這是所有 Google Cloud 專案中不重複的名稱 (上述名稱已遭占用,因此不適用於您,抱歉!)。本程式碼研究室稍後會將其稱為 PROJECT_ID。
接著,您必須在 Cloud 控制台中啟用帳單,才能使用 Google Cloud 資源。
完成本程式碼研究室的費用不應超過數美元,但如果您決定使用更多資源,或是將資源繼續執行 (請參閱本文件結尾的「清除」一節),則可能會增加費用。
Google Cloud Platform 新使用者享有價值 $300 美元的免費試用期。
啟用 Google Cloud Shell
在 GCP 主控台的右上角工具列中,按一下 Cloud Shell 圖示:
然後按一下「啟動 Cloud Shell」:
佈建並連線至環境的作業只需幾分鐘的時間:
這部虛擬機器搭載各種您需要的開發工具,提供永久的 5 GB 主目錄,而且在 Google Cloud 中運作,可大幅提升網路效能和驗證功能。您只需要瀏覽器或 Google Chromebook,就能完成這個實驗室的大部分工作 (甚至全部)。
連線至 Cloud Shell 後,您應會發現自己通過驗證,且專案已設為您的「PROJECT_ID」PROJECT_ID。
在 Cloud Shell 中執行下列指令,確認您已通過驗證:
gcloud auth list
指令輸出
Credentialed accounts:
 - <myaccount>@<mydomain>.com (active)
gcloud config list project
指令輸出
[core]
project = <PROJECT_ID>
如未設定,請輸入下列指令設定專案:
gcloud config set project <PROJECT_ID>
指令輸出
Updated property [core/project].
啟動 Cloud Shell。
啟動 Cloud Shell 後,您可以使用指令列建立新的 Memorystore 執行個體。
$ gcloud redis instances create myinstance --size=1 --region=us-central1
如果 Memorystore API 未啟用,系統會詢問是否要啟用。回答「y」。
API [redis.googleapis.com] not enabled on project [204466653457].
Would you like to enable and retry (this will take a few minutes)?
(y/N)?  y
Enabling service redis.googleapis.com on project 204166153457...
Waiting for async operation operations/tmo-acf.c8909997-1b4e-1a62-b6f5-7da75cce1416 to complete...
Operation finished successfully. The following command can describe the Operation details:
 gcloud services operations describe operations/tmo-acf.c8909997-1b4e-1a62-b6f5-7da75cce1416
Create request issued for: [myinstance]
Waiting for operation [operation-1538645026454-57763b937ad39-2564ab37-3fea7701] to complete...done.
Created instance [myinstance].
作業完成後,您就可以使用執行個體。
執行下列指令,取得執行個體的 redis 主機 IP 位址。稍後設定 Spring Boot 應用程式時,您會再次使用這個值。
$ gcloud redis instances describe myinstance --region=us-central1 \
  | grep host
host: 10.0.0.4
在 Google Cloud 控制台中,依序前往「Storage」>「Memorystore」,您應該就能看到執行個體處於「ready」狀態:

在相同地區中建立 Compute Engine 執行個體。
$ gcloud compute instances create instance-1 --zone us-central1-c
作業完成後,您就可以使用執行個體。
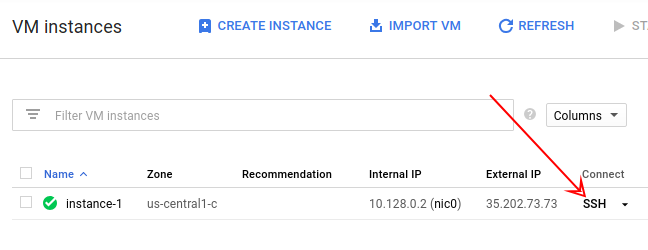
依序前往「Compute」 >「Compute Engine」 >「VM instances」,然後在「Connect」欄中點選「SSH」,即可透過 SSH 連線至執行個體:

在虛擬機器 (VM) 執行個體殼層 (而非 Cloud Shell) 中,安裝 OpenJDK、Maven、telnet:
$ sudo apt-get install openjdk-8-jdk-headless maven telnet
等待安裝完成,然後繼續下一個步驟。
使用 web、redis 和 cache 依附元件建立新的 Spring Boot 專案:
$ curl https://start.spring.io/starter.tgz \
  -d dependencies=web,redis,cache -d language=java -d baseDir=cache-app \
  | tar -xzvf - && cd cache-app
編輯 application.properties 檔案,將應用程式設定為使用 Memorystore 執行個體的 IP 位址做為 Redis 主機。
$ nano src/main/resources/application.properties
新增下列行,並填入 Memorystore for Redis IP 位址 (來自前幾個步驟):
spring.redis.host=<memorystore-host-ip-address>
在該行後方新增一行,然後建立 REST 控制器 Java 類別:
$ nano src/main/java/com/example/demo/HelloWorldController.java
將下列內容放入檔案中:
package com.example.demo;

import org.springframework.beans.factory.annotation.Autowired;
import org.springframework.cache.annotation.Cacheable;
import org.springframework.data.redis.core.StringRedisTemplate;
import org.springframework.web.bind.annotation.PathVariable;
import org.springframework.web.bind.annotation.RequestMapping;
import org.springframework.web.bind.annotation.RestController;

@RestController
public class HelloWorldController {
@Autowired
private StringRedisTemplate template;

@RequestMapping("/hello/{name}")
@Cacheable("hello")
public String hello(@PathVariable String name) throws InterruptedException {
  Thread.sleep(5000);
  return "Hello " + name;
 }
}
@RequestMapping 註解會將方法公開為 HTTP 端點,並將路徑的一部分對應至方法參數 (如 @PathVariable 註解所示)。
@Cacheable("hello") 註解表示方法執行作業應快取,且快取名稱為「hello」。這個註解會與參數值一併做為快取鍵。您會在稍後的程式碼實驗室中看到範例。
此外,您也需要在 Spring Boot 應用程式類別中啟用快取。
編輯「DemoApplication.java」:
$ nano src/main/java/com/example/demo/DemoApplication.java
匯入 org.springframework.cache.annotation.EnableCaching,並使用這個註解為類別加上註解。結果看起來會像這樣:
package com.example.demo;

import org.springframework.boot.SpringApplication;
import org.springframework.boot.autoconfigure.SpringBootApplication;
import org.springframework.cache.annotation.EnableCaching;

@SpringBootApplication
@EnableCaching
public class DemoApplication {

public static void main(String[] args) {
  SpringApplication.run(DemoApplication.class, args);
 }
}
現在可以執行應用程式了!
$ mvn spring-boot:run
以先前的方式開啟與執行個體的另一個 SSH 連線。在新 SSH 視窗中,多次存取 /hello/ 端點,並將「bob」做為名稱傳遞。
$ time curl http://localhost:8080/hello/bob
Hello bob!

real        0m5.408s
user        0m0.036s
sys        0m0.009s

$ time curl http://localhost:8080/hello/bob
Hello bob!

real        0m0.092s
user        0m0.021s
sys        0m0.027s
請注意,第一次要求耗時五秒,但下一次要求的速度明顯快得多,即使方法中有 Thread.sleep(5000)invocation 也是如此。這是因為實際方法只執行一次,結果會放入快取中。後續每次呼叫都會直接從快取傳回結果。
您可實際查看應用程式快取的內容。在您上個步驟使用的相同終端機中,使用 telnet 連線至 Memorystore for Redis 主機:
$ telnet <memorystore-host-ip-address> 6379
如要查看快取鍵清單,請使用下列指令:
KEYS *
hello::bob
如您所見,快取名稱會做為金鑰的前置字元,參數值則會做為第二部分。
如要擷取值,請使用 GET 指令:
$ GET hello::bob
   Hello bob!
使用 QUIT 指令結束。
如要清理,請從 Cloud Shell 刪除 Compute Engine 和 Memorystore 執行個體。
刪除運算執行個體:
$ gcloud compute instances delete instance-1 --zone us-central1-c
刪除 Memorystore for Redis 執行個體:
$ gcloud redis instances delete myinstance --region=us-central1
您已建立 Memorystore for Redis 和 Compute Engine 執行個體。此外,您也設定了 Spring Boot 應用程式,透過 Spring Boot 快取使用 Memorystore!
瞭解詳情
- Spring Boot 快取
- Memorystore
- Google Cloud 上的 Spring 專案
- Google Cloud GitHub 存放區中的 Spring
- 在 Google Cloud 中使用 Java
授權
這項內容採用的授權為 Creative Commons 姓名標示 2.0 通用授權。
