
1. ก่อนเริ่มต้น
ใน Codelab นี้ คุณจะได้เรียนรู้วิธีวัด Core Web Vitals ของหน้าเว็บด้วยweb-vitalsไลบรารี JavaScript
Google ขอแนะนำให้คุณวัด Core Web Vitals และให้ค่าดังกล่าวอยู่ในเปอร์เซ็นไทล์ที่ 75 ของการโหลดหน้าเว็บที่แบ่งกลุ่มตามอุปกรณ์เคลื่อนที่และเดสก์ท็อป
Core Web Vitals ประกอบด้วยเมตริก 3 รายการต่อไปนี้ ซึ่งใช้ได้กับหน้าเว็บทั้งหมดและให้ข้อมูลเชิงลึกที่สำคัญเกี่ยวกับประสบการณ์ของผู้ใช้
- Largest Contentful Paint (LCP) วัดประสิทธิภาพการโหลดและควรเกิดขึ้นภายใน 2.5 วินาทีหลังจากที่หน้าเว็บเริ่มโหลด
- Interaction to Next Paint (INP) วัดการโต้ตอบและควรเกิดขึ้นภายใน 200 มิลลิวินาที
- Cumulative Layout Shift (CLS) วัดความเสถียรของภาพและควรอยู่ภายใน 0.1
ข้อกำหนดเบื้องต้น
สิ่งที่คุณต้องทำ
- เพิ่มไลบรารี
web-vitalsลงในหน้าเว็บ - วัดผล Core Web Vitals ของหน้าเว็บในเครื่องมือสำหรับนักพัฒนาซอฟต์แวร์ Google Chrome
- ไม่บังคับ: รายงาน Core Web Vitals ของหน้าเว็บไปยัง Google Analytics
สิ่งที่คุณต้องมี
- โปรแกรมแก้ไขข้อความที่คุณเลือก เช่น Sublime Text หรือ Visual Studio Code
- เว็บเบราว์เซอร์ที่ใช้ Chromium เช่น Google Chrome หรือ Microsoft Edge (ดูข้อมูลเพิ่มเติมเกี่ยวกับเหตุผลที่ต้องใช้เว็บเบราว์เซอร์ที่ใช้ Chromium ได้ที่การรองรับเบราว์เซอร์)
2. เพิ่มไลบรารี web-vitals ลงในหน้าเว็บ
- ในโปรแกรมแก้ไขข้อความ ให้สร้างไฟล์
web-vitals-test.htmlแล้วป้อนโค้ด HTML นี้ในไฟล์
web-vitals-test.html
<!DOCTYPE html>
<html lang="en">
<head>
  <meta charset="utf-8">
  <title>Web Vitals Test</title>
  <meta name="viewport" content="width=device-width, initial-scale=1">
</head>
<body>
  <p><img style="max-width: 360px" src="https://placekitten.com/g/3840/2160" alt="Kitten" /></p>
  <p>Text below image</p>
</body>
</html>
โค้ดนี้จะสร้างหน้าเว็บที่คุณใช้สำหรับ Codelab นี้
- ในองค์ประกอบ
<body>ของโค้ด HTML หลังจากองค์ประกอบ<p>ที่ 2 ให้ป้อนสคริปต์โมดูลนี้ แล้วบันทึกไฟล์
web-vitals-test.html
<script type="module">
  import {onCLS, onINP, onLCP} from 'https://unpkg.com/web-vitals@4?module';

  onCLS(console.log);
  onINP(console.log);
  onLCP(console.log);
</script>
สคริปต์โมดูลนี้จะโหลดไลบรารี web-vitals จากเครือข่ายนำส่งข้อมูล ตอนนี้ไฟล์ของคุณจะมีลักษณะเหมือนข้อมูลโค้ดต่อไปนี้
web-vitals-test.html
<!DOCTYPE html>
<html lang="en">
<head>
  <meta charset="utf-8">
  <title>Web Vitals Test</title>
  <meta name="viewport" content="width=device-width, initial-scale=1">
</head>
<body>
  <p><img style="max-width: 360px" src="https://placekitten.com/g/3840/2160" alt="Kitten" /></p>
  <p>Text below image</p>

<script type="module">
  import {onCLS, onINP, onLCP} from 'https://unpkg.com/web-vitals@4?module';

  onCLS(console.log);
  onINP(console.log);
  onLCP(console.log);
</script>
</body>
</html>
เบราว์เซอร์ที่ทันสมัยทั้งหมดรองรับสคริปต์โมดูล ซึ่งเหมาะกับโค้ดที่ใช้เฉพาะ API ใหม่ เช่น API ที่จำเป็นต่อการวัด Core Web Vitals เบราว์เซอร์ที่ไม่รองรับโมดูลหรือ Core Web Vitals API จะไม่พยายามโหลดสคริปต์นี้
3. วัด Core Web Vitals ของหน้าเว็บในเครื่องมือสำหรับนักพัฒนาซอฟต์แวร์ Google Chrome
- เปิดไฟล์ที่บันทึกไว้ในเว็บเบราว์เซอร์
- คลิกขวาที่หน้าเว็บ แล้วคลิกตรวจสอบในกล่องโต้ตอบ
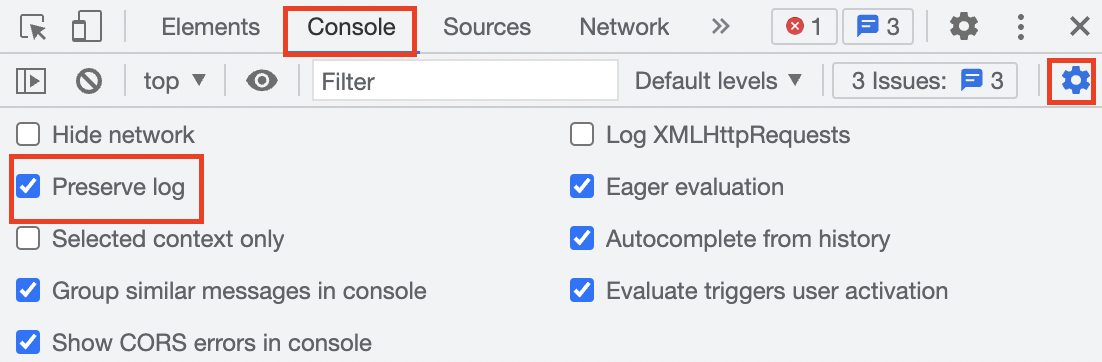
- ในแผงเครื่องมือสำหรับนักพัฒนาซอฟต์แวร์ของ Google Chrome ให้คลิกแท็บคอนโซล แล้วเลือกการตั้งค่าคอนโซล
 > เก็บรักษาบันทึก การตั้งค่านี้ช่วยให้มั่นใจว่าบันทึกจะยังคงอยู่เมื่อคุณรีเฟรชหน้าเว็บ
- คลิกแท็บเครือข่าย จากนั้นคลิกลูกศรขยายของเมนูแบบเลื่อนลงการควบคุมอัตรา แล้วเลือก3G ช้า
 การตั้งค่านี้จะจำลองการเชื่อมต่อเครือข่ายที่ช้า

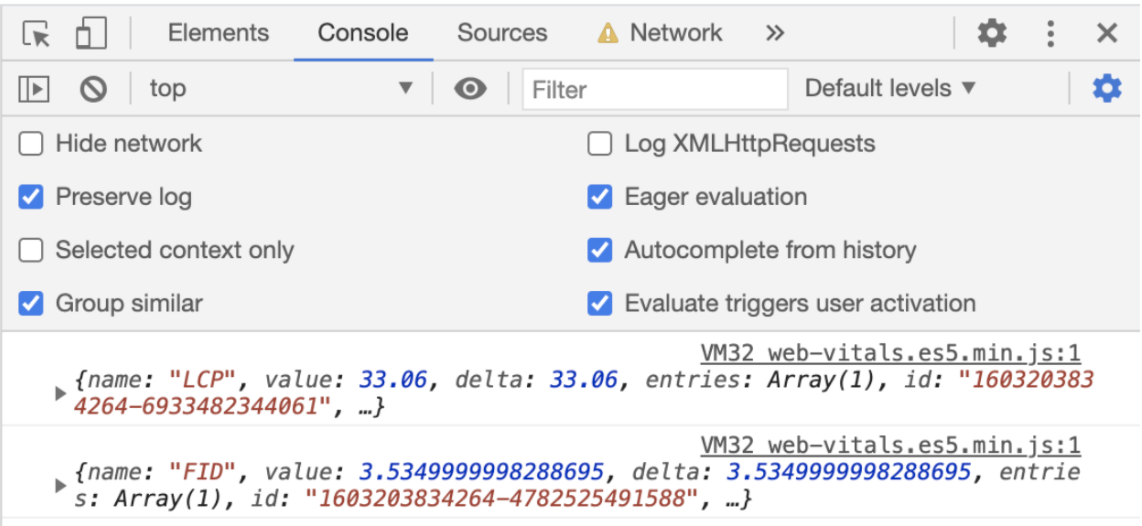
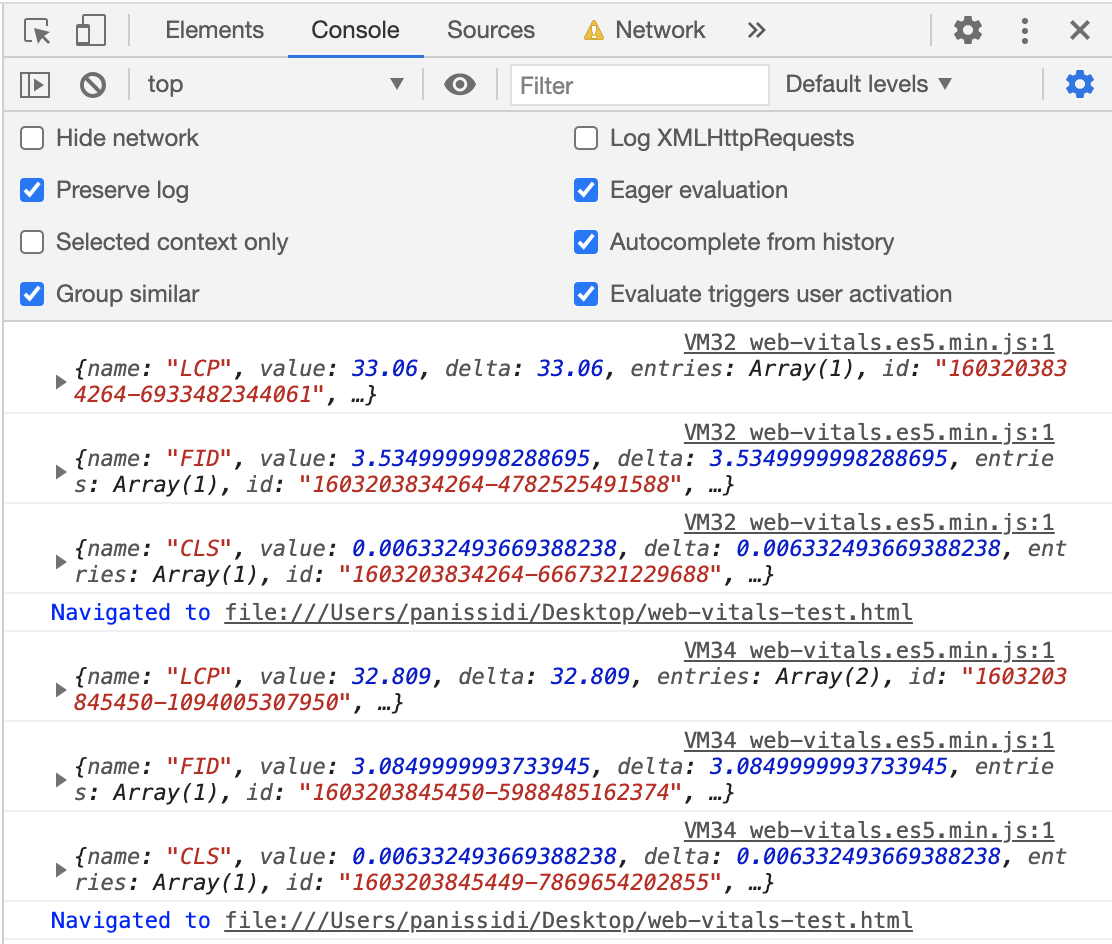
- กลับไปที่แท็บคอนโซล แล้วคลิกที่ใดก็ได้ในหน้าเว็บ เมตริก LCP จะพิมพ์ในแท็บคอนโซล
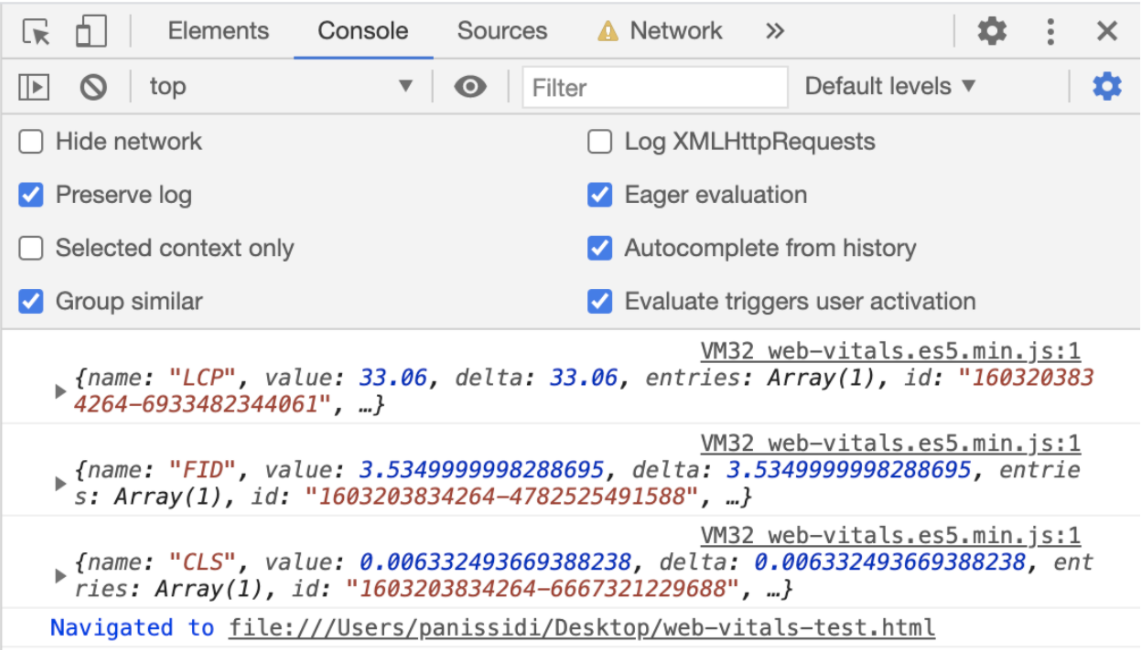
- รีเฟรชหน้าเว็บ เมตริก CLS จะพิมพ์ในแท็บคอนโซล
- กลับไปที่แท็บเครือข่าย แล้วคลิกลูกศรขยาย ของเมนูแบบเลื่อนลงสำหรับการควบคุมปริมาณ แล้วเลือก3G เร็ว การตั้งค่านี้จะจำลองการเชื่อมต่อเครือข่ายที่รวดเร็ว
- กลับไปที่แท็บคอนโซล แล้วคลิกที่ใดก็ได้ในหน้าเว็บ เมตริก LCP จะพิมพ์ในแท็บคอนโซลอีกครั้ง แต่จะได้รับการปรับปรุงจากก่อนหน้านี้
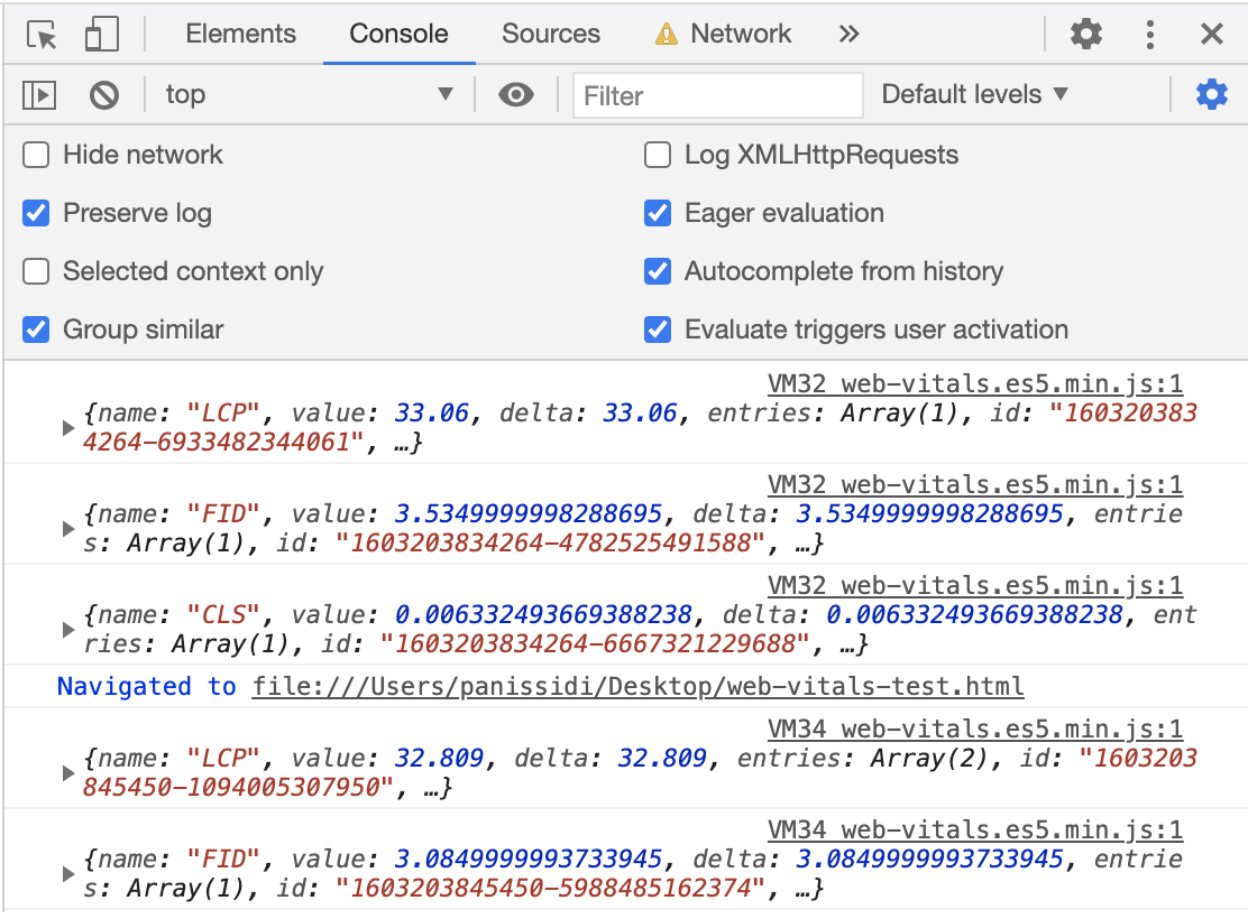
- รีเฟรชหน้าเว็บ เมตริก CLS จะแสดงในแท็บคอนโซลอีกครั้ง แต่ได้รับการปรับปรุงจากก่อนหน้านี้
4. ไม่บังคับ: รายงาน Core Web Vitals ของหน้าเว็บไปยัง Google Analytics
- ในไฟล์
web-vitals-test.htmlหลังจากคำสั่งนำเข้าของสคริปต์โมดูล ให้ป้อนฟังก์ชันsendToGoogleAnalytics()นี้ แล้วบันทึกไฟล์
web-vitals-test.html
function sendToGoogleAnalytics({name, delta, id}) {
  // Assumes the global `gtag()` function exists, see:
  // https://developers.google.com/analytics/devguides/collection/gtagjs
  gtag('event', name, {
    event_category: 'Web Vitals',
    // Google Analytics metrics must be integers, so the value is rounded.
    // For CLS the value is first multiplied by 1000 for greater precision
    // (note: increase the multiplier for greater precision if needed).
    value: Math.round(name === 'CLS' ? delta * 1000 : delta),
    // The `id` value will be unique to the current page load. When sending
    // multiple values from the same page (e.g. for CLS), Google Analytics can
    // compute a total by grouping on this ID (note: requires `eventLabel` to
    // be a dimension in your report).
    event_label: id,
    // Use a non-interaction event to avoid affecting bounce rate.
    non_interaction: true,
  });
}

onCLS(sendToGoogleAnalytics);
onINP(sendToGoogleAnalytics);
onLCP(sendToGoogleAnalytics);
โค้ดนี้จะส่ง Core Web Vitals ไปยัง Google Analytics ซึ่งคุณจะดูได้ในรายงานเหตุการณ์ยอดนิยม
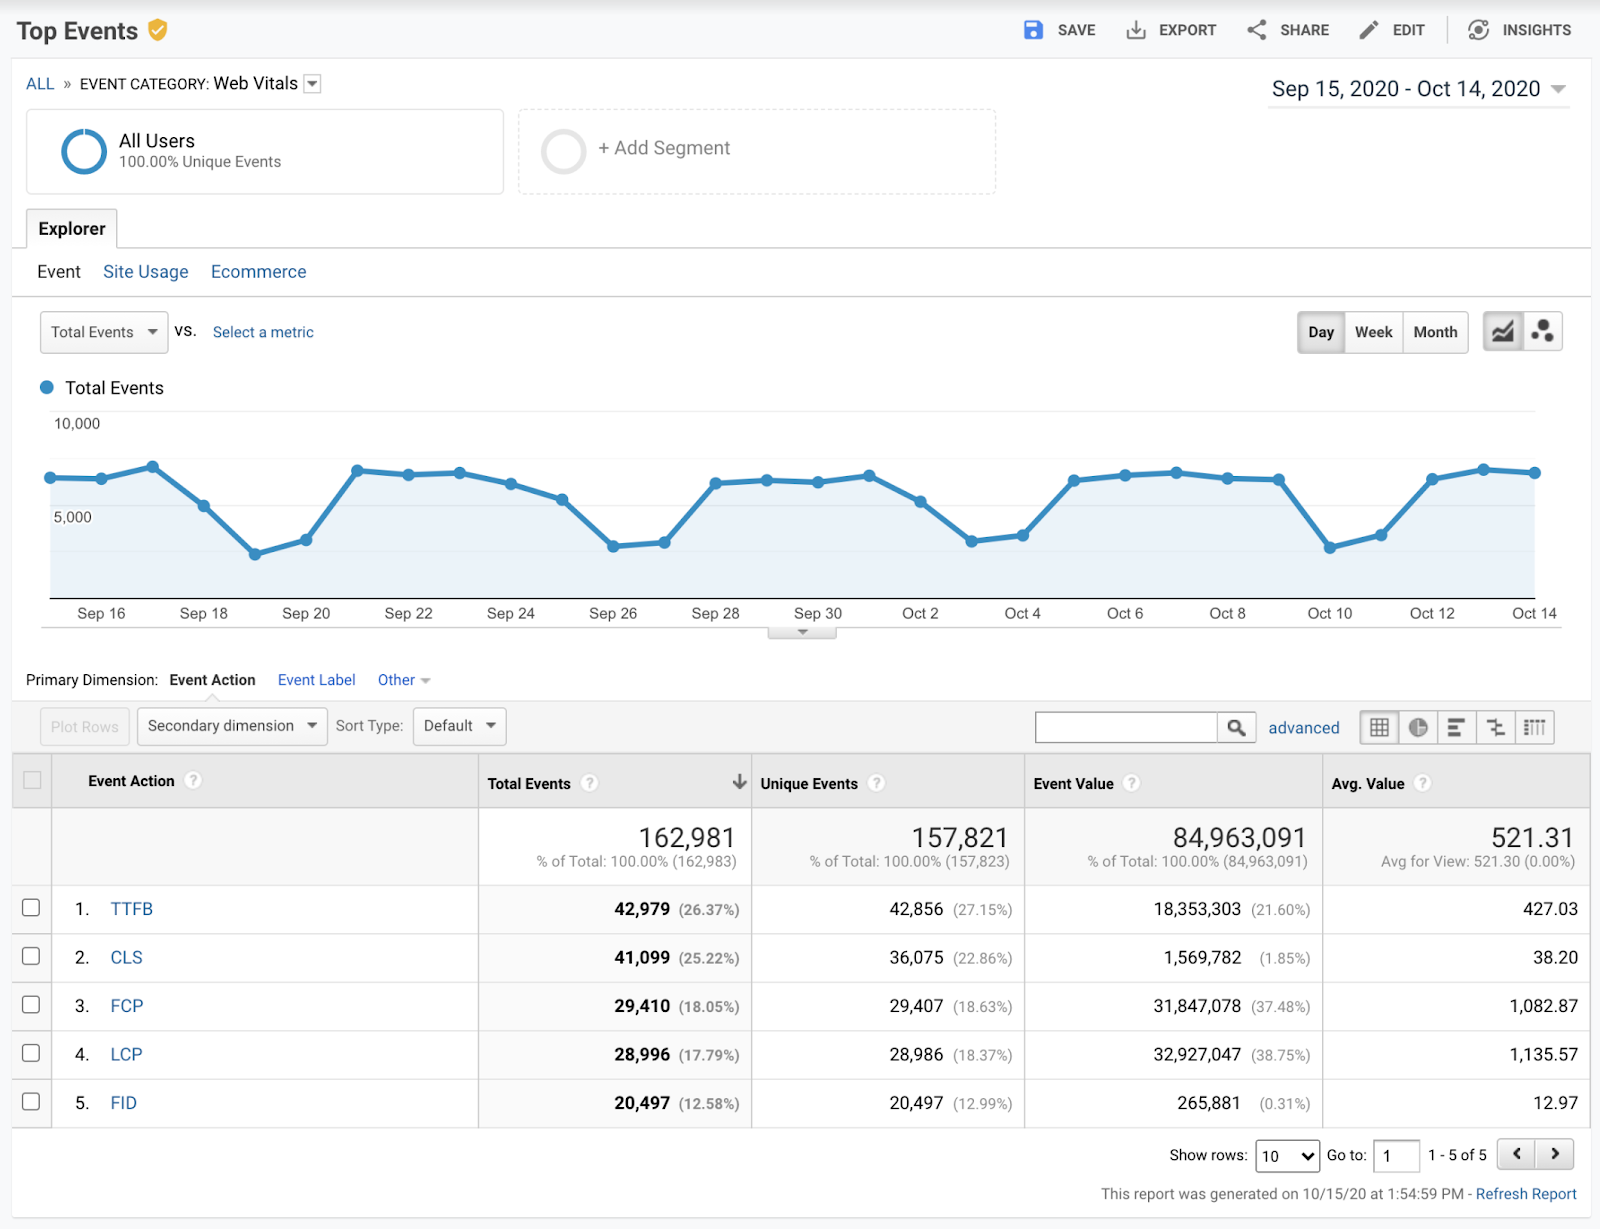
ตอนนี้ไฟล์ของคุณจะมีลักษณะเหมือนข้อมูลโค้ดต่อไปนี้
web-vitals-test.html
<!DOCTYPE html>
<html lang="en">
<head>
  <meta charset="utf-8">
  <title>Web Vitals Test</title>
  <meta name="viewport" content="width=device-width, initial-scale=1">
</head>
<body>
  <p><img style="max-width: 360px" src="https://placekitten.com/g/3840/2160" alt="Kitten" /></p>
  <p>Text below image</p>

<script type="module">
  import {onCLS, onINP, onLCP} from 'https://unpkg.com/web-vitals@4?module';

  function sendToGoogleAnalytics({name, delta, id}) {
    // Assumes the global `gtag()` function exists, see:
    // https://developers.google.com/analytics/devguides/collection/gtagjs
    gtag('event', name, {
      event_category: 'Web Vitals',
      // Google Analytics metrics must be integers, so the value is rounded.
      // For CLS the value is first multiplied by 1000 for greater precision
      // (note: increase the multiplier for greater precision if needed).
      value: Math.round(name === 'CLS' ? delta * 1000 : delta),
      // The `id` value will be unique to the current page load. When sending
      // multiple values from the same page (e.g. for CLS), Google Analytics can
      // compute a total by grouping on this ID (note: requires `eventLabel` to
      // be a dimension in your report).
      event_label: id,
      // Use a non-interaction event to avoid affecting bounce rate.
      non_interaction: true,
    });
  }

  onCLS(sendToGoogleAnalytics);
  onINP(sendToGoogleAnalytics);
  onLCP(sendToGoogleAnalytics);
</script>
</body>
</html>
5. ขอแสดงความยินดี
ยินดีด้วย คุณได้เรียนรู้วิธีวัดผลและรายงาน Core Web Vitals ของหน้าเว็บด้วยไลบรารี web-vitals