
In this codelab you will create a short Kotlin program that prints a birthday message with a cake and a birthday banner.
Prerequisites
- How to open and edit code in https://try.kotlinlang.org/, a browser-based Kotlin programming tool.
- Understand the
"Hello world!"program from the Write your first Kotlin program codelab. - How to use
println()to write text to the console of the online Kotlin code editor.
What you will learn
- How to print more complex text from your program.
- How to do basic math in Kotlin and store the results in variables for later use.
- How to create a function to print the same string several times.
- How to create a loop that prints a text snippet multiple times.
What you will build
- You will create a short program that you can use to print birthday messages, a text-based picture of a cake, and a banner.
What you need
- A computer with internet access and a modern web browser, such as the latest version of Chrome.
Set up your starter code
- In your browser, open https://try.kotlinlang.org/. This opens a browser-based Kotlin programming tool.
- In the file explorer, make sure Examples > Hello, world! > Simplest version > SimplestVersion.kt is selected, and the code editor shows the
Hello world!program. - If you see the code with your previous changes, that's OK. Restore the original state of the program by clicking the Undo arrow next to the filename.

- In the definition of
fun main(), remove the argumentargs: Array<String>because you are not going to use it. It is provided in the code given by default in the editor, but it is not mandatory to have. The first line of your program should now look like the code below.
fun main(){- Inside the
fun main()function, replace the"Hello, world!"text with"Happy Birthday, Rover!". - Below that, still inside the curly braces, add two more lines to print:
"You are already 5!"and"5 is the very best age to celebrate!".
Your finished code should look like this.
fun main() {
    println("Happy Birthday, Rover!")
    println("You are already 5!")
    println("5 is the very best age to celebrate!")
}- Run your code.
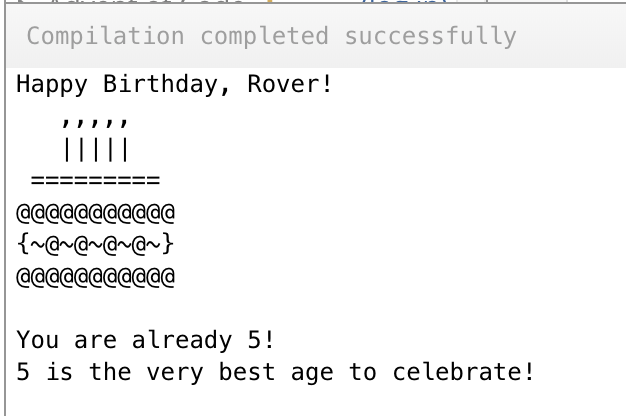
- Verify that the Console tab shows Happy Birthday, Rover! and below that, You are already 5! and 5 is the very best age to celebrate!

Add a birthday cake
A birthday message needs a birthday-themed picture. Like, a cake. You can add a cake to your birthday message by printing additional lines that use the letters and symbols on your keyboards and println().
Continue from the solution code above.
- In your code, between the two
println()statements forHappy BirthdayandYou are already 5, add the following lines of print statements, as shown below. This creates a cake. The lastprintln()statement has no text between the quotes, which prints an empty line.
    println("   ,,,,,   ")
    println("   |||||   ")
    println(" =========")
    println("@@@@@@@@@@@")
    println("{~@~@~@~@~}")
    println("@@@@@@@@@@@")
    println("")
To help others understand your code, you can add a comment before you print the cake. If you run your code, the output won't look any different, because comments are just information for you and other developers, not commands for the system. An inline comment starts with // followed by text, as shown below.
// This is a comment line
// This is another comment- Add a comment before you print the cake:
// Let's print a cake!. - Add a comment before printing the empty line:
// This prints an empty line.
Your code should look like the code below.
fun main() {
    println("Happy Birthday, Rover!")

    // Let's print a cake!
    println("   ,,,,,   ")
    println("   |||||   ")
    println(" =========")
    println("@@@@@@@@@@@")
    println("{~@~@~@~@~}")
    println("@@@@@@@@@@@")

    // This prints an empty line.
    println("")

    println("You are already 5!")
    println("5 is the very best age to celebrate!")
}- Run your code, and the output should look like the screenshot below.
Store Rover's age in a variable
- In your finished code so far, notice how you are repeating the same age number twice.
Instead of repeating this number, you could store it in one place, as a variable. It's like putting your number into a box and giving it a name. Then you can use this variable name any time you need the value. And, if the age changes, you only have to change your program in one place. By changing the variable, the correct value for the age is printed everywhere the variable is used.
- In your program, as the first line of code inside the
main() function, add the following code to create a variable calledage, with a value of 5, as shown below. (You must put this line before theprintln()statements).
val age = 5This line means:
valis a special word used by Kotlin, called a keyword, indicating that what follows is the name of a variable.ageis the name of the variable.=makes the value ofage(on its left) be the same as the value on its right. In math, a single equal sign is used to assert that the values on each side are the same. In Kotlin, unlike in math, a single equal sign is used to assign the value on the right to the named variable on the left.
A developer would say it like this: This line declares a variable named age whose assigned value is 5.
To use a variable inside a print statement, you need to surround it with some symbols that tell the system that what comes next is not text, but a variable. Instead of printing text, the system needs to print the value of the variable. You do this by putting your variable inside curly braces preceded by a dollar sign, like in the example below.
${variable}- In your code, replace the number 5 in both print statements with the
agevariable as shown below.
println("You are already ${age}!")
println("${age} is the very best age to celebrate!")- Run your code, and both messages should show the same age.
- Change the value of the variable to something different. For example, you could show Rover's age in days instead of years. To do this, multiply the age with 365, omitting leap years. You can do this calculation right when you create the variable, as shown below.
val age = 5 * 365- Run your code again, and notice that both messages now show the age in days.

- [Optional] Change the text of the print messages to work better with days. For example, change them to read:
You are already 1825 days old!
1825 days old is the very best age to celebrate!
Put text into a variable
You can not only put numbers into variables, but also text.
- Below the variable for
age, add a variable callednamefor the name of the birthday person and set its value to"Rover".
val name = "Rover"- Replace the name
Roverin the birthday message with the variable, as shown below.
println("Happy Birthday, ${name}!")And you can have more than one variable in a print statement.
- Add
Roverto the age message, using thenamevariable, as shown below.
println("You are already ${age} days old, ${name}!")Your completed code should look similar to this.
fun main() {

    val age = 5 * 365
    val name = "Rover"

    println("Happy Birthday, ${name}!")

    // Let's print a cake!
    println("   ,,,,,   ")
    println("   |||||   ")
    println(" =========")
    println("@@@@@@@@@@@")
    println("{~@~@~@~@~}")
    println("@@@@@@@@@@@")

    // This prints an empty line.
    println("")

    println("You are already ${age} days old, ${name}!")
    println("${age} days old is the very best age to celebrate!")
}
Congratulations! You can now create messages with text, graphics created from symbols, use variables to store numbers and text, and print text using variables.
In this task you will create a birthday banner, and then learn how to simplify that code using techniques for repeating and reusing code, and why that is a good thing.
Create a starter birthday banner
- In https://try.kotlinlang.org/, place your cursor somewhere inside the code.
- Right-click to open the context menu and choose Select All (Ctrl-A).
- Press the backspace or delete key to delete all the code.
- Copy-paste the code below into the editor.
fun main() {
    println("=======================")
    println("Happy Birthday, Jhansi!")
    println("=======================")
}- Run your program to see a banner printed in the Console.
=======================
Happy Birthday, Jhansi!
=======================
Create a function for printing the border
The code that you just pasted and ran is a function called main() that contains three print statements. When you press the Run button, the system executes the function and all the code inside it.
Your Kotlin program always has to have a main() function. In addition, you can create and use functions of your own. Just like variables help you avoid duplicating work, functions can help you avoid writing the same code multiple times. In your code, the print statements for the top and bottom of the banner are exactly the same. Let's create and use a function for printing those borders.
- In the editor, below the
main()function, insert an empty line, just to give you some room to work. The system ignores empty lines, and you can insert them wherever they are helpful for organizing your code. - Create a function. Start with the
funkeyword, followed by a name,printBorder, a pair of parentheses(), and a pair of curly braces{}, as shown below.
fun printBorder() {}A word about naming functions.
- Notice how the name of the function
printBorderstarts with a lower-case letter and a verb. Function names almost always start with a lowercase letter, and a verb, and the name should describe what the function does. Like:print()or here,printBorder(). - Notice also that the second word inside the name starts with uppercase. This style is called "camel case", and makes names much easier to read. Some more name examples are
drawReallyCoolFancyBorderandprintBirthdayMessage.
- Put the closing brace
}of theprintBorderfunction on a new line and add an empty line in between the two curly braces, to give you room to add more code. Having the closing brace } on its own line makes it easier to see where the function ends. - Inside the
main()function, copy the print statement for the border and paste it between the curly braces of theprintBorder()function.
Your finished printBorder() function should look like this.
fun printBorder() {
    println("=======================")
}
To use or call, a function, use its name with parentheses. Notice that this is how you have been using println()! So to use the printBorder function, call printBorder()anywhere in your code that you need to.
- In the
main()function, replace the lines of code that print a border line usingprintln()with calls to theprintBorder()function. Your finished code should look like this.
fun main() {
    printBorder()
    println("Happy Birthday, Jhansi!")
    printBorder()
}

fun printBorder() {
    println("=======================")
}- Run your code to make sure all is working as before.
Note that changing to code to make it better or easier to work with without changing the output is called "refactoring".
Repeat a border pattern
Looking at the border line, it's really the same symbol all over again. So, instead of saying:
"Print this string of 23 symbols"
you could say,
"Print this 1 symbol 23 times".
In code, you do this by using a repeat() statement.
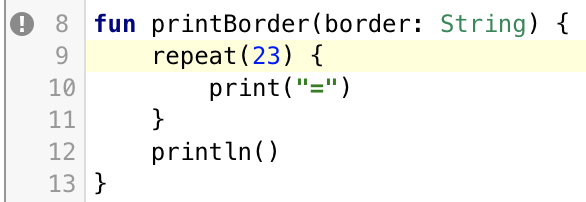
- In the
printBorder()method, use arepeat()statement to print the equal sign 23 times. - Instead of using
println(), useprint(), so that you do not jump to a new line after printing each "=".
Here is the code. You now have a single instruction to print the equal sign, and to repeat that instruction 23 times, you use a repeat() statement.
fun printBorder() {
    repeat(23) {
        print("=")
    }
}- The
repeat()statement starts with the wordrepeat, followed by(). This kind of statement is referred to as a 'loop' because you are repeating or looping over the same code multiple times. You will learn about other ways of creating loops later. - Inside the parentheses
()is the number of repetitions, - followed by curly braces
{}, - and inside the curly braces
{}, is the code to repeat.
- Within the
printBorder()method, after the closing curly brace } of therepeat()statement, which is after you are done printing the border line, add aprintln()statement to print a newline.
Your code should now be like this.
fun printBorder() {
    repeat(23) {
        print("=")
    }
    println()
}
The code in the main() function does not change, and your entire program should look like this.=
fun main() {
    printBorder()
    println("Happy Birthday, Jhansi!")
    printBorder()
}

fun printBorder() {
    repeat(23) {
        print("=")
    }
    println()
}- Run your code. The output should be the same as before, but this time, you were able to create the border by specifying the "=" symbol only once!
=======================
Happy Birthday, Jhansi!
=======================
Use arguments to change the border
What if you wanted to create borders that use different symbols, such as the ones below?
%%%%%%%%%%%%%%%%%%%%%%%
****************************************************
:::::::::::::::::::::::::::::::::::::::::::::::::::::::::::::::::::::::::
You could define a separate function for each of these different symbols. However, there is a more efficient way to do this. You can reuse the function you already wrote and make it more flexible, so that it works for different kinds of symbols..
A cool thing about functions is that you can give them input using arguments. You encountered this briefly in a previous codelab, when you got acquainted with main(). In this step, you will add an argument to the printBorder() function, so that it can print any border pattern that you supply.
- In
main(), at the top, create a variable calledborderfor the border pattern. This will hold text to repeat for the border.
val border = "%"- Now, pass that
bordervariable into both calls to theprintBorder()function as an argument. You do this by placingborderinside the parentheses(), just like when you supplied text forprintln()to print.
Your main() function should look like the code below.
fun main() {
    val border = "%"
    printBorder(border)
    println("Happy Birthday, Jhansi!")
    printBorder(border)
}
The printBorder() function is going to take the value of this border as an input and figure out how to print out the full border.
- Run your code.Your code does not execute, and instead, you see error icons next to your code.
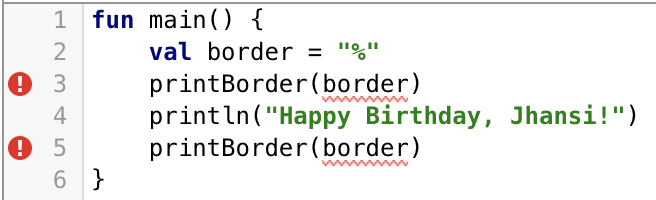
- Look at the Problems view, and there is an error message.
As before, the message indicates where the error is, and gives you a hint as to what it might be. The important part is: Too many arguments for public fun printBorder(). You are calling the printBorder() function and passing a border as input. However, the printBorder() function definition does not accept any input at the moment.
- Fix this error by adding an argument for the border to the
printBorder()function definition. See the first line of code as shown below.
fun printBorder(border: String) {
    repeat(23) {
        print("=")
    }
    println()
}- Notice that the name of the argument is
border. - The name is followed by a colon
: - and the word
String, which is a description of what kind, or type, of argument this is.
A String is a piece of text made up of characters surrounded by quotes. You can think of it as beads lined up on a string to form a necklace, like, characters lined up to form words and text. Specifying that the argument has to be a String helps the system enforce that your argument is text, and not, for example, a number.
- Run your code. The
printBorder()function now accepts a borderStringas input. And the code inmain()callsprintBorder(border)withborderas the argument. Your code should run without errors. - Look at the output of your program in the Console and it still shows the same border as before?
=======================
Happy Birthday, Jhansi!
=======================
This is not the intended behavior! You tried to make a border with the "%" symbol, but the program is still printing a border with the "=" symbol. In the next steps, you will investigate why this is happening.
- In the editor, notice a grayed exclamation mark. This icon indicates a warning. Warnings are about issues with your code that you need to pay attention to, but they don't keep your code from running.
- Switch to the Problems view and read the warning. It says
"Parameter 'border' is never used."This warning explains the problem with the output. You are passing a new string for the border to the function, but you are not using it for printing.
- Change the
printBorder()function to use the passed inborderinstead of printing the "=". This works exactly the same as ifborderwas a variable that you defined inside the function!
fun printBorder(border: String) {
    repeat(23) {
        print(border)
    }
    println()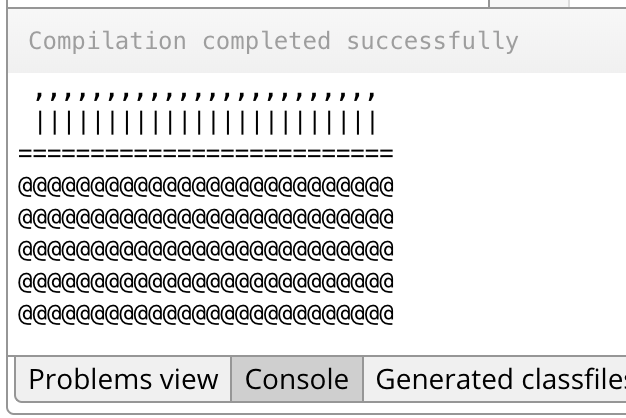
}- Run your code again. The output should look like what's below.
%%%%%%%%%%%%%%%%%%%%%%%
Happy Birthday, Jhansi!
%%%%%%%%%%%%%%%%%%%%%%%
Great job, you fixed the problem! Here is your finished code.
fun main() {
    val border = "%"
    printBorder(border)
    println("Happy Birthday, Jhansi!")
    printBorder(border)
}

fun printBorder(border: String) {
    repeat(23) {
        print(border)
    }
    println()
}
You made the printBorder() function a lot more flexible, without adding much more code. Now you can print a border of different symbols with just a small change.
- [Optional] By changing only a single line of code in the
main()function, how would you print birthday banners like this?
***********************
Happy Birthday, Jhansi!
***********************
:::::::::::::::::::::::
Happy Birthday, Jhansi!
:::::::::::::::::::::::
Modify a function to have two arguments
What if you wanted to use a different pattern that was longer than 1 character, say "`-._,-'". You would not repeat this pattern 23 times as it would be way too long. You could repeat it maybe 4 times. To accomplish this, you could change the number of repetitions in the repeat() statement of printBorder(). However, you can do something better!
You can define a fancier border based on two things:
- The pattern to repeat (which you already have done)
- The number of times you want to repeat the pattern
You can create variables for each, the pattern and the number of repetitions, and then pass both pieces of information into the printBorder() function.
- In
main(), change the border to be the"`-._,-'"pattern.
val border = "`-._,-'"- Run your code, and notice that the pattern is now way too long.
- In
main(), below the definition ofborder, create a new variable namedtimesToRepeatfor the number of repetitions. Set its value to 4.
val timesToRepeat = 4- In
main(), when callingprintBorder(), add the number of repetitions as a second argument. Separate the two arguments with a comma.
printBorder(border, timesToRepeat)The main() function should now look like this:
fun main() {
    val border = "`-._,-'"
    val timesToRepeat = 4
    printBorder(border, timesToRepeat)
    println("Happy Birthday, Jhansi!")
    printBorder(border, timesToRepeat)
}
As before, this code gives you an error, because you have more arguments calling printBorder() than in the definition of printBorder().
- Fix
printBorder()to also accept the number of repetitions as input. Add a comma after the argument, followed by the additional argument:timesToRepeat: Int.The first line of your function definition now looks like shown below.
fun printBorder(border: String, timesToRepeat: Int) {Notice:
- The comma separates the two arguments.
timesToRepeatis the name of the argument,- followed by a colon : symbol,
- and the type:
Int. timesToRepeatis a number, so instead of making it of typeString, you need to make it of typeInt, which is short for an integer, a whole number.
- Inside
printBorder(), changerepeatto use thetimesToRepeatargument (instead of the number 23). YourprintBorder()code should look like this.
fun printBorder(border: String, timesToRepeat: Int) {
    repeat(timesToRepeat) {
        print(border)
    }
    println()
}- Run your code. And the output looks as shown below.
`-._,-'`-._,-'`-._,-'`-._,-'
Happy Birthday, Jhansi!
`-._,-'`-._,-'`-._,-'`-._,-'
- To make this output perfect, insert two spaces at the beginning of the Happy Birthday message. Then your output will be as shown below.
`-._,-'`-._,-'`-._,-'`-._,-'
  Happy Birthday, Jhansi!
`-._,-'`-._,-'`-._,-'`-._,-'
Here is the final code for your banner:
fun main() {
    val border = "`-._,-'"
    val timesToRepeat = 4
    printBorder(border, timesToRepeat)
    println("  Happy Birthday, Jhansi!")
    printBorder(border, timesToRepeat)
}

fun printBorder(border: String, timesToRepeat: Int) {
    repeat(timesToRepeat) {
        print(border)
    }
    println()
}
Congratulations! With functions, arguments, variables, and a repeat loop, you have learned fundamental building blocks that are used in almost all programs.
Take a break, and then tackle the next task below, where you will create more functions and loops, and you will gain the power to build a gigantic cake with the right number of candles with just a few lines of programming.
In this task, you are going to upgrade the birthday cake code to always be the right size with the right number of candles for any age.
- You will create a total of three functions for drawing a layered cake with candles.
- You will use a
repeat()inside anotherrepeat(), creating what's called a "nested loop". - The way you will build up this code is how you can build up any program, starting with the big picture and adding detail. This is called "top-down development".
- The instructions are not as detailed for this practice, and you can refer to the finished code if you get stuck.
Here is a picture of the cake you will be baking:
And here are the instructions.
Create the main function
- Reset your code in the editor to the
Hello, world!program. - You can remove the argument to
main(), because you won't be using it. - In
main(), create a variableageand set it to 24. - In
main(), create a second variablelayersand set it to 5. - In
main(), call a functionprintCakeCandles()and pass in theage. This will leave you with an error, because you have not created that function yet. - Samewise, call a function
printCakeTop()and also pass in theage. - Finally, call a function
printCakeBottom()and pass in theageand also the number oflayers. - To get rid of the errors, comment out the three function calls by adding
//at the beginning of each line, as shown below. This technique allows you to draft your code without triggering errors. - Run your program, and it should have no errors and do nothing.
Your main() function should look like the code below.
fun main() {
    val age = 24
    val layers = 5
    // printCakeCandles(age)
    // printCakeTop(age)
    // printCakeBottom(age, layers)
}
Create printCakeTop()
The printCakeTop() function to print the top of the cake, a line of equal signs, is almost the same as the printBorder() function you created earlier in this codelab.
==========================
- Below the
main()function, add a blank line, and then create a function,printCakeTop()that takes one argument,age, of typeInt. - Inside, use a
repeat()statement to print one equal signagetimes plus 2. The extra two equals signs are so that the candles won't fall off the side of the cake. - At the end, when the
repeat()is done, print an empty line. - In
main(), remove the two//symbols from the beginning of the line of code forprintCakeTop(), because the function now exists.
printCakeTop(age)Here is your finished function.
fun printCakeTop(age: Int) {
    repeat(age + 2) {
        print("=")
    }
    println()
}- Run your code to see the top of the cake.
Create printCakeCandles()
Each candle is made up of two symbols. An comma , for the flame, and a vertical line | for the candle body.
,,,,,,,,,,,,,,,,,,,,,,,,
||||||||||||||||||||||||
To accomplish this in one function, put two repeat() statements, one for the flames and one for the bodies, into your function.
- Below the
main()function and theprintCakeTop()function, create a new function,printCakeCandles()that takes one argument,age, of typeInt. - Inside, use a
repeat()statement to print one comma,for the flame. - Repeat this
agetimes. - At the end, print an empty line.
- Add a
print()statement to print one space for insetting the candles. - Below, repeat the steps to create a second
repeat()statement to print the candle bodies with a vertical line |. - In
main(), remove the two//symbols from the beginning of the line of code forprintCakeCandles().
printCakeCandles(age)- Run your code to see the top of the cake and the candles
Solution:
fun printCakeCandles(age: Int) {
    print (" ")
    repeat(age) {
        print(",")
    }
    println() // Print an empty line

    print(" ") // Print the inset of the candles on the cake
    repeat(age) {
        print("|")
    }
    println()
}
Create printCakeBottom()
In this function, you are drawing a cake bottom that is as wide as age + 2, and you draw it for a height of a given number of layers.
@@@@@@@@@@@@@@@@@@@@@@@@@@
@@@@@@@@@@@@@@@@@@@@@@@@@@
@@@@@@@@@@@@@@@@@@@@@@@@@@
@@@@@@@@@@@@@@@@@@@@@@@@@@
@@@@@@@@@@@@@@@@@@@@@@@@@@
- This means your function needs two arguments, one for the width (
age) and one for the height (layers). - To print the bottom of the cake, you first repeat the 'at' @ symbol
age + 2times to print one layer. Then, you repeat printing one layerlayerstimes.
Repeat drawing layers
Draw the at symbol age+2 times to create a layer
- Below the existing functions, create a function
printCakeBottom()with two arguments,ageandlayers, both of typeInt. - Inside the function, use a
repeat()statement to print one layer of 'at'@symbolsage + 2times. Finish by printing an empty line, as shown below.
fun printCakeBottom(age: Int, layers: Int) {
    repeat(age + 2) {
        print("@")
    }
    println()
}- Run your code to verify that it prints one line of cake bottom.
 ,,,,,,,,,,,,,,,,,,,,,,,,
 ||||||||||||||||||||||||
==========================
@@@@@@@@@@@@@@@@@@@@@@@@@@
Nested repeat() statements
To print multiple identical layers of cake bottom, you could say:
For layer 1 repeat the symbol 12 times: @@@@@@@@@@@@
For layer 2 repeat the symbol 12 times: @@@@@@@@@@@@
For layer 3 repeat the symbol 12 times: @@@@@@@@@@@@
Or you can say this much more concisely as:
Repeat for three layers:
Repeat the symbol 12 times.
@@@@@@@@@@@@
@@@@@@@@@@@@
@@@@@@@@@@@@
Now, this is something neat you can do with repeat() statements. You can put one repeat() statement inside another repeat() statement. So you could create a repeat() statement within a repeat() statement to print the symbol a certain number of times for a certain number of layers.
Let's do that for printing cake layers.
- Put a second
repeat()statement around all of the code inside the function. Repeat this looplayerstimes. - In
main(), remove only the two//from the line of code forprintCakeBottom().
printCakeBottom(age, layers)- Run your code to see the whole cake.
Solution for printCakeBottom().
fun printCakeBottom(age: Int, layers: Int) {
    repeat(layers) {
        repeat(age + 2) {
            print("@")
        }
        println()
    }
}
Congratulations! You've just finished a pretty complex program with several functions and a nested repeat statement. And your cake will always have the right number of candles!
The final output of your program should be:
 ,,,,,,,,,,,,,,,,,,,,,,,,
 ||||||||||||||||||||||||
==========================
@@@@@@@@@@@@@@@@@@@@@@@@@@
@@@@@@@@@@@@@@@@@@@@@@@@@@
@@@@@@@@@@@@@@@@@@@@@@@@@@
@@@@@@@@@@@@@@@@@@@@@@@@@@
@@@@@@@@@@@@@@@@@@@@@@@@@@
Solution code
fun main() {
    val age = 24
    val layers = 5
    printCakeCandles(age)
    printCakeTop(age)
    printCakeBottom(age, layers)
}

fun printCakeCandles(age: Int) {
    print (" ")
    repeat(age) {
          print(",") // Print an empty line
    }
    println()

    print(" ") // Print the inset of the candles on the cake
    repeat(age) {
        print("|")
    }
    println()
}

fun printCakeTop(age: Int) {
    repeat(age + 2) {
        print("=")
    }
    println()
}

fun printCakeBottom(age: Int, layers: Int) {
    repeat(layers) {
        repeat(age + 2) {
            print("@")
        }
        println()
    }
}- Use
${}to surround variables and calculations in the text of print statements. For example:${age}whereageis a variable. - Create a variable using the
valkeyword and a name. Once set, this value cannot be changed. Assign a value to a variable using the equal sign. Examples of values are text and numbers. - A
Stringis text surrounded by quotes, such as"Hello". - An
Intis a whole positive or negative number, such as 0, 23, or -1024. - You can pass one or more arguments into a function for the function to use, for example:
fun printCakeBottom(age:Int, layers:Int) {} - Use a
repeat() {}statement to repeat a set of instructions several times. For example:repeat (23) { print('%") }orrepeat (layers) { print("@@@@@@@@@@") } - A loop is an instruction to repeat instructions multiple times. A
repeat()statement is an example of a loop. - You can nest loops, that is, put loops within loops. For example, you can create a
repeat()statement within arepeat()statement to print a symbol a number of times for a number of rows, like you did for the cake layers.
Summary of using function arguments: To use arguments with a function, you need to do three things:
- Add the argument and type to the function definition:
printBorder(border: String) - Use the argument inside the function:
println(border) - Supply the argument when you call the function:
printBorder(border)
Here is the official documentation for the Kotlin concepts you learned in this codelab.
If the browser-based Kotlin programming tool is not executing your code or gives you an error such as the one below, you can try the following.
- Reload the page using SHIFT-Reload.
- Wait a minute, then try again.
