
This is the first walkthrough in the Classroom add-ons walkthrough series.
In this walkthrough, you lay the groundwork for developing a web application and publishing it as a Classroom add-on. Future walkthrough steps expand this app.
In the course of this walkthrough you complete the following:
- Create a new Google Cloud project for your add-on.
- Create a skeleton web app with placeholder sign-in buttons.
- Publish a Google Workspace Marketplace Store Listing for your add-on.
Once finished, you can install your add-on and load it in the Classroom add-ons iframe.
Prerequisites
Choose a language to see the appropriate prerequisites:
Python
Our Python example uses the Flask framework. You can download the complete
source code for all walkthroughs from the Overview page. The code for this
particular walkthrough can be found in the /flask/01-basic-app/ directory.
If necessary, install Python 3.7+ and ensure that pip is available.
python -m ensurepip --upgradeWe also recommend that you set up and activate a new Python virtual environment.
python3 -m venv .classroom-addon-envsource .classroom-addon-env/bin/activate
Each walkthrough subdirectory in the downloaded examples contains a
requirements.txt. You can quickly install the required libraries using
pip. Use the following to install the required libraries for this
walkthrough.
cd flask/01-basic-apppip install -r requirements.txt
Node.js
Our Node.js example uses the Express framework. You can download the complete source code for all walkthroughs from the Overview page.
If necessary, install NodeJS v16.13+.
Install required node modules using npm.
npm installJava
Our Java example uses the Spring Boot framework. You can download the complete source code for all walkthroughs from the Overview page.
Install Java 11+ if you don't already have it installed on your machine.
Spring Boot applications can use Gradle or Maven to handle builds and manage dependencies. This example includes the Maven wrapper that ensures a successful build without requiring you to install Maven itself.
To be able to run our provided example, run the following commands in the directory where you downloaded the project to ensure you have the prerequisites to run the project.
java --version./mvnw --version
Or on Windows:
java -versionmvnw.cmd --version
Set up a Google Cloud project
Access to the Classroom API and the required authentication methods are controlled by Google Cloud projects. The following instructions lead you through the minimum steps to create and configure a new project for use with your add-on.
Create the project
Create a new Google Cloud project by visiting the project creation page. You can provide any name for the new project. Click Create.
It takes a few moments for the new project to be fully created. Once done, be sure to select the project; you can choose it in the project selector drop-down menu at top of the screen, or click SELECT PROJECT in the notifications menu at the top-right.

Attach the Google Workspace Marketplace SDK to the Google Cloud project
Navigate to the API Library browser. Search for
Google Workspace Marketplace SDK. You should see the SDK appear in the list of
results.

Select the Google Workspace Marketplace SDK card, then click Enable.
Configure the Google Workspace Marketplace SDK
Google Workspace Marketplace provides the listing through which users and administrators install your add-on. Configure the Marketplace SDK's App Configuration and Store Listing and the OAuth Consent Screen to proceed.
App Configuration
Navigate to the Marketplace SDK's App Configuration page. Provide the following information:
Set the App Visibility to
PublicorPrivate.- The public setting is intended for apps that will eventually be released to end users. A public app must undergo an approval process before it is published to end users, but you can specify users that can install and test it as a Draft. This is a pre-publication state that will allow you to test and develop your add-on before sending it for approval.
- The private setting is suitable for internal testing and development. A private app can only be installed by users in the same domain as the project was created. You should therefore set visibility to private only if the project was created in a domain with a Google Workspace for Education subscription, or else your test users will be unable to launch Classroom add-ons.
Set Installation Settings to
Admin Only installif you want to restrict the installation to domain administrators.Under App Integration, select Classroom add-on. You're prompted for the secure Attachment Setup URI; this is the URL that you expect to be loaded when a user opens your add-on. For the purposes of this walkthrough, this should be
https://<your domain>/addon-discovery.The Allowed Attachment URI Prefixes are used to validate the URIs set in
AddOnAttachmentusing thecourses.*.addOnAttachments.createand thecourses.*.addOnAttachments.patchmethods. The validation is a literal string prefix match and doesn't allow for the use of wild cards at this time. Add at least the root domain of your content server, such ashttps://localhost:5000/orhttps://cdn.myedtech.com/.Add the same OAuth Scopes as provided in your OAuth consent screen in the previous step.
Complete the fields as appropriate for your organization under Developer Links.
Store Listing
Navigate to the Marketplace SDK's Store Listing page. Provide the following information:
- Under App Details, add a language or expand the drop-down next to the language already listed. Provide an Application Name and descriptions; these appear on your add-on's Google Workspace Marketplace store listing page. Click Done to save.
- Choose a Category for your add-on.
- Under Graphics Assets, provide images for the required fields. These can be changed later, and can be placeholders for now.
- Under Support Links, provide the requested URLs. These can be placeholders if you set the App Visibility to Private in the previous step.
If you set the App Visibility to Private in the previous step, click PUBLISH; your app is immediately available for installation. If you set the App Visibility to Public, add email addresses in the Draft Testers area for any test users and click Save Draft.
OAuth Consent Screen
The OAuth Consent Screen appears when users first authorize your app. It prompts them to allow your app to access their personal and account information, as dictated by the scopes that you enable.
Navigate to the OAuth consent screen creation page. Provide the following information:
- Set User Type to External. Click Create.
- In the next page, fill in the required app details and contact information. Provide any domains that host your app under Authorized Domains. Click SAVE AND CONTINUE.
Add any OAuth Scopes that your web app requires. See the OAuth configuration guide for an in-depth discussion of scopes and their purpose.
You must request at least one of the following scopes in order for Google to send the
login_hintquery parameter. A more detailed explanation of this behavior is available in our OAuth configuration guide:https://www.googleapis.com/auth/userinfo.email(already included)https://www.googleapis.com/auth/userinfo.profile(already included)
The following scopes are specific to Classroom add-ons:
https://www.googleapis.com/auth/classroom.addons.teacherhttps://www.googleapis.com/auth/classroom.addons.student
Also include any other Google API scopes that your app requires from end users.
Click SAVE AND CONTINUE.
List the email addresses of any testing accounts on the Test users page. Click SAVE AND CONTINUE.
Confirm that your settings are correct, then return to the dashboard.
Install the add-on
You can now install your add-on using the link at the top of the Marketplace SDK's Store Listing page. Click View In Marketplace at the top of the page to see the listing, then choose Install.
Build a basic web app
Set up a skeleton web application with two routes. Future walkthrough steps
expand this application, so for now just create a landing page for the add-on
/addon-discovery and a mock index page / for our "company site."
Implement these two endpoints:
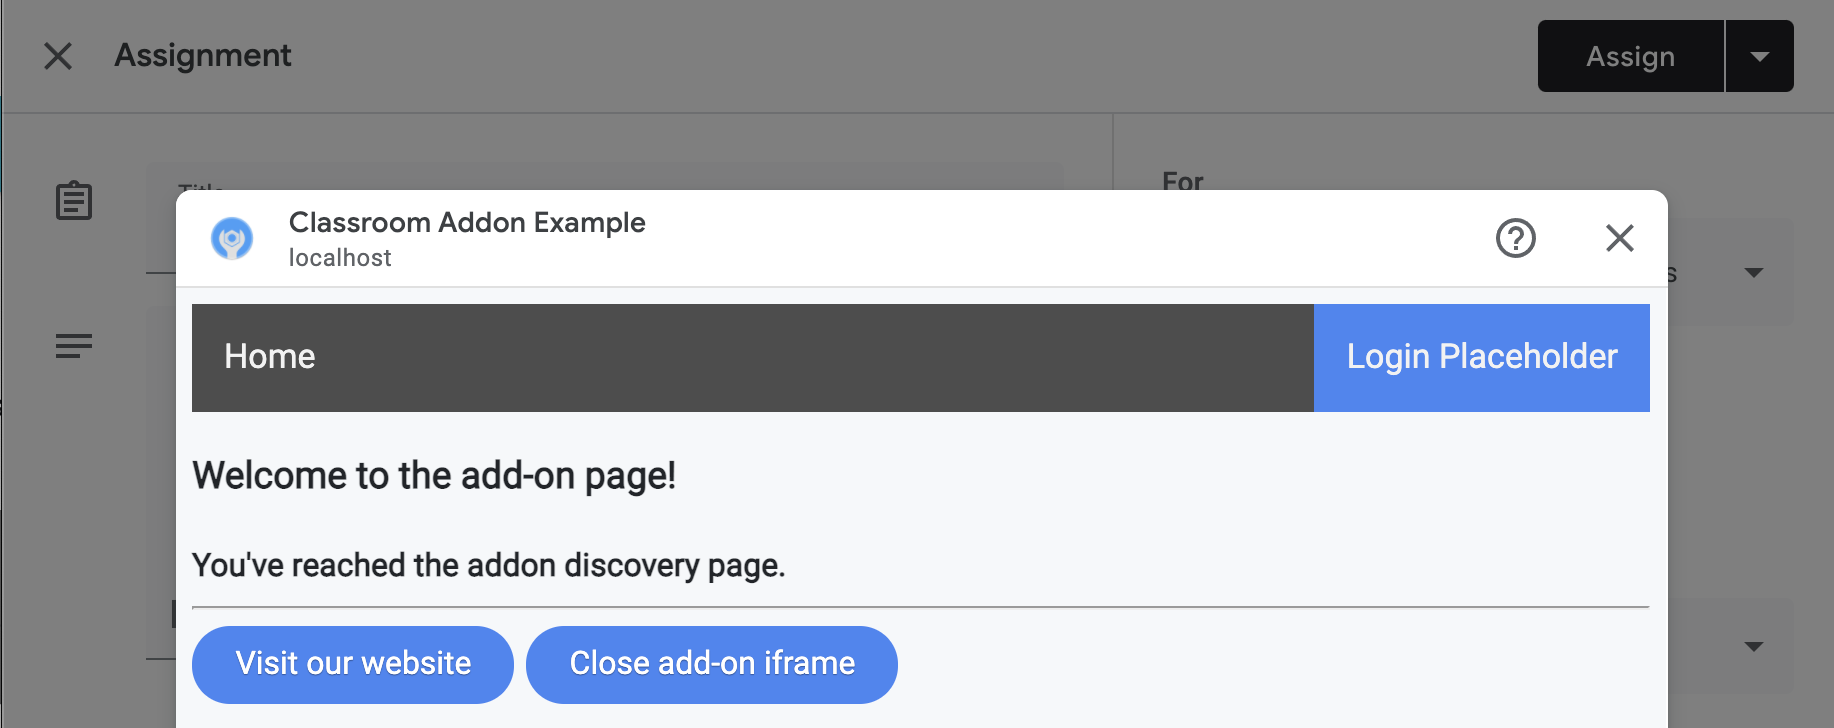
/: displays a welcome message and a button to close both the current tab and the add-on iframe./addon-discovery: displays a welcome message and two buttons: one to close the add-on iframe and one to open a website in a new tab.
Note that we're adding buttons to create and close windows or the iframe. These demonstrate a method for safely popping the user into a new tab for authorization in the next walkthrough.
Create utility script
Create a static/scripts directory. Create a new file addon-utils.js. Add the
following two functions.
/**
 *   Opens a given destination route in a new window. This function uses
 *   window.open() so as to force window.opener to retain a reference to the
 *   iframe from which it was called.
 *   @param {string} destinationURL The endpoint to open, or "/" if none is
 *   provided.
 */
function openWebsiteInNewTab(destinationURL = '/') {
  window.open(destinationURL, '_blank');
}

/**
 *   Close the iframe by calling postMessage() in the host Classroom page. This
 *   function can be called directly when in a Classroom add-on iframe.
 *
 *   Alternatively, it can be used to close an add-on iframe in another window.
 *   For example, if an add-on iframe in Window 1 opens a link in a new Window 2
 *   using the openWebsiteInNewTab function, you can call
 *   window.opener.closeAddonIframe() from Window 2 to close the iframe in Window
 *   1.
 */
function closeAddonIframe() {
  window.parent.postMessage({
    type: 'Classroom',
    action: 'closeIframe',
  }, '*');
};
Create routes
Implement the /addon-discovery and / endpoints.
Python
Set up the application directory
For the purposes of this example, structure the application logic as a
Python module. This is the webapp directory in our provided example.
Create a directory for the server module, webapp for example. Move the
static directory into the module directory. Create a template directory
in the module directory as well; your HTML files go here.
Build the server module*
Create the __init__.py file in your module directory and add the following
imports and declarations.
from flask import Flask
import config

app = Flask(__name__)
app.config.from_object(config.Config)

# Load other module script files. This import statement refers to the
# 'routes.py' file described below.
from webapp import routes
Then create a file to handle the web app's routes. This is
webapp/routes.py in our provided example. Implement the two routes in this
file.
from webapp import app
import flask

@app.route("/")
def index():
    return flask.render_template("index.html",
                                message="You've reached the index page.")

@app.route("/classroom-addon")
def classroom_addon():
    return flask.render_template(
        "addon-discovery.html",
        message="You've reached the addon discovery page.")
Note that our routes both pass a message variable to their respective
Jinja templates. This is useful to identify which page the user has reached.
Create configuration and launch files
In your application's root directory, create the main.py and config.py
files. Configure your secret key in config.py.
import os

class Config(object):
    # Note: A secret key is included in the sample so that it works.
    # If you use this code in your application, replace this with a truly secret
    # key. See https://flask.palletsprojects.com/quickstart/#sessions.
    SECRET_KEY = os.environ.get(
        'SECRET_KEY') or "REPLACE ME - this value is here as a placeholder."
In your main.py file, import your module and start the Flask server.
from webapp import app

if __name__ == "__main__":
    # Run the application over HTTPs with a locally stored certificate and key.
    # Defaults to https://localhost:5000.
    app.run(
        host="localhost",
        ssl_context=("localhost.pem", "localhost-key.pem"),
        debug=True)
Node.js
Routes are registered in the app.js file with the following lines.
const websiteRouter = require('./routes/index');
const addonRouter = require('./routes/classroom-addon');

app.use('/', websiteRouter);
app.use('/addon-discovery', addonRouter);
Open /01-basic-app/routes/index.js and review the code. This route is
reached when the end-user visit's the company website. The route renders a
response using the index Handlebars template and passes the template a
data object containing title and message variables.
router.get('/', function (req, res, next) {
  res.render('index', {
    title: 'Education Technology',
    message: 'Welcome to our website!'
  });
});
Open the second route /01-basic-app/routes/classroom-addon.js and review
the code. This route is reached when the end-user visit's the add-on. Notice
that this route uses the discovery Handlebars template and additionally
the addon.hbs layout to render the page differently than the company
website.
router.get('/', function (req, res, next) {
  res.render('discovery', {
    layout: 'addon.hbs',
    title: 'Education Technology Classroom add-on',
    message: `Welcome.`
  });
});
Java
The Java code example uses modules to package the sequential walkthrough
steps. Since this is the first walkthrough, the code is under the
step_01_basic_app module. it's not expected that you implement your
project using modules; rather, we suggest that you build on a single project
as you follow each step in the walkthrough.
Create a controller class, Controller.java in this example project, to
define the endpoints. In this file, import the @GetMapping annotation from
the spring-boot-starter-web dependency.
import org.springframework.web.bind.annotation.GetMapping;
Include the Spring framework controller annotation above the class definition to indicate the purpose of the class.
@org.springframework.stereotype.Controller
public class Controller {
Then implement the two routes and an additional route for error handling.
/** Returns the index page that will be displayed when the add-on opens in a
*   new tab.
*   @param model the Model interface to pass error information that's
*   displayed on the error page.
*   @return the index page template if successful, or the onError method to
*   handle and display the error message.
*/
@GetMapping(value = {"/"})
public String index(Model model) {
  try {
    return "index";
  } catch (Exception e) {
    return onError(e.getMessage(), model);
  }
}

/** Returns the add-on discovery page that will be displayed when the iframe
*   is first opened in Classroom.
*   @param model the Model interface to pass error information that's
*   displayed on the error page.
*   @return the addon-discovery page.
*/
@GetMapping(value = {"/addon-discovery"})
public String addon_discovery(Model model) {
  try {
    return "addon-discovery";
  } catch (Exception e) {
    return onError(e.getMessage(), model);
  }
}

/** Handles application errors.
*   @param errorMessage message to be displayed on the error page.
*   @param model the Model interface to pass error information to display on
*   the error page.
*   @return the error page.
*/
@GetMapping(value = {"/error"})
public String onError(String errorMessage, Model model) {
  model.addAttribute("error", errorMessage);
  return "error";
}
Test the add-on
Launch your server. Then, sign in to Google Classroom as one of your Teacher test users. Navigate to the Classwork tab and create a new Assignment. Select your add-on from the Add-ons picker. The iframe opens and the add-on loads the Attachment Setup URI that you specified in the Marketplace SDK's App Configuration page.
Congratulations! You're ready to proceed to the next step: signing in users with Google SSO.