
This page includes the information you need to know about creating and configuring Google Cloud projects for Classroom add-ons. Google Cloud projects are used to implement Google Single Sign-On through OAuth 2.0 (Google SSO), to authorize requests made by your add-on, and to manage an add-on's listing in the Google Workspace Marketplace store.
For more general information about publishing an add-on to Marketplace see Publish an app.
Google Cloud project creation
There are two types of projects to create: a private project used for development and a public project reachable by end users. The "public" and "private" labels refer to the visibility of your application in Google Workspace Marketplace; a private Marketplace application can only be installed by users within the domain in which it was created, while a public Marketplace application is available to any Google Workspace domain. These must be two separate applications, as a project can't be both public and private. Public applications must be reviewed and approved before they're available in the marketplace.
For general Google Cloud project creation information visit Create a Google Cloud project.
Create a public Google Cloud project
This project represents the add-on application that's accessible by administrators, teachers, and students. A public project must be reviewed and approved by the Google Workspace Marketplace team before it can be launched or installed.
Create a new Google Cloud project in your production domain.
Enable the Classroom API in your Cloud project.
Enable the Google Workspace Marketplace SDK in your Cloud project.
Set the Marketplace SDK App Configuration App Visibility to Public and check the Unlisted box.
Complete the required fields in the Marketplace SDK Store Listing page and click PUBLISH.
Your app will be reviewed by the Google Workspace Marketplace team. They will communicate with you using the developer email address specified in the Marketplace SDK. After the app has been approved, clear the Unlisted box so that teachers and administrators can find it in the Marketplace.
Create a private Google Cloud project
This private project represents the add-on application used for development. It's not accessible to users outside of the domain in which it was created, but it doesn't need to be approved before installation. Google therefore recommends using this project to develop and test your add-on in a controlled environment.
You need access to a Google Workspace for Education domain with the Teaching & Learning or Plus license to create a private project. If you don't already have access to such a domain, follow these steps to set up a Google Workspace for Education demo domain, upgrade it to a Plus license, and allow it to access the Classroom add-ons API:
- Complete the steps to get a developer test domain.
While signed in as an administrator in the demo domain, create a new Google Cloud project.
If you cannot access the Google Cloud console or create Cloud projects, check the following in the Admin console:
- Visit the Account settings > Age-based access settings page and select the option for All users in this group or org unit are 18 or older.
- Under Apps > Additional Google services:
- Google Cloud Platform is ON for everyone.
- Project Creation Settings are Allow users to create projects.
- Cloud Shell Access Settings are Allow access to Cloud Shell.
Complete and submit the demo domain upgrade request form. Submitting this form requests that Google upgrade your demo domain to Google Workspace for Education Plus with ten licenses and allows your Cloud project in to the Classroom add-ons API.
You will receive an email when the upgrade and allowlist processes are complete. Assign Plus licenses to your test teacher accounts in the Admin console. Under Directory > Users, create or select your test teacher accounts. In each teacher's Licenses, confirm that Google Workspace for Education Plus is Assigned.
Enable the Classroom API in your Cloud project.
Enable the Google Workspace Marketplace SDK in your Cloud project.
Set the Marketplace SDK App Configuration App Visibility to private.
Complete the required fields in the Marketplace SDK Store Listing page and click PUBLISH. After the app listing has been published, users in the domain can find and install the app in the Google Workspace Marketplace or by visiting the App URL shown in the Store Listing page.
OAuth 2.0
Access to the Classroom API requires user data access consent. These are obtained by requesting Google access to OAuth scopes for the signed-in user and receiving a token that can be used to subsequently make API calls to Google Classroom. Scopes must be configured in the Google Workspace Marketplace store listing so that the domain administrator can provide consent on behalf of their domain users if they install the add-on.
Because Classroom scopes are Sensitive, you must request OAuth verification before launching your add-on. Otherwise, users will see a warning message that the application is unverified, and only a small number of users will be able to access your product. See the overview of the review sequence for more information about verification.
See the OAuth Scopes for Google APIs page for a detailed list of all available scopes and their uses. See Configure OAuth page in the Workspace documentation for general OAuth configuration information.
User permissions
Your web app should request at least one of the following scopes:
https://www.googleapis.com/auth/userinfo.email, which allows an application to view the user's email address.https://www.googleapis.com/auth/userinfo.profile, which allows an application to see personal information such as portrait, first and last names, and other personal information that the user has made publicly available.
After a user has authorized one of these scopes in your add-on, they're
identified by the login_hint query parameter. This parameter is passed to any
of your web app's URLs when an iframe is opened. If a user hasn't authorized one
of these scopes, login_hint won't be sent.
login_hint is a standard OpenID Connect parameters that you can optionally
pass along to Google when using Google Sign-in or requesting an OAuth token. It
is intended to make the authorization experience smoother for the end user.
Classroom add-ons scopes
The following scopes are specific to Classroom add-ons:
https://www.googleapis.com/auth/classroom.addons.teacher, which allows access to all API methods.https://www.googleapis.com/auth/classroom.addons.student, which allows access to launch validation and attachment read operations.
Even with a valid OAuth access token denoting the user's credentials, API calls are gated by additional requirements:
- All methods require the user to be a teacher or student in the course
specified by the
courseIdin the request. - Attachment creation, update, deletion, and grade passback require the user to be a teacher.
- Calls to a specific Google Classroom post are gated by the following
checks.
- When an add-on already has at least one attachment on a post, it can
make requests for:
- iframe launch validation
- Attachment read, update, and delete operations
- Grade updates on that post
- When the Attachment Discovery iframe is first opened, the add-on might
not yet have an attachment on the post. An
addOnTokenquery parameter is provided that can be used to make requests for the following:- Creating an attachment under the post (
addOnTokenis required) - Launch validation (
addOnTokenis validated if provided and is required when the add-on doesn't have an existing attachment on the post)
- Creating an attachment under the post (
- When an add-on already has at least one attachment on a post, it can
make requests for:
OAuth verification
A Classroom add-on uses Google APIs to access Google users' data.
Refer to the OAuth API verification FAQs for more information about the verification process.
Google Workspace Marketplace listing
For general Google Workspace Marketplace SDK configuration information visit Enable and configure the Google Workspace Marketplace SDK and Create a Google Workspace Marketplace store listing.
Listing considerations
Your public Google Cloud project's Marketplace SDK Store Listing specifies your application's name and descriptions that are to end users. You can provide these details in multiple languages under App Details.
Follow these guidelines in your listings:
- Under App Details:
- Avoid punctuation in the Application Name. For example, use "My Add-on by My Company" instead of "My Company: My Add-on" or "My Add-on, by My Company".
- The Short Description and Detailed Description shouldn't contain the exact same text.
- Ensure that you have selected a value for the Pricing field. This field includes options for Free, Paid with a free trial, Paid with free features, and Paid pricing. You don't need to specify the cost amount in the Marketplace listing.
- Ensure that you have selected a value for the Category field. Academic Resources or Teacher and Admin Tools might be good choices for a Classroom add-on.
- See the items listed in Marketplace's App details description for further information.
- Under Graphics Assets:
- Any provided graphic assets are not fuzzy and meet the sizes specified in the Google Workspace Marketplace standards
- Any provided screenshots are accurate representations of your add-on experience.
- Under Support Links:
- Ensure that you have supplied a link to your application's Terms of Service.
- Ensure that you're meeting the Google API Branding guidelines, which covers allowed names and descriptions.
- If you refer to any Google products in your listing, use its name in the format provided in the Trademarks List. Ensure that you include the trademark (™) symbol if specified; use "Google Docs™", not "Google Docs".
Integrate with Google's licensing and billing services
If you're interested in letting your Google Workspace Marketplace applications integrate with Google's licensing and billing services visit Marketplace API.
Installation settings
Add-ons can allow individual installation in addition to administrator installation. This page highlights some differences between the two installation types. it's not intended to promote either installation type. You can choose whether to allow individual installation in the Google Workspace Marketplace SDK App Configuration page.
Administrator installation
Administrator installations let an administrator add an add-on to all accounts in a domain or to specific access groups or organizational units. Only a domain administrator can perform an administrator installation. The administrator can optionally consent to all access scopes on behalf of all users in the domain; users aren't prompted to consent to any access scopes if the administrator chooses to do so.
The following are some considerations regarding administrator installation.
- Tighter controls. Administrators can restrict which users can access an add-on.
- Compatibility with licensing. If your application requires a license, channeling installations through an administrator might help ensure that licenses are being distributed and used appropriately with the corresponding institution.
- Lower burden on end users. An administrator installation reduces the set up load for teachers and students. This might result in a more seamless user experience with fewer clicks and less opportunities for confusion.
See Install Marketplace apps in your domain for more information about how to perform administrator installations and How the organizational structure works to learn more about organizational units and access groups.
Individual installation
Individual installations add an add-on to the user's own account. The user is prompted to consent to the add-on's access scopes during installation.
The following are some considerations regarding individual installation.
- Facilitate adoption. More users can see and install your add-on from the Google Workspace Marketplace. Allowing individual installation may prompt more teachers to adopt or advocate for your product.
- Administrator testing. An administrator might individually install an add-on to test or evaluate it before approving or installing it for a broader group.
In addition to installing add-ons on behalf of users, administrators can also maintain an allowlist to permit users to install add-ons that allow individual installation. If an add-on isn't in the allowlist, users can still see the add-on's listing in the Google Workspace Marketplace but can't install the add-on; they instead see a message explaining that the add-on hasn't been allowed for install by a domain administrator. See Manage Google Workspace Marketplace apps on your allowlist to learn more about this behavior.
See the Google Workspace Marketplace installation settings documentation for more information.
App Integration
You must provide a launch iframe URL in the Attachment Setup URI field. This
URL is used as the iframe src value for the Attachment Discovery iframe. The
Attachment Discovery iframe is used by teachers to find content or activities to
attach to their assignment. It can be set in the Google Cloud project console.
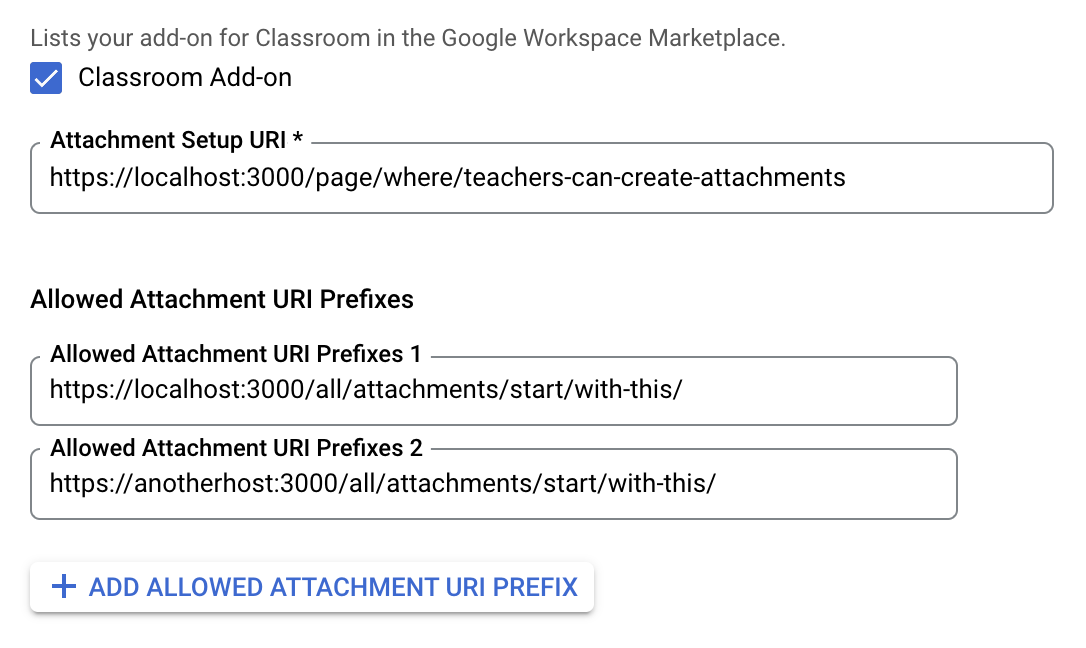
The Allowed Attachment URI Prefixes are used to validate the URIs set in an
AddOnAttachment using the *.addOnAttachments.create and
*.addOnAttachments.patch methods. The validation is a literal string prefix
match and doesn't allow for the use of wild cards.
You must also specify all URI prefixes from which attachments are allowed from your add-on. This feature increases security by preventing attachments from unauthorized sources.
Set both of these values in your Google Cloud project's Marketplace SDK App Configuration page.
Test accounts
Create test accounts on your demo domain to verify the correct behavior of your private add-on. Two student accounts are needed to test switching between students in the Student Work Review iframe.
Suggested test accounts:
- Tammy Teacher, tammy.teacher@<your demo domain>
- Sam Student, sam.student@<your demo domain>
- Sally Student, sally.student@<your demo domain>
Follow this procedure to create a new test account:
- Login to your Admin console.
- Navigate to Users.
- Click Add new user (see Figure 1).
- Enter the user's information and assign proper roles.
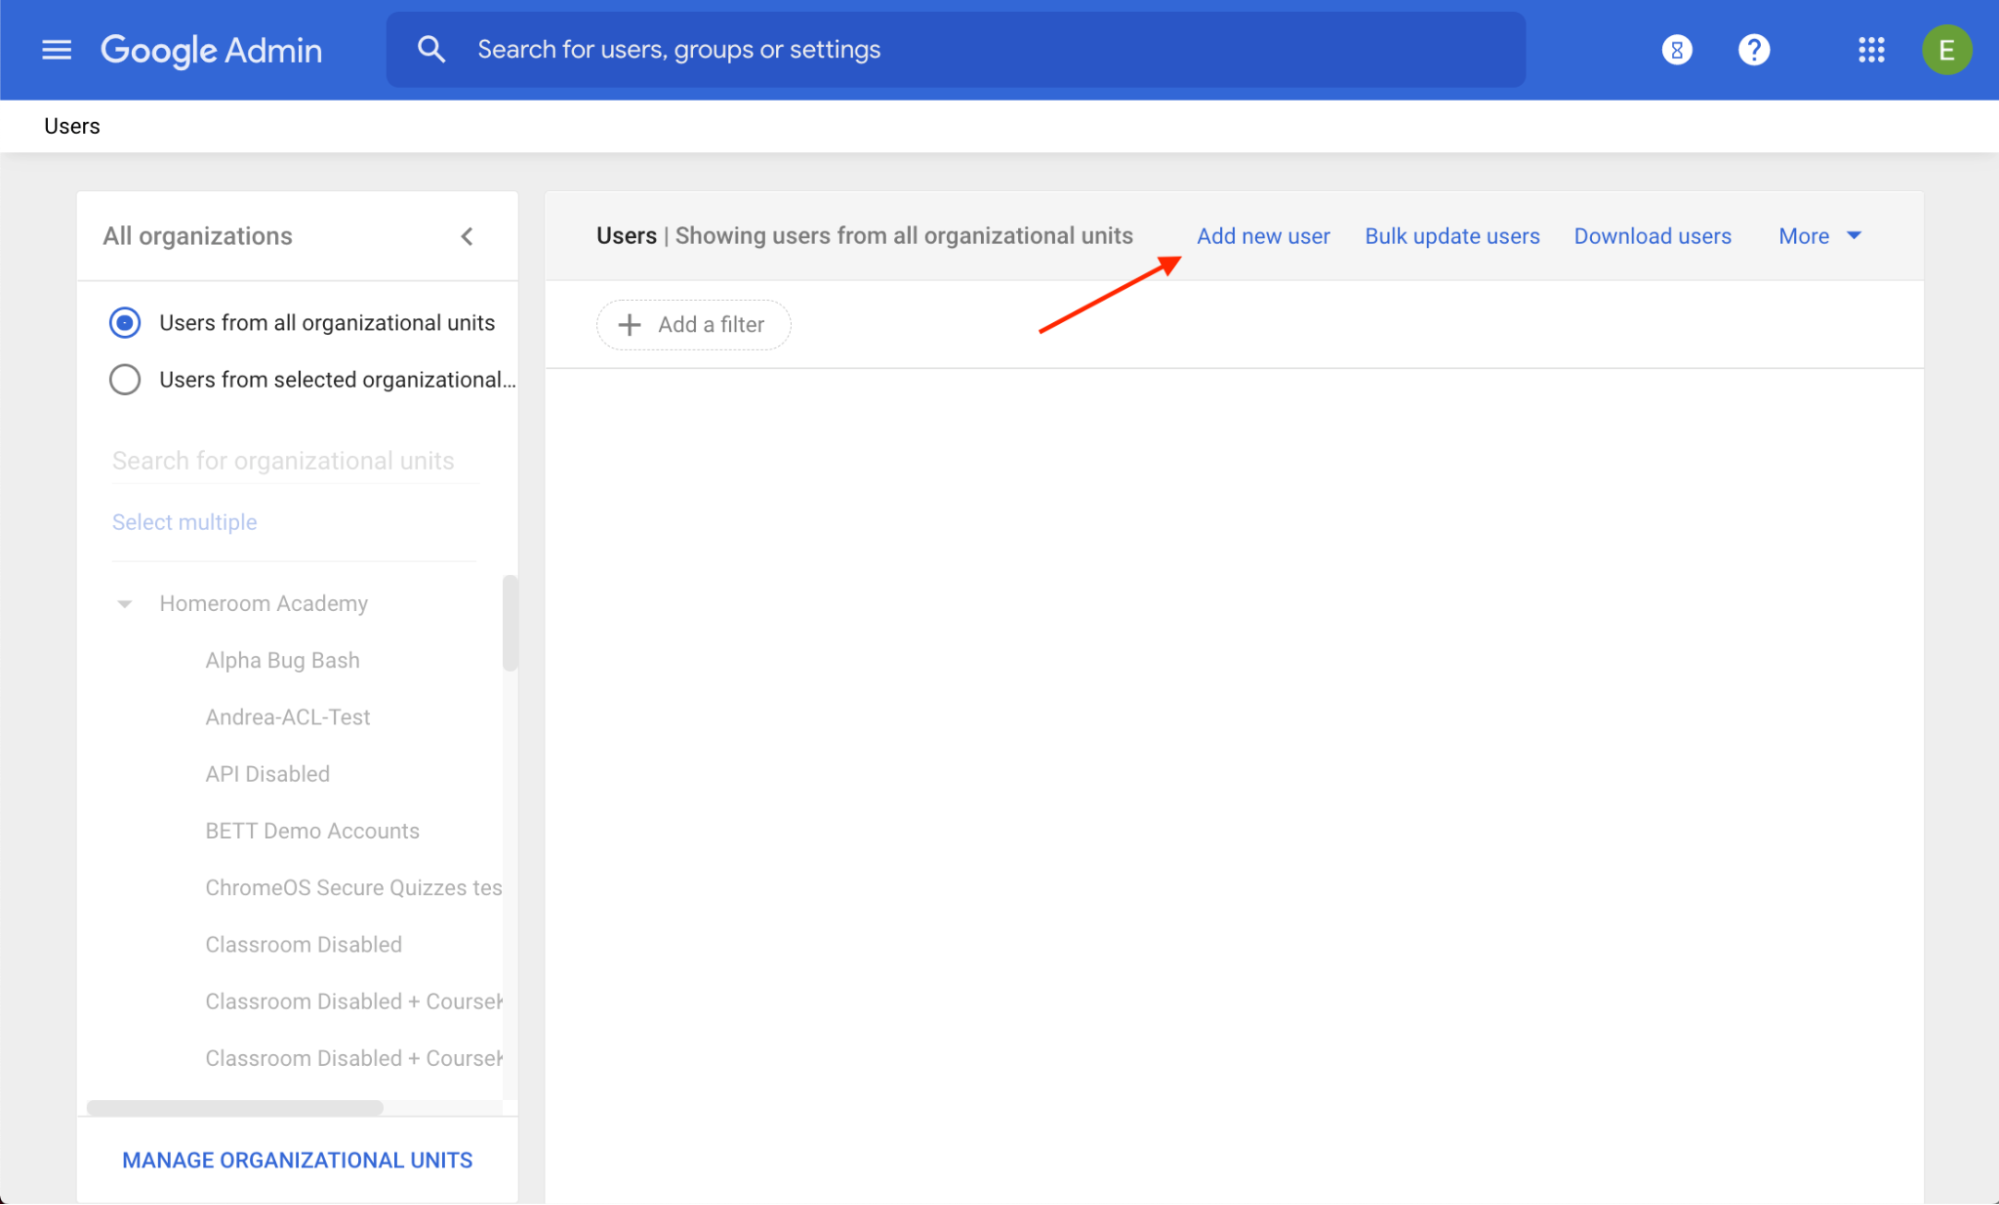 Figure 1. Location of the Add new user link within
the Admin console.
Figure 1. Location of the Add new user link within
the Admin console.
Follow this procedure to create a new test group:
- Login to your Admin console.
- Navigate to Groups.
- Click Create group (see Figure 2).
- Enter the group's members and owners.
 Figure 2. Location of the Create group link within
the Admin console.
Figure 2. Location of the Create group link within
the Admin console.