
This is the fourth walkthrough in the Classroom add-ons walkthrough series.
In this walkthrough, you interact with the Google Classroom API to create attachments. You provide routes for users to view the attachment content. The views differ depending on the user's role in the class. This walkthrough covers content-type attachments, which don't require a student submission.
In the course of this walkthrough you complete the following:
- Retrieve and use the following add-on query parameters:
addOnToken: An authorization token passed to the Attachment Discovery View.itemId: A unique identifier for the CourseWork, CourseWorkMaterial or Announcement that receives the add-on attachment.itemType: Either "courseWork", "courseWorkMaterials" or "announcement".courseId: A unique identifier for the Google Classroom course in which the assignment is being created.attachmentId: A unique identifier assigned by Google Classroom to an add-on attachment after creation.
- Implement persistent storage for content-type attachments.
- Provide routes to create attachments and to serve the Teacher View and Student View iframes.
- Issue the following requests to the Google Classroom add-ons API:
- Create a new attachment.
- Get the add-on context, which identifies whether the logged-in user is a student or teacher.
Once finished, you can create content-type attachments on assignments through the Google Classroom UI when logged in as a teacher. Teachers and students in the class can also view the content.
Enable the Classroom API
Make calls to the Classroom API beginning with this step. The API must be enabled for your Google Cloud project before you can make calls to it. Navigate to the Google Classroom API library entry and choose Enable.
Handle the Attachment Discovery View query parameters
As previously discussed, Google Classroom passes query parameters when loading the Attachment Discovery View in the iframe:
courseId: The ID of the current Classroom course.itemId: A unique identifier for the CourseWork, CourseWorkMaterial or Announcement that receives the add-on attachment.itemType: Either "courseWork", "courseWorkMaterials" or "announcement".addOnToken: A token used to authorize certain Classroom add-on actions.login_hint: The Google ID of the current user.
This walkthrough addresses courseId, itemId, itemType and addOnToken.
Retain and pass these when issuing calls to the Classroom API.
As in the previous walkthrough step, store the passed query parameter values in our session. It's important that we do so when the Attachment Discovery View is first opened, as this is the only opportunity for Classroom to pass these query parameters.
Python
Navigate to your Flask server file that provides routes for the Attachment
Discovery View (attachment-discovery-routes.py if you're following our
provided example). At the top of your add-on landing route
(/classroom-addon in our provided example), retrieve and store the
courseId, itemId, itemType and addOnToken query parameters.
# Retrieve the itemId, courseId, and addOnToken query parameters.
if flask.request.args.get("itemId"):
    flask.session["itemId"] = flask.request.args.get("itemId")
if flask.request.args.get("itemType"):
    flask.session["itemType"] = flask.request.args.get("itemType")
if flask.request.args.get("courseId"):
    flask.session["courseId"] = flask.request.args.get("courseId")
if flask.request.args.get("addOnToken"):
    flask.session["addOnToken"] = flask.request.args.get("addOnToken")
Write these values to the session only if they're present; they're not passed again if the user happens to return to the Attachment Discovery View later without closing the iframe.
Add persistent storage for content-type attachments
You need a local record of any created attachments. This lets you look up the content that the teacher selected using identifiers provided by Classroom.
Set up a database schema for an Attachment. Our provided example presents
attachments that show an image and a caption. An Attachment contains the
following attributes:
attachment_id: A unique identifier for an attachment. Assigned by Classroom and returned in the response when creating an attachment.image_filename: The local filename of the image to display.image_caption: The caption to show with the image.
Python
Extend the SQLite and flask_sqlalchemy implementation from previous steps.
Navigate to the file in which you have defined your User table (models.py
if you're following our provided example). Add the following at the bottom
of the file below the User class.
class Attachment(db.Model):
    # The attachmentId is the unique identifier for the attachment.
    attachment_id = db.Column(db.String(120), primary_key=True)

    # The image filename to store.
    image_filename = db.Column(db.String(120))

    # The image caption to store.
    image_caption = db.Column(db.String(120))
Import the new Attachment class into the server file with your attachment handling routes.
Set up new routes
Begin this walkthrough step by setting up some new pages in our application. These let a user create and view content through our add-on.
Add attachment creation routes
You need pages for the teacher to select content and issue attachment creation
requests. Implement the /attachment-options route to display content options
for the teacher to select. You also need templates for the content selection and
creation confirmation pages. Our provided examples contain templates for these,
and can also display the requests and responses from the
Classroom API.
Note that you could alternatively modify your existing Attachment Discovery View
landing page to display the content options instead of creating the new
/attachment-options page. We recommend creating a new page for the purposes of
this exercise so that you preserve the SSO behavior implemented in the second
walkthrough step, such as revocation of the app permissions. These should prove
useful as you build and test your add-on.
A teacher can select from a small set of captioned images in our provided example. We've provided four images of famous landmarks whose captions are derived from the filenames.
Python
In our provided example, this is in the webapp/attachment_routes.py file.
@app.route("/attachment-options", methods=["GET", "POST"])
def attachment_options():
    """
    Render the attachment options page from the "attachment-options.html"
    template.

    This page displays a grid of images that the user can select using
    checkboxes.
    """

    # A list of the filenames in the static/images directory.
    image_filenames = os.listdir(os.path.join(app.static_folder, "images"))

    # The image_list_form_builder method creates a form that displays a grid
    # of images, checkboxes, and captions with a Submit button. All images
    # passed in image_filenames will be shown, and the captions will be the
    # title-cased filenames.

    # The form must be built dynamically due to limitations in WTForms. The
    # image_list_form_builder method therefore also returns a list of
    # attribute names in the form, which will be used by the HTML template
    # to properly render the form.
    form, var_names = image_list_form_builder(image_filenames)

    # If the form was submitted, validate the input and create the attachments.
    if form.validate_on_submit():

        # Build a dictionary that maps image filenames to captions.
        # There will be one dictionary entry per selected item in the form.
        filename_caption_pairs = construct_filename_caption_dictionary_list(
            form)

        # Check that the user selected at least one image, then proceed to
        # make requests to the Classroom API.
        if len(filename_caption_pairs) > 0:
            return create_attachments(filename_caption_pairs)
        else:
            return flask.render_template(
                "create-attachment.html",
                message="You didn't select any images.",
                form=form,
                var_names=var_names)

    return flask.render_template(
        "attachment-options.html",
        message=("You've reached the attachment options page. "
                "Select one or more images and click 'Create Attachment'."),
        form=form,
        var_names=var_names,
    )
This produces a "Create Attachments" page that resembles the following:
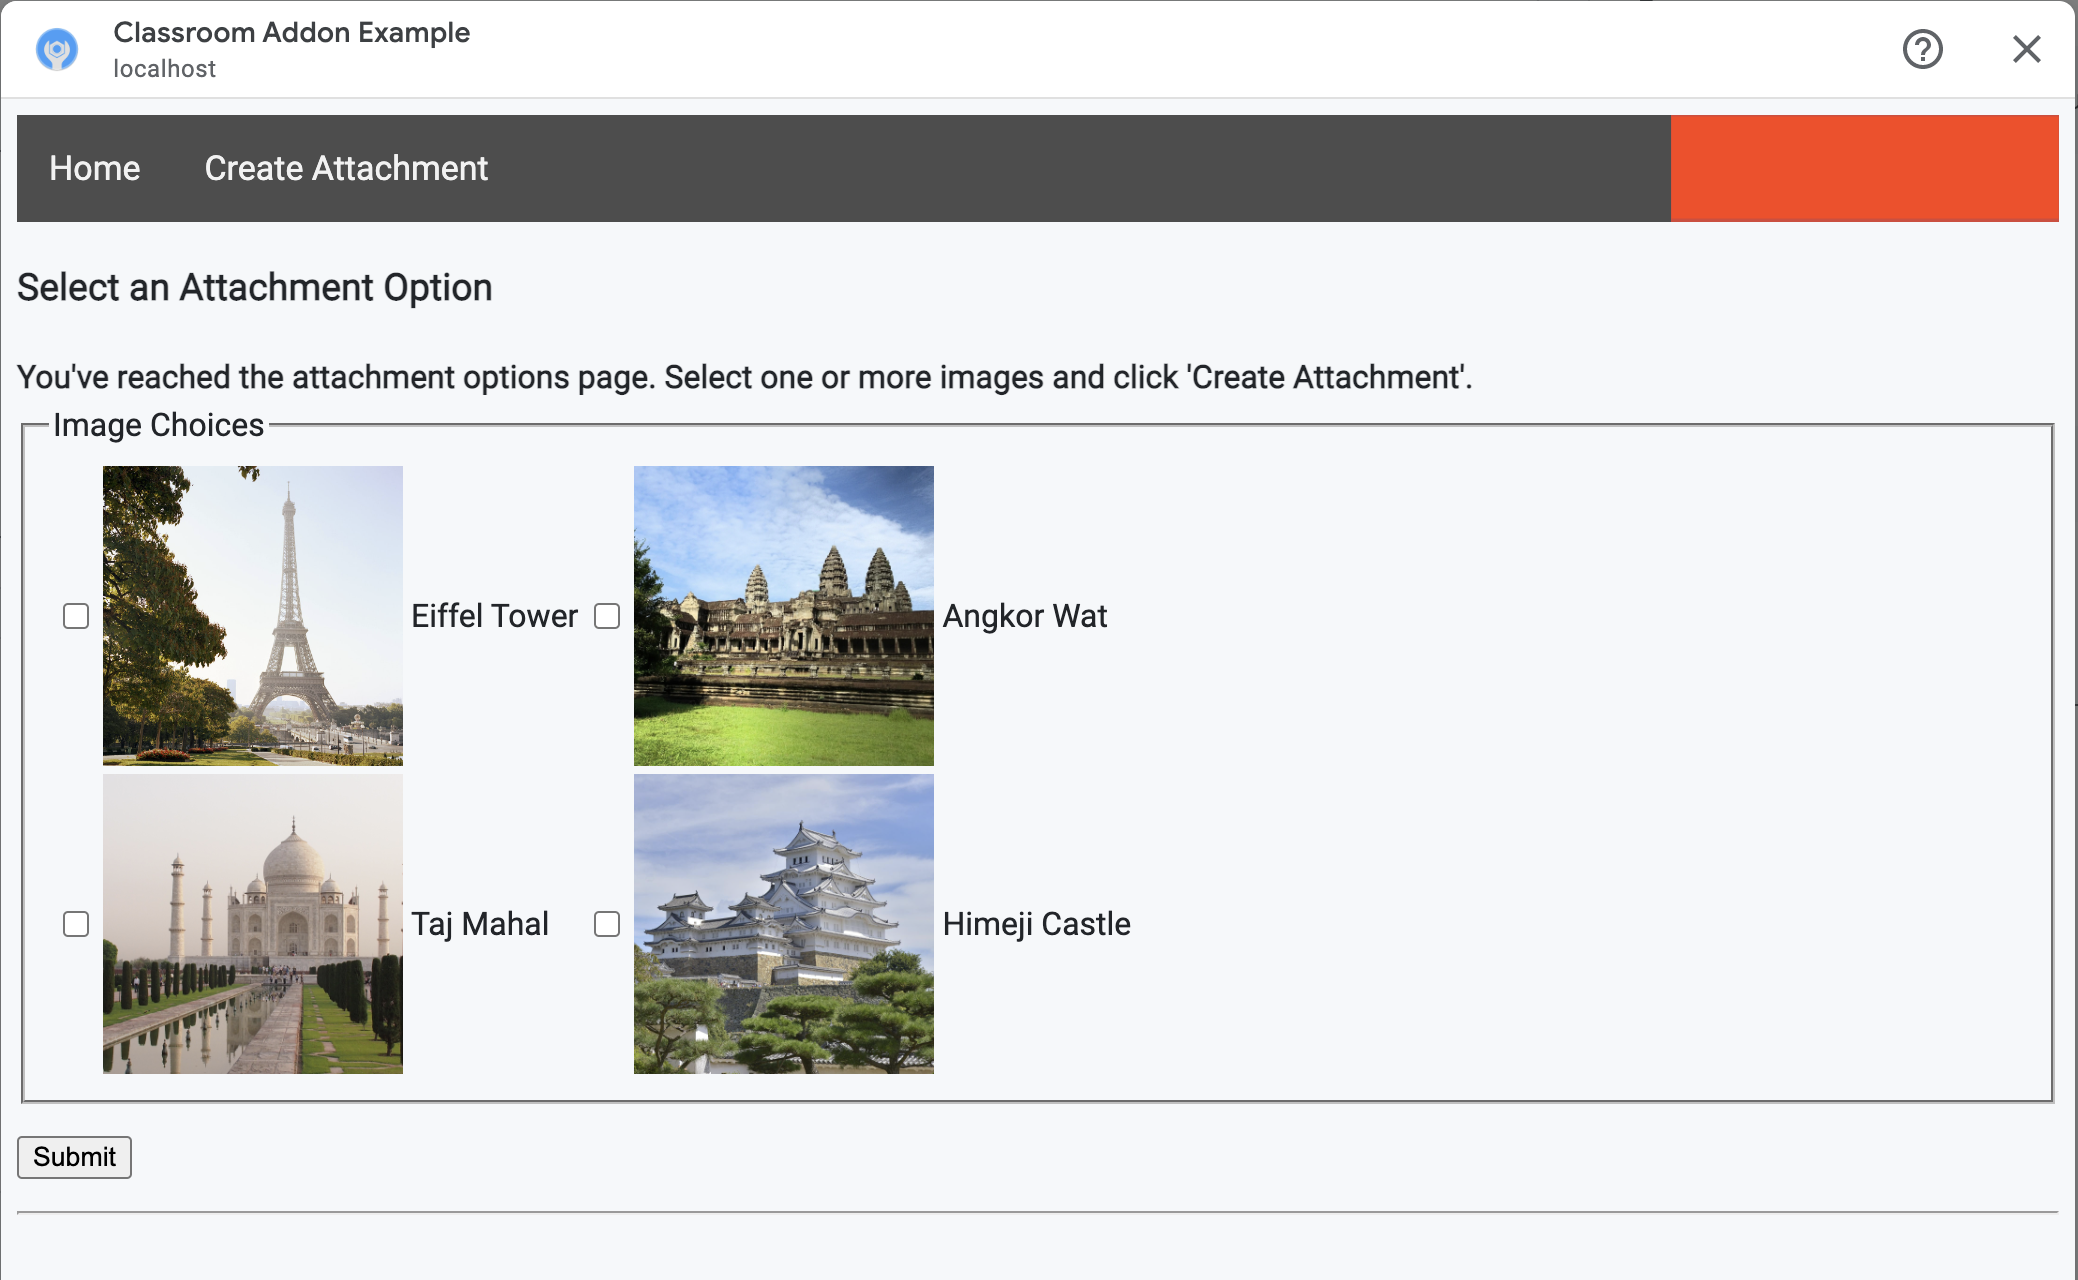
The teacher can select multiple images. Create one attachment for each image
that the teacher selected in the create_attachments method.
Issue attachment creation requests
Now that you know which pieces of content the teacher would like to attach, issue requests to the Classroom API to create attachments on our assignment. Store the attachment details in your database after receiving a response from the Classroom API.
Begin by getting an instance of the Classroom service:
Python
In our provided example, this is in the webapp/attachment_routes.py file.
def create_attachments(filename_caption_pairs):
    """
    Create attachments and show an acknowledgement page.

    Args:
        filename_caption_pairs: A dictionary that maps image filenames to
            captions.
    """
    # Get the Google Classroom service.
    classroom_service = googleapiclient.discovery.build(
        serviceName="classroom",
        version="v1",
        credentials=credentials)
Issue a CREATE request to the courses.courseWork.addOnAttachments
endpoint. For each image selected by the teacher, first construct an
AddOnAttachment object:
Python
In our provided example, this is a continuation of the create_attachments
method.
# Create a new attachment for each image that was selected.
attachment_count = 0
for key, value in filename_caption_pairs.items():
    attachment_count += 1

    # Create a dictionary with values for the AddOnAttachment object fields.
    attachment = {
        # Specifies the route for a teacher user.
        "teacherViewUri": {
            "uri":
                flask.url_for(
                    "load_content_attachment", _scheme='https', _external=True),
        },
        # Specifies the route for a student user.
        "studentViewUri": {
            "uri":
                flask.url_for(
                    "load_content_attachment", _scheme='https', _external=True)
        },
        # The title of the attachment.
        "title": f"Attachment {attachment_count}",
    }
At least the teacherViewUri, studentViewUri, and title fields must be
provided for each attachment. The teacherViewUri and studentViewUri
represent the URLs that are loaded when the attachment is opened by the
respective user type.
Send the AddOnAttachment object in the body of a request to the appropriate
addOnAttachments endpoint. Provide the courseId, itemId, itemType and
addOnToken identifiers with each request.
Python
In our provided example, this is a continuation of the create_attachments
method.
# Use the itemType to determine which stream item type the teacher created
match flask.session["itemType"]:
    case "announcements":
        parent = classroom_service.courses().announcements()
    case "courseWorkMaterials":
        parent = classroom_service.courses().courseWorkMaterials()
    case _:
        parent = classroom_service.courses().courseWork()

# Issue a request to create the attachment.
resp = parent.addOnAttachments().create(
    courseId=flask.session["courseId"],
    itemId=flask.session["itemId"],
    addOnToken=flask.session["addOnToken"],
    body=attachment).execute()
Create an entry for this attachment in your local database so that you can later
load the correct content. Classroom returns a unique id value
in the response to the creation request, so use this as the primary key in our
database. Note also that Classroom passes the attachmentId
query parameter when opening the Teacher and Student Views:
Python
In our provided example, this is a continuation of the create_attachments
method.
# Store the value by id.
new_attachment = Attachment(
    # The new attachment's unique ID, returned in the CREATE response.
    attachment_id=resp.get("id"),
    image_filename=key,
    image_caption=value)
db.session.add(new_attachment)
db.session.commit()
Consider routing the user to a confirmation page at this point, acknowledging that they have successfully created attachments.
Allow attachments from your add-on
Now is a good time to add any appropriate addresses to the Allowed Attachment URI Prefixes field in the Google Workspace Marketplace SDK's App Configuration page. Your add-on can only create attachments from one of the URI prefixes listed on this page. This is a security measure to help reduce the possibility of man-in-the-middle attacks.
The simplest approach is to provide your top-level domain in this field, for
example https://example.com. https://localhost:<your port number>/ would
work if you're using your local machine as the web server.
Add routes for the Teacher and Student Views
There are four iframes in which a Google Classroom add-on might be loaded. You have only built routes that serve the Attachment Discovery View iframe thus far. Next, add routes to serve the Teacher and Student View iframes as well.
The Teacher View iframe is required to show a preview of the student experience, but can optionally include additional information or editing features.
The Student View is the page that's presented to each student when they open an add-on attachment.
For the purposes of this exercise, create a single /load-content-attachment
route that serves both Teacher and Student View. Use Classroom API
methods to determine whether the user is a teacher or student when the page
loads.
Python
In our provided example, this is in the webapp/attachment_routes.py file.
@app.route("/load-content-attachment")
def load_content_attachment():
    """
    Load the attachment for the user's role."""

    # Since this is a landing page for the Teacher and Student View iframes, we
    # need to preserve the incoming query parameters.
    if flask.request.args.get("itemId"):
        flask.session["itemId"] = flask.request.args.get("itemId")
    if flask.request.args.get("itemType"):
        flask.session["itemType"] = flask.request.args.get("itemType")
    if flask.request.args.get("courseId"):
        flask.session["courseId"] = flask.request.args.get("courseId")
    if flask.request.args.get("attachmentId"):
        flask.session["attachmentId"] = flask.request.args.get("attachmentId")
Keep in mind that you should also authenticate the user at this point. You
should also handle the login_hint query parameter here, and route the user to
your authorization flow if necessary. See the login guidance details discussed
in previous walkthroughs for more information about this flow.
Then send a request to the getAddOnContext endpoint that matches the item
type.
Python
In our provided example, this is a continuation of the
load_content_attachment method.
# Create an instance of the Classroom service.
classroom_service = googleapiclient.discovery.build(
    serviceName="classroom"
    version="v1",
    credentials=credentials)

# Use the itemType to determine which stream item type the teacher created
match flask.session["itemType"]:
    case "announcements":
        parent = classroom_service.courses().announcements()
    case "courseWorkMaterials":
        parent = classroom_service.courses().courseWorkMaterials()
    case _:
        parent = classroom_service.courses().courseWork()

addon_context_response = parent.getAddOnContext(
    courseId=flask.session["courseId"],
    itemId=flask.session["itemId"]).execute()
This method returns information about the current user's role in the class.
Alter the view presented to the user depending on their role. Exactly one of the
studentContext or teacherContext fields are populated in the response
object. Examine these to determine how to address the user.
In any case, use the attachmentId query parameter value to know which
attachment to retrieve from our database. This query parameter is provided when
opening either the Teacher or Student View URIs.
Python
In our provided example, this is a continuation of the
load_content_attachment method.
# Determine which view we are in by testing the returned context type.
user_context = "student" if addon_context_response.get(
    "studentContext") else "teacher"

# Look up the attachment in the database.
attachment = Attachment.query.get(flask.session["attachmentId"])

# Set the text for the next page depending on the user's role.
message_str = f"I see that you're a {user_context}! "
message_str += (
    f"I've loaded the attachment with ID {attachment.attachment_id}. "
    if user_context == "teacher" else
    "Please enjoy this image of a famous landmark!")

# Show the content with the customized message text.
return flask.render_template(
    "show-content-attachment.html",
    message=message_str,
    image_filename=attachment.image_filename,
    image_caption=attachment.image_caption,
    responses=response_strings)
Test the add-on
Complete the following steps to test attachment creation:
- Sign in to [Google Classroom] as one of your Teacher test users.
- Navigate to the Classwork tab and create a new Assignment.
- Click the Add-ons button below the text area, then select your add-on. The iframe opens and the add-on loads the Attachment Setup URI that you specified in the Google Workspace Marketplace SDK's App Configuration page.
- Choose a piece of content to attach to the assignment.
- Close the iframe after the attachment creation flow is complete.
You should see an attachment card appear in the assignment creation UI in Google Google Classroom. Click the card to open the Teacher View iframe and confirm that the correct attachment appears. Click the Assign button.
Complete the following steps to test the student experience:
- Then sign in to Classroom as a student test user in the same class as the teacher test user.
- Find the test assignment in the Classwork tab.
- Expand the assignment and click the attachment card to open the Student View iframe.
Confirm that the correct attachment appears for the student.
Congratulations! You're ready to proceed to the next step: creating activity-type attachments.