
OAuth ベースの Google ログイン「Streamlined」リンクタイプは、OAuth ベースのアカウント リンクの上層に Google ログインを追加します。これにより、Google ユーザーには音声によるシームレスなリンクを提供し、Google 以外の ID でサービスに登録したユーザーに対してもアカウント リンクを有効にできます。
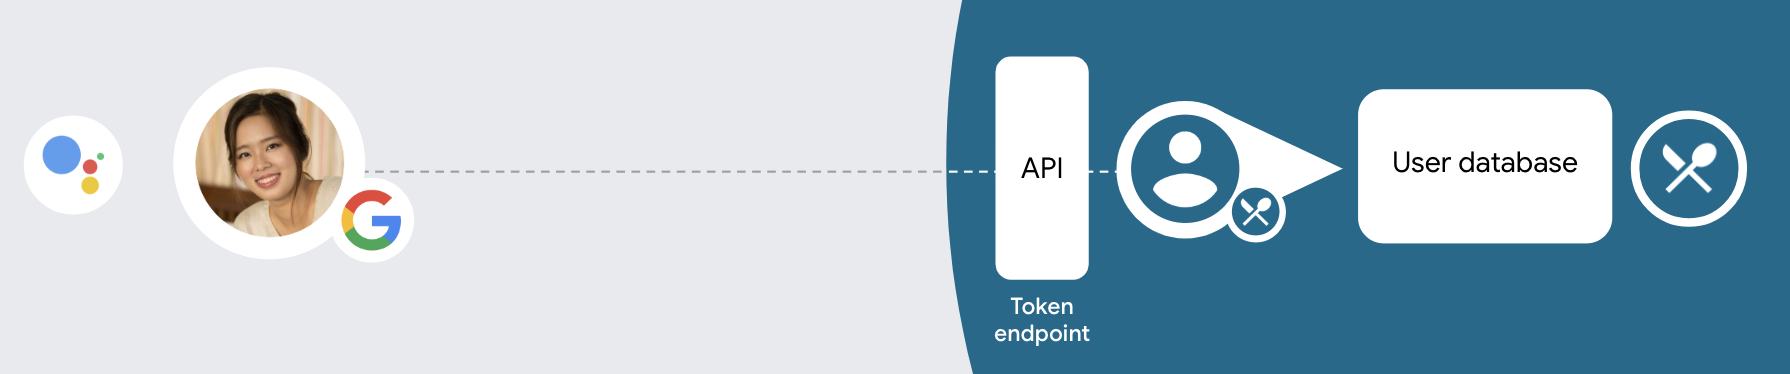
このリンクタイプは Google ログインから始まり、ユーザーの Google プロフィール情報がシステムに存在するかどうかを確認できます。ユーザーの情報がシステムで見つからない場合は、標準の OAuth フローが開始されます。ユーザーは、Google プロファイル情報を使用して新しいアカウントを作成することもできます。
簡略化されたリンクタイプを使用してアカウント リンクを行うには、次の一般的な手順に従います。
- まず、ユーザーの Google プロフィールにアクセスすることについてユーザーに同意を求めます。
- プロフィールの情報を使用してユーザーを識別します。
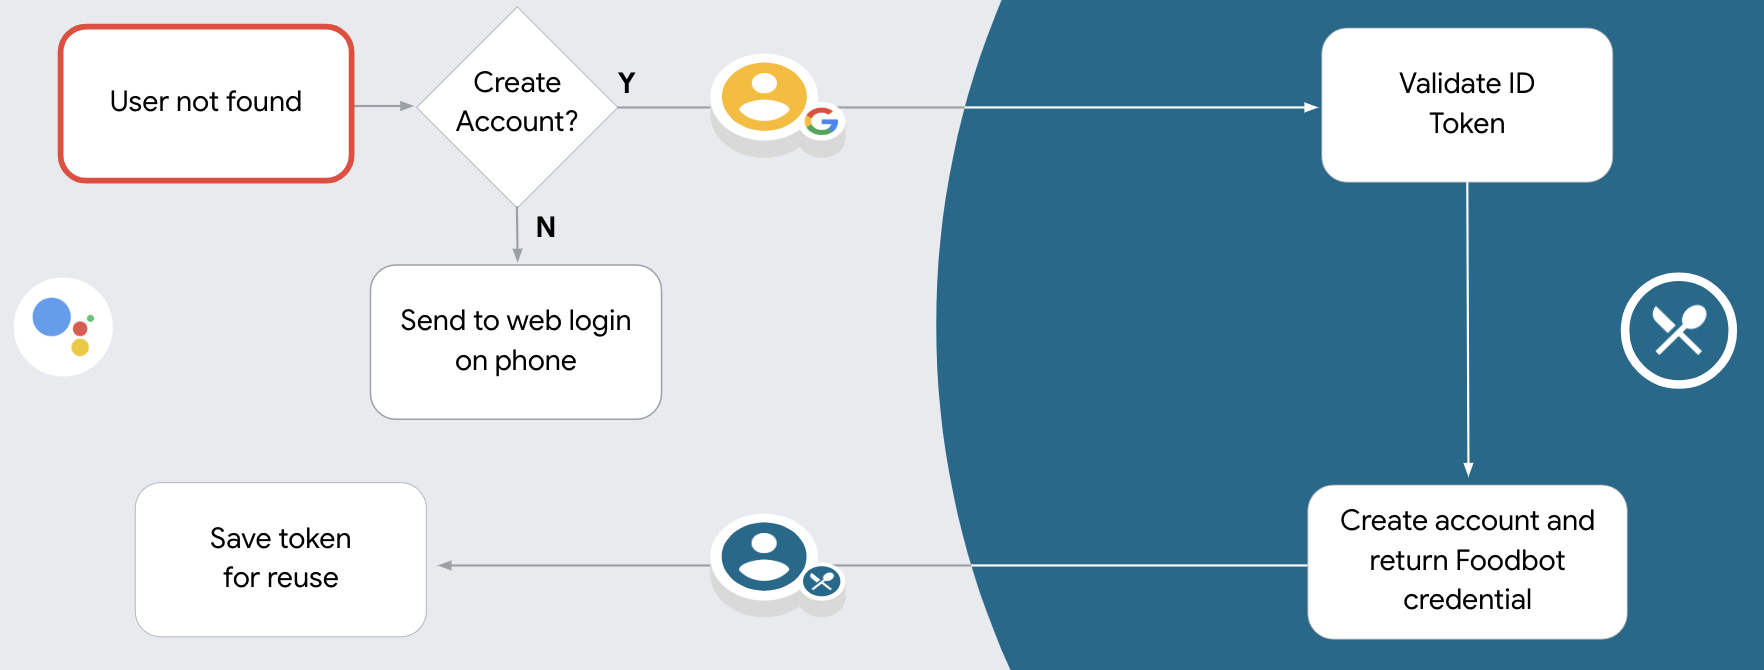
- 認証システムでその Google ユーザーに一致するユーザーが見つからない場合、次に進む先は、アクション コンソールでそのアクション プロジェクトに対して音声によるアカウント作成を許可しているか、またはウェブサイトでのみアカウントの作成を許可しているかによって異なります。
- 音声によるアカウント作成を許可する場合は、Google から受け取った ID トークンを検証します。その後、ID トークンに含まれているプロフィール情報に基づいてユーザー アカウントを作成できます。
- 音声によるアカウントの作成を許可していない場合、ユーザーはブラウザに転送されて認証ページが読み込まれ、ユーザー作成フローは完了します。
音声によるアカウント作成を許可する
音声によるユーザー アカウントの作成を許可した場合、ユーザーは次のどちらを行うか選択するよう求められます。
- Google アカウント情報を使用してシステムに新しいアカウントを作成する。
- Google 以外のアカウントがすでにある場合は、別のアカウントで認証システムにログインする。
アカウント作成フローをスムーズに進めたい場合は、音声によるアカウント作成を許可することをおすすめします。ユーザーは Google 以外の既存のアカウントを使用してログインする場合のみ、音声フローから離れます。
音声によるアカウント作成を許可しない
音声によるユーザー アカウントの作成を許可していない場合は、ユーザー認証のために指定しておいたウェブサイトの URL が開きます。この動作が画面のないデバイスで起こった場合は、ユーザーをスマートフォンに誘導してアカウント リンクフローを続行します。
次の場合はアカウント作成を許可しないことをおすすめします。
Google 以外のアカウントを持つユーザーが新しいユーザー アカウントを作成することを許可せず、代わりにそのユーザーを認証システム内の既存のユーザー アカウントにリンクさせる場合。たとえば、ポイント プログラムを提供していて、ユーザーが既存のアカウントで獲得したポイントを失わないように配慮する必要がある場合などです。
アカウント作成フローを完全に制御する場合。たとえば、アカウントの作成中に利用規約をユーザーに表示する必要がある場合に、アカウントの作成を許可しないようにできます。
OAuth ベースの Google ログインの「簡略化された」リンクを実装する
アカウントは業界標準の OAuth 2.0 フローを使用してリンクされます。Actions on Google は、インプリシット フローと認可コードフローをサポートしています。
インプリシット コードフローでは、Google がユーザーのブラウザで認可エンドポイントを開きます。ログインに成功すると、長期間有効なアクセス トークンが Google に返されます。このアクセス トークンは、アシスタントからアクションに送信されるすべてのリクエストに含まれるようになりました。
認可コードフローでは、次の 2 つのエンドポイントが必要になります。
- 認可エンドポイント。まだログインしていないユーザーにログイン用の UI を表示し、リクエストされたアクセスへの同意を短期の認可コードの形式で記録します。
- トークン交換エンドポイント。次の 2 種類の交換を行います。
- 長期の更新トークンと短期のアクセス トークンの認可コードを交換します。この処理は、ユーザーがアカウントのリンクフローを行ったときに発生します。
- 長期の更新トークンを短期のアクセス トークンと交換します。この処理は、トークンが期限切れになり、新しいアクセス トークンが必要になった場合に発生します。
暗黙的コードフローは実装が簡単ですが、暗黙的フローで発行されたアクセス トークンに有効期限を設定しないことをおすすめします。暗黙的フローでトークンの有効期限を設定すると、ユーザーは再びアカウントをリンクする必要があります。セキュリティ上の理由によりトークンの有効期限が必要な場合は、代わりに認証コードフローの使用を検討してください。
プロジェクトを構成する
プロジェクトで簡素化されたリンクを使用するよう構成するには、次の手順に従います。
- Actions Console を開き、使用するプロジェクトを選択します。
- [Develop](開発)タブをクリックして、[Account linking](アカウント リンク)を選択します。
- [Account linking] の横にあるスイッチをオンにします。
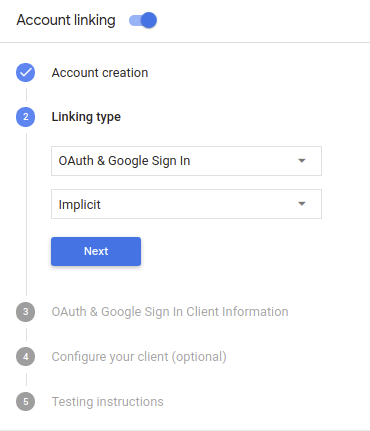
- [アカウントの作成] セクションで、[はい] を選択します。
[Linking type] で、[OAuth & Google Sign In](OAuth および Google ログイン)と [Implicit](インプリシット)を選択します。
[Client Information](クライアント情報)で、次のことを行います。
- [Client ID issued by your Actions to Google] に、Google からのリクエストを識別する値を割り当てます。
- 認可エンドポイントとトークン交換エンドポイントの URL を挿入します。
[Save](保存)をクリックします。
OAuth サーバーを実装する
OAuth 2.0 暗黙的フローをサポートするために、サービスは 使用できます。このエンドポイントは、認証と認可を担当します。 データアクセスについてユーザーから同意を得る。認可エンドポイントは、ログインしていないユーザーにログイン用の UI を表示し、リクエストされたアクセスへの同意を記録します。
アクションからサービスの API を呼び出す必要がある場合、Google はこのエンドポイントを使用して、API の呼び出し許可をユーザーから取得します。
通常、Google が開始する OAuth 2.0 インプリシット フローのセッションは次のような流れになります。
- Google がユーザーのブラウザで認可エンドポイントを開きます。ユーザーがログインし(ログインしていない場合)、Google が API を使用してデータにアクセスすることを承諾します(まだ許可していない場合)。
- サービスがアクセス トークンを作成します。そのトークンを含むリクエストを送信して、ユーザーのブラウザを Google にリダイレクトし、Google にアクセス トークンを返します。
- Google がサービスの API を呼び出し、リクエストごとにアクセス トークンを関連付けます。サービスは、アクセス トークンによって API へのアクセスが Google に許可されていることを確認し、API 呼び出しを完了します。
認可リクエストの処理
アクションが OAuth 2.0 暗黙的フローを介してアカウント リンクを実行する必要がある場合、 Google は、次を含むリクエストでユーザーを認可エンドポイントに送信します。 次のパラメータを指定します。
| 認可エンドポイントのパラメータ | |
|---|---|
client_id |
Google に割り当てたクライアント ID。 |
redirect_uri |
このリクエストに対するレスポンスを送信する URL。 |
state |
リダイレクト URL で変更されずに Google に返される会計上の値。 |
response_type |
レスポンスで返される値のタイプ。OAuth 2.0 暗黙の API では、
レスポンス タイプは常に token です。 |
たとえば、認可エンドポイントが https://myservice.example.com/auth にある場合、
次のようなリクエストになります。
GET https://myservice.example.com/auth?client_id=GOOGLE_CLIENT_ID&redirect_uri=REDIRECT_URI&state=STATE_STRING&response_type=token
認可エンドポイントでログイン リクエストを処理する場合は、次の手順に従います。
client_idとredirect_uriの値を検証する 意図しないクライアント アプリへのアクセスや構成ミスのあるクライアント アプリclient_idが、指定したクライアント ID と一致することを確認します。 割り当てられていますredirect_uriで指定された URL を確認します。 パラメータの形式は次のとおりです。https://oauth-redirect.googleusercontent.com/r/YOUR_PROJECT_ID
ユーザーがサービスにログインしているかどうか確認します。ユーザーがログインしていない場合は、サービスのログインまたは登録フローを完了します。
Google が API へのアクセスで使用するアクセス トークンを生成します。アクセス トークンには任意の文字列値を設定できますが、トークンを使用するユーザーとクライアントを一意に表し、簡単に推測されない文字列にする必要があります。
ユーザーのブラウザを URL にリダイレクトする HTTP レスポンスを送信する
redirect_uriパラメータで指定します。URL フラグメントに次のパラメータをすべて含めます。access_token: 生成したアクセス トークンtoken_type: 文字列bearerstate: 元の状態から変更されていない状態の値 リクエスト 結果の URL の例を次に示します。https://oauth-redirect.googleusercontent.com/r/YOUR_PROJECT_ID#access_token=ACCESS_TOKEN&token_type=bearer&state=STATE_STRING
Google の OAuth 2.0 リダイレクト ハンドラがアクセス トークンを受け取り、
state 値が変更されていないことを確認します。Google は、
そのトークンを後続の呼び出しにアタッチします。
AppRequest の一部としてアクションに渡します。
自動リンクの処理
ユーザーがアクションから Google プロフィールへのアクセスに同意すると、Google は Google ユーザー ID の署名付きアサーションを含むリクエストを送信します。 このアサーションには、ユーザーの Google アカウント ID、名前、 入力します。このリクエストは、プロジェクトに構成されているトークン交換エンドポイントで処理されます。
対応する Google アカウントが認証システムにすでに存在する場合、トークン交換エンドポイントはユーザーのトークンを返します。Google アカウントが
一致すると、トークン交換エンドポイントから user_not_found エラーが返されます。
リクエストは次のようになります。
POST /token HTTP/1.1
Host: oauth2.example.com
Content-Type: application/x-www-form-urlencoded

grant_type=urn:ietf:params:oauth:grant-type:jwt-bearer&intent=get&assertion=JWT&consent_code=CONSENT_CODE&scope=SCOPES
トークン交換エンドポイントでは、以下のパラメータを処理する必要があります。
| トークン交換エンドポイントのパラメータ | |
|---|---|
grant_type |
交換されるトークンの種類。これらのリクエストでは、
パラメータの値は urn:ietf:params:oauth:grant-type:jwt-bearer です。 |
intent |
このリクエストの場合、このパラメータの値は「get」です。 |
assertion |
Google ユーザー ID の署名付きアサーションを提供する JSON Web Token(JWT)。JWT には、ユーザーの Google アカウント ID、名前、メールアドレスなどの情報が含まれます。 |
consent_code |
省略可: この値を指定すると、 ユーザーが、アクションが指定されたスコープにアクセスすることに同意しました。 |
scope |
省略可: Google からユーザーに同意を求めるように構成したスコープ。 |
リンク リクエストを受信すると、トークン交換エンドポイントは次の処理を行います。
JWT アサーションを検証してデコードする
JWT アサーションを検証してデコードするには、お使いの言語の JWT デコード ライブラリを使用します。 Google の公開鍵(JWK または PEM 形式など)を使用して、トークンの できます。
デコードされた場合、JWT アサーションは次の例のようになります。
{
  "sub": 1234567890,        // The unique ID of the user's Google Account
  "iss": "https://accounts.google.com",        // The assertion's issuer
  "aud": "123-abc.apps.googleusercontent.com", // Your server's client ID
  "iat": 233366400,         // Unix timestamp of the assertion's creation time
  "exp": 233370000,         // Unix timestamp of the assertion's expiration time
  "name": "Jan Jansen",
  "given_name": "Jan",
  "family_name": "Jansen",
  "email": "jan@gmail.com", // If present, the user's email address
  "locale": "en_US"
}
トークンの署名を検証するだけでなく、アサーションの発行者が、
(iss フィールド)が https://accounts.google.com であり、オーディエンス(aud フィールド)である
アクションに割り当てられたクライアント ID です。
Google アカウントが認証システムに存在するかどうかの確認
次のいずれかの条件を満たしていることを確認します。
- Google アカウント ID(アサーションの
subフィールドにあります)は、ユーザー データベースにあります。 - アサーションに含まれているメールアドレスが、ユーザーのデータベースに登録されているユーザーと一致している。
いずれかの条件も満たしていない場合は、このユーザーはすでに登録済みで、アクセス トークンを発行できます。
Google アカウント ID もアサーションのメールアドレスもユーザーのデータベースに登録されているユーザーと一致しない場合、ユーザーはまだ登録されていません。この場合、
トークン交換エンドポイントから、error=user_not_found を指定した HTTP 401 エラーが返されます。
次に例を示します。
HTTP/1.1 401 Unauthorized
Content-Type: application/json;charset=UTF-8

{
  "error":"user_not_found",
}
user_not_found エラーを含む 401 エラー レスポンスを受信すると、
intent パラメータの値を使用してトークン交換エンドポイントを呼び出す
create に設定して、ユーザーのプロフィール情報を含む ID トークンを送信する
関連付けられます。
Google ログインによるアカウントの作成
ユーザーがサービスのアカウントを作成する必要がある場合、Google は
トークン交換エンドポイントに送信します。
intent=create。次の例のようになります。
POST /token HTTP/1.1
Host: oauth2.example.com
Content-Type: application/x-www-form-urlencoded

response_type=token&grant_type=urn:ietf:params:oauth:grant-type:jwt-bearer&scope=SCOPES&intent=create&consent_code=CONSENT_CODE&assertion=JWT[&NEW_ACCOUNT_INFO]
assertion パラメータには、次のトークンを提供する JSON Web Token(JWT)が含まれます。
Google ユーザーの ID に関する署名付きのアサーションです。JWT には、ユーザーの Google アカウント ID、名前、メールアドレスなどの情報が含まれます。これらの情報は、サービスに新しいアカウントを作成する際に使用できます。
アカウント作成リクエストに応答するには、トークン交換エンドポイントで次の処理を行う必要があります。
JWT アサーションを検証してデコードする
JWT アサーションを検証してデコードするには、お使いの言語の JWT デコード ライブラリを使用します。 Google の公開鍵(JWK または PEM 形式など)を使用して、トークンの できます。
デコードされた場合、JWT アサーションは次の例のようになります。
{
  "sub": 1234567890,        // The unique ID of the user's Google Account
  "iss": "https://accounts.google.com",        // The assertion's issuer
  "aud": "123-abc.apps.googleusercontent.com", // Your server's client ID
  "iat": 233366400,         // Unix timestamp of the assertion's creation time
  "exp": 233370000,         // Unix timestamp of the assertion's expiration time
  "name": "Jan Jansen",
  "given_name": "Jan",
  "family_name": "Jansen",
  "email": "jan@gmail.com", // If present, the user's email address
  "locale": "en_US"
}
トークンの署名を検証するだけでなく、アサーションの発行者が、
(iss フィールド)が https://accounts.google.com であり、オーディエンス(aud フィールド)である
アクションに割り当てられたクライアント ID です。
ユーザー情報を検証して新しいアカウントを作成する
次のいずれかの条件を満たしていることを確認します。
- Google アカウント ID(アサーションの
subフィールドにあります)は、ユーザー データベースにあります。 - アサーションに含まれているメールアドレスが、ユーザーのデータベースに登録されているユーザーと一致している。
いずれかの条件が true の場合、ユーザーに既存のアカウントをリンクするよう促す
そのリクエストに対して HTTP 401 エラーを返し、Google アカウント
error=linking_error とユーザーのメールアドレス(login_hint を参照)。
次の例をご覧ください。
HTTP/1.1 401 Unauthorized
Content-Type: application/json;charset=UTF-8

{
  "error":"linking_error",
  "login_hint":"foo@bar.com"
}
どちらの条件も true でない場合は、その情報を使用して新しいユーザー アカウントを作成します。 JWT で提供します。通常、新しいアカウントにはパスワードが設定されていません。ユーザーがアプリケーションから Google にログインできるように、他のプラットフォームに Google ログインを追加することをおすすめします。また、他のプラットフォームでログイン パスワードを設定できるように、パスワード再設定フローを開始するリンクをメールで送信することもできます。
作成が完了したら、アクセス トークンを発行します。 JSON オブジェクトで値を HTTPS レスポンスの本文に URL を付加します。
{
  "token_type": "Bearer",
  "access_token": "ACCESS_TOKEN",

  "expires_in": SECONDS_TO_EXPIRATION
}
認証フローの音声ユーザー インターフェースを設計する
ユーザーが確認済みかどうかを確認し、アカウントのリンクフローを開始する
- Actions Console で Actions Builder プロジェクトを開きます。
- アクションでアカウント リンクを開始する新しいシーンを作成します。
- [シーン] をクリックします。
- [追加](+)アイコンをクリックして、新しいシーンを追加します。
- 新しく作成したシーンで、[条件] の追加アイコン add をクリックします。
- 会話に関連付けられているユーザーが確認済みのユーザーかどうかを確認する条件を追加します。チェックに失敗した場合、アクションは会話中にアカウント リンクを実行できず、アカウント リンクを必要としない機能へのアクセスを提供するようにフォールバックする必要があります。
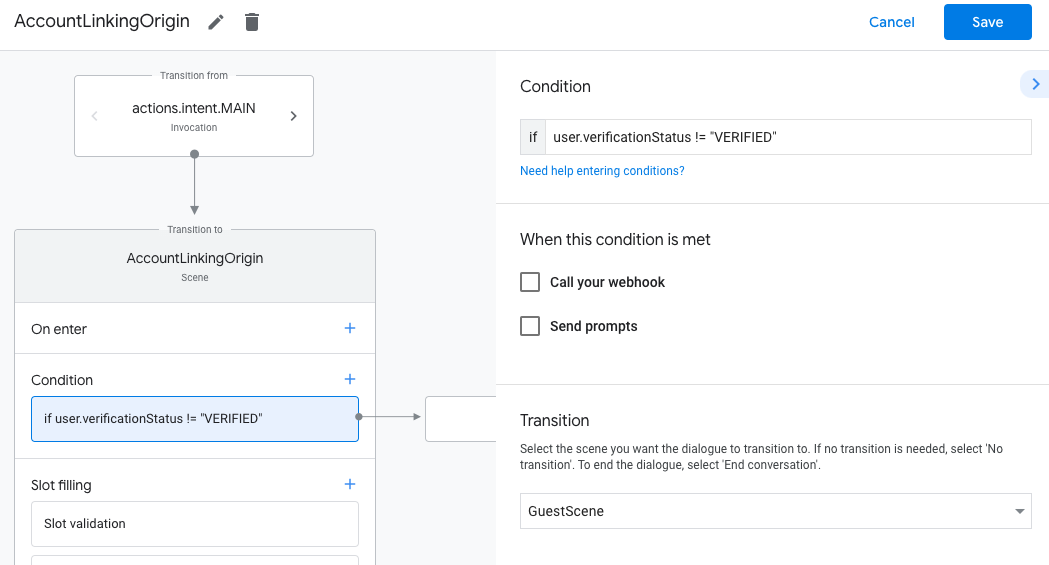
- [条件] の
Enter new expressionフィールドに、次のロジックを入力します。user.verificationStatus != "VERIFIED" - [Transition] で、アカウント リンクを必要としないシーン、またはゲスト専用機能のエントリ ポイントとなるシーンを選択します。
- [条件] の
- [条件] の追加アイコン add をクリックします。
- ユーザーに関連付けられた ID がない場合にアカウント リンクフローをトリガーする条件を追加します。
- [条件] の
Enter new expressionフィールドに、次のロジックを入力します。user.verificationStatus == "VERIFIED" - [移行] で、[アカウント リンク] システム シーンを選択します。
- [保存] をクリックします。
- [条件] の
![]()
保存すると、<SceneName>_AccountLinking という新しいアカウント リンク システム シーンがプロジェクトに追加されます。
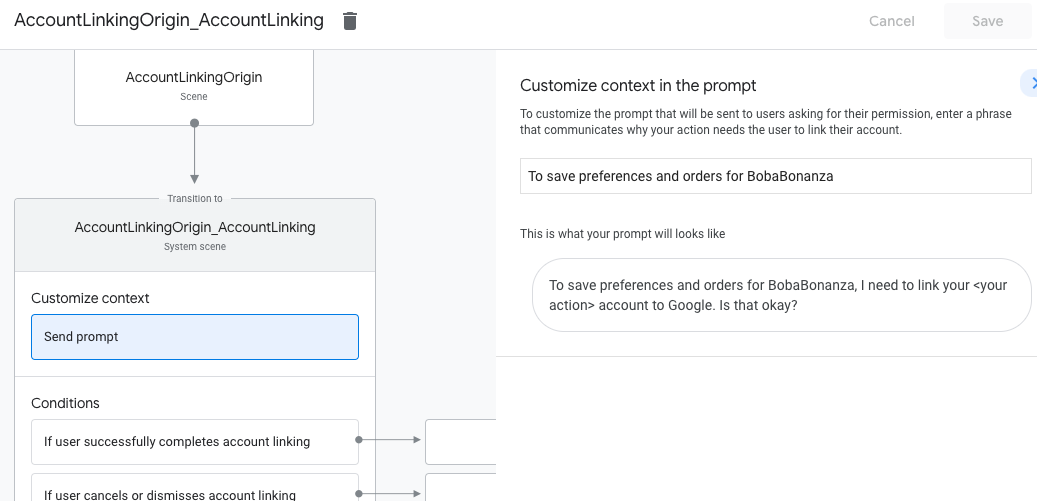
アカウント リンク シーンをカスタマイズする
- [Scenes] で、アカウント リンク システム シーンを選択します。
- [プロンプトを送信] をクリックし、アクションがユーザーの ID にアクセスする必要がある理由を説明する短い文言を追加します(例: 「設定を保存するため」)。
- [保存] をクリックします。
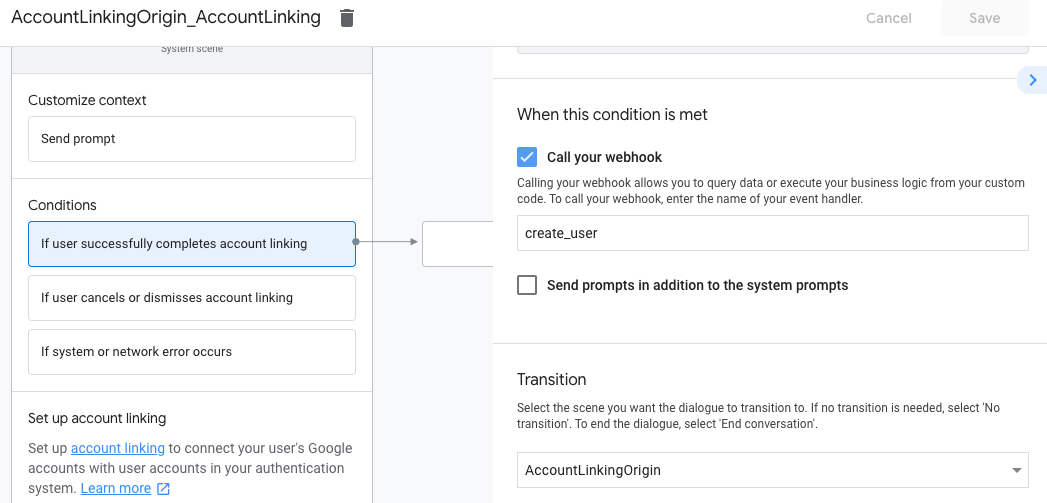
- [条件] で [ユーザーがアカウントのリンクを正常に完了した場合] をクリックします。
- ユーザーがアカウントのリンクに同意した場合のフローの進行方法を設定します。たとえば、Webhook を呼び出して必要なカスタム ビジネス ロジックを処理し、元のシーンに戻ります。
- [保存] をクリックします。
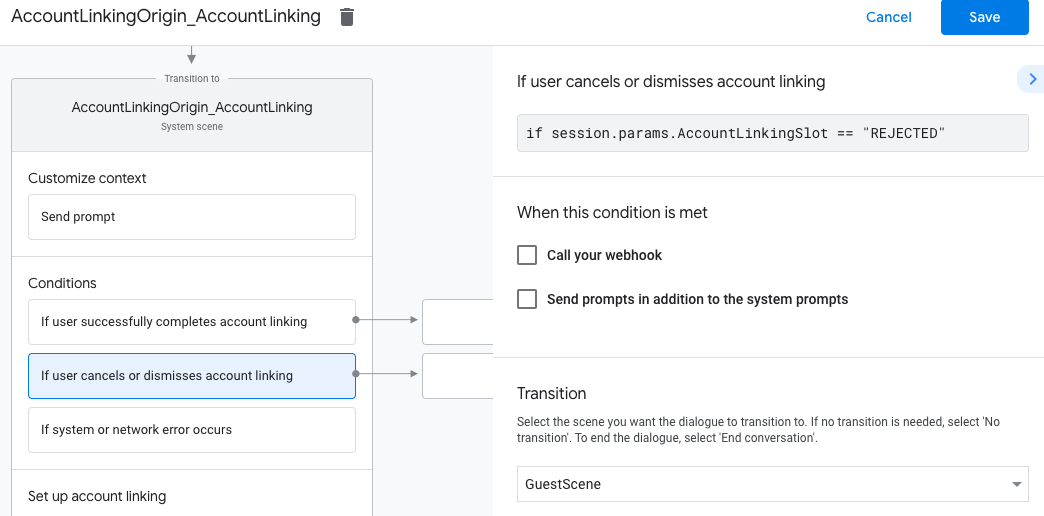
- [条件] で、[ユーザーがアカウントのリンクをキャンセルまたは閉じた場合] をクリックします。
- ユーザーがアカウントのリンクに同意しない場合のフローの進行方法を設定します。たとえば、確認メッセージを送信し、アカウントのリンクを必要としない機能を提供するシーンにリダイレクトします。
- [保存] をクリックします。
- [条件] で [システムエラーまたはネットワーク エラーが発生した場合] をクリックします。
- システム エラーやネットワーク エラーが原因でアカウント リンクフローを完了できない場合に、フローをどのように続行するかを設定します。たとえば、確認メッセージを送信し、アカウントのリンクを必要としない機能を提供するシーンにリダイレクトします。
- [保存] をクリックします。
データアクセス リクエストを処理する
アシスタントのリクエストにアクセス トークンが含まれている場合は、まずそのアクセス トークンが有効で期限切れになっていないことを確認してから、そのトークンに関連付けられているユーザー アカウントをユーザー アカウント データベースから取得します。