
پیوند برنامه مبتنی بر OAuth (App Flip) به کاربران شما اجازه میدهد تا به سرعت حسابهای خود را در سیستم احراز هویت شما به حسابهای گوگل خود پیوند دهند. اگر برنامه شما هنگام شروع فرآیند پیوند حساب روی تلفن کاربر نصب شده باشد، آنها به طور یکپارچه برای دریافت مجوز کاربر به برنامه شما منتقل میشوند.
این رویکرد فرآیند اتصال سریعتری را فراهم میکند، زیرا کاربر مجبور نیست نام کاربری و رمز عبور خود را برای تأیید اعتبار دوباره وارد کند؛ در عوض، App Flip از اعتبارنامههای حساب کاربری در برنامه شما استفاده میکند. هنگامی که کاربر حساب گوگل خود را با برنامه شما مرتبط کرد، میتواند از هرگونه ادغامی که شما ایجاد کردهاید، بهرهمند شود.
میتوانید App Flip را هم برای برنامههای iOS و هم برای برنامههای اندروید تنظیم کنید.
الزامات
برای پیادهسازی App Flip، باید الزامات زیر را برآورده کنید:
- شما باید یک اپلیکیشن اندروید یا iOS داشته باشید.
- شما باید مالک، مدیر و نگهدارنده یک سرور OAuth 2.0 باشید که از جریان کد مجوز OAuth 2.0 پشتیبانی کند.
جریان معکوس برنامه مبتنی بر OAuth
نمودار توالی زیر، تعامل بین کاربر، برنامه گوگل، برنامه شما و سرور احراز هویت شما را برای App Flip به تفصیل نشان میدهد.
نقشها و مسئولیتها
جدول زیر نقشها و مسئولیتهای بازیگران در جریان App Flip را تعریف میکند.
| بازیگر / جزء | نقش GAL | مسئولیتها |
|---|---|---|
| برنامه/سرور گوگل | کلاینت OAuth | فرآیند پیوند را آغاز میکند، یک پیوند عمیق به برنامه تلفن همراه شما ایجاد میکند، کد مجوز را با توکنها مبادله میکند و آنها را به طور ایمن برای دسترسی به APIهای سرویس شما ذخیره میکند. |
| برنامه شما | نماینده مجوز | کاربر را احراز هویت میکند (معمولاً با استفاده از اعتبارنامههای موجود برنامه)، رضایت را دریافت میکند و یک کد مجوز را از سرور شما بازیابی میکند. |
| سرور احراز هویت شما | سرور احراز هویت | کدهای مجوز و توکنهای بهروزرسانی را اعتبارسنجی میکند و توکنهای دسترسی را به سرور گوگل صادر میکند. |
برای اطلاعات بیشتر در مورد جریان کد مجوز پیوند OAuth، به اجرای سرور OAuth خود مراجعه کنید.
دستورالعملهای طراحی
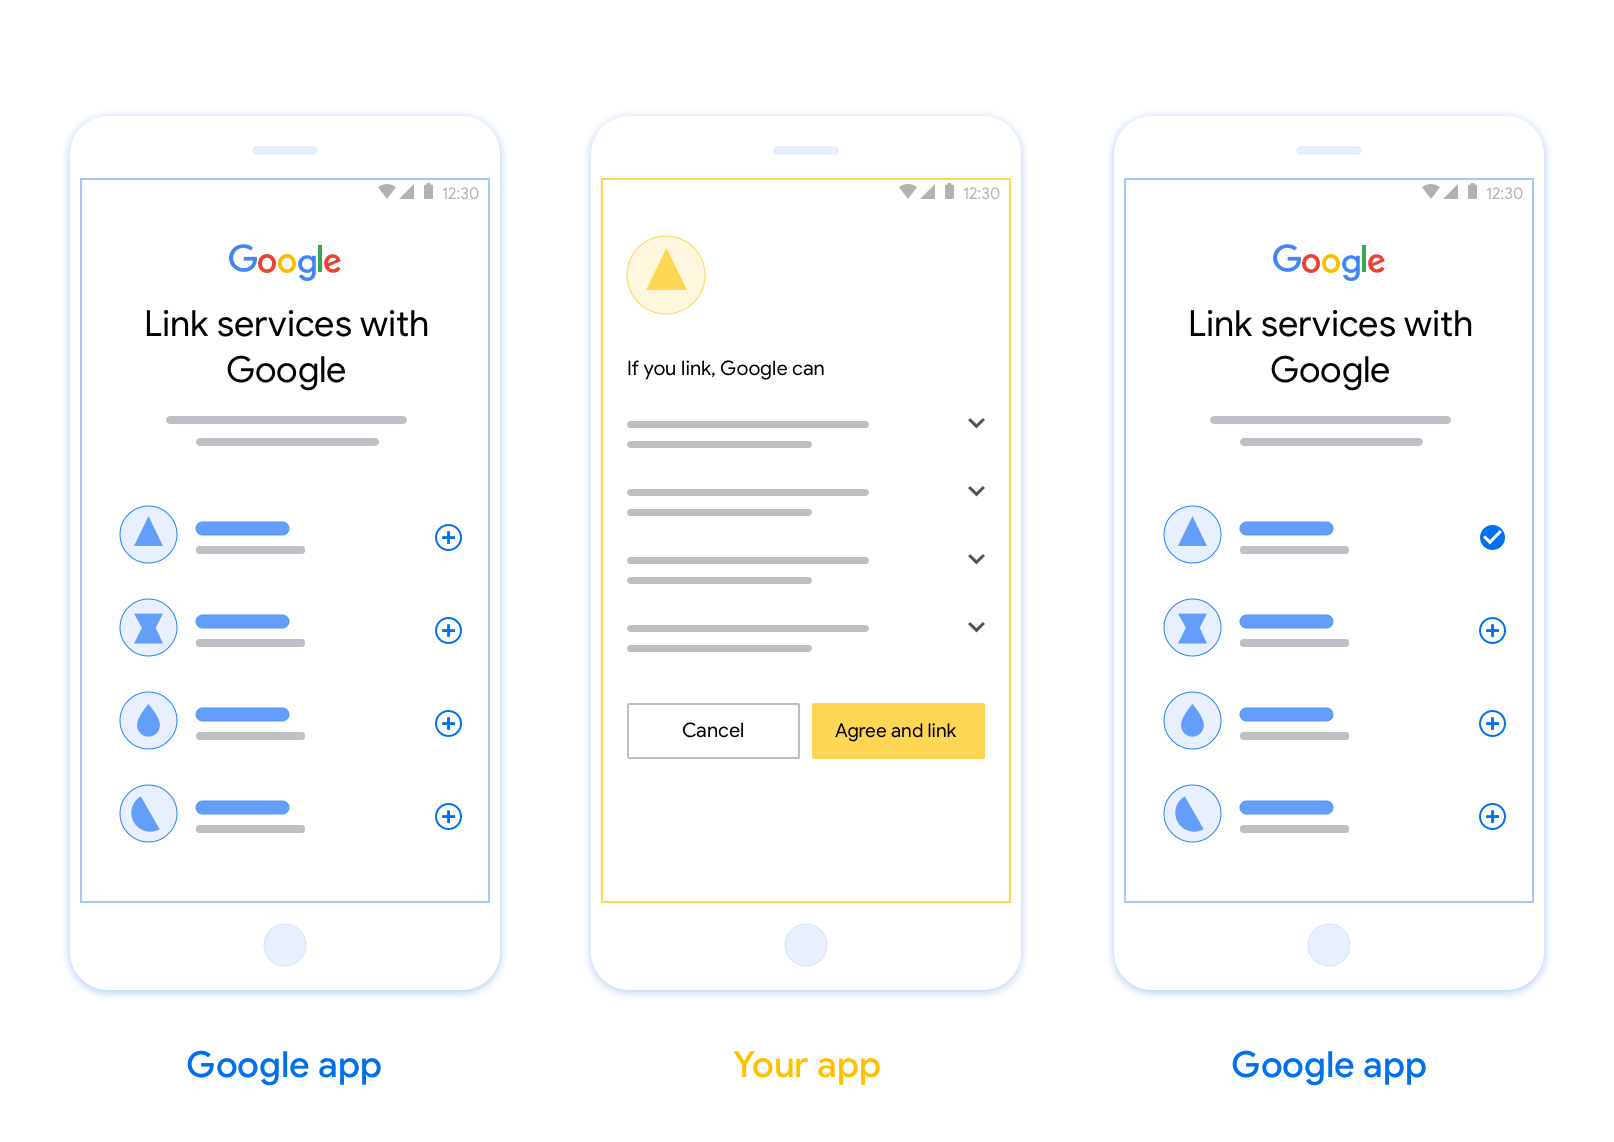
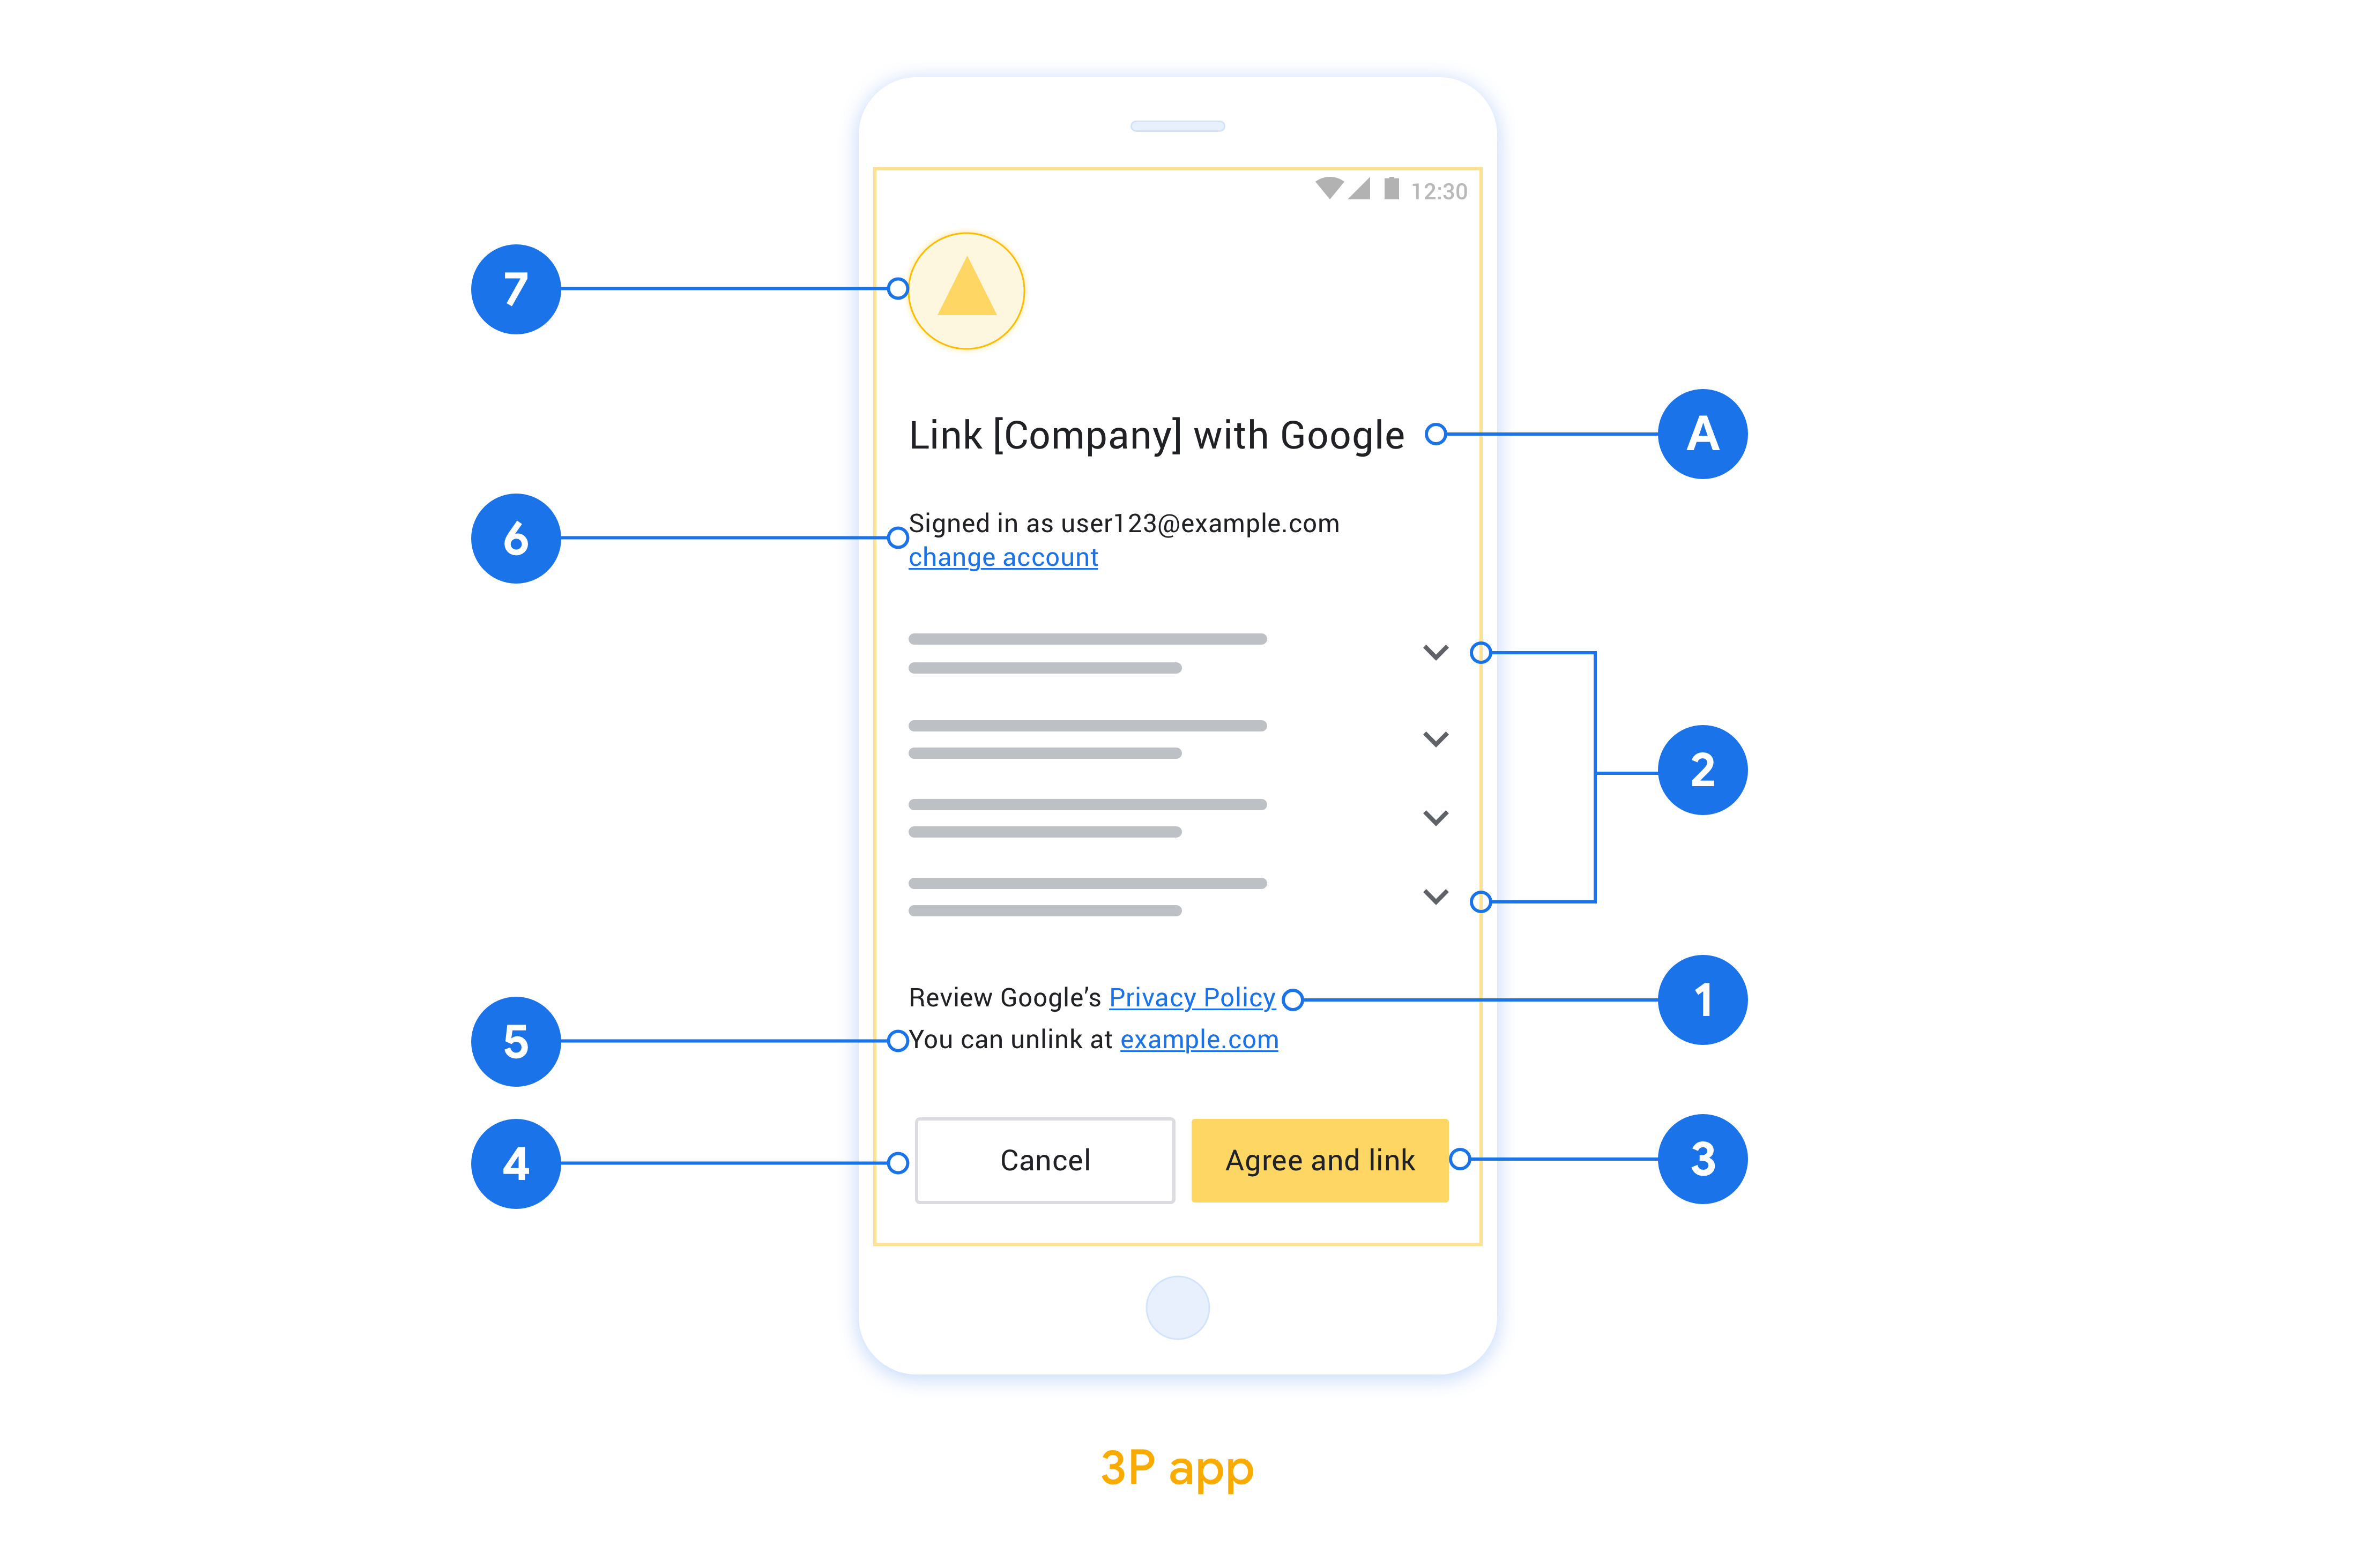
این بخش الزامات و توصیههای طراحی برای صفحه رضایت اتصال حساب App Flip را شرح میدهد. پس از اینکه گوگل برنامه شما را فراخوانی کرد، برنامه شما صفحه رضایت را به کاربر نمایش میدهد.
الزامات
- شما باید اطلاع دهید که حساب کاربر به گوگل متصل میشود، نه به یک محصول خاص گوگل، مانند گوگل هوم یا دستیار گوگل.
توصیهها
توصیه میکنیم موارد زیر را انجام دهید:
سیاست حفظ حریم خصوصی گوگل را نمایش دهید. پیوندی به سیاست حفظ حریم خصوصی گوگل را در صفحه رضایتنامه قرار دهید.
دادههایی که باید به اشتراک گذاشته شوند. با زبانی واضح و مختصر به کاربر بگویید که گوگل به چه دادههایی از او نیاز دارد و چرا.
فراخوان عمل واضح. در صفحه رضایت خود، یک فراخوان عمل واضح مانند «موافقت و پیوند» بیان کنید. دلیل این امر این است که کاربران باید بدانند برای پیوند دادن حسابهایشان، چه دادههایی را باید با گوگل به اشتراک بگذارند.
امکان رد یا لغو. در صورتی که کاربران تصمیم به عدم پذیرش لینک بگیرند، راهی برای بازگشت، رد یا لغو آن فراهم کنید.
امکان لغو پیوند. مکانیزمی برای لغو پیوند کاربران ارائه دهید، مانند URL به تنظیمات حساب کاربری آنها در پلتفرم شما. از طرف دیگر، میتوانید پیوندی به حساب گوگل قرار دهید که کاربران بتوانند حساب پیوند شده خود را مدیریت کنند.
امکان تغییر حساب کاربری. روشی را برای کاربران پیشنهاد دهید تا حساب(های) خود را تغییر دهند. این امر به ویژه در صورتی مفید است که کاربران تمایل به داشتن چندین حساب داشته باشند.
- اگر کاربری برای تغییر حساب کاربری باید صفحه رضایت را ببندد، یک خطای قابل بازیابی به گوگل ارسال کنید تا کاربر بتواند با پیوند OAuth و جریان ضمنی به حساب مورد نظر خود وارد شود.
لوگوی خود را قرار دهید. لوگوی شرکت خود را در صفحه رضایتنامه نمایش دهید. از دستورالعملهای سبک خود برای قرار دادن لوگوی خود استفاده کنید. اگر میخواهید لوگوی گوگل را نیز نمایش دهید، به بخش لوگوها و علائم تجاری مراجعه کنید.
برای App Flip مبتنی بر OAuth تنظیم کنید
بخشهای زیر پیشنیازهای App Flip مبتنی بر OAuth و نحوه پیکربندی پروژه App Flip خود را در کنسول Actions شرح میدهند.
یک Action ایجاد کنید و یک سرور OAuth 2.0 راه اندازی کنید
قبل از اینکه بتوانید App Flip را پیکربندی کنید، باید موارد زیر را انجام دهید:
- یک اکشن ایجاد کنید. برای ایجاد یک Action، دستورالعمل های موجود در بخش Create a project را دنبال کنید.
- یک سرور OAuth 2.0 راه اندازی کنید. برای اطلاعات بیشتر درباره راهاندازی سرور OAuth، به پیادهسازی پیوند حساب OAuth مراجعه کنید.
App Flip را در کنسول Actions پیکربندی کنید
بخش زیر نحوه پیکربندی App Flip را در کنسول Actions توضیح میدهد.
- روی توسعه در پیمایش بالا کلیک کنید. سپس روی Account linking در ناوبری سمت چپ کلیک کنید.
- سوئیچ کنار پیوند حساب را روشن کنید.
- در قسمت ایجاد حساب ، خیر را انتخاب کنید، من فقط میخواهم اجازه ایجاد حساب در وبسایت خود را بدهم .
- روی Next کلیک کنید.
- در قسمت نوع پیوند ، OAuth و کد مجوز را از منوهای کشویی انتخاب کنید.
- روی Next کلیک کنید.
- تمام فیلدهای زیر اطلاعات مشتری OAuth را پر کنید. (اگر App Flip پشتیبانی نمی شود، OAuth معمولی به عنوان یک بازگشت استفاده می شود.)
- روی Next کلیک کنید.
- در قسمت Use your app for account linking (اختیاری) ، گزینه Enable for iOS را علامت بزنید.
- فیلد پیوند جهانی را پر کنید. برای اطلاعات بیشتر درباره پیوندهای جهانی، به اجازه دادن به برنامهها و وبسایتها برای پیوند دادن به محتوای شما مراجعه کنید.
- اگر میخواهید به صورت اختیاری مشتری خود را پیکربندی کنید، دامنهها را اضافه کنید و روی Add scope در زیر Configure your client (اختیاری) کلیک کنید. اگر نه، روی Next کلیک کنید.
- در دستورالعملهای تست،
test(یا هر رشته دیگری) را بهعنوان جایبان تایپ کنید. (پر کردن این فیلد با یک حساب آزمایشی تنها در صورتی ضروری است که شما واقعاً اقدام خود را برای انتشار ارسال می کنید.) - روی ذخیره کلیک کنید.
اکنون می توانید برای پیاده سازی App Flip در برنامه iOS یا Android خود به بخش بعدی بروید.
App Flip را در برنامه های بومی خود پیاده کنید
برای اجرای App Flip، باید کد مجوز کاربر را در برنامه خود تغییر دهید تا پیوند عمیق از Google را بپذیرید.
برنامه Flip را روی دستگاه خود تست کنید
اکنون که یک Action ایجاد کرده اید و App Flip را در کنسول و برنامه خود پیکربندی کرده اید، می توانید App Flip را در دستگاه تلفن همراه خود آزمایش کنید. برای آزمایش App Flip می توانید از برنامه Google Assistant استفاده کنید.
برای آزمایش App Flip از برنامه Assistant، این مراحل را دنبال کنید:
- به کنسول Actions بروید و پروژه خود را انتخاب کنید.
- روی تست در پیمایش بالا کلیک کنید.
- جریان پیوند حساب را از برنامه دستیار فعال کنید:
- برنامه Google Assistant را باز کنید.
- روی تنظیمات کلیک کنید.
- در تب Assistant، روی Home Control کلیک کنید.
- روی Add(+) کلیک کنید.
- Action خود را از لیست ارائه دهندگان انتخاب کنید. پیشوند آن با "[test]" در لیست خواهد بود. وقتی اکشن [تست] خود را از لیست انتخاب میکنید، باید برنامه شما را باز کند.
- بررسی کنید که برنامه شما راه اندازی شده است و شروع به آزمایش جریان مجوز خود کنید.