

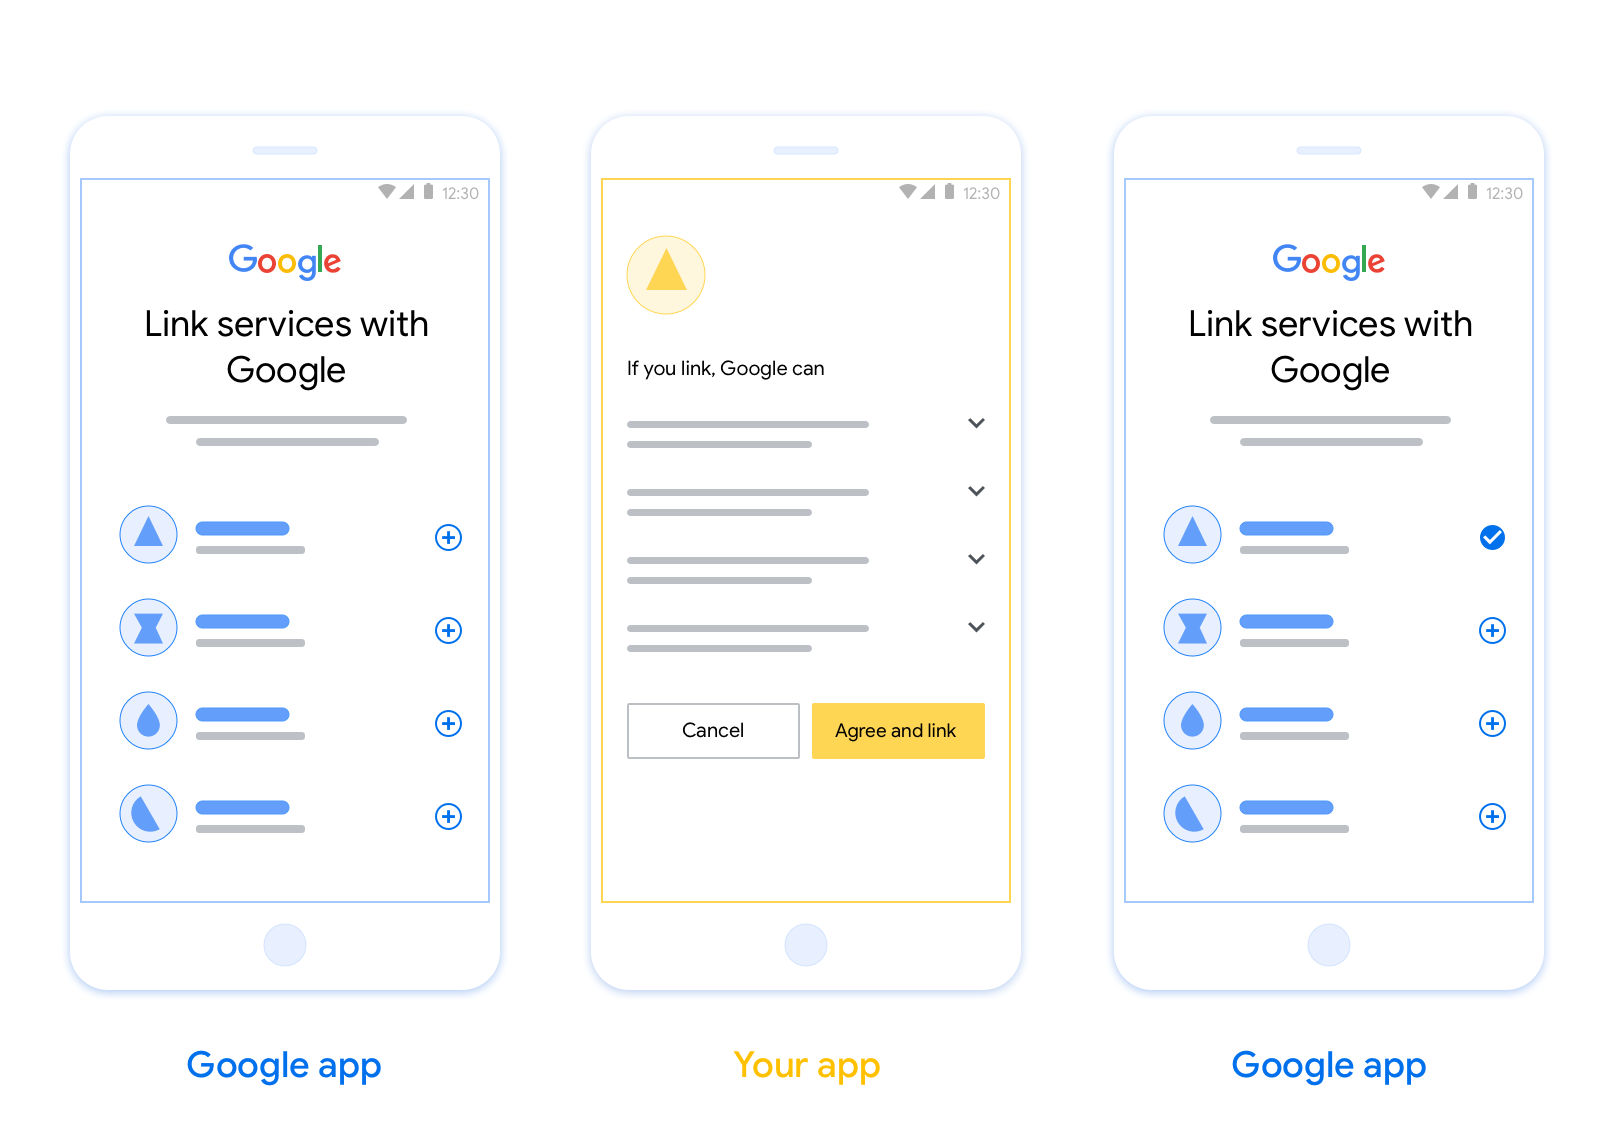
OAuth-based App Flip Linking (App Flip) allows your users to quickly link their accounts in your authentication system to their Google Accounts. If your app is installed on your user's phone when they initiate the account linking process, they are seamlessly flipped to your app to obtain user authorization.
This approach provides a faster linking process since the user does not have to re-enter their username and password to authenticate; instead, App Flip leverages the credentials from the user's account on your app. Once a user has linked their Google Account with your app, they can take advantage of any integrations that you have developed.
You can set up App Flip for both iOS and Android apps.
Requirements
To implement App Flip, you must fulfill the following requirements:
- You must have an Android or iOS app.
- You must own, manage and maintain an OAuth 2.0 server which supports the OAuth 2.0 authorization code flow.
OAuth-based App Flip Flow
The following sequence diagram details the interaction between the User, Google App, Your App, and Your Authorization Server for App Flip.
Roles and responsibilities
The following table defines the roles and responsibilities of the actors in the App Flip flow.
| Actor / Component | GAL Role | Responsibilities |
|---|---|---|
| Google App / Server | OAuth Client | Initiates the linking process, triggers a deep link to your mobile app, exchanges the authorization code for tokens, and securely stores them to access your service's APIs. |
| Your App | Authorization Agent | Authenticates the user (typically using existing app credentials), obtains consent, and retrieves an authorization code from your server. |
| Your Authorization Server | Authorization Server | Validates authorization codes and refresh tokens, and issues access tokens to the Google Server. |
מידע נוסף על תהליך קוד ההרשאה לקישור OAuth זמין במאמר הטמעה של שרת OAuth.
Design guidelines
This section describes the design requirements and recommendations for the App Flip account linking consent screen. After Google calls your app, your app displays the consent screen to the user.
Requirements
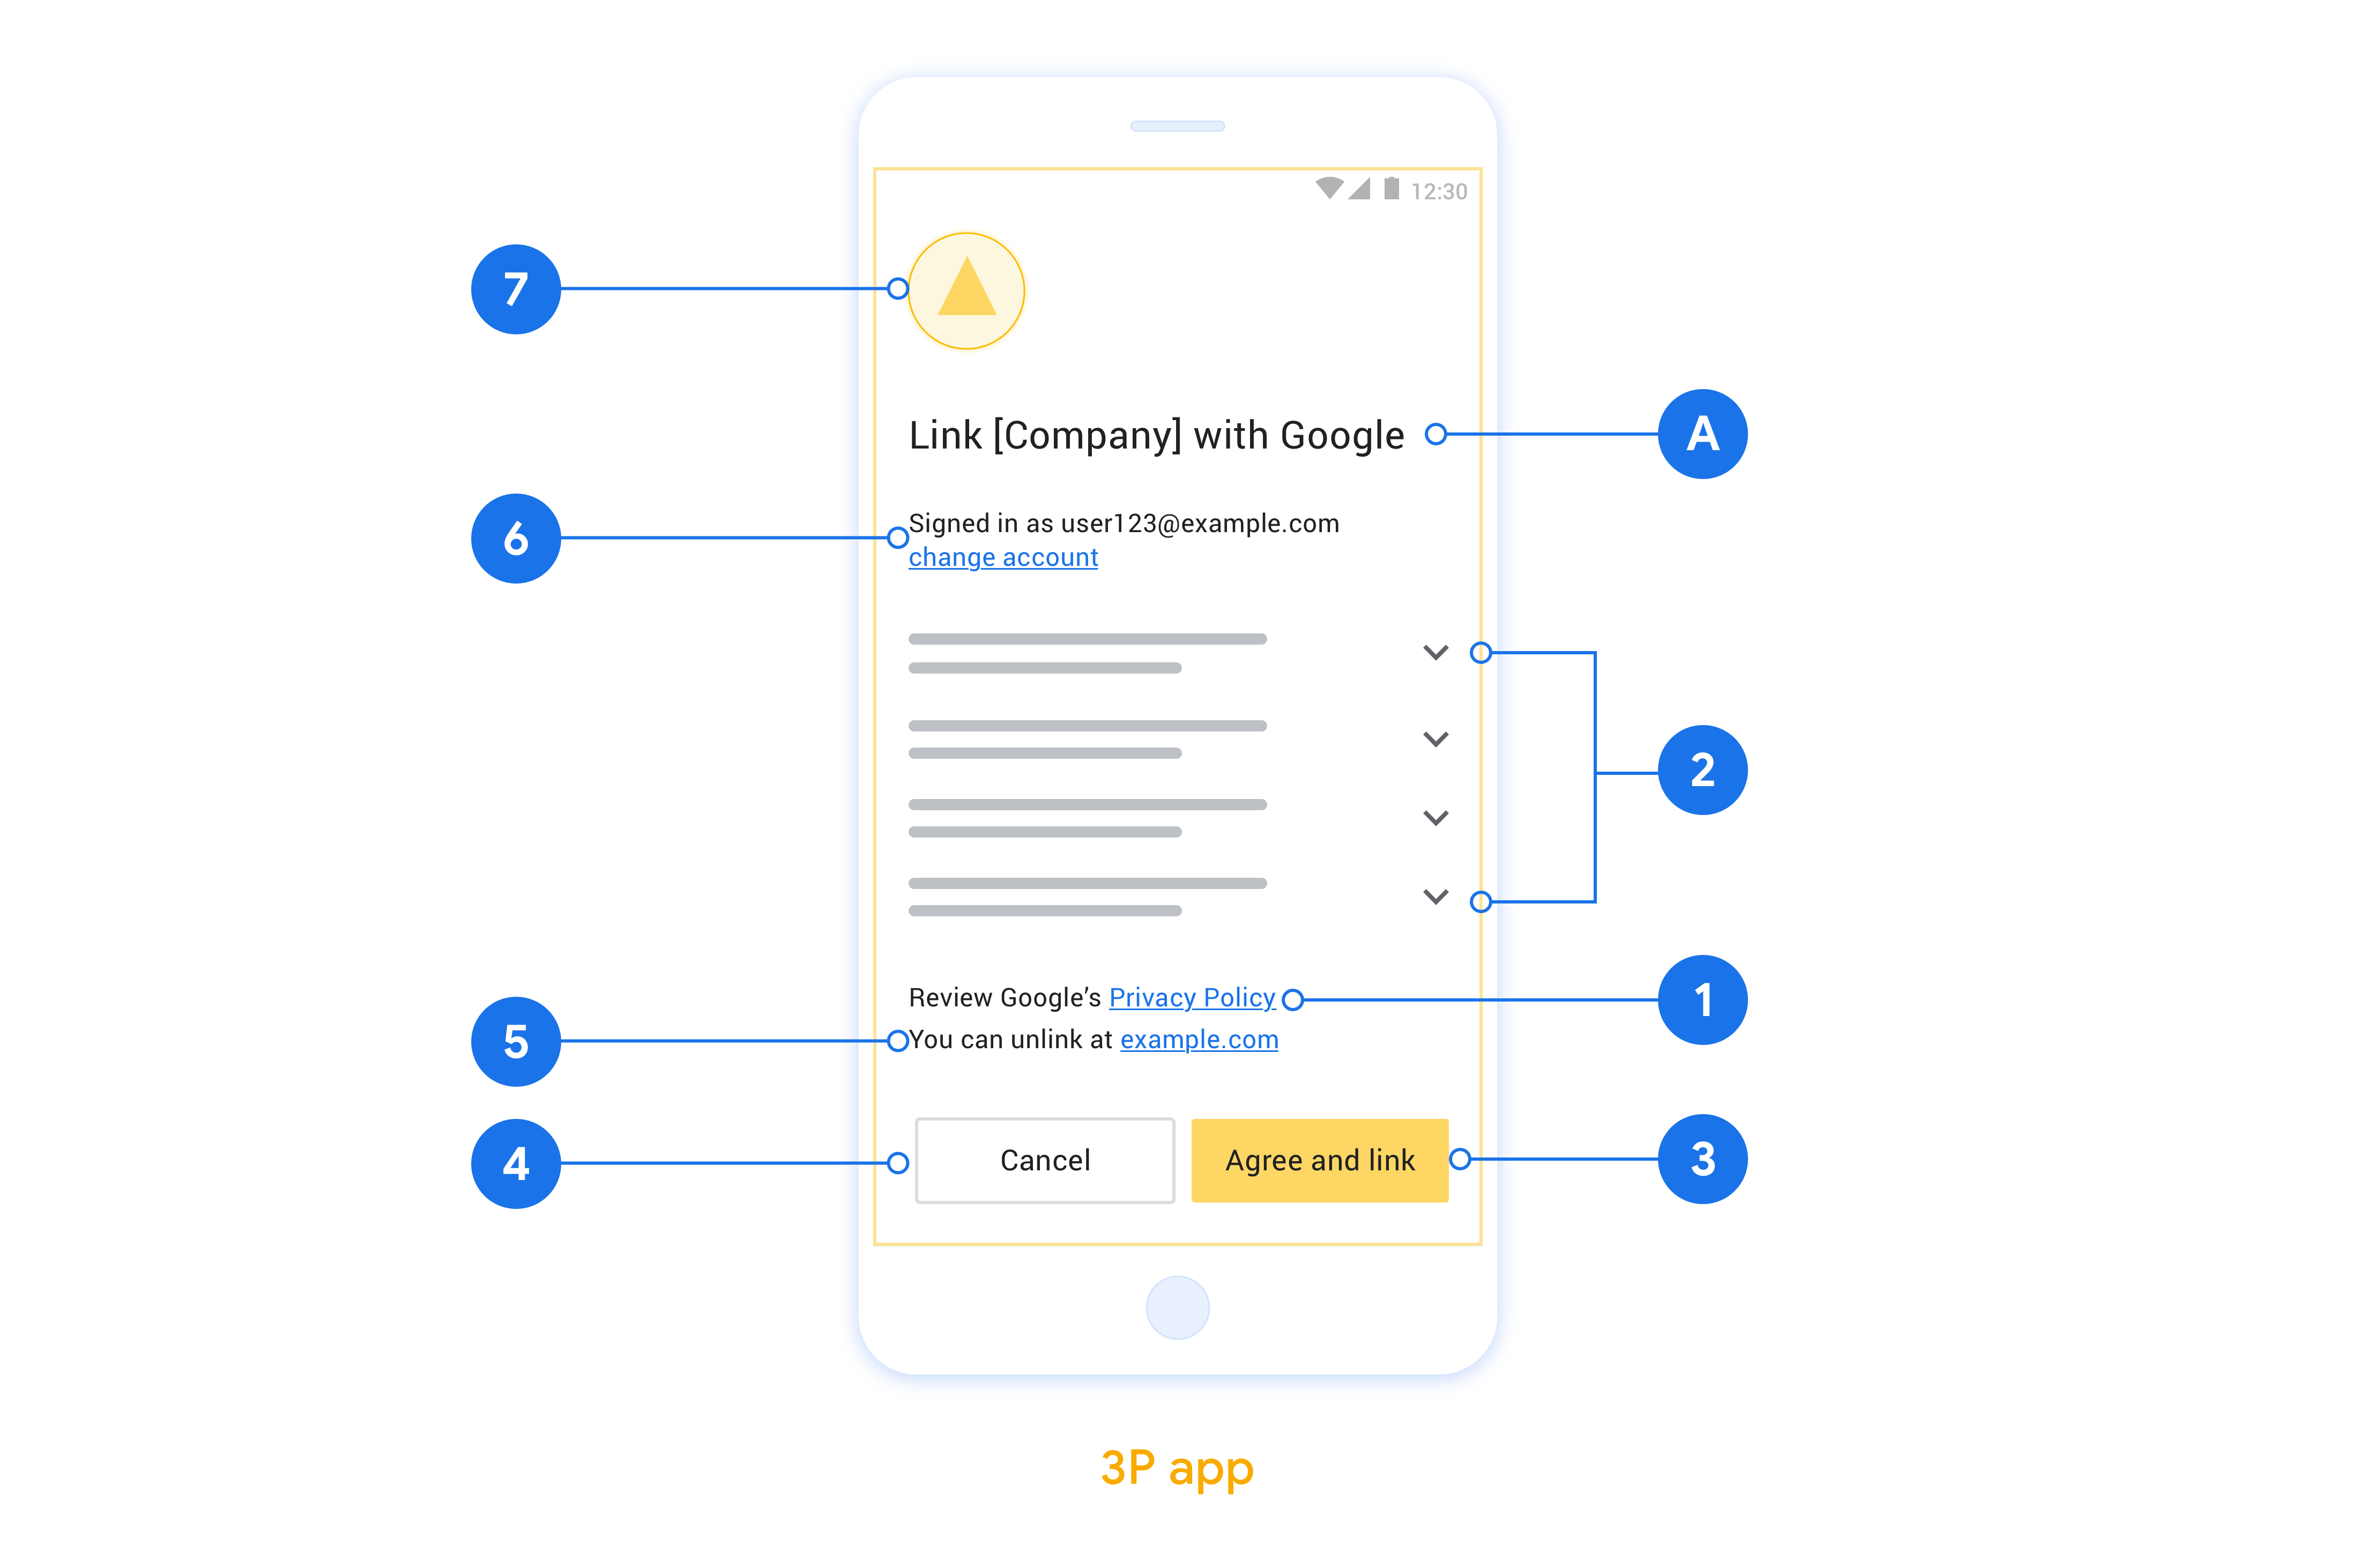
- You must communicate that the user’s account is being linked to Google, not to a specific Google product, such as Google Home or Google Assistant.
Recommendations
We recommend that you do the following:
Display Google's Privacy Policy. Include a link to Google’s Privacy Policy on the consent screen.
Data to be shared. Use clear and concise language to tell the user what data of theirs Google requires and why.
Clear call-to-action. State a clear call-to-action on your consent screen, such as “Agree and link.” This is because users need to understand what data they're required to share with Google to link their accounts.
Ability to deny or cancel. Provide a way for users to go back, deny, or cancel, if they choose not to link.
Ability to unlink. Offer a mechanism for users to unlink, such as a URL to their account settings on your platform. Alternatively, you can include a link to Google Account where users can manage their linked account.
Ability to change user account. Suggest a method for users to switch their account(s). This is especially beneficial if users tend to have multiple accounts.
- If a user must close the consent screen to switch accounts, send a recoverable error to Google so the user can sign in to the desired account with OAuth linking and the implicit flow.
Include your logo. Display your company logo on the consent screen. Use your style guidelines to place your logo. If you wish to also display Google's logo, see Logos and trademarks.
הגדרה של מעבר בין אפליקציות שמבוסס על OAuth
בקטעים הבאים מפורטים התנאים המוקדמים לשימוש בתכונה 'החלפת אפליקציות' שמבוססת על OAuth, ומוסבר איך להגדיר את פרויקט 'החלפת אפליקציות' ב-Actions Console.
יצירת פעולה והגדרת שרת OAuth 2.0
לפני שמגדירים את התכונה 'מעבר מהיר לאפליקציה', צריך לבצע את הפעולות הבאות:
- יוצרים פעולה. כדי ליצור פעולה, פועלים לפי ההוראות שבקטע יצירת פרויקט.
- הגדרת שרת OAuth 2.0 מידע נוסף על הגדרת שרת OAuth זמין במאמר הטמעה של קישור חשבונות OAuth.
הגדרת מעבר מהיר בין אפליקציות במסוף הפעולות
בקטע הבא מוסבר איך להגדיר את התכונה 'החלפת אפליקציות' במסוף הפעולות.
- בסרגל הניווט העליון, לוחצים על פיתוח. לאחר מכן, לוחצים על קישור חשבון בניווט הימני.
- מעבירים את המתג לצד קישור חשבונות למצב מופעל.
- בקטע יצירת חשבון, בוחרים באפשרות לא, אני רק רוצה לאפשר יצירת חשבון באתר שלי.
- לוחצים על הבא.
- בקטע סוג הקישור, בוחרים באפשרות OAuth וקוד הרשאה מהתפריטים הנפתחים.
- לוחצים על הבא.
- ממלאים את כל השדות בקטע פרטי לקוח OAuth. (אם האפליקציה לא תומכת בהחלפה בין אפליקציות, נעשה שימוש ב-OAuth רגיל כחלופה).
- לוחצים על הבא.
- בקטע שימוש באפליקציה לקישור חשבונות (אופציונלי), מסמנים את האפשרות הפעלה ב-iOS.
- ממלאים את השדה Universal Link (קישור אוניברסלי). מידע נוסף על קישורים אוניברסליים זמין במאמר מתן הרשאה לאפליקציות ולאתרים לקשר לתוכן שלכם .
- אם רוצים להגדיר את הלקוח, מוסיפים היקפי הרשאות ולוחצים על הוספת היקף הרשאות בקטע הגדרת הלקוח (אופציונלי). אם לא, לוחצים על הבא.
- בקטע Testing instructions (הוראות לבדיקה), מקלידים
test(או כל מחרוזת אחרת) כמציין מיקום. (מילוי השדה הזה בחשבון בדיקה נדרש רק אם אתם שולחים את הפעולה שלכם לפרסום). - לוחצים על שמירה.
עכשיו אפשר להמשיך לקטע הבא כדי להטמיע את התכונה 'החלפת אפליקציות' באפליקציה ל-iOS או ל-Android.
הטמעה של התכונה 'החלפה מהירה בין אפליקציות' באפליקציות מקוריות
כדי להטמיע את התכונה 'מעבר מהיר לאפליקציה', צריך לשנות את קוד הרשאת המשתמש באפליקציה כדי לאפשר קבלת קישור עומק מ-Google.
בדיקת התכונה 'החלפת אפליקציות' במכשיר
אחרי שיצרתם פעולה והגדרתם את התכונה 'מעבר מהיר לאפליקציה' ב-Play Console ובאפליקציה, אתם יכולים לבדוק את התכונה הזו במכשיר הנייד. אפשר להשתמש באפליקציית Google Assistant כדי לבדוק את התכונה 'החלפת אפליקציות'.
כדי לבדוק את התכונה 'מעבר מהיר בין אפליקציות' מאפליקציית Assistant, פועלים לפי השלבים הבאים:
- נכנסים אל Actions console ובוחרים את הפרויקט.
- לוחצים על בדיקה בסרגל הניווט העליון.
- מפעילים את תהליך קישור החשבון מאפליקציית Assistant:
- פותחים את אפליקציית Google Assistant.
- לוחצים על הגדרות.
- בכרטיסייה Assistant, לוחצים על Home Control (שליטה בבית).
- לוחצים על הוספה(+).
- בוחרים את הפעולה הרצויה מרשימת הספקים. הוא יופיע ברשימה עם הקידומת [test]. כשבוחרים את פעולת [הבדיקה] מהרשימה, האפליקציה אמורה להיפתח.
- מוודאים שהאפליקציה הושקה ומתחילים לבדוק את תהליך ההרשאה.