يوضِّح لك هذا الدليل التوجيهي كيفية إعداد حدث purchase على موقعك الإلكتروني لكي تتمكّن من
قياس الحالات التي يُجري فيها أحد الأشخاص عملية شراء. يتضمّن الدليل التوجيهي السمات
والمقاييس والتقارير التي تُعبّئها "إحصاءات Google" ببيانات من الحدث. للتعلّم
اطّلِع على مزيد من المعلومات عن أحداث التجارة الإلكترونية. اطّلِع على قياس التجارة الإلكترونية.
قبل البدء
يفترض هذا البرنامج التعليمي أنك قمت بما يلي:
- إنشاء حساب وموقع على "إحصاءات Google"
- إنشاء مصدر بيانات لموقعك الإلكتروني
- وضع علامة "إحصاءات Google" على موقعك الإلكتروني
يجب أن يكون لديك أيضًا ما يلي:
- لديك الإذن بالوصول إلى رمز المصدر الخاص بموقعك الإلكتروني
- دور المحرِّر (أو دور أعلى) في حساب "إحصاءات Google"
الخطوة 1: إضافة الفعالية إلى موقعك الإلكتروني
يجب وضع الحدث purchase على صفحة موقعك الإلكتروني حيث
يجري شخص ما عملية شراء. على سبيل المثال، يمكنك إضافة الحدث إلى صفحة
صفحة التأكيد التي تظهر عندما يُجري أحد الأشخاص عملية شراء. هذا الدليل التوجيهي
كيفية إضافة الحدث إلى صفحة ينقر فيها أحد المستخدمين على "شراء"
.
ضَع الحدث في علامة <script> في نهاية العلامة <body>. يؤدي وضع
يؤدي الحدث مباشرةً في العلامة <script> إلى تشغيل الحدث عند تحميل الصفحة. تشير رسالة الأشكال البيانية
يصف القسم التالي كيفية بدء الحدث عندما ينقر مستخدم على "شراء".
<!--
  Note: In the following code sample, make sure to
  replace "TAG_ID" with your tag ID.
  Learn more: https://support.google.com/tagmanager/answer/12326985
-->
<!DOCTYPE html>
<html lang="en">
<head>
    <!-- Google tag (gtag.js) -->
    <script async src="https://www.googletagmanager.com/gtag/js?id=TAG_ID"></script>
    <script>
        window.dataLayer = window.dataLayer || [];
        function gtag(){dataLayer.push(arguments);}
        gtag('js', new Date());

        gtag('config', 'TAG_ID');
    </script>
</head>
<body>
    <div>This is where the purchase form would go</div>
    <button>Submit</button>
    <script>
    gtag("event", "purchase", {
        transaction_id: "T_12345_1",
        value: 30.03,
        tax: 4.90,
        shipping: 5.99,
        currency: "USD",
        coupon: "SUMMER_SALE",
        items: [
        // If someone purchases more than one item,
        // you can add those items to the items array
         {
          item_id: "SKU_12345",
          item_name: "Stan and Friends Tee",
          affiliation: "Google Merchandise Store",
          coupon: "SUMMER_FUN",
          discount: 2.22,
          index: 0,
          item_brand: "Google",
          item_category: "Apparel",
          item_category2: "Adult",
          item_category3: "Shirts",
          item_category4: "Crew",
          item_category5: "Short sleeve",
          item_list_id: "related_products",
          item_list_name: "Related Products",
          item_variant: "green",
          location_id: "ChIJIQBpAG2ahYAR_6128GcTUEo",
          price: 10.01,
          quantity: 3
        }]
    });
    </script>
</body>
</html>
الخطوة 2: ربط الحدث بزر
يمكنك إعداد حدث "purchase" ليتم تشغيله عندما ينقر أحد المستخدمين على
"شراء" بعدة طرق. تتمثل إحدى الطرق في إضافة معرّف إلى حقل "الشراء"
ثم ضع رمز الحدث في أداة معالجة الحدث. في ما يلي
على سبيل المثال، لا يتم إرسال الحدث إلا عندما ينقر أحد الأشخاص على زر يحتوي على المعرّف
purchase
<!--
  Note: In the following code sample, make sure to
  replace "TAG_ID" with your tag ID.
  Learn more: https://support.google.com/tagmanager/answer/12326985
-->
<!DOCTYPE html>
<html lang="en">
<head>
    <!-- Google tag (gtag.js) -->
    <script async src="https://www.googletagmanager.com/gtag/js?id=TAG_ID"></script>
    <script>
        window.dataLayer = window.dataLayer || [];
        function gtag(){dataLayer.push(arguments);}
        gtag('js', new Date());

        gtag('config', 'TAG_ID');
    </script>
</head>
<body>
    <div>This is where the purchase form would go</div>
    <button id="purchase">Purchase</button>
    <script>
    document.getElementById("purchase").addEventListener("click", function () {
        gtag("event", "purchase", {
                // This purchase event uses a different transaction ID
                // from the previous purchase event so Analytics
                // doesn't deduplicate the events.
                // Learn more: https://support.google.com/analytics/answer/12313109
                transaction_id: "T_12345_2",
                value: 30.03,
                tax: 4.90,
                shipping: 5.99,
                currency: "USD",
                coupon: "SUMMER_SALE",
                items: [
                {
                  item_id: "SKU_12345",
                  item_name: "Stan and Friends Tee",
                  affiliation: "Google Merchandise Store",
                  coupon: "SUMMER_FUN",
                  discount: 2.22,
                  index: 0,
                  item_brand: "Google",
                  item_category: "Apparel",
                  item_category2: "Adult",
                  item_category3: "Shirts",
                  item_category4: "Crew",
                  item_category5: "Short sleeve",
                  item_list_id: "related_products",
                  item_list_name: "Related Products",
                  item_variant: "green",
                  location_id: "ChIJIQBpAG2ahYAR_6128GcTUEo",
                  price: 10.01,
                  quantity: 3
                }]
          });
      });
    </script>
</body>
</html>
الخطوة 3: التأكّد من أنّك تجمع البيانات
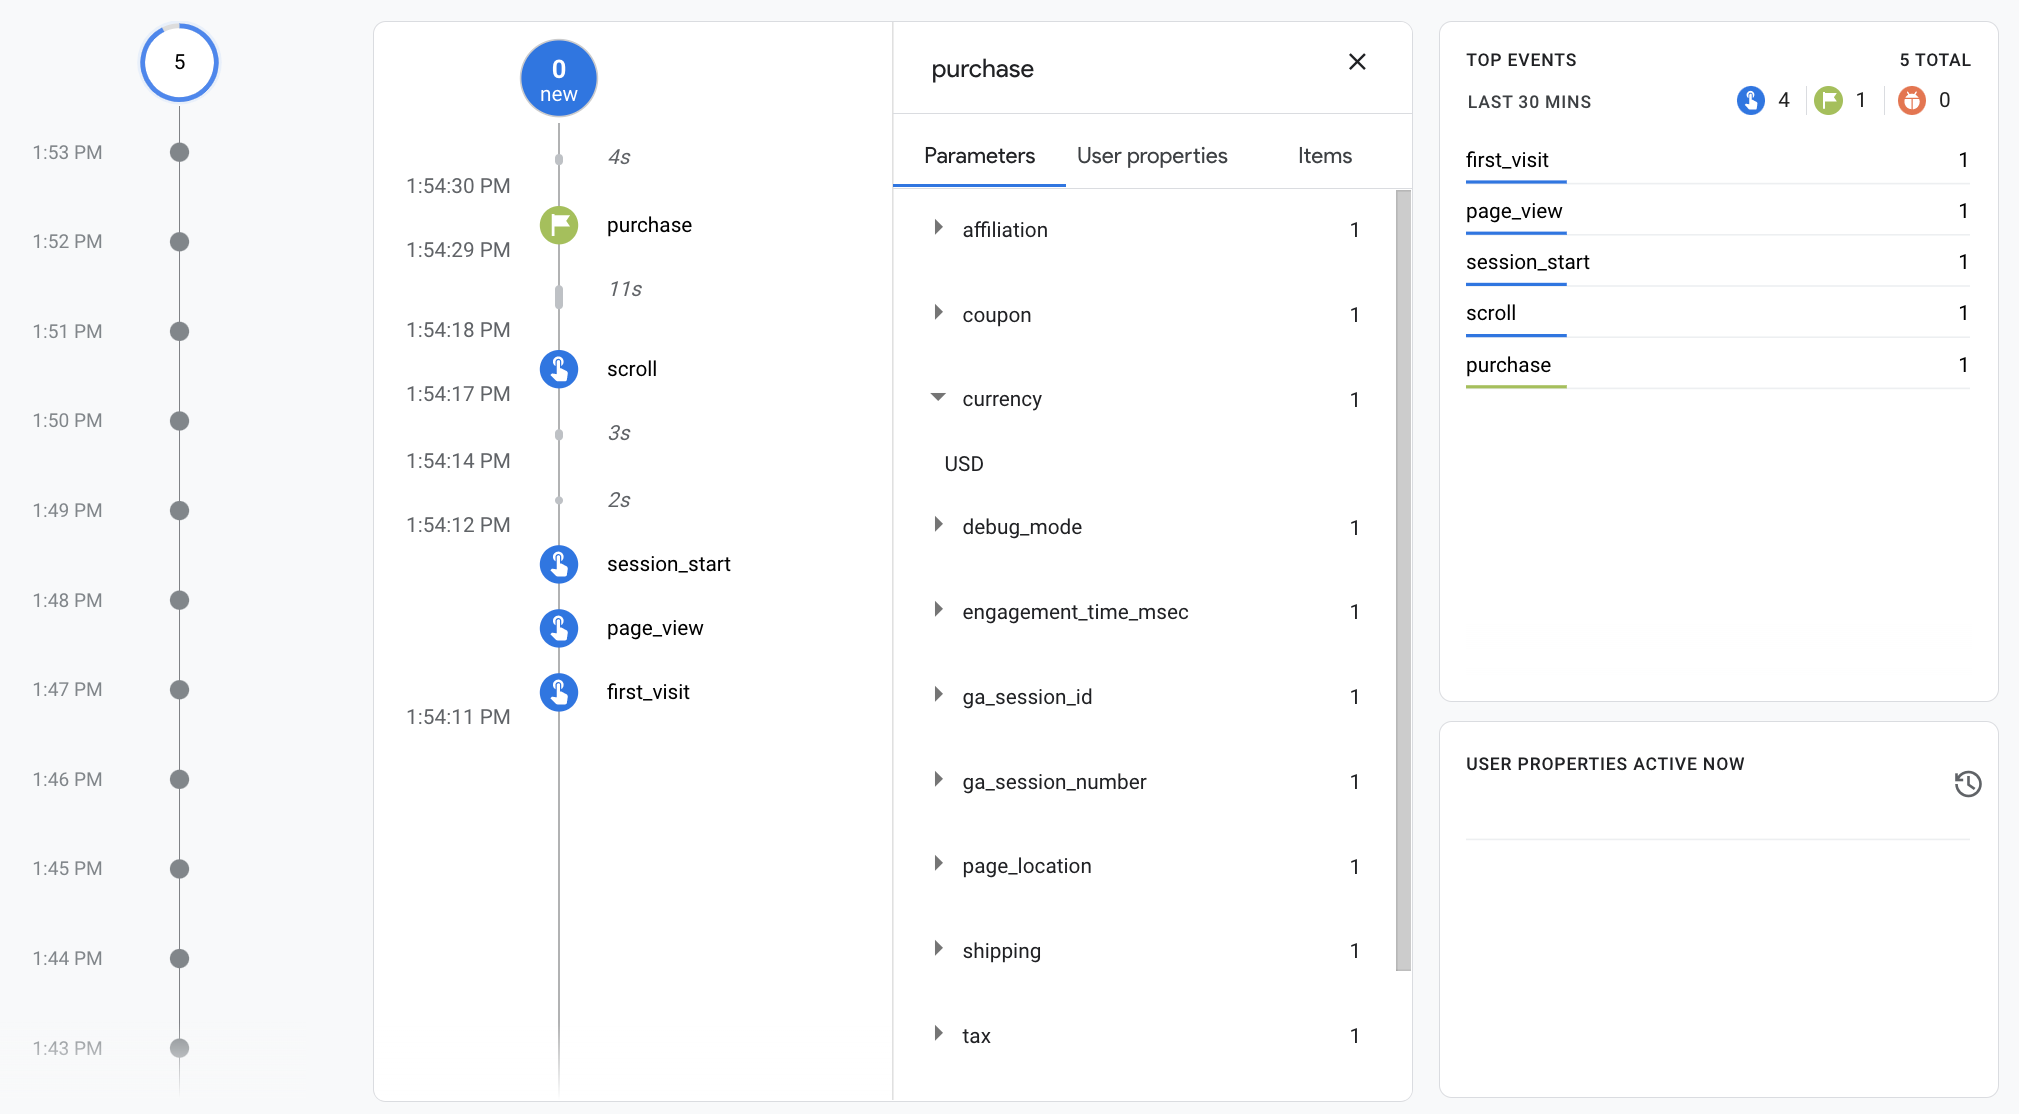
يعرض تقرير DebugView بيانات في الوقت الفعلي من موقعك الإلكتروني حتى تتمكّن من
للتأكّد من إعداد الأحداث بشكل صحيح لتفعيل وضع تصحيح الأخطاء على صفحة ويب، عليك إضافة
مَعلمة debug_mode التالية إلى الأمر config:
<!--
  Note: In the following code sample, make sure to
  replace "TAG_ID" with your tag ID.
  Learn more: https://support.google.com/tagmanager/answer/12326985
-->
<!DOCTYPE html>
<html lang="en">
<head>
    <!-- Google tag (gtag.js) -->
    <script async src="https://www.googletagmanager.com/gtag/js?id=TAG_ID"></script>
    <script>
        window.dataLayer = window.dataLayer || [];
        function gtag(){dataLayer.push(arguments);}
        gtag('js', new Date());

        gtag('config', 'TAG_ID',{ 'debug_mode': true });
    </script>
</head>
<body>
    <div>This is where the purchase form would go</div>
    <button id="purchase">Purchase</button>
    <script>
    document.getElementById("purchase").addEventListener("click", function () {
        gtag("event", "purchase", {
                // This purchase event uses a different transaction ID
                // from the previous purchase event so Analytics
                // doesn't deduplicate the events.
                // Learn more: https://support.google.com/analytics/answer/12313109
                transaction_id: "T_12345_3",
                value: 30.03,
                tax: 4.90,
                shipping: 5.99,
                currency: "USD",
                coupon: "SUMMER_SALE",
                items: [
                {
                  item_id: "SKU_12345",
                  item_name: "Stan and Friends Tee",
                  affiliation: "Google Merchandise Store",
                  coupon: "SUMMER_FUN",
                  discount: 2.22,
                  index: 0,
                  item_brand: "Google",
                  item_category: "Apparel",
                  item_category2: "Adult",
                  item_category3: "Shirts",
                  item_category4: "Crew",
                  item_category5: "Short sleeve",
                  item_list_id: "related_products",
                  item_list_name: "Related Products",
                  item_variant: "green",
                  location_id: "ChIJIQBpAG2ahYAR_6128GcTUEo",
                  price: 10.01,
                  quantity: 3
                }]
        });
    });
    </script>
</body>
</html>
بعد تفعيل وضع تصحيح الأخطاء، ستبدأ في رؤية أحداث تملأ تقرير DebugView حيث يستخدم الأشخاص موقعك الإلكتروني. على سبيل المثال، يؤدي النقر على "شراء" في موقعك على الويب إلى تعبئة التقرير بالبيانات التالية. يمكنك اختيار حدث للاطّلاع على المَعلمات وخصائص المستخدِمين والعناصر المرتبطة بالحدث.
الخطوة 4: الاطّلاع على بيانات التجارة الإلكترونية
بعد 24 ساعة تقريبًا، ستصبح البيانات التي أرسلتها مع حدث "purchase"
متاحة في التقارير والاستكشافات وGoogle Analytics Data API.
يمكنك أيضًا الوصول إلى البيانات في BigQuery عند إعداد BigQuery Export.
يعد "purchase" يؤدي الحدث إلى تعبئة مجموعة متنوعة من السمات المنشأة مسبقًا
والمقاييس، والتي تُستخدَم في التقارير والاستكشافات تشير رسالة الأشكال البيانية
في ما يلي بعض السمات التي يتم ملؤها ببيانات من
حدث واحد (purchase) في الخطوة الأولى:
| المعلمة | السمة | القيمة |
|---|---|---|
affiliation |
ارتباط السلعة | متجر بيع سلع Google |
currency |
العملة | الدولار الأمريكي |
discount |
قيمة الخصم على السلعة | 2.22 |
index |
موضع قائمة السلع | 0 |
item_brand |
العلامة التجارية للسلعة | |
item_category |
فئة السلعة | ملابس |
item_id |
معرّف السلعة | SKU_12345 |
item_list_id |
رقم تعريف قائمة السلع | related_products |
item_list_name |
اسم قائمة السلع | المنتجات ذات الصلة |
item_name |
اسم العنصر | قميص مُزيَّن بشخصيات كتاب Stan and Friends |
item_variant |
خيار السلعة | أخضر |
location_id |
معرّف الموقع الجغرافي للسلعة | ChIJIQBpAG2ahYAR_6128GcTUEo (رقم تعريف مكان Google لمدينة سان فرانسيسكو) |
shipping |
مبلغ الشحن | يورو |
tax |
مبلغ الضريبة | 4.90 |
transaction_id |
معرِّف المعاملة | T_12345 |
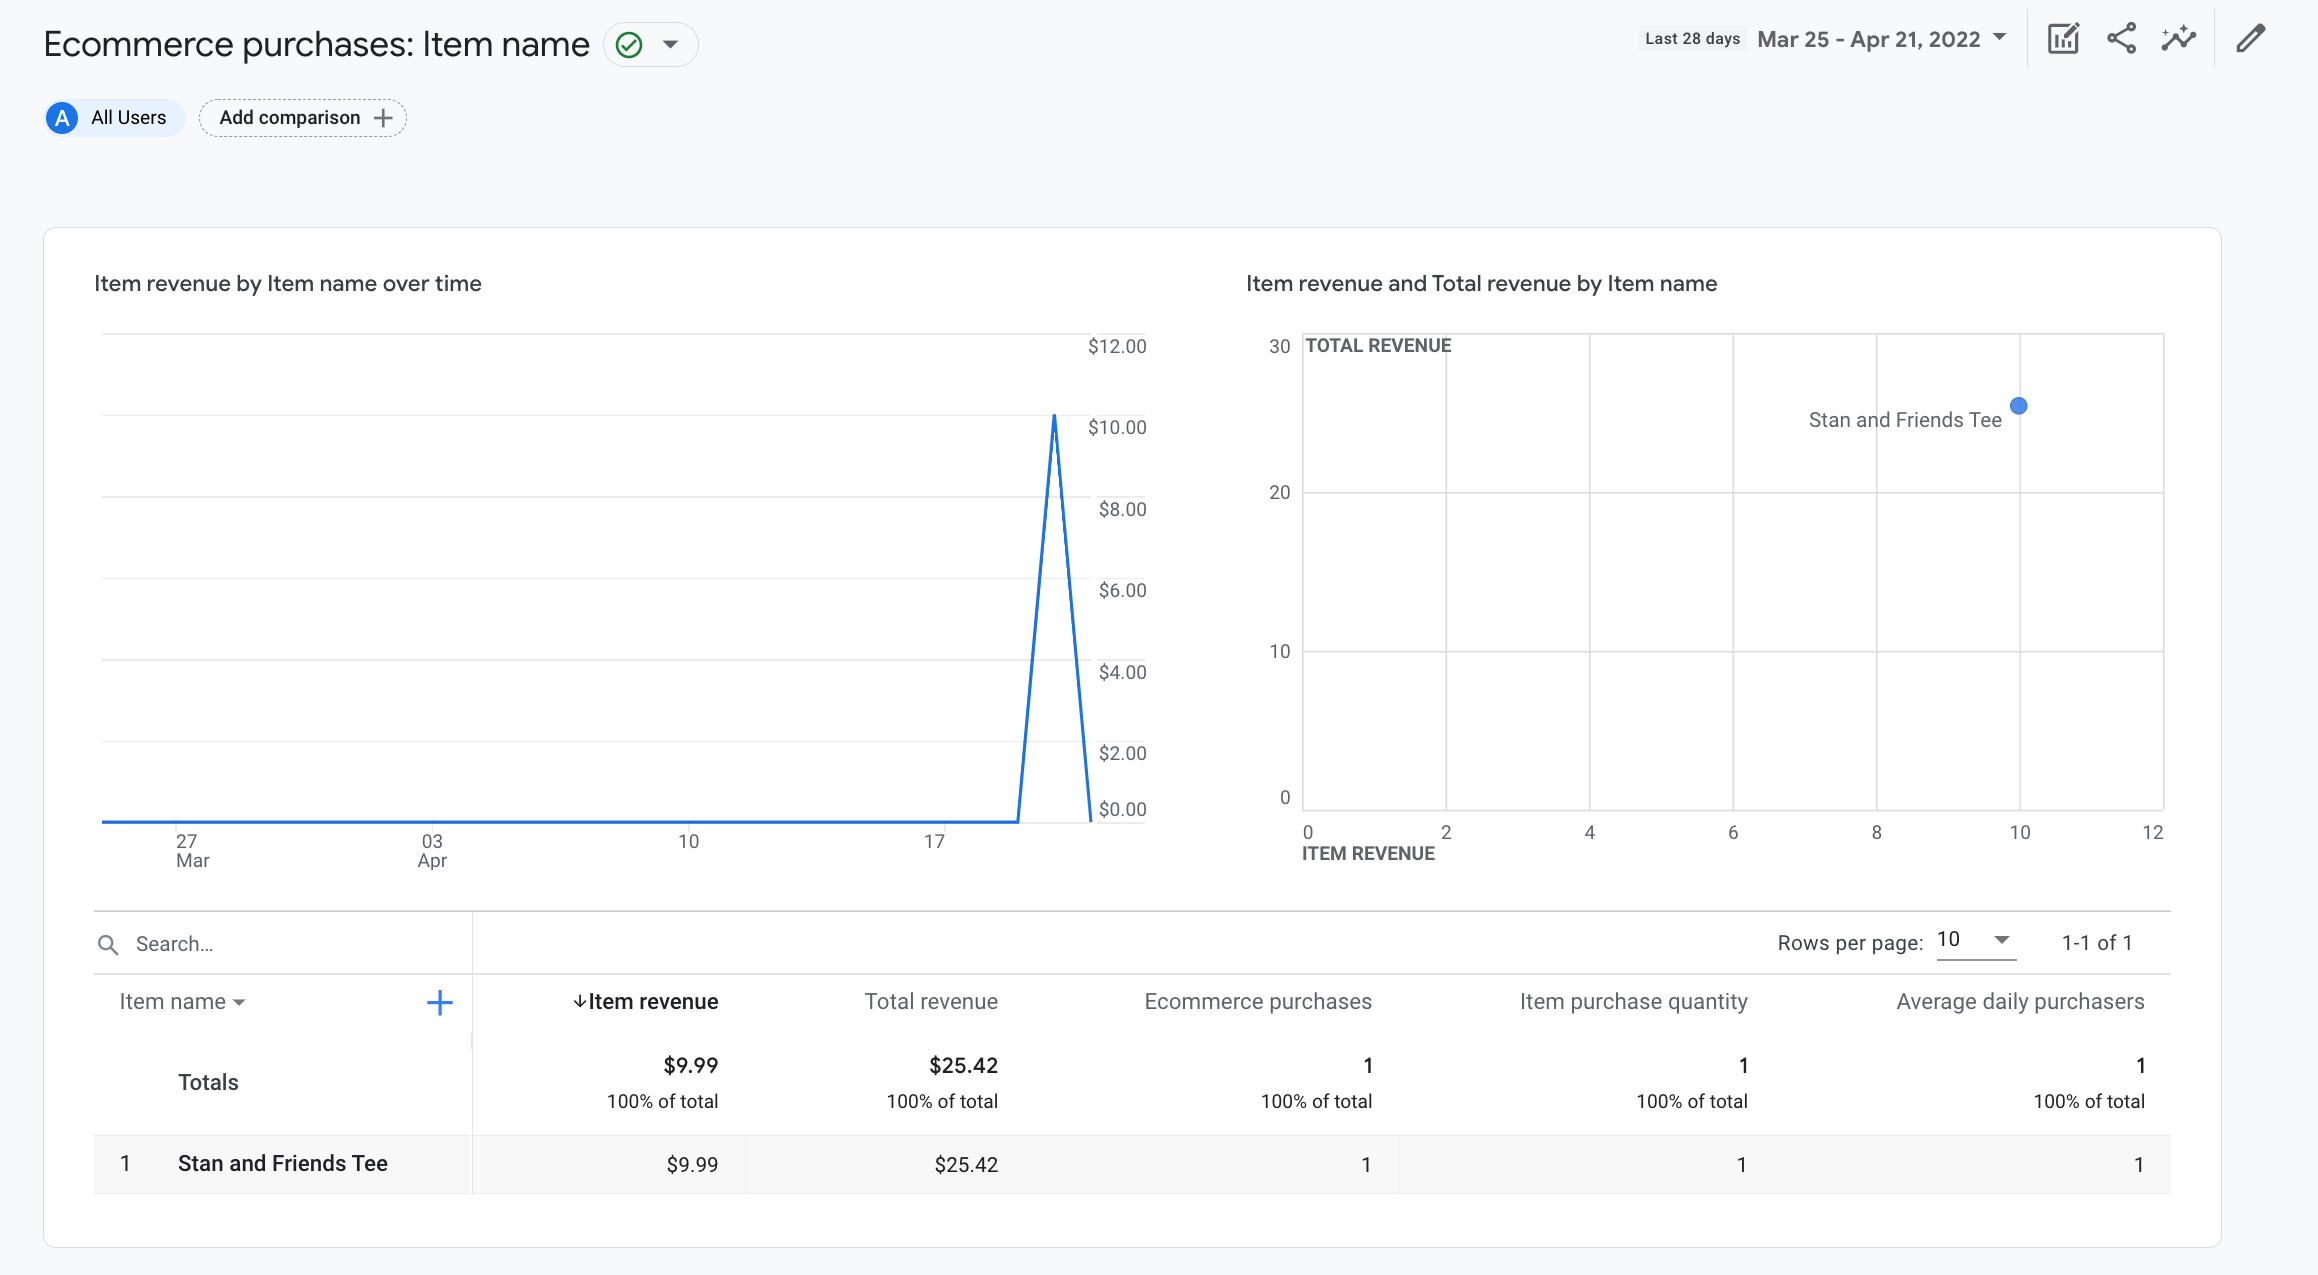
بالإضافة إلى السمات، تملأ "إحصاءات Google" عددًا من مواقع التجارة الإلكترونية والمقاييس المتعلقة بالأرباح على سبيل المثال، إذا نقر أحد المستخدمين على "شراء" زر مرة واحدة، تتم تعبئة المقاييس التالية في "إحصاءات Google":
- تبلغ قيمة مقياس أرباح السلع 30.03 دولار أمريكي.
- تبلغ قيمة مقياس إجمالي الأرباح 30.03 دولارًا أمريكيًا (أو ما يعادله بالعملة المحلية)
- قيمة مقياس عمليات الشراء في التجارة الإلكترونية هي 1
يمكنك استخدام هذه السمات والمقاييس لإنشاء استكشافات ولكن يمكنك أيضًا استخدام عمليات الشراء عبر التجارة الإلكترونية التالية التي تم إنشاؤها مسبقًا للاطّلاع على بيانات التجارة الإلكترونية: