Z tego przewodnika dowiesz się, jak kodować aplikacje, aby reklamy wyświetlały się prawidłowo na iPhonie X.
Wymagania wstępne
- Zaimportuj Google Mobile Ads SDK w wersji 7.26.0 lub nowszej – samodzielnie albo w ramach Firebase.
Banery reklamowe
Banery reklamowe muszą być umieszczone w „bezpiecznym obszarze”, aby nie zasłaniały ich zaokrąglone rogi, obudowa czujnika i wskaźnik ekranu początkowego. Na tej stronie znajdziesz przykłady dodawania ograniczeń, które pozwalają umieścić baner u góry lub u dołu bezpiecznego obszaru.
Storyboard/Interface Builder
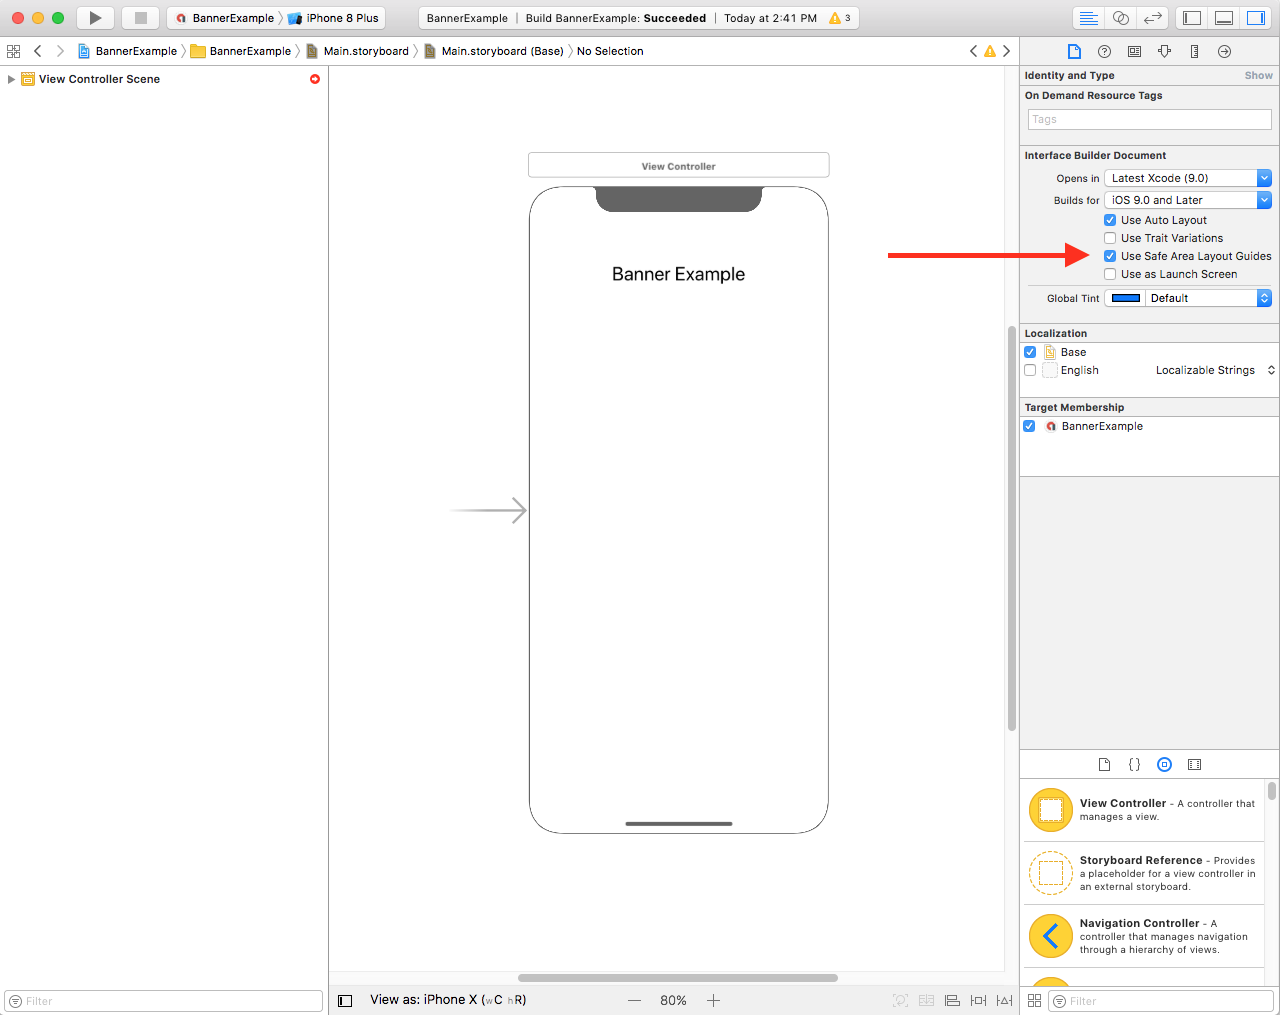
Jeśli Twoja aplikacja korzysta z Interface Buildera, najpierw włącz przewodniki układu bezpiecznego obszaru. Aby to zrobić, musisz używać Xcode w wersji 9 lub nowszej i kierować reklamy na iOS w wersji 9 lub nowszej.
Otwórz plik Interface Buildera i kliknij scenę kontrolera widoku. Po prawej stronie zobaczysz opcje Interface Builder Document (Dokument Interface Buildera). Zaznacz opcję Use Safe Area Layout Guides (Używaj przewodników układu bezpiecznego obszaru) i upewnij się, że tworzysz aplikację na iOS 9.0 lub nowszy.
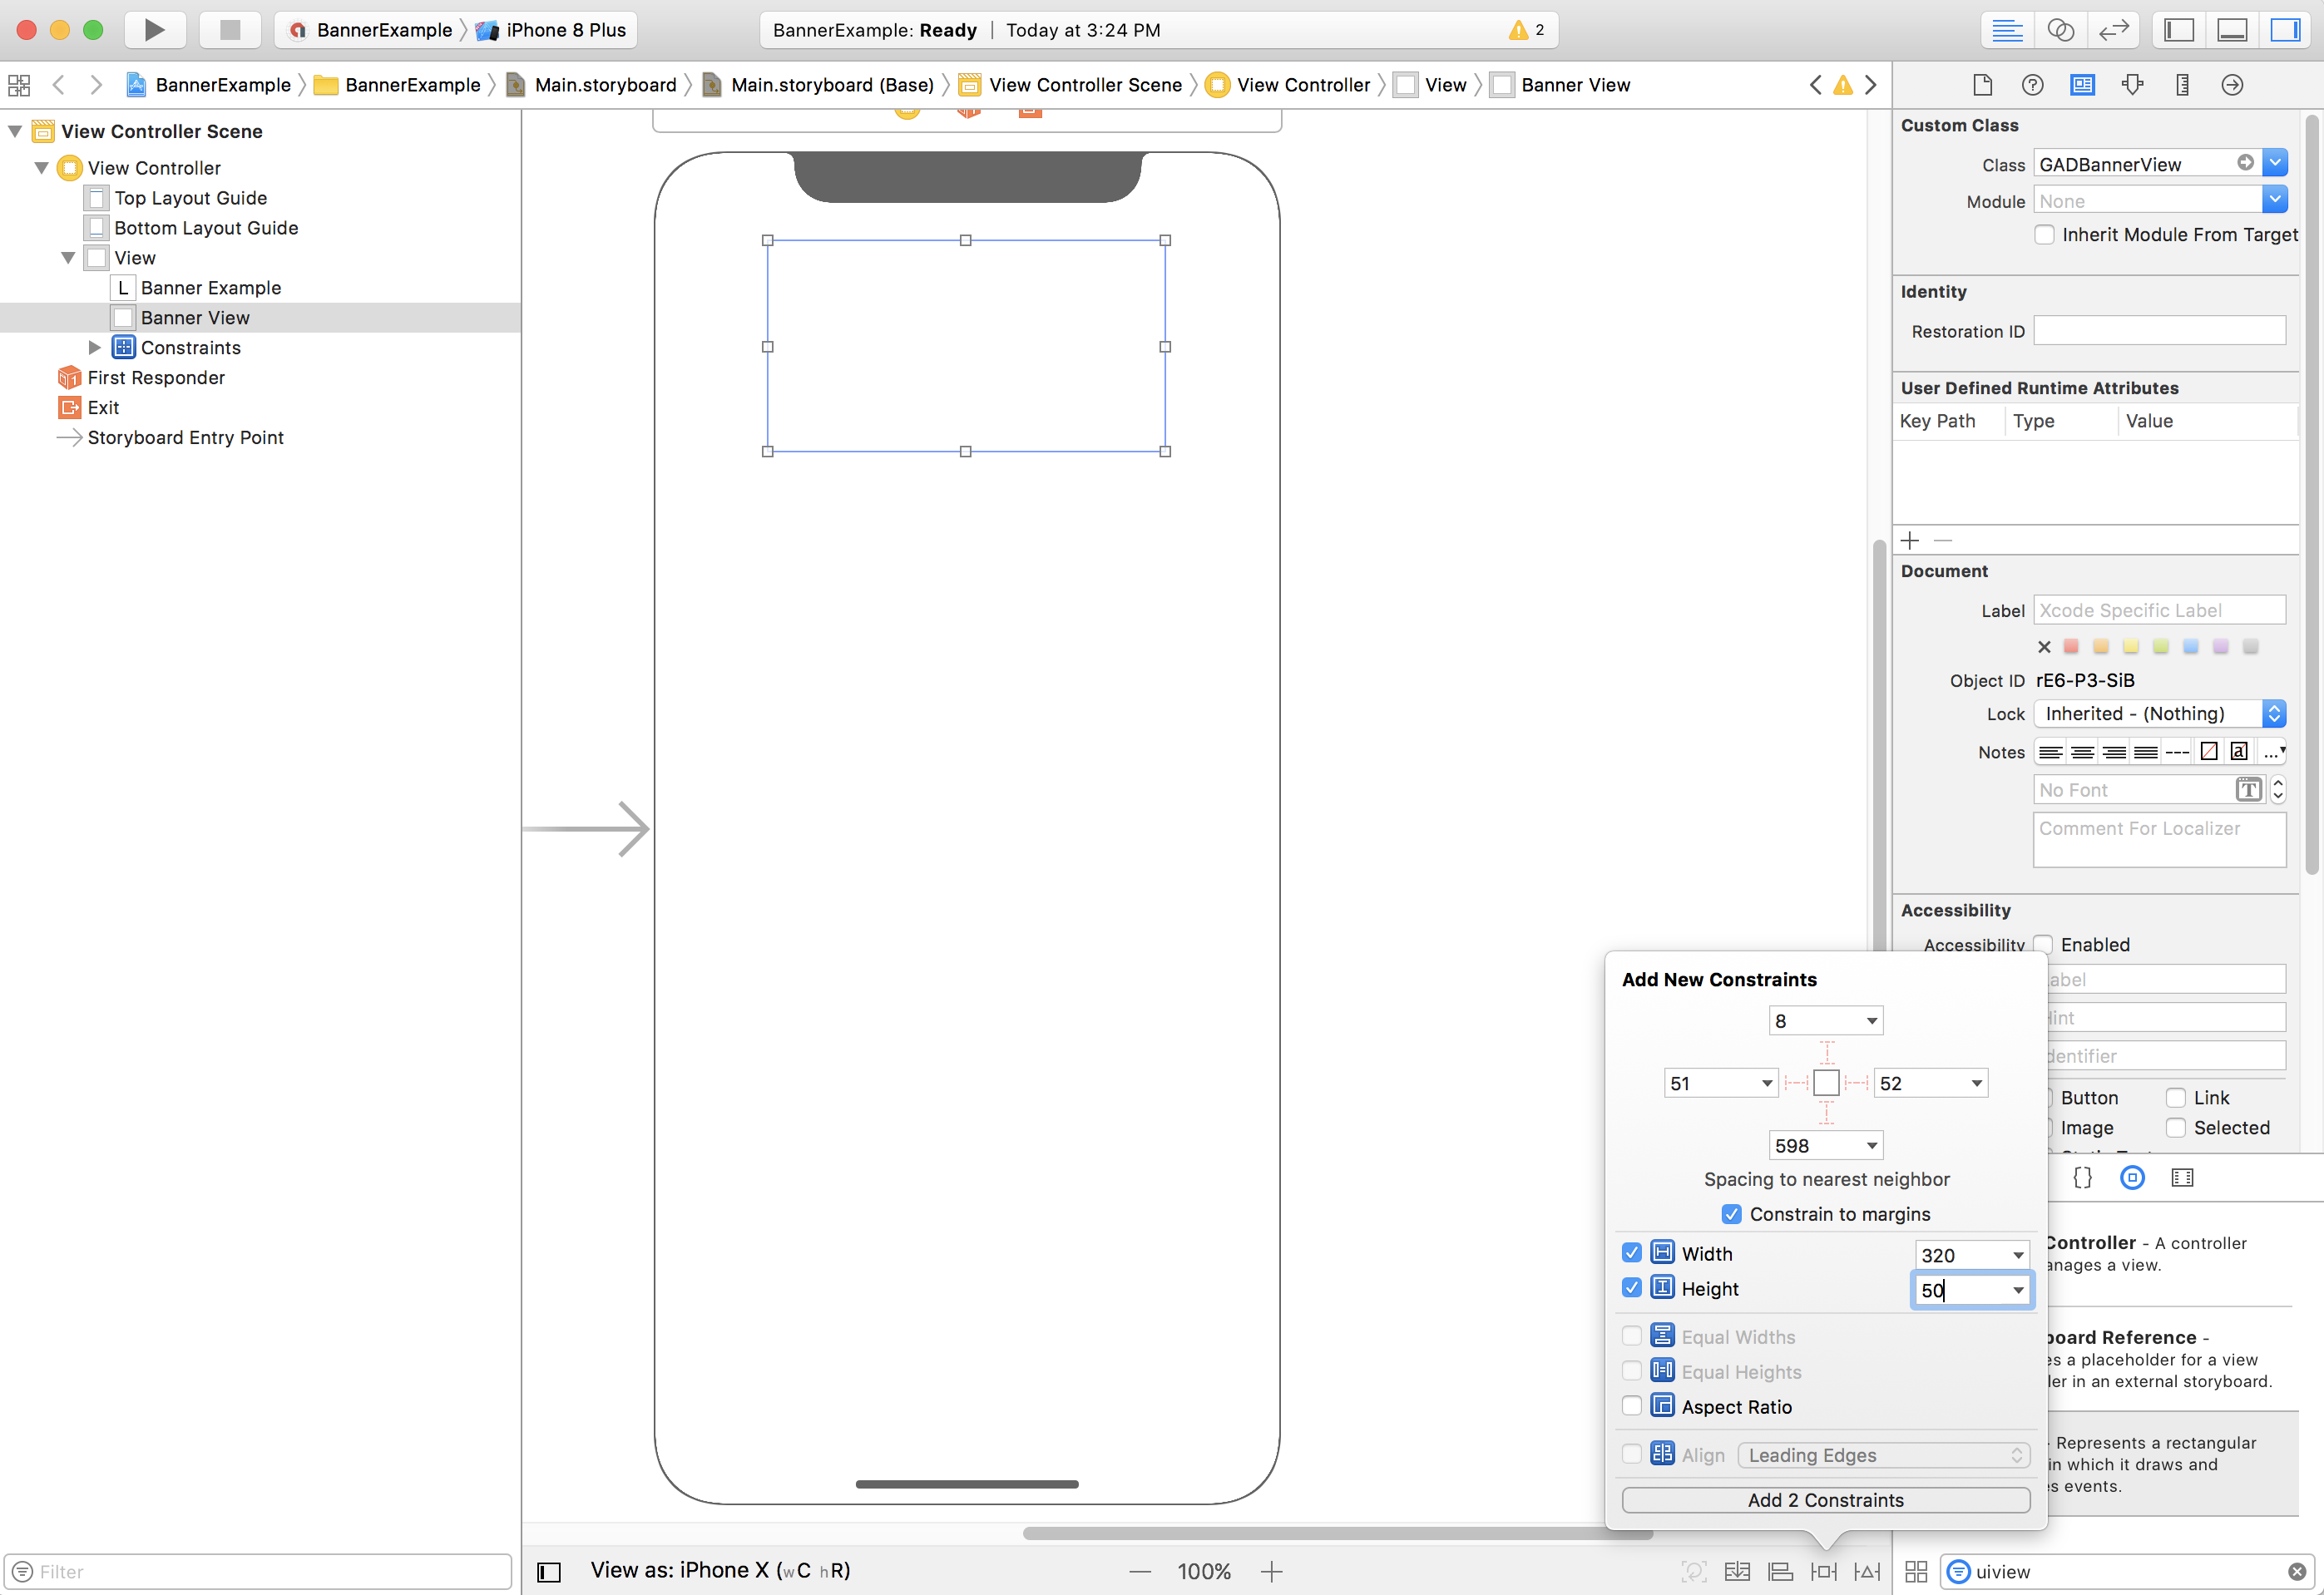
Zalecamy ograniczenie rozmiaru banera do wymaganego za pomocą ograniczeń szerokości i wysokości.
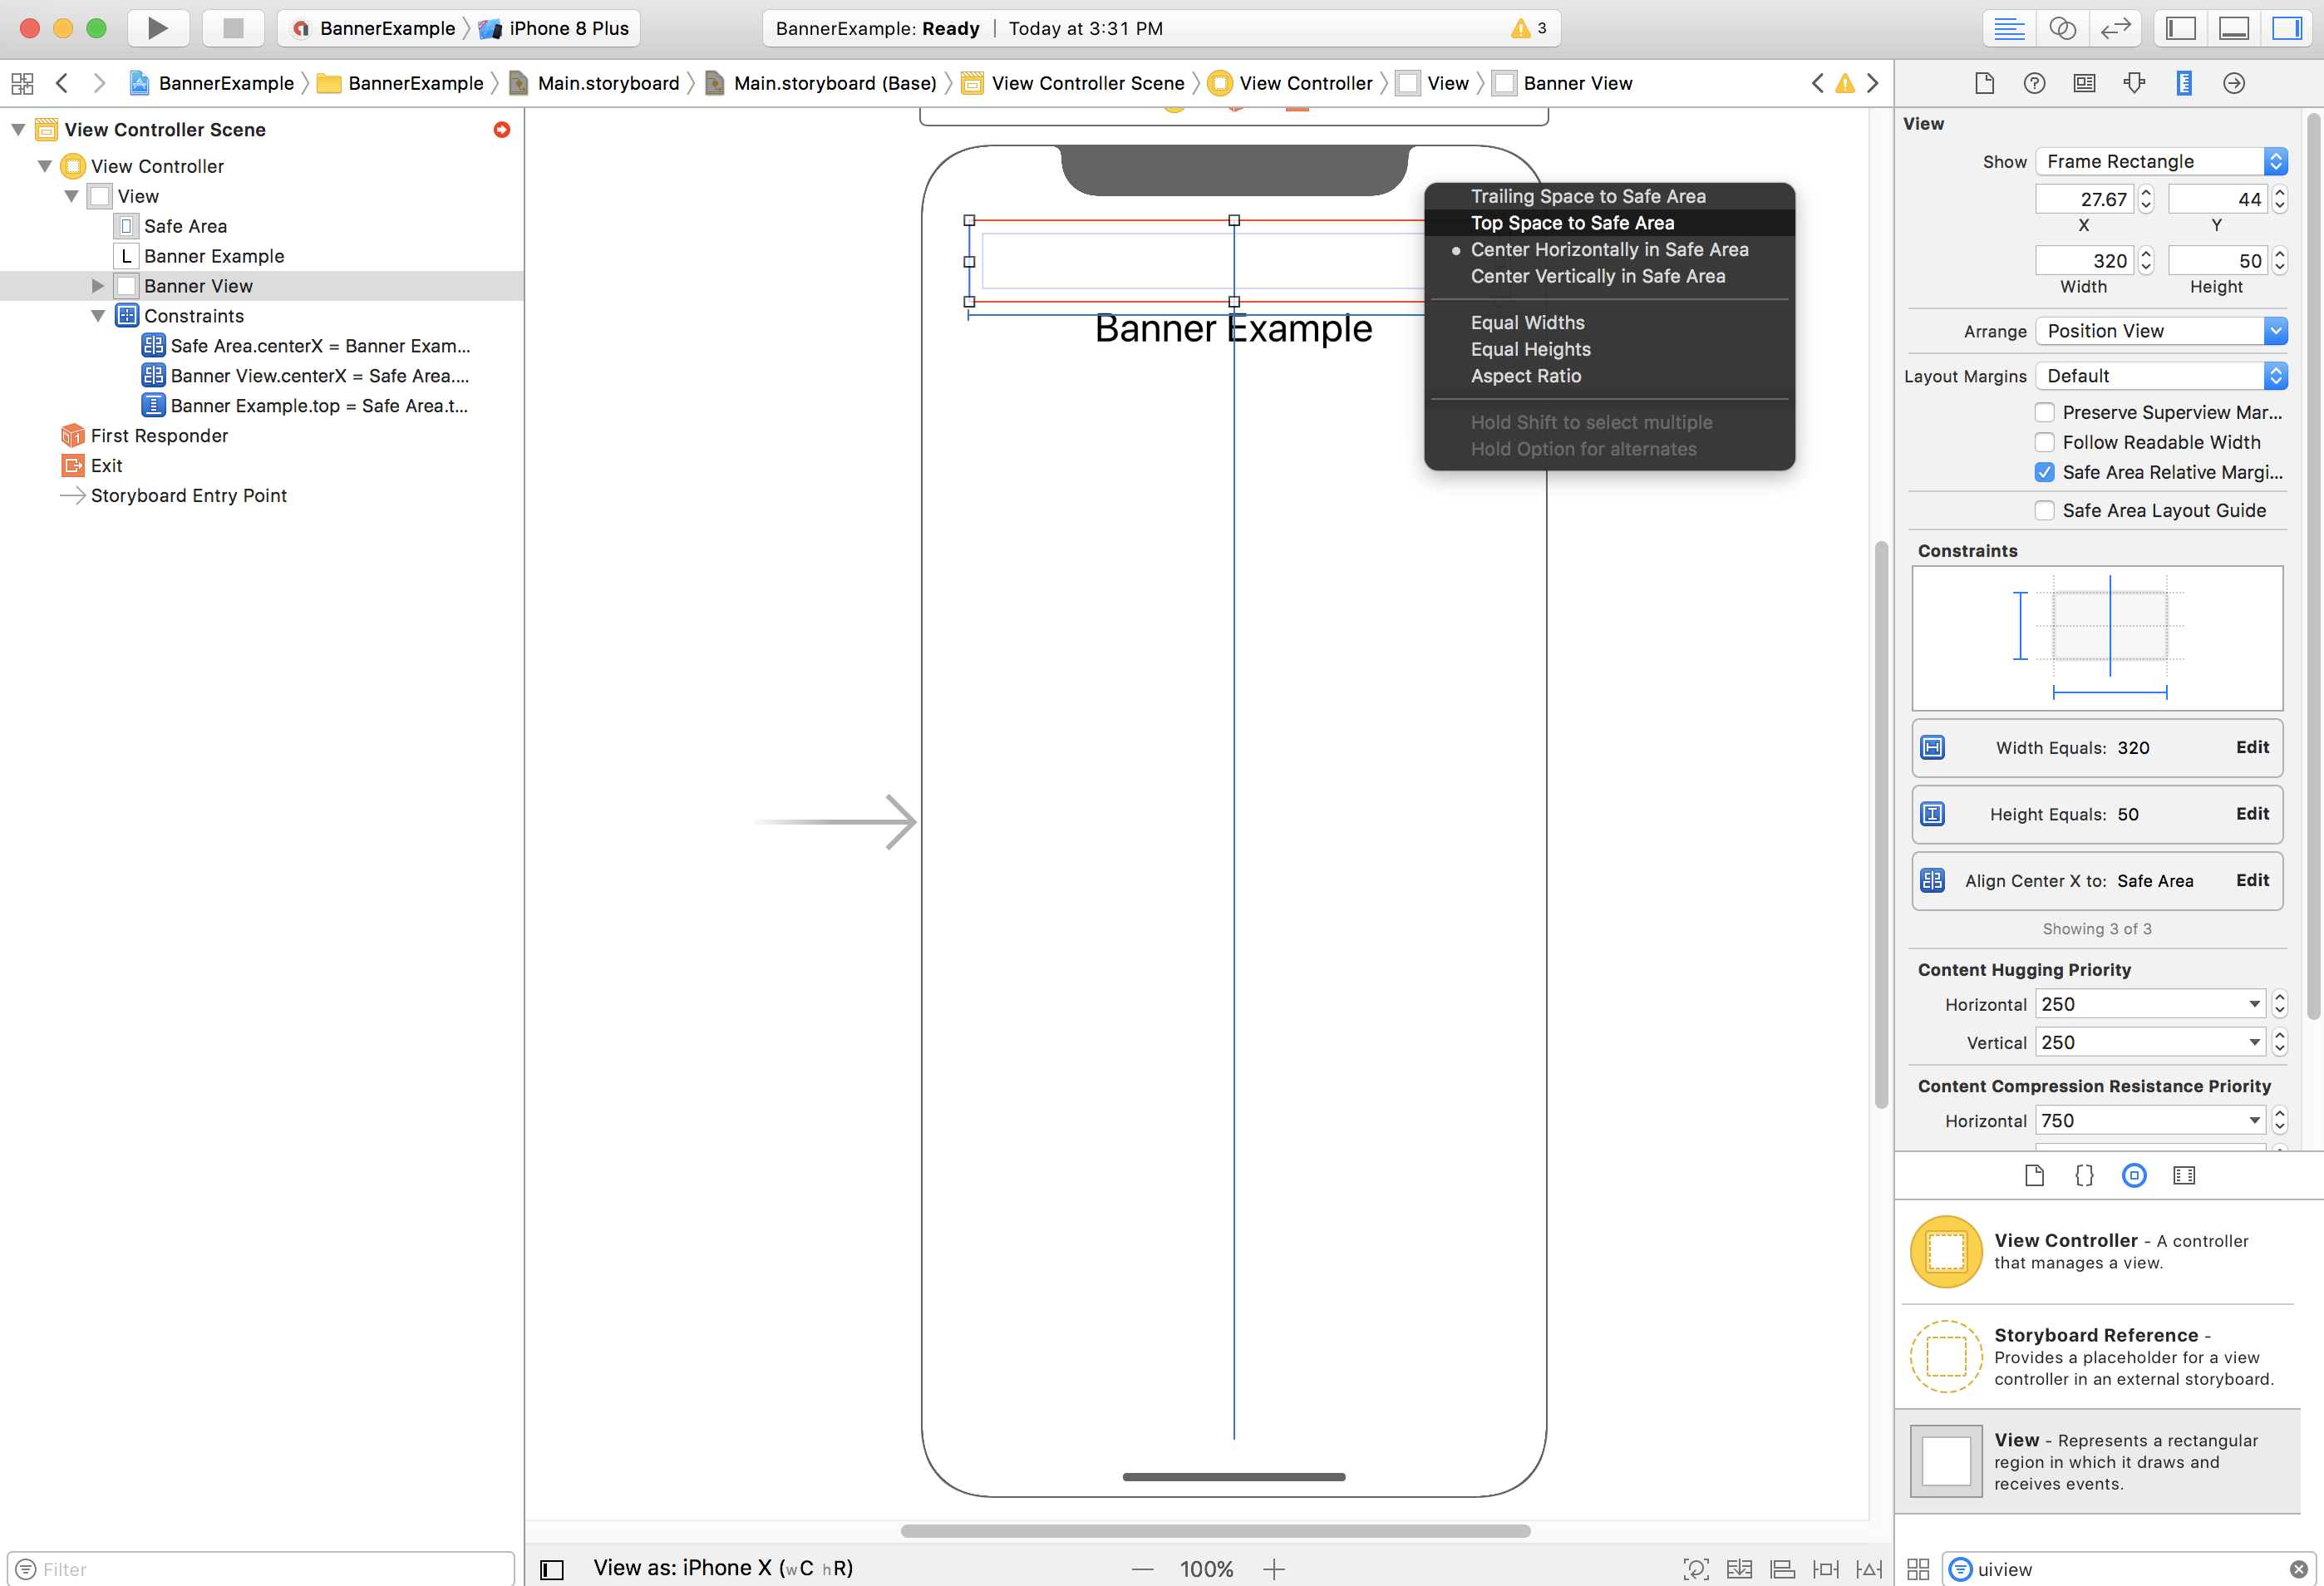
Teraz możesz wyrównać baner do górnej krawędzi bezpiecznego obszaru, ograniczając właściwość Top (Góra) elementu GADBannerView do górnej krawędzi bezpiecznego obszaru:
Podobnie możesz wyrównać baner do dolnej krawędzi bezpiecznego obszaru, ograniczając właściwość Bottom (Dół) elementu GADBannerView do dolnej krawędzi bezpiecznego obszaru:
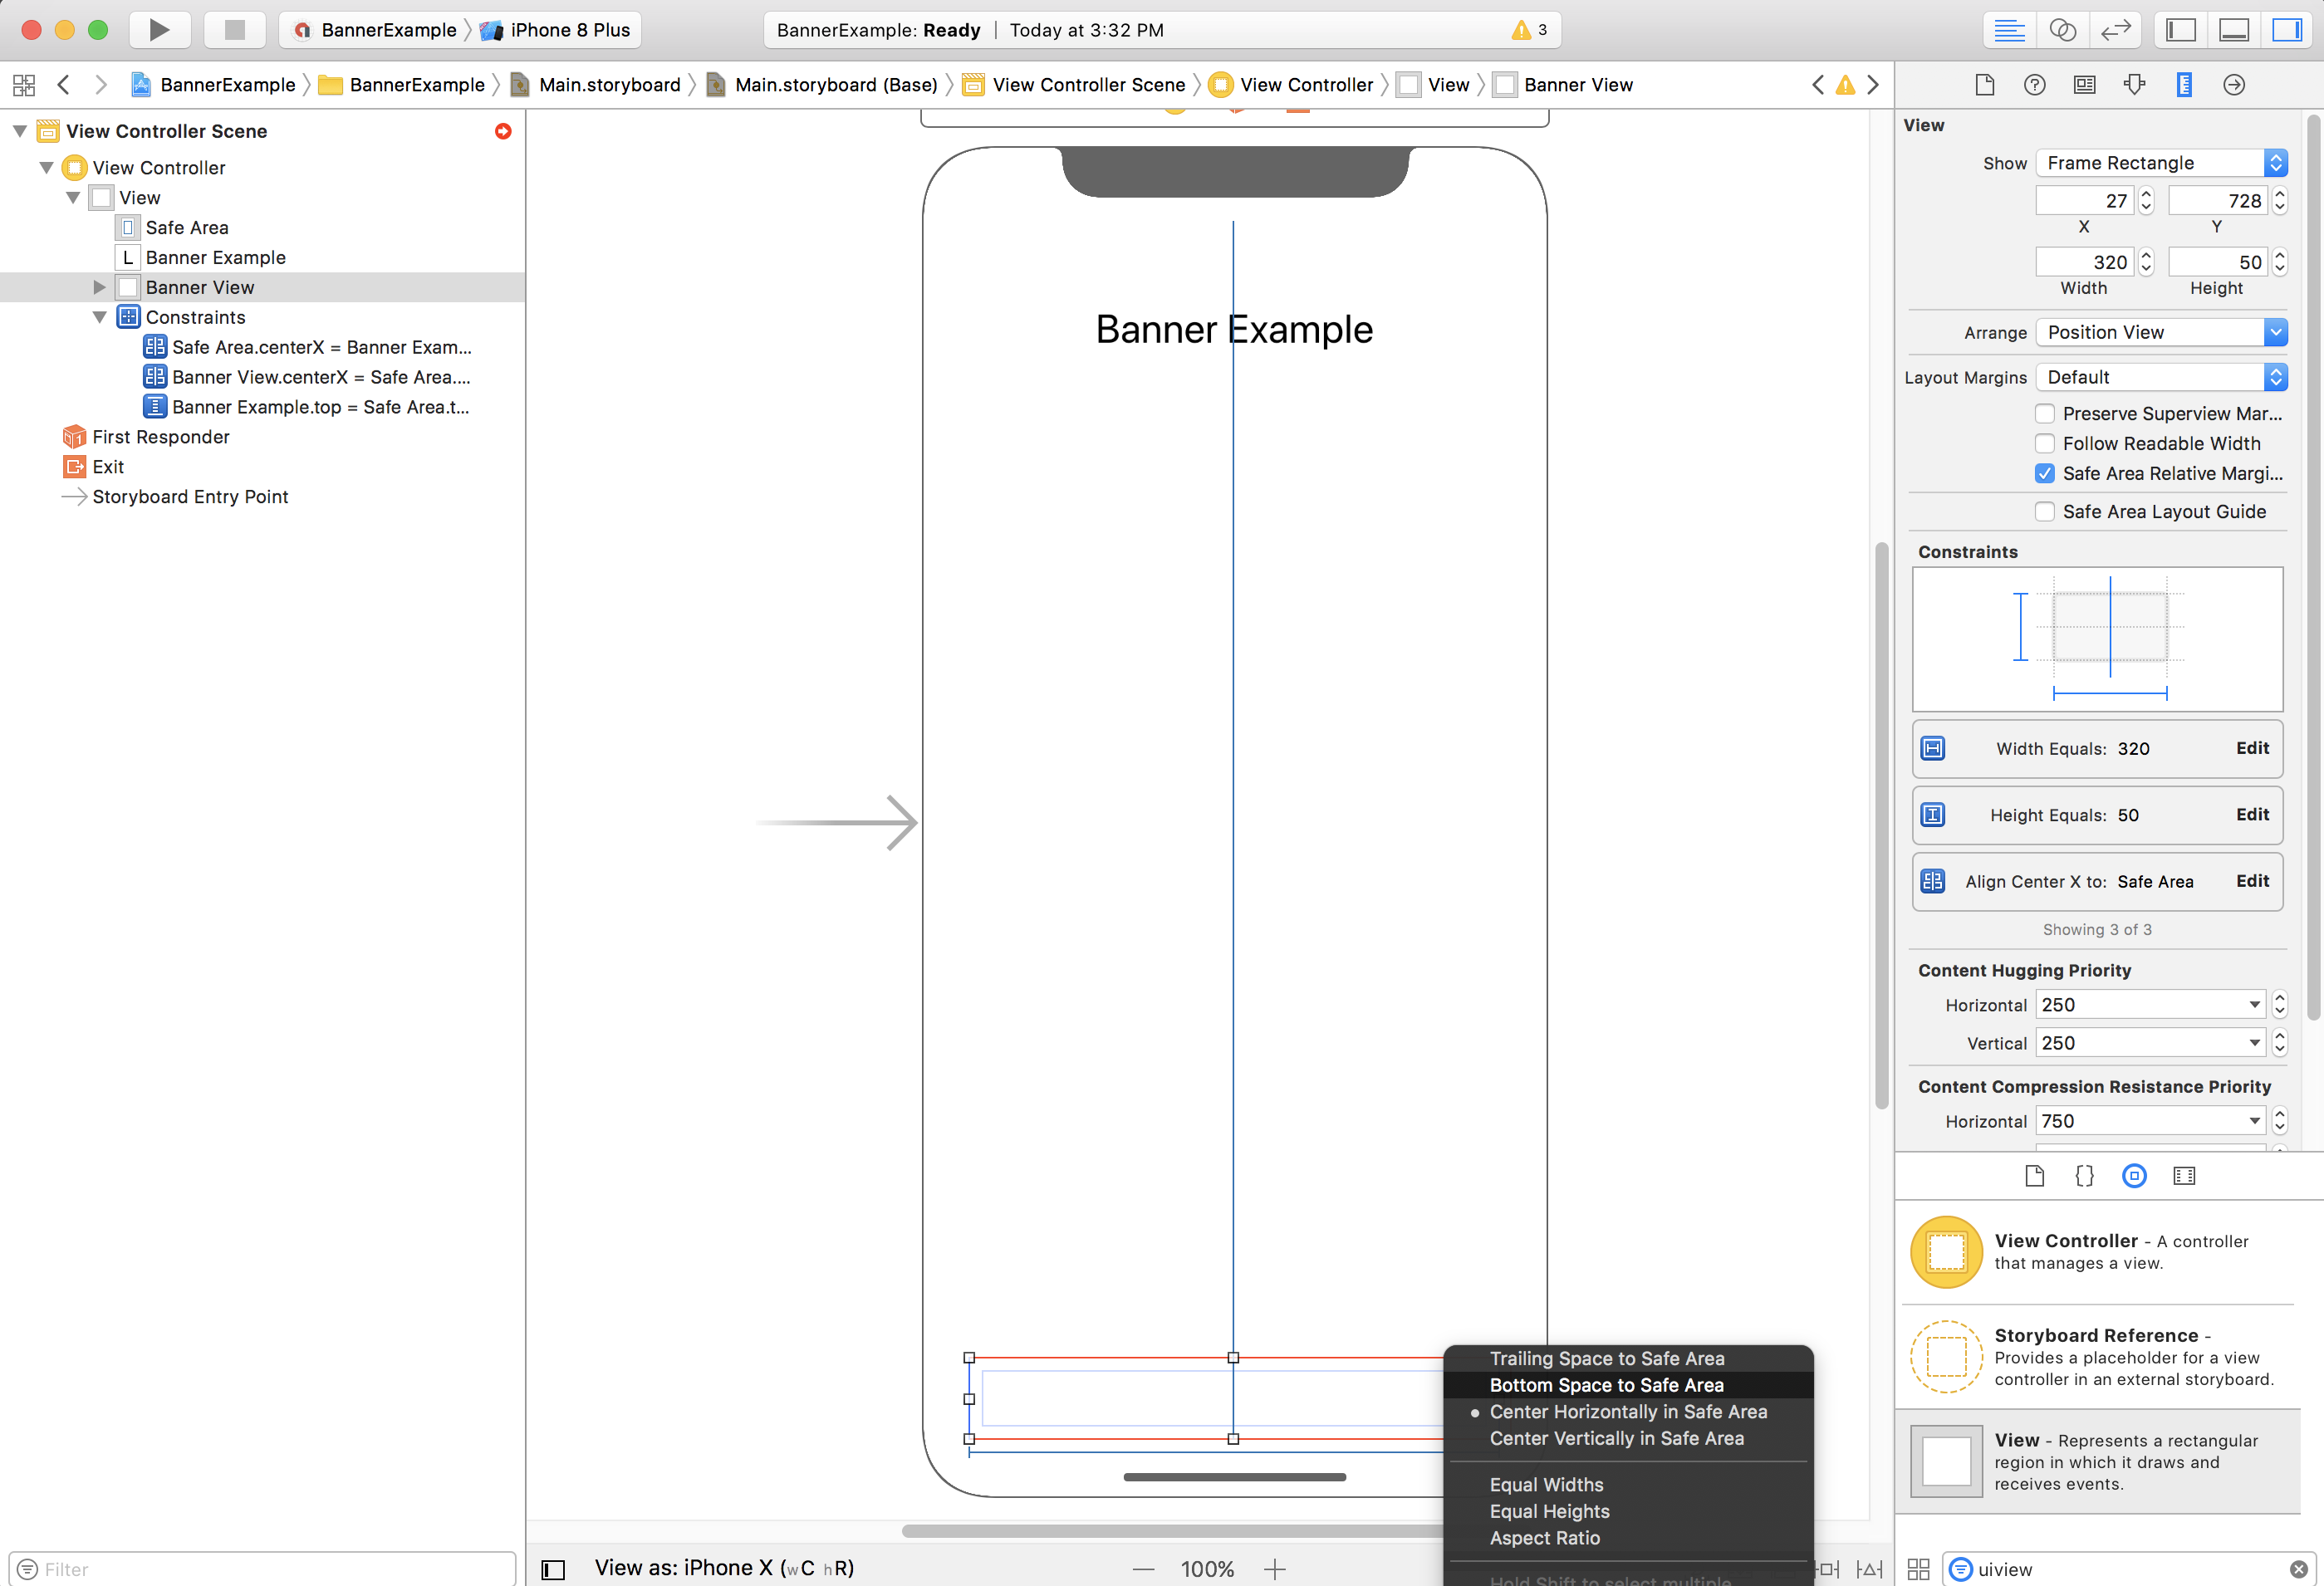
Ograniczenia powinny teraz wyglądać podobnie jak na zrzucie ekranu poniżej (rozmiar i położenie mogą się różnić):

ViewController
Oto prosty fragment kodu kontrolera widoku, który wykonuje minimalne czynności potrzebne do wyświetlenia banera w elemencie GADBannerView skonfigurowanym w storyboardzie powyżej:
Swift
class ViewController: UIViewController {

  /// The banner view.
  @IBOutlet var bannerView: BannerView!

  override func viewDidLoad() {
    super.viewDidLoad()
    // Replace this ad unit ID with your own ad unit ID.
    bannerView.adUnitID = "ca-app-pub-3940256099942544/2934735716"
    bannerView.rootViewController = self
    bannerView.load(Request())
  }

}
Objective-C
@interface ViewController()

@property(nonatomic, strong) IBOutlet GADBannerView *bannerView;

@end

@implementation ViewController

- (void)viewDidLoad {
  [super viewDidLoad];

  // Replace this ad unit ID with your own ad unit ID.
  self.bannerView.adUnitID = @"ca-app-pub-3940256099942544/2934735716";
  self.bannerView.rootViewController = self;
  GADRequest *request = [GADRequest request];
  [self.bannerView loadRequest:request];
}
Wyrównywanie banerów do krawędzi bezpiecznego obszaru
Jeśli chcesz, aby baner był wyrównany do lewej lub prawej krawędzi, ogranicz lewą lub prawą krawędź banera do lewej lub prawej krawędzi bezpiecznego obszaru, a nie do lewej lub prawej krawędzi widoku nadrzędnego.
Jeśli masz włączoną opcję Use Safe Area Layout Guides (Używaj przewodników układu bezpiecznego obszaru), Interface Builder domyślnie będzie używać krawędzi bezpiecznego obszaru podczas dodawania ograniczeń do widoku.
Automatyczna
Jeśli Twoja aplikacja tworzy banery reklamowe automatycznie, możesz zdefiniować ograniczenia i umieścić baner reklamowy w kodzie. Ten przykład pokazuje, jak ograniczyć baner, aby był wyśrodkowany poziomo u dołu bezpiecznego obszaru:
Swift
class ViewController: UIViewController {

  var bannerView: BannerView!

  override func viewDidLoad() {
    super.viewDidLoad()

    // Instantiate the banner view with your desired banner size.
    bannerView = BannerView(adSize: AdSizeBanner)
    addBannerViewToView(bannerView)
    bannerView.rootViewController = self
    // Set the ad unit ID to your own ad unit ID here.
    bannerView.adUnitID = "ca-app-pub-3940256099942544/2934735716"
    bannerView.load(Request())
  }

  func addBannerViewToView(_ bannerView: UIView) {
    bannerView.translatesAutoresizingMaskIntoConstraints = false
    view.addSubview(bannerView)
    if #available(iOS 11.0, *) {
      positionBannerAtBottomOfSafeArea(bannerView)
    }
    else {
      positionBannerAtBottomOfView(bannerView)
    }
  }

  @available (iOS 11, *)
  func positionBannerAtBottomOfSafeArea(_ bannerView: UIView) {
    // Position the banner. Stick it to the bottom of the Safe Area.
    // Centered horizontally.
    let guide: UILayoutGuide = view.safeAreaLayoutGuide

    NSLayoutConstraint.activate(
      [bannerView.centerXAnchor.constraint(equalTo: guide.centerXAnchor),
       bannerView.bottomAnchor.constraint(equalTo: guide.bottomAnchor)]
    )
  }

  func positionBannerAtBottomOfView(_ bannerView: UIView) {
    // Center the banner horizontally.
    view.addConstraint(NSLayoutConstraint(item: bannerView,
                                          attribute: .centerX,
                                          relatedBy: .equal,
                                          toItem: view,
                                          attribute: .centerX,
                                          multiplier: 1,
                                          constant: 0))
    // Lock the banner to the top of the bottom layout guide.
    view.addConstraint(NSLayoutConstraint(item: bannerView,
                                          attribute: .bottom,
                                          relatedBy: .equal,
                                          toItem: self.bottomLayoutGuide,
                                          attribute: .top,
                                          multiplier: 1,
                                          constant: 0))
  }

}
Objective-C
@interface ViewController()

@property(nonatomic, strong) GADBannerView *bannerView;

@end

@implementation ViewController

- (void)viewDidLoad {
  [super viewDidLoad];

  // Instantiate the banner view with your desired banner size.
  self.bannerView = [[GADBannerView alloc] initWithAdSize:GADAdSizeBanner];
  [self addBannerViewToView:self.bannerView];

  // Replace this ad unit ID with your own ad unit ID.
  self.bannerView.adUnitID = @"ca-app-pub-3940256099942544/2934735716";
  self.bannerView.rootViewController = self;
  GADRequest *request = [GADRequest request];
  [self.bannerView loadRequest:request];
}

#pragma mark - view positioning

-(void)addBannerViewToView:(UIView *_Nonnull)bannerView {
  self.bannerView.translatesAutoresizingMaskIntoConstraints = NO;
  [self.view addSubview:self.bannerView];
  if (@available(ios 11.0, *)) {
    [self positionBannerViewAtBottomOfSafeArea:bannerView];
  } else {
    [self positionBannerViewAtBottomOfView:bannerView];
  }
}

- (void)positionBannerViewAtBottomOfSafeArea:(UIView *_Nonnull)bannerView NS_AVAILABLE_IOS(11.0) {
  // Position the banner. Stick it to the bottom of the Safe Area.
  // Centered horizontally.
  UILayoutGuide *guide = self.view.safeAreaLayoutGuide;
  [NSLayoutConstraint activateConstraints:@[
    [bannerView.centerXAnchor constraintEqualToAnchor:guide.centerXAnchor],
    [bannerView.bottomAnchor constraintEqualToAnchor:guide.bottomAnchor]
  ]];
}

- (void)positionBannerViewAtBottomOfView:(UIView *_Nonnull)bannerView {
  [self.view addConstraint:[NSLayoutConstraint constraintWithItem:bannerView
                                                        attribute:NSLayoutAttributeCenterX
                                                        relatedBy:NSLayoutRelationEqual
                                                           toItem:self.view
                                                        attribute:NSLayoutAttributeCenterX
                                                       multiplier:1
                                                         constant:0]];
  [self.view addConstraint:[NSLayoutConstraint constraintWithItem:bannerView
                                                        attribute:NSLayoutAttributeBottom
                                                        relatedBy:NSLayoutRelationEqual
                                                           toItem:self.bottomLayoutGuide
                                                        attribute:NSLayoutAttributeTop
                                                       multiplier:1
                                                         constant:0]];
}

@end
Powyższe techniki można łatwo wykorzystać do ograniczania do górnej krawędzi bezpiecznego obszaru, modyfikując używane atrybuty i punkty zakotwiczenia.
Banery inteligentne
Jeśli używasz banerów inteligentnych, zwłaszcza w orientacji poziomej, zalecamy używanie ograniczeń do wyrównywania krawędzi banera do lewej i prawej krawędzi bezpiecznego obszaru.
W Interface Builderze jest to obsługiwane w iOS 9 i nowszych wersjach. Wystarczy zaznaczyć opcję Use Safe Area Layout Guides (Używaj przewodników układu bezpiecznego obszaru) jak opisano powyżej.
W kodzie należy stosować ograniczenia krawędzi względem przewodników układu bezpiecznego obszaru, jeśli są dostępne. Oto fragment kodu, który dodaje widok banera do widoku i ogranicza go do dolnej krawędzi widoku, na całą szerokość:
Swift
func addBannerViewToView(_ bannerView: BannerView) {
  bannerView.translatesAutoresizingMaskIntoConstraints = false
  view.addSubview(bannerView)
  if #available(iOS 11.0, *) {
    // In iOS 11, we need to constrain the view to the safe area.
    positionBannerViewFullWidthAtBottomOfSafeArea(bannerView)
  }
  else {
    // In lower iOS versions, safe area is not available so we use
    // bottom layout guide and view edges.
    positionBannerViewFullWidthAtBottomOfView(bannerView)
  }
}

// MARK: - view positioning
@available (iOS 11, *)
func positionBannerViewFullWidthAtBottomOfSafeArea(_ bannerView: UIView) {
  // Position the banner. Stick it to the bottom of the Safe Area.
  // Make it constrained to the edges of the safe area.
  let guide = view.safeAreaLayoutGuide
  NSLayoutConstraint.activate([
    guide.leftAnchor.constraint(equalTo: bannerView.leftAnchor),
    guide.rightAnchor.constraint(equalTo: bannerView.rightAnchor),
    guide.bottomAnchor.constraint(equalTo: bannerView.bottomAnchor)
  ])
}

func positionBannerViewFullWidthAtBottomOfView(_ bannerView: UIView) {
  view.addConstraint(NSLayoutConstraint(item: bannerView,
                                        attribute: .leading,
                                        relatedBy: .equal,
                                        toItem: view,
                                        attribute: .leading,
                                        multiplier: 1,
                                        constant: 0))
  view.addConstraint(NSLayoutConstraint(item: bannerView,
                                        attribute: .trailing,
                                        relatedBy: .equal,
                                        toItem: view,
                                        attribute: .trailing,
                                        multiplier: 1,
                                        constant: 0))
  view.addConstraint(NSLayoutConstraint(item: bannerView,
                                        attribute: .bottom,
                                        relatedBy: .equal,
                                        toItem: bottomLayoutGuide,
                                        attribute: .top,
                                        multiplier: 1,
                                        constant: 0))
}
Objective-C
- (void)addBannerViewToView:(UIView *)bannerView {
  bannerView.translatesAutoresizingMaskIntoConstraints = NO;
  [self.view addSubview:bannerView];
  if (@available(ios 11.0, *)) {
    // In iOS 11, we need to constrain the view to the safe area.
    [self positionBannerViewFullWidthAtBottomOfSafeArea:bannerView];
  } else {
    // In lower iOS versions, safe area is not available so we use
    // bottom layout guide and view edges.
    [self positionBannerViewFullWidthAtBottomOfView:bannerView];
  }
}

#pragma mark - view positioning

- (void)positionBannerViewFullWidthAtBottomOfSafeArea:(UIView *_Nonnull)bannerView NS_AVAILABLE_IOS(11.0) {
  // Position the banner. Stick it to the bottom of the Safe Area.
  // Make it constrained to the edges of the safe area.
  UILayoutGuide *guide = self.view.safeAreaLayoutGuide;

  [NSLayoutConstraint activateConstraints:@[
    [guide.leftAnchor constraintEqualToAnchor:bannerView.leftAnchor],
    [guide.rightAnchor constraintEqualToAnchor:bannerView.rightAnchor],
    [guide.bottomAnchor constraintEqualToAnchor:bannerView.bottomAnchor]
  ]];
}

- (void)positionBannerViewFullWidthAtBottomOfView:(UIView *_Nonnull)bannerView {
  [self.view addConstraint:[NSLayoutConstraint constraintWithItem:bannerView
                                                        attribute:NSLayoutAttributeLeading
                                                        relatedBy:NSLayoutRelationEqual
                                                           toItem:self.view
                                                        attribute:NSLayoutAttributeLeading
                                                       multiplier:1
                                                         constant:0]];
  [self.view addConstraint:[NSLayoutConstraint constraintWithItem:bannerView
                                                        attribute:NSLayoutAttributeTrailing
                                                        relatedBy:NSLayoutRelationEqual
                                                           toItem:self.view
                                                        attribute:NSLayoutAttributeTrailing
                                                       multiplier:1
                                                         constant:0]];
  [self.view addConstraint:[NSLayoutConstraint constraintWithItem:bannerView
                                                        attribute:NSLayoutAttributeBottom
                                                        relatedBy:NSLayoutRelationEqual
                                                           toItem:self.bottomLayoutGuide
                                                        attribute:NSLayoutAttributeTop
                                                       multiplier:1
                                                         constant:0]];
}
Reklamy natywne
Jeśli Twoja aplikacja przypina reklamy natywne do górnej lub dolnej krawędzi ekranu, obowiązują te same zasady co w przypadku banerów reklamowych.
Kluczowa różnica polega na tym, że zamiast dodawać ograniczenia do elementu GADBannerView, musisz dodać ograniczenia do elementu GADNativeAdView (lub widoku zawierającego reklamę), aby uwzględnić przewodniki układu bezpiecznego obszaru. W przypadku widoków natywnych zalecamy podanie bardziej szczegółowych ograniczeń rozmiaru.
Reklamy pełnoekranowe i reklamy z nagrodą
Od wersji 7.26.0 Google Mobile Ads SDK w pełni obsługuje formaty reklam pełnoekranowych i reklam z nagrodą na iPhonie X.