このガイドでは、iPhone X で広告が適切に表示されるようアプリのコードを記述する方法に関するベスト プラクティスを紹介します。
前提条件
バナー広告
バナー広告は、丸みのある角やセンサー部分、ホーム インジケータによって見にくくならないいように、 "セーフ エリア" に配置する必要があります。このページでは、セーフエリアの上端や下端の内側にバナーが収まるように制限を加える方法について、例を挙げて説明します。
ストーリーボード/Interface Builder
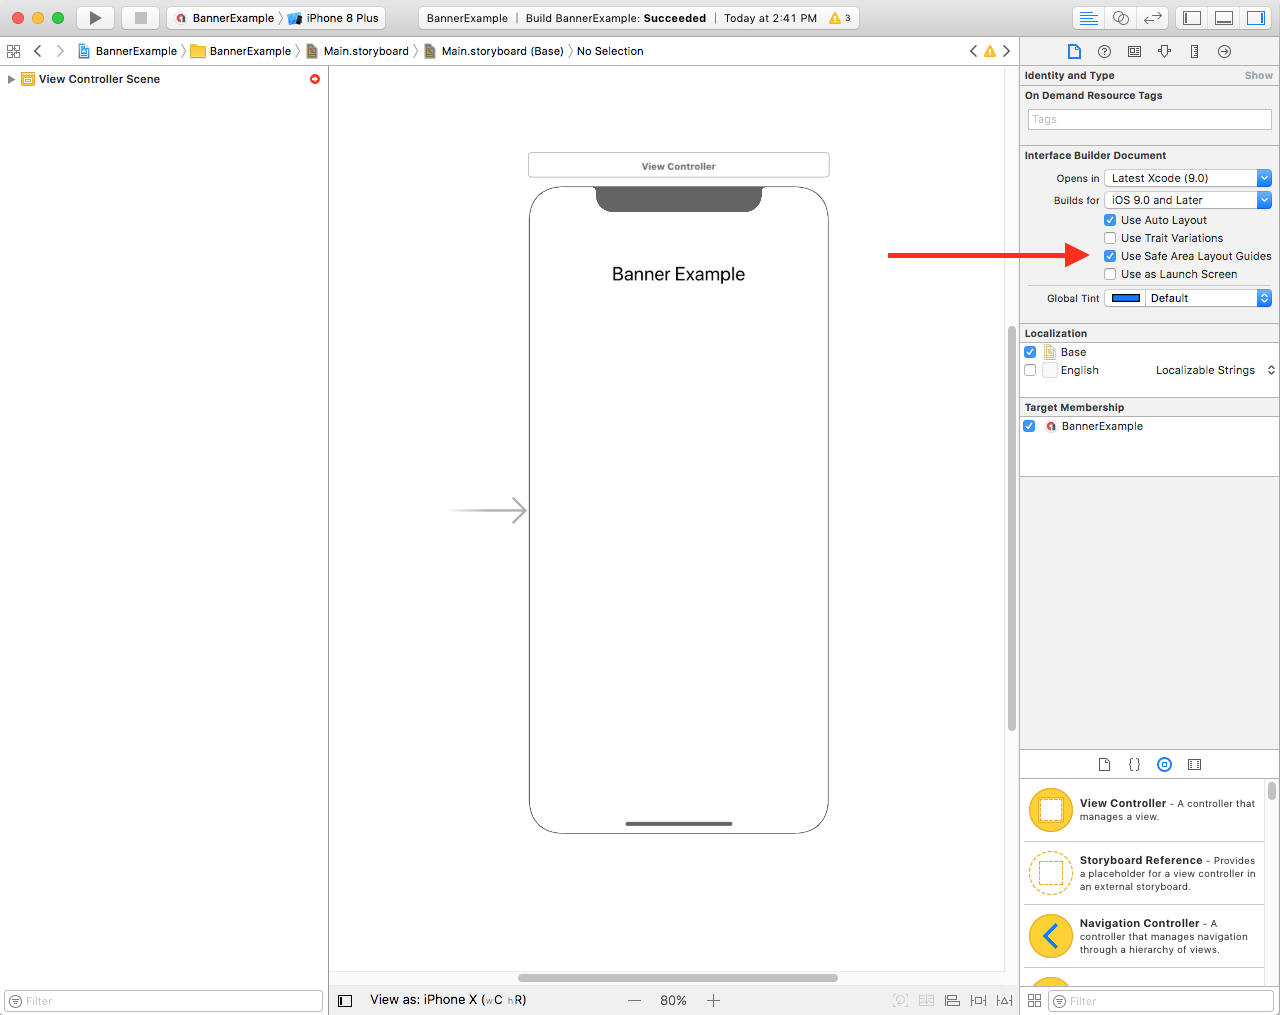
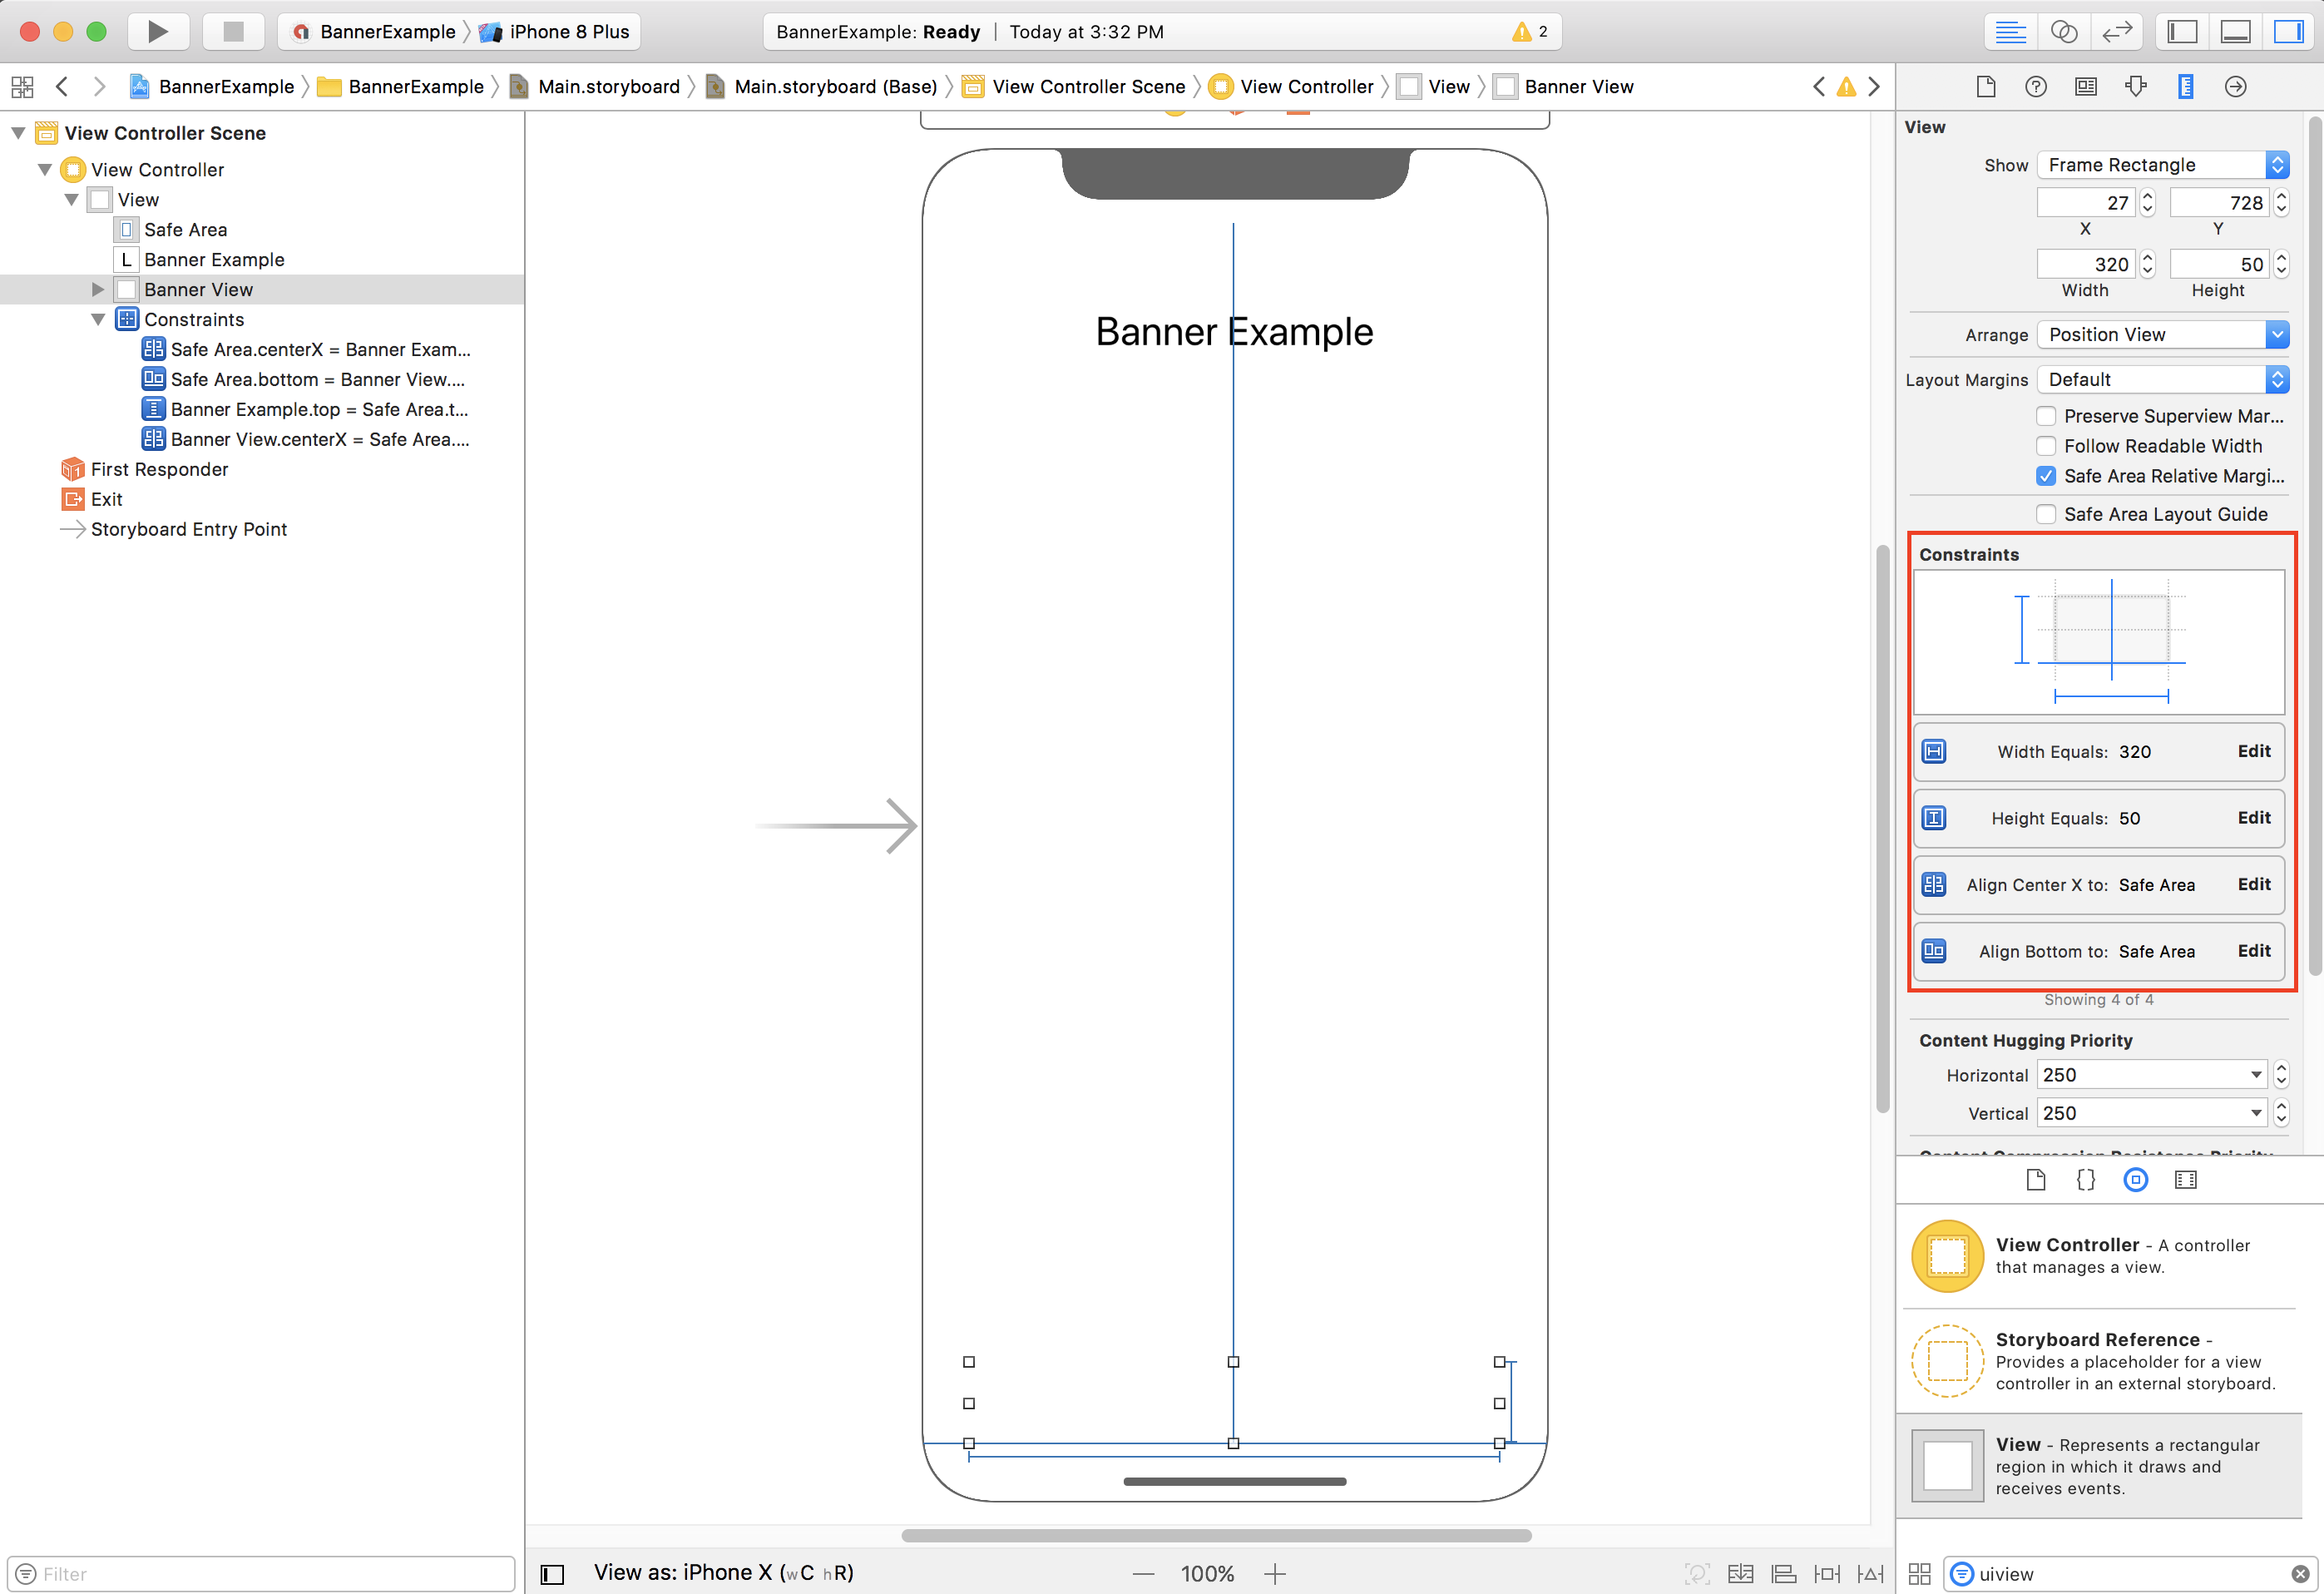
アプリで Interface Builder を使用している場合は、まず、セーフエリアのレイアウト ガイドが有効であることを確認します。それには、Xcode 9 以降を実行し、iOS 9 以降をターゲットに設定する必要があります。
Interface Builder ファイルを開いてビュー コントローラ シーンをクリックすると、右側に [Interface Builder Document] オプションが表示されます。[Use Safe Area Layout Guides] チェックボックスをオンにして、少なくとも [iOS 9.0 以降] 向けで作成するようにします。
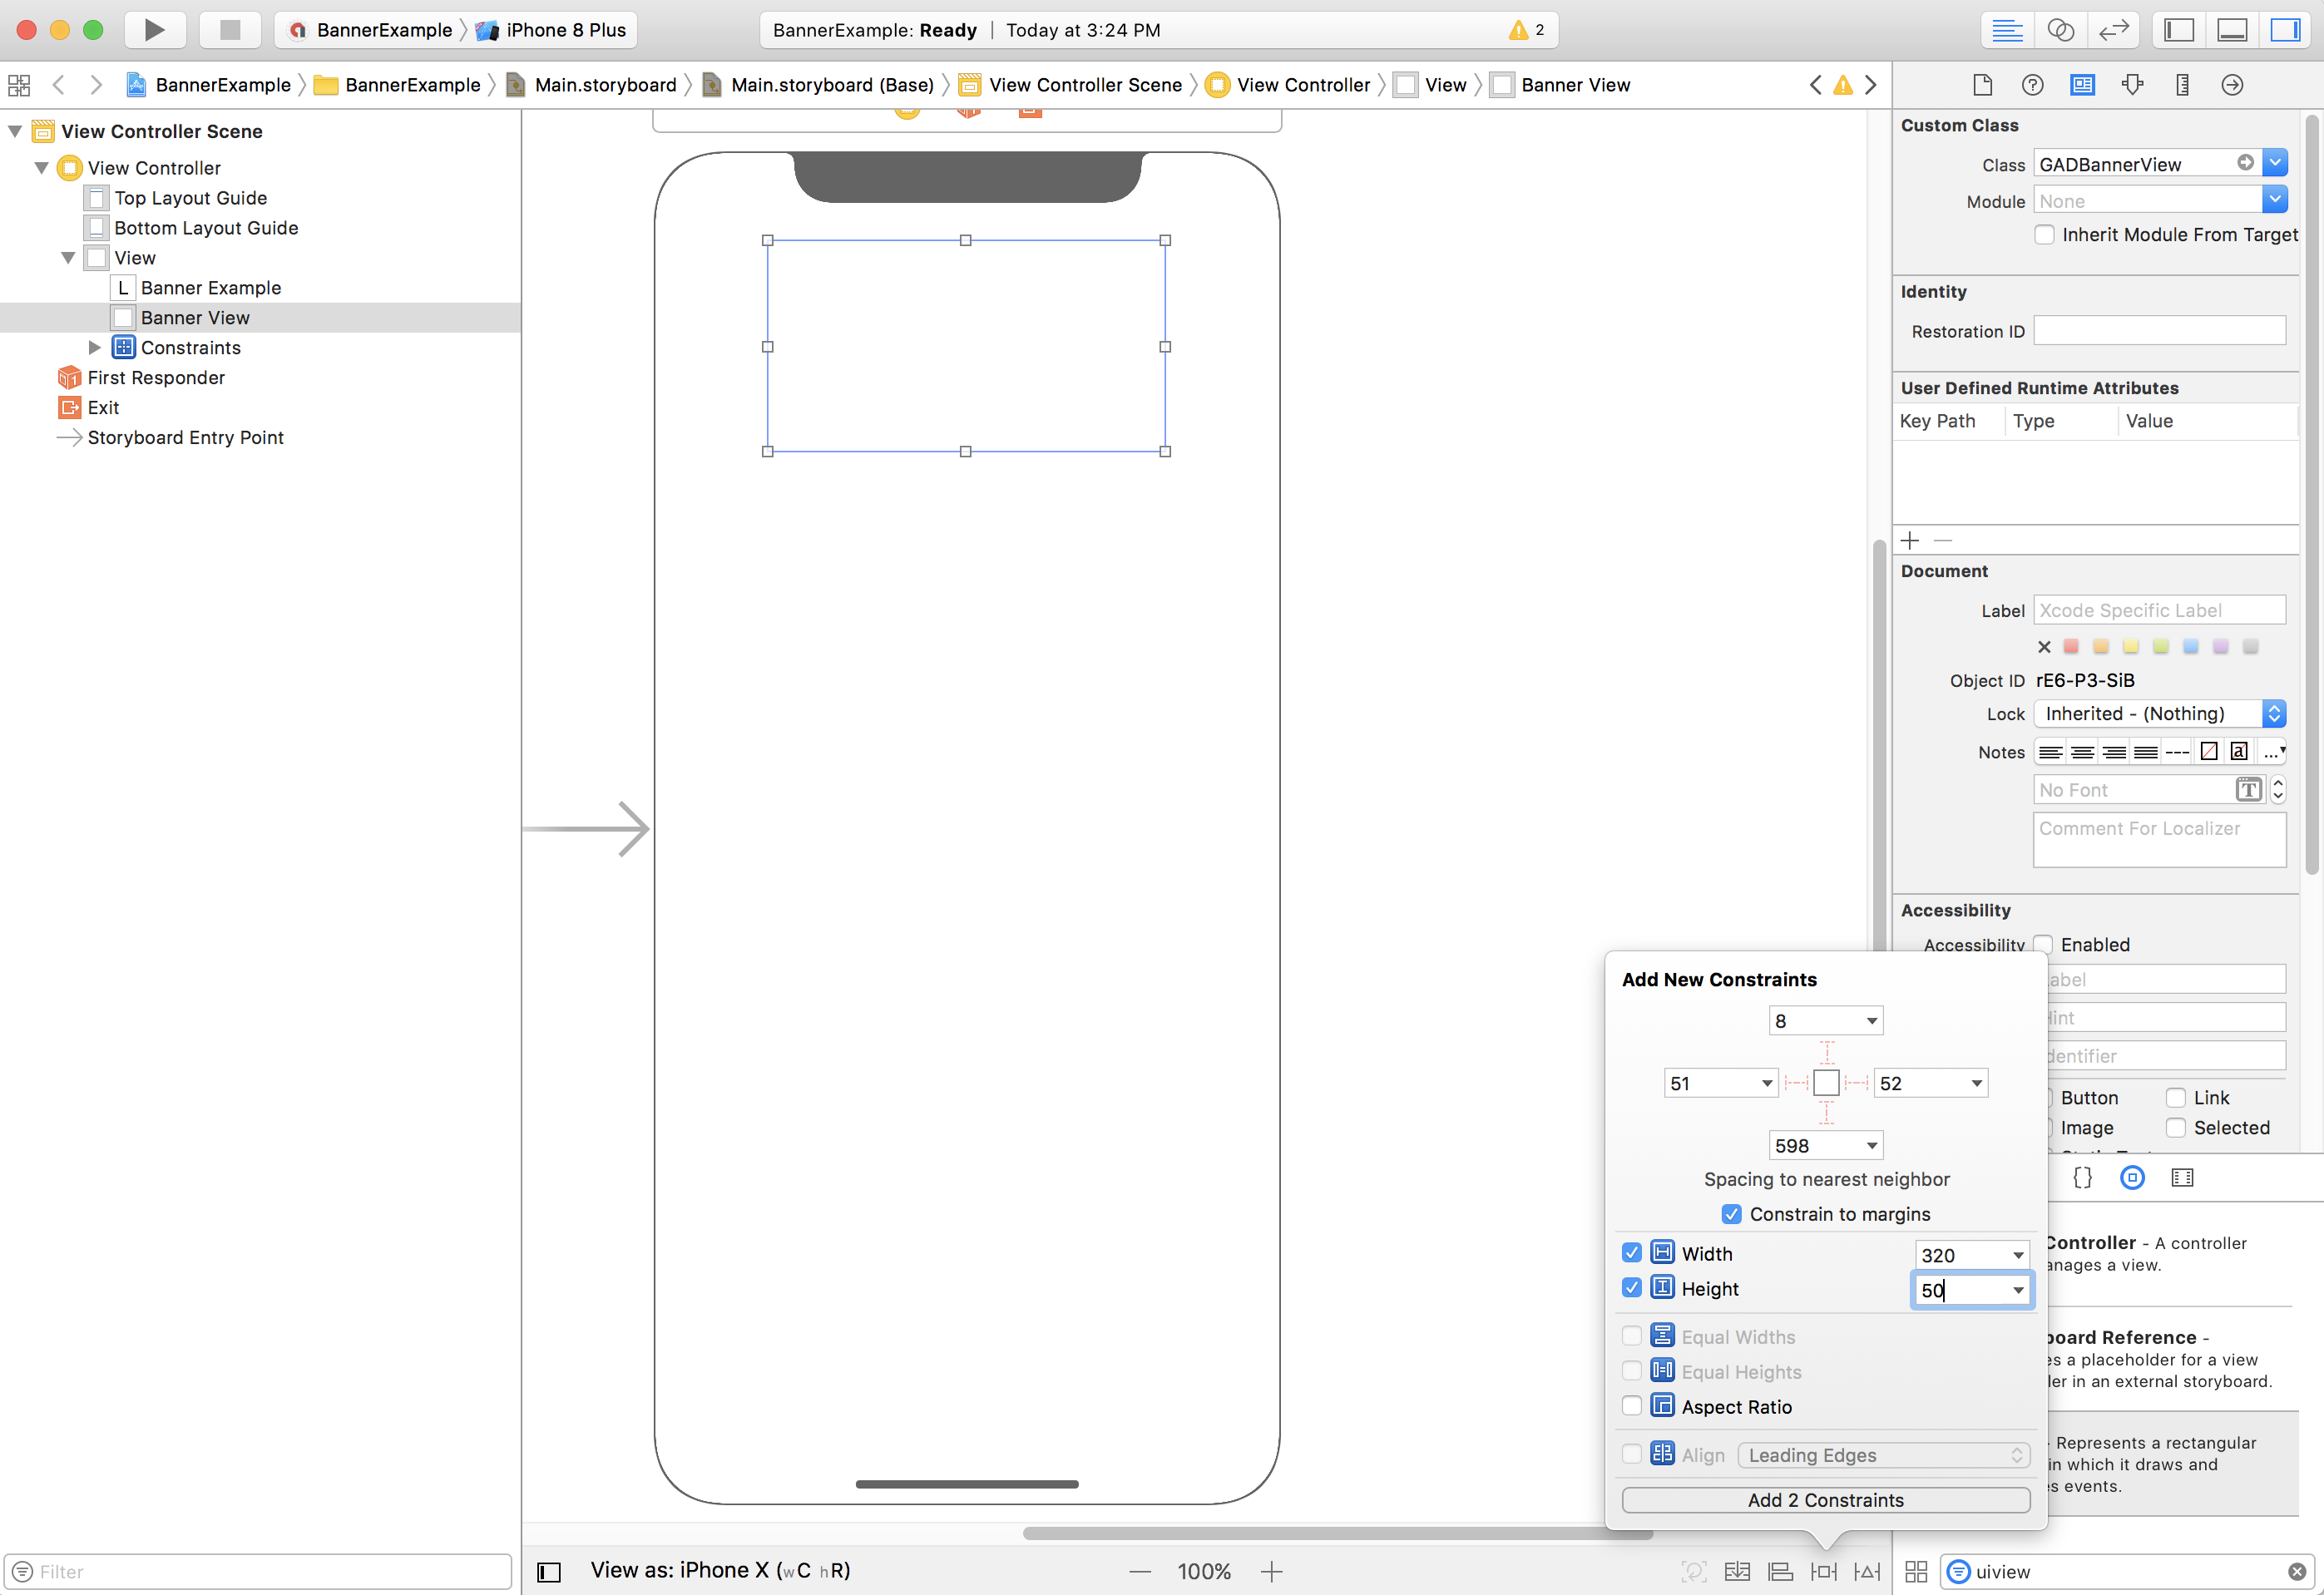
幅と高さの制限を使って、必要なサイズにバナーが収まるように指定することをおすすめします。
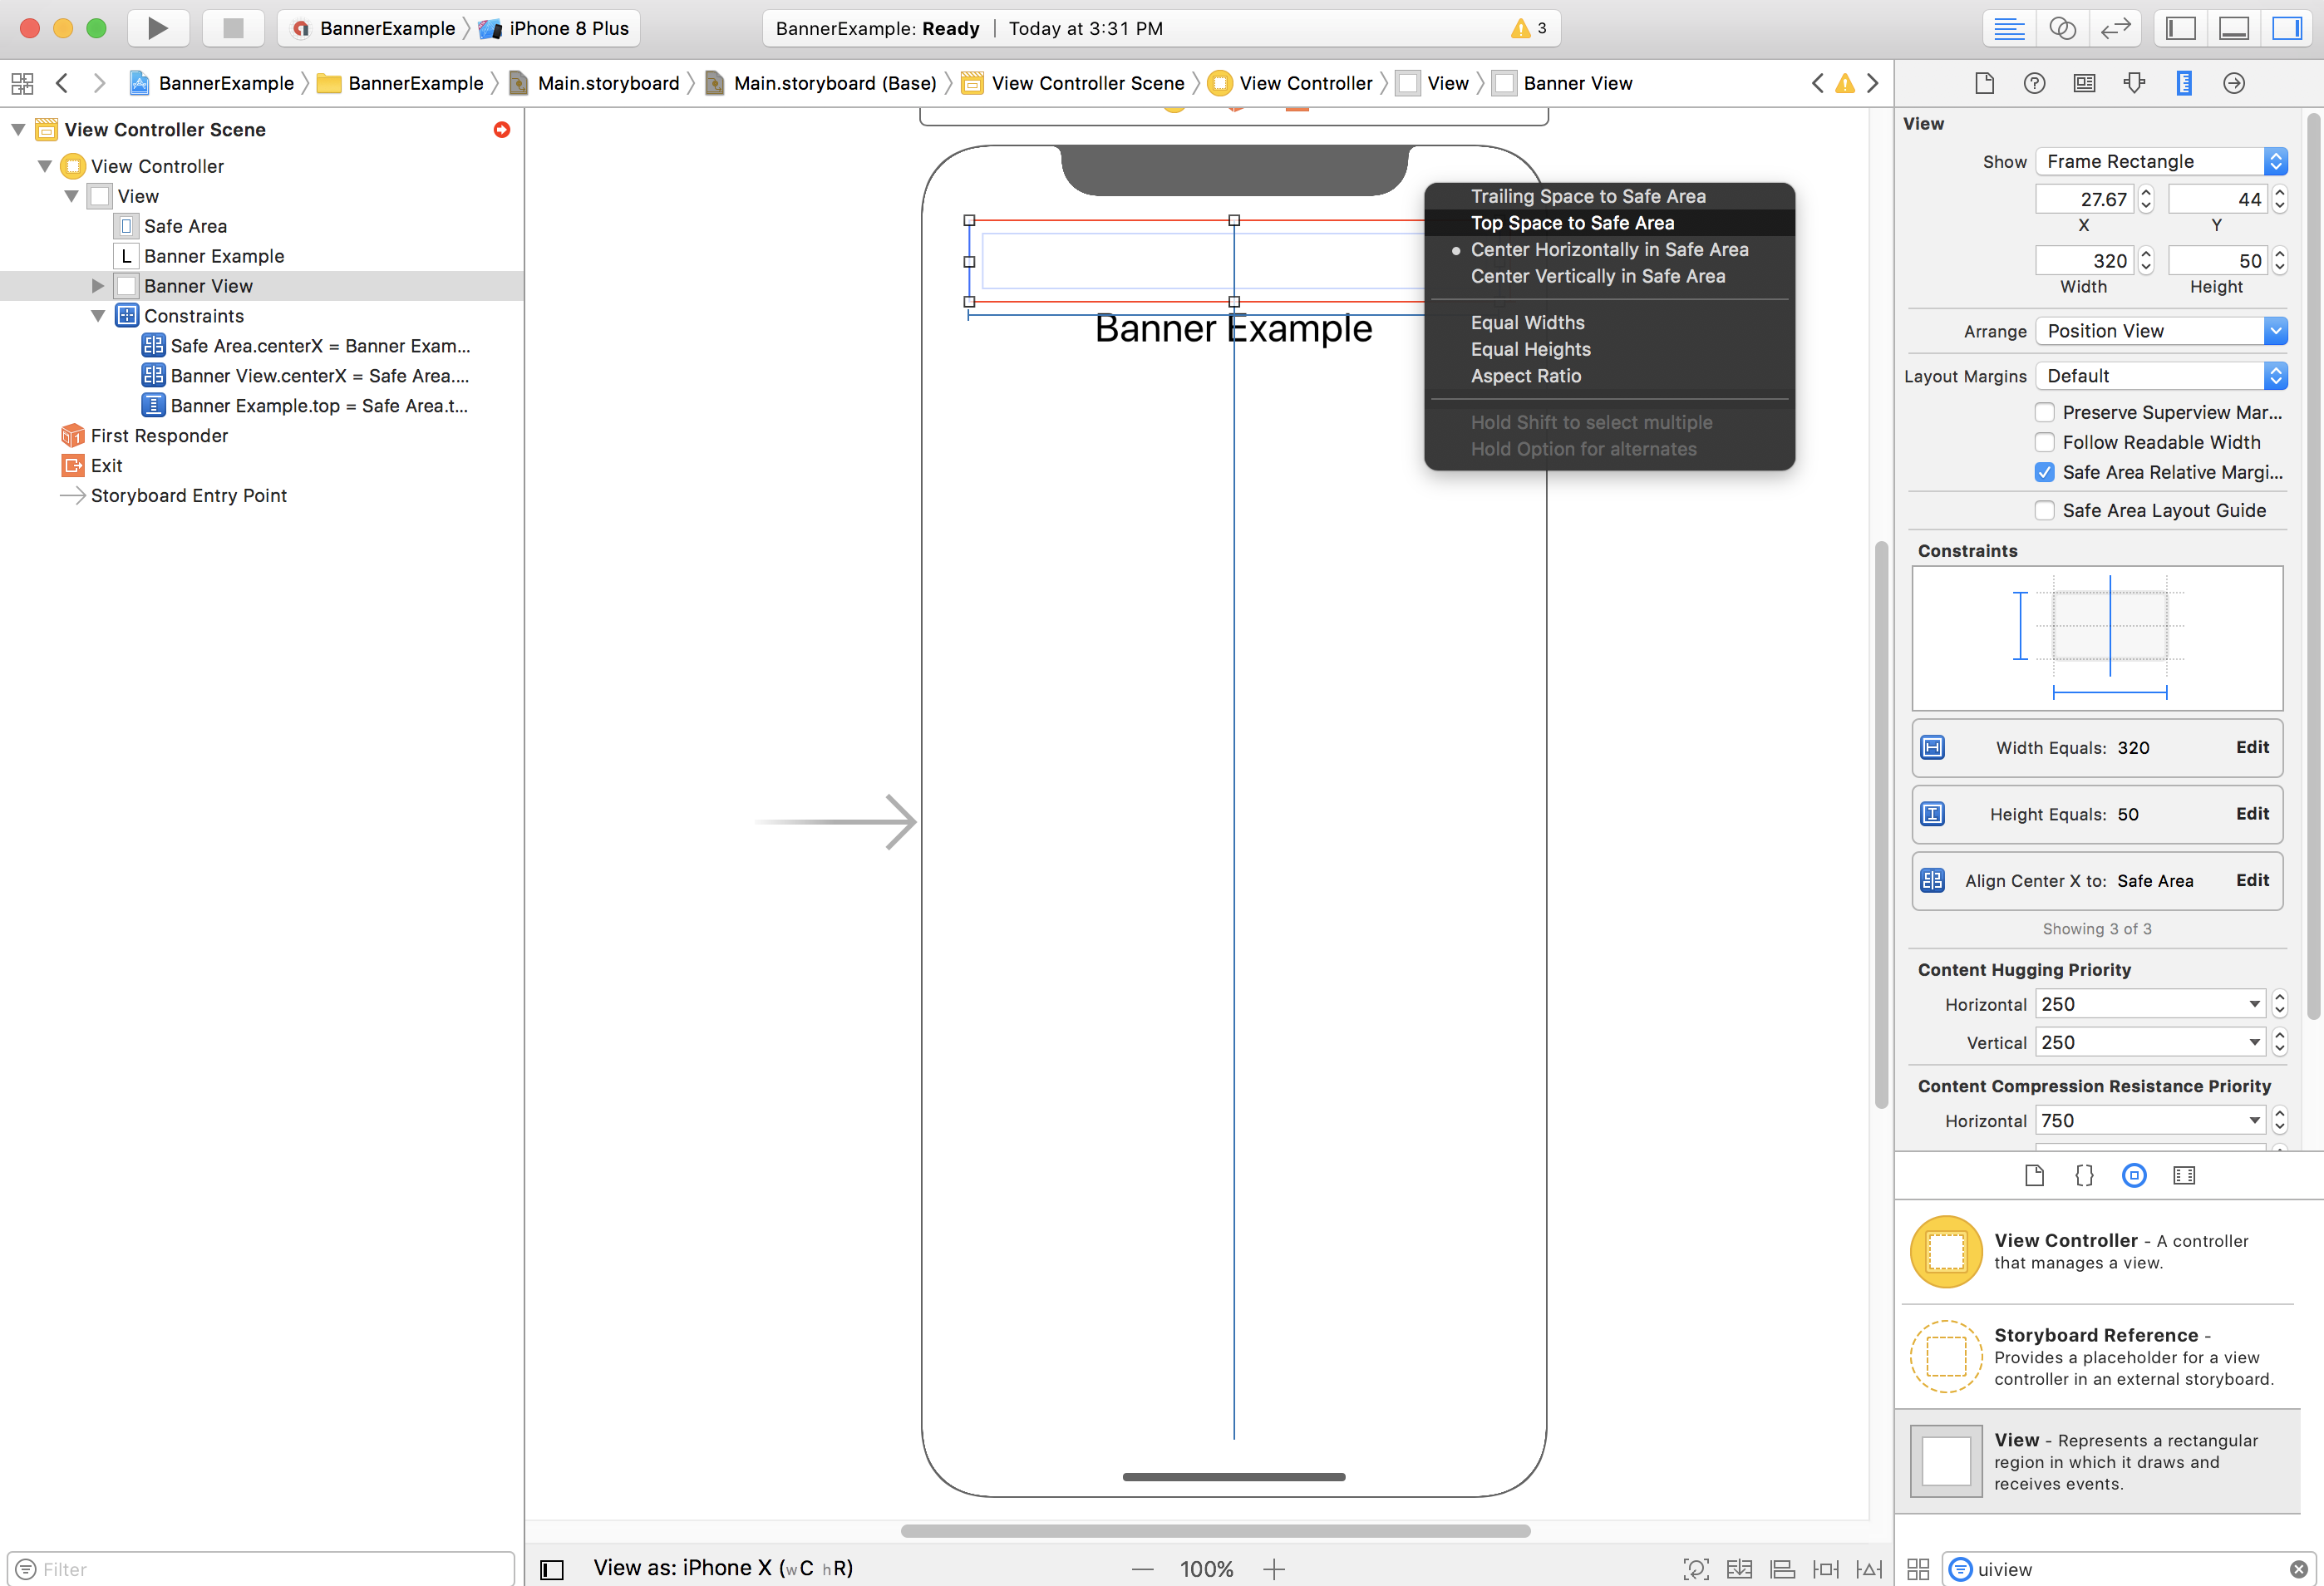
今では、セーフエリアの上端に合わせてバナーを表示できるようになりました。それには、次のように GADBannerView の Top プロパティにセーフエリアの上端の制限を指定します。
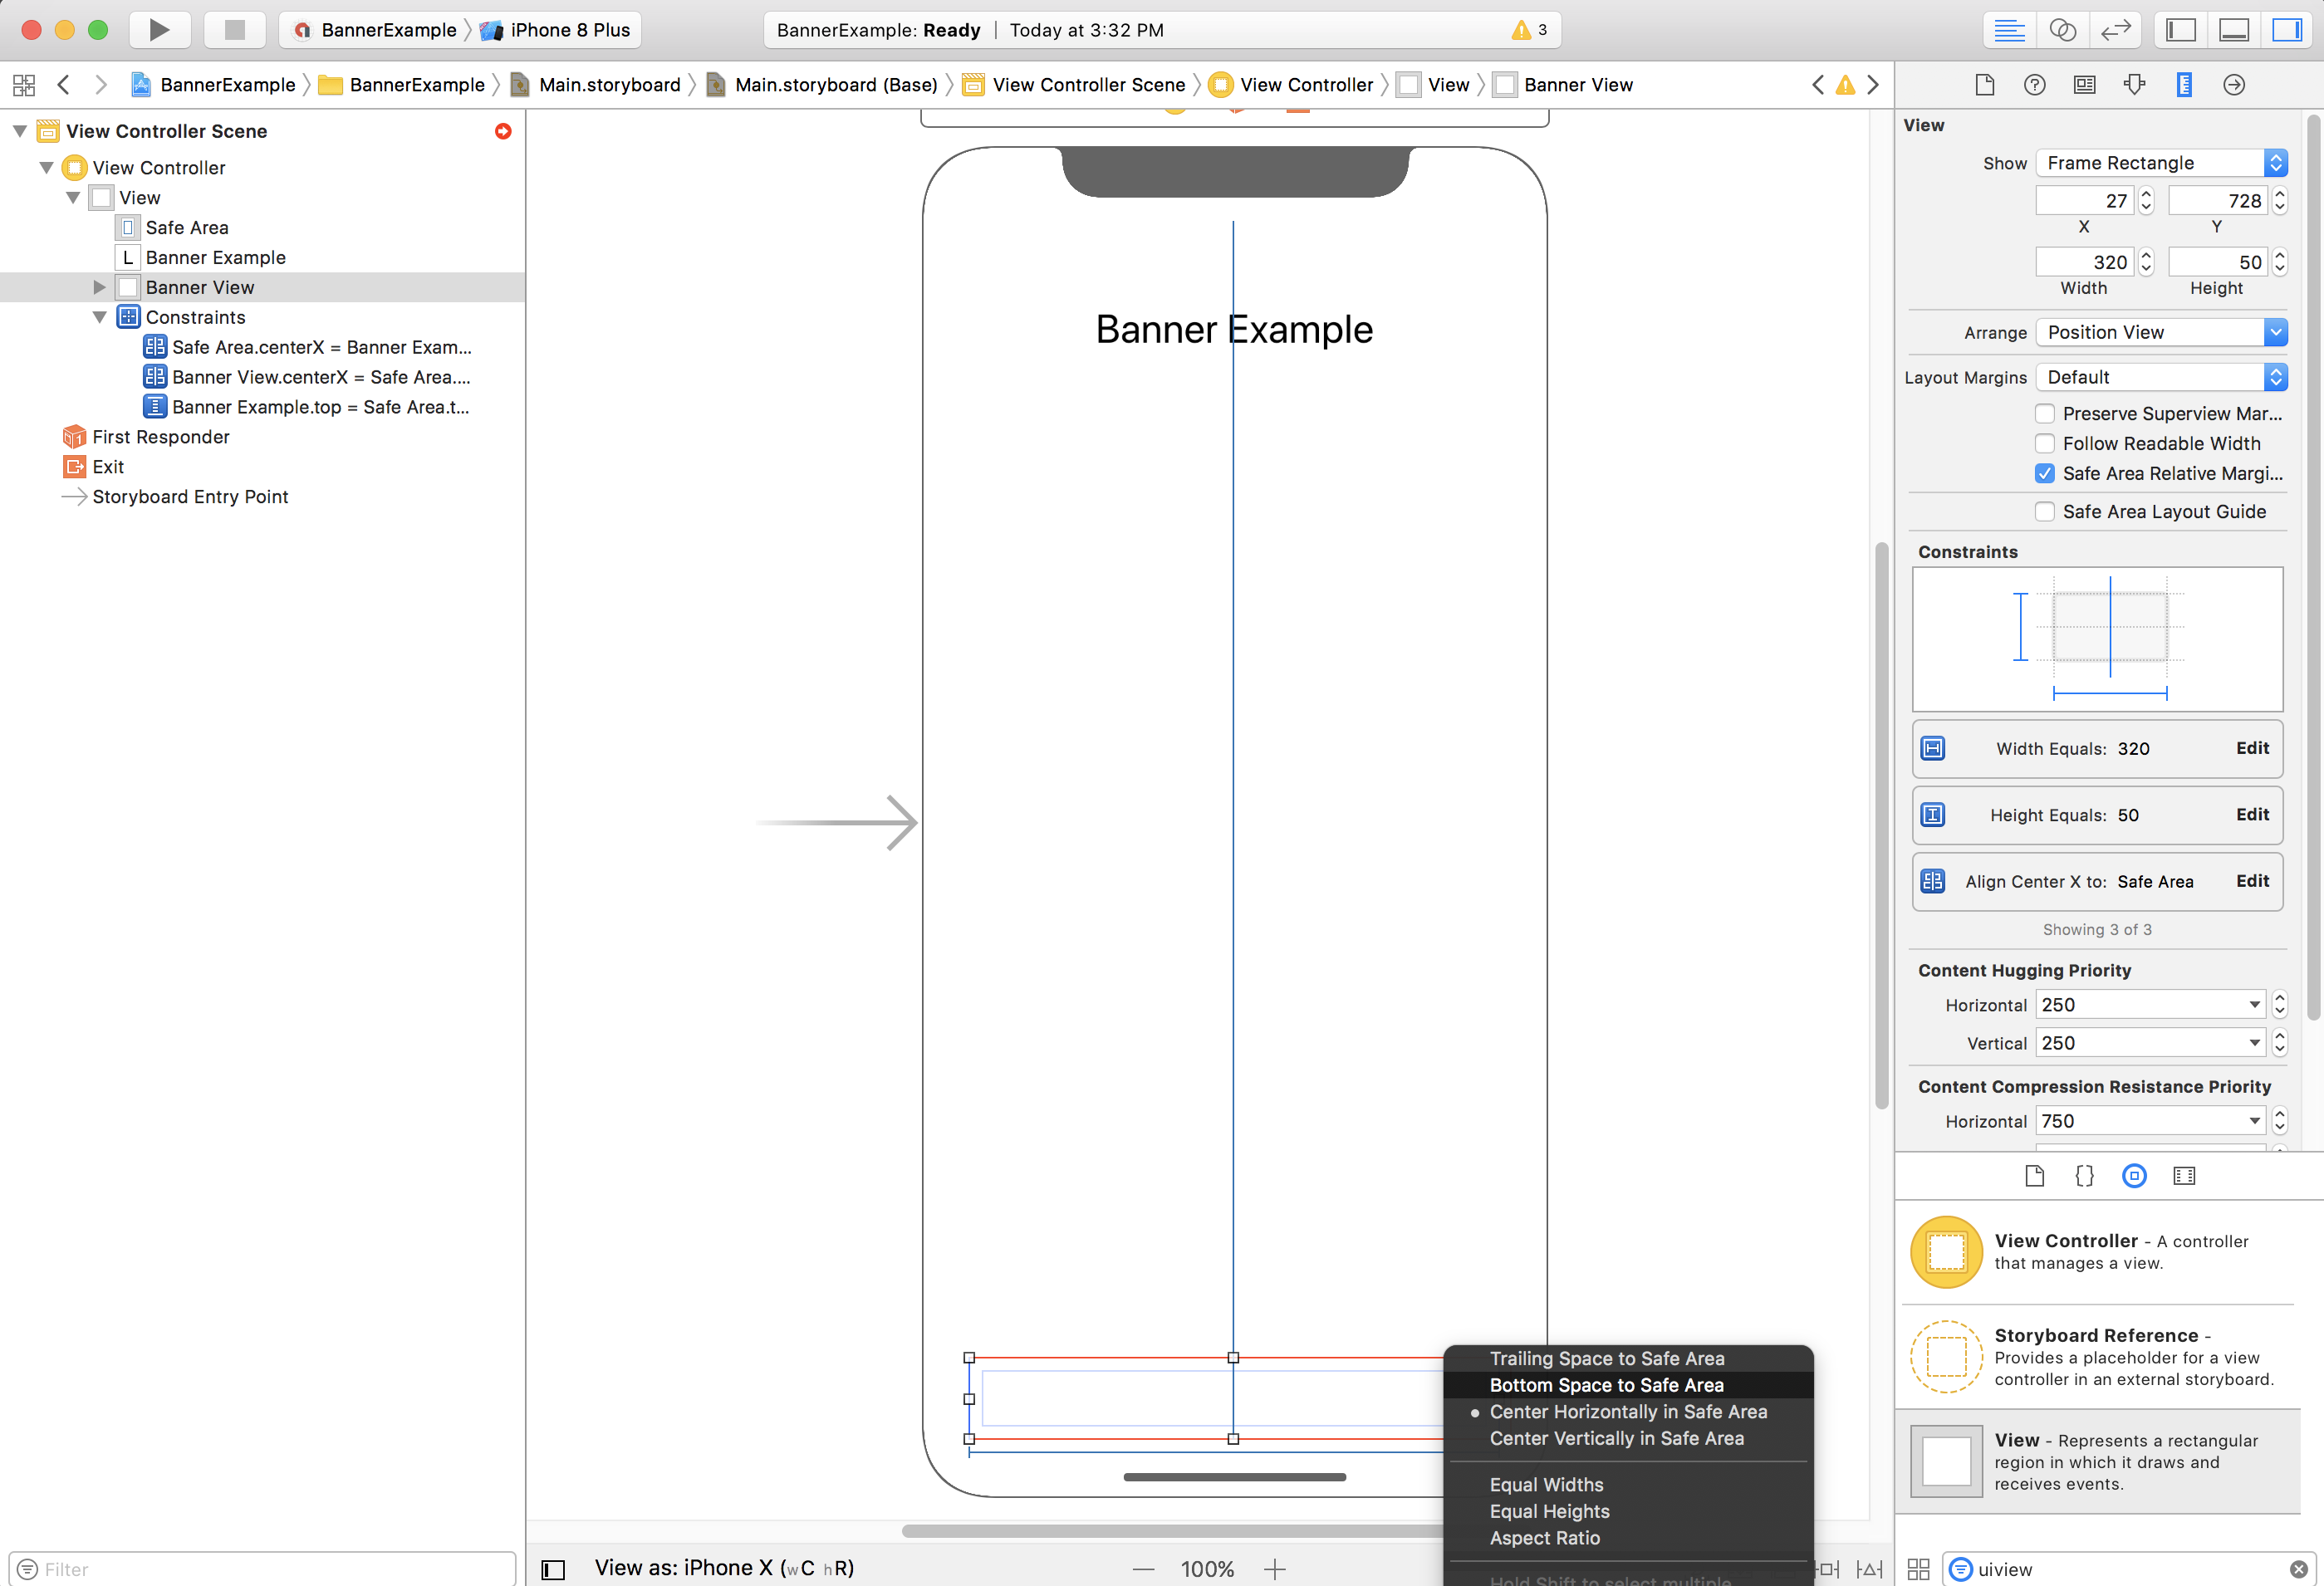
同様に、セーフエリアの下端に合わせてバナーを表示することもできます。それには次のように GADBannerView の Bottom プロパティにセーフエリア下端の制限を指定します。
こうした制限を加えると、次のスクリーンショットのような内容が表示されます(表示されるサイズや位置は実際の指定に応じて異なります)。
ViewController
次に示すビュー コントローラのコード スニペットは、上のストーリーボードで設定した GADBannerView でバナーを表示するために最低限必要な処理を行うコードです。
Swift
class ViewController: UIViewController {

  /// The banner view.
  @IBOutlet var bannerView: BannerView!

  override func viewDidLoad() {
    super.viewDidLoad()
    // Replace this ad unit ID with your own ad unit ID.
    bannerView.adUnitID = "ca-app-pub-3940256099942544/2934735716"
    bannerView.rootViewController = self
    bannerView.load(Request())
  }

}
Objective-C
@interface ViewController()

@property(nonatomic, strong) IBOutlet GADBannerView *bannerView;

@end

@implementation ViewController

- (void)viewDidLoad {
  [super viewDidLoad];

  // Replace this ad unit ID with your own ad unit ID.
  self.bannerView.adUnitID = @"ca-app-pub-3940256099942544/2934735716";
  self.bannerView.rootViewController = self;
  GADRequest *request = [GADRequest request];
  [self.bannerView loadRequest:request];
}
セーフエリアの端に沿ってバナーを表示する
バナーを左揃えか右揃えにする場合は、バナーの左端や右端の制限として superview ではなくセーフエリアの左端や右端を指定します。
[Use Safe Area Layout Guides] を有効にしている場合は、ビューに制限を指定するとセーフエリアの端がデフォルト値として使われます。
プログラマティック
バナー広告をプログラムで作成している場合は、制限を定義してバナー広告をコード内に配置できます。次の例は、セーフエリアの下端中央にバナーを配置するよう制限する方法を示しています。
Swift
class ViewController: UIViewController {

  var bannerView: BannerView!

  override func viewDidLoad() {
    super.viewDidLoad()

    // Instantiate the banner view with your desired banner size.
    bannerView = BannerView(adSize: AdSizeBanner)
    addBannerViewToView(bannerView)
    bannerView.rootViewController = self
    // Set the ad unit ID to your own ad unit ID here.
    bannerView.adUnitID = "ca-app-pub-3940256099942544/2934735716"
    bannerView.load(Request())
  }

  func addBannerViewToView(_ bannerView: UIView) {
    bannerView.translatesAutoresizingMaskIntoConstraints = false
    view.addSubview(bannerView)
    if #available(iOS 11.0, *) {
      positionBannerAtBottomOfSafeArea(bannerView)
    }
    else {
      positionBannerAtBottomOfView(bannerView)
    }
  }

  @available (iOS 11, *)
  func positionBannerAtBottomOfSafeArea(_ bannerView: UIView) {
    // Position the banner. Stick it to the bottom of the Safe Area.
    // Centered horizontally.
    let guide: UILayoutGuide = view.safeAreaLayoutGuide

    NSLayoutConstraint.activate(
      [bannerView.centerXAnchor.constraint(equalTo: guide.centerXAnchor),
       bannerView.bottomAnchor.constraint(equalTo: guide.bottomAnchor)]
    )
  }

  func positionBannerAtBottomOfView(_ bannerView: UIView) {
    // Center the banner horizontally.
    view.addConstraint(NSLayoutConstraint(item: bannerView,
                                          attribute: .centerX,
                                          relatedBy: .equal,
                                          toItem: view,
                                          attribute: .centerX,
                                          multiplier: 1,
                                          constant: 0))
    // Lock the banner to the top of the bottom layout guide.
    view.addConstraint(NSLayoutConstraint(item: bannerView,
                                          attribute: .bottom,
                                          relatedBy: .equal,
                                          toItem: self.bottomLayoutGuide,
                                          attribute: .top,
                                          multiplier: 1,
                                          constant: 0))
  }

}
Objective-C
@interface ViewController()

@property(nonatomic, strong) GADBannerView *bannerView;

@end

@implementation ViewController

- (void)viewDidLoad {
  [super viewDidLoad];

  // Instantiate the banner view with your desired banner size.
  self.bannerView = [[GADBannerView alloc] initWithAdSize:GADAdSizeBanner];
  [self addBannerViewToView:self.bannerView];

  // Replace this ad unit ID with your own ad unit ID.
  self.bannerView.adUnitID = @"ca-app-pub-3940256099942544/2934735716";
  self.bannerView.rootViewController = self;
  GADRequest *request = [GADRequest request];
  [self.bannerView loadRequest:request];
}

#pragma mark - view positioning

-(void)addBannerViewToView:(UIView *_Nonnull)bannerView {
  self.bannerView.translatesAutoresizingMaskIntoConstraints = NO;
  [self.view addSubview:self.bannerView];
  if (@available(ios 11.0, *)) {
    [self positionBannerViewAtBottomOfSafeArea:bannerView];
  } else {
    [self positionBannerViewAtBottomOfView:bannerView];
  }
}

- (void)positionBannerViewAtBottomOfSafeArea:(UIView *_Nonnull)bannerView NS_AVAILABLE_IOS(11.0) {
  // Position the banner. Stick it to the bottom of the Safe Area.
  // Centered horizontally.
  UILayoutGuide *guide = self.view.safeAreaLayoutGuide;
  [NSLayoutConstraint activateConstraints:@[
    [bannerView.centerXAnchor constraintEqualToAnchor:guide.centerXAnchor],
    [bannerView.bottomAnchor constraintEqualToAnchor:guide.bottomAnchor]
  ]];
}

- (void)positionBannerViewAtBottomOfView:(UIView *_Nonnull)bannerView {
  [self.view addConstraint:[NSLayoutConstraint constraintWithItem:bannerView
                                                        attribute:NSLayoutAttributeCenterX
                                                        relatedBy:NSLayoutRelationEqual
                                                           toItem:self.view
                                                        attribute:NSLayoutAttributeCenterX
                                                       multiplier:1
                                                         constant:0]];
  [self.view addConstraint:[NSLayoutConstraint constraintWithItem:bannerView
                                                        attribute:NSLayoutAttributeBottom
                                                        relatedBy:NSLayoutRelationEqual
                                                           toItem:self.bottomLayoutGuide
                                                        attribute:NSLayoutAttributeTop
                                                       multiplier:1
                                                         constant:0]];
}

@end
上記の手法は、使用する属性とアンカーを変更すれば、セーフエリアの上端に配置を制限する際にも簡単に利用できます。
スマートバナー
特にスマートバナーを横向きで使用している場合は、制限を使って、バナーの端をセーフエリアの左端と右端に合わせて表示することをおすすめします。
Interface Builder では、上記のように [Use Safe Area Layout Guides] チェックボックスをオンにすると、iOS 9 まで遡ってこの設定がサポートされます 。
プログラミングの際は、可能であればセーフエリアのレイアウト ガイドを参照して端の制限を指定してください。次のコード スニペットは、ビューにバナービューを追加して、そのビューの下端を制限に指定して全幅表示する方法を示しています。
Swift
func addBannerViewToView(_ bannerView: BannerView) {
  bannerView.translatesAutoresizingMaskIntoConstraints = false
  view.addSubview(bannerView)
  if #available(iOS 11.0, *) {
    // In iOS 11, we need to constrain the view to the safe area.
    positionBannerViewFullWidthAtBottomOfSafeArea(bannerView)
  }
  else {
    // In lower iOS versions, safe area is not available so we use
    // bottom layout guide and view edges.
    positionBannerViewFullWidthAtBottomOfView(bannerView)
  }
}

// MARK: - view positioning
@available (iOS 11, *)
func positionBannerViewFullWidthAtBottomOfSafeArea(_ bannerView: UIView) {
  // Position the banner. Stick it to the bottom of the Safe Area.
  // Make it constrained to the edges of the safe area.
  let guide = view.safeAreaLayoutGuide
  NSLayoutConstraint.activate([
    guide.leftAnchor.constraint(equalTo: bannerView.leftAnchor),
    guide.rightAnchor.constraint(equalTo: bannerView.rightAnchor),
    guide.bottomAnchor.constraint(equalTo: bannerView.bottomAnchor)
  ])
}

func positionBannerViewFullWidthAtBottomOfView(_ bannerView: UIView) {
  view.addConstraint(NSLayoutConstraint(item: bannerView,
                                        attribute: .leading,
                                        relatedBy: .equal,
                                        toItem: view,
                                        attribute: .leading,
                                        multiplier: 1,
                                        constant: 0))
  view.addConstraint(NSLayoutConstraint(item: bannerView,
                                        attribute: .trailing,
                                        relatedBy: .equal,
                                        toItem: view,
                                        attribute: .trailing,
                                        multiplier: 1,
                                        constant: 0))
  view.addConstraint(NSLayoutConstraint(item: bannerView,
                                        attribute: .bottom,
                                        relatedBy: .equal,
                                        toItem: bottomLayoutGuide,
                                        attribute: .top,
                                        multiplier: 1,
                                        constant: 0))
}
Objective-C
- (void)addBannerViewToView:(UIView *)bannerView {
  bannerView.translatesAutoresizingMaskIntoConstraints = NO;
  [self.view addSubview:bannerView];
  if (@available(ios 11.0, *)) {
    // In iOS 11, we need to constrain the view to the safe area.
    [self positionBannerViewFullWidthAtBottomOfSafeArea:bannerView];
  } else {
    // In lower iOS versions, safe area is not available so we use
    // bottom layout guide and view edges.
    [self positionBannerViewFullWidthAtBottomOfView:bannerView];
  }
}

#pragma mark - view positioning

- (void)positionBannerViewFullWidthAtBottomOfSafeArea:(UIView *_Nonnull)bannerView NS_AVAILABLE_IOS(11.0) {
  // Position the banner. Stick it to the bottom of the Safe Area.
  // Make it constrained to the edges of the safe area.
  UILayoutGuide *guide = self.view.safeAreaLayoutGuide;

  [NSLayoutConstraint activateConstraints:@[
    [guide.leftAnchor constraintEqualToAnchor:bannerView.leftAnchor],
    [guide.rightAnchor constraintEqualToAnchor:bannerView.rightAnchor],
    [guide.bottomAnchor constraintEqualToAnchor:bannerView.bottomAnchor]
  ]];
}

- (void)positionBannerViewFullWidthAtBottomOfView:(UIView *_Nonnull)bannerView {
  [self.view addConstraint:[NSLayoutConstraint constraintWithItem:bannerView
                                                        attribute:NSLayoutAttributeLeading
                                                        relatedBy:NSLayoutRelationEqual
                                                           toItem:self.view
                                                        attribute:NSLayoutAttributeLeading
                                                       multiplier:1
                                                         constant:0]];
  [self.view addConstraint:[NSLayoutConstraint constraintWithItem:bannerView
                                                        attribute:NSLayoutAttributeTrailing
                                                        relatedBy:NSLayoutRelationEqual
                                                           toItem:self.view
                                                        attribute:NSLayoutAttributeTrailing
                                                       multiplier:1
                                                         constant:0]];
  [self.view addConstraint:[NSLayoutConstraint constraintWithItem:bannerView
                                                        attribute:NSLayoutAttributeBottom
                                                        relatedBy:NSLayoutRelationEqual
                                                           toItem:self.bottomLayoutGuide
                                                        attribute:NSLayoutAttributeTop
                                                       multiplier:1
                                                         constant:0]];
}
ネイティブ広告
アプリでネイティブ広告を画面の上端か下端に固定する場合は、ネイティブ広告にも
バナー広告と同じ手法を適用できます。
主な違いは、セーフエリアのレイアウト ガイドに準拠するために、GADBannerView ではなく GADNativeAdView(またはその広告を含むビュー)に制限を加える必要がある点です。ネイティブ ビューでは、サイズの制限をより明示的に指定することをおすすめします。
インタースティシャル広告とリワード広告
バージョン 7.26.0 では、Google Mobile Ads SDK、iPhone X 向けのインタースティシャル広告と リワード広告のフォーマットが完全にサポートされています。