
इस गाइड में, iPhone X पर विज्ञापनों को सही तरीके से रेंडर करने के लिए, ऐप्लिकेशन को कोड करने के सबसे सही तरीके बताए गए हैं.
ज़रूरी शर्तें
- Google Mobile Ads SDK का 7.26.0 या इसके बाद का वर्शन इंपोर्ट करें. इसके लिए, इसे अलग से या Firebase के हिस्से के तौर पर इंपोर्ट किया जा सकता है.
बैनर विज्ञापन
बैनर विज्ञापनों को "सुरक्षित जगह" में रखा जाना चाहिए, ताकि वे गोल कोनों, सेंसर हाउसिंग, और होम इंडिकेटर से छिप न जाएं. इस पेज पर, आपको बैनर को सुरक्षित क्षेत्र के सबसे ऊपर या सबसे नीचे रखने के लिए, पाबंदियां जोड़ने के उदाहरण मिलेंगे.
स्टोरीबोर्ड/इंटरफ़ेस बिल्डर
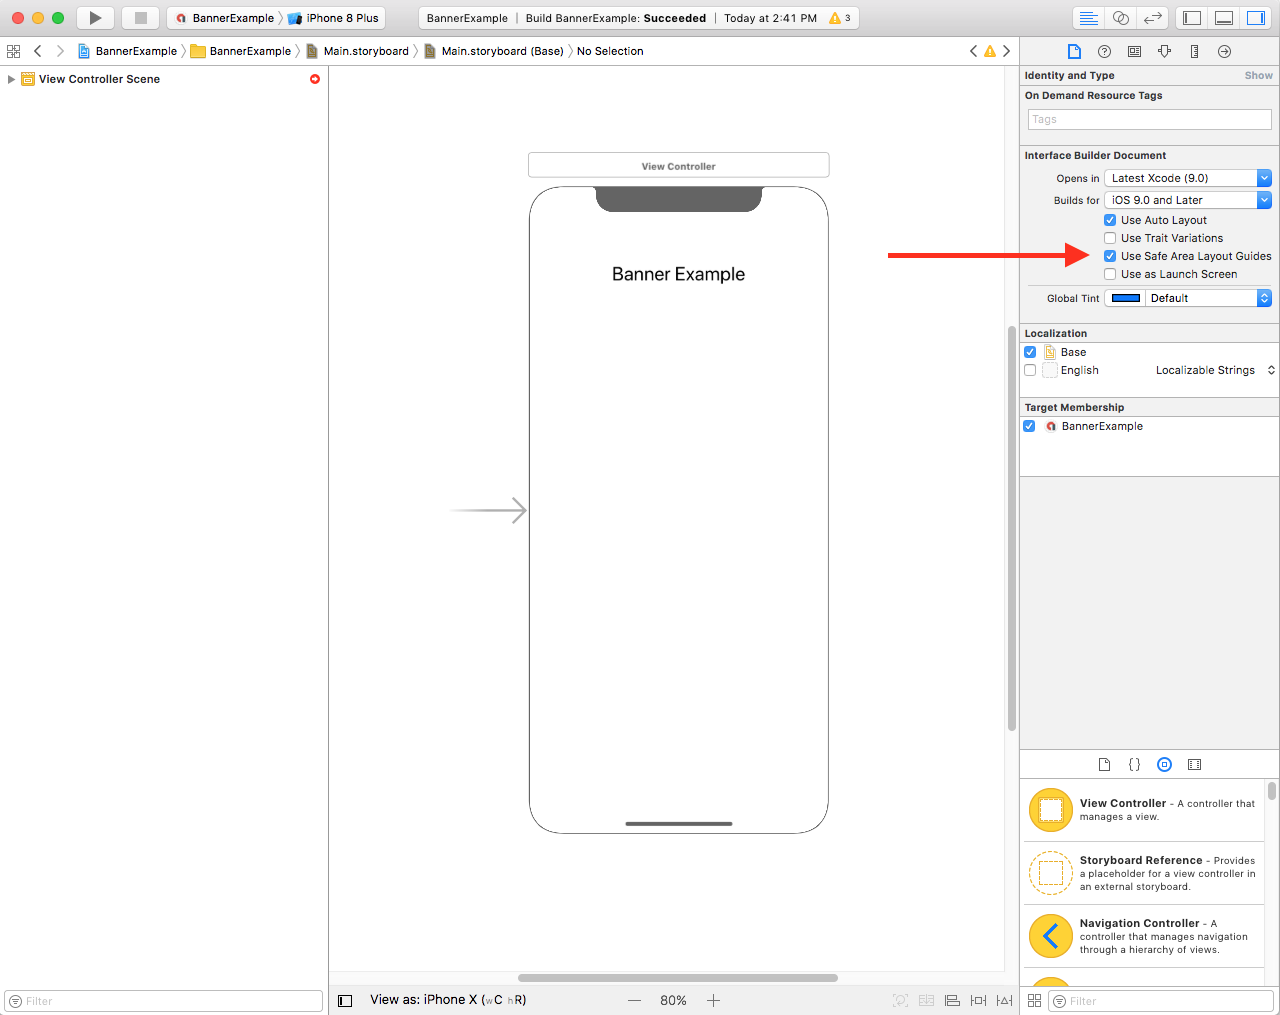
अगर आपका ऐप्लिकेशन इंटरफ़ेस बिल्डर का इस्तेमाल करता है, तो सबसे पहले पक्का करें कि आपने सुरक्षित जगह के लेआउट की गाइड चालू की हों. इसके लिए, आपको Xcode 9+ का इस्तेमाल करना होगा और iOS 9+ को टारगेट करना होगा.
इंटरफ़ेस बिल्डर फ़ाइल खोलें और व्यू कंट्रोलर सीन पर क्लिक करें. आपको दाईं ओर, Interface Builder Document के विकल्प दिखेंगे. Use Safe Area Layout Guides को चुनें और पक्का करें कि कम से कम iOS 9.0 और इसके बाद के वर्शन के लिए ऐप्लिकेशन बनाया जा रहा हो.
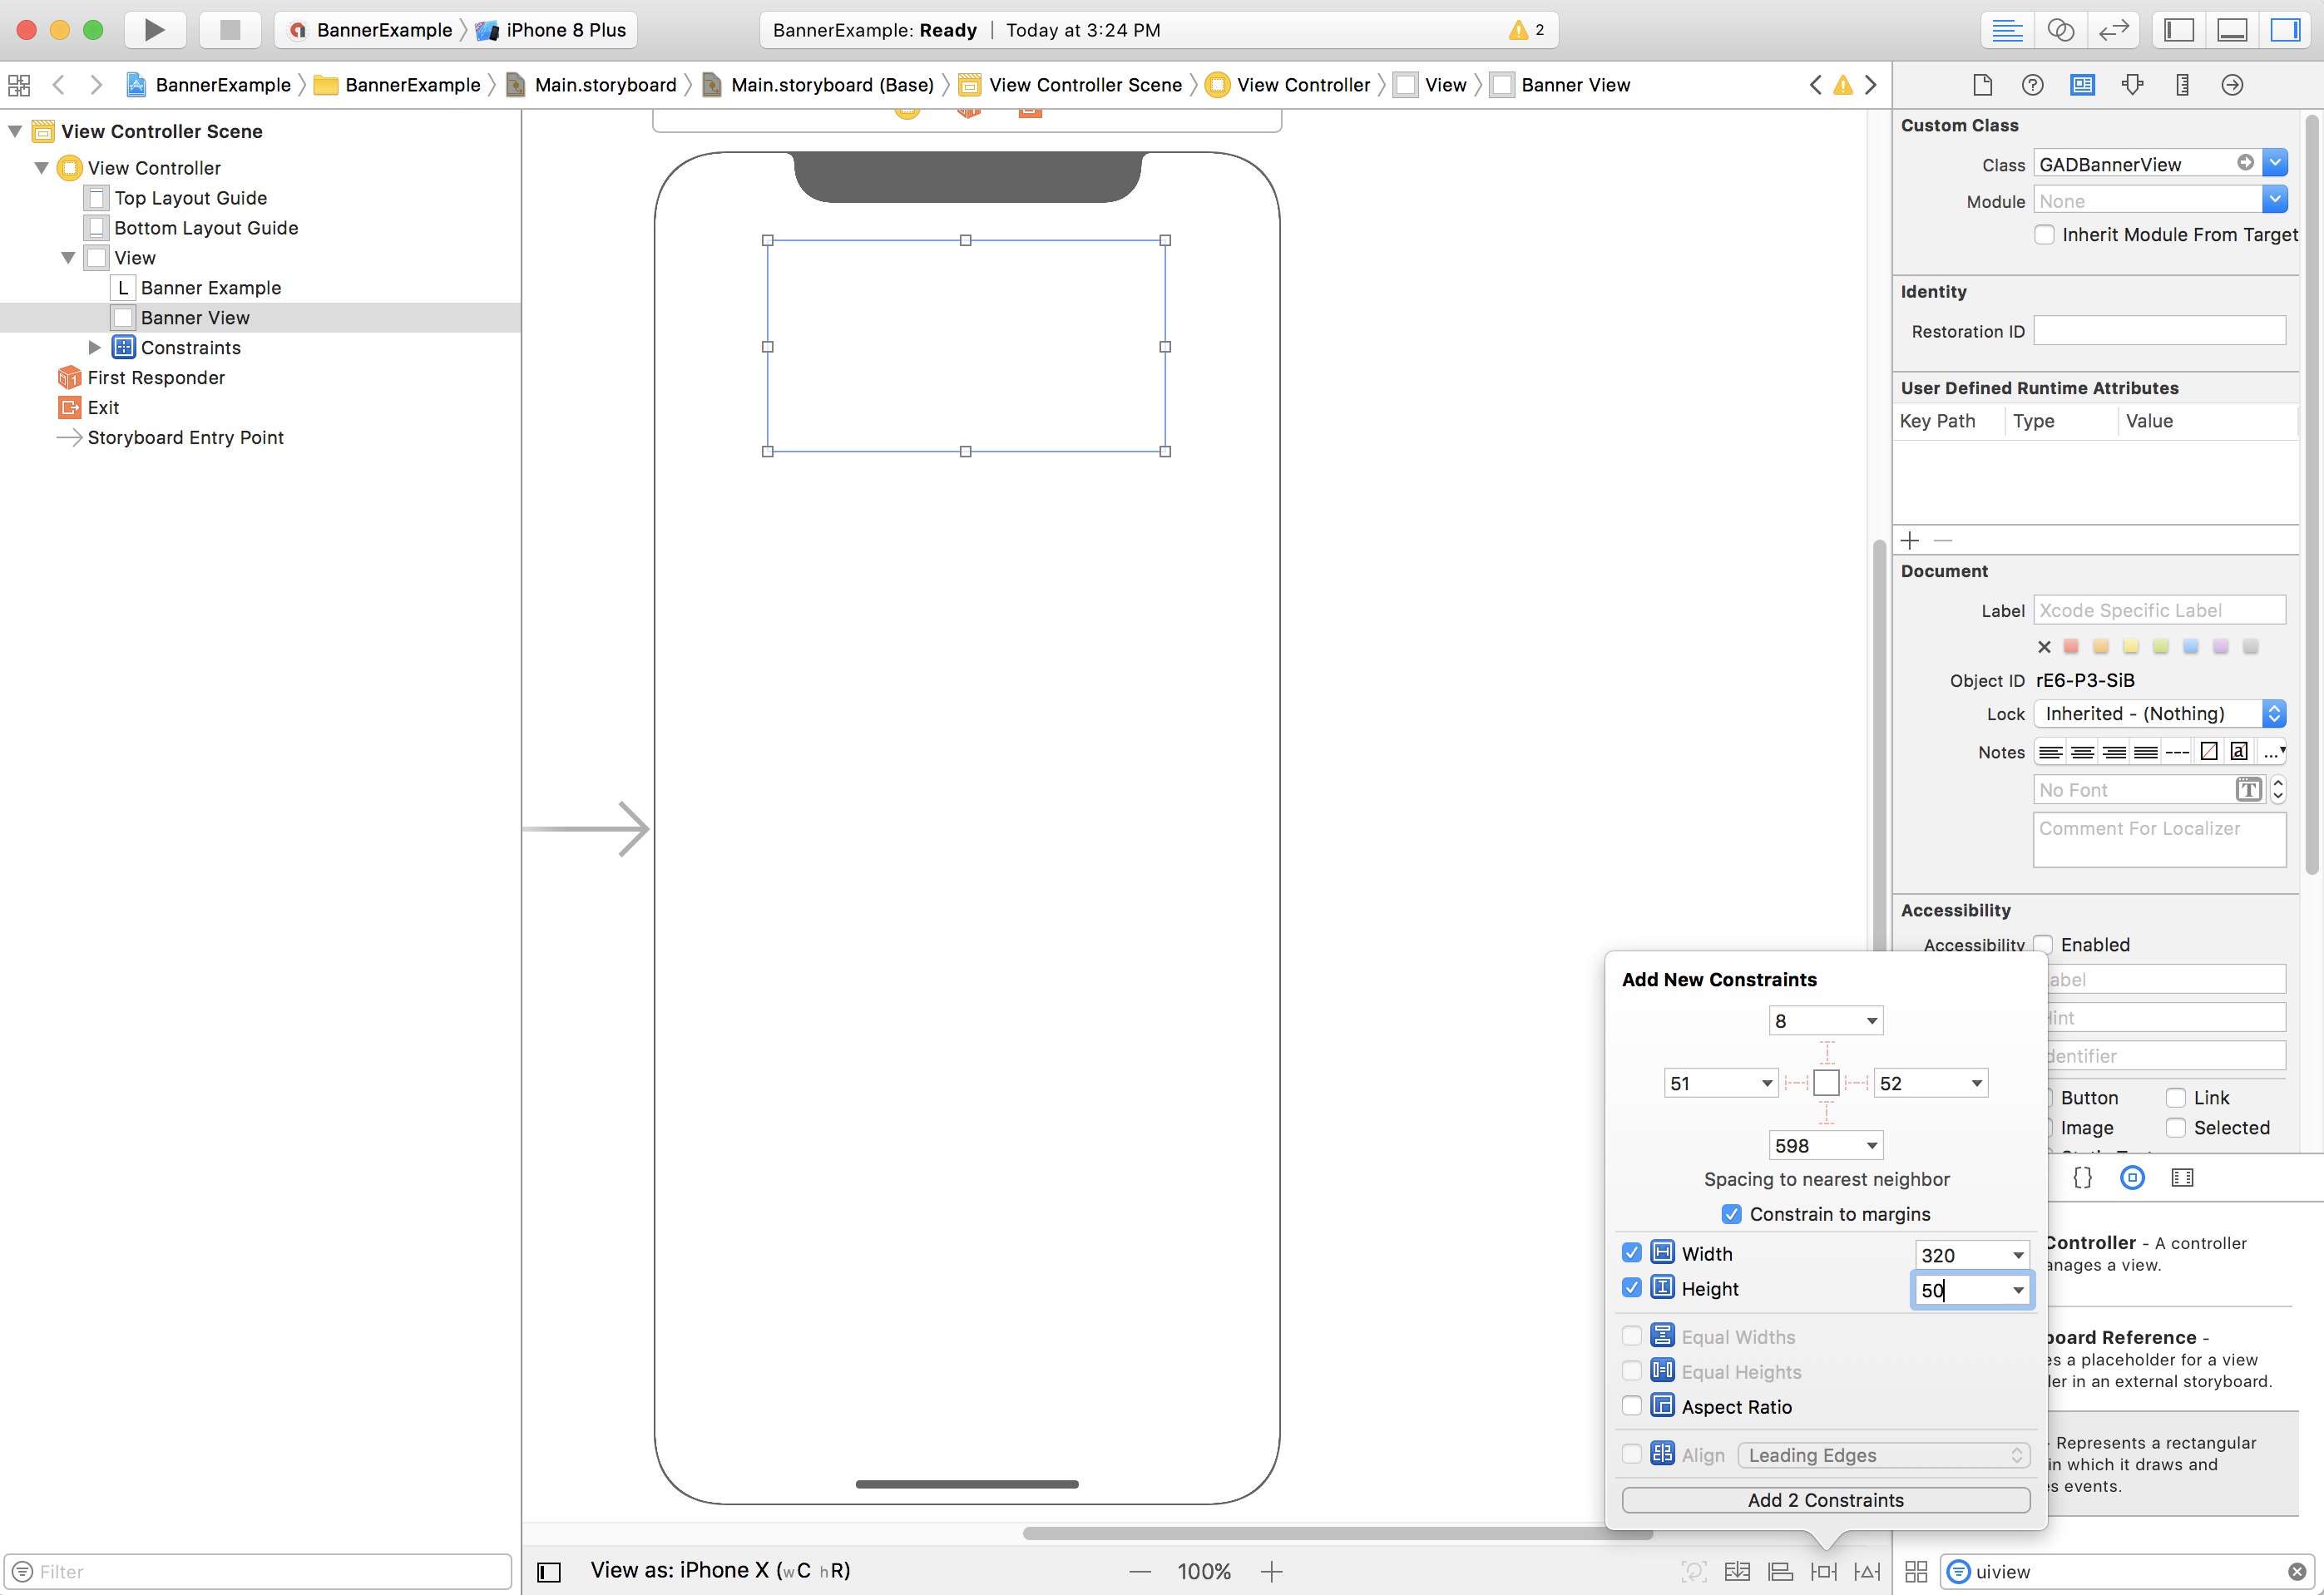
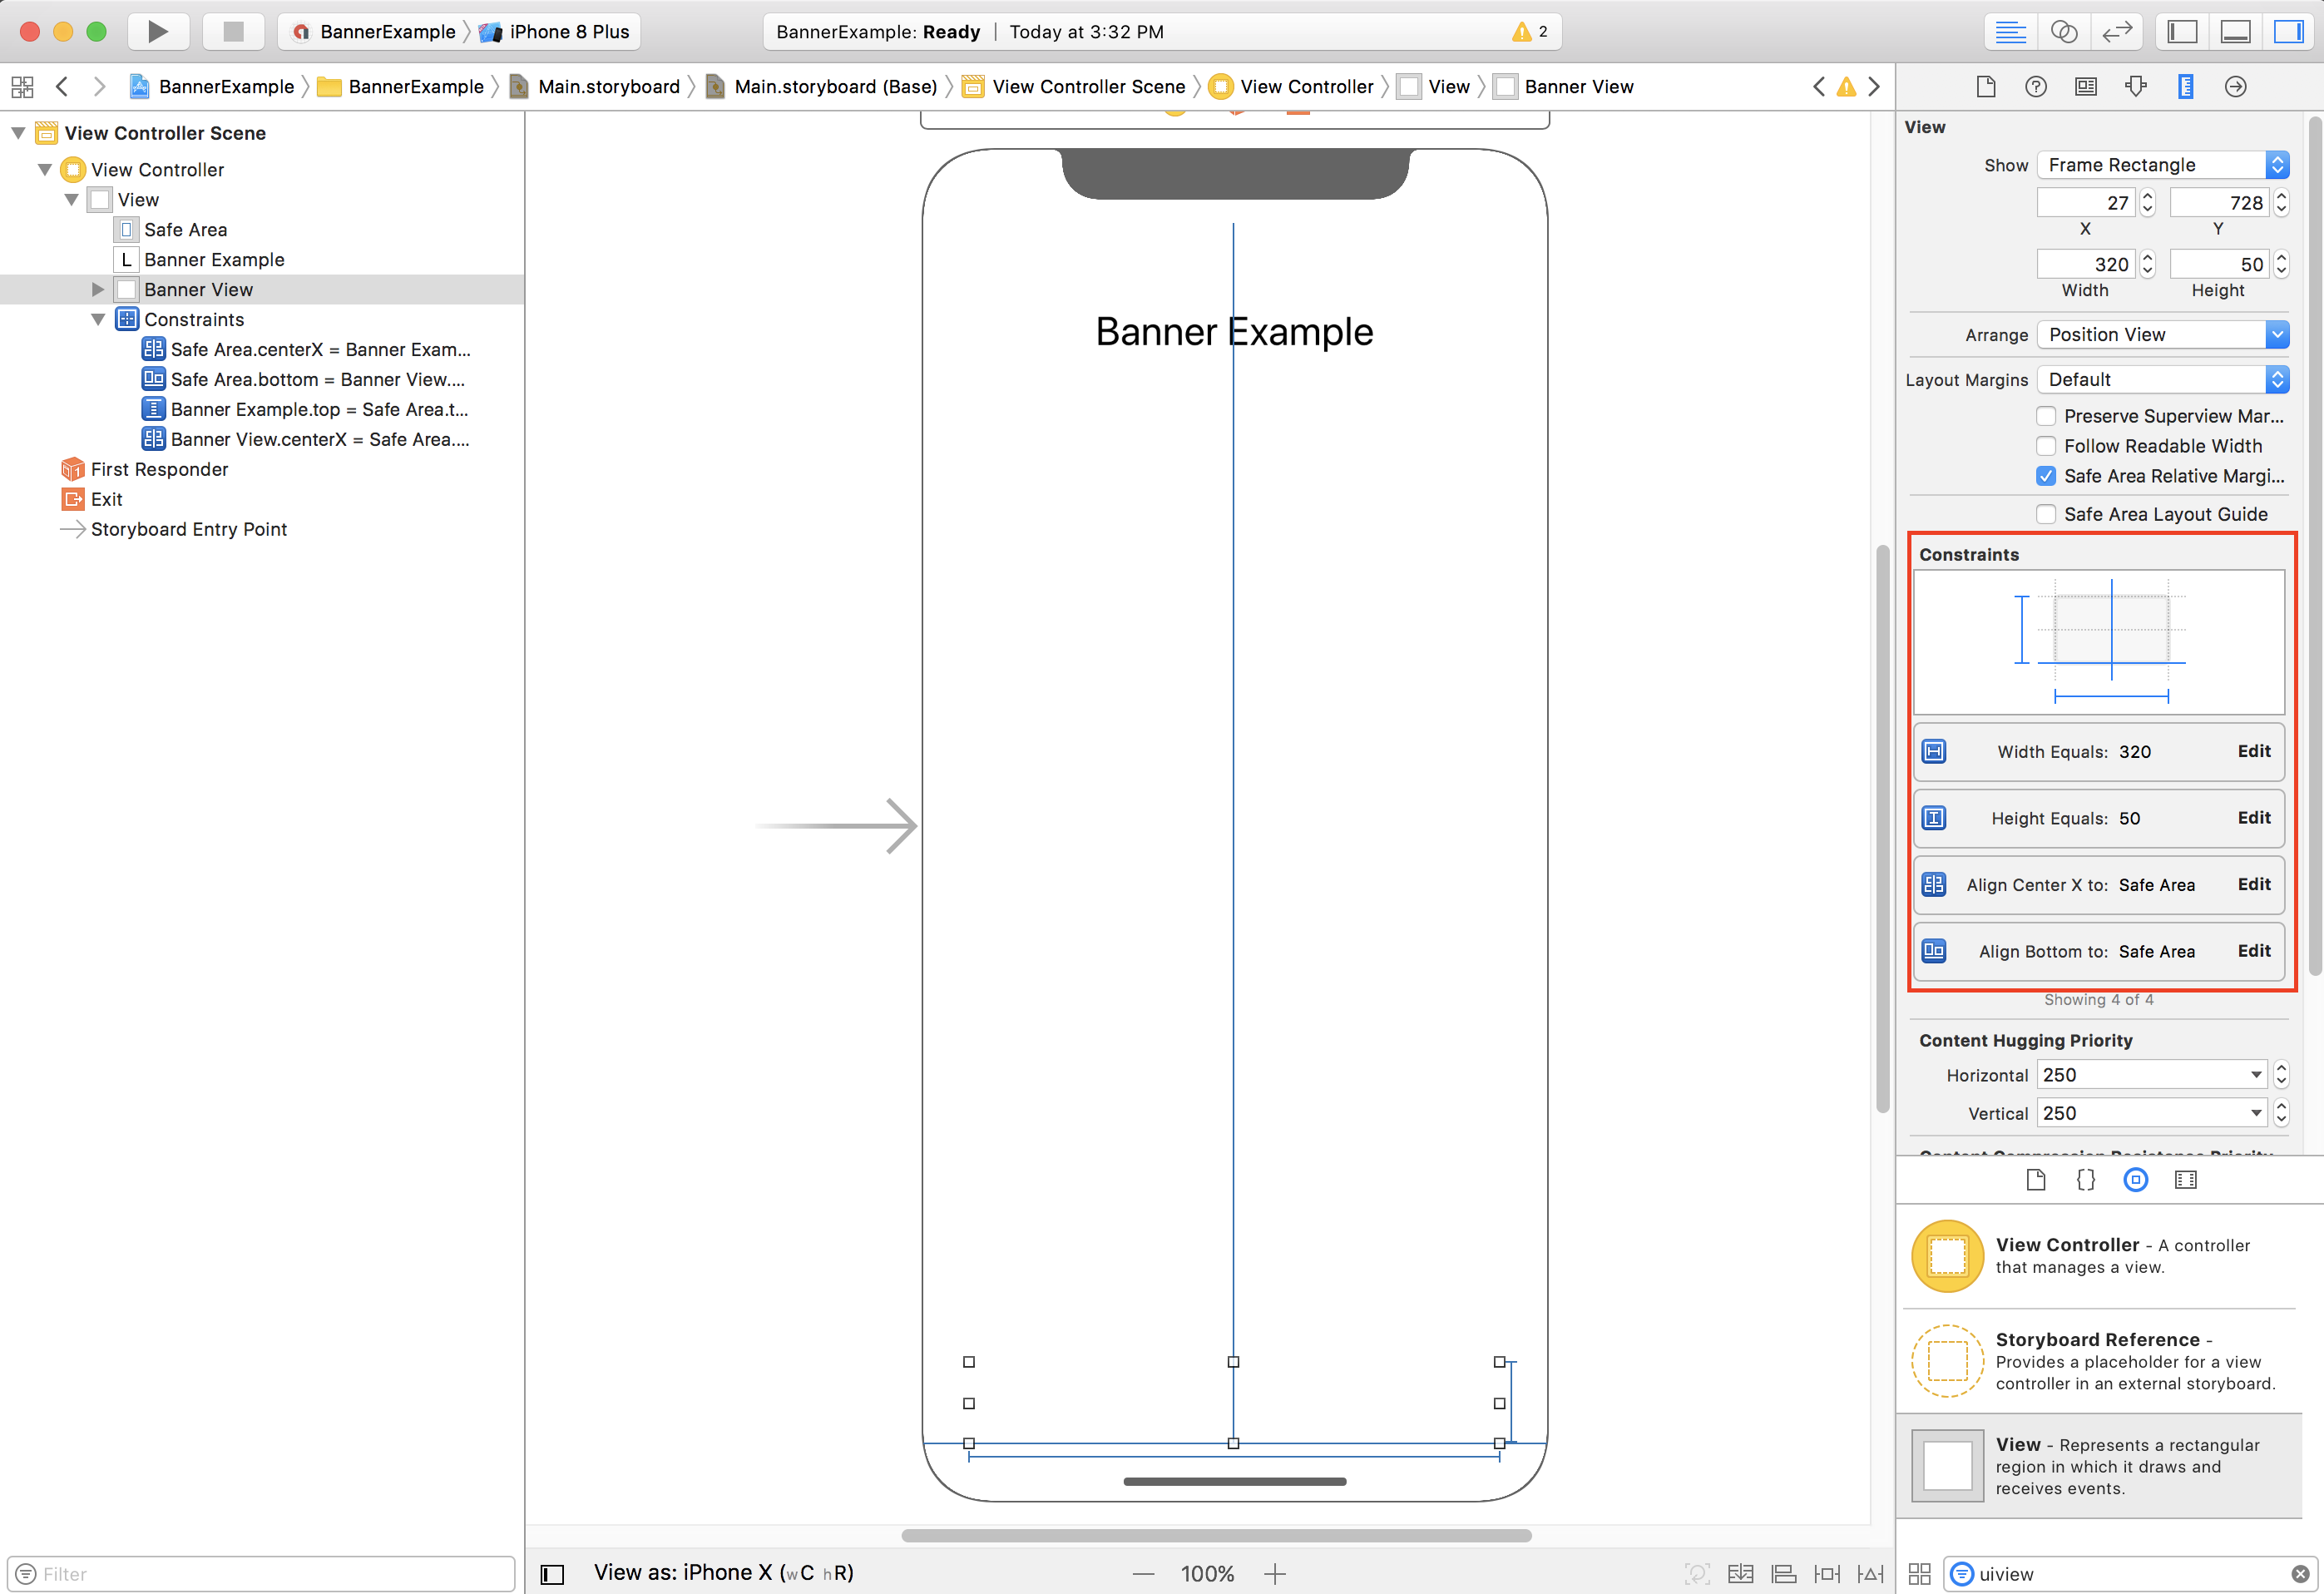
हमारा सुझाव है कि आप चौड़ाई और ऊंचाई की सीमाओं का इस्तेमाल करके, बैनर को ज़रूरी साइज़ तक सीमित करें.
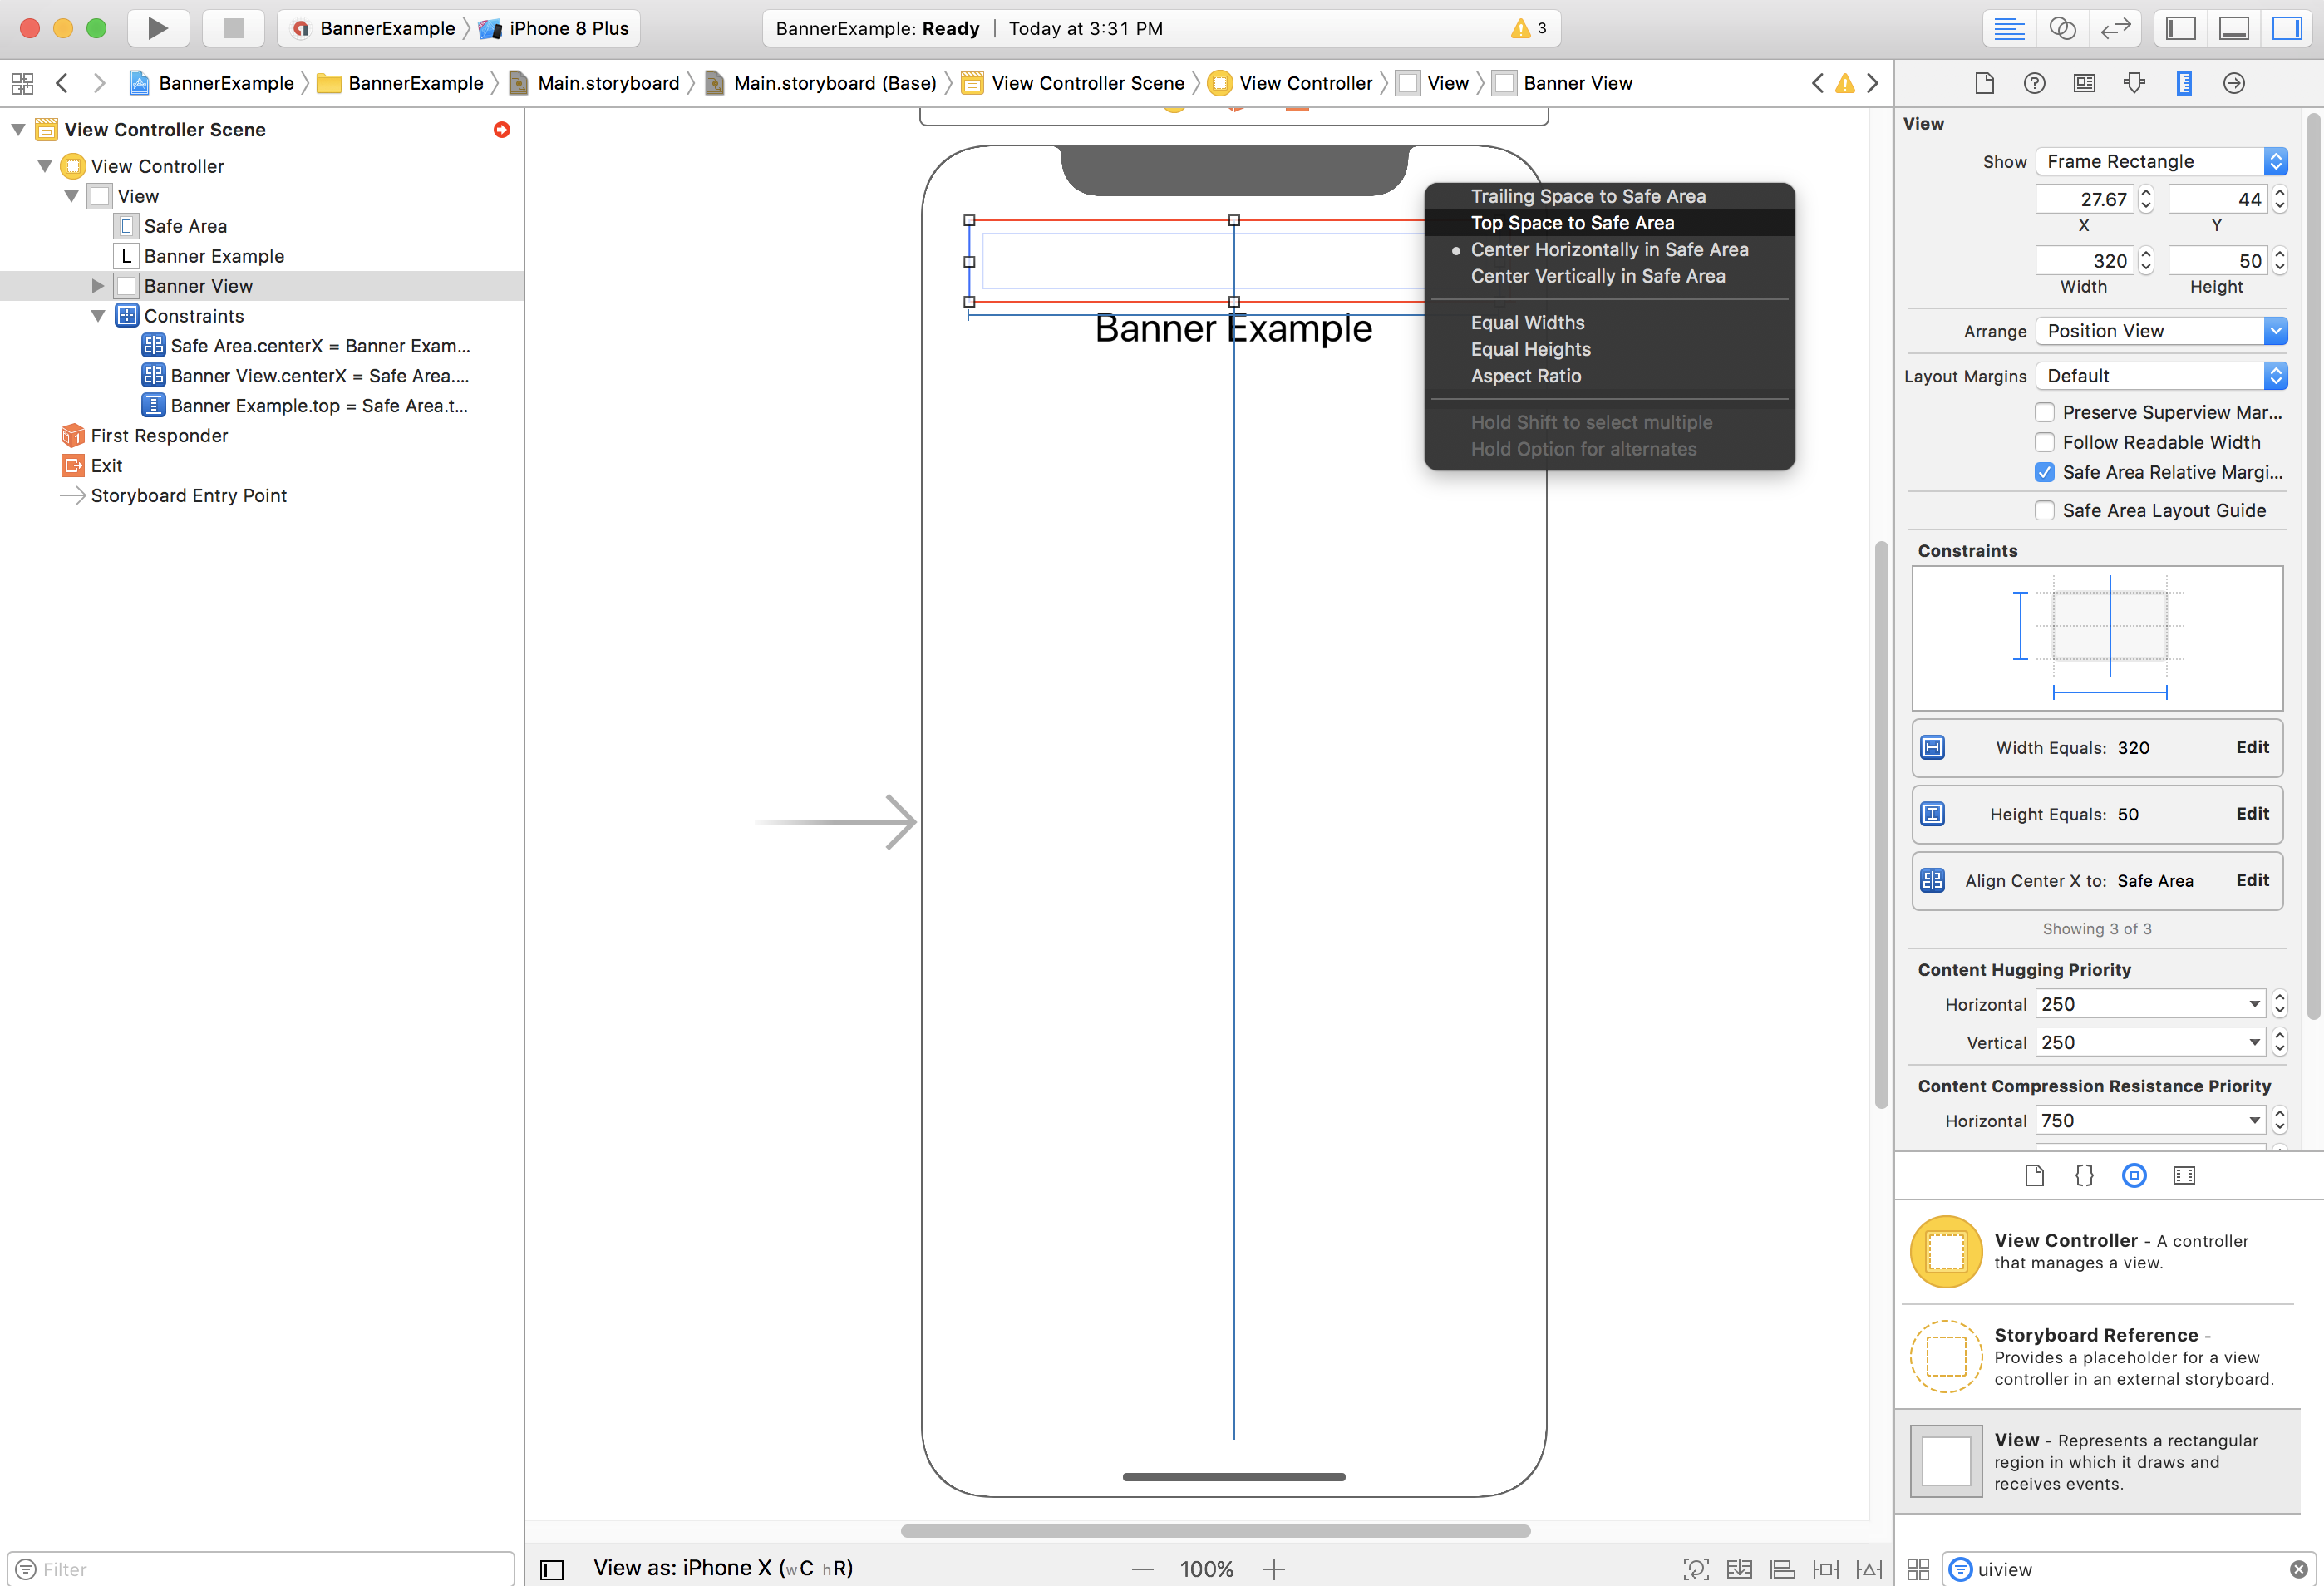
अब बैनर को सुरक्षित हिस्से के सबसे ऊपर अलाइन किया जा सकता है. इसके लिए, GADBannerView की टॉप प्रॉपर्टी को सुरक्षित हिस्से के सबसे ऊपर सीमित करें:
इसी तरह, GADBannerView की बॉटम प्रॉपर्टी को सेफ़ एरिया के बॉटम तक सीमित करके, बैनर को सेफ़ एरिया के बॉटम में अलाइन किया जा सकता है:
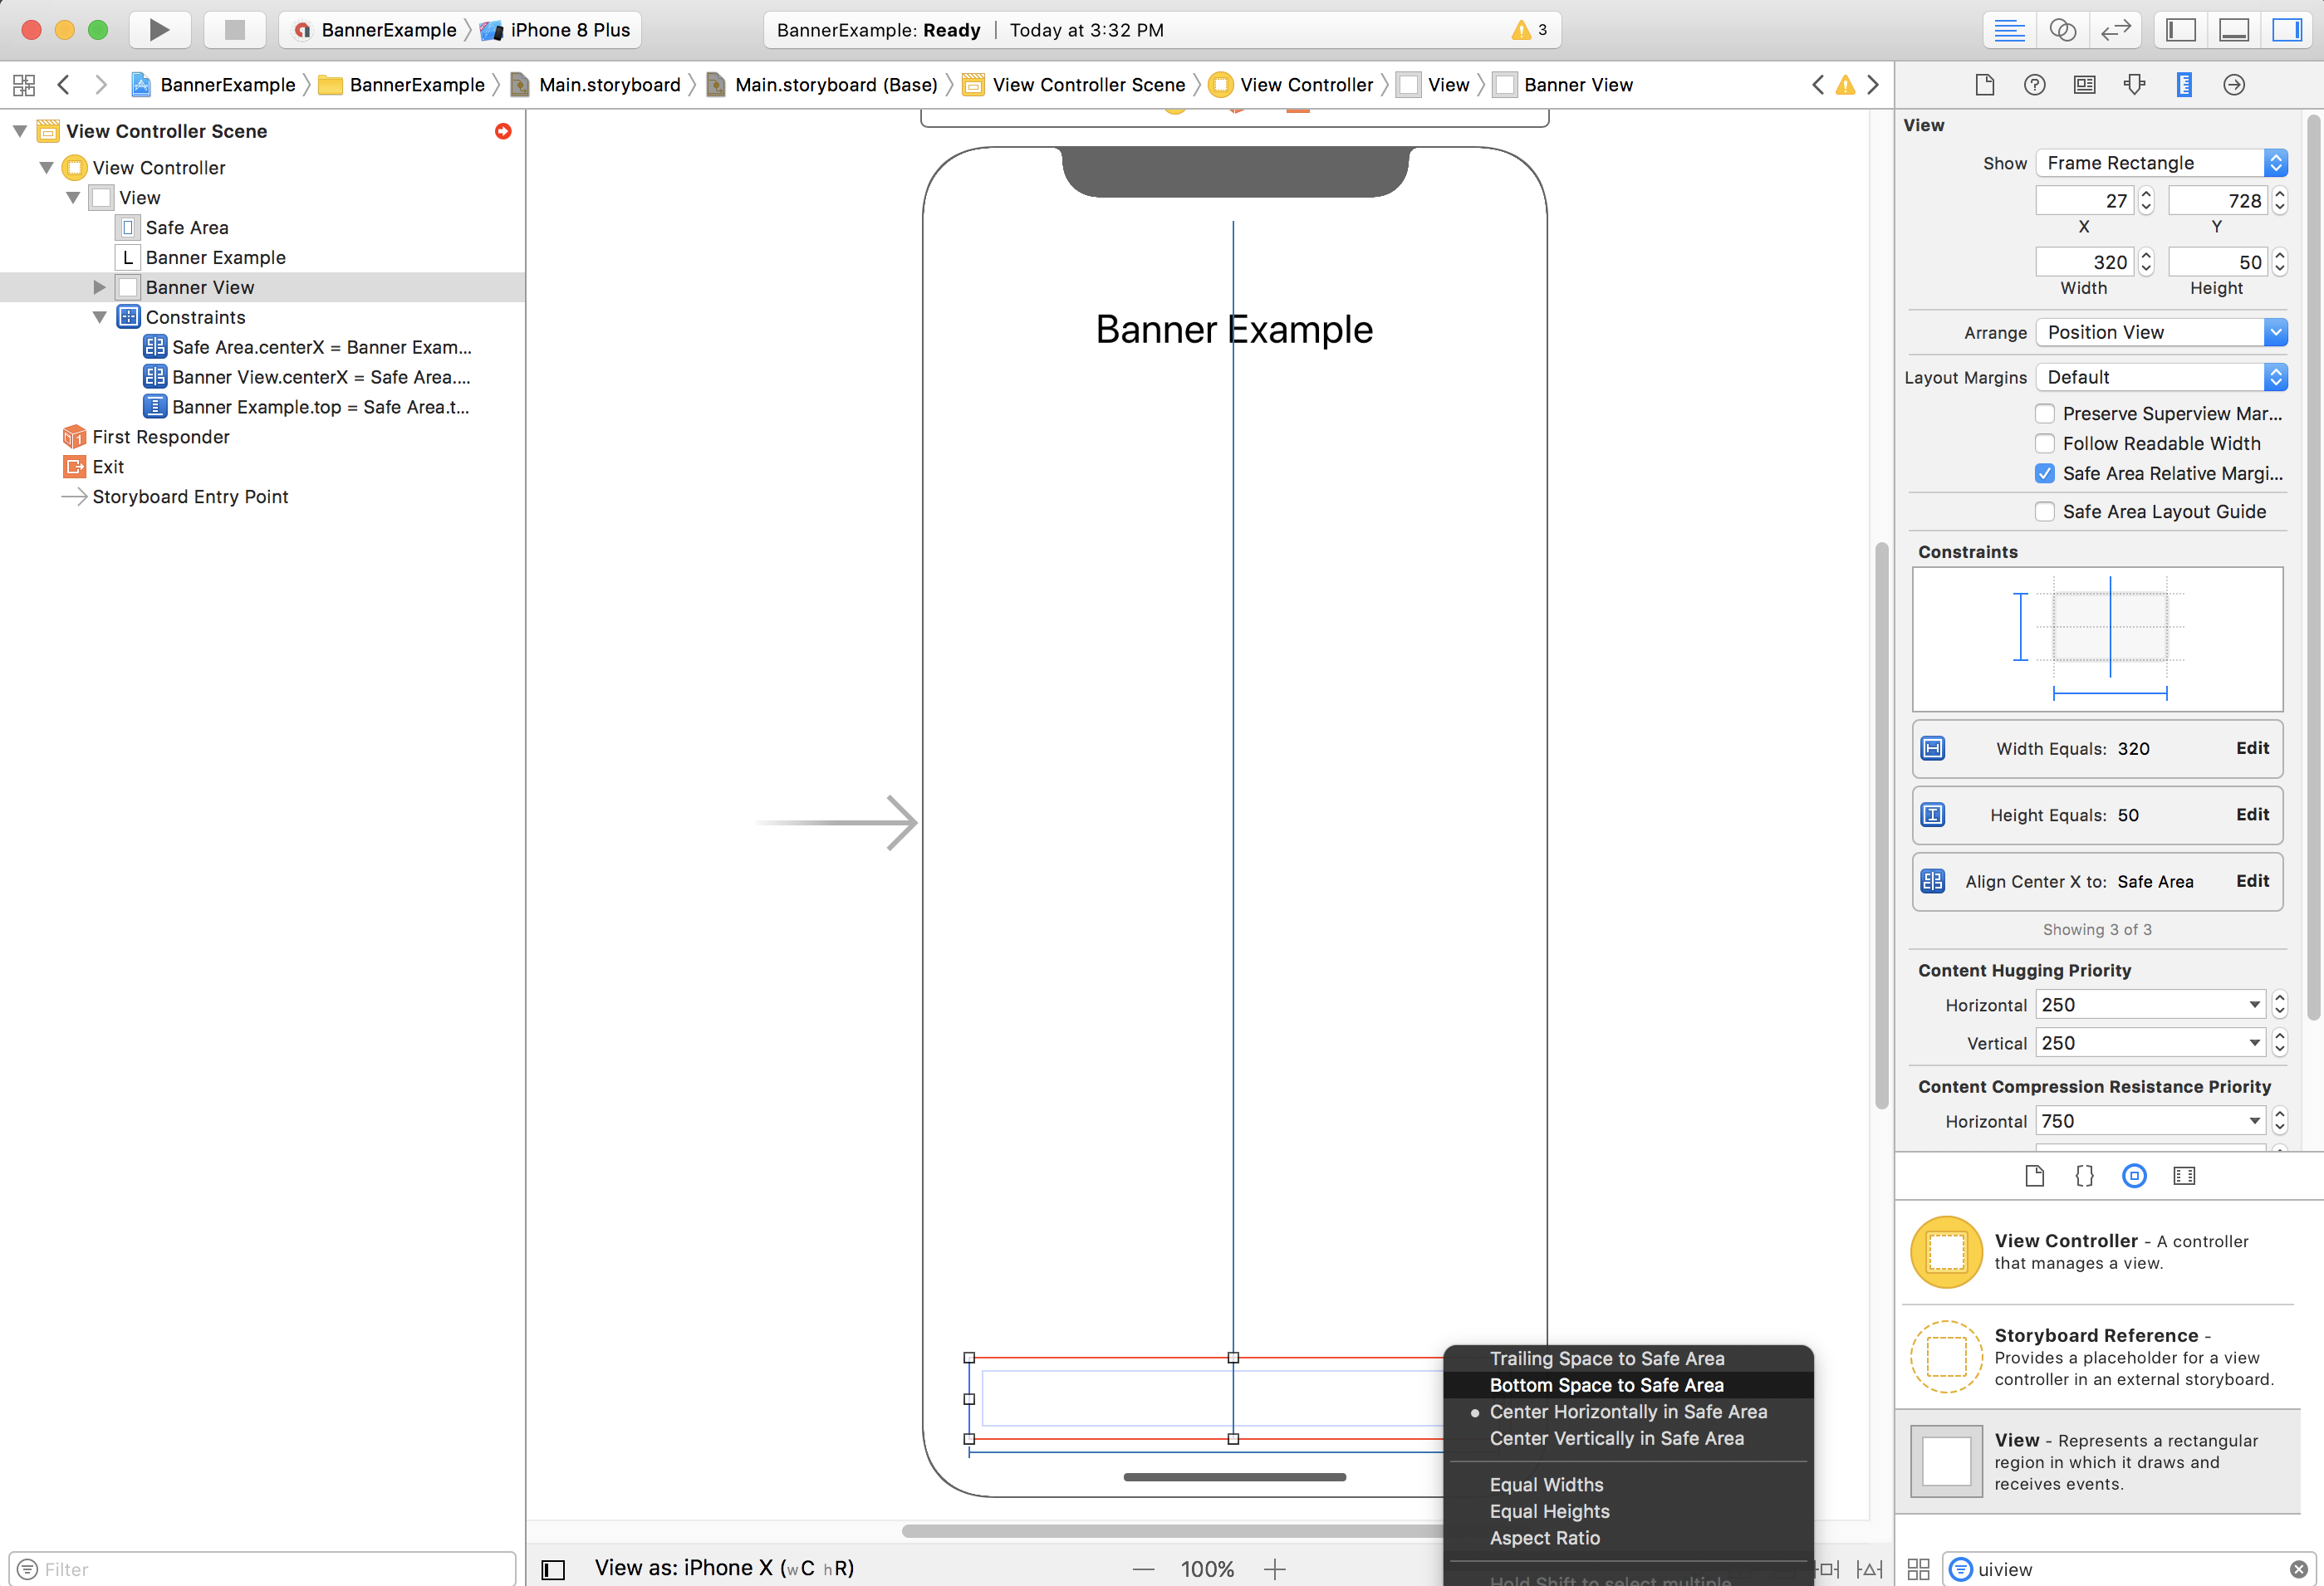
अब आपकी कंस्ट्रेंट, नीचे दिए गए स्क्रीनशॉट की तरह दिखनी चाहिए. हालांकि, साइज़/पोज़िशन अलग-अलग हो सकती है:
ViewController
यहां व्यू कंट्रोलर कोड स्निपेट का एक आसान उदाहरण दिया गया है. इसमें GADBannerView में बैनर दिखाने के लिए ज़रूरी कम से कम कोड शामिल है, जैसा कि ऊपर स्टोरीबोर्ड में कॉन्फ़िगर किया गया है:
Swift
class ViewController: UIViewController {

  /// The banner view.
  @IBOutlet var bannerView: BannerView!

  override func viewDidLoad() {
    super.viewDidLoad()
    // Replace this ad unit ID with your own ad unit ID.
    bannerView.adUnitID = "ca-app-pub-3940256099942544/2934735716"
    bannerView.rootViewController = self
    bannerView.load(Request())
  }

}
Objective-C
@interface ViewController()

@property(nonatomic, strong) IBOutlet GADBannerView *bannerView;

@end

@implementation ViewController

- (void)viewDidLoad {
  [super viewDidLoad];

  // Replace this ad unit ID with your own ad unit ID.
  self.bannerView.adUnitID = @"ca-app-pub-3940256099942544/2934735716";
  self.bannerView.rootViewController = self;
  GADRequest *request = [GADRequest request];
  [self.bannerView loadRequest:request];
}
बैनर को सुरक्षित जगह के किनारे पर अलाइन करना
अगर आपको बैनर को बाईं या दाईं ओर अलाइन करना है, तो बैनर के बाएं/दाएं किनारे को सुरक्षित हिस्से के बाएं/दाएं किनारे तक सीमित करें. इसे सुपरव्यू के बाएं/दाएं किनारे तक सीमित न करें.
अगर आपने Use Safe Area Layout Guides को चालू किया है, तो व्यू में कंस्ट्रेंट जोड़ते समय, इंटरफ़ेस बिल्डर डिफ़ॉल्ट रूप से सुरक्षित एरिया के किनारों का इस्तेमाल करेगा.
प्रोग्रामेटिक
अगर आपका ऐप्लिकेशन प्रोग्राम के हिसाब से बैनर विज्ञापन बनाता है, तो पाबंदियां तय की जा सकती हैं. साथ ही, कोड में बैनर विज्ञापन की जगह तय की जा सकती है. इस उदाहरण में, बैनर को सुरक्षित जगह के सबसे नीचे, हॉरिज़ॉन्टल तौर पर बीच में रखने का तरीका बताया गया है:
Swift
class ViewController: UIViewController {

  var bannerView: BannerView!

  override func viewDidLoad() {
    super.viewDidLoad()

    // Instantiate the banner view with your desired banner size.
    bannerView = BannerView(adSize: AdSizeBanner)
    addBannerViewToView(bannerView)
    bannerView.rootViewController = self
    // Set the ad unit ID to your own ad unit ID here.
    bannerView.adUnitID = "ca-app-pub-3940256099942544/2934735716"
    bannerView.load(Request())
  }

  func addBannerViewToView(_ bannerView: UIView) {
    bannerView.translatesAutoresizingMaskIntoConstraints = false
    view.addSubview(bannerView)
    if #available(iOS 11.0, *) {
      positionBannerAtBottomOfSafeArea(bannerView)
    }
    else {
      positionBannerAtBottomOfView(bannerView)
    }
  }

  @available (iOS 11, *)
  func positionBannerAtBottomOfSafeArea(_ bannerView: UIView) {
    // Position the banner. Stick it to the bottom of the Safe Area.
    // Centered horizontally.
    let guide: UILayoutGuide = view.safeAreaLayoutGuide

    NSLayoutConstraint.activate(
      [bannerView.centerXAnchor.constraint(equalTo: guide.centerXAnchor),
       bannerView.bottomAnchor.constraint(equalTo: guide.bottomAnchor)]
    )
  }

  func positionBannerAtBottomOfView(_ bannerView: UIView) {
    // Center the banner horizontally.
    view.addConstraint(NSLayoutConstraint(item: bannerView,
                                          attribute: .centerX,
                                          relatedBy: .equal,
                                          toItem: view,
                                          attribute: .centerX,
                                          multiplier: 1,
                                          constant: 0))
    // Lock the banner to the top of the bottom layout guide.
    view.addConstraint(NSLayoutConstraint(item: bannerView,
                                          attribute: .bottom,
                                          relatedBy: .equal,
                                          toItem: self.bottomLayoutGuide,
                                          attribute: .top,
                                          multiplier: 1,
                                          constant: 0))
  }

}
Objective-C
@interface ViewController()

@property(nonatomic, strong) GADBannerView *bannerView;

@end

@implementation ViewController

- (void)viewDidLoad {
  [super viewDidLoad];

  // Instantiate the banner view with your desired banner size.
  self.bannerView = [[GADBannerView alloc] initWithAdSize:GADAdSizeBanner];
  [self addBannerViewToView:self.bannerView];

  // Replace this ad unit ID with your own ad unit ID.
  self.bannerView.adUnitID = @"ca-app-pub-3940256099942544/2934735716";
  self.bannerView.rootViewController = self;
  GADRequest *request = [GADRequest request];
  [self.bannerView loadRequest:request];
}

#pragma mark - view positioning

-(void)addBannerViewToView:(UIView *_Nonnull)bannerView {
  self.bannerView.translatesAutoresizingMaskIntoConstraints = NO;
  [self.view addSubview:self.bannerView];
  if (@available(ios 11.0, *)) {
    [self positionBannerViewAtBottomOfSafeArea:bannerView];
  } else {
    [self positionBannerViewAtBottomOfView:bannerView];
  }
}

- (void)positionBannerViewAtBottomOfSafeArea:(UIView *_Nonnull)bannerView NS_AVAILABLE_IOS(11.0) {
  // Position the banner. Stick it to the bottom of the Safe Area.
  // Centered horizontally.
  UILayoutGuide *guide = self.view.safeAreaLayoutGuide;
  [NSLayoutConstraint activateConstraints:@[
    [bannerView.centerXAnchor constraintEqualToAnchor:guide.centerXAnchor],
    [bannerView.bottomAnchor constraintEqualToAnchor:guide.bottomAnchor]
  ]];
}

- (void)positionBannerViewAtBottomOfView:(UIView *_Nonnull)bannerView {
  [self.view addConstraint:[NSLayoutConstraint constraintWithItem:bannerView
                                                        attribute:NSLayoutAttributeCenterX
                                                        relatedBy:NSLayoutRelationEqual
                                                           toItem:self.view
                                                        attribute:NSLayoutAttributeCenterX
                                                       multiplier:1
                                                         constant:0]];
  [self.view addConstraint:[NSLayoutConstraint constraintWithItem:bannerView
                                                        attribute:NSLayoutAttributeBottom
                                                        relatedBy:NSLayoutRelationEqual
                                                           toItem:self.bottomLayoutGuide
                                                        attribute:NSLayoutAttributeTop
                                                       multiplier:1
                                                         constant:0]];
}

@end
ऊपर बताई गई तकनीकों का इस्तेमाल करके, सुरक्षित हिस्से के सबसे ऊपरी हिस्से तक सीमित किया जा सकता है. इसके लिए, इस्तेमाल किए गए एट्रिब्यूट और ऐंकर में बदलाव करना होगा.
स्मार्ट बैनर
अगर स्मार्ट बैनर का इस्तेमाल किया जा रहा है, खास तौर पर लैंडस्केप मोड में, तो हमारा सुझाव है कि आप बैनर के किनारों को सुरक्षित जगह के बाएं और दाएं किनारों के साथ अलाइन करने के लिए, कंस्ट्रेंट का इस्तेमाल करें.
इंटरफ़ेस बिल्डर में, सुरक्षित एरिया लेआउट गाइड का इस्तेमाल करें विकल्प को चुनकर, iOS 9 तक के वर्शन पर इसका इस्तेमाल किया जा सकता है. इसके बारे में ऊपर बताया गया है.
कोड में, आपको अपने एज कंस्ट्रेंट को सेफ़ एरिया लेआउट गाइड के हिसाब से बनाना चाहिए. यहां एक कोड स्निपेट दिया गया है, जो व्यू में बैनर व्यू जोड़ता है. साथ ही, इसे व्यू के सबसे नीचे, पूरी चौड़ाई में सीमित करता है:
Swift
func addBannerViewToView(_ bannerView: BannerView) {
  bannerView.translatesAutoresizingMaskIntoConstraints = false
  view.addSubview(bannerView)
  if #available(iOS 11.0, *) {
    // In iOS 11, we need to constrain the view to the safe area.
    positionBannerViewFullWidthAtBottomOfSafeArea(bannerView)
  }
  else {
    // In lower iOS versions, safe area is not available so we use
    // bottom layout guide and view edges.
    positionBannerViewFullWidthAtBottomOfView(bannerView)
  }
}

// MARK: - view positioning
@available (iOS 11, *)
func positionBannerViewFullWidthAtBottomOfSafeArea(_ bannerView: UIView) {
  // Position the banner. Stick it to the bottom of the Safe Area.
  // Make it constrained to the edges of the safe area.
  let guide = view.safeAreaLayoutGuide
  NSLayoutConstraint.activate([
    guide.leftAnchor.constraint(equalTo: bannerView.leftAnchor),
    guide.rightAnchor.constraint(equalTo: bannerView.rightAnchor),
    guide.bottomAnchor.constraint(equalTo: bannerView.bottomAnchor)
  ])
}

func positionBannerViewFullWidthAtBottomOfView(_ bannerView: UIView) {
  view.addConstraint(NSLayoutConstraint(item: bannerView,
                                        attribute: .leading,
                                        relatedBy: .equal,
                                        toItem: view,
                                        attribute: .leading,
                                        multiplier: 1,
                                        constant: 0))
  view.addConstraint(NSLayoutConstraint(item: bannerView,
                                        attribute: .trailing,
                                        relatedBy: .equal,
                                        toItem: view,
                                        attribute: .trailing,
                                        multiplier: 1,
                                        constant: 0))
  view.addConstraint(NSLayoutConstraint(item: bannerView,
                                        attribute: .bottom,
                                        relatedBy: .equal,
                                        toItem: bottomLayoutGuide,
                                        attribute: .top,
                                        multiplier: 1,
                                        constant: 0))
}
Objective-C
- (void)addBannerViewToView:(UIView *)bannerView {
  bannerView.translatesAutoresizingMaskIntoConstraints = NO;
  [self.view addSubview:bannerView];
  if (@available(ios 11.0, *)) {
    // In iOS 11, we need to constrain the view to the safe area.
    [self positionBannerViewFullWidthAtBottomOfSafeArea:bannerView];
  } else {
    // In lower iOS versions, safe area is not available so we use
    // bottom layout guide and view edges.
    [self positionBannerViewFullWidthAtBottomOfView:bannerView];
  }
}

#pragma mark - view positioning

- (void)positionBannerViewFullWidthAtBottomOfSafeArea:(UIView *_Nonnull)bannerView NS_AVAILABLE_IOS(11.0) {
  // Position the banner. Stick it to the bottom of the Safe Area.
  // Make it constrained to the edges of the safe area.
  UILayoutGuide *guide = self.view.safeAreaLayoutGuide;

  [NSLayoutConstraint activateConstraints:@[
    [guide.leftAnchor constraintEqualToAnchor:bannerView.leftAnchor],
    [guide.rightAnchor constraintEqualToAnchor:bannerView.rightAnchor],
    [guide.bottomAnchor constraintEqualToAnchor:bannerView.bottomAnchor]
  ]];
}

- (void)positionBannerViewFullWidthAtBottomOfView:(UIView *_Nonnull)bannerView {
  [self.view addConstraint:[NSLayoutConstraint constraintWithItem:bannerView
                                                        attribute:NSLayoutAttributeLeading
                                                        relatedBy:NSLayoutRelationEqual
                                                           toItem:self.view
                                                        attribute:NSLayoutAttributeLeading
                                                       multiplier:1
                                                         constant:0]];
  [self.view addConstraint:[NSLayoutConstraint constraintWithItem:bannerView
                                                        attribute:NSLayoutAttributeTrailing
                                                        relatedBy:NSLayoutRelationEqual
                                                           toItem:self.view
                                                        attribute:NSLayoutAttributeTrailing
                                                       multiplier:1
                                                         constant:0]];
  [self.view addConstraint:[NSLayoutConstraint constraintWithItem:bannerView
                                                        attribute:NSLayoutAttributeBottom
                                                        relatedBy:NSLayoutRelationEqual
                                                           toItem:self.bottomLayoutGuide
                                                        attribute:NSLayoutAttributeTop
                                                       multiplier:1
                                                         constant:0]];
}
नेटिव विज्ञापन
अगर आपका ऐप्लिकेशन, नेटिव विज्ञापनों को स्क्रीन पर सबसे ऊपर या सबसे नीचे पिन करता है, तो नेटिव विज्ञापनों पर भी वही सिद्धांत लागू होते हैं जो बैनर विज्ञापनों पर लागू होते हैं.
दोनों में मुख्य अंतर यह है कि GADBannerView में पाबंदियां जोड़ने के बजाय, आपको GADNativeAdView (या विज्ञापन के लिए मौजूद व्यू) में पाबंदियां जोड़नी होंगी, ताकि सुरक्षित जगह के लेआउट की गाइड का पालन किया जा सके. नेटिव व्यू के लिए, हमारा सुझाव है कि साइज़ की ज़्यादा सटीक सीमाएं तय करें.
इंटरस्टीशियल और इनाम वाले विज्ञापन
वर्शन 7.26.0 से, Google Mobile Ads SDK iPhone X के लिए इंटरस्टीशियल और इनाम वाले विज्ञापन फ़ॉर्मैट के साथ पूरी तरह काम करता है.