
این راهنما روالهای مطلوب را درباره نحوه کدنویسی برنامههایتان برای ارائه صحیح آگهیها در iPhone X نشان میدهد.
پیشنیازها
- وارد کردن نسخه ۷.۲۶.۰ یا بالاتر Google Mobile Ads SDK، یا بهتنهایی یا بهعنوان بخشی از Firebase.
آگهیهای برنما
آگهیهای برنما باید در «منطقه امن» قرار داده شوند تا گوشههای گرد، محفظه حسگر، و نشانگر «صفحه اصلی» آنها را نپوشاند. در این صفحه نمونههایی از نحوه افزودن محدودیتها برای قرار دادن برنما در بالا یا پایین «منطقه امن» را خواهید دید.
داستاننما/سازنده میانای کاربری
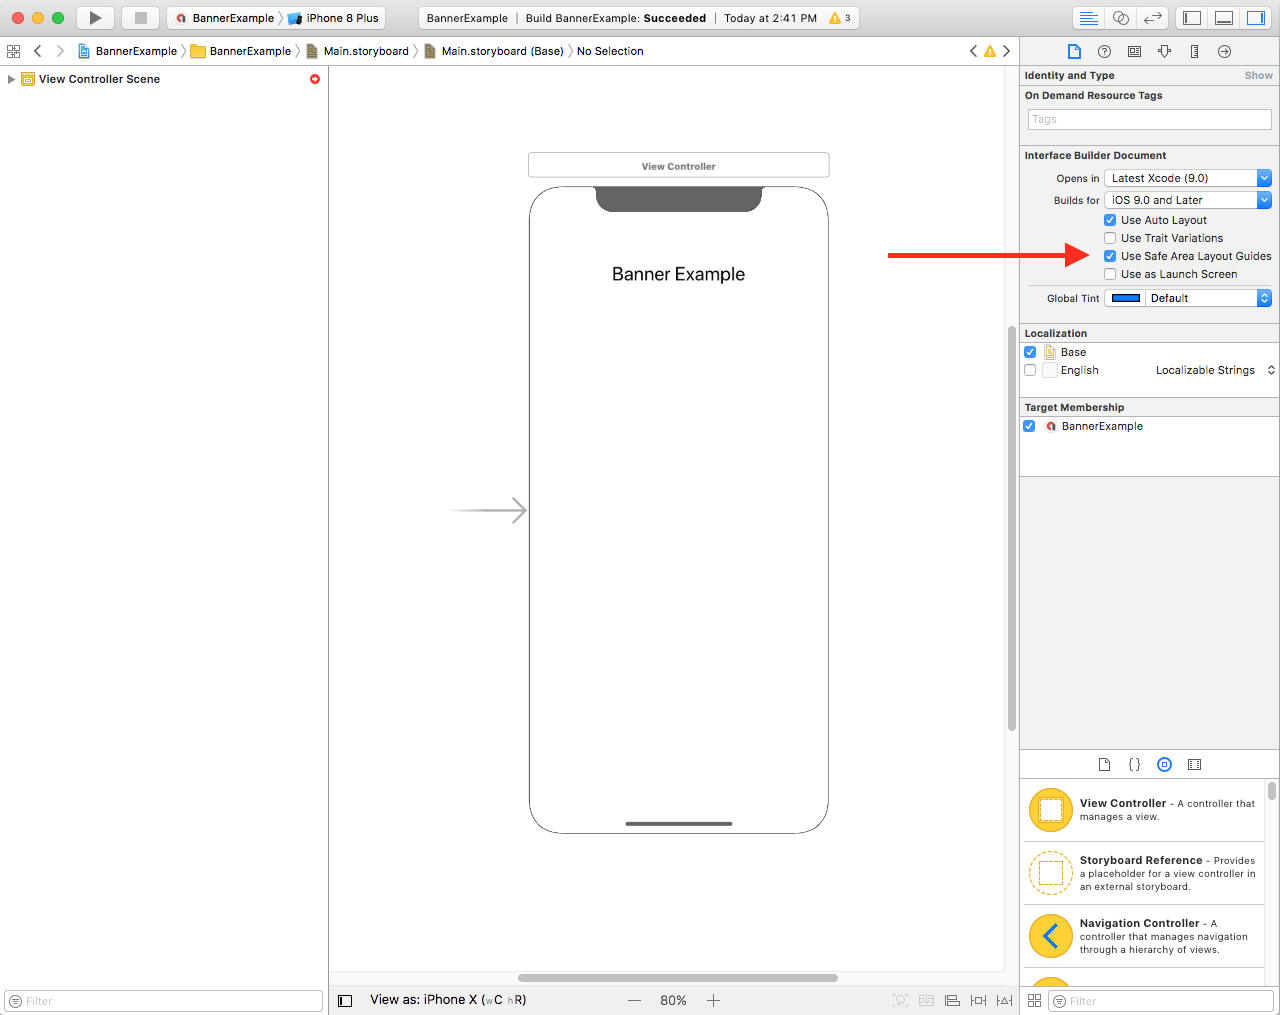
اگر برنامهتان از Interface Builder استفاده میکند، ابتدا مطمئن شوید که راهنماهای چیدمان Safe Area را فعال کردهاید. برای انجام این کار، باید Xcode 9+ را اجرا کنید و iOS 9+ را هدف قرار دهید.
فایل Interface Builder را باز کنید و روی صحنه کنترلکننده نمای خود کلیک کنید. گزینههای Interface Builder Document را در سمت چپ خواهید دید. استفاده از راهنماهای چیدمان منطقه امن را علامت بزنید و مطمئن شوید که حداقل برای iOS 9.0 و نسخههای جدیدتر میسازید.
توصیه میکنیم بااستفاده از محدودیتهای عرض و ارتفاع، برنما را به اندازه موردنیاز محدود کنید.
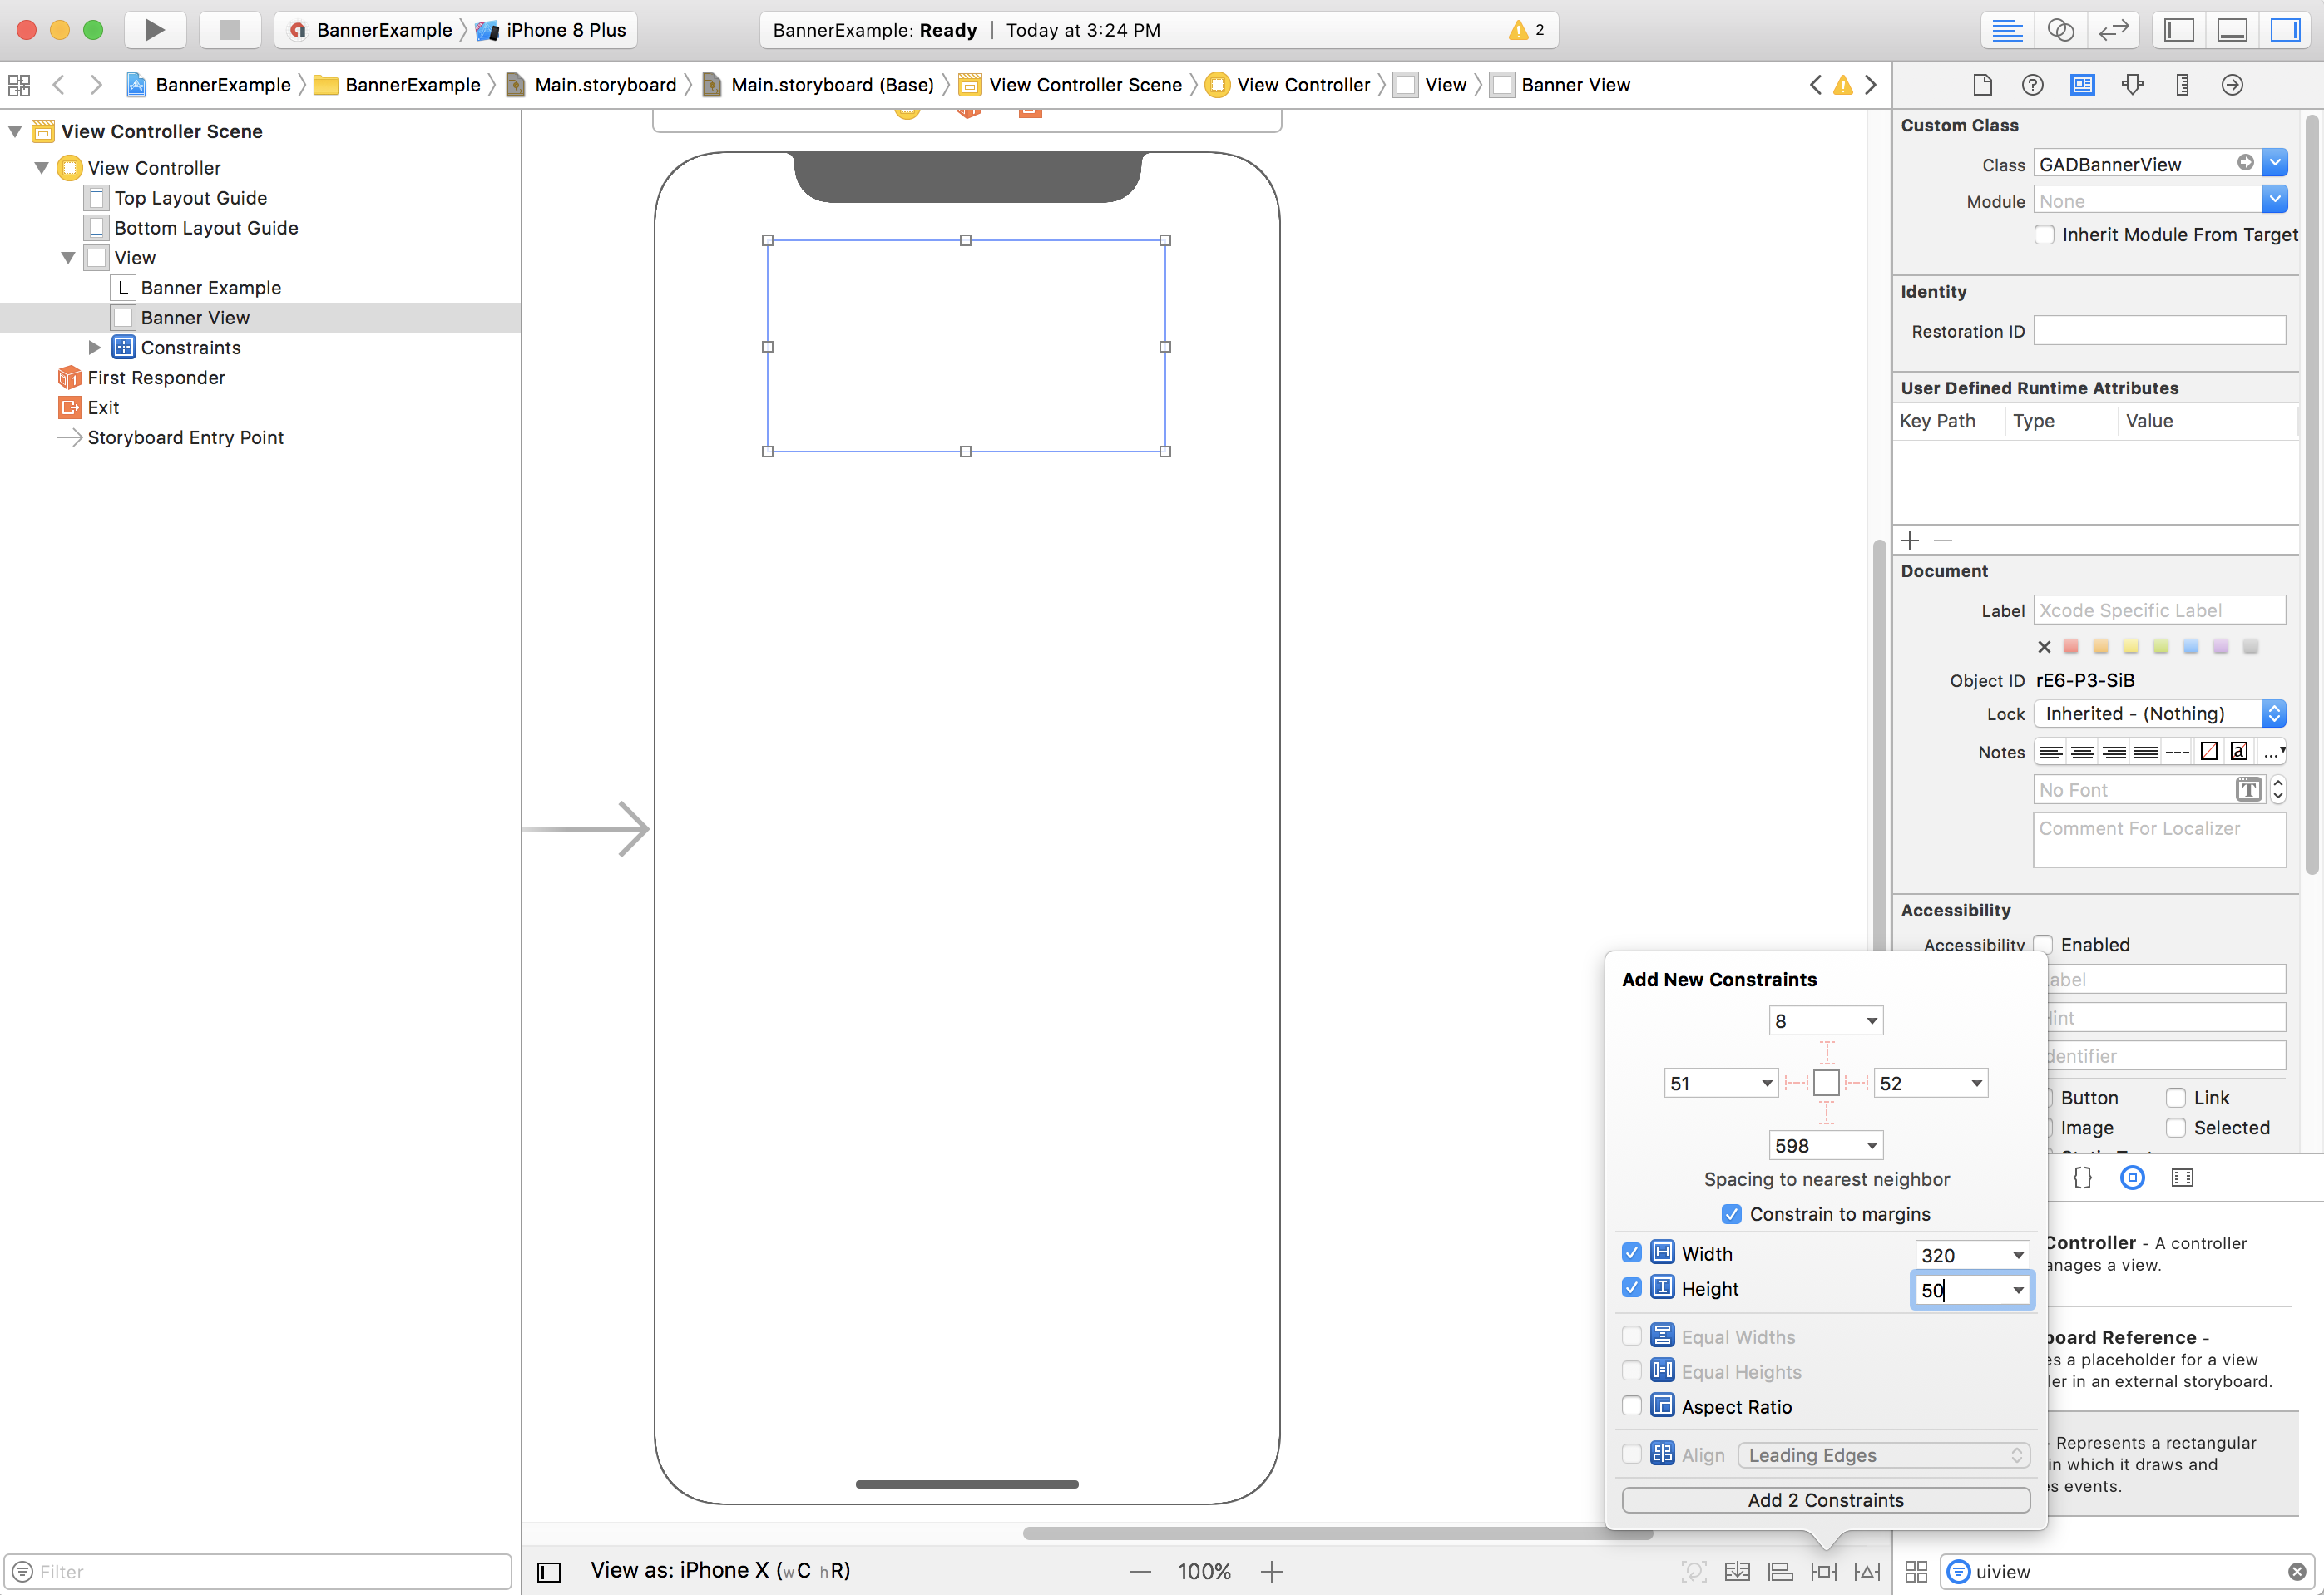
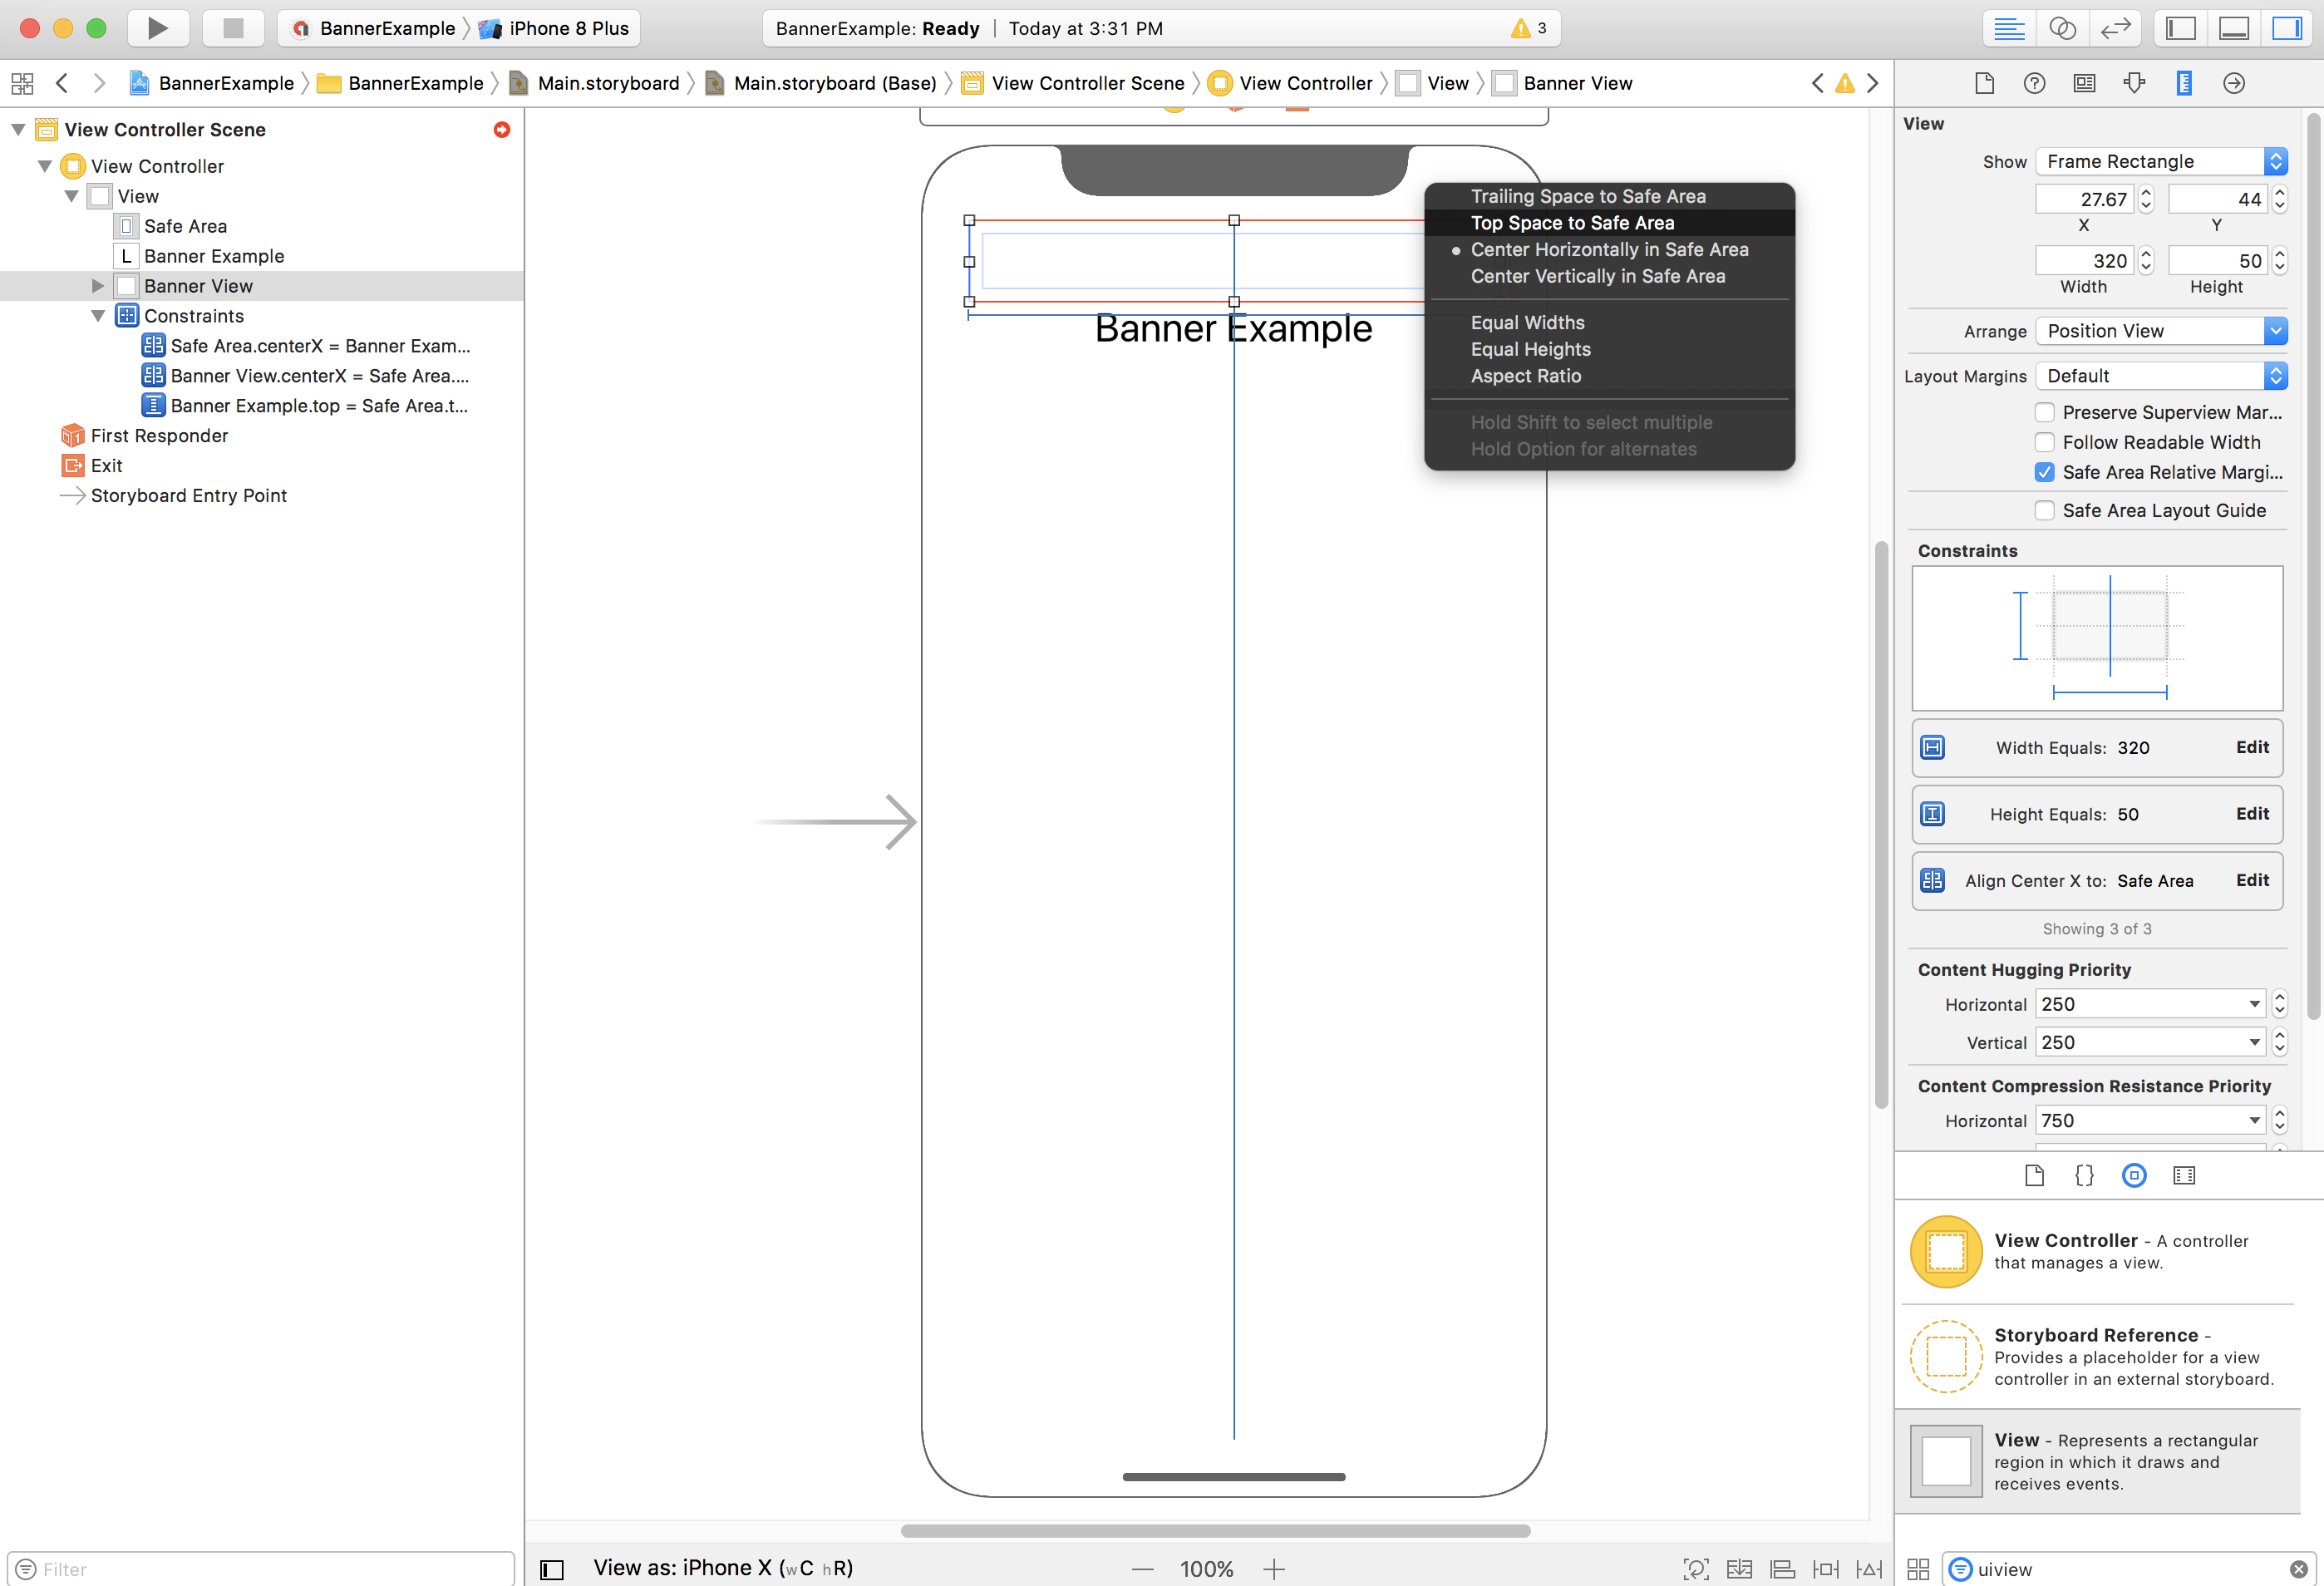
اکنون میتوانید با محدود کردن ویژگی Top در GADBannerView به بالای «منطقه امن»، برنما را با بالای «منطقه امن» تراز کنید:
بهطور مشابه، میتوانید برنما را با محدود کردن ویژگی Bottom مربوط به GADBannerView به پایین منطقه امن، با پایین منطقه امن تراز کنید:
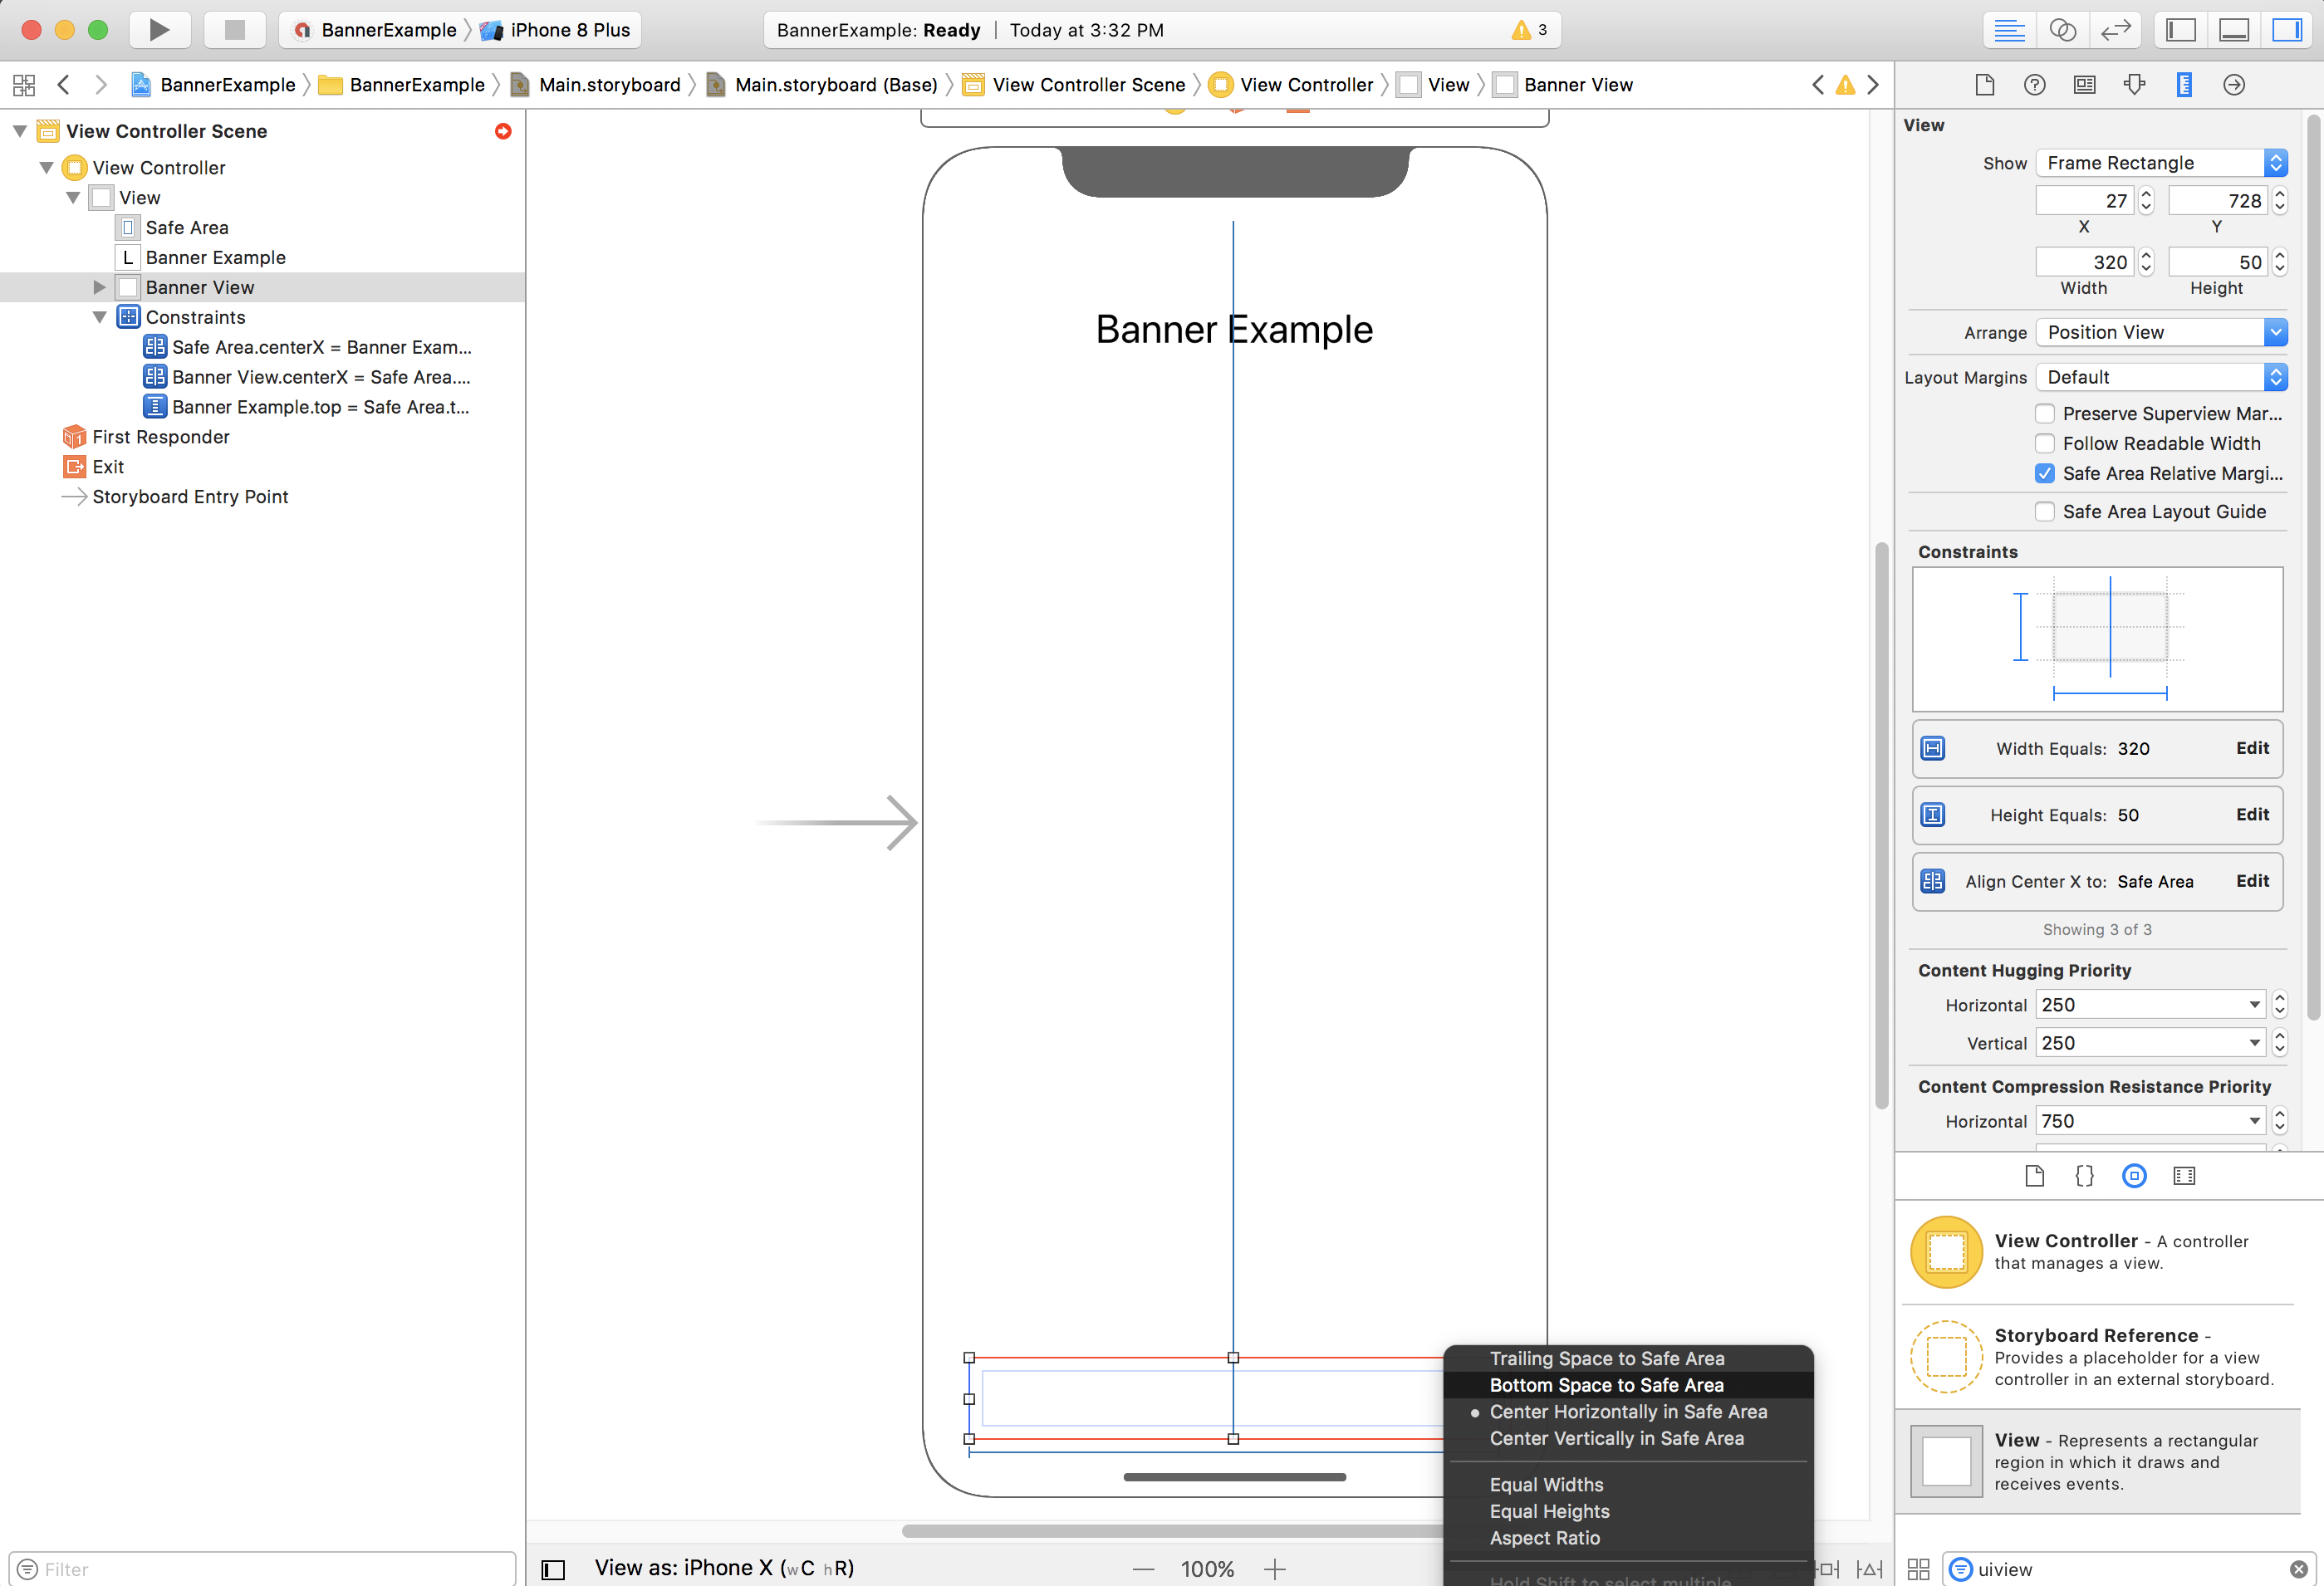
محدودیتهای شما اکنون باید شبیه نماگرفت زیر باشد (اندازه/موقعیت میتواند متفاوت باشد):
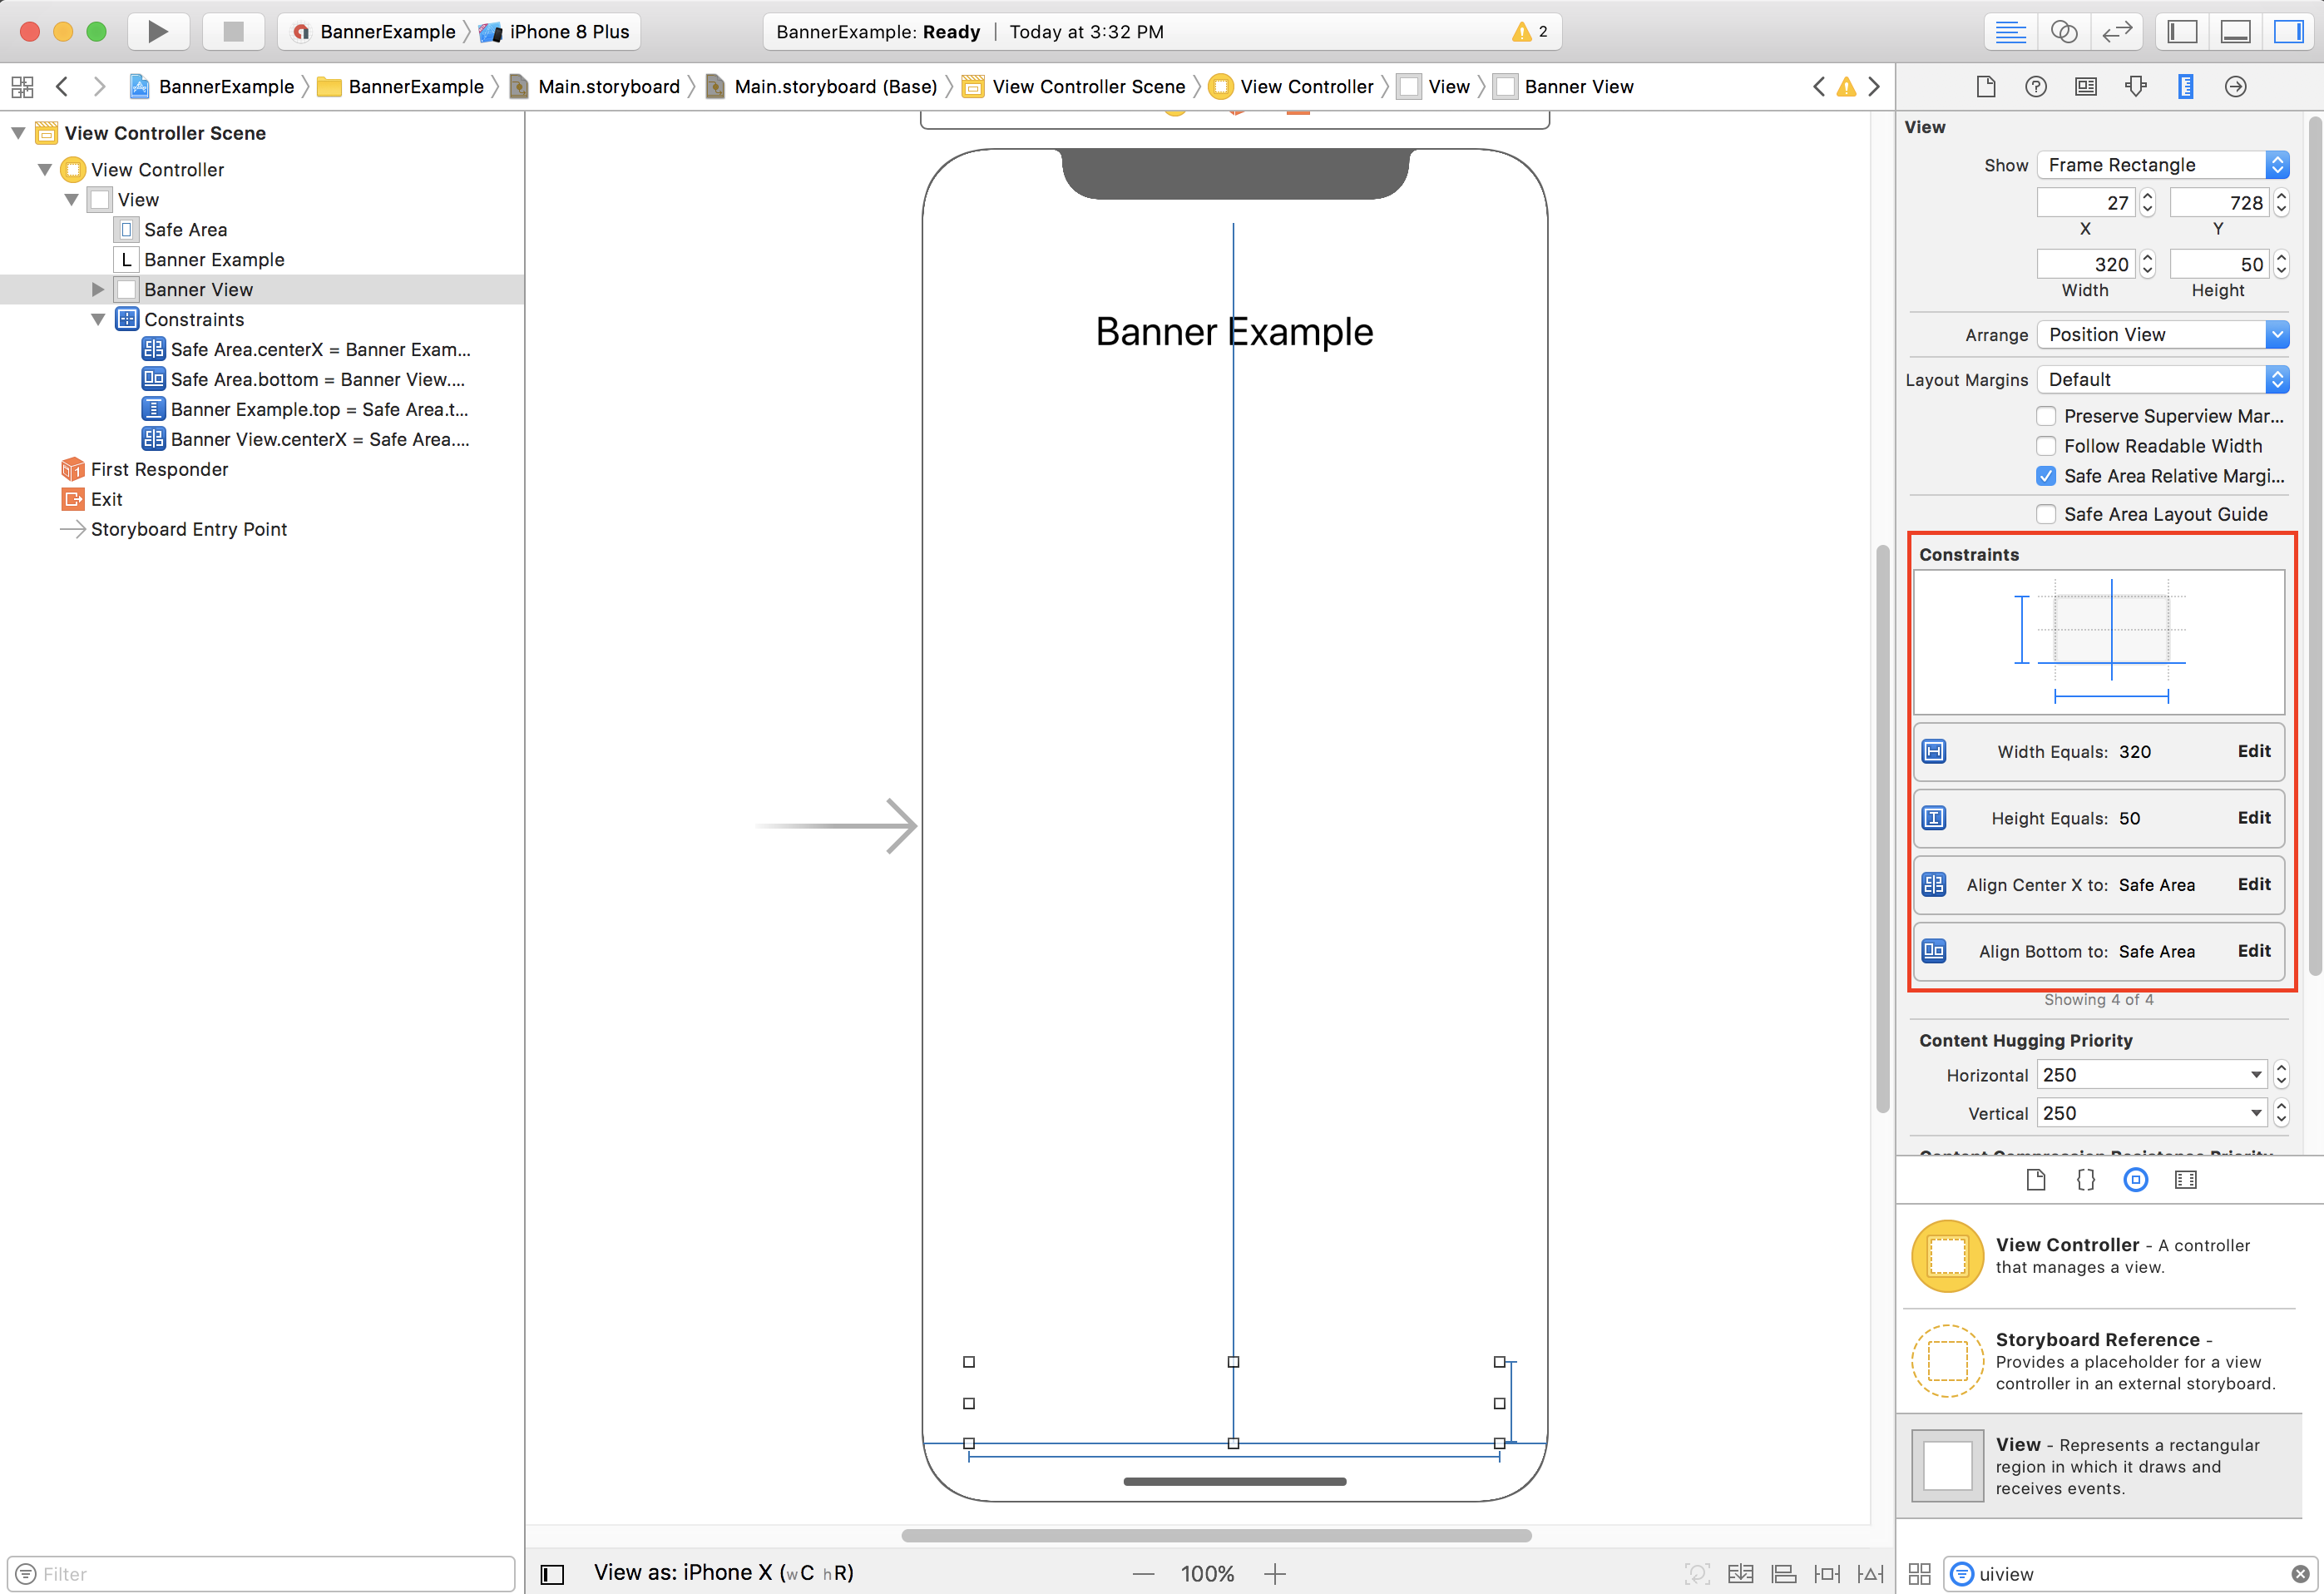
ViewController
در اینجا یک تکهکد کنترلکننده نمای ساده وجود دارد که حداقل کارهای لازم را برای
نمایش برنما در GADBannerView، همانطور که در استوریبرد بالا پیکربندی شده است، انجام میدهد:
Swift
class ViewController: UIViewController {

  /// The banner view.
  @IBOutlet var bannerView: BannerView!

  override func viewDidLoad() {
    super.viewDidLoad()
    // Replace this ad unit ID with your own ad unit ID.
    bannerView.adUnitID = "ca-app-pub-3940256099942544/2934735716"
    bannerView.rootViewController = self
    bannerView.load(Request())
  }

}
آبجکتیو-سی
@interface ViewController()

@property(nonatomic, strong) IBOutlet GADBannerView *bannerView;

@end

@implementation ViewController

- (void)viewDidLoad {
  [super viewDidLoad];

  // Replace this ad unit ID with your own ad unit ID.
  self.bannerView.adUnitID = @"ca-app-pub-3940256099942544/2934735716";
  self.bannerView.rootViewController = self;
  GADRequest *request = [GADRequest request];
  [self.bannerView loadRequest:request];
}
تراز کردن برنماها با لبه منطقه امن
اگر میخواهید بنر تراز چپ یا راست داشته باشید، لبه چپ/راست بنر را به لبه چپ/راست منطقه امن محدود کنید و نه لبه چپ/راست نمای فوقالعاده.
اگر استفاده از راهنماهای چیدمان منطقه امن را فعال کرده باشید، سازنده میانای کاربر بهطور پیشفرض از لبههای منطقه امن هنگام افزودن محدودیتها به نما استفاده خواهد کرد.
برنامهریزیشده
اگر برنامهتان آگهیهای برنمایی را بهصورت برنامهریزیشده ایجاد میکند، میتوانید محدودیتها را تعریف کنید و آگهی برنمایی را در کد قرار دهید. این مثال نشان میدهد که چگونه میتوان یک برنما را محدود کرد تا بهصورت افقی در مرکز پایین «منطقه امن» قرار گیرد:
Swift
class ViewController: UIViewController {

  var bannerView: BannerView!

  override func viewDidLoad() {
    super.viewDidLoad()

    // Instantiate the banner view with your desired banner size.
    bannerView = BannerView(adSize: AdSizeBanner)
    addBannerViewToView(bannerView)
    bannerView.rootViewController = self
    // Set the ad unit ID to your own ad unit ID here.
    bannerView.adUnitID = "ca-app-pub-3940256099942544/2934735716"
    bannerView.load(Request())
  }

  func addBannerViewToView(_ bannerView: UIView) {
    bannerView.translatesAutoresizingMaskIntoConstraints = false
    view.addSubview(bannerView)
    if #available(iOS 11.0, *) {
      positionBannerAtBottomOfSafeArea(bannerView)
    }
    else {
      positionBannerAtBottomOfView(bannerView)
    }
  }

  @available (iOS 11, *)
  func positionBannerAtBottomOfSafeArea(_ bannerView: UIView) {
    // Position the banner. Stick it to the bottom of the Safe Area.
    // Centered horizontally.
    let guide: UILayoutGuide = view.safeAreaLayoutGuide

    NSLayoutConstraint.activate(
      [bannerView.centerXAnchor.constraint(equalTo: guide.centerXAnchor),
       bannerView.bottomAnchor.constraint(equalTo: guide.bottomAnchor)]
    )
  }

  func positionBannerAtBottomOfView(_ bannerView: UIView) {
    // Center the banner horizontally.
    view.addConstraint(NSLayoutConstraint(item: bannerView,
                                          attribute: .centerX,
                                          relatedBy: .equal,
                                          toItem: view,
                                          attribute: .centerX,
                                          multiplier: 1,
                                          constant: 0))
    // Lock the banner to the top of the bottom layout guide.
    view.addConstraint(NSLayoutConstraint(item: bannerView,
                                          attribute: .bottom,
                                          relatedBy: .equal,
                                          toItem: self.bottomLayoutGuide,
                                          attribute: .top,
                                          multiplier: 1,
                                          constant: 0))
  }

}
آبجکتیو-سی
@interface ViewController()

@property(nonatomic, strong) GADBannerView *bannerView;

@end

@implementation ViewController

- (void)viewDidLoad {
  [super viewDidLoad];

  // Instantiate the banner view with your desired banner size.
  self.bannerView = [[GADBannerView alloc] initWithAdSize:GADAdSizeBanner];
  [self addBannerViewToView:self.bannerView];

  // Replace this ad unit ID with your own ad unit ID.
  self.bannerView.adUnitID = @"ca-app-pub-3940256099942544/2934735716";
  self.bannerView.rootViewController = self;
  GADRequest *request = [GADRequest request];
  [self.bannerView loadRequest:request];
}

#pragma mark - view positioning

-(void)addBannerViewToView:(UIView *_Nonnull)bannerView {
  self.bannerView.translatesAutoresizingMaskIntoConstraints = NO;
  [self.view addSubview:self.bannerView];
  if (@available(ios 11.0, *)) {
    [self positionBannerViewAtBottomOfSafeArea:bannerView];
  } else {
    [self positionBannerViewAtBottomOfView:bannerView];
  }
}

- (void)positionBannerViewAtBottomOfSafeArea:(UIView *_Nonnull)bannerView NS_AVAILABLE_IOS(11.0) {
  // Position the banner. Stick it to the bottom of the Safe Area.
  // Centered horizontally.
  UILayoutGuide *guide = self.view.safeAreaLayoutGuide;
  [NSLayoutConstraint activateConstraints:@[
    [bannerView.centerXAnchor constraintEqualToAnchor:guide.centerXAnchor],
    [bannerView.bottomAnchor constraintEqualToAnchor:guide.bottomAnchor]
  ]];
}

- (void)positionBannerViewAtBottomOfView:(UIView *_Nonnull)bannerView {
  [self.view addConstraint:[NSLayoutConstraint constraintWithItem:bannerView
                                                        attribute:NSLayoutAttributeCenterX
                                                        relatedBy:NSLayoutRelationEqual
                                                           toItem:self.view
                                                        attribute:NSLayoutAttributeCenterX
                                                       multiplier:1
                                                         constant:0]];
  [self.view addConstraint:[NSLayoutConstraint constraintWithItem:bannerView
                                                        attribute:NSLayoutAttributeBottom
                                                        relatedBy:NSLayoutRelationEqual
                                                           toItem:self.bottomLayoutGuide
                                                        attribute:NSLayoutAttributeTop
                                                       multiplier:1
                                                         constant:0]];
}

@end
با اصلاح کردن ویژگیها و لنگرهای استفادهشده، بهراحتی میتوان از تکنیکهای بالا برای محدود کردن به بالای ناحیه امن استفاده کرد.
برنماهای هوشمند
اگر از برنماهای هوشمند، بهویژه در حالت افقی، استفاده میکنید، توصیه میکنیم از محدودیتها برای تراز کردن لبههای برنما با لبههای چپ و راست منطقه امن استفاده کنید.
در سازنده میانای کاربر، این مورد با علامت زدن گزینه استفاده از راهنماهای چیدمان منطقه امن همانطور که در بالا توضیح داده شد، تا iOS 9 پشتیبانی میشود.
در کد، باید محدودیتهای لبه را نسبت به راهنماهای چیدمان منطقه امن (درصورت وجود) ایجاد کنید. در اینجا تکهکدی وجود دارد که نمای برنما را به نما اضافه میکند و آن را به پایین نما، با عرض کامل، محدود میکند:
Swift
func addBannerViewToView(_ bannerView: BannerView) {
  bannerView.translatesAutoresizingMaskIntoConstraints = false
  view.addSubview(bannerView)
  if #available(iOS 11.0, *) {
    // In iOS 11, we need to constrain the view to the safe area.
    positionBannerViewFullWidthAtBottomOfSafeArea(bannerView)
  }
  else {
    // In lower iOS versions, safe area is not available so we use
    // bottom layout guide and view edges.
    positionBannerViewFullWidthAtBottomOfView(bannerView)
  }
}

// MARK: - view positioning
@available (iOS 11, *)
func positionBannerViewFullWidthAtBottomOfSafeArea(_ bannerView: UIView) {
  // Position the banner. Stick it to the bottom of the Safe Area.
  // Make it constrained to the edges of the safe area.
  let guide = view.safeAreaLayoutGuide
  NSLayoutConstraint.activate([
    guide.leftAnchor.constraint(equalTo: bannerView.leftAnchor),
    guide.rightAnchor.constraint(equalTo: bannerView.rightAnchor),
    guide.bottomAnchor.constraint(equalTo: bannerView.bottomAnchor)
  ])
}

func positionBannerViewFullWidthAtBottomOfView(_ bannerView: UIView) {
  view.addConstraint(NSLayoutConstraint(item: bannerView,
                                        attribute: .leading,
                                        relatedBy: .equal,
                                        toItem: view,
                                        attribute: .leading,
                                        multiplier: 1,
                                        constant: 0))
  view.addConstraint(NSLayoutConstraint(item: bannerView,
                                        attribute: .trailing,
                                        relatedBy: .equal,
                                        toItem: view,
                                        attribute: .trailing,
                                        multiplier: 1,
                                        constant: 0))
  view.addConstraint(NSLayoutConstraint(item: bannerView,
                                        attribute: .bottom,
                                        relatedBy: .equal,
                                        toItem: bottomLayoutGuide,
                                        attribute: .top,
                                        multiplier: 1,
                                        constant: 0))
}
آبجکتیو-سی
- (void)addBannerViewToView:(UIView *)bannerView {
  bannerView.translatesAutoresizingMaskIntoConstraints = NO;
  [self.view addSubview:bannerView];
  if (@available(ios 11.0, *)) {
    // In iOS 11, we need to constrain the view to the safe area.
    [self positionBannerViewFullWidthAtBottomOfSafeArea:bannerView];
  } else {
    // In lower iOS versions, safe area is not available so we use
    // bottom layout guide and view edges.
    [self positionBannerViewFullWidthAtBottomOfView:bannerView];
  }
}

#pragma mark - view positioning

- (void)positionBannerViewFullWidthAtBottomOfSafeArea:(UIView *_Nonnull)bannerView NS_AVAILABLE_IOS(11.0) {
  // Position the banner. Stick it to the bottom of the Safe Area.
  // Make it constrained to the edges of the safe area.
  UILayoutGuide *guide = self.view.safeAreaLayoutGuide;

  [NSLayoutConstraint activateConstraints:@[
    [guide.leftAnchor constraintEqualToAnchor:bannerView.leftAnchor],
    [guide.rightAnchor constraintEqualToAnchor:bannerView.rightAnchor],
    [guide.bottomAnchor constraintEqualToAnchor:bannerView.bottomAnchor]
  ]];
}

- (void)positionBannerViewFullWidthAtBottomOfView:(UIView *_Nonnull)bannerView {
  [self.view addConstraint:[NSLayoutConstraint constraintWithItem:bannerView
                                                        attribute:NSLayoutAttributeLeading
                                                        relatedBy:NSLayoutRelationEqual
                                                           toItem:self.view
                                                        attribute:NSLayoutAttributeLeading
                                                       multiplier:1
                                                         constant:0]];
  [self.view addConstraint:[NSLayoutConstraint constraintWithItem:bannerView
                                                        attribute:NSLayoutAttributeTrailing
                                                        relatedBy:NSLayoutRelationEqual
                                                           toItem:self.view
                                                        attribute:NSLayoutAttributeTrailing
                                                       multiplier:1
                                                         constant:0]];
  [self.view addConstraint:[NSLayoutConstraint constraintWithItem:bannerView
                                                        attribute:NSLayoutAttributeBottom
                                                        relatedBy:NSLayoutRelationEqual
                                                           toItem:self.bottomLayoutGuide
                                                        attribute:NSLayoutAttributeTop
                                                       multiplier:1
                                                         constant:0]];
}
آگهیهای بومی
اگر برنامهتان آگهیهای بومی را به بالا یا پایین صفحه سنجاق میکند، همان
اصولی که برای آگهیهای برنمای اعمال میشود برای آگهیهای بومی نیز اعمال میشود.
تفاوت کلیدی این است که بهجای افزودن محدودیتها به GADBannerView، باید محدودیتها را به GADNativeAdView (یا نمای حاوی آگهی) اضافه کنید تا راهنماهای چیدمان «منطقه امن» رعایت شود. برای نماهای بومی
توصیه میکنیم محدودیتهای اندازه صریحتری ارائه دهید.
آگهیهای بینابینی و پاداشدار
از نسخه ۷.۲۶.۰، Google Mobile Ads SDK بهطور کامل از قالبهای آگهی پاداشی و بینابینی برای iPhone X پشتیبانی میکند.