Firebase Crashlytics 是一項輕巧的即時當機回報工具,可協助您輕鬆管理應用程式的穩定性問題。Crashlytics 會智慧地將當機情況分組,並醒目顯示導致當機的情況,節省您排解問題的時間。
本指南說明如何將 Crashlytics 整合到 Xcode 專案,以便記錄廣告回應 ID。之後在排解應用程式當機問題時,您可以查詢廣告回應 ID,並使用 AdMob 中的廣告審核中心找出並封鎖廣告。
步驟 1:將 Firebase 新增至 iOS 應用程式
如要從乾淨的應用程式嘗試使用 Firebase 記錄,可以從 GitHub 下載或複製 Google Mobile Ads SDK iOS 範例存放區。本指南特別使用橫幅範例。
如果您已有應用程式,應該可以使用應用程式的軟體包 ID 繼續進行其他步驟。您也可以略微調整,將相同步驟套用至存放區中的其他範例。
如要使用 Firebase Crashlytics,請務必建立 Firebase 專案,並將應用程式加入該專案。如果沒有 Firebase 專案,請先建立。請務必向該專案註冊應用程式。
在 Firebase 控制台的 Crashlytics 頁面中,按一下「設定 Crashlytics」。
在隨即顯示的畫面中,按一下 否 > 設定新的 Firebase 應用程式。

在 Podfile 中,新增 Google Analytics 和 Firebase Crashlytics 的 Pod。
source 'https://github.com/CocoaPods/Specs.git'

platform :ios, '8.0'

target 'BannerExample' do
  use_frameworks!
  pod 'Google-Mobile-Ads-SDK'
  pod 'Firebase/Crashlytics'
  pod 'Firebase/Analytics'
end
在「終端機」或命令提示字元中,安裝及更新 Pod:
pod install --repo-update
開啟
BannerExample.xcworkspace檔案,讓 Xcode 載入專案。
步驟 2:為應用程式設定 Firebase
Swift
在 AppDelegate.swift 中新增下列程式碼:
import UIKit

// Import the Firebase library
import FirebaseCore

@UIApplicationMain
class AppDelegate: UIResponder, UIApplicationDelegate {

  var window: UIWindow?

  func application(_ application: UIApplication,
      didFinishLaunchingWithOptions launchOptions:
          [UIApplication.LaunchOptionsKey: Any]?) -> Bool {
    // Configure an instance of Firebase
    FirebaseApp.configure()
    return true
  }
}
Objective-C
在 AppDelegate.m 中新增下列程式碼:
@import AppDelegate.h;

// Import the Firebase library
@import FirebaseCore;

@interface AppDelegate ()

@end

@implementation AppDelegate

‐ (BOOL)application:(UIApplication *)application
        didFinishLaunchingWithOptions:(NSDictionary *)launchOptions {
    // Override point for customization after application launch.

    // Initialize Firebase
    [FIRApp configure];
    return YES;
}
在 Xcode 中開啟「Build Settings」,然後按一下「Build Phases」分頁標籤。新增 Fabric 執行指令碼:
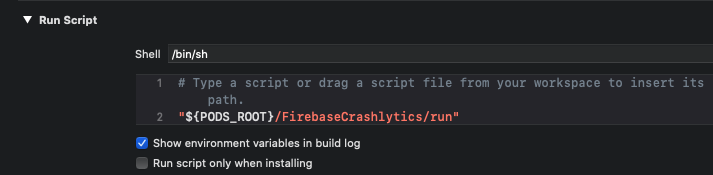
清除建構資料夾,然後建構及執行應用程式。現在您可以登入 Firebase 網頁控制台,並存取 Crashlytics 資訊主頁。
(選用):測試設定
新增當機按鈕後,每次按下按鈕都會強制當機。這個測試設定會觸發步驟 3 中的程式碼,將自訂記錄傳送至 Firebase Crashlytics 資訊主頁。
Swift
在 ViewController.swift 中,將下列程式碼行新增至 viewDidLoad() 函式:
    override func viewDidLoad() {
        super.viewDidLoad()
        bannerView.delegate = self
        bannerView.adUnitID = "ca-app-pub-3940256099942544/2934735716"
        bannerView.rootViewController = self
        bannerView.load(Request())
        let button = UIButton(type: .roundedRect)
        button.frame = CGRect(x: 20, y: 50, width: 100, height: 30)
        button.setTitle("Crash", for: [])
        button.addTarget(self, action: #selector(self.crashButtonTapped(_:)),
            for: .touchUpInside)
        view.addSubview(button)
    }
然後將這個 @IBAction 新增至類別宣告底部:
    @IBAction func crashButtonTapped(_ sender: AnyObject) {
        fatalError("Test Crash Happened")
    }
Objective-C
在 ViewController.m 中,將下列程式碼行新增至 viewDidLoad
方法:
‐ (void)viewDidLoad {
    [super viewDidLoad];

    /// ...

    UIButton* button = [UIButton buttonWithType:UIButtonTypeRoundedRect];
    button.frame = CGRectMake(20, 50, 100, 30);
    [button setTitle:@"Crash" forState:UIControlStateNormal];
    [button addTarget:self action:@selector(crashButtonTapped:)
        forControlEvents:UIControlEventTouchUpInside];
    [self.view addSubview:button];
}
然後將這個 IBAction 新增至類別宣告底部:
‐ (IBAction)crashButtonTapped:(id)sender {
    assert(NO);
}
在 Xcode 工具列中按下「Stop」按鈕,然後透過模擬器重新啟動應用程式。應用程式載入後,您可以按一下「當機」按鈕。返回 Xcode,然後按一下「Play」按鈕,將當機記錄上傳至 Crashlytics。
步驟 3:記錄廣告回應 ID
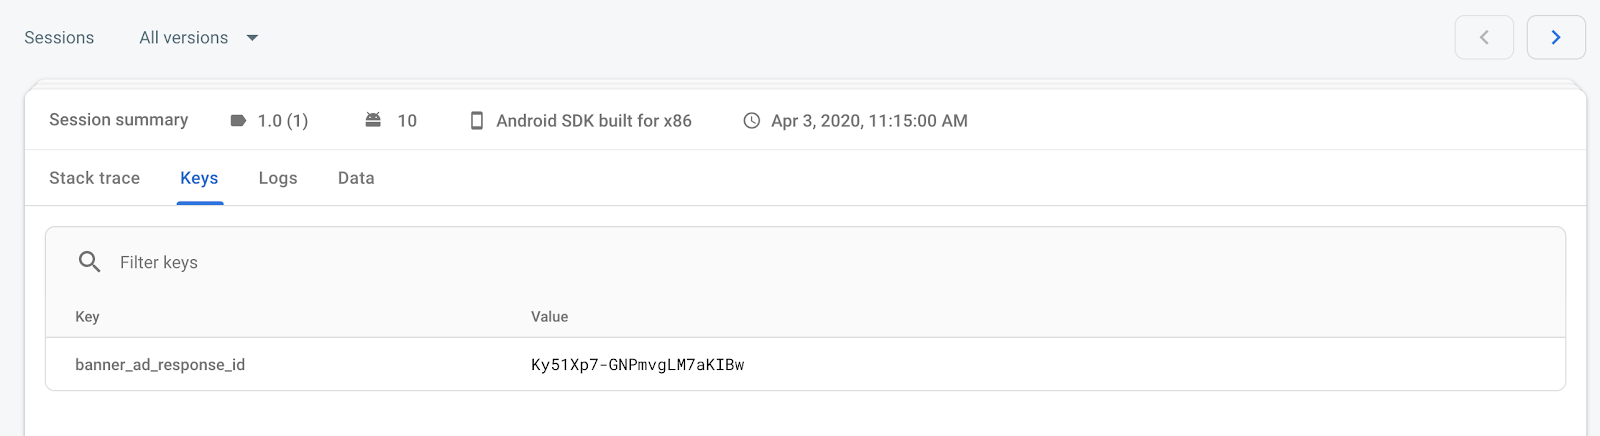
如果您載入多個廣告並在不同時間顯示,建議使用個別鍵記錄每個廣告回應 ID。舉例來說,本指南使用的範例只有一則橫幅廣告。因此,我們會在以下程式碼片段中,將廣告回應 ID 記錄為 banner_ad_response_id 鍵。
您也可以在 Firebase Crashlytics 中為不同廣告類型和廣告事件建立多個自訂鍵 / 值組合。請參閱廣告請求生命週期通知
如要進一步瞭解自訂記錄,請參閱「自訂 Firebase Crashlytics 當機報告」。
Swift
在 ViewController.swift 中加入下列程式碼。基本上,它會使用 adViewDidReceiveAd 回呼函式中的 Crashlytics.setCustomValue() 函式。
import GoogleMobileAds
import UIKit

class ViewController: UIViewController, BannerViewDelegate {

    /// The banner view.
    @IBOutlet weak var bannerView: BannerView!

    override func viewDidLoad() {
       super.viewDidLoad()
       ...
       bannerView.delegate = self
       ...
    }

    /// Tells the delegate an ad request loaded an ad.
    func adViewDidReceiveAd(_ bannerView: BannerView) {
        if let responseInfo = bannerView.responseInfo,
                responseId = responseInfo.responseId {
            print("adViewDidReceiveAd from network:
                \(responseInfo.adNetworkClassName), response Id='\(responseId)'")
            Crashlytics.sharedInstance().setCustomValue(responseId,
                forKey: "banner_ad_response_id")
        }
    }
}
Objective-C
在 ViewController.m 中加入下列程式碼。基本上,它會在 adViewDidReceiveAd 函式中使用 [FIRCrashlytics crashlytics]
setCustomValue 函式。
@import GoogleMobileAds;
@interface ViewController ()

@property(nonatomic, strong) GADBannerView *bannerView;

@end

@implementation ViewController

‐ (void)viewDidLoad {
  [super viewDidLoad];

  // In this case, we instantiate the banner with desired ad size.
  self.bannerView = [[GADBannerView alloc]
      initWithAdSize:GADAdSizeBanner];

  [self addBannerViewToView:self.bannerView];
}

‐ (void)addBannerViewToView:(UIView *)bannerView {
  bannerView.translatesAutoresizingMaskIntoConstraints = NO;
  [self.view addSubview:bannerView];
  [self.view addConstraints:@[
    [NSLayoutConstraint constraintWithItem:bannerView
                               attribute:NSLayoutAttributeBottom
                               relatedBy:NSLayoutRelationEqual
                                  toItem:self.bottomLayoutGuide
                               attribute:NSLayoutAttributeTop
                              multiplier:1
                                constant:0],
    [NSLayoutConstraint constraintWithItem:bannerView
                                 attribute:NSLayoutAttributeCenterX
                                 relatedBy:NSLayoutRelationEqual
                                    toItem:self.view
                                kattribute:NSLayoutAttributeCenterX
                                multiplier:1
                                  constant:0]
                             ]];
}

- (void)adViewDidReceiveAd:(GADBannerView *)bannerView {
  NSString *adResponseId = bannerView.responseInfo.responseId;
  if (adResponseId) {
    NSLog(@"adViewDidReceiveAd from network: %@ with response Id: %@",
        bannerView.responseInfo.adNetworkClassName, adResponseId);
    [[FIRCrashlytics crashlytics] setCustomValue:adResponseId
                                          forKey:@"banner_ad_response_id"];
  }
}

@end
恭喜!現在,您可以在 Crashlytics 資訊主頁的當機工作階段主要部分,看到最近的 adResponseId。請注意,部分金鑰可能需要一小時才會顯示在資訊主頁中。