Page Summary
-
This guide explains how to use the Google Mobile Ads SDK to integrate Liftoff Monetize ads, formerly Vungle, into an Android app using AdMob Mediation for both bidding and waterfall methods.
-
The Liftoff Monetize mediation adapter supports various ad formats including App Open, Banner, Interstitial, Rewarded, Rewarded Interstitial, and Native ads.
-
Requirements for integration include Android API level 23 or higher, specific Liftoff Monetize adapter versions for bidding, the latest Google Mobile Ads SDK, and completing the AdMob mediation get started guide.
-
The process involves setting up configurations in the Liftoff Monetize UI by adding your app and creating placements for different ad formats, noting the App ID and Placement Reference ID.
-
Setting up Liftoff Monetize demand in the AdMob UI requires configuring mediation settings for your ad unit, adding Liftoff Monetize as an ad source for either bidding or waterfall, and importing the Vungle SDK and Liftoff Monetize adapter into your project.
-
Publishers are responsible for implementing privacy settings like EU consent (GDPR) and US states privacy laws by passing user consent information to the Vungle SDK.
This guide shows you how to use Google Mobile Ads SDK (Legacy) to load and display ads from Liftoff Monetize using AdMob Mediation covering both bidding and waterfall integrations. It covers how to add Liftoff Monetize to an ad unit's mediation configuration, and how to integrate the Vungle SDK and adapter into an Android app.
Supported integrations and ad formats
The mediation adapter for Liftoff Monetize has the following capabilities:
| Integration | |
|---|---|
| Bidding | |
| Waterfall | |
| Formats | |
| App Open | |
| Banner | |
| Interstitial | |
| Rewarded | |
| Rewarded Interstitial | |
| Native | |
Requirements
Android API level 23 or higher
[For bidding]: To integrate all supported ad formats in bidding, use Liftoff Monetize adapter 7.3.0.0 or higher (latest version recommended)
Latest Google Mobile Ads SDK (Legacy).
Complete the mediation Get started guide.
Step 1: Set up configurations in Liftoff Monetize UI
Sign up or log in to your Liftoff Monetize account.
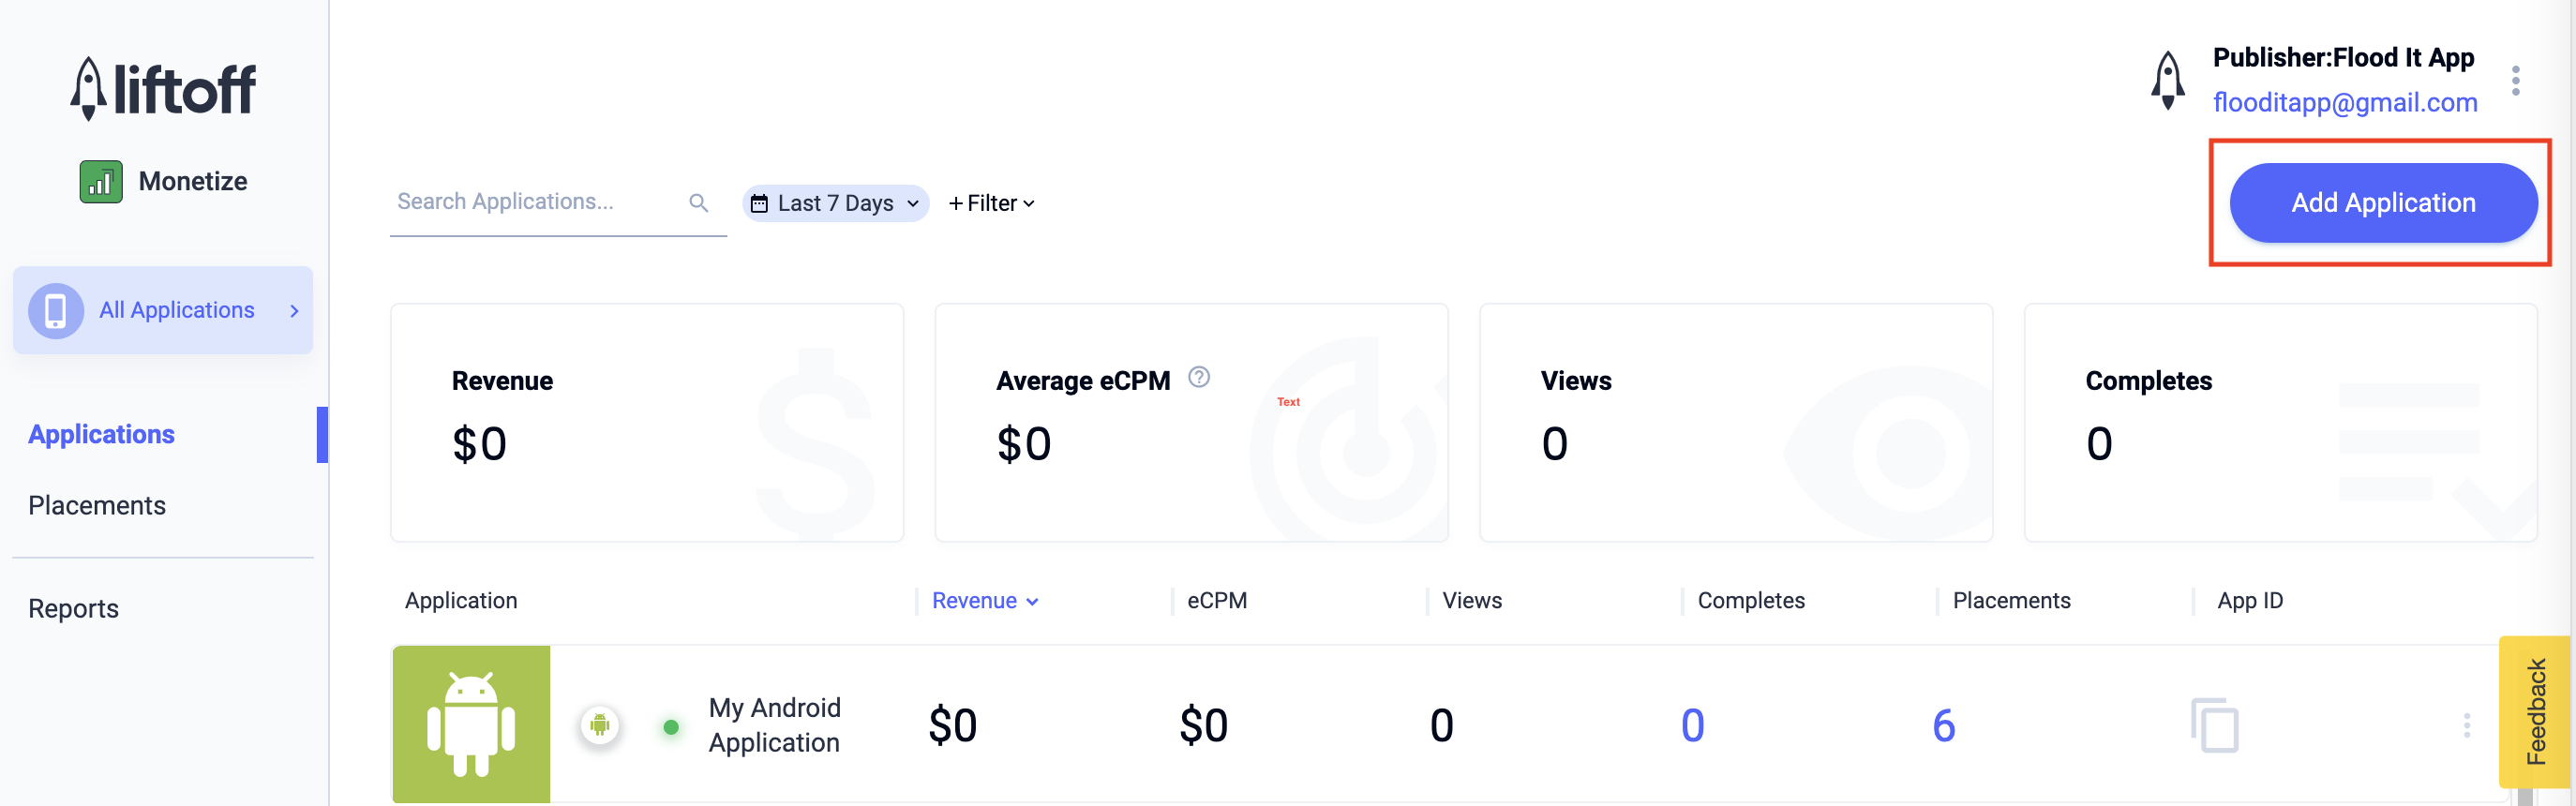
Add your app to the Liftoff Monetize dashboard by clicking the Add Application button.
Fill out the form, entering all the necessary details.

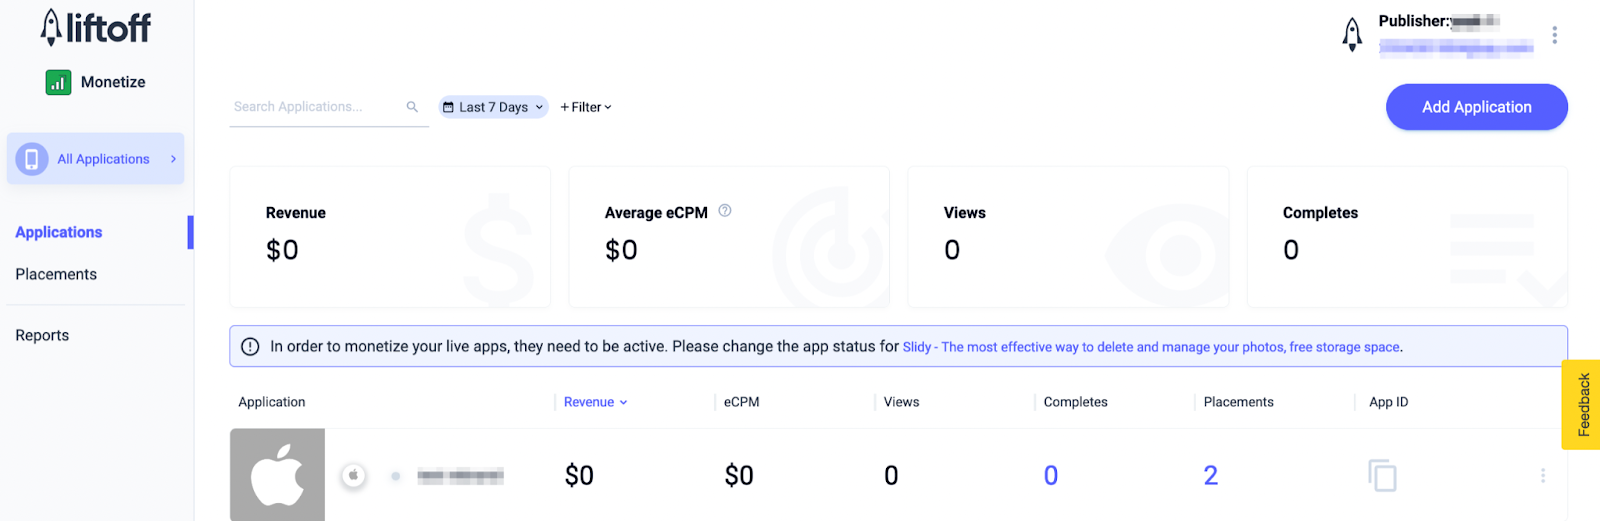
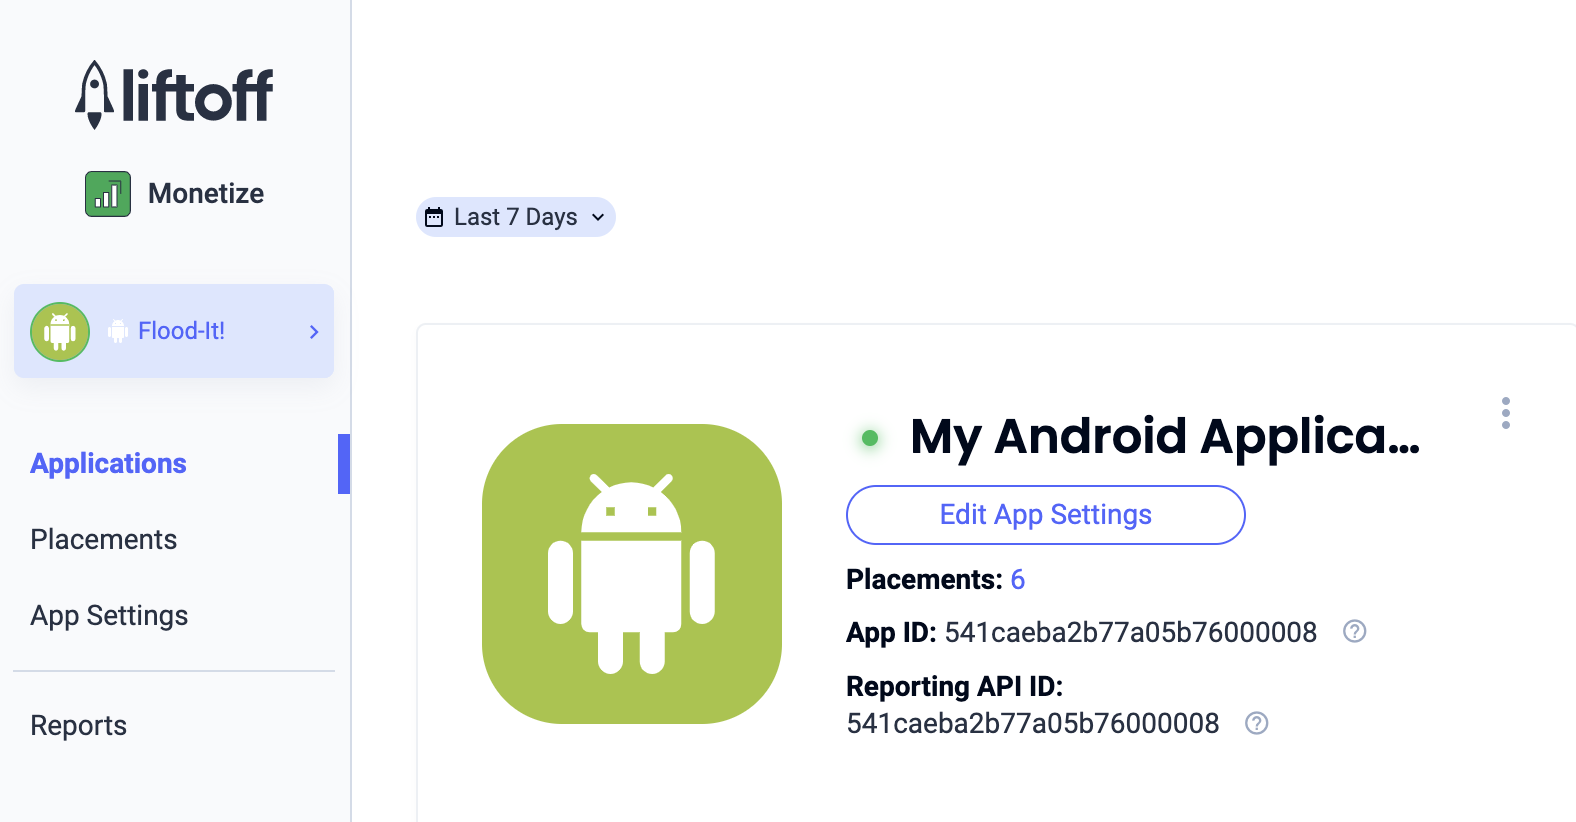
Once your app is created, select your app from the Liftoff Monetize Applications dashboard.
Take note of the App ID.
Add new placements
To create a new placement to be used with AdMob Mediation, navigate to the Liftoff Monetize Placements dashboard, click the Add Placement button and select your app from the drop-down list.

Details for adding new placements are included below:
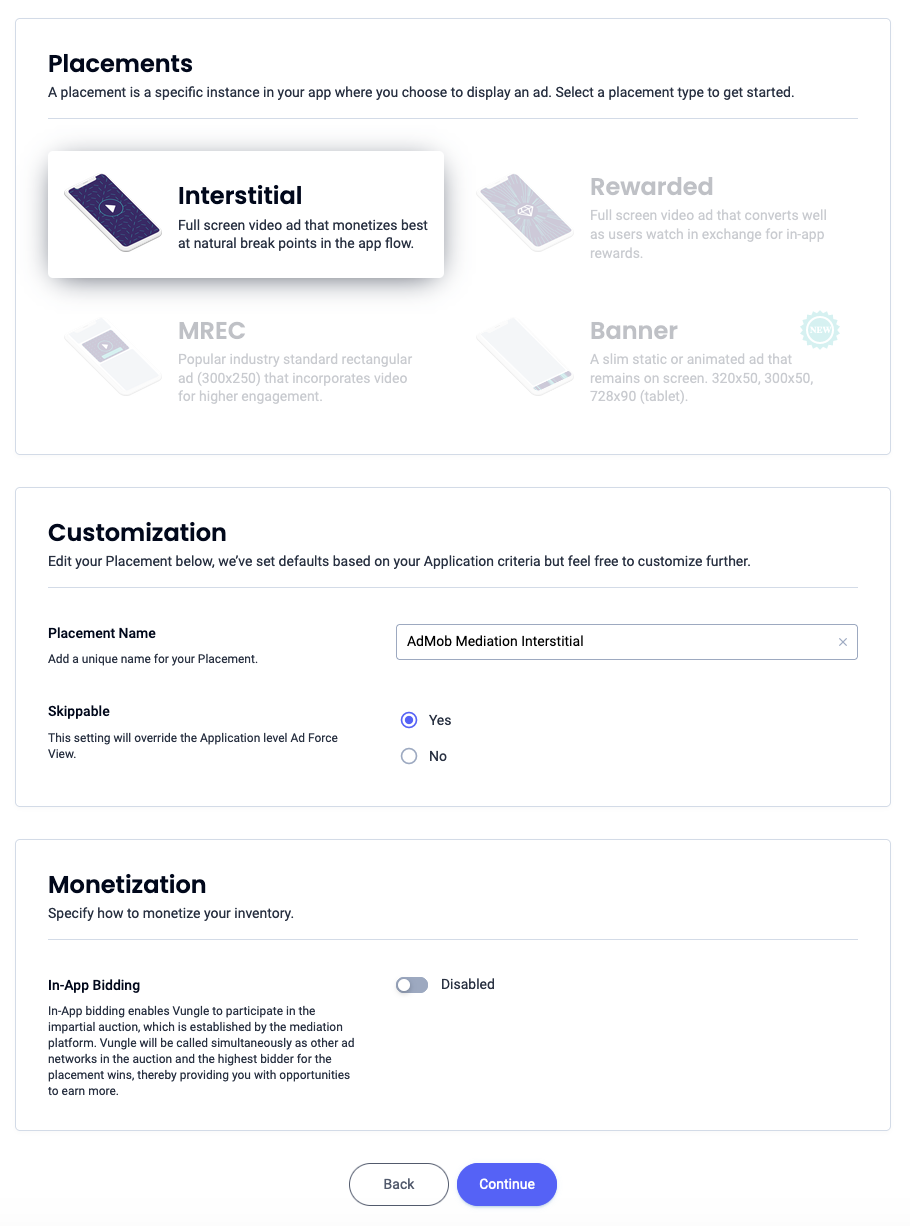
App Open
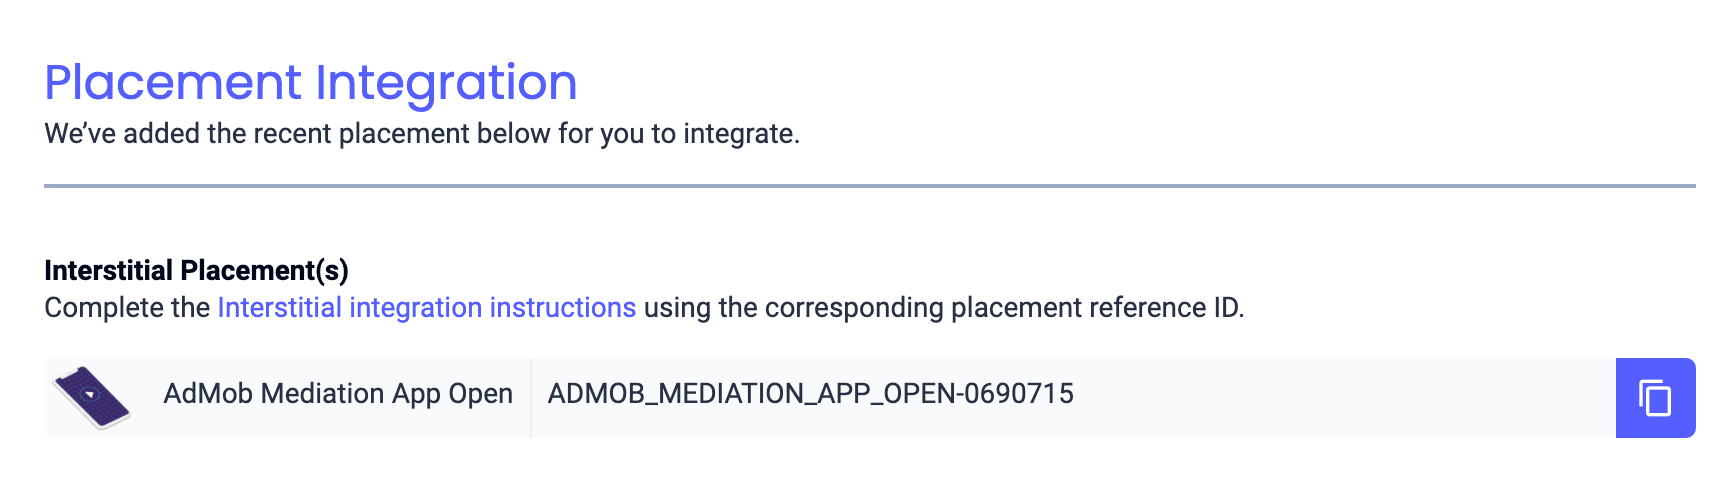
Select Interstitial and enter a Placement Name. Then, select Yes for Skippable and fill out the rest of the form. [Bidding only] Under Monetization, toggle the In-App Bidding switch to Enabled. Click the Continue button at the bottom of the page to create the placement.
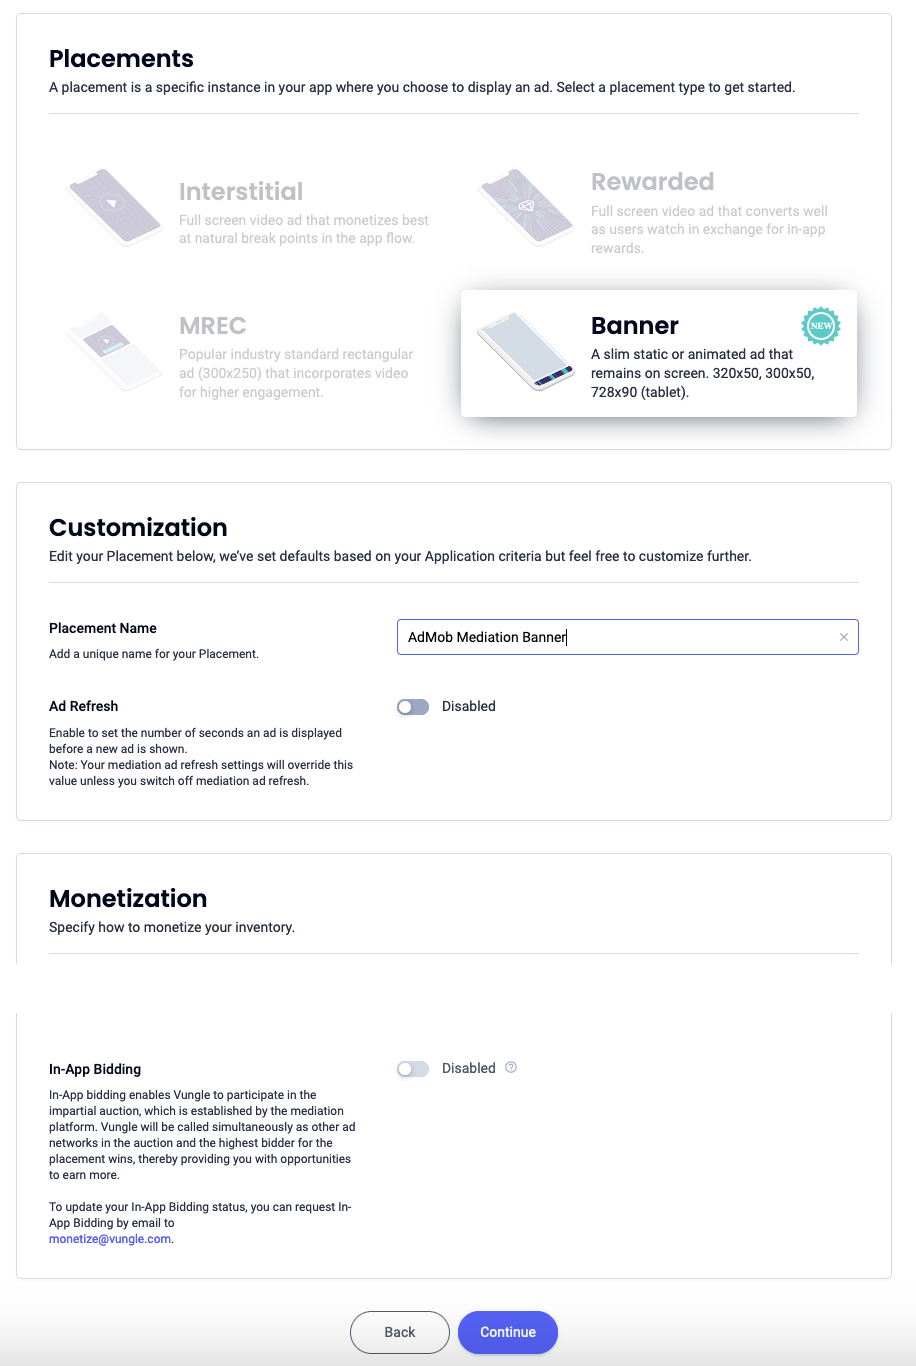
Banner
Select Banner, enter a Placement Name and fill out the rest of the form. [Bidding only] Under Monetization, toggle the In-App Bidding switch to Enabled. Click the Continue button at the bottom of the page to create the placement.
300x250 Banner
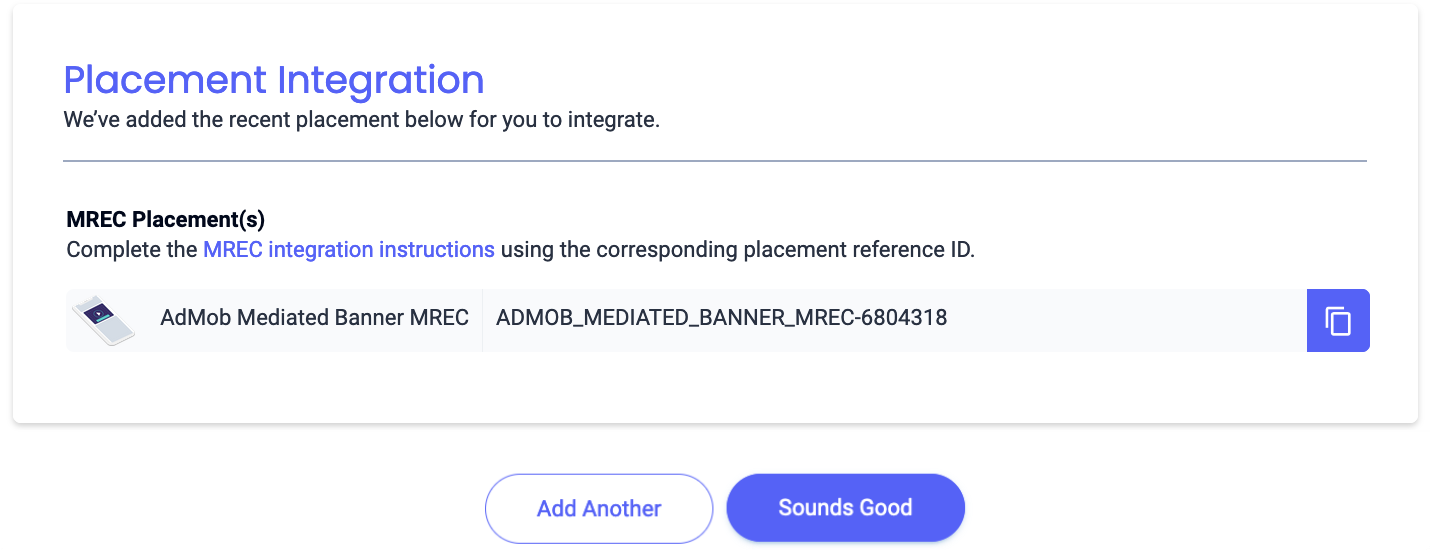
Select MREC, enter a Placement Name and fill out the rest of the form. [Bidding only] Under Monetization, toggle the In-App Bidding switch to Enabled. Click the Continue button at the bottom of the page to create the placement.

Interstitial
Select Interstitial, enter a Placement Name, and fill out the rest of the form. [Bidding only] Under Monetization, toggle the In-App Bidding switch to Enabled. Click the Continue button at the bottom of the page to create the placement.
Rewarded
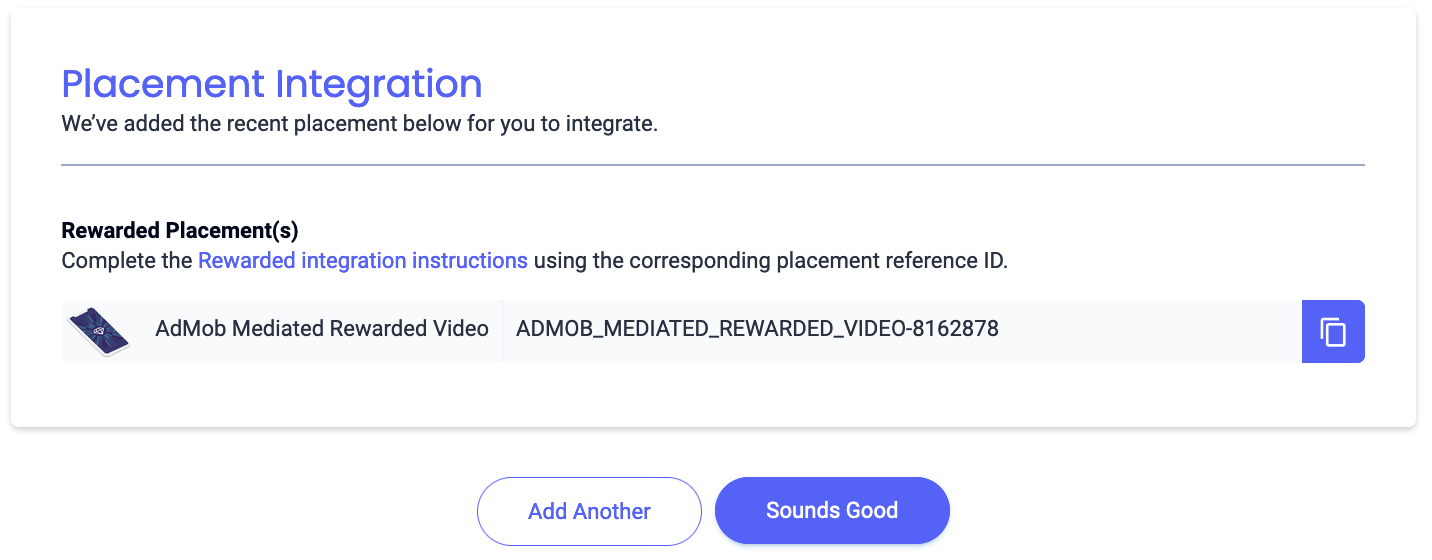
Select Rewarded, enter a Placement Name and fill out the rest of the form. [Bidding only] Under Monetization, toggle the In-App Bidding switch to Enabled. Click the Continue button at the bottom of the page to create the placement.

Rewarded Interstitial
Select Rewarded. Enter a Placement Name, enable Skippable and fill out the rest of the form. [Bidding only] Under Monetization, toggle the In-App Bidding switch to Enabled. Click the Continue button at the bottom of the page to create the placement.

Native
Select Native, enter a Placement Name and fill out the rest of the form. [Bidding only] Under Monetization, toggle the In-App Bidding switch to Enabled. Click the Continue button at the bottom of the page to create the placement.

Take note of the Reference ID and click Sounds Good.
App Open
Banner

300x250 Banner
Interstitial

Rewarded
Rewarded Interstitial

Native

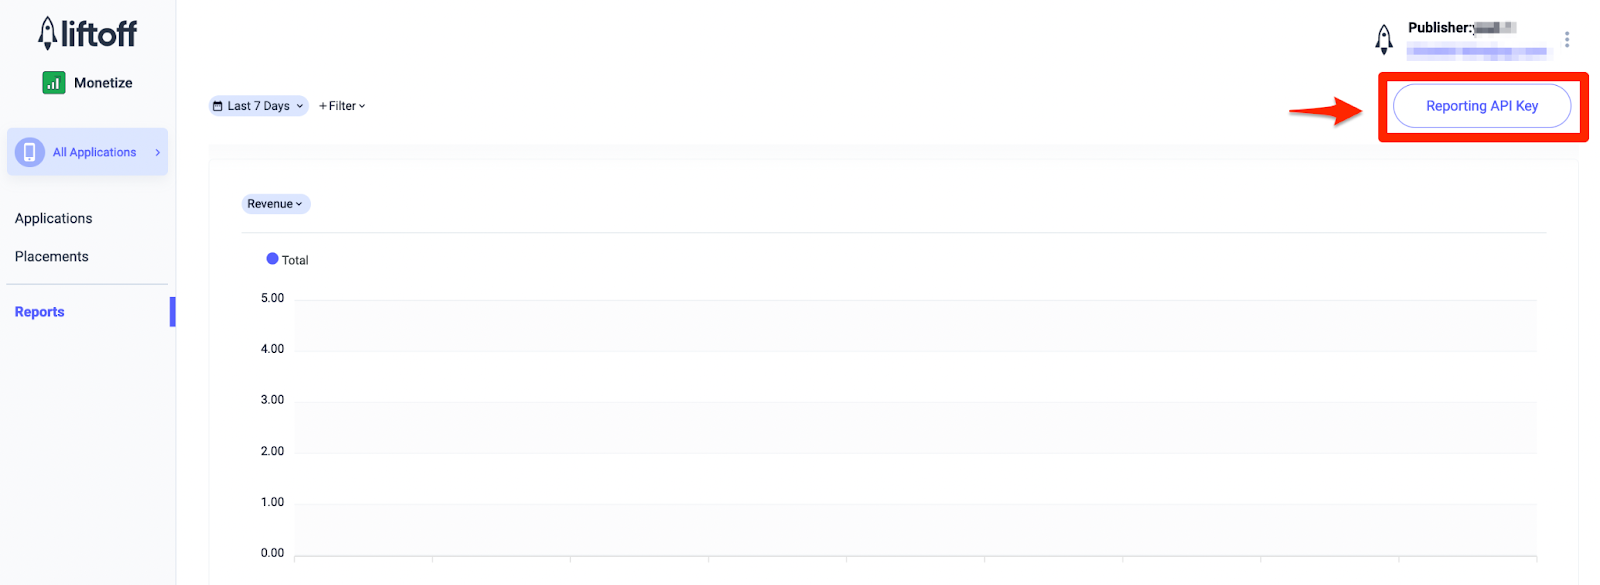
Locate your Reporting API Key
Bidding
This step isn't required for bidding integrations.
Waterfall
In addition to the App ID and the Reference ID, you'll also need your Liftoff Monetize Reporting API Key to set up your AdMob ad unit ID. Navigate to the Liftoff Monetize Reports dashboard and click the Reporting API Key button to view your Reporting API Key.
Update your app-ads.txt
Authorized Sellers for Apps app-ads.txt is an IAB Tech Lab initiative that helps ensure your
app ad inventory is only sold through channels you've identified as authorized. To prevent a
significant loss in ad revenue, you'll need to implement an app-ads.txt file.
If you haven't done so already,
set up an app-ads.txt file for your app.
To implement app-ads.txt for Liftoff Monetize,
download and append Liftoff Monetize's
app-ads.txt entries to your existing app-ads.txt file. For more
information, see
app-ads.txt.
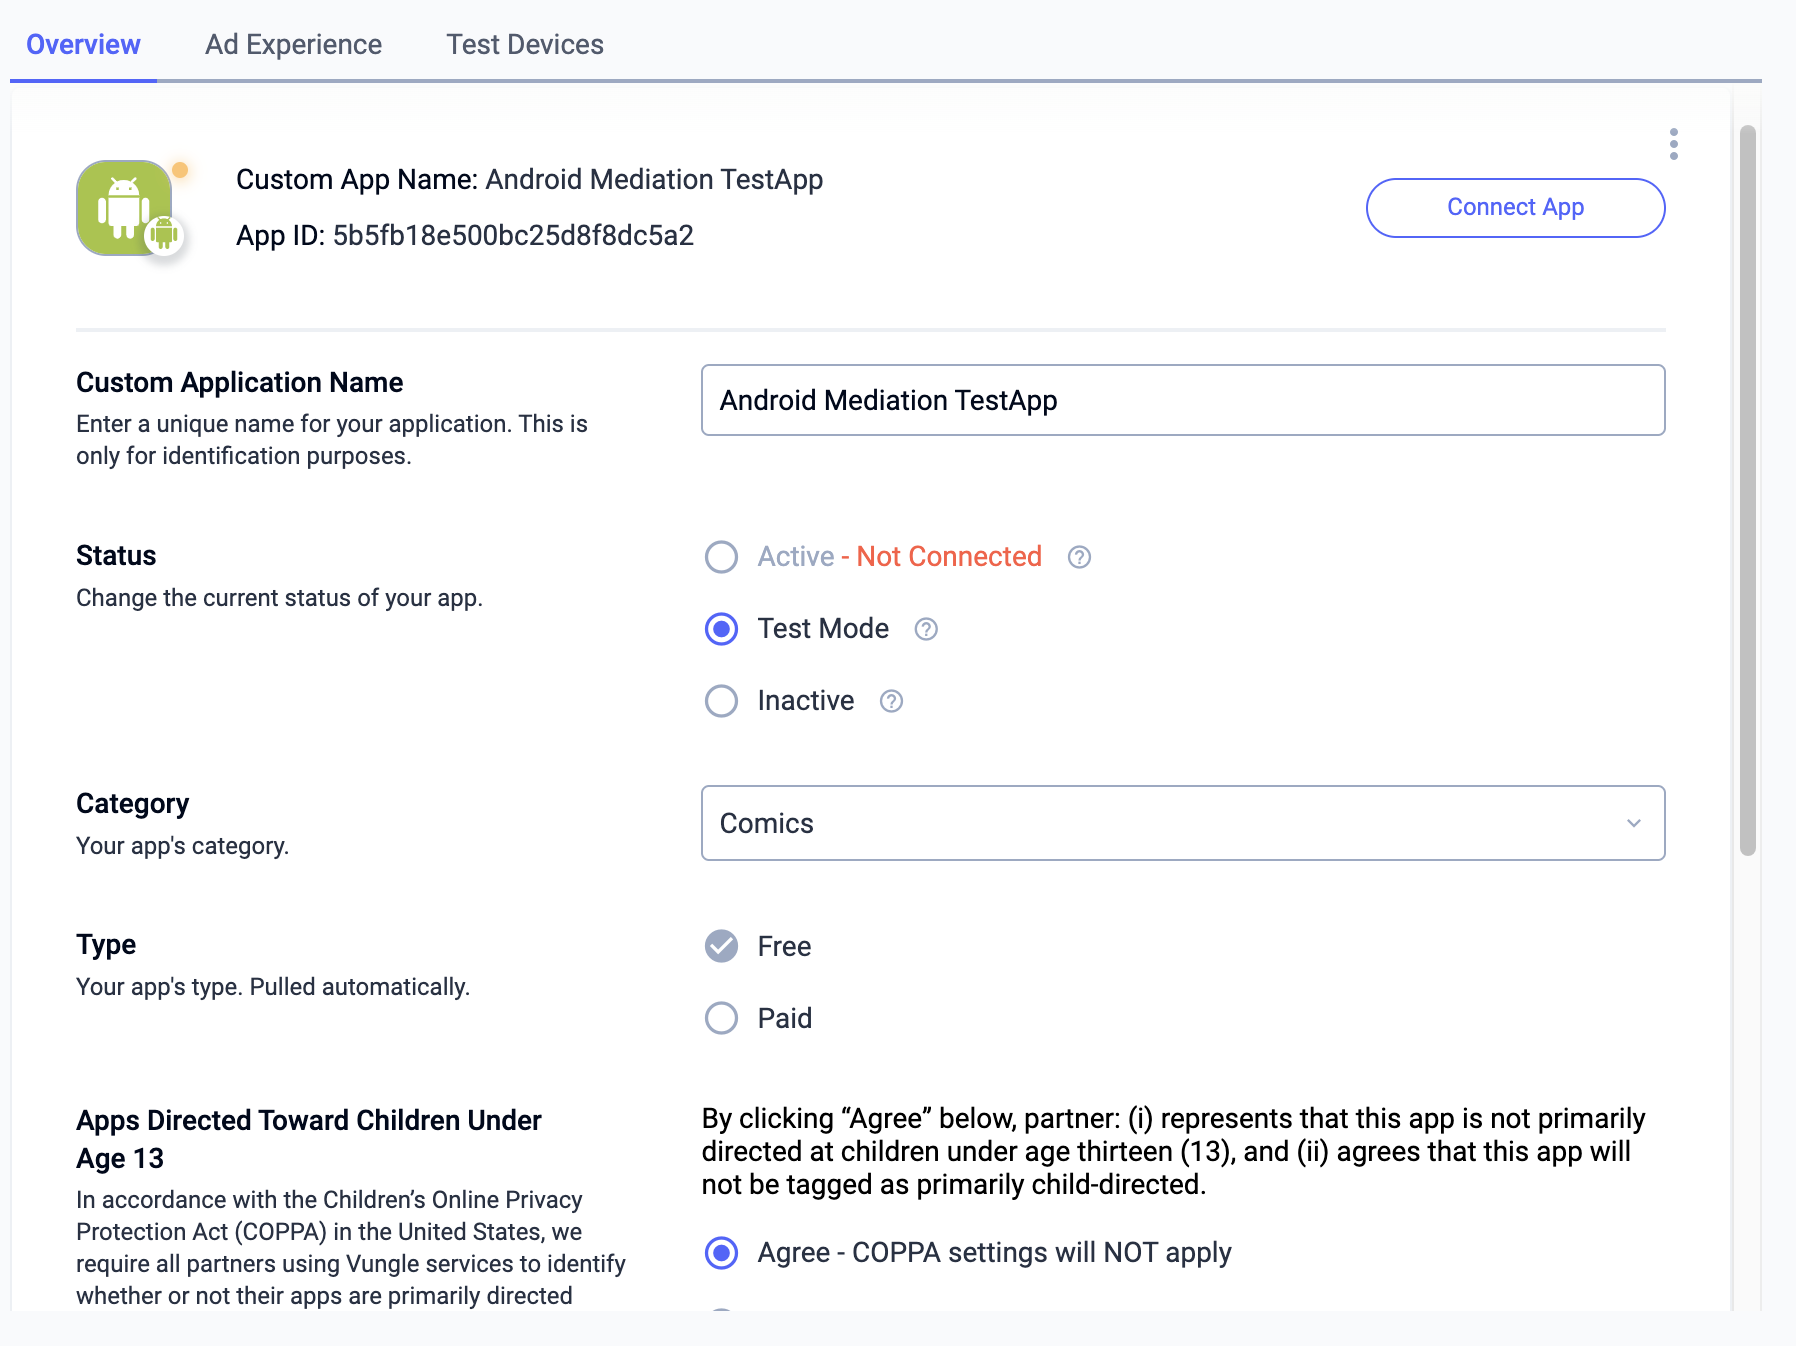
Turn on test mode
To enable test ads, go to your Liftoff Monetize dashboard and navigate to Applications.
Select your app for which you would like to enable test ads under the Placement Reference ID section of your app. Test ads can be enabled by selecting Test Mode to Show test ads only under the Status section.
Step 2: Set up Liftoff Monetize demand in AdMob UI
Configure mediation settings for your ad unit
You need to add Liftoff Monetize to the mediation configuration for your ad unit.
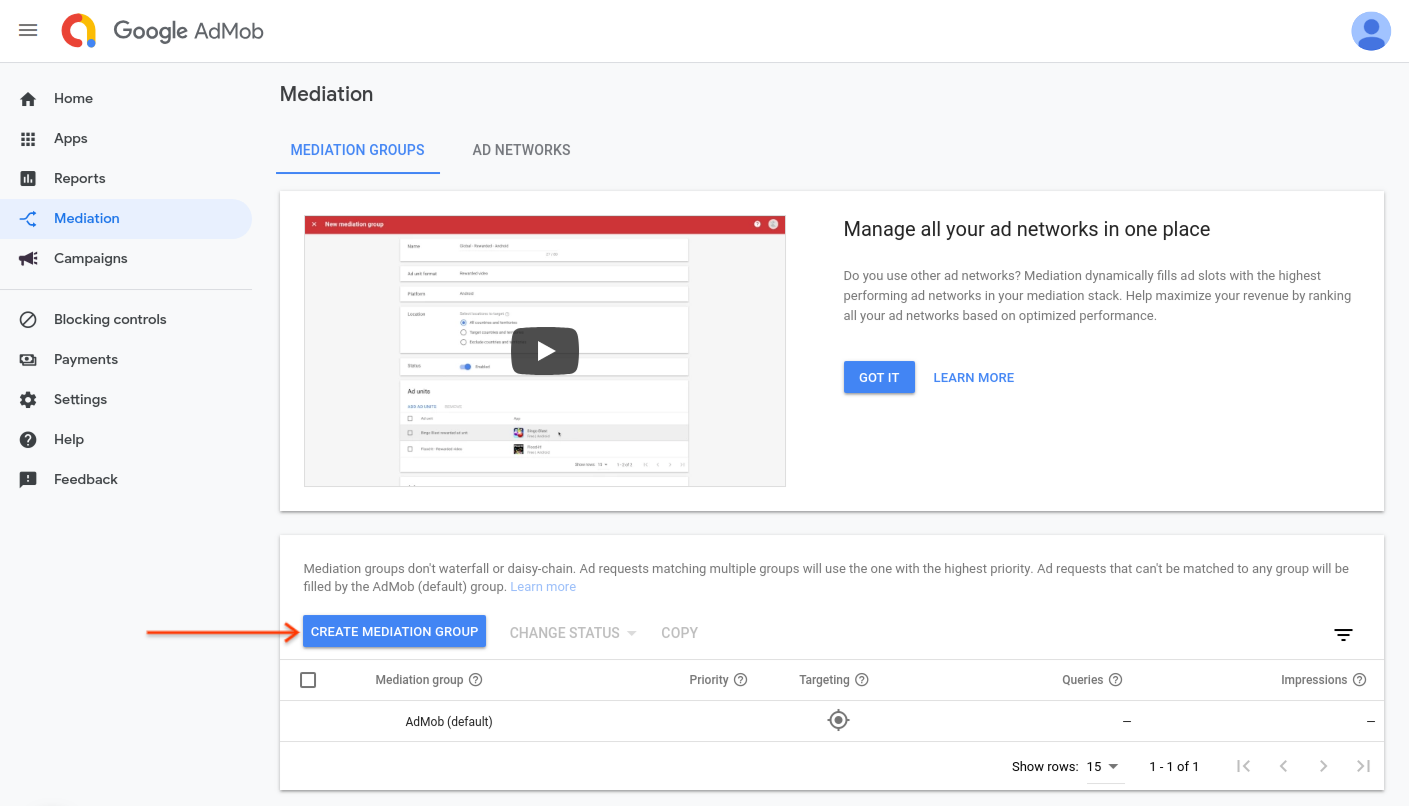
First, sign in to your AdMob account. Next, navigate to the Mediation tab. If you have an existing mediation group you'd like to modify, click the name of that mediation group to edit it, and skip ahead to Add Liftoff Monetize as an ad source.
To create a new mediation group, select Create Mediation Group.
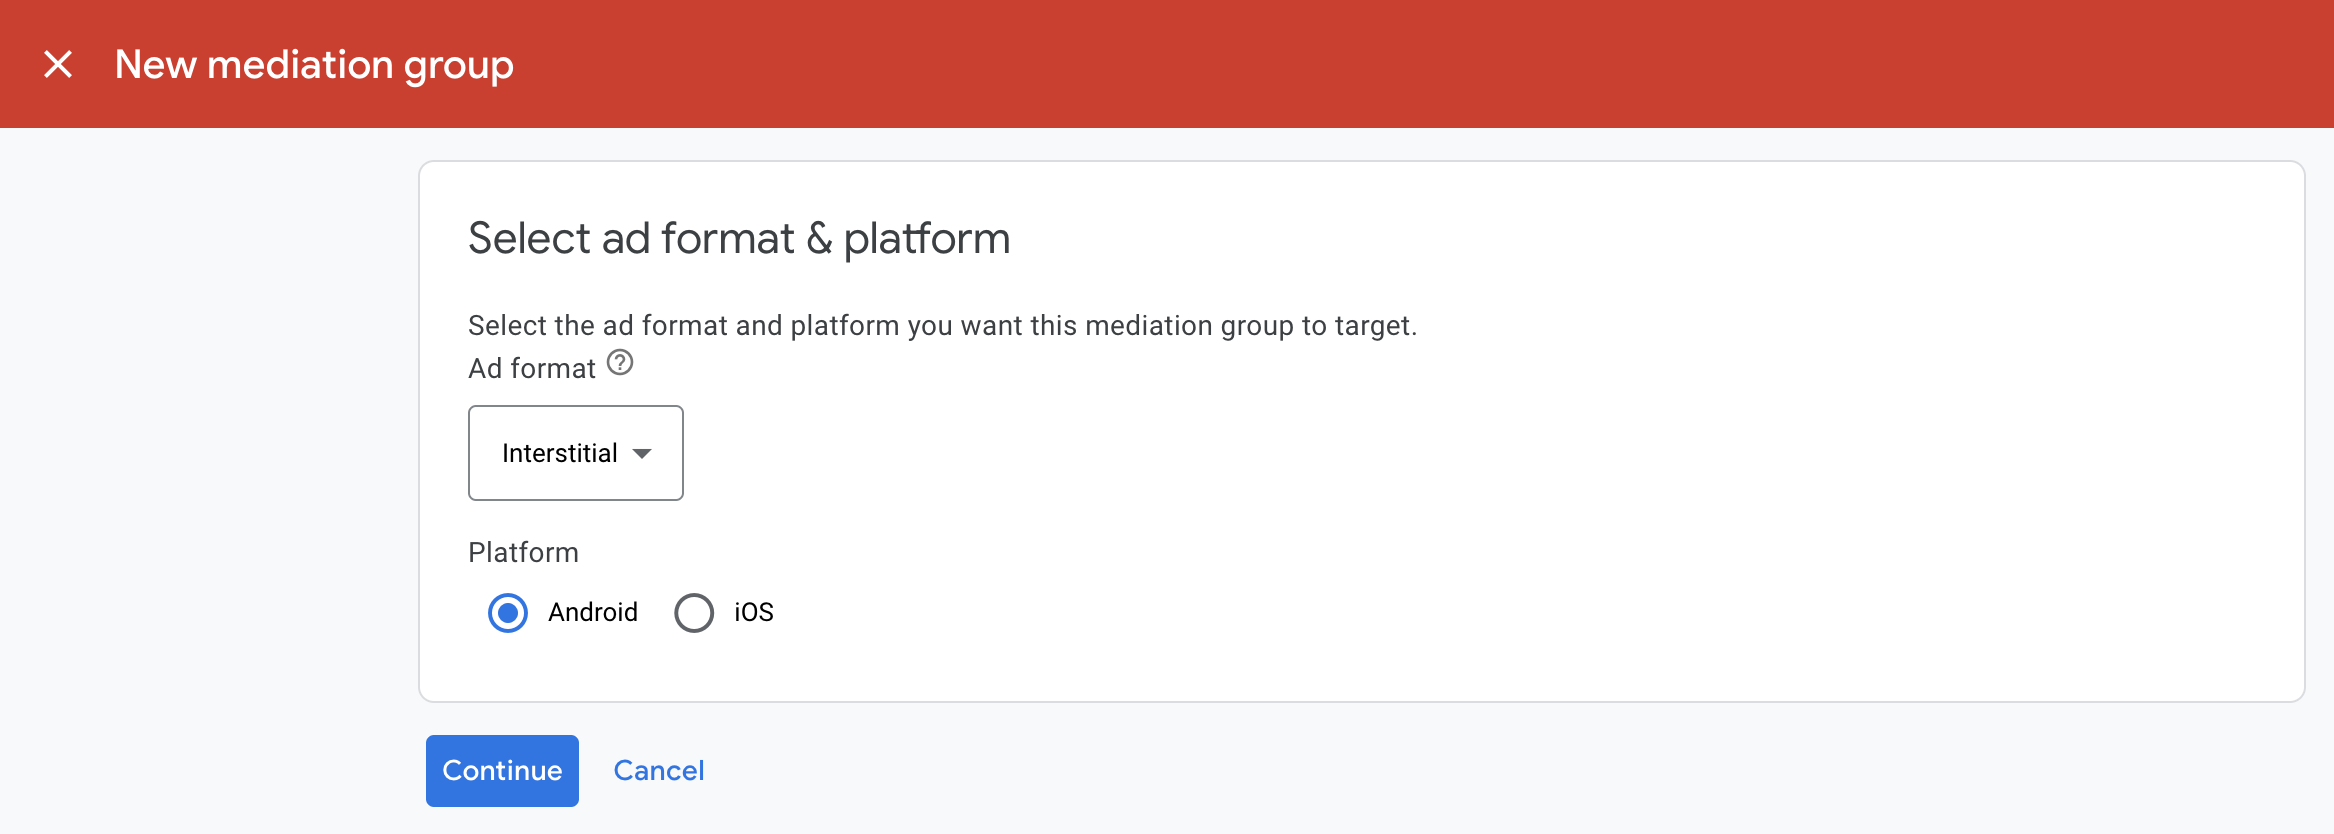
Enter your ad format and platform, then click Continue.
Give your mediation group a name, and select locations to target. Next, set the mediation group status to Enabled, and then click Add Ad Units.
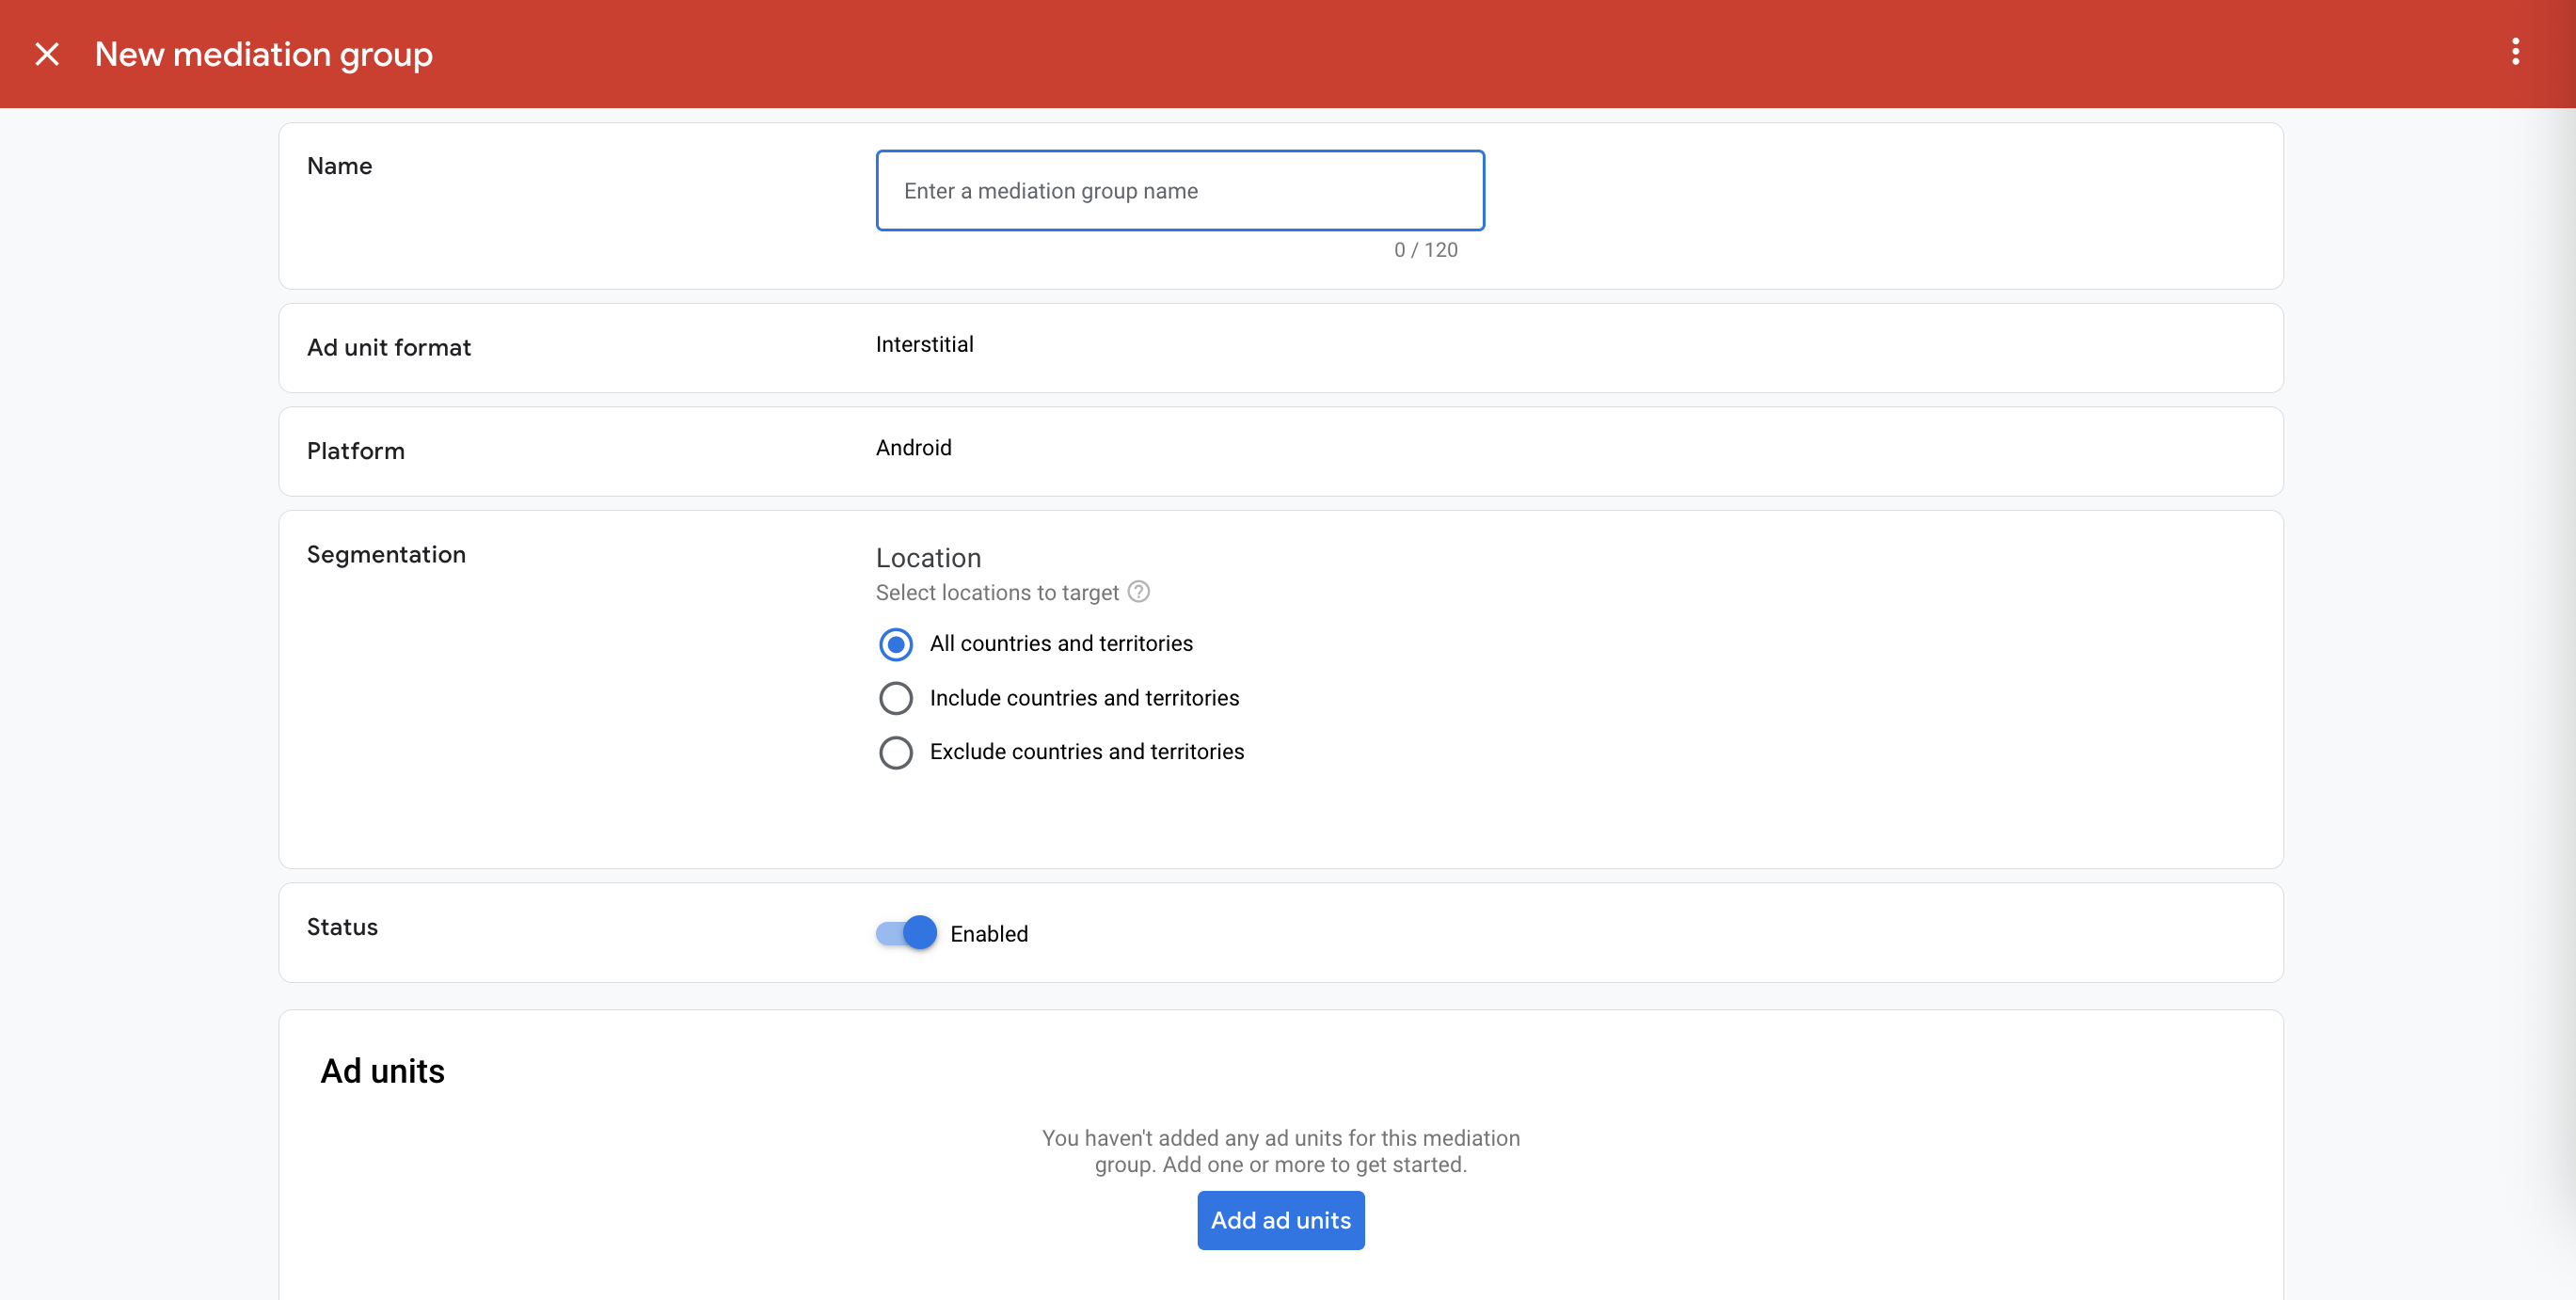
Associate this mediation group with one or more of your existing AdMob ad units. Then click Done.

You should now see the ad units card populated with the ad units you selected:

Add Liftoff Monetize as an ad source
Bidding
Under the Bidding card in the Ad Sources section, select Add ad source. Then select Liftoff Monetize .
Click How to sign a partnership agreement and set up a bidding partnership with Liftoff Monetize.
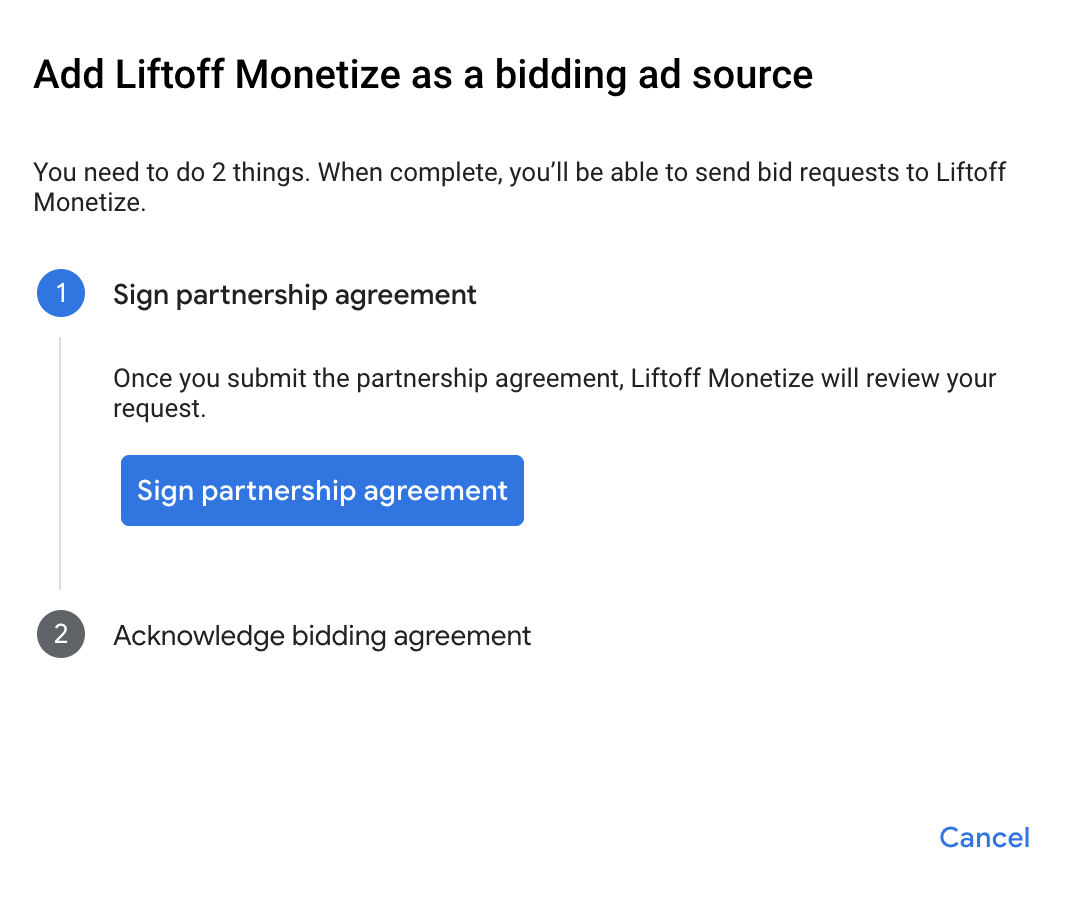
Click Acknowledge & agree, then click Continue.

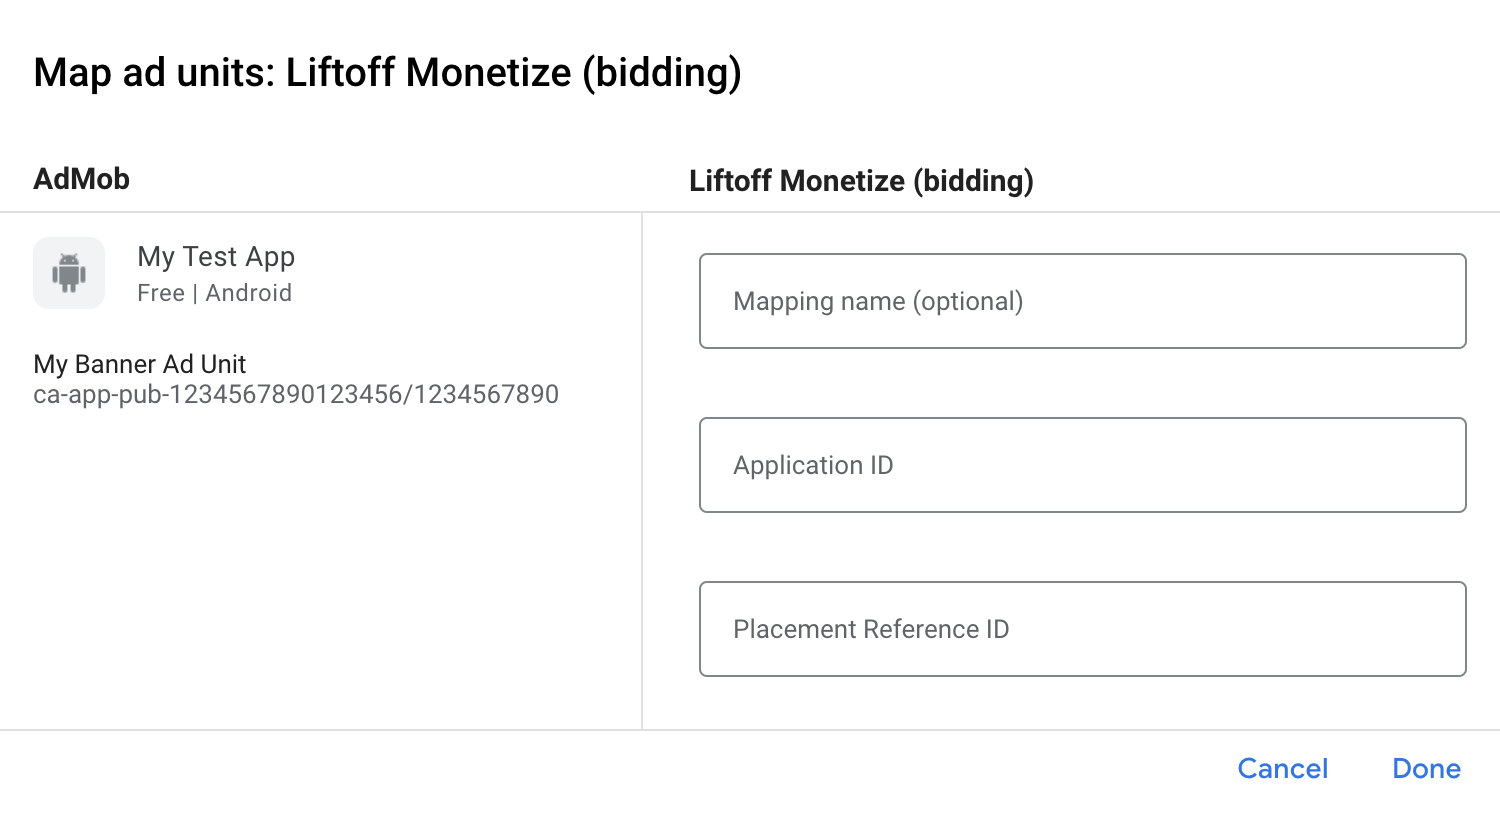
If you already have a mapping for Liftoff Monetize, you can select it. Otherwise, click Add mapping.

Next, enter the Application ID and Placement Reference ID obtained in the previous section. Then click Done.
Waterfall
Under the Waterfall card in the Ad Sources section, select Add Ad Source.
Select Liftoff Monetize and enable the Optimize switch. Enter the Reporting API Key obtained in the previous section to set up ad source optimization for Liftoff Monetize. Then enter an eCPM value for Liftoff Monetize and click Continue.

If you already have a mapping for Liftoff Monetize, you can select it. Otherwise, click Add mapping.
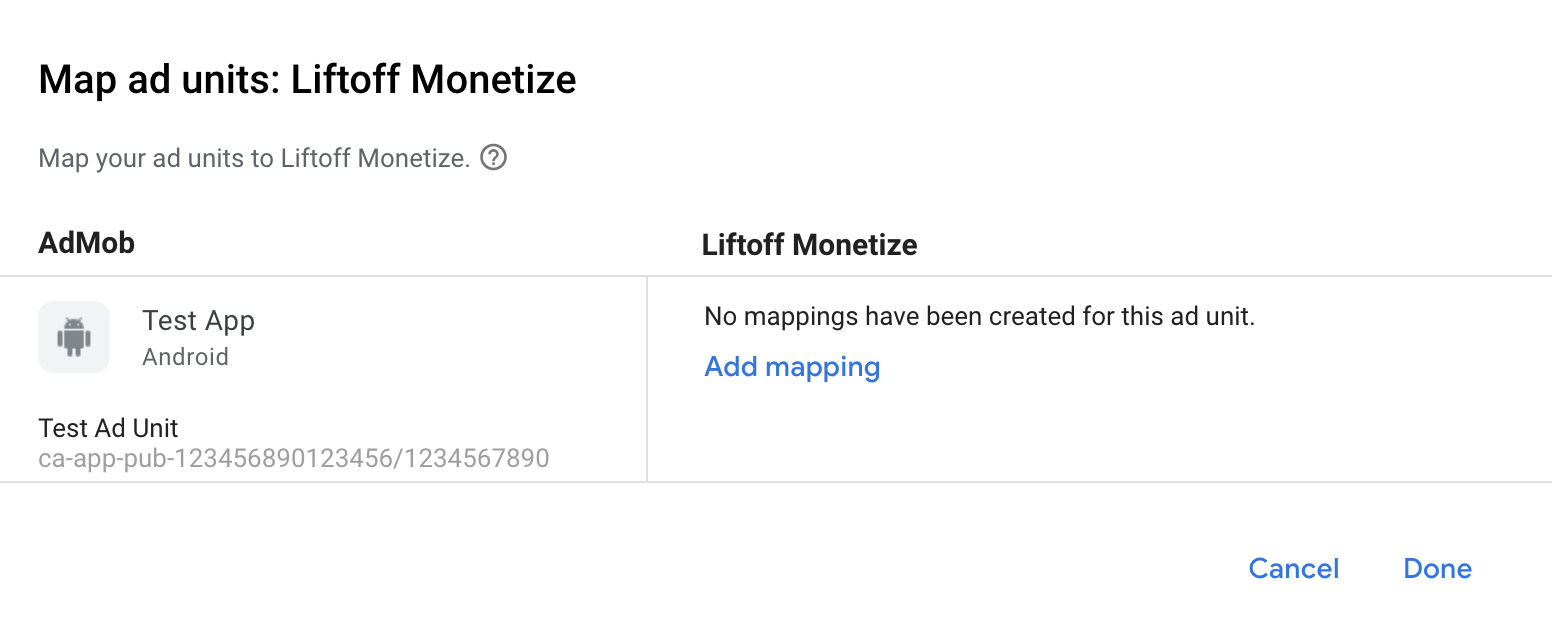
Next, enter the Application ID and Placement Reference ID obtained in the previous section. Then click Done.

Add Liftoff to GDPR and US state regulations ad partners list
Follow the steps in European regulations settings and US state regulations settings to add Liftoff to the European and US state regulations ad partners list in the AdMob UI.
Step 3: Import the Vungle SDK and Liftoff Monetize adapter
Android Studio integration (recommended)
In your app-level gradle file, add the following implementation dependencies:
Kotlin
dependencies {
    implementation("com.google.android.gms:play-services-ads:25.4.0")
    implementation("com.google.ads.mediation:vungle:7.7.4.2")
}
Groovy
dependencies {
    implementation 'com.google.android.gms:play-services-ads:25.4.0'
    implementation 'com.google.ads.mediation:vungle:7.7.4.2'
}
Manual integration
Download the latest Vungle Android SDK and extract the
.aarand JAR files under thelibsfolder and add it to your project.Navigate to the Liftoff Monetize adapter artifacts on Google's Maven Repository. Select the latest version, download the Vungle adapter's
.aarfile, and add it to your project.
Step 4: Implement privacy settings on the Vungle SDK
EU consent and GDPR
To comply with Google EU User Consent Policy, you must make certain disclosures to your users in the European Economic Area (EEA), the UK, and Switzerland, and obtain their consent for the use of cookies or other local storage where legally required, and for the collection, sharing, and use of personal data for ads personalization. This policy reflects the requirements of the EU ePrivacy Directive and the General Data Protection Regulation (GDPR). You are responsible for verifying consent is propagated to each ad source in your mediation chain. Google is unable to pass the user's consent choice to such networks automatically.
Starting in Vungle SDK version 7.4.1, Liftoff Monetize automatically reads GDPR consent set by consent management platforms that support Google's Additional Consent specification, including the UMP SDK. For more information, see GDPR Recommended Implementation Instructions.
US states privacy laws
US states privacy laws require giving users the right to opt out of the "sale" of their "personal information" (as the law defines those terms), with the opt-out offered through a prominent "Do Not Sell My Personal Information" link on the "selling" party's homepage. The US states privacy laws compliance guide offers the ability to enable restricted data processing for Google ad serving, but Google is unable to apply this setting to each ad network in your mediation chain. Therefore, you must identify each ad network in your mediation chain that may participate in the sale of personal information and follow guidance from each of those networks to ensure compliance.
Liftoff Monetize includes an API that lets you pass consent to the Vungle SDK. The following sample code shows how to pass this consent information to the Vungle SDK. If you choose to call this method, it is recommended that you do so prior to requesting ads through Google Mobile Ads SDK (Legacy).
Java
Kotlin
See CCPA implementation for more details and the values that can be provided in the method.
Step 5: Add required code
No additional code required for Liftoff Monetize integration.
Step 6: Test your implementation
Enable test ads
Make sure you register your test device for AdMob and enable test mode in Liftoff Monetize UI.
Verify test ads
To verify that you are receiving test ads from Liftoff Monetize, enable single ad source testing in ad inspector using the Liftoff Monetize (Bidding) and Liftoff Monetize (Waterfall) ad source(s).
Optional steps
Network-specific parameters
The Liftoff Monetize adapter supports the following additional request parameters which can be passed to the adapter:
userId- A string representing Liftoff Monetize's Incentivized User ID.
adOrientation- An integer specifying the presentation orientation for full-screen ads.
setBackButtonImmediatelyEnabled- A boolean to enable or disable the back button on App Open ads immediately. Set to
trueto enable the back button immediately,falseotherwise. Defaults tofalse. See Liftoff Monetize's documentation on how to integrate app open ads for more info.
Here's a code example of how to create an ad request that sets these parameters:
Java
Kotlin
Native ads rendering
The Liftoff Monetize adapter returns its native ads as
NativeAd
objects. It populates the following
native ads field descriptions
for a
NativeAd.
| Field | Assets always included by Liftoff Monetize adapter |
|---|---|
| Headline | |
| Image | 1 |
| Media view | |
| Body | |
| App icon | |
| Call to action | |
| Star rating | |
| Store | |
| Price |
1 The Liftoff Monetize
adapter does not provide direct access to the main image asset for its native
ads. Instead, the adapter populates the
MediaView
with a video or an image.
Error codes
If the adapter fails to receive an ad from Liftoff Monetize, publishers can
check the underlying error from the ad response using
ResponseInfo.getAdapterResponses()
under the following classes:
| Format | Class name |
|---|---|
| App Open (Bidding) | com.google.ads.mediation.vungle.VungleMediationAdapter |
| App Open (Waterfall) | com.google.ads.mediation.vungle.VungleMediationAdapter |
| Banner (Bidding) | com.google.ads.mediation.vungle.VungleMediationAdapter |
| Banner (Waterfall) | com.vungle.mediation.VungleInterstitialAdapter |
| Interstitial (Bidding) | com.google.ads.mediation.vungle.VungleMediationAdapter |
| Interstitial (Waterfall) | com.vungle.mediation.VungleInterstitialAdapter |
| Rewarded (Bidding) | com.google.ads.mediation.vungle.VungleMediationAdapter |
| Rewarded (Waterfall) | com.vungle.mediation.VungleAdapter |
| Rewarded Interstitial (Bidding) | com.google.ads.mediation.vungle.VungleMediationAdapter |
| Rewarded Interstitial (Waterfall) | com.google.ads.mediation.vungle.VungleMediationAdapter |
| Native (Bidding) | com.google.ads.mediation.vungle.VungleMediationAdapter |
| Native (Waterfall) | com.google.ads.mediation.vungle.VungleMediationAdapter |
Here are the codes and accompanying messages thrown by the Liftoff Monetize adapter when an ad fails to load:
| Error code | Domain | Reason |
|---|---|---|
| 101 | com.google.ads.mediation.vungle | Invalid server parameters (e.g. app ID or placement ID). |
| 102 | com.google.ads.mediation.vungle | The requested banner size does not map to a valid Liftoff Monetize ad size. |
| 103 | com.google.ads.mediation.vungle | Liftoff Monetize requires an Activitycontext to request
ads. |
| 104 | com.google.ads.mediation.vungle | The Vungle SDK cannot load multiple ads for the same placement ID. |
| 105 | com.google.ads.mediation.vungle | The Vungle SDK failed to initialize. |
| 106 | com.google.ads.mediation.vungle | Vungle SDK returned a successful load callback, but Banners.getBanner() or Vungle.getNativeAd() returned null. |
| 107 | com.google.ads.mediation.vungle | Vungle SDK is not ready to play the ad. |
| 108 | com.google.ads.mediation.vungle | Vungle SDK returned invalid bidding token. |
For errors that come from the Vungle SDK, refer to Error Codes: Vungle SDK for iOS and Android.
Liftoff Monetize Android Mediation Adapter Changelog
Version 7.7.5.0 (In progress)
Version 7.7.4.2
- Maps
AgeRestrictedTreatmentto Liftoff Monetize's COPPA API. - Removed the old API implementations for the following waterfall ad formats: Banner, Interstitial.
- Updated the adapter to use
loadBannerAdfor Waterfall Banner ads andloadInterstitialAdfor Waterfall Interstitial ads.
Built and tested with:
- Google Mobile Ads SDK version 25.4.0.
- Google Mobile Ads Next-Gen SDK version 1.2.1.
- Vungle SDK version 7.7.4.
Version 7.7.4.1
- Added logging using
VungleMediationLoggerto highlight the case when multiple app ids are detected.
Built and tested with:
- Google Mobile Ads SDK version 25.3.0.
- Google Mobile Ads Next-Gen SDK version 1.2.1.
Version 7.7.4.0
- Added
MediationInterstitialAdimplementation to the interstitial ad format. - Verified compatibility with Vungle SDK 7.7.4.
Built and tested with:
- Google Mobile Ads SDK version 25.2.0.
- Vungle SDK version 7.7.4.
Version 7.7.2.0
- Added property to build the adapter with GMA Next-Gen SDK dependency.
- Added logging using
VungleMediationLoggerfor adaptive banner size mismatch. - Set the
adapterAdFormatproperty in BaseAd. - Verified compatibility with Vungle SDK 7.7.2.
Built and tested with:
- Google Mobile Ads SDK version 25.0.0.
- Google Mobile Ads Next-Gen SDK version 0.25.0-beta01.
- Vungle SDK version 7.7.2.
Version 7.7.1.0
- Verified compatibility with Vungle SDK 7.7.1.
Built and tested with:
- Google Mobile Ads SDK version 25.0.0.
- Vungle SDK version 7.7.1.
Version 7.7.0.1
- Added support for publishers to configure
com.vungle.ads.AdConfig.setBackButtonImmediatelyEnabledfor app open ads using mediation extras.
Built and tested with:
- Google Mobile Ads SDK version 24.9.0.
- Vungle SDK version 7.7.0.
Version 7.7.0.0
- Verified compatibility with Vungle SDK 7.7.0.
Built and tested with:
- Google Mobile Ads SDK version 24.9.0.
- Vungle SDK version 7.7.0.
Version 7.6.3.1
- Added support for forwarding the tagForUnderAgeOfConsent Google Mobile Ads SDK parameter to the Liftoff Monetize SDK.
Built and tested with:
- Google Mobile Ads SDK version 24.9.0.
- Vungle SDK version 7.6.3.
Version 7.6.3.0
- Verified compatibility with Vungle SDK 7.6.3.
Built and tested with:
- Google Mobile Ads SDK version 24.9.0.
- Vungle SDK version 7.6.3.
Version 7.6.2.0
- Verified compatibility with Vungle SDK 7.6.2.
Built and tested with:
- Google Mobile Ads SDK version 24.9.0.
- Vungle SDK version 7.6.2.
Version 7.6.1.0
- Verified compatibility with Vungle SDK 7.6.1.
Built and tested with:
- Google Mobile Ads SDK version 24.7.0.
- Vungle SDK version 7.6.1.
Version 7.6.0.0
- Verified compatibility with Vungle SDK 7.6.0.
Built and tested with:
- Google Mobile Ads SDK version 24.7.0.
- Vungle SDK version 7.6.0.
Version 7.5.1.1
- Removed class-level references to Context. Can help reduce memory leak issues.
- Added new API implementation for Waterfall Banner ad.
Built and tested with:
- Google Mobile Ads SDK version 24.7.0.
- Vungle SDK version 7.5.1.
Version 7.5.1.0
- Verified compatibility with Vungle SDK 7.5.1.
Built and tested with:
- Google Mobile Ads SDK version 24.5.0.
- Vungle SDK version 7.5.1.
Version 7.5.0.1
- Sets
overrideImpressionRecordingto true for both waterfall and RTB native ads.
Built and tested with:
- Google Mobile Ads SDK version 24.4.0.
- Vungle SDK version 7.5.0.
Version 7.5.0.0
- Verified compatibility with Vungle SDK 7.5.0.
Built and tested with:
- Google Mobile Ads SDK version 24.2.0.
- Vungle SDK version 7.5.0.
Version 7.4.3.1
- Updated the minimum required Android API level to 23.
- Updated the minimum required Google Mobile Ads SDK version to 24.0.0.
Built and tested with:
- Google Mobile Ads SDK version 24.0.0.
- Vungle SDK version 7.4.3.
Version 7.4.3.0
- Verified compatibility with Vungle SDK 7.4.3.
Built and tested with:
- Google Mobile Ads SDK version 23.6.0.
- Vungle SDK version 7.4.3.
Version 7.4.2.0
- Verified compatibility with Vungle SDK 7.4.2.
Built and tested with:
- Google Mobile Ads SDK version 23.5.0.
- Vungle SDK version 7.4.2.
Version 7.4.1.0
- Verified compatibility with Vungle SDK 7.4.1.
Built and tested with:
- Google Mobile Ads SDK version 23.3.0.
- Vungle SDK version 7.4.1.
Version 7.4.0.1
- Added custom ad size support for bidding and waterfall banner ads.
Built and tested with:
- Google Mobile Ads SDK version 23.2.0.
- Vungle SDK version 7.4.0.
Version 7.4.0.0
- Extended the
VungleInterstitialAdapterclass fromVungleMediationAdapterto add waterfall support for the app open ad format on Google Ad Manager. - Verified compatibility with Vungle SDK 7.4.0.
Built and tested with:
- Google Mobile Ads SDK version 23.2.0.
- Vungle SDK version 7.4.0.
Version 7.3.2.0
- Verified compatibility with Vungle SDK 7.3.2.
Built and tested with:
- Google Mobile Ads SDK version 23.0.0.
- Vungle SDK version 7.3.2.
Version 7.3.1.0
- Verified compatibility with Vungle SDK 7.3.1.
Built and tested with:
- Google Mobile Ads SDK version 23.0.0.
- Vungle SDK version 7.3.1.
Version 7.3.0.0
- Updated the minimum required Google Mobile Ads SDK version to 23.0.0.
- Verified compatibility with Vungle SDK 7.3.0.
- Added waterfall and bidding support for app open ad format.
Built and tested with:
- Google Mobile Ads SDK version 23.0.0.
- Vungle SDK version 7.3.0.
Version 7.1.0.0
- Verified compatibility with Vungle SDK 7.1.0.
Built and tested with:
- Google Mobile Ads SDK version 22.3.0.
- Vungle SDK version 7.1.0.
Version 7.0.0.1
- Fixed an issue where Google Mobile Ads SDK was not recording impressions for bidding native ads.
- Reverted the adapter to depend on Google Mobile Ads SDK version 22.3.0.
Built and tested with:
- Google Mobile Ads SDK version 22.3.0.
- Vungle SDK version 7.0.0.
Version 7.0.0.0
- Added support to load multiple ads with the same placement ID for all waterfall ad formats.
- Rebranded adapter name from Vungle to Liftoff Monetize.
- Verified compatibility with Vungle SDK 7.0.0.
Built and tested with:
- Google Mobile Ads SDK version 22.4.0.
- Vungle SDK version 7.0.0.
Version 6.12.1.1
- Updated adapter to use new
VersionInfoclass. - Updated the minimum required Google Mobile Ads SDK version to 22.0.0.
Built and tested with:
- Google Mobile Ads SDK version 22.0.0.
- Vungle SDK version 6.12.1.
Version 6.12.1.0
- Verified compatibility with Vungle SDK 6.12.1.
Built and tested with:
- Google Mobile Ads SDK version 21.4.0.
- Vungle SDK version 6.12.1.
Version 6.12.0.1
- Added bidding support for banner ad format.
- Verified compatibility with Vungle SDK 6.12.0.
- Updated the minimum required Google Mobile Ads SDK version to 21.4.0.
Built and tested with:
- Google Mobile Ads SDK version 21.4.0.
- Vungle SDK version 6.12.0.
Version 6.12.0.0
- Added waterfall mediation and bidding support for rewarded interstitial ad format.
- Added bidding support for native ad format.
Built and tested with:
- Google Mobile Ads SDK version 21.1.0.
- Vungle SDK version 6.12.0.
Version 6.11.0.3
- Added waterfall mediation support for native ad format.
- Updated the minimum required Google Mobile Ads SDK version to 21.1.0.
Built and tested with:
- Google Mobile Ads SDK version 21.1.0.
- Vungle SDK version 6.11.0.
Version 6.11.0.2
- Added support for loading multiple ads for the same placement ID in rewarded bidding ads.
Built and tested with:
- Google Mobile Ads SDK version 21.0.0.
- Vungle SDK version 6.11.0.
Version 6.11.0.1
- Updated
compileSdkVersionandtargetSdkVersionto API 31. - Updated the minimum required Google Mobile Ads SDK version to 21.0.0.
- Updated the minimum required Android API level to 19.
Built and tested with:
- Google Mobile Ads SDK version 21.0.0.
- Vungle SDK version 6.11.0.
Version 6.11.0.0
- Verified compatibility with Vungle SDK 6.11.0.
Built and tested with:
- Google Mobile Ads SDK version 20.6.0.
- Vungle SDK version 6.11.0.
Version 6.10.5.0
- Verified compatibility with Vungle SDK 6.10.5.
- Updated the minimum required Google Mobile Ads SDK version to 20.6.0.
Built and tested with:
- Google Mobile Ads SDK version 20.6.0.
- Vungle SDK version 6.10.5.
Version 6.10.4.0
- Verified compatibility with Vungle SDK 6.10.4.
Built and tested with:
- Google Mobile Ads SDK version 20.5.0.
- Vungle SDK version 6.10.4.
Version 6.10.3.0
- Verified compatibility with Vungle SDK 6.10.3.
Built and tested with:
- Google Mobile Ads SDK version 20.5.0.
- Vungle SDK version 6.10.3.
Version 6.10.2.1
- Verified compatibility with Vungle SDK 6.10.2.
- Added bidding support for interstitial and rewarded ad formats.
- Updated the minimum required Google Mobile Ads SDK version to 20.5.0.
Built and tested with:
- Google Mobile Ads SDK version 20.5.0.
- Vungle SDK version 6.10.2.
Version 6.10.2.0
- Verified compatibility with Vungle SDK 6.10.2.
- Fixed an adapter issue by replacing parameter
serverParameters, withmediationExtrasto obtain Vungle network-specific parameters, when requesting Banner and Interstitial ads.
Built and tested with:
- Google Mobile Ads SDK version 20.3.0.
- Vungle SDK version 6.10.2.
Version 6.10.1.0
- Verified compatibility with Vungle SDK 6.10.1.
- Updated the minimum required Google Mobile Ads SDK version to 20.3.0.
- MREC Ads are now supported with Vungle's banner API.
- Updated standardized error codes and messages.
Built and tested with:
- Google Mobile Ads SDK version 20.3.0.
- Vungle SDK version 6.10.1.
Version 6.9.1.1
- Updated the minimum required Google Mobile Ads SDK version to 20.0.0.
Built and tested with:
- Google Mobile Ads SDK version 20.0.0.
- Vungle SDK version 6.9.1.
Version 6.9.1.0
- Verified compatibility with Vungle SDK 6.9.1.
- Added support for OMSDK.
- Various bug fixes.
- Rewarded Ad Support for Vungle onAdViewed callback.
- Updated the minimum required Google Mobile Ads SDK version to 19.7.0.
Built and tested with:
- Google Mobile Ads SDK version 19.7.0.
- Vungle SDK version 6.9.1.
Version 6.8.1.1
- Updated the minimum required Google Mobile Ads SDK version to 19.6.0.
Built and tested with:
- Google Mobile Ads SDK version 19.6.0.
- Vungle SDK version 6.8.1.
Version 6.8.1.0
- Verified compatibility with Vungle SDK 6.8.1.
- Updated the minimum required Google Mobile Ads SDK version to 19.5.0.
Built and tested with:
- Google Mobile Ads SDK version 19.5.0.
- Vungle SDK version 6.8.1.
Version 6.8.0.0
- Verified compatibility with Vungle SDK 6.8.0.
- Updated the adapter to not forward
onAdClosed()when banner ads are refreshed or destroyed. - Remove
FlexFeedandFlexView(deprecated in Vungle 6.8.0). - Updated the minimum required Google Mobile Ads SDK version to 19.4.0.
Built and tested with:
- Google Mobile Ads SDK version 19.4.0.
- Vungle SDK version 6.8.0.
Version 6.7.1.0
- Verified compatibility with Vungle SDK 6.7.1.
- Fixed a bug where ads wouldn't load if an ad was loaded using an application context.
- Updated
targetSdkVersionto API 29. - Updated the minimum required Google Mobile Ads SDK version to 19.3.0.
Built and tested with:
- Google Mobile Ads SDK version 19.3.0.
- Vungle SDK version 6.7.1.
Version 6.7.0.0
- Verified compatibility with Vungle SDK 6.7.0.
- Updated the adapter to support inline adaptive banner requests.
- Interstitial and rewarded ads are now unmuted by default.
- Interstitial ads now forward the
onAdLeftApplication()callback when clicked. - Updated the minimum required Google Mobile Ads SDK version to 19.2.0.
Built and tested with:
- Google Mobile Ads SDK version 19.2.0.
- Vungle SDK version 6.7.0.
Version 6.5.3.0
- Verified compatibility with Vungle SDK 6.5.3.
- Add support for the newly-introduced Vungle's Banner format.
- Updated the minimum required Google Mobile Ads SDK version to 19.0.1.
Built and tested with:
- Google Mobile Ads SDK version 19.0.1.
- Vungle SDK version 6.5.3.
Version 6.4.11.1
- Fixed an issue where banner ads failed to refresh.
Version 6.4.11.0
- Verified compatibility with Vungle SDK 6.4.11.
- Added support for banner ads.
- Migrated the adapter to AndroidX.
- Updated the minimum required Google Mobile Ads SDK version to 18.2.0.
Version 6.3.24.1
- Updated adapter to support new open-beta Rewarded API.
- Updated the minimum required Google Mobile Ads SDK version to 17.2.0.
Version 6.3.24.0
- Verified compatibility with Vungle SDK 6.3.24.
Version 6.3.17.0
- Verified compatibility with Vungle SDK 6.3.17.
Version 6.3.12.0
- Verified compatibility with Vungle SDK 6.3.12.
Version 6.2.5.1
- Updated the adapter to invoke the
onRewardedVideoComplete()ad event.
Version 6.2.5.0
- Verified compatibility with Vungle SDK 6.2.5.
Version 5.3.2.1
- Updated adapter to correctly report clicks to the Google Mobile Ads SDK.
Version 5.3.2.0
- Verified compatibility with Vungle SDK 5.3.2.
- Updated the Adpater project for Android Studio 3.0.
- Added the following methods to Bundle builder class.
setOrdinalViewCount: This field is used to pass the mediation ordinal, whenever Publisher receives the ordinal data reports from Vungle.setFlexViewCloseTimeInSec: This option is used to make flex view ads dismiss on their own after the specified number of seconds.
Version 5.3.0.0
- Verified compatibility with Vungle SDK 5.3.0.
Version 5.1.0.0
- Updated the adapter to make it compatible with Vungle SDK 5.1.0.
- Changed the version naming system to [Vungle SDK version].[adapter patch version].
Earlier versions
- Added support for interstitial and rewarded video ad formats.