Google タグ マネージャーでは、モバイルアプリ内の測定用のタグやピクセルの実装と管理が可能で、その際にアプリケーションのバイナリを再ビルドしてアプリ マーケットプレイスに再提出する必要もありません。Firebase 向け Google アナリティクスの SDK を使用していれば、手軽にタグ マネージャーを導入でき、実装の管理や変更がアプリの出荷後でも可能です。
また、重要なイベントをログに記録しておくことにより、どのタグやピクセルを配信するかを後で決めることができます。
前提条件
- Firebase コンソールで、Firebase プロジェクトにアプリを追加します。
- アプリに Google アナリティクスを導入します。Firebase プロジェクトで Google アナリティクスを有効化し、Firebase 向け Google アナリティクスの SDK をアプリに追加してください。
- タグ マネージャー アカウントを作成します。
- タグ マネージャー コンテナを設定します。
以下の各セクションでは、iOS アプリで Google タグ マネージャーを設定および使用する手順を説明していきます。
1. タグ マネージャーをプロジェクトに追加する
タグ マネージャー パッケージを追加します。
CocoaPods
CocoaPods からタグ マネージャーを追加するには:
ターミナルで次のコマンドを実行します。
$ sudo gem install cocoapodsプロジェクトのディレクトリに移動します。
次のコマンドを実行して、
Podfileという名前のファイルを作成します。$ pod initPodfileに以下を追加します。pod 'GoogleTagManager', '~> 6.0'次のコマンドを実行して、タグ マネージャーの依存関係をダウンロードして、プロジェクトにインストールします。
$ pod install
Swift Package Manager
Swift Package Manager からタグ マネージャーを追加するには:
- CocoaPods ベースのプロジェクトから移行する場合は、
pod deintegrateを実行して Xcode プロジェクトから CocoaPods を削除します。CocoaPods が生成した.xcworkspaceファイルは、後で安全に削除できます。プロジェクトに初めて Firebase を追加する場合、この手順は無視してください。 - Xcode 12 で、[File] > [Tag Manager Packages] > [Add Package Dependency] に移動して、タグ マネージャー ライブラリをインストールします。
表示されるプロンプトで、タグ マネージャーの GitHub リポジトリを入力します。
https://github.com/googleanalytics/google-tag-manager-ios-sdk.git使用するタグ マネージャーのバージョンを選択します。新しいプロジェクトには、タグ マネージャーの最新バージョンを使用することをおすすめします。
プロジェクトの [Build Settings] の [Other Linker Flags] に
-ObjCを追加します。
タグ マネージャー アカウントに iOS コンテナがない場合は、次の手順で作成します。
- タグ マネージャー アカウントにログインします。
- 上部のナビゲーション バーにある [管理] をクリックします。
- [コンテナ] 列で、プルダウン メニューをクリックし、[コンテナを作成] を選択します。
- コンテナ名を入力します。
- [iOS] コンテナを選択します。
- [Firebase(iOS 版)] SDK を選択します。
- [作成] をクリックします。
コンテナをダウンロードします。
- タグ マネージャー アカウントにログインします。
- iOS コンテナを選択します。
- 上部のナビゲーション バーにある [バージョン] をクリックします。
選択したコンテナ バージョンで [アクション] > [ダウンロード] をクリックします。
ダウンロードしたコンテナをプロジェクトに追加します。
- ダウンロードしたファイルを XCode プロジェクトのルートにある
containerという名前のフォルダにコピーしますにコピーします(通常、PROJECT_ROOT/container/GTM-XXXXXX.jsonとなります)。 - Xcode を開きます。
- [File] メニューから [Add files to] を選択します。
containerフォルダを選択します。- [Options] をクリックし、[Create folder references] がオンになっていることを確認します。
- [Finish] をクリックします。
- ダウンロードしたファイルを XCode プロジェクトのルートにある
2. イベントと変数をログに記録する
タグ マネージャーは、Firebase 向け Google アナリティクスの SDK によって記録されたイベント、パラメータ、ユーザー プロパティを使って、Google タグ マネージャーで設定済みのタグをトリガーおよび構築します。
イベントをログに記録する方法や、ユーザー プロパティを設定する方法については、Firebase のデベロッパー向けドキュメントをご覧ください。
タグ マネージャーで変数を設定する
Google タグ マネージャーで使用するイベント パラメータとユーザー プロパティの値を取得するには、タグ マネージャーの管理画面で変数を設定します。
たとえば、アプリで次のカスタム イベントをログに記録するとします。
Analytics.logEvent("share_image", parameters: [
  "image_name": name,
  "full_text": text
])
タグ マネージャーで新しいイベント パラメータ変数を次のように設定すれば、image_name と full_text parameter の値を取得できます。
- 変数名: Image Name
- 変数タイプ: イベント パラメータ
- イベント パラメータのキー名:
image_name
および
- 変数名: Full Text
- 変数タイプ: イベント パラメータ
- イベント パラメータのキー名:
full_text
同様に、アプリで次のユーザー プロパティを設定するとします。
Analytics.setUserProperty(food, forName: "favorite_food")
Google タグ マネージャーで新しい Firebase ユーザー プロパティ変数を次のように設定すれば、favorite_food の値を取得できます。
- 変数名: Favorite Food
- 変数タイプ: Firebase ユーザー プロパティ
- イベント パラメータのキー名:
favorite_food
イベントを修正またはブロックする
タグ マネージャーを使用すると、Firebase 向け Google アナリティクスにログが記録される前に、イベントを変更したりブロックしたりできます。イベントを変更できると、アプリをアップデートしなくても、イベント パラメータの値の追加、削除、変更や、イベント名の調整が可能です。ブロックされていないイベントは、Firebase 向け Google アナリティクスにログが記録されます。
Firebase 向け Google アナリティクスの SDK が自動的に記録するイベントやユーザー プロパティもいくつか存在します。自動収集されているイベントやプロパティは、コードを特に追加しなくても、タグ マネージャーで活用できます。ただし、ブロックすることはできません。
3. イベントを送信する
Firebase イベント名変数、Firebase イベント パラメータ変数、その他の変数が、トリガーを設定するために使用されます。トリガー条件は、Firebase イベントをログに記録するたびに評価されます。Firebase 向け Google アナリティクスのイベントは、デフォルトでは自動的に配信されます。Firebase 向け Google アナリティクスのタグをタグ マネージャーに追加すれば、イベントがアナリティクスに送信されるのをブロックすることも可能です。
4. コンテナをプレビュー、デバッグし、公開する
あるバージョンのコンテナを公開する前に、そのコンテナをプレビューして、意図したとおりに機能することを確認する必要があります。タグ マネージャーを使用すると、タグ マネージャーの管理画面でリンクと QR コードを生成し、それらを使用してアプリを開いて、各バージョンのコンテナをプレビューできます。
コンテナをプレビューする
コンテナをプレビューするには、タグ マネージャーの管理画面でプレビュー URL を生成します。
- タグ マネージャー アカウントにログインします。
- モバイル向けのコンテナを選択します。
- 上部のナビゲーション バーにある [バージョン] をクリックします。
- プレビューするコンテナ バージョンで [アクション] > [プレビュー] をクリックします。
- アプリのパッケージ名を入力します。
[開始プレビュー リンクを作成] をクリックします。
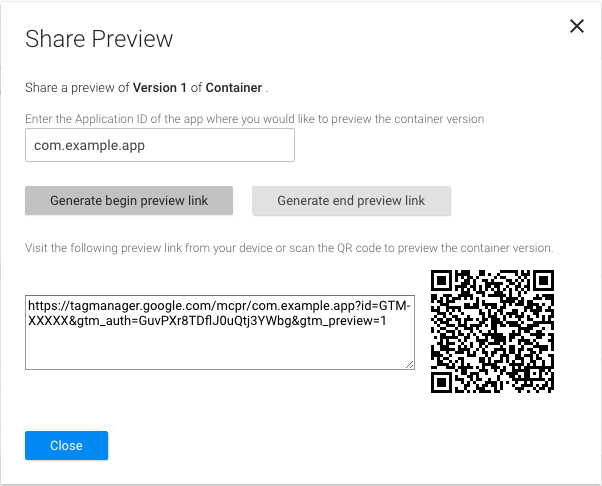
図 1: タグ マネージャーの管理画面からプレビュー URL を取得する。 後の手順で使用するために、このプレビュー URL を保存しておきます。
コンテナのプレビューを有効にするには、プロジェクトのプロパティ リストでタグ マネージャーのプレビュー URL スキームを定義する必要があります。アプリのプロパティ リストファイルの [URL タイプ] で、次の URL 識別子と URL スキームを登録します。
URL identifier: _your.package.name_
URL scheme: tagmanager.c._your.package.name_

エミュレータまたは実機上でアプリを停止し、プレビュー URL を開いて、アプリでドラフト コンテナをプレビューします。
コンテナをデバッグする
シミュレータまたはプレビュー モードでアプリを実行すると、タグ マネージャーは自動的にログ記録を詳細モードに切り替えます。
コンテナを公開する
コンテナをプレビューし、機能していることを確認したら、コンテナを公開できます。コンテナを公開すると、モバイルアプリ ユーザーがお客様のタグ設定を利用できるようになります。
関連資料
高度な設定をご覧ください。