
هنگام پر کردن آدرس تحویل، اطلاعات صورتحساب یا اطلاعات رویداد، فعال کردن فرمها با قابلیت تکمیل خودکار مکان به کاربران کمک میکند تا تعداد دفعات فشردن کلید و اشتباهات هنگام وارد کردن اطلاعات آدرس را کاهش دهند. این آموزش مراحل مورد نیاز برای فعال کردن یک فیلد ورودی با قابلیت تکمیل خودکار مکان و پر کردن فیلدهای فرم آدرس با اجزای آدرس از آدرس انتخاب شده توسط کاربر و نمایش آدرس انتخاب شده روی نقشه برای کمک به تأیید بصری را شرح میدهد.
ویدیوها: فرمهای آدرس را با قابلیت تکمیل خودکار مکان بهبود دهید
فرمهای آدرس
اندروید
آیاواس
وب
پلتفرم نقشههای گوگل یک ویجت تکمیل خودکار مکان برای پلتفرمهای موبایل و وب ارائه میدهد. این ویجت که در شکلهای قبلی نشان داده شده است، یک کادر محاورهای جستجو با قابلیت تکمیل خودکار داخلی ارائه میدهد که حتی میتوانید آن را برای جستجوی مبتنی بر مکان بهینه کنید.
کد را دریافت کنید
مخزن Google Places SDK for Android Demos را از GitHub کپی یا دانلود کنید.
نسخه جاوای اکتیویتی را مشاهده کنید:
    /*
 * Copyright 2022 Google LLC
 *
 * Licensed under the Apache License, Version 2.0 (the "License");
 * you may not use this file except in compliance with the License.
 * You may obtain a copy of the License at
 *
 *     https://www.apache.org/licenses/LICENSE-2.0
 *
 * Unless required by applicable law or agreed to in writing, software
 * distributed under the License is distributed on an "AS IS" BASIS,
 * WITHOUT WARRANTIES OR CONDITIONS OF ANY KIND, either express or implied.
 * See the License for the specific language governing permissions and
 * limitations under the License.
 */

package com.example.placesdemo;

import android.annotation.SuppressLint;
import android.app.Activity;
import android.content.Intent;
import android.content.pm.PackageManager;
import android.content.res.Resources;
import android.os.Bundle;
import android.util.Log;
import android.view.View;
import android.view.ViewStub;
import android.widget.Button;
import android.widget.CheckBox;
import android.widget.Toast;

import androidx.activity.result.ActivityResultLauncher;
import androidx.activity.result.contract.ActivityResultContracts;
import androidx.annotation.NonNull;
import androidx.annotation.Nullable;
import androidx.appcompat.app.AppCompatActivity;
import androidx.core.content.ContextCompat;

import com.example.placesdemo.databinding.AutocompleteAddressActivityBinding;
import com.google.android.gms.location.FusedLocationProviderClient;
import com.google.android.gms.location.LocationServices;
import com.google.android.gms.maps.CameraUpdateFactory;
import com.google.android.gms.maps.GoogleMap;
import com.google.android.gms.maps.GoogleMapOptions;
import com.google.android.gms.maps.OnMapReadyCallback;
import com.google.android.gms.maps.SupportMapFragment;
import com.google.android.gms.maps.model.LatLng;
import com.google.android.gms.maps.model.MapStyleOptions;
import com.google.android.gms.maps.model.Marker;
import com.google.android.gms.maps.model.MarkerOptions;
import com.google.android.libraries.places.api.Places;
import com.google.android.libraries.places.api.model.AddressComponent;
import com.google.android.libraries.places.api.model.AddressComponents;
import com.google.android.libraries.places.api.model.Place;
import com.google.android.libraries.places.api.model.PlaceTypes;
import com.google.android.libraries.places.api.net.PlacesClient;
import com.google.android.libraries.places.widget.Autocomplete;
import com.google.android.libraries.places.widget.model.AutocompleteActivityMode;

import java.util.Arrays;
import java.util.List;

import static android.Manifest.permission.ACCESS_FINE_LOCATION;
import static com.google.maps.android.SphericalUtil.computeDistanceBetween;
import androidx.activity.EdgeToEdge;

/**
 * Activity for using Place Autocomplete to assist filling out an address form.
 */
@SuppressWarnings("FieldCanBeLocal")
public class AutocompleteAddressActivity extends AppCompatActivity implements OnMapReadyCallback {

    private static final String TAG = "ADDRESS_AUTOCOMPLETE";
    private static final String MAP_FRAGMENT_TAG = "MAP";
    private LatLng coordinates;
    private boolean checkProximity = false;
    private SupportMapFragment mapFragment;
    private GoogleMap map;
    private Marker marker;
    private PlacesClient placesClient;
    private View mapPanel;
    private LatLng deviceLocation;
    private static final double acceptedProximity = 150;

    private AutocompleteAddressActivityBinding binding;

    View.OnClickListener startAutocompleteIntentListener = view -> {
        view.setOnClickListener(null);
        startAutocompleteIntent();
    };

    private final ActivityResultLauncher<Intent> startAutocomplete = registerForActivityResult(
            new ActivityResultContracts.StartActivityForResult(),
            result -> {
                if (result.getResultCode() == Activity.RESULT_OK) {
                    Intent intent = result.getData();
                    if (intent != null) {
                        Place place = Autocomplete.getPlaceFromIntent(intent);

                        // Write a method to read the address components from the Place
                        // and populate the form with the address components
                        Log.d(TAG, "Place: " + place.getAddressComponents());
                        fillInAddress(place);
                    }
                } else if (result.getResultCode() == Activity.RESULT_CANCELED) {
                    // The user canceled the operation.
                    Log.i(TAG, "User canceled autocomplete");
                }
            });

    @Override
    protected void onActivityResult(int requestCode, int resultCode, @Nullable Intent intent) {
        super.onActivityResult(requestCode, resultCode, intent);
        binding.autocompleteAddress1.setOnClickListener(startAutocompleteIntentListener);
    }

    @Override
    protected void onCreate(Bundle savedInstanceState) {
        // Enable edge-to-edge display. This must be called before calling super.onCreate().
        EdgeToEdge.enable(this);
        super.onCreate(savedInstanceState);

        binding = AutocompleteAddressActivityBinding.inflate(getLayoutInflater());
        setContentView(binding.getRoot());

        // Retrieve a PlacesClient (previously initialized - see MainActivity)
        placesClient = Places.createClient(this);

        // Attach an Autocomplete intent to the Address 1 EditText field
        binding.autocompleteAddress1.setOnClickListener(startAutocompleteIntentListener);

        // Update checkProximity when user checks the checkbox
        CheckBox checkProximityBox = findViewById(R.id.checkbox_proximity);
        checkProximityBox.setOnCheckedChangeListener((view, isChecked) -> {
            // Set the boolean to match user preference for when the Submit button is clicked
            checkProximity = isChecked;
        });

        // Submit and optionally check proximity
        Button saveButton = findViewById(R.id.autocomplete_save_button);
        saveButton.setOnClickListener(v -> saveForm());

        // Reset the form
        Button resetButton = findViewById(R.id.autocomplete_reset_button);
        resetButton.setOnClickListener(v -> clearForm());
    }

    private void startAutocompleteIntent() {

        // Set the fields to specify which types of place data to
        // return after the user has made a selection.
        List<Place.Field> fields = Arrays.asList(Place.Field.ADDRESS_COMPONENTS,
                Place.Field.LOCATION, Place.Field.VIEWPORT);

        // Build the autocomplete intent with field, country, and type filters applied
        Intent intent = new Autocomplete.IntentBuilder(AutocompleteActivityMode.OVERLAY, fields)
                .setCountries(List.of("US"))
                .setTypesFilter(List.of("establishment"))
                .build(this);
        startAutocomplete.launch(intent);
    }

    @Override
    public void onMapReady(@NonNull GoogleMap googleMap) {
        map = googleMap;
        try {
            // Customise the styling of the base map using a JSON object defined
            // in a string resource.
            boolean success = map.setMapStyle(
                    MapStyleOptions.loadRawResourceStyle(this, R.raw.style_json));

            if (!success) {
                Log.e(TAG, "Style parsing failed.");
            }
        } catch (Resources.NotFoundException e) {
            Log.e(TAG, "Can't find style. Error: ", e);
        }
        map.moveCamera(CameraUpdateFactory.newLatLngZoom(coordinates, 15f));
        marker = map.addMarker(new MarkerOptions().position(coordinates));
    }

    private void fillInAddress(Place place) {
        AddressComponents components = place.getAddressComponents();
        StringBuilder address1 = new StringBuilder();
        StringBuilder postcode = new StringBuilder();

        // Get each component of the address from the place details,
        // and then fill-in the corresponding field on the form.
        // Possible AddressComponent types are documented at https://goo.gle/32SJPM1
        if (components != null) {
            for (AddressComponent component : components.asList()) {
                String type = component.getTypes().get(0);
                switch (type) {
                    case "street_number": {
                        address1.insert(0, component.getName());
                        break;
                    }

                    case "route": {
                        address1.append(" ");
                        address1.append(component.getShortName());
                        break;
                    }

                    case "postal_code": {
                        postcode.insert(0, component.getName());
                        break;
                    }

                    case "postal_code_suffix": {
                        postcode.append("-").append(component.getName());
                        break;
                    }

                    case "locality":
                        binding.autocompleteCity.setText(component.getName());
                        break;

                    case "administrative_area_level_1": {
                        binding.autocompleteState.setText(component.getShortName());
                        break;
                    }

                    case "country":
                        binding.autocompleteCountry.setText(component.getName());
                        break;
                }
            }
        }

        binding.autocompleteAddress1.setText(address1.toString());
        binding.autocompletePostal.setText(postcode.toString());

        // After filling the form with address components from the Autocomplete
        // prediction, set cursor focus on the second address line to encourage
        // entry of sub-premise information such as apartment, unit, or floor number.
        binding.autocompleteAddress2.requestFocus();

        // Add a map for visual confirmation of the address
        showMap(place);
    }

    private void showMap(Place place) {
        coordinates = place.getLocation();

        // It isn't possible to set a fragment's id programmatically so we set a tag instead and
        // search for it using that.
        mapFragment = (SupportMapFragment)
                getSupportFragmentManager().findFragmentByTag(MAP_FRAGMENT_TAG);

        // We only create a fragment if it doesn't already exist.
        if (mapFragment == null) {
            mapPanel = ((ViewStub) findViewById(R.id.stub_map)).inflate();
            GoogleMapOptions mapOptions = new GoogleMapOptions();
            mapOptions.mapToolbarEnabled(false);

            // To programmatically add the map, we first create a SupportMapFragment.
            mapFragment = SupportMapFragment.newInstance(mapOptions);

            // Then we add it using a FragmentTransaction.
            getSupportFragmentManager()
                    .beginTransaction()
                    .add(R.id.confirmation_map, mapFragment, MAP_FRAGMENT_TAG)
                    .commit();
            mapFragment.getMapAsync(this);
        } else {
            updateMap(coordinates);
        }
    }

    private void updateMap(LatLng latLng) {
        marker.setPosition(latLng);
        map.moveCamera(CameraUpdateFactory.newLatLngZoom(latLng, 15f));
        if (mapPanel.getVisibility() == View.GONE) {
            mapPanel.setVisibility(View.VISIBLE);
        }
    }

    private void saveForm() {
        Log.d(TAG, "checkProximity = " + checkProximity);
        if (checkProximity) {
            checkLocationPermissions();
        } else {
            Toast.makeText(
                            this,
                            R.string.autocomplete_skipped_message,
                            Toast.LENGTH_SHORT)
                    .show();
        }
    }

    private void clearForm() {
        binding.autocompleteAddress1.setText("");
        binding.autocompleteAddress2.getText().clear();
        binding.autocompleteCity.getText().clear();
        binding.autocompleteState.getText().clear();
        binding.autocompletePostal.getText().clear();
        binding.autocompleteCountry.getText().clear();
        if (mapPanel != null) {
            mapPanel.setVisibility(View.GONE);
        }
        binding.autocompleteAddress1.requestFocus();
    }

    // Register the permissions callback, which handles the user's response to the
    // system permissions dialog. Save the return value, an instance of
    // ActivityResultLauncher, as an instance variable.
    private final ActivityResultLauncher<String> requestPermissionLauncher =
            registerForActivityResult(new ActivityResultContracts.RequestPermission(), isGranted -> {
                if (isGranted) {
                    // Since ACCESS_FINE_LOCATION is the only permission in this sample,
                    // run the location comparison task once permission is granted.
                    // Otherwise, check which permission is granted.
                    getAndCompareLocations();
                } else {
                    // Fallback behavior if user denies permission
                    Log.d(TAG, "User denied permission");
                }
            });

    private void checkLocationPermissions() {
        if (ContextCompat.checkSelfPermission(this, ACCESS_FINE_LOCATION)
                == PackageManager.PERMISSION_GRANTED) {
            getAndCompareLocations();
        } else {
            requestPermissionLauncher.launch(
                    ACCESS_FINE_LOCATION);
        }
    }

    @SuppressLint("MissingPermission")
    private void getAndCompareLocations() {
        // TODO: Detect and handle if user has entered or modified the address manually and update
        // the coordinates variable to the Lat/Lng of the manually entered address. May use
        // Geocoding API to convert the manually entered address to a Lat/Lng.
        LatLng enteredLocation = coordinates;
        map.setMyLocationEnabled(true);

        FusedLocationProviderClient fusedLocationClient =
                LocationServices.getFusedLocationProviderClient(this);

        fusedLocationClient.getLastLocation()
                .addOnSuccessListener(this, location -> {
                    // Got last known location. In some rare situations this can be null.
                    if (location == null) {
                        return;
                    }

                    deviceLocation = new LatLng(location.getLatitude(), location.getLongitude());
                    Log.d(TAG, "device location = " + deviceLocation);
                    Log.d(TAG, "entered location = " + enteredLocation.toString());

                    // Use the computeDistanceBetween function in the Maps SDK for Android Utility Library
                    // to use spherical geometry to compute the distance between two Lat/Lng points.
                    double distanceInMeters = computeDistanceBetween(deviceLocation, enteredLocation);
                    if (distanceInMeters <= acceptedProximity) {
                        Log.d(TAG, "location matched");
                        // TODO: Display UI based on the locations matching
                    } else {
                        Log.d(TAG, "location not matched");
                        // TODO: Display UI based on the locations not matching
                    }
                });
    }
}
فعال کردن APIها
برای اجرای این توصیهها، باید APIهای زیر را در کنسول Google Cloud فعال کنید:
- کیت توسعه نرمافزار نقشهها برای اندروید (یا API برای پلتفرم مورد نظر شما)
- API مکانها
برای اطلاعات بیشتر در مورد تنظیمات، به «راهاندازی پروژه Google Cloud خود» مراجعه کنید.
افزودن قابلیت تکمیل خودکار به فیلدهای ورودی
این بخش نحوه اضافه کردن قابلیت تکمیل خودکار مکان به فرم آدرس را توضیح میدهد.
افزودن ویجت تکمیل خودکار مکان
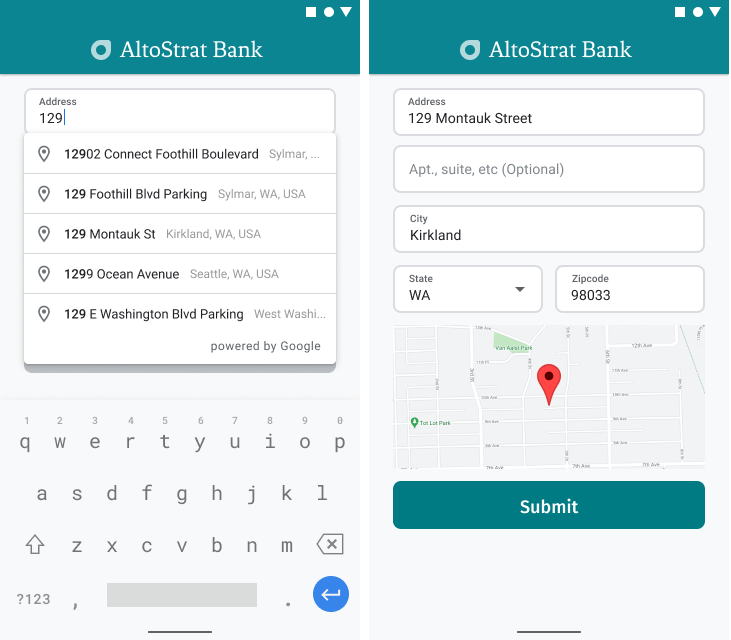
در اندروید، میتوانید ویجت تکمیل خودکار را با استفاده از یک Intent تکمیل خودکار اضافه کنید که Place Autocomplete را از فیلد ورودی Address Line 1 اجرا میکند، جایی که کاربر شروع به وارد کردن آدرس خود میکند. وقتی شروع به تایپ میکنند، میتوانند آدرس خود را از لیست پیشبینیهای تکمیل خودکار انتخاب کنند.
ابتدا، با استفاده از ActivityResultLauncher ، یک لانچر اکتیویتی آماده کنید که به نتیجهی اکتیویتیِ اجرا شده گوش میدهد. فراخوانیِ نتیجه شامل یک شیء Place خواهد بود که مربوط به آدرسی است که کاربر از پیشبینیهای تکمیل خودکار انتخاب میکند.
    private final ActivityResultLauncher<Intent> startAutocomplete = registerForActivityResult(
            new ActivityResultContracts.StartActivityForResult(),
            result -> {
                if (result.getResultCode() == Activity.RESULT_OK) {
                    Intent intent = result.getData();
                    if (intent != null) {
                        Place place = Autocomplete.getPlaceFromIntent(intent);

                        // Write a method to read the address components from the Place
                        // and populate the form with the address components
                        Log.d(TAG, "Place: " + place.getAddressComponents());
                        fillInAddress(place);
                    }
                } else if (result.getResultCode() == Activity.RESULT_CANCELED) {
                    // The user canceled the operation.
                    Log.i(TAG, "User canceled autocomplete");
                }
            });
در مرحله بعد، فیلدها، مکان و ویژگیهای نوعِ intent مربوط به Place Autocomplete را تعریف کرده و آن را با Autocomplete.IntentBuilder بسازید. در نهایت، intent را با استفاده از ActivityResultLauncher تعریف شده در نمونه کد قبلی، اجرا کنید.
    private void startAutocompleteIntent() {

        // Set the fields to specify which types of place data to
        // return after the user has made a selection.
        List<Place.Field> fields = Arrays.asList(Place.Field.ADDRESS_COMPONENTS,
                Place.Field.LOCATION, Place.Field.VIEWPORT);

        // Build the autocomplete intent with field, country, and type filters applied
        Intent intent = new Autocomplete.IntentBuilder(AutocompleteActivityMode.OVERLAY, fields)
                .setCountries(List.of("US"))
                .setTypesFilter(List.of("establishment"))
                .build(this);
        startAutocomplete.launch(intent);
    }
مدیریت آدرس برگردانده شده توسط Place Autocomplete
تعریف ActivityResultLauncher در مراحل قبل، کاری را که باید هنگام برگرداندن نتیجه activity در callback انجام شود، نیز تعریف کرد. اگر کاربر یک پیشبینی را انتخاب کند، آن پیشبینی در intent موجود در شیء result ارائه خواهد شد. از آنجایی که intent توسط Autocomplete.IntentBuilder ساخته شده است، متد Autocomplete.getPlaceFromIntent() میتواند شیء Place را از آن استخراج کند.
    private final ActivityResultLauncher<Intent> startAutocomplete = registerForActivityResult(
            new ActivityResultContracts.StartActivityForResult(),
            result -> {
                if (result.getResultCode() == Activity.RESULT_OK) {
                    Intent intent = result.getData();
                    if (intent != null) {
                        Place place = Autocomplete.getPlaceFromIntent(intent);

                        // Write a method to read the address components from the Place
                        // and populate the form with the address components
                        Log.d(TAG, "Place: " + place.getAddressComponents());
                        fillInAddress(place);
                    }
                } else if (result.getResultCode() == Activity.RESULT_CANCELED) {
                    // The user canceled the operation.
                    Log.i(TAG, "User canceled autocomplete");
                }
            });
از آنجا، Place.getAddressComponents() را فراخوانی کنید و هر جزء آدرس را با فیلد ورودی مربوطه در فرم آدرس مطابقت دهید و فیلد را با مقداری از Place انتخاب شده توسط کاربر پر کنید.
یک نمونه پیادهسازی برای پر کردن فیلدهای فرم آدرس در متد fillInAddress از نمونه کد ارائه شده در بخش Get the code این صفحه به اشتراک گذاشته شده است.
دریافت دادههای آدرس از پیشبینی به جای آدرسی که به صورت دستی وارد شده است، به اطمینان از صحت آدرس کمک میکند، تضمین میکند که آدرس شناخته شده و قابل تحویل است و تعداد دفعات فشردن کلید توسط کاربر را کاهش میدهد.
ملاحظات هنگام پیادهسازی تکمیل خودکار مکان
تکمیل خودکار مکان تعدادی گزینه دارد که به آن اجازه میدهد در پیادهسازی خود انعطافپذیر باشد، اگر میخواهید از چیزی بیش از یک ویجت استفاده کنید. میتوانید از ترکیبی از سرویسها استفاده کنید تا دقیقاً همان چیزی را که برای تطبیق صحیح یک مکان نیاز دارید، به دست آورید.
برای فرم ADDRESS، پارامتر types را روی
addressتنظیم کنید تا تطابقها به آدرسهای کامل خیابان محدود شود. درباره typeهای پشتیبانیشده در درخواستهای Place Autocomplete بیشتر بدانید.اگر نیازی به جستجو در سراسر جهان ندارید، محدودیتها و بایاسهای مناسب را تنظیم کنید. تعدادی پارامتر وجود دارد که میتوان از آنها برای بایاس یا محدود کردن هر تطبیقی فقط به مناطق خاص استفاده کرد.
RectangularBoundsبرای تعیین مرزهای مستطیلی جهت محدود کردن یک ناحیه استفاده کنید، ازsetLocationRestriction()برای اطمینان از اینکه فقط آدرسهای موجود در آن نواحی بازگردانده میشوند، استفاده کنید.برای محدود کردن پاسخها به مجموعهای خاص از کشورها،
setCountries()استفاده کنید.
در صورت از قلم افتادن فیلدهای خاص در تطابق، فیلدها را قابل ویرایش بگذارید و به مشتریان اجازه دهید در صورت لزوم آدرس را بهروزرسانی کنند. از آنجایی که اکثر آدرسهای برگردانده شده توسط Place Autocomplete حاوی شمارههای فرعی مانند شماره آپارتمان، سوئیت یا واحد نیستند، میتوانید فوکوس را به خط ۲ آدرس منتقل کنید تا کاربر را تشویق کنید که در صورت لزوم آن اطلاعات را پر کند.
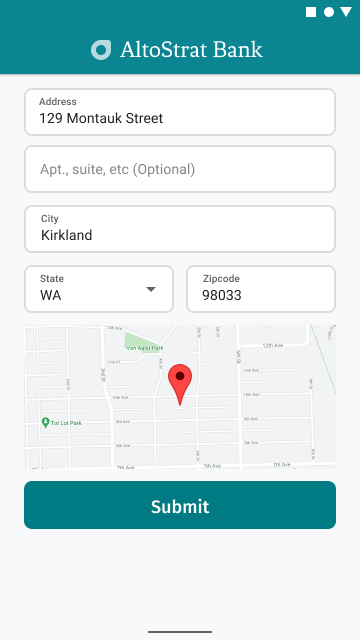
ارائه تاییدیه تصویری از آدرس
به عنوان بخشی از فرآیند وارد کردن آدرس، تأیید بصری آدرس روی نقشه را در اختیار کاربران قرار دهید. این کار به کاربران اطمینان بیشتری میدهد که آدرس صحیح است.
شکل زیر نقشهای را در زیر آدرس نشان میدهد که در آدرس وارد شده یک پین وجود دارد.
مثال زیر مراحل اولیه اضافه کردن نقشه در اندروید را دنبال میکند. برای جزئیات بیشتر به مستندات مراجعه کنید.
- اضافه کردن
SupportMapFragment(در این مورد، اضافه کردن یک فرگمنت به صورت پویا) - دریافت یک هندل برای فرگمنت و ثبت فراخوانی برگشتی
- استایلدهی و افزودن نشانگر به نقشه
- غیرفعال کردن کنترلهای نقشه
افزودن SupportMapFragment
ابتدا، یک قطعه کد SupportMapFragment به فایل XML طرحبندی اضافه کنید.
    <fragment
        android:name="com.google.android.gms.maps.SupportMapFragment"
        android:id="@+id/confirmation_map"
        android:layout_width="match_parent"
        android:layout_height="match_parent"/>
سپس، اگر هنوز قطعه کدی وجود ندارد، آن را به صورت برنامهنویسی شده اضافه کنید.
    private void showMap(Place place) {
        coordinates = place.getLocation();

        // It isn't possible to set a fragment's id programmatically so we set a tag instead and
        // search for it using that.
        mapFragment = (SupportMapFragment)
                getSupportFragmentManager().findFragmentByTag(MAP_FRAGMENT_TAG);

        // We only create a fragment if it doesn't already exist.
        if (mapFragment == null) {
            mapPanel = ((ViewStub) findViewById(R.id.stub_map)).inflate();
            GoogleMapOptions mapOptions = new GoogleMapOptions();
            mapOptions.mapToolbarEnabled(false);

            // To programmatically add the map, we first create a SupportMapFragment.
            mapFragment = SupportMapFragment.newInstance(mapOptions);

            // Then we add it using a FragmentTransaction.
            getSupportFragmentManager()
                    .beginTransaction()
                    .add(R.id.confirmation_map, mapFragment, MAP_FRAGMENT_TAG)
                    .commit();
            mapFragment.getMapAsync(this);
        } else {
            updateMap(coordinates);
        }
    }
دریافت یک هندل برای فرگمنت و ثبت فراخوانی برگشتی
برای دریافت یک هندل به فرگمنت، متد
FragmentManager.findFragmentByIdرا فراخوانی کنید و شناسه منبع فرگمنت را در فایل layout خود به آن ارسال کنید. اگر فرگمنت را به صورت پویا اضافه کردهاید ، از این مرحله صرف نظر کنید زیرا قبلاً هندل را بازیابی کردهاید.برای تنظیم callback روی فرگمنت، متد
getMapAsyncرا فراخوانی کنید.
برای مثال، اگر قطعه را به صورت ایستا اضافه کرده باشید:
کاتلین
val mapFragment = supportFragmentManager
    .findFragmentById(R.id.map) as SupportMapFragment
mapFragment.getMapAsync(this)
جاوا
SupportMapFragment mapFragment = (SupportMapFragment) getSupportFragmentManager()
    .findFragmentById(R.id.map);
mapFragment.getMapAsync(this);
استایلدهی و افزودن نشانگر به نقشه
وقتی نقشه آماده شد، سبک را تنظیم کنید، دوربین را در مرکز قرار دهید و یک نشانگر در مختصات آدرس وارد شده اضافه کنید. کد زیر از سبکبندی تعریفشده در یک شیء JSON استفاده میکند یا میتوانید بهطور جایگزین، شناسه نقشهای را که با Cloud-based Maps Styling تعریف شده است، بارگذاری کنید.
    @Override
    public void onMapReady(@NonNull GoogleMap googleMap) {
        map = googleMap;
        try {
            // Customise the styling of the base map using a JSON object defined
            // in a string resource.
            boolean success = map.setMapStyle(
                    MapStyleOptions.loadRawResourceStyle(this, R.raw.style_json));

            if (!success) {
                Log.e(TAG, "Style parsing failed.");
            }
        } catch (Resources.NotFoundException e) {
            Log.e(TAG, "Can't find style. Error: ", e);
        }
        map.moveCamera(CameraUpdateFactory.newLatLngZoom(coordinates, 15f));
        marker = map.addMarker(new MarkerOptions().position(coordinates));
    }
غیرفعال کردن کنترلهای نقشه
برای ساده نگه داشتن نقشه با نمایش مکان بدون کنترلهای اضافی نقشه (مانند قطبنما، نوار ابزار یا سایر ویژگیهای داخلی)، غیرفعال کردن کنترلهایی را که ضروری نمیدانید در نظر بگیرید. در اندروید، گزینه دیگر فعال کردن حالت ساده (lite mode) برای ارائه تعامل محدود است.