
Working with data in the Google Health API is at its core a cycle of syncing data between the Google Health API datastore in the cloud and your own app or backend datastore. However, this cycle can take different forms depending on a variety of factors:
- Are you writing data to the Google Health API? Reading only? Or doing both?
- Is your datastore local on the app or device? Or in your own cloud?
- Do you need to sync Google Health API data between the user's app and a wearable device? How often do you sync devices?
- What types of data are you working with? Basic counts? Units of measurement? Series with different rates of sampling?
- Do you plan to read data while your app is in the background?
- Do you plan to work with historical data recorded prior to your app receiving user permissions?
To understand how this all fits together, take a look at the Google Health API sync lifecycle. There are two versions of this lifecycle: standard (read and write) and read-only.
The standard sync lifecycle
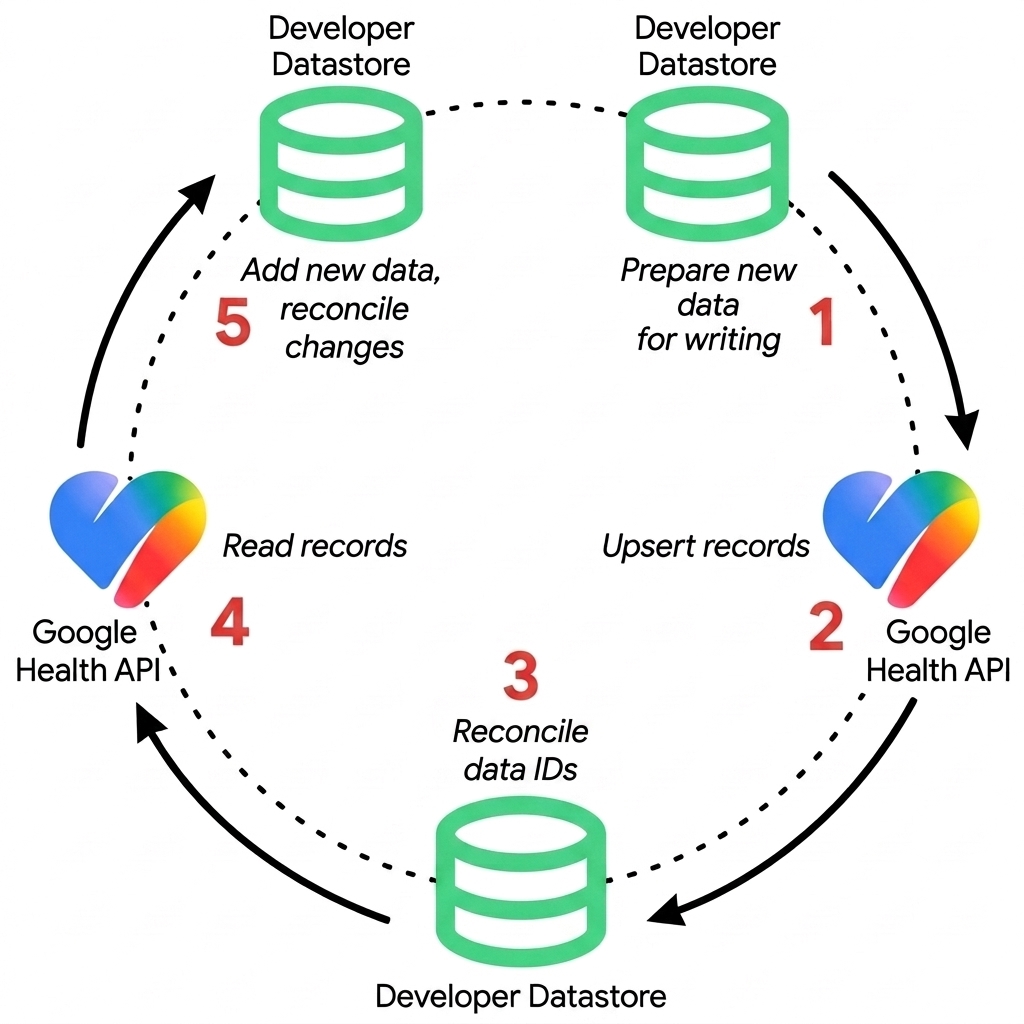
Integrating with the Google Health API means copying data to an app or backend datastore. For ease of use in this documentation, we'll call this datastore the developer datastore.
"Copy" here can take the place of any discrete activity, such as reading from the Google Health API (copying to the developer datastore) or writing to the Google Health API (copying to the Google Health API). Performing these actions repeatedly in a specific order is the sync lifecycle.
Figure 1 illustrates the standard sync lifecycle that involves read and write operations, without regard to any of the factors previously mentioned.
Write
- Prepare new data for writing — Transfer data from an external device or
app and format data points into JSON representations compatible with Google
Health API data types. Note that custom client-assigned IDs for writes are
not supported in the Health API at this time. Such IDs may be provided in a
POST, but they are ignored. - Upsert records — Submit data points to the Google Health API using
REST endpoints. Use
POSTfor creating records, andPATCHfor inserting and updating existing records. The IDs needed for thePATCHoperation will have come from a previousPOSToperation (next step in a previous cycle). - Process returned resource IDs — When using server-generated IDs, extract
and persist the server-returned resource
nameor ID in your developer datastore to enable future updates (PATCH) or deletions (DELETE). See Identification strategies for more information on the two types.
Read
- Read records — Fetch new data from and changes to existing data in the
Google Health API using REST endpoints (
GETwithfilterquery parameters andpageTokenpagination, or aggregation endpoints likerollUpanddailyRollUp), or receive real-time notifications using Webhook Subscriptions (projects.subscribers). A notification only indicates that new data is available, not what the actual data is. - Reconcile developer datastore — Reconcile the new and updated data to your developer datastore. Connected devices can produce overlapping intervals during syncs. To learn how the Google Health API resolves them, see Interval timestamps and connected device syncing.
This cycle then repeats at appropriate intervals according to the specific needs of external devices or apps. This is generally the order we recommend for syncing data between your own datastore and the Google Health API.
Identification strategies
If you intend to write data to the Google Health API, prior to building your integration with the Google Health APIs, you must choose a resource identification strategy when creating data points (the basic unit of data).
Client-assigned IDs for writes are not supported in the Health API at this time.
Such IDs may be provided in a POST, but they are ignored. Details on this
option are provided here for informational purposes.
- Server-Generated IDs (default option): The client submits data without an ID, and the Google Health API backend generates and returns a unique system identifier.
- Client-Assigned Custom IDs (per AIP-133, not yet supported): The client app generates a unique identifier (for example, a UUID or local database primary key) and supplies it in the resource path upon creation.
The following table compares both identification strategies to help you choose the right approach for your integration:
| Feature | Server-Generated IDs | Client-Assigned Custom IDs |
|---|---|---|
| ID Generation | Server generates random system ID during POST
execution. |
Client generates stable ID locally (UUID v4 / internal PK) before write. |
| Resource Path | .../dataPoints/{server_id} (returned in response) |
.../dataPoints/{custom_id} |
| Post-Write Local Step | Required. Must store returned server_id in local
DB to enable future updates/deletions. |
None. App already owns the ID. |
| ID Mapping Table | Required. Client must maintain a 2-way mapping
(local_id ↔ server_id). |
Not needed. Client uses its own primary key directly. |
| Retry Behavior (Weak Network) | Risk of Duplicates. Retrying a timed-out POST
creates a duplicate record with a new server ID. |
Safe & Idempotent. Retrying POST with the same
custom_id prevents duplicate creation (returns 409
ALREADY_EXISTS). |
| Offline Sync Support | Limited. Must wait for server response to obtain official resource IDs before referencing them. | Full. Entities can be created and mutated offline with stable IDs, then synced seamlessly when reconnected. |
| Format Constraints | Handled entirely by the server. | Must follow ^[a-z0-9-]{4,63}$ (4–63 lowercase
alphanumeric & hyphens). |
| When to Choose |
Choose server-generated IDs if:
|
Choose custom IDs if:
|
The read-only sync lifecycle
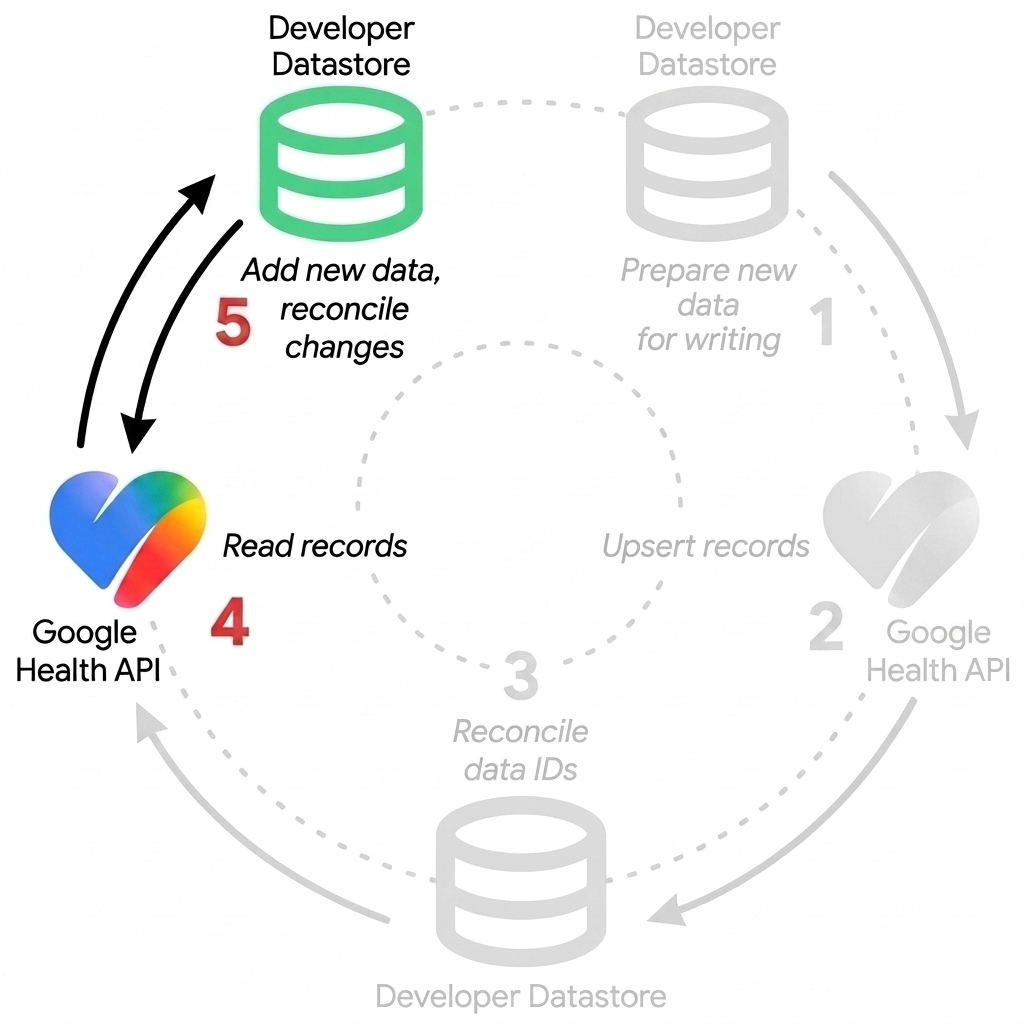
An app that intends to only read from the Google Health API must copy data to their developer datastore and handle the reconciliation portion of the lifecycle.
The same tasks covered in the Read section apply here.
Figure 2 illustrates the read-only lifecycle.
Interval timestamps and connected device syncing
Interval data represents measurements collected over a duration of time, such as steps, heart rate, or exercise sessions. In contrast, point-in-time measurements include manual entries like a food log or scale reading. Interval data typically originates from syncing connected devices, such as smartwatches and fitness trackers.
Interval timestamps (startTime and endTime in REST JSON payloads, or
start_time and end_time in filter expressions and gRPC) introduce unique
behaviors when working with interval data. This section explains why overlapping
intervals occur and compares the list and reconcile endpoints.
Overlapping intervals from connected devices
Connected devices like Fitbit trackers and Google Pixel Watch continuously collect high-frequency biometric readings while worn. After a device syncs data points to Google Health, it does not retroactively alter those existing records. Their stored interval timestamps remain unchanged.
However, before subsequent sync cycles, on-device algorithms often re-interpret raw sensor telemetry. The device re-buckets readings collected over preceding hours. When the device syncs again, it uploads new data points. Their start and end boundaries can overlap with previously stored intervals.
For example, consider a user wearing a smartwatch whose activity data is synced in two consecutive batches:
- During the first sync, the device uploads a data point covering
10:00:00Zto10:14:59Z. - Following on-device recalculation, a second sync uploads another data point
covering
10:14:00Zto10:28:59Z.
Both records are stored independently in the Google Health backend. As a
result, both data points cover the interval from 10:14:00Z to 10:14:59Z.
This produces a 59-second overlap when querying raw records.
Compare list and reconcile endpoints
You can handle these overlapping intervals using either the list or
reconcile endpoint. Choose the endpoint that matches your application
requirements:
| Feature | list endpoint |
reconcile endpoint |
|---|---|---|
| HTTP method | GET https://health.googleapis.com/v4/users/me/dataTypes/dataType/dataPoints |
GET https://health.googleapis.com/v4/users/me/dataTypes/dataType/dataPoints:reconcile |
| Overlap behavior | Returns all stored records as uploaded without deduplication. When intervals overlap, both records are returned. | Resolves conflicts and deduplicates overlapping records across devices and sync sessions into a single continuous stream. |
| Advantages | Provides a complete, unmodified audit trail of every record uploaded by each device and sync batch. | Simplifies timeline rendering and duration calculations by automatically handling overlapping intervals and multi-device conflicts. |
| Disadvantages | Your application is responsible for detecting and resolving overlapping intervals, multi-device conflicts, and off-wrist periods. | Subordinate overlapping records are omitted from the response, so individual device sync batches cannot be audited in isolation. |
The reconcile endpoint is designed for drawing user interfaces, rendering
activity timelines, and computing non-overlapping duration totals. It resolves
conflicting intervals from re-bucketed sync sessions. It also reconciles
activity logged simultaneously across multiple devices, such as a watch and a
phone.
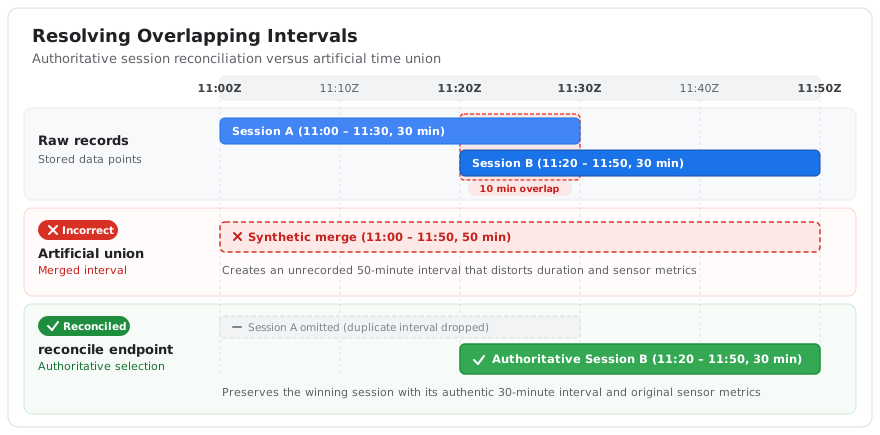
Reconciliation resolves conflicting sessions by selecting the authoritative
record rather than synthesizing an artificial time union. For example, it does
not merge 11:00:00Z to 11:30:00Z and 11:20:00Z to 11:50:00Z into
11:00:00Z to 11:50:00Z. The reconciled response returns the winning data
point with its original recorded interval. This preserves the integrity of
that session's measured telemetry and metrics.
Figure 3 illustrates how the reconcile endpoint handles overlapping sessions.
It selects the authoritative record rather than creating an artificial time
union.
The Endpoints guide provides complete request and response examples. To compare
raw list records with reconcile output, see
Get a reconciled view of interval data.
The list endpoint is designed for device diagnostics and data audits. Use it
when your workflow requires inspecting unmodified records as uploaded by each
device. When querying with list, your client logic must handle any interval
overlaps in the raw data.
Timestamp mutability and owner updates
Connected devices don't retroactively modify stored timestamps during normal
sync cycles. However, interval timestamps (startTime and endTime in REST
JSON payloads, or start_time and end_time in filter expressions and gRPC)
are not universally immutable across all data sources. Only the original
creator or owner of a record can modify its fields. Other applications cannot
edit data points they did not create.
An owner application can use the
patch endpoint to
update its existing records. This includes modifying start or end timestamps,
which updates both the UTC (startTime and endTime) and civil time
(civilStartTime and civilEndTime) fields on the server. For an example of
updating timestamps with PATCH, see
Update interval timestamps for existing data
in the Endpoints guide.
Similarly, data points synced from external platforms like Health Connect or partner apps inherit updates from the originating source. If Health Connect subsequently receives an update for a synced record from the original third-party app, those changes propagate and overwrite the existing record.