
Page Summary
-
Google Ads scripts can integrate with third-party APIs using
UrlFetchAppto fetch and post data. -
Authentication methods like HTTP Basic Authentication, OAuth 1.0, OAuth 2.0, and service accounts are used to securely access third-party APIs.
-
Parsing responses from APIs, typically in JSON or XML formats, is crucial for using the returned data within scripts, with built-in methods like
JSON.parseandXmlService.parseavailable. -
Robust error handling, including checking HTTP status codes and validating response structures, is essential when working with third-party APIs due to their dynamic nature.
-
Troubleshooting involves inspecting requests and responses, with utility functions available to help debug common issues like incorrect formatting, authorization problems, or resource not found errors.
A powerful feature of Google Ads scripts is the ability to integrate with data and services from third-party APIs.
This guide covers the following concepts that can help you write scripts to connect to other services:
- Making HTTP requests: How to use
UrlFetchAppto access external APIs. - Authentication: We cover some common authentication scenarios.
- Parsing responses: How to process returned JSON and XML data.
We also include samples for a number of popular APIs that illustrate these concepts.
Fetch data with UrlFetchApp
UrlFetchApp provides the
core functionality required for interacting with third-party APIs.
The following example shows fetching weather data from OpenWeatherMap. We chose OpenWeatherMap due to its relatively straightforward authorization scheme and API.
Make a request
The OpenWeatherMap documentation specifies the format for requesting the current weather as follows:
http://api.openweathermap.org/data/2.5/weather?q=[location]&apikey=[apikey]
The URL provides our first example of authorization: The parameter apikey is
required, and the value is unique to each user. This key is obtained through
signing up.
After signup, a request using the key can be issued as follows:
const location = 'London,uk';
const apikey = 'da.......................81'; // Replace with your API key
const currentWeatherUrl = `http://api.openweathermap.org/data/2.5/weather?q=${location}&apiKey=${apiKey}`;
const response = UrlFetchApp.fetch(currentWeatherUrl);
console.log(response.getContentText());
Executing this code results in a long string of JSON text written to the logging window in Google Ads scripts.
The next step is converting this to a format that can be used within your script.
JSON data
Many APIs provide responses in JSON format. This represents a serialization of JavaScript objects, such that objects, arrays, and basic types can be represented and transferred as strings.
To convert a JSON string — like the one returned from
OpenWeatherMap—back into a JavaScript object, use the built-in
JSON.parse method. Continuing from the example from before:
const json = response.getContentText();
const weatherData = JSON.parse(json);
console.log(weatherData.name);
//  "London"
The JSON.parse method converts the string to an object, which has a property
name.
See the Parse responses section for more details on working with API responses in different formats.
Error handling
Error handling is an important consideration when working with third-party APIs in your scripts because third-party APIs often change frequently and generate unexpected response values, for example:
- The URL or parameters for the API can change without your knowledge.
- Your API key (or other user credential) can expire.
- The format of the response can change without notice.
HTTP status codes
Due to the potential for unexpected responses, you should inspect the HTTP
status code. By default,
UrlFetchApp will throw an exception if an HTTP error code is encountered. To
change this behavior, it's necessary to pass an optional parameter, as in the
following example:
const options = {
  muteHttpExceptions: true
}
const response = UrlFetchApp.fetch(url, options);
// Any status code greater or equal to 400 is either a client or server error.
if (response.getResponseCode() >= 400) {
  // Error encountered, send an email alert to the developer
  sendFailureEmail();
}
Response structure
When third-party APIs change, you may not immediately be aware of changes that
might affect your scripts. For example, if the name property returned in the
OpenWeatherMap example is changed to locationName, scripts using this property
will fail.
For this reason it can be beneficial to test whether the structure returned is as expected, for example:
const weatherData = JSON.parse(json);
if (weatherData && weatherData.name) {
  console.log('Location is : ' + name);
} else {
  console.log('Data not in expected format');
}
POST data with UrlFetchApp
The introductory example with OpenWeatherMap
only fetched data. Typically, API calls that don't change state at the remote
server use the HTTP
GET
method.
The GET method is the default for UrlFetchApp. However, some API calls, such
as calls to a service that sends SMS messages, will require other methods, like
POST or PUT.
To illustrate using POST calls with UrlFetchApp, the following example
demonstrates integration with Slack, a collaborative messaging
application, to send a Slack message to Slack users and groups.
Set up Slack
This guide assumes you've already signed up for a Slack account.
As with OpenWeatherMap in the previous example, it's necessary to obtain a token to enable sending messages. Slack provides a unique URL to allow you to send messages to your team, called an Incoming Webhook.
Set up a Incoming Webhook by clicking on Add Incoming WebHooks Integration and following the instructions. The process should issue a URL to use for messaging.
Make a POST request
Having set up your Incoming Webhook, making a POST request requires the use of
some extra properties in the options parameter passed to UrlFetchApp.fetch:
method: As mentioned, this defaults toGET, but here we override it and set it toPOST.payload: This is the data to be sent to the server as part of thePOSTrequest. In this example, Slack expects an object serialized to JSON format as described in the Slack documentation. For this, the [JSON.stringify][json-stringify-url] method is used, and theContent-Typeis set toapplication/json.// Change the URL for the one issued to you from 'Setting up Slack'. const SLACK_URL = 'https://hooks.slack.com/services/AAAA/BBBB/CCCCCCCCCC'; const slackMessage = { text: 'Hello, slack!' }; const options = { method: 'POST', contentType: 'application/json', payload: JSON.stringify(slackMessage) }; UrlFetchApp.fetch(SLACK_URL, options);
Extended Slack example
The previous example shows the minimum code needed to enable incoming messages into Slack. An extended sample illustrates the creation and sending of a Campaign Performance Report to a group, as well as some formatting and display options.

See message formatting in the Slack documentation for more details on Slack messages.
Form data
The previous example demonstrated using a JSON string as the payload property
for the POST request.
Depending on the format of payload, UrlFetchApp takes different approaches
to constructing the POST request:
- When
payloadis a string, the string argument is sent as the body of the request. When
payloadis an object, for example a map of values:{to: 'mail@example.com', subject:'Test', body:'Hello, World!'}The key-value pairs are converted to form-data:
subject=Test&to=mail@example.com&body=Hello,+World!Also the
Content-Typeheader for the request is set toapplication/x-www-form-urlencoded.
Some APIs require the use of form data when submitting POST requests, so this automatic conversion from JavaScript objects to form data is useful to bear in mind.
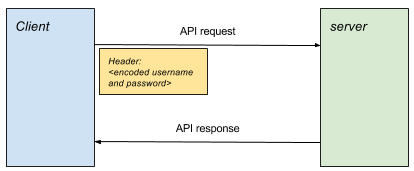
HTTP basic authentication
HTTP basic authentication is one of the simplest forms of authentication and is used by many APIs.
Authentication is achieved by attaching an encoded username and password to the HTTP headers in each request.
Construct a request
The following steps are required to produce an authenticated request:
- Form the passphrase by joining together the username and password with a
colon, for example
username:password. - Base64 encode the passphrase, for example
username:passwordbecomesdXNlcm5hbWU6cGFzc3dvcmQ=. - Attach an
Authorizationheader to the request, in the formAuthorization: Basic <encoded passphrase>
The following snippet illustrates how to achieve this in Google Ads scripts:
const USERNAME = 'your_username';
const PASSWORD = 'your_password';
const API_URL = 'http://<place_api_url_here>';

const authHeader = 'Basic ' + Utilities.base64Encode(USERNAME + ':' + PASSWORD);
const options = {
  headers: {Authorization: authHeader}
}
// Include 'options' object in every request
const response = UrlFetchApp.fetch(API_URL, options);
Basic authentication samples
The code samples section contains two samples that illustrate using HTTP Basic Authentication:
Plivo
Plivo is a service that facilitates the sending and receiving of SMS messages with their API. This sample illustrates sending messages.
- Register with Plivo.
- Paste the sample script into a new script in Google Ads.
- Replace
PLIVO_ACCOUNT_AUTHIDandPLIVO_ACCOUNT_AUTHTOKENvalues with the values from the management dashboard. - Insert your email address as specified in the script for notification of errors.
- To use Plivo, you must either purchase numbers or add numbers to the trial account. Add Sandbox numbers that can be used with the trial account.
- Add both the number that will appear as the sender, and the recipient number.
- Update
PLIVO_SRC_PHONE_NUMBERin the script to one of the sandbox numbers just registered. This should include the international country code, for example447777123456for a UK number.
Twilio
Twilio is another service that facilitates the sending and receiving of SMS messages with their API. This sample illustrates sending messages.
- Register with Twillio.
- Paste the sample script into a new script in Google Ads.
- Replace
TWILIO_ACCOUNT_SIDandTWILIO_ACCOUNT_AUTHTOKENvalues with the values shown on the account console page. - Replace
TWILIO_SRC_PHONE_NUMBERwith the number from the dashboard--this is the number authorized by Twilio to send messages.
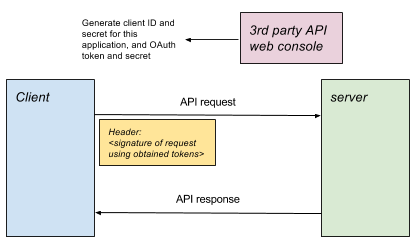
OAuth 1.0
Many popular services use OAuth for authentication. OAuth comes in a number of flavors and versions.
Whereas with HTTP basic authentication, a user has only one username and password, OAuth allows third-party applications to be granted access to a user's account and data, using credentials specific to that third-party application. In addition, the extent of the access will also be specific to that application.
For background on OAuth 1.0, see the OAuth Core guide. In particular, see 6. Authenticating with OAuth. In full three-legged OAuth 1.0, the process is as follows:
- The application ("Consumer") obtains a request token.
- The user authorizes the request token.
- The application exchanges the request token for an access token.
- For all subsequent resource requests, the access token is used in a signed request.
For third-party services to use OAuth 1.0 without user-interaction (for example as Google Ads scripts would require) steps 1, 2, and 3 are not possible. Therefore, some services issue an access token from their configuration console, allowing the application to go to step 4 directly. This is known as one-legged OAuth 1.0.
OAuth 1.0 in Google Ads scripts
For Google Ads scripts, each script is usually interpreted as an application. Through the console or administration settings page for the service, it is usually necessary to:
- Set up an application configuration, to represent the script.
- Specify what permissions are being extended to the script.
- Obtain Consumer key, Consumer secret, access token, and access secret for use with one-legged OAuth.
OAuth 2.0
OAuth 2.0 is used in popular APIs to provide access to user data. The owner of an account for a given third-party service grants permission to specific applications to allow them to access user data. The advantages are that the owner:
- Does not have to share their account credentials with the application.
- Can control which applications have access to the data individually, and to what extent. (For example, the access granted may be read-only, or only to a subset of the data.)
To use OAuth 2.0-enabled services in Google Ads scripts, there are several steps:
- Outside of your script
Grant authorization for Google Ads scripts to access your user data via the third party API. In most cases this will involve setting up an application in the console of the third-party service. This application represents your script.
You specify which access rights the Google Ads scripts application should be given, and it will usually be assigned a client ID. This allows you, through OAuth 2.0 to control which applications have access to your data in the third-party service, and also, which aspects of that data they can see or modify.
- In your script
Authorize with the remote server. Depending on the grant type the server has allowed, a different set of steps, known as a flow will need to be followed, but all will result ultimately in an access token being issued that will be used for that session for all subsequent requests.
Make API requests. Pass the access token with each request.
Authorization flows
Each grant type and corresponding flow caters to different usage scenarios. For example, a different flow is used when a user is taking part in an interactive session, in contrast to a scenario where an application is required to run in the background without a user present.
API providers will decide on which grant types they accept, and this will guide how the user proceeds with integrating their API.
Implementation
For all the different OAuth flows, the aim is to obtain an access token which can then be used for the rest of the session to authenticate requests.
A sample library, illustrates how to authenticate for each different flow type. Each of these methods returns an object that obtains and stores the access token, and facilitates authenticated requests.
The general usage pattern is:
// Authenticate using chosen flow type
const urlFetchObj = OAuth2.<flow method>(args);
// Make request(s) using obtained object.
const response1 = urlFetchObj.fetch(url1);
const response2 = urlFetchObj.fetch(url2, options);
Client credentials grant
The [client credentials grant][client-credentials-rfc] is one of the simpler forms of OAuth2 flow, in which the application exchanges an ID and secret, unique to the application, in return for the issuance of a time-limited access token.

// Access token is obtained and cached.
const authUrlFetch = OAuth2.withClientCredentials(
    tokenUrl, clientId, clientSecret, optionalScope));
// Use access token in each request
const response = authUrlFetch.fetch(url);
// ... use response
Refresh token grant
The refresh token grant is similar to the client credentials grant, in that a request to the server will return an access token that can be used in the session.
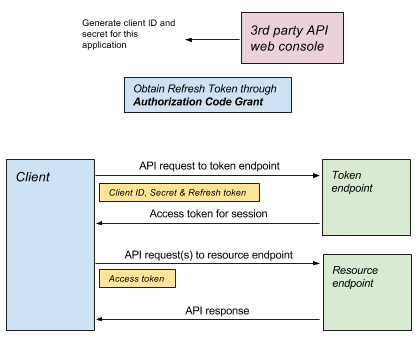
Obtain a refresh token
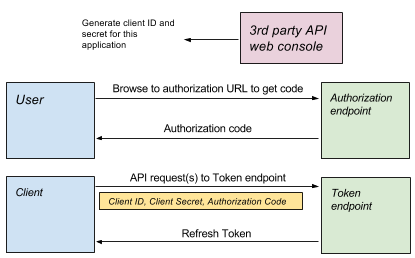
The difference with the refresh token grant is that whereas the details required for a client credentials grant come from the application configuration (for example, in the control panel of the service), the refresh token is granted as part of a more complex flow, such as an [authorization code grant][authorization-code-rfc], which will require user interaction:
- Using the OAuth Playground to obtain a refresh token
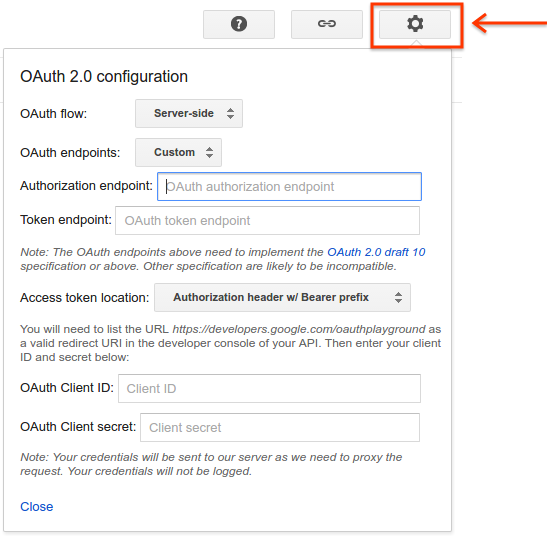
The OAuth2 playground provides a UI that allows the user to step through the authorization code grant to obtain a refresh token.
The settings button on the top right lets you define all the parameters to use in the OAuth flow, including:
- Authorization endpoint: Used as the start of the flow for authorization.
- Token endpoint: Used with the refresh token to obtain an access token.
client ID and secret: Credentials for the application.
Refresh token usage
Once the initial authorization has been performed, services can issue a refresh token which can then be used in a similar way to the client credentials flow:
const authUrlFetch = OAuth2.withRefreshToken(tokenUrl, clientId, clientSecret,
    refreshToken, optionalScope);
const response = authUrlFetch.fetch(url);
// ... use response
Search Ads 360 example
Search Ads 360 is an example of an API that can be used with a refresh token. In this sample, a script generates and returns a report. Consult the Search Ads 360 API reference for full details of other actions that can be performed.
Create the script
- Create a new project in the Google Cloud console, and obtain a client ID, client secret, and refresh token by following the procedure in the Search Ads 360 guide, ensuring that you enable the Search Ads 360 API.
- Paste the [sample script][search-ads-360-example] into a new script in Google Ads.
- Paste the [sample OAuth2 library][oauth20-library-example] beneath the code listing.
- Amend the script to contain the correct values for client ID, client secret, and refresh token.
Apps Script Execution API example
This example illustrates executing a function in Apps Script using the Apps Script Execution API. This lets you call Apps Script from Google Ads scripts.
Create an Apps Script script
Create a new script. The following sample will list 10 files from Drive:
function listFiles() {
  const limit = 10;
  const files = [];
  const fileIterator = DriveApp.getFiles();
  while (fileIterator.hasNext() && limit) {
    files.push(fileIterator.next().getName());
    limit--;
  }
  return files;
}
Configure Apps Script for execution
- Save the script.
- Click Resources > Cloud Platform project.
- Click the project name to navigate to the Google Cloud console.
- Navigate to APIs & Services.
- Enable the appropriate APIs, in this case the Drive API, and the Apps Script Execution API.
- Create OAuth credentials from the Credentials item in the menu.
- Back in your script, publish the script for execution from Publish > Deploy as API Executable.
Create the Google Ads script
- Paste the sample script into a new script in Google Ads.
- Additionally, paste the [sample OAuth2 library][oauth20-library-example] beneath the code listing.
- Amend the script to contain the correct values for client ID, client secret, and refresh token.
Service accounts
An alternative to grant types is the concept of service accounts.
Service accounts differ from grant types in that they aren't used to access user data: After authentication, requests are made by the Service Account on behalf of the application, not as the user who may own the project. For example, if the service account were to use the Drive API to create a file, this would belong to the service account, and by default wouldn't be accessible to the owner of the project.
Google natural language API example
The [natural language API][natural-language-api-docs] provides [sentiment analysis][sentiment-analysis-api-docs] and [entity analysis][entity-analysis-api-docs] for text.
This example illustrates calculating the [sentiment][sentiment-api-docs] for ad text—including headline or description. This provides a measure for how positive the message is and the magnitude of the message: Which is better, We sell cakes or We sell the best cakes in London. Buy today!?
Set up the script
- Create a new project in the Google Cloud console.
- Enable the [Natural Language API][natural-language-api].
- Enable billing for the project.
- [Create a Service Account][create-service-account]. Download the credentials JSON file.
- Paste the [sample script][natural-language-example] into a new script in Google Ads.
- Additionally, paste the [sample OAuth2 library][oauth20-library-example] beneath the code listing.
- Replace the necessary values:
serviceAccount: The email address of the Service Account, for examplexxxxx@yyyy.iam.gserviceaccount.com.key: The key from the JSON file downloaded when creating the Service Account. Starts-----BEGIN PRIVATE KEY...and ends...END PRIVATE KEY-----\n.
API responses
APIs can return data in a range of formats. The most notable of these are XML and JSON.
JSON
JSON is usually simpler than XML to work with as a response format. However, there are still some issues that can arise.
Response validation
Having obtained a successful response from the call to the API, the typical next
step is to use JSON.parse to convert the JSON string to a JavaScript object.
At this point, it's sensible to handle the case where the parsing
fails:
const json = response.getContentText();
try {
  const data = JSON.parse(json);
  return data;
} catch(e) {
  // Parsing of JSON failed - handle error.
}
Also, if the API is not under your control, consider that the structure of the response may change, and properties may not exist any more:
// Less good approach
// Assumes JSON was in form {"queryResponse": ...} when parsed.
const answer = data.queryResponse;

// Better approach
if (data && data.queryResponse) {
  const answer = data.queryResponse;
} else {
  // Format of API response has changed - alert developer or handle accordingly
}
XML
The XmlService allows your scripts to parse and extract data from XML response
bodies.
Validation
XML is still a popular format for building APIs. A response from an API call can
be parsed using the XmlService
parse
method:
const responseText = response.getContentText();
try {
  const document = XmlService.parse(responseText);
} catch(e) {
  // Error in XML representation - handle accordingly.
}
While XmlService.parse detects errors in the XML and throws exceptions
accordingly, it doesn't provide the ability to validate the XML against a
schema.
Root element
Given successful parsing of the XML document, the root element is obtained using
the getRootElement() method:
const document = XmlService.parse(responseText);
const rootElement = document.getRootElement();
Namespaces
In the following example, the Sportradar API is used to obtain soccer results for selected matches. The XML response takes the following format:
<schedule_schedules xmlns="http://schemas.sportradar.com/sportsapi/soccer/v4">
  <schedule>
     ...
  </schedule>
</schedule_schedules>
Note how the namespace is specified in the root element. Because of this, it's necessary to:
- Extract the namespace attribute from the document.
- Use this namespace when traversing and accessing child elements.
The following sample shows how to access the <schedule> element and search for
its <sport_event> child elements in the preceding document snippet:
const document = XmlService.parse(xmlText);
const rootElement = document.getRootElement();
// The namespace is required for accessing child elements in the schema.
const namespace = rootElement.getNamespace();
const scheduleElement = rootElement.getChild('schedule', namespace);
const sportEvents = scheduleElement.getChildren('sport_event', namespace);
Obtain values
Given the sample from the soccer schedule:
<sport_event_status status="..." ... />
Attributes can be retrieved, for example:
const statusElement = sportEventElement.getChild('sport_event_status', namespace);
const status = statusElement.getAttribute('status').getValue();
Text contained within an element can be read using getText(), but these will
be concatenated where there are multiple text children of an element. Consider
using getChildren() and iterating over each child in cases where multiple text
children are likely.
Sportradar example
This full Sportradar example illustrates retrieving details of soccer matches, specifically English Premier League matches. The Soccer API is one of a large range of sports feeds offered by Sportradar.
Set up a Sportradar account
- Navigate to the Sportradar developer site
- Register for a trial account.
- Having registered, sign in to your account.
- Once logged in, navigate to My Account.
Sportradar separates different sports into different APIs. For example, you might purchase access to the Soccer API but not the Tennis API. Each Application you create can have different sports associated with it, and different keys.
- Under Applications click Create a new Application. Give the application a name and description, and ignore the website field.
- Select only the Issue a new key for Soccer Trial Europe v2.
- Click Register Application.
Once successful, this should result in a page with your new API key on it.
- Paste the sample script into a new script in Google Ads.
- Replace the API key in the listing with the newly issued key, and edit the email address field.
Troubleshooting
Working with third-party APIs, errors can occur for a number of reasons, for example:
- Clients issuing requests to the server in a format not expected by the API.
- Clients expecting a response format different than the one encountered.
- Clients using invalid tokens or keys, or values left as placeholders.
- Clients hitting usage limits.
- Clients supplying invalid parameters.
In all of these cases, and others, a good first step in identifying the cause of the issue is to examine the detail of the response causing the error.
Parse responses
By default, any response that returns an error (a status code of 400 or over) will be thrown by the Google Ads scripts engine.
To prevent this behaviour, and to allow the error and error message to be
inspected, set the muteHttpExceptions property of the optional parameters to
UrlFetchApp.fetch. For example:
const params = {
  muteHttpExceptions: true
};
const response = UrlFetchApp.fetch(url, params);
if (response.getResponseCode() >= 400) {
  // ... inspect error details...
}
Common status codes
200 OKindicates success. If the response doesn't contain the expected data, consider that:- Some APIs allow specifying which fields, response format, or both, to use. Check the API documentation for detail on this.
- An API may have multiple resources that can be called. Consult the documentation to determine whether a different resource may be more appropriate to use, and will return the data you require.
- The API may have changed since the code was written. Consult the documentation or the developer for clarification.
400 Bad Requesttypically means that something is not correct in the formatting or structure of the request sent to the server. Inspect the request and compare it with the API specifications to ensure it conforms with expectations. See Inspect requests for details on how to examine the requests.401 Unauthorizedusually means the API is being called without providing or successfully performing authorization.- If the API uses basic authorization, make sure the
Authorizationheader is being constructed and supplied in the request. - If the API uses OAuth 2.0, make sure the access token has been obtained and is being supplied as a Bearer token.
- For any other variations on authorization, make sure the necessary credentials for the request are being supplied.
- If the API uses basic authorization, make sure the
403 Forbiddenindicates the user doesn't have permission for the resource being requested.- Ensure the user has been granted the necessary permissions, for example, giving the user access to a file in a file-based request.
404 Not Foundmeans the requested resource does not exist.- Check that the URL used for the API endpoint is correct.
- If fetching a resource, check that the resource being referenced exists (for example, if the file exists for a file-based API).
Inspect requests
Inspecting requests is useful when API responses indicate the request is badly
formed, for example, a 400 status code. To help examine requests, UrlFetchApp
has a companion method to the fetch() method, called getRequest(url,
params)
Instead of sending a request to the server, this method constructs the request that would have been sent and then returns it. This allows the user to inspect elements of the request to ensure the request looks correct.
For example, if form data in your request consists of many strings concatenated together, the error may lie in the function you created to generate that form data. At its simplest:
const request = UrlFetchApp.getRequest(url, params);
console.log(request);
// Now make the fetch:
const response = UrlFetchApp.fetch(url, params);
// ...
will allow you to inspect the elements of the request.
Log requests and responses
To assist with the entire process of inspecting requests and responses to a
third-party API, the following helper function can be used as a drop-in
replacement for UrlFetchApp.fetch(), to log both requests and responses.
Replace all instances of
UrlFetchApp.fetch()in your code withlogUrlFetch().Add the following function to the end of your script.
function logUrlFetch(url, opt_params) {
 const params = opt_params || {};
 params.muteHttpExceptions = true;
 const request = UrlFetchApp.getRequest(url, params);
 console.log('Request:       >>> ' + JSON.stringify(request));
 const response = UrlFetchApp.fetch(url, params);
 console.log('Response Code: <<< ' + response.getResponseCode());
 console.log('Response text: <<< ' + response.getContentText());
 if (response.getResponseCode() >= 400) {
   throw Error('Error in response: ' + response);
 }
 return response;
}
When executing your script, details of all requests and responses are logged to the console, allowing easier debugging.
[json-stringify-url]: //developer.mozilla.org/en/docs/Web/JavaScript/Reference/Global_Objects/JSON/stringify [client-credentials-rfc]: //datatracker.ietf.org/doc/html/rfc6749#section-4.4 [authorization-code-rfc]: //datatracker.ietf.org/doc/html/rfc6749#section-1.3.1 [oauth20-library-example]: /google-ads/scripts/docs/examples/oauth20-library [search-ads-360-example]: /google-ads/scripts/docs/examples/search-ads-360 [natural-language-api]: //console.developers.google.com/apis/api/language.googleapis.com/overview [create-service-account]: //console.developers.google.com/apis/credentials/serviceaccountkey [natural-language-example]: /google-ads/scripts/docs/examples/natural-language [natural-language-api-docs]: //cloud.google.com/natural-language/docs/ [sentiment-api-docs]: //cloud.google.com/natural-language/docs/reference/rest/v1beta2/Sentiment [sentiment-analysis-api-docs]: //cloud.google.com/natural-language/docs/analyzing-sentiment [entity-analysis-api-docs]: //cloud.google.com/natural-language/docs/analyzing-entities