您可以使用簡單的 REST API 插入、更新、讀取及刪除靜態資訊卡。此外,您也可以將物件附加至靜態資訊卡,例如地點或媒體。
運作方式
根據預設,靜態資訊卡會顯示在 Glass 時鐘的右側,並在送達時顯示與使用者相關的資訊。不過,這類資訊卡不像即時資訊卡一樣需要立即處理,使用者可以選擇在閒暇時閱讀或採取行動。

當 Glassware 將靜態資訊卡插入時間軸時,Glass 可能會播放通知音效來提醒使用者。所有先前的靜態資訊卡也會向右移動,並在 7 天後或有 200 張新卡片時從時間軸消失。
使用時機
當發生重要事件時,靜態資訊卡非常適合用來向使用者傳送週期性通知。例如,新聞傳送服務會在發生重大事件時傳送相關報導。Mirror API 靜態資訊卡也可以透過 OPEN_URI 選單項目啟動動態資訊卡或沉浸式體驗。您可以藉此建立混合式互動,利用靜態資訊卡做為通知,並使用即時資訊卡或沉浸式體驗,提供更具互動性的體驗。
如需時間軸項目可執行的完整作業清單,請參閱參考資料說明文件。
插入靜態卡片
如要插入靜態資訊卡 (時間軸項目),請將時間軸項目的 JSON 表示法 POST 至 REST 端點。
時間軸項目中的大部分欄位都是選填。最簡單的說法是,時間軸項目只包含簡短的訊息,例如:
原始 HTTP
POST /mirror/v1/timeline HTTP/1.1
Host: www.googleapis.com
Authorization: Bearer {auth token}
Content-Type: application/json
Content-Length: 26

{ "text": "Hello world" }
Java
TimelineItem timelineItem = new TimelineItem();
timelineItem.setText("Hello world");
service.timeline().insert(timelineItem).execute();
Python
timeline_item = {'text': 'Hello world'}
service.timeline().insert(body=timeline_item).execute()
成功後,您會收到 201 Created 回應代碼,以及所建立項目的完整副本。以上述範例來說,成功的回應可能如下所示:
原始 HTTP
HTTP/1.1 201 Created
Date: Tue, 25 Sep 2012 23:30:11 GMT
Content-Type: application/json
Content-Length: 303

{
 "kind": "glass#timelineItem",
 "id": "1234567890",
 "selfLink": "https://www.googleapis.com/mirror/v1/timeline/1234567890",
 "created": "2012-09-25T23:28:43.192Z",
 "updated": "2012-09-25T23:28:43.192Z",
 "etag": "\"G5BI0RWvj-0jWdBrdWrPZV7xPKw/t25selcGS3uDEVT6FB09hAG-QQ\"",
 "text": "Hello world"
}
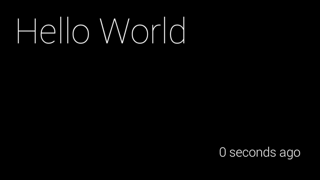
插入項目後,使用者時間軸會顯示如下:
插入含有附件的時間軸項目
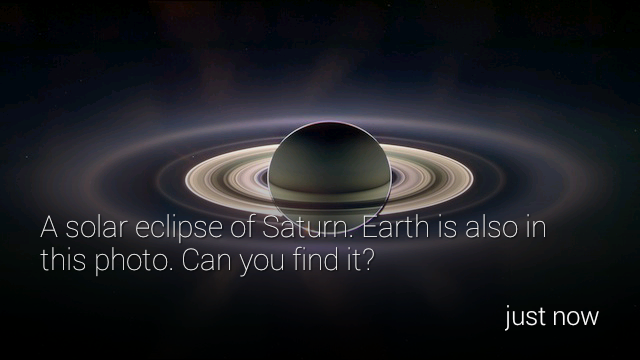
一張圖片勝過千言萬語,這比時間軸項目能容納的內容多得多。為此,您也可以在時間軸項目中附加圖片和影片。以下範例說明如何插入附有相片的動態消息項目:
原始 HTTP
POST /upload/mirror/v1/timeline HTTP/1.1
Host: www.googleapis.com
Authorization: Bearer {auth token}
Content-Type: multipart/related; boundary="mymultipartboundary"
Content-Length: {length}

--mymultipartboundary
Content-Type: application/json; charset=UTF-8

{ "text": "A solar eclipse of Saturn. Earth is also in this photo. Can you find it?" }
--mymultipartboundary
Content-Type: image/jpeg
Content-Transfer-Encoding: binary

[binary image data]
--mymultipartboundary--
Java
TimelineItem timelineItem = new TimelineItem();
timelineItem.setText("Hello world");
InputStreamContent mediaContent = new InputStreamContent(contentType, attachment);
service.timeline().insert(timelineItem, mediaContent).execute();
Python
timeline_item = {'text': 'Hello world'}
media_body = MediaIoBaseUpload(
    io.BytesIO(attachment), mimetype=content_type, resumable=True)
service.timeline().insert(body=timeline_item, media_body=media_body).execute()
在 Glass 上,附加圖片的時間軸項目如下所示:
附加影片
如果要在時間軸項目中附加影片檔案,建議您串流播放影片,而非一次上傳整個有效負載。Google Mirror API 支援使用 HTTP 即時串流、漸進式下載和即時串流通訊協定 (RTSP) 進行串流。防火牆經常會封鎖 RTSP,因此請盡可能使用其他選項。
如要串流播放影片,請使用 PLAY_VIDEO 內建選單項目,並將影片網址指定為選單項目的 payload。詳情請參閱「新增內建選單項目」和「支援的媒體格式」。
分頁
如果時間軸項目無法顯示在單一時間軸資訊卡上,但應與同一張資訊卡建立關聯,您可以將這些項目分頁顯示。分頁項目共用相同的 timeline.id,因此具有相同的選單項目。使用者輕觸分頁時間軸項目時,會顯示「閱讀更多」選單項目。
Glass 會自動將顯示 text 的時間軸項目分頁。如要讓 Glass 自動分頁 html,請使用 article 標記,並將其類別屬性設為 auto-paginate,如下例所示:
<article class="auto-paginate">
 <h3>Very long list</h3>
 <ul>
   <li>First item</li>
   <li>Second item</li>
   <li>Third item</li>
   <li>Fourth item</li>
   <li>Fifth item</li>
   <li>Sixth item</li>
   <li>...</li>
 </ul>
<article>
如要手動分頁,請針對要在每張資訊卡上顯示的內容使用 article 標記。Glass 會在個別的子時間軸資訊卡中顯示每個 article 標記的內容。舉例來說,您可以使用下列 HTML 建立分頁時間軸項目:
<article>
 <section>
   <p>First page</p>
 </section>
</article>

<article>
 <section>
   <p>Second page</p>
 </section>
</article>

<article>
 <section>
   <p>Third page</p>
 </section>
</article>
根據預設,分頁時間軸項目的第一張資訊卡會顯示為封面資訊卡,使用者選取「閱讀更多」選單項目時,系統也會再次顯示這張資訊卡。如要避免在輕觸「瞭解詳情」後再次顯示第一張資訊卡,可以為第一個 <article> 標記指定 cover-only CSS 類別:
<article class="cover-only">
...
cover-only 類別也支援自動分頁的時間軸項目:
<article class="auto-paginate cover-only">
...
郵件分類
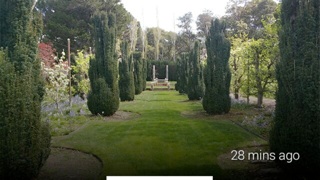
您可以將相關但不同的項目分組,例如電子郵件對話串中的個別郵件。套裝組合會顯示主要封面資訊卡,使用者輕觸即可顯示子時間軸,其中包含套裝組合中的其他資訊卡。組合包的封面資訊卡右上角會顯示摺角,與一般時間軸資訊卡有所區別。
如要將時間軸項目組合在一起,請使用相同的 bundleId 值建立這些項目。最近新增的項目是套裝組合的封面資訊卡。
下圖顯示一組封面卡片,右上角有摺疊角,下方有兩張組合卡片。


讀取時間軸項目
服務可以存取自己建立的所有時間軸項目,以及與服務共用的所有時間軸項目。以下說明如何列出服務可見的時間軸項目。
原始 HTTP
GET /mirror/v1/timeline HTTP/1.1
Host: www.googleapis.com
Authorization: Bearer {auth token}
Java
TimelineItem timelineItem = new TimelineItem();
service.timeline().list().execute();
Python
service.timeline().list().execute()
您可以使用其他 REST 作業來取得、更新及刪除時間軸項目。
存取附件
您可以透過名為 attachments 的陣列屬性,存取時間軸項目的附件。然後,您可以透過附件的 contentUrl 屬性或附件端點,取得附件的二進位資料。
原始 HTTP
GET /mirror/v1/timeline/{itemId}/attachments/{attachmentId} HTTP/1.1
Host: www.googleapis.com
Authorization: Bearer {auth token}
Java
TimelineItem item = service.timeline().get(itemId).execute();
String attachmentId = item.getAttachments().get(0).getId();
service.attachments().get(itemId, attachmentId).executeAsInputStream();
建立選單項目
使用者可以透過選單項目要求與時間軸資訊卡相關的動作,選單項目分為內建和自訂兩種。
內建選單項目可存取 Glass 提供的特殊功能,例如朗讀時間軸資訊卡、前往某個地點、分享圖片或回覆訊息:

應用程式可透過自訂選單項目,公開 Glassware 專屬的行為,您也可以提供選單項目圖示,與品牌形象相符。
新增內建選單項目
您可以在插入時間軸項目時填入 menuItems array,將內建選單項目新增至時間軸項目。如要使用內建選單項目,您只需要填入每個 menuItem 的 action。
原始 HTTP
HTTP/1.1 201 Created
Date: Tue, 25 Sep 2012 23:30:11 GMT
Content-Type: application/json
Content-Length: 303

{
  "text": "Hello world",
  "menuItems": [
    {
      "action": "REPLY"
    }
  ]
}
定義自訂選單項目
如果內建選單項目不符合需求,您可以在插入或更新時間軸項目時,按照下列步驟建立自訂選單項目和動作:
- 為
menuItem.action指定CUSTOM。 - 指定
menuItem.id。使用者輕觸自訂選單項目時,Glassware 會收到通知,其中已填入menuItem.id。方便您判斷通知來源。 - 指定
menuItem.values即可在 Glass 上新增iconUrl和displayName。指向 50 x 50 的 PNG 圖片,該圖片為白色,且背景透明,適用於iconUrl。 指定
displayTime。如未指定displayTime,使用者輕觸自訂選單項目時,時間軸項目就會移至時間軸最前面。
原始 HTTP
HTTP/1.1 201 Created
Date: Tue, 25 Sep 2012 23:30:11 GMT
Content-Type: application/json
Content-Length: 303

{
  "text": "Hello world",
  "displayTime": "2013-08-08T22:47:31-07:00",
  "menuItems": [
    {
      "action": "CUSTOM",
      "id": "complete"
      "values": [{
        "displayName": "Complete",
        "iconUrl": "http://example.com/icons/complete.png"
      }]
    }
  ]
}
允許使用者釘選時間軸資訊卡
您可以建立選單項目,讓使用者固定時間軸資訊卡,這樣時間軸資訊卡就會永久顯示在主要時鐘資訊卡左側。使用者也可以使用相同的選單項目取消釘選資訊卡。
釘選選單項目是內建選單項目,因此您只需要為 menuItem 提供 TOGGLE_PINNED
action 即可。
原始 HTTP
HTTP/1.1 201 Created
Date: Tue, 25 Sep 2012 23:30:11 GMT
Content-Type: application/json
Content-Length: 303

{
  "text": "You can pin or unpin this card.",
 "menuItems": [
    {
      "action": "TOGGLE_PINNED"
    }
  ...
 ]
}
訂閱
透過 Mirror API,您可以訂閱通知,在使用者對時間軸項目執行特定動作或使用者位置更新時收到通知。訂閱通知時,您會提供處理通知的回呼網址。
接收通知
Mirror API 會以 POST 要求的形式,將通知傳送至訂閱的端點,其中包含 JSON 要求主體。
原始 HTTP
{
  "collection": "timeline",
  "itemId": "3hidvm0xez6r8_dacdb3103b8b604_h8rpllg",
  "operation": "UPDATE",
  "userToken": "harold_penguin",
  "verifyToken": "random_hash_to_verify_referer",
  "userActions": [
    {
      "type": "<TYPE>",
      "payload": "<PAYLOAD>"
    }
  ]
}
Java
import com.google.api.client.json.JsonFactory;
import com.google.api.client.json.jackson.JacksonFactory;
import com.google.api.services.mirror.model.Notification;

import java.io.IOException;
import java.io.InputStream;
// ...

public class MyClass {
  // ...

  /**
    * Parse a request body into a Notification object.
    *
    * @param requestBody The notification payload sent by the Mirror API.
    * @return Parsed notification payload if successful, {@code null} otherwise.
    */
  static Notification parseNotification(InputStream requestBody) {
    try {
      JsonFactory jsonFactory = new JacksonFactory();

      return jsonFactory.fromInputStream(requetBody, Notification.class);
    } catch (IOException e) {
      System.out.println("An error occurred: " + e);
      return null;
    }
  }

  // ...
}
Python
import json

def parse_notification(request_body):
  """Parse a request body into a notification dict.

  Params:
    request_body: The notification payload sent by the Mirror API as a string.
  Returns:
    Dict representing the notification payload.
  """
  return json.load(request_body)
如果未發生錯誤,您的服務必須以 200 OK HTTP 狀態碼回應 API。如果服務傳回錯誤碼,Mirror API 可能會嘗試將通知重新傳送至服務。
通知類型
Mirror API 會針對不同事件傳送不同的通知酬載。
回覆
使用者已使用內建的 REPLY
選單項目回覆時間軸項目:
{
  "collection": "timeline",
  "itemId": "3hidvm0xez6r8_dacdb3103b8b604_h8rpllg",
  "operation": "INSERT",
  "userToken": "harold_penguin",
  "verifyToken": "random_hash_to_verify_referer",
  "userActions": [
    {
      "type": "REPLY"
    }
  ]
}
itemId 屬性會設為包含下列項目的項目 ID:
inReplyTo屬性設為回覆的時間軸項目ID。text屬性設為文字轉錄內容。- 如果時間軸項目是回覆,則
recipients屬性會設為回覆對象的creator。
範例:
{
  "kind": "glass#timelineItem",
  "id": "3hidvm0xez6r8_dacdb3103b8b604_h8rpllg",
  "inReplyTo": "3236e5b0-b282-4e00-9d7b-6b80e2f47f3d",
  "text": "This is a text reply",
  "recipients": [
    {
      "id": "CREATOR_ID",
      "displayName": "CREATOR_DISPLAY_NAME",
      "imageUrls": [
        "CREATOR_IMAGE_URL"
      ]
    }
  ]
}
刪除
使用者刪除了時間軸項目:
{
  "collection": "timeline",
  "itemId": "3hidvm0xez6r8_dacdb3103b8b604_h8rpllg",
  "operation": "DELETE",
  "userToken": "harold_penguin",
  "verifyToken": "random_hash_to_verify_referer",
  "userActions": [
    {
      "type": "DELETE"
    }
  ]
}
itemId 屬性會設為已刪除項目的 ID。除了 ID 和 isDeleted 屬性,項目不再包含其他中繼資料。
已選取自訂選單項目
使用者已選取服務設定的自訂選單項目:
{
  "collection": "timeline",
  "itemId": "3hidvm0xez6r8_dacdb3103b8b604_h8rpllg",
  "operation": "UPDATE",
  "userToken": "harold_penguin",
  "userActions": [
    {
      "type": "CUSTOM",
      "payload": "PING"
    }
  ]
}
itemId 屬性會設為使用者選取的選單項目 ID。
userActions 陣列包含使用者對這個項目執行的自訂動作清單。你的服務應據此採取相應行動。
位置更新
目前使用者可前往新地點:
{
  "collection": "locations",
  "itemId": "latest",
  "operation": "UPDATE",
  "userToken": "harold_penguin",
  "verifyToken": "random_hash_to_verify_referer"
}
當 Glassware 收到位置更新時,請向 glass.locations.get 端點傳送要求,以擷取最新已知位置。Glassware 每隔 10 分鐘就會收到位置更新通知。
語音指令
使用者已啟動語音指令,例如:「Ok Glass,記下筆記,Cat Stream,Chipotle 的生日是明天」。系統會將下列通知傳送至 Glassware:
{
  "collection": "timeline",
  "operation": "INSERT",
  "userToken": "chipotle's_owner",
  "verifyToken": "mew mew mew",
  "itemId": "<ITEM_ID>",
  "userActions": [
    {“type”: "LAUNCH"}
  ]
}
這項通知與其他通知的不同之處,在於 userActions 屬性中的 LAUNCH 值。
然後您可以使用 itemId 中的值擷取時間軸項目:
{
  "id": "<ITEM_ID>",
  "text": "Chipotle's birthday is tomorrow",
  "recipients": [
    {"id": "CAT_STREAM"}
  ]
}
recipients 屬性包含代表所用語音指令的聯絡人 id。