Page Summary
-
Earth Engine Javascript API allows users to develop and deploy web apps to make datasets and results easy to explore and query without needing the Code Editor.
-
This tutorial demonstrates creating a simple Earth Engine web app to visualize global ground-level PM2.5 concentration estimates and population data.
-
Developing a web app involves stages like generating a base map, setting up panels for text, widgets, and charts, adding links, and defining interactive layers.
-
Functions are used to manage panel creation, update information on map clicks, load and visualize data, and control layer visibility through a selector and legend.
-
The web app includes features like a customizable base map, an info panel, data source links, an inspector panel to show clicked-location data, a time series chart, and a dynamic legend with a layer selector.
Generating a new base map for your web app
To better control how to visualize our data, we can generate a new base map for our web app and add it to the map. Earth Engine uses Google's Map API to set the base map style. An example is given below, but you can learn more about these options in the Customizing Base Map Style tutorial.
// Define base map style.
var basemapStyle = [{
        featureType: 'all',
        elementType: 'labels.text.fill',
        stylers: [{
                saturation: 36
            },
            {
                color: '#000000'
            },
            {
                lightness: 40
            },
        ],
    },
    {
        featureType: 'all',
        elementType: 'labels.text.stroke',
        stylers: [{
                visibility: 'on'
            },
            {
                color: '#000000'
            },
            {
                lightness: 16
            },
        ],
    },
    {
        featureType: 'all',
        elementType: 'labels.icon',
        stylers: [{
            visibility: 'off'
        },
        ],
    },
    {
        featureType: 'administrative',
        elementType: 'geometry.fill',
        stylers: [{
                color: '#000000'
            },
            {
                lightness: 20
            },
        ],
    },
    {
        featureType: 'administrative',
        elementType: 'geometry.stroke',
        stylers: [{
                color: '#000000'
            },
            {
                lightness: 17
            },
            {
                weight: 1.2
            },
        ],
    },
    {
        featureType: 'administrative',
        elementType: 'labels.text.fill',
        stylers: [{
            lightness: '38'
        },
        ],
    },
    {
        featureType: 'landscape',
        elementType: 'geometry',
        stylers: [{
                color: '#000000'
            },
            {
                lightness: 20
            },
        ],
    },
    {
        featureType: 'landscape',
        elementType: 'geometry.fill',
        stylers: [{
            lightness: '-32'
        },
        ],
    },
    {
        featureType: 'poi',
        elementType: 'geometry',
        stylers: [{
                color: '#000000'
            },
            {
                lightness: 21
            },
        ],
    },
    {
        featureType: 'poi',
        elementType: 'labels.text.fill',
        stylers: [{
            lightness: '36'
        },
        ],
    },
    {
        featureType: 'road.highway',
        elementType: 'geometry.fill',
        stylers: [{
                color: '#000000'
            },
            {
                lightness: 17
            },
        ],
    },
    {
        featureType: 'road.highway',
        elementType: 'geometry.stroke',
        stylers: [{
                color: '#000000'
            },
            {
                lightness: 29
            },
            {
                weight: 0.2
            },
        ],
    },
    {
        featureType: 'road.highway',
        elementType: 'labels.text.fill',
        stylers: [{
            color: '#bdbdbd'
        },
        ],
    },
    {
        featureType: 'road.arterial',
        elementType: 'geometry',
        stylers: [{
            lightness: 18
        },
        ],
    },
    {
        featureType: 'road.arterial',
        elementType: 'geometry.fill',
        stylers: [{
            lightness: '-62'
        },
        ],
    },
    {
        featureType: 'road.arterial',
        elementType: 'labels.text.fill',
        stylers: [{
                color: '#e5e5e5'
            },
            {
                visibility: 'off'
            },
        ],
    },
    {
        featureType: 'road.local',
        elementType: 'geometry',
        stylers: [{
                color: '#000000'
            },
            {
                lightness: 16
            },
        ],
    },
    {
        featureType: 'road.local',
        elementType: 'geometry.fill',
        stylers: [{
            lightness: '21'
        },
        ],
    },
    {
        featureType: 'road.local',
        elementType: 'labels.text.fill',
        stylers: [{
            color: '#a0a0a0'
        },
        ],
    },
    {
        featureType: 'transit',
        elementType: 'geometry',
        stylers: [{
                color: '#000000'
            },
            {
                lightness: 19
            },
        ],
    },
    {
        featureType: 'water',
        elementType: 'geometry',
        stylers: [{
                color: '#232222'
            },
            {
                lightness: 17
            },
        ],
    },
];

// Clear existing map.
ui.root.clear();

// Initiate new map object.
var map = ui.Map();

// Add custom map.
ui.root.add(map);

// Set basemap options.
map.setOptions('Base', {
    Base: basemapStyle
});

// Set visibility options to remove geometry creator, map type controller,
// and layer list.
map.setControlVisibility({
    all: false,
    layerList: false,
    zoomControl: true,
    scaleControl: true,
    mapTypeControl: false,
    fullscreenControl: false
});

// Set the default map's cursor to a 'crosshair'.
map.style().set('cursor', 'crosshair');

// Set the center and zoom level of the new map.
map.setCenter(79.32, 26.56, 4);
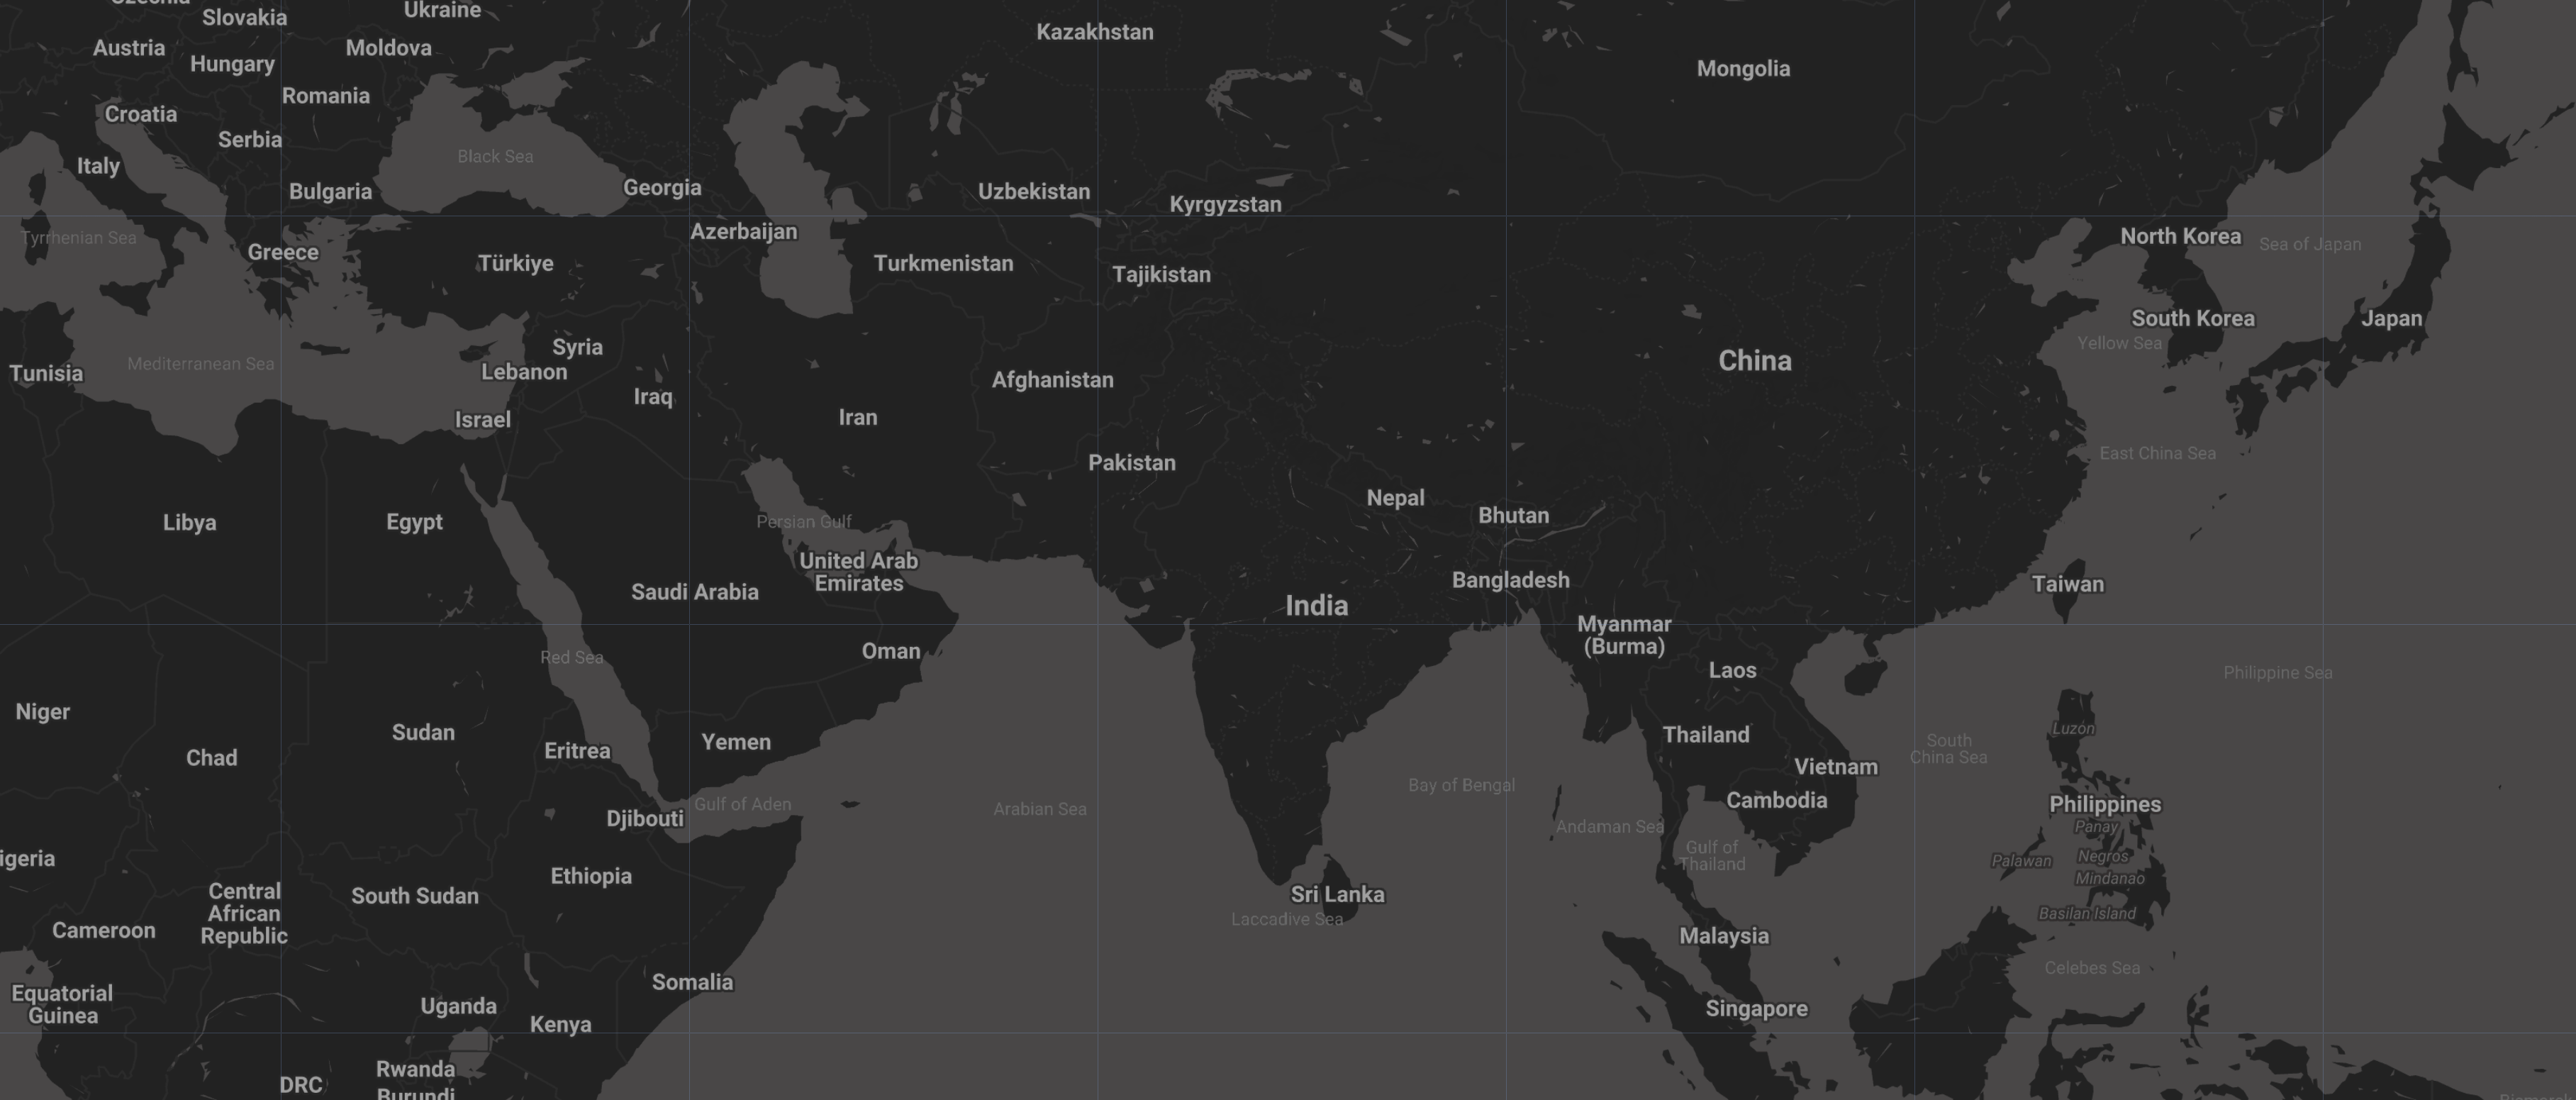
Now our web app will use this custom base map, which can be further modified, if required, to optimize the visualization or highlight certain features.

Setting up a panel to hold your text, widgets, and charts
To hold all of the introductory text, widgets, and charts that will be used by or displayed on our web app, we create a function to generate a panel object and call it to add this panel to the map.
// Function to create the intro panel with labels.
function panelcreate() {
    // Create an intro panel with labels.
    var intro = ui.Panel([
        ui.Label({
            value: 'Global Air Pollution Explorer',
            style: {
                fontSize: '1.4vw',
                fontWeight: 'bold'
            },
        }),
        ui.Label({
            value: 'This app visualizes global population and its annual exposure to ' +
            'ground-level PM₂.₅ pollution for the year 2020. Click on any point to retrieve ' +
            'the annual average PM₂.₅ concentration, the population, and the ' +
            'exceedance factor, defined here as the actual concentration divided by the ' +
            'WHO standard (5 µg/m3 for annual average PM₂.₅), of the corresponding pixel. ' +
            'The data layers can be switched from the legend panel. ' +
            'The long-term changes in annual average PM₂.₅ from 1998 to 2021 ' +
            'are also shown for the corresponding pixel.',
            style: {
                fontSize: '.9vw',
                fontWeight: 'normal'
            },
        }),
    ]);

    // Add intro panel to the main panel.
    panel.add(intro);
}

// Create main panel.
var panel = ui.Panel();

// Set the width and font style for the main panel.
panel.style().set({
    width: '20%',
    fontSize: '1vw',
    fontWeight: 'bold'
});

// Add the main panel to the UI root.
ui.root.insert(1, panel);

// Call the panelcreate function to create the intro panel.
panelcreate();
Adding links and references to main panel
We can add links to the main panel, which is helpful when we want to refer back to a published paper, a DOI, or a personal website. Some examples are provided below.
// Function to create reference panel.
function referencecreate() {
    var referenceZero = ui.Label({
        value: 'Data Source:',
        style: {
            color: 'black',
            fontWeight: 'bold',
            textAlign: 'center'
        },
    });
    var referenceOne = ui.Label({
        value: 'Gridded Population of the World',
        style: {
            color: 'black',
            fontWeight: 'bold',
            textAlign: 'center'
        },
        targetUrl: 'https://doi.org/10.7927/H4JW8BX5'
    });
    var referenceTwo = ui.Label({
        value: 'Surface PM₂.₅',
        style: {
            color: 'black',
            fontWeight: 'bold',
            textAlign: 'center',
            padding: '0px 0px 4px 0px'
        },
        targetUrl: 'https://sites.wustl.edu/acag/datasets/surface-pm2-5/'
    });
    var referenceThree = ui.Label({
        value: 'Created by:',
        style: {
            color: 'black',
            fontWeight: 'bold',
            textAlign: 'center'
        },
    });
    var referenceFour = ui.Label({
        value: 'TC',
        style: {
            color: 'black',
            fontWeight: 'bold',
            textAlign: 'center'
        },
        targetUrl: 'https://tc25.github.io/'
    });

    // Add reference to the panel.
    panel.add(referenceZero);
    panel.add(referenceOne);
    panel.add(referenceTwo);
    panel.add(referenceThree);
    panel.add(referenceFour);
}

// Call the reference panel creation function.
referencecreate();
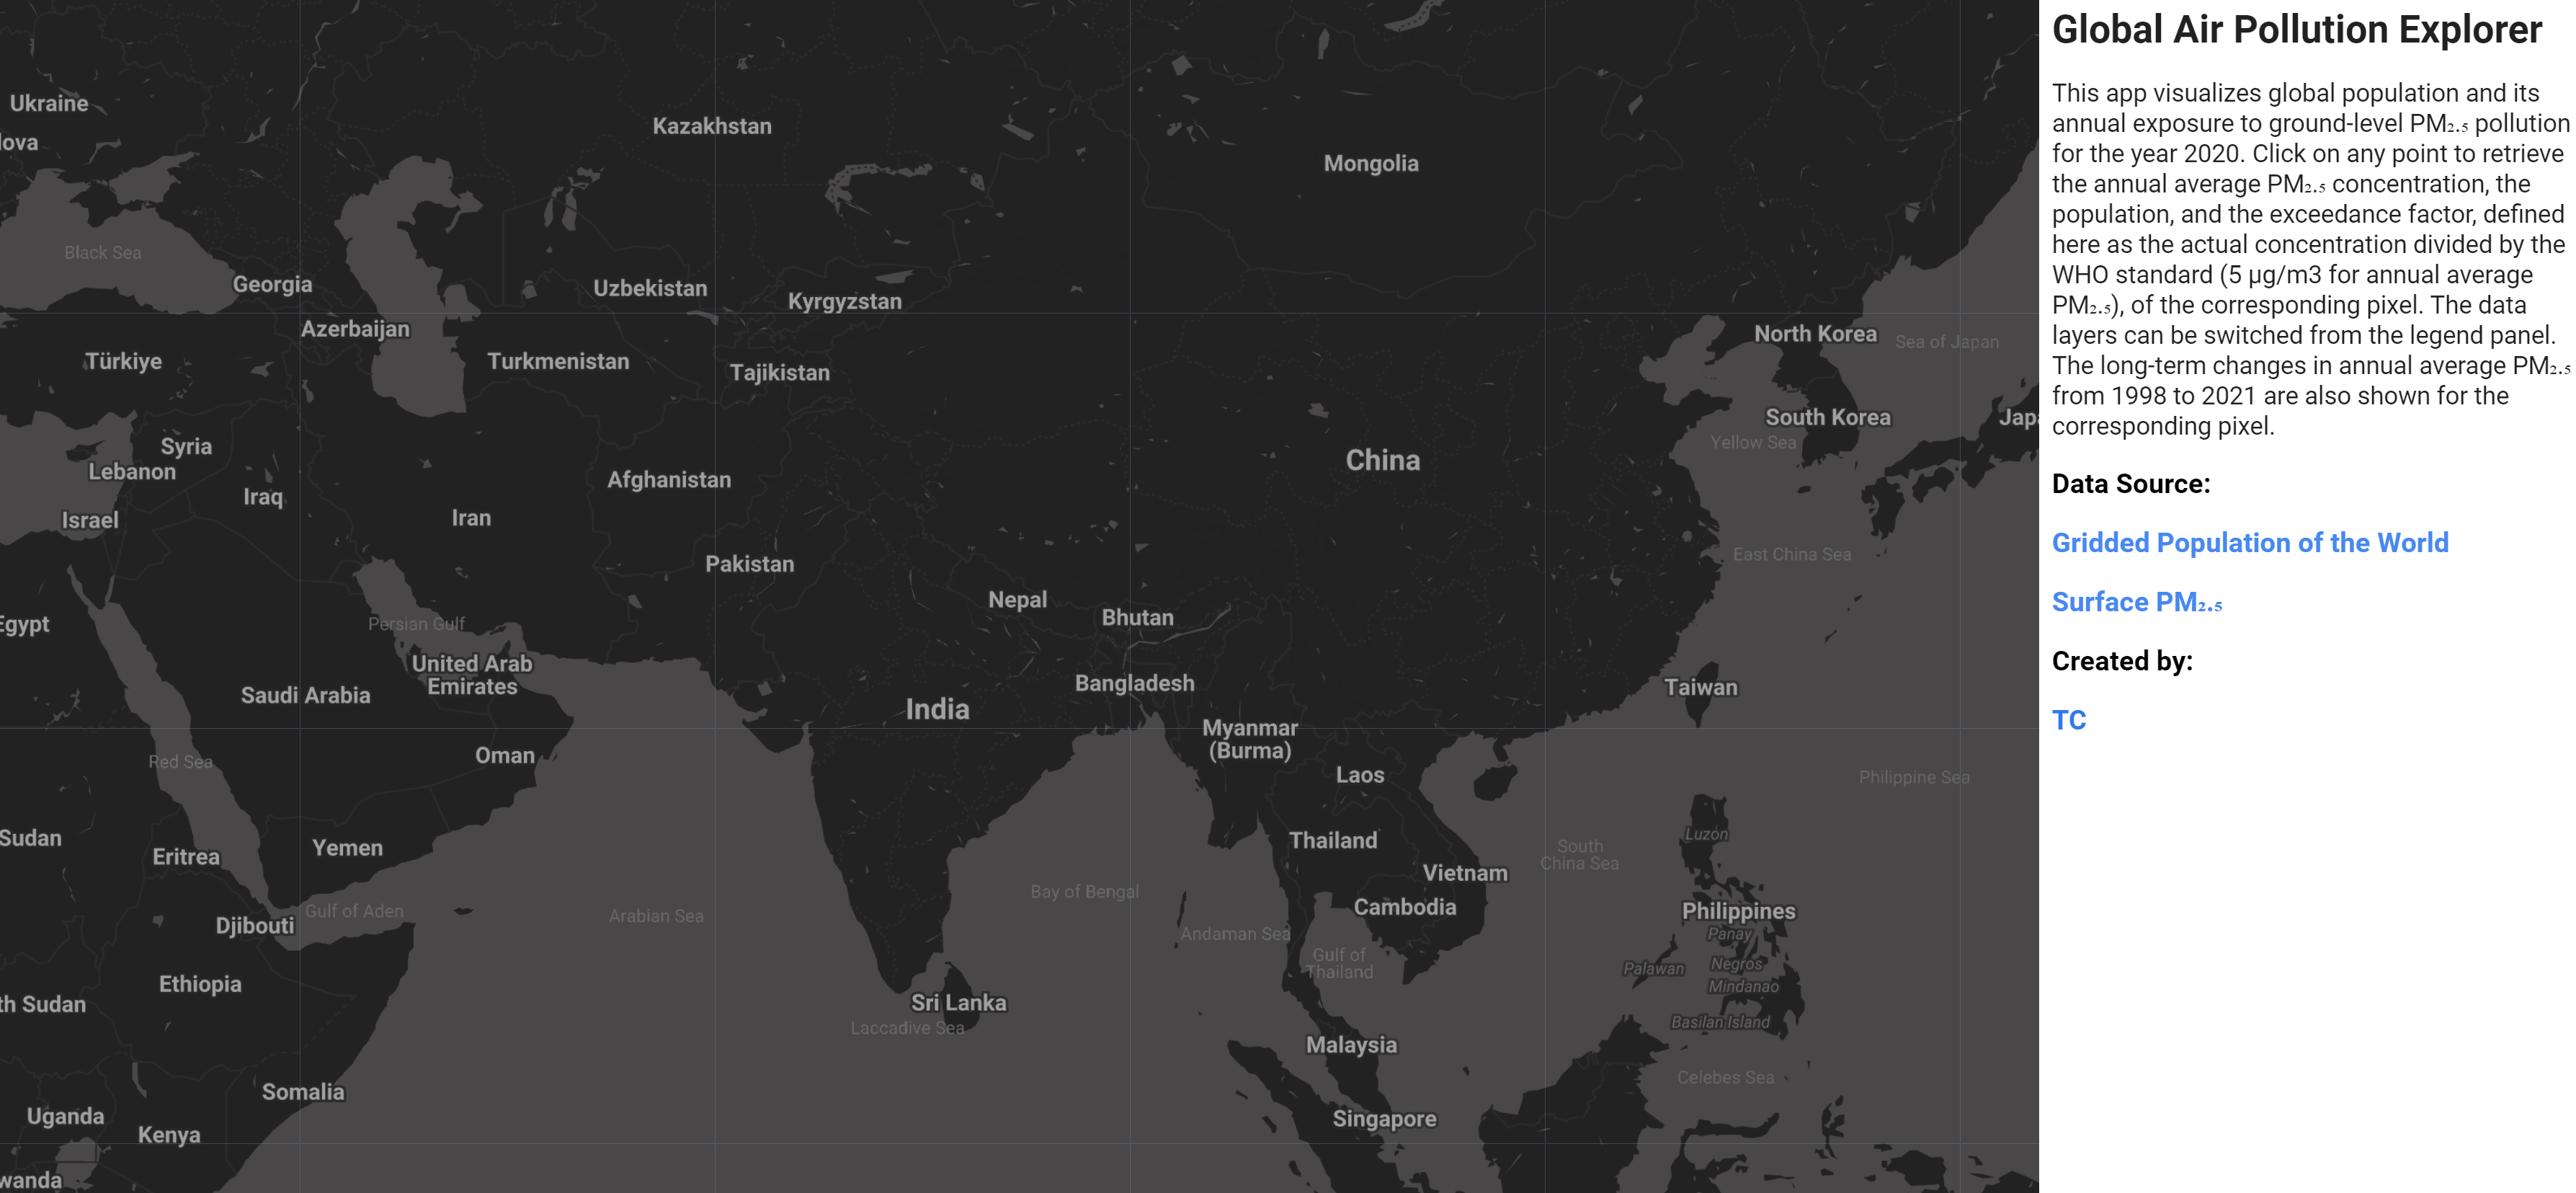
Here is what the initial panel looks like.

Defining a panel to interact with the layers and update values on the main panel
Now we can start adding more functionality to the app. We start by adding a panel that can help users interact with the app by providing some simple instructions. This is added to the top of the map for visibility.
// Create an inspector panel with a horizontal layout.
var inspector = ui.Panel({
    layout: ui.Panel.Layout.flow('vertical'),
});

// Add a label to the panel.
inspector.add(
    ui.Label({
        value: 'Click on a location to extract variables',
        style: {
            fontSize: '1.7vmin',
            fontWeight: 'bold',
            textAlign: 'center',
            margin: '0px 0px 0px 0px'
        },
    })
);

// Add the inspector panel to the default map.
map.add(inspector);
Loading images to display and defining visualization options
We now load images and define visualization properties of the datasets that we want to interact with in this web app. Many of these have been preprocessed for this tutorial, but you can use any of the datasets in the Earth Engine data catalog to generate similar web apps. Note that layers are not added to the map at this point, that happens on app initialization and on the fly, upon user selection, in a later step.
// Load in all relevant datasets.
// PM2.5 data for the year 2020 regridded to the same grids as the
// population estimates.
var PM = ee.Image('users/tirthankar25/PM_2020_regrid');

// Image collection of the original annual mean PM2.5 data.
var pmTime = ee.ImageCollection('projects/gee-datastore/assets/PM25_v5GL03');

// Population data.
var Pop = ee.Image(
  'CIESIN/GPWv411/GPW_Population_Count/gpw_v4_population_count_rev11_2020_30_sec');

// Exceedance factor of PM2.5 concentration.
var exceedanceFactor = ee.Image('users/tirthankar25/PMtimes_2020');

// Define color palette:
var thePalette = [
    '#40004b',
    '#762a83',
    '#9970ab',
    '#c2a5cf',
    '#e7d4e8',
    '#f7f7f7',
    '#d9f0d3',
    '#a6dba0',
    '#5aae61',
    '#1b7837',
    '#00441b'
].reverse();

// Define information about each layer that will be used to visualize it and
// describe it in a selector widget and legend.
var dataInfo = {
    'ex': {
        name: 'Exceedance factor',
        desc: 'Actual concentration of PM₂.₅ divided by the WHO standard',
        img: exceedanceFactor,
        vis: {
            min: 1,
            max: 20,
            palette: thePalette,
            opacity: 0.65
        }
    },
    'pm': {
        name: 'PM₂.₅ concentration',
        desc: 'Annual average PM₂.₅ concentration (µg/m3)',
        img: PM,
        vis: {
            min: 10,
            max: 100,
            palette: thePalette,
            opacity: 0.65
        }
    },
    'pop': {
        name: 'Population count',
        desc: 'Number of people',
        img: Pop,
        vis: {
            min: 2000,
            max: 18000,
            palette: thePalette,
            opacity: 0.65
        }
    },
};
Function to interact with layers
We will write a callback function that is invoked whenever the map is clicked. The location of the clicked point and other relevant information for the layers being displayed can then be extracted. These values, including a chart that shows the entire time series for the selected point, will be added to our main panel on each map click.
// Register a callback on the default map to be invoked when the map is clicked.
map.onClick(function(coords) {
    // Clear the main panel.
    panel.clear();

    // Call the panel creation function again.
    panelcreate();

    // Call the reference panel creation function again.
    referencecreate();

    // Create panels to hold lon/lat and UHI values.
    var lat = ui.Label();
    var lon = ui.Label();
    var Value = ui.Label();
    var pmPix = ui.Label();
    pmPix.style().set('padding', '0px 0px 4px 0px');
    var popPix = ui.Label();
    var efPix = ui.Label();

    // Add panels to show longitude, latitude, and pixel values to the main panel.
    panel.add(ui.Panel([lat, lon], ui.Panel.Layout.flow('horizontal')));
    panel.add(ui.Panel([popPix], ui.Panel.Layout.flow('horizontal')));
    panel.add(ui.Panel([pmPix], ui.Panel.Layout.flow('horizontal')));
    panel.add(ui.Panel([efPix], ui.Panel.Layout.flow('horizontal')));

    // Add a red dot showing the point clicked on.
    var point = ee.Geometry.Point(coords.lon, coords.lat);
    var dot = ui.Map.Layer(point, {
        color: 'red'
    });
    map.layers().set(1, dot);

    // Clear the inspector panel.
    inspector.clear();

    // Show the inspector panel and add a loading label.
    inspector.style().set('shown', true);
    inspector.add(
        ui.Label({
            value: 'Loading...',
            style: {
                color: 'gray',
                fontSize: '1.7vmin',
                fontWeight: 'normal',
                textAlign: 'center',
                margin: '0px 0px 0px 0px'
            },
        })
    );

    // Sample data at the clicked point from the images.
    function getVal(img, point, scale, key, places) {
        var info = ee.Image(img).sample(point, scale).first().getInfo();
        var formattedValue;
        if (info) {
            formattedValue = info.properties[key].toFixed(places);
        } else {
            formattedValue = 'NoData';
        }
        return formattedValue;
    }
    var samplePop = getVal(Pop, point, 300, 'population_count', 0);
    var samplePM = getVal(PM, point, 300, 'b1', 2);
    var sampleEF = getVal(exceedanceFactor, point, 300, 'b1', 2);

    // Update the lon/lat panel with values from the click event.
    lat.setValue('Lat: ' + coords.lat.toFixed(2));
    lon.setValue('Lon: ' + coords.lon.toFixed(2));

    // Update the pmPix, popPix, and efPix panels with their respective values.
    pmPix.setValue('PM₂.₅ concentration (µg/m3): ' + samplePM);
    popPix.setValue('Population count: ' + samplePop);
    efPix.setValue('Exceedance factor: ' + sampleEF);

    // Create a pmChart line chart.
    // Create a line chart from the pmTime image and point data.
    if (samplePM != 'NoData') {
        var pmChart = ui.Chart.image
            .series(pmTime, point)
            // Set the chart type to be a line chart.
            .setChartType('LineChart');
        pmChart.setOptions({
            // Set the title of the chart.
            title: 'Long-term change in annual PM₂.₅ concentration',
            vAxes: {
                0: {
                    // Set the title of the vertical axis.
                    title: 'PM₂.₅ concentration (µg/m3)',
                    // Set the format of the numbers on the axis.
                    format: '#.##',
                    // Set the style of the text.
                    titleTextStyle: {
                        bold: true,
                        color: '#bd0026',
                        italic: false
                    },
                },
            },
            hAxis: {
                // Set the title of the horizontal axis.
                title: 'Year',
                // Set the format of the numbers on the axis.
                format: 'yyyy',
                // Set the number of gridlines on the axis.
                gridlines: {
                    count: 22
                },
                // Set the style of the text.
                titleTextStyle: {
                    bold: true,
                    italic: false
                },
            },
            // Set the type of curve for the line chart.
            curveType: 'function',
            // Set the color of the line.
            colors: ['#bd0026'],
            // Set the width of the line.
            lineWidth: 3,
            // Set the size of the points on the line chart.
            pointSize: 5,
            // Set the height of the chart area.
            chartArea: {
                height: '53%'
            },
            tooltip: {
                trigger: 'none'
            },
            series: {
                0: {
                    targetAxisIndex: 0,
                    visibleInLegend: false
                },
            },
        });

        // Add the chart to the panel.
        panel.widgets().set(10, pmChart);
    } else {
        // Add a blank label widget if there is no data.
        panel.widgets().set(10, ui.Label());
    }

    // Clear inspector again and display a new label.
    inspector.clear();

    inspector.style().set('shown', true);
    inspector.add(
        // Set the label text.
        ui.Label({
            value: 'Click on another location...',
            style: {
                fontSize: '1.7vmin',
                fontWeight: 'bold',
                textAlign: 'center',
                margin: '0px 0px 0px 0px'
            },
        })
    );
});
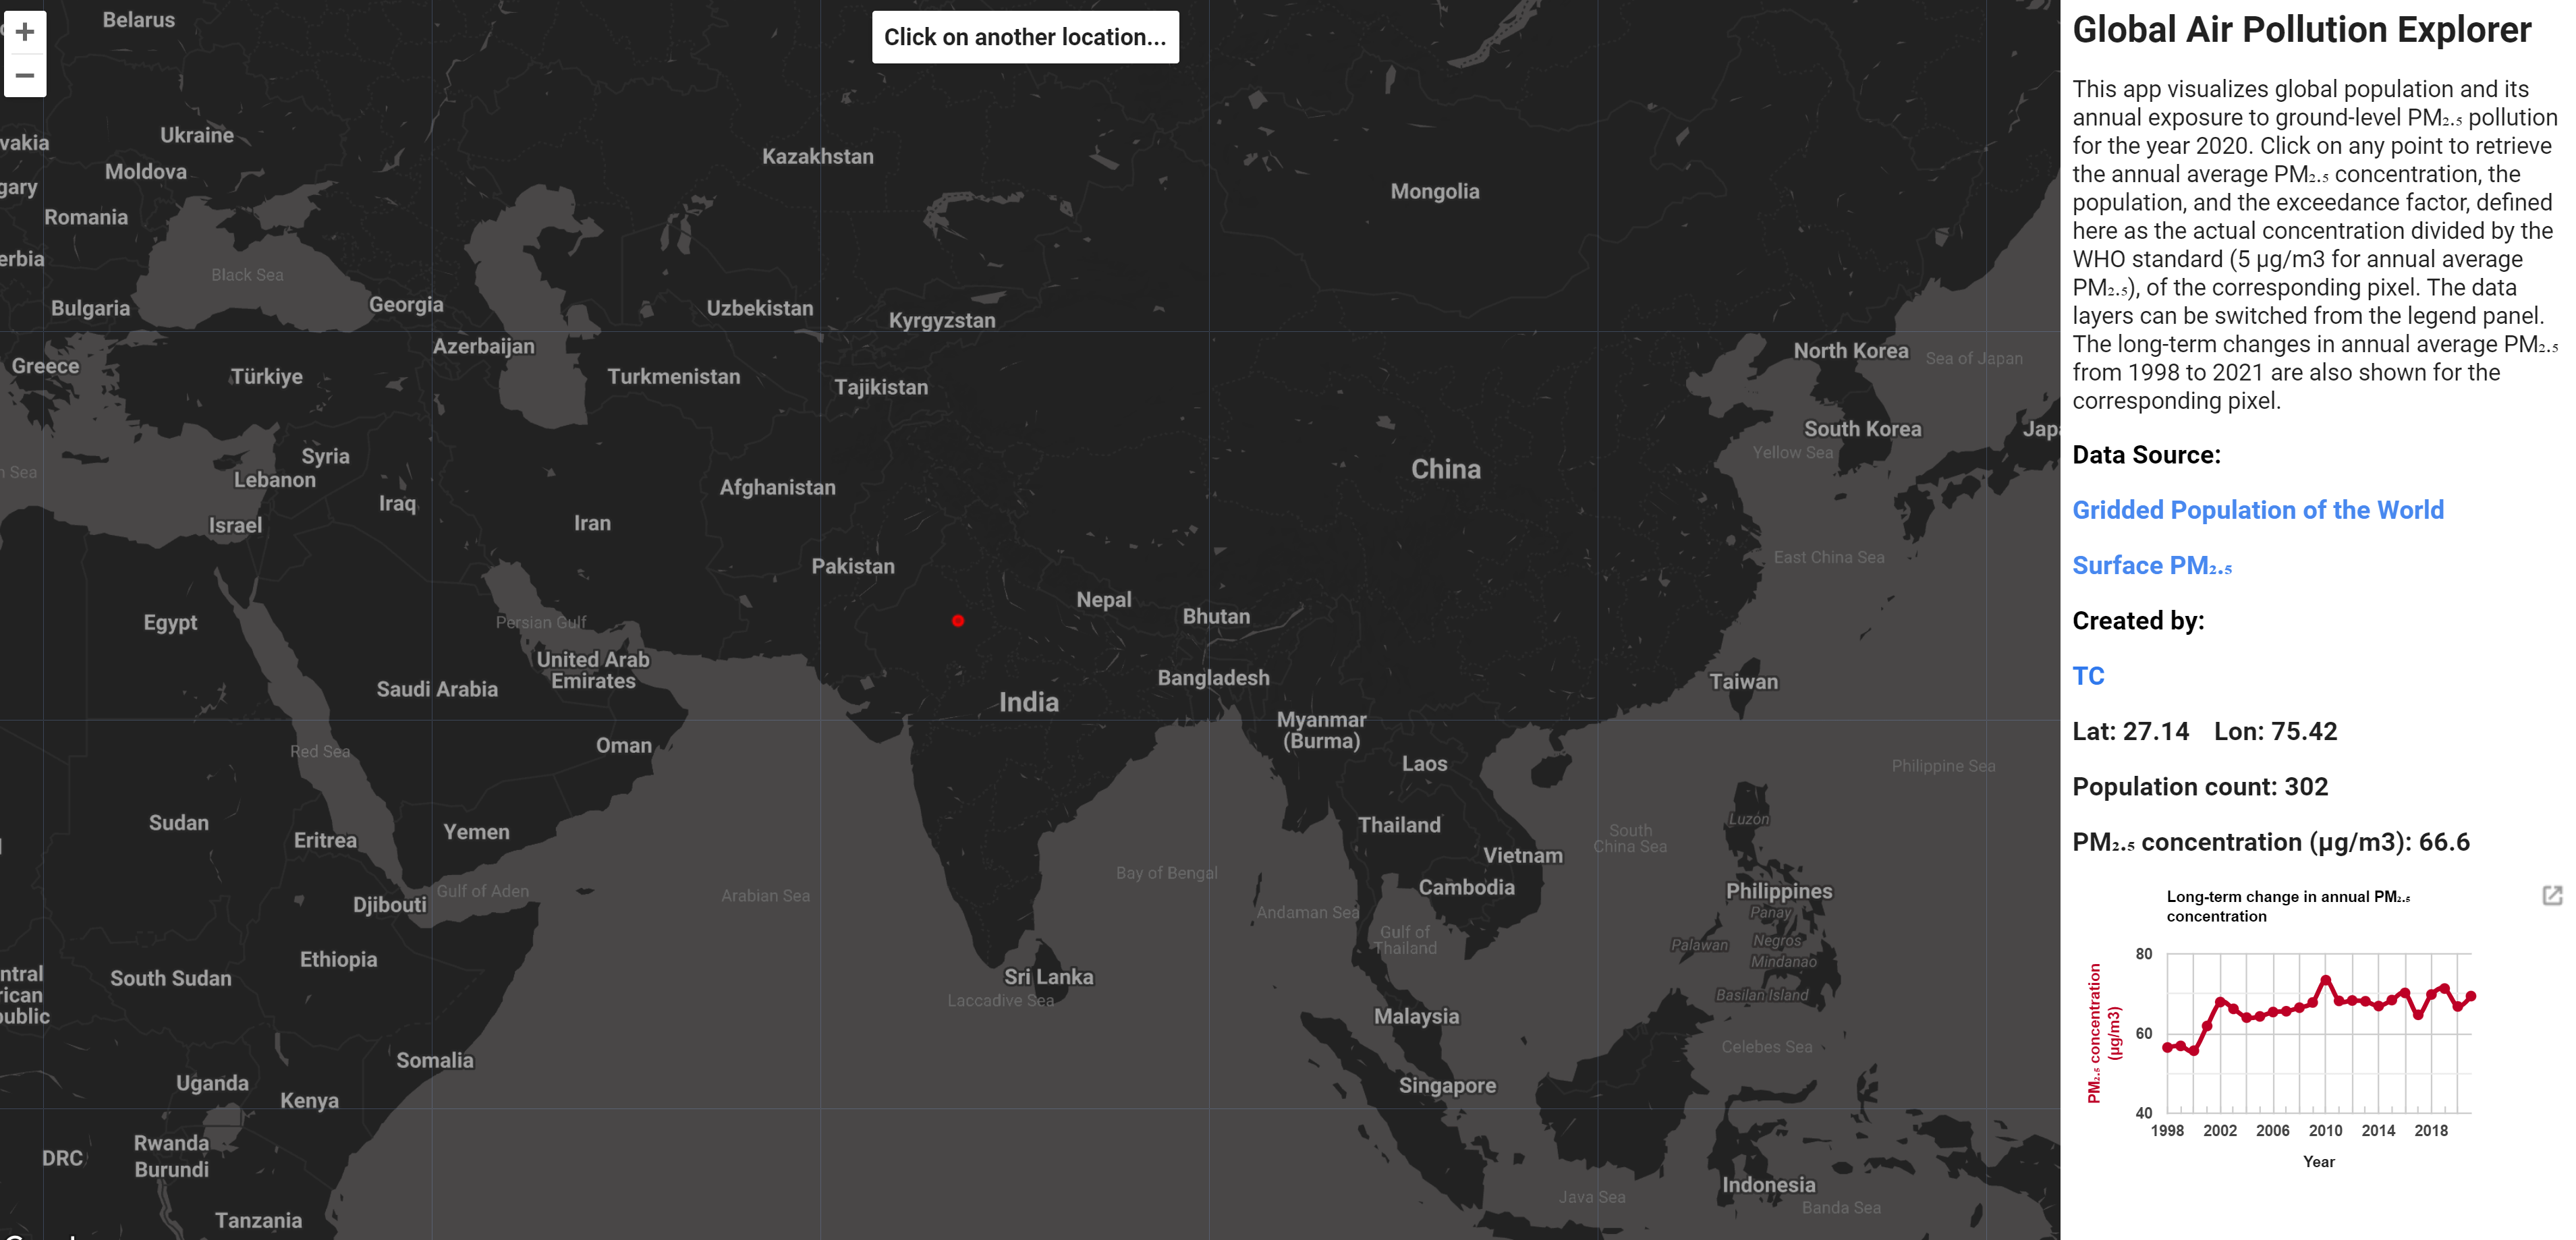
We can now click on different parts of the map and the relevant values will be added to the main panel.

Note, however, that the layers themselves are not visible. This is because we will link the layers to a legend bar with a layer selector, which is described in the steps below.
Creating the legend panel
Next, we create panel that will hold our legend. The legend panel will be initialized at the end of the script.
var legend = ui.Panel({
    style: {
        position: 'bottom-left',
        width: '25%'
    }
});
Function to update visualization based on selected layer
First, we define a selector object that is added to the legend panel and can be used to update the layer being displayed. A callback function we define in the following step will be called whenever a new selection is made.
// Create a layer selector that dictates which layer is visible on the map.
// The list of possible layers are generated from the data info provided above.
var items = [];
Object.keys(dataInfo).forEach(function(key) {
    items.push({value: key, label: dataInfo[key].name});
});
items.push({value: 'none', label: 'Remove all'});

var select = ui.Select({
    items: items,
    value: items[0].value,
    style: {margin: '8px 0px'}
});
Define a callback function that will reset the map and update the dataset displayed based on the layer selected.
// Redraw function is called when the user changes the selected layer.
function redraw(layer) {
    // Fetch the info that corresponds to the selected layer.
    var info = dataInfo[layer];

    // Reset the layers and the legend.
    map.layers().reset();
    legend.clear();

    // Construct the layer selection widgets.
    legend
    .add(
        ui.Label({
            value: 'Choose display layer:',
            style: {
                fontSize: '14px',
                fontWeight: 'bold',
                textAlign: 'left',
                margin: '4px 0px'
            },
        })
    )
    .add(select);

    // Construct the legend widgets.
    function makeLegend(vis) {
        // Creates a color bar thumbnail image for use in legend from the given
        // color palette.
        function makeColorBarParams(palette) {
            return {
            // Bounding box for color bar.
                bbox: [0, 0, 1, 0.1],
                // Dimensions of color bar.
                dimensions: '100x10',
                // Format of color bar.
                format: 'png',
                // Min value for color bar.
                min: 0,
                // Max value for color bar.
                max: 1,
                // Color palette for color bar.
                palette: palette
            };
        }

        // Create the color bar for the legend.
        var colorBar = ui.Thumbnail({
        // Image to use for color bar.
            image: ee.Image.pixelLonLat().select(0),
            // Parameters for color bar.
            params: makeColorBarParams(vis.palette),
            style: {
                // Stretch color bar horizontally.
                stretch: 'horizontal',
                // No margin for color bar.
                margin: '0px 0px',
                // Max height of color bar.
                maxHeight: '10%',
                // Width of color bar.
                width: '100%'
            },
        });

        // Create a panel with three numbers for the legend.
        var legendLabels = ui.Panel({
            widgets: [
                ui.Label(vis.min, {
                    margin: '0px 0px'
                }),
                ui.Label('10.5', {
                    margin: '0px 0px',
                    textAlign: 'center',
                    stretch: 'horizontal'
                }),
                ui.Label(vis.max, {
                    margin: '0px 0px'
                }),
            ],
            layout: ui.Panel.Layout.flow('horizontal')
        });

        // Add label to legend.
        legend.add(
            ui.Label({
                value: info.desc,
                style: {
                    fontSize: '14px',
                    textAlign: 'left',
                    padding: '0px 0px 4px 0px',
                    margin: '8px 0px'
                },
            })
        );

        // Add colorbar to legend.
        legend.add(colorBar);

        // Add labels to legend.
        legend.add(legendLabels);
    }

    // If layer is none, reset layers on map.
    if (layer == 'none') {
        map.layers().reset();
    } else {
        // Check which layer is selected and create the corresponding legend.
        makeLegend(info.vis);

        // Add layer to map.
        var visImg = info.img.visualize(info.vis);
        map.addLayer(visImg, {}, layer);
    }
}

// Register the `redraw` function to the layer selector.
select.onChange(redraw);
Initializing the script
Finally, to initialize the script, we will invoke the function to display the default exceedance factor of PM2.5 concentration layer and add the legend to the map.
// Invoke the redraw function at start up to initialize the exceedance map.
redraw('ex');

// Add legend to map.
map.add(legend);
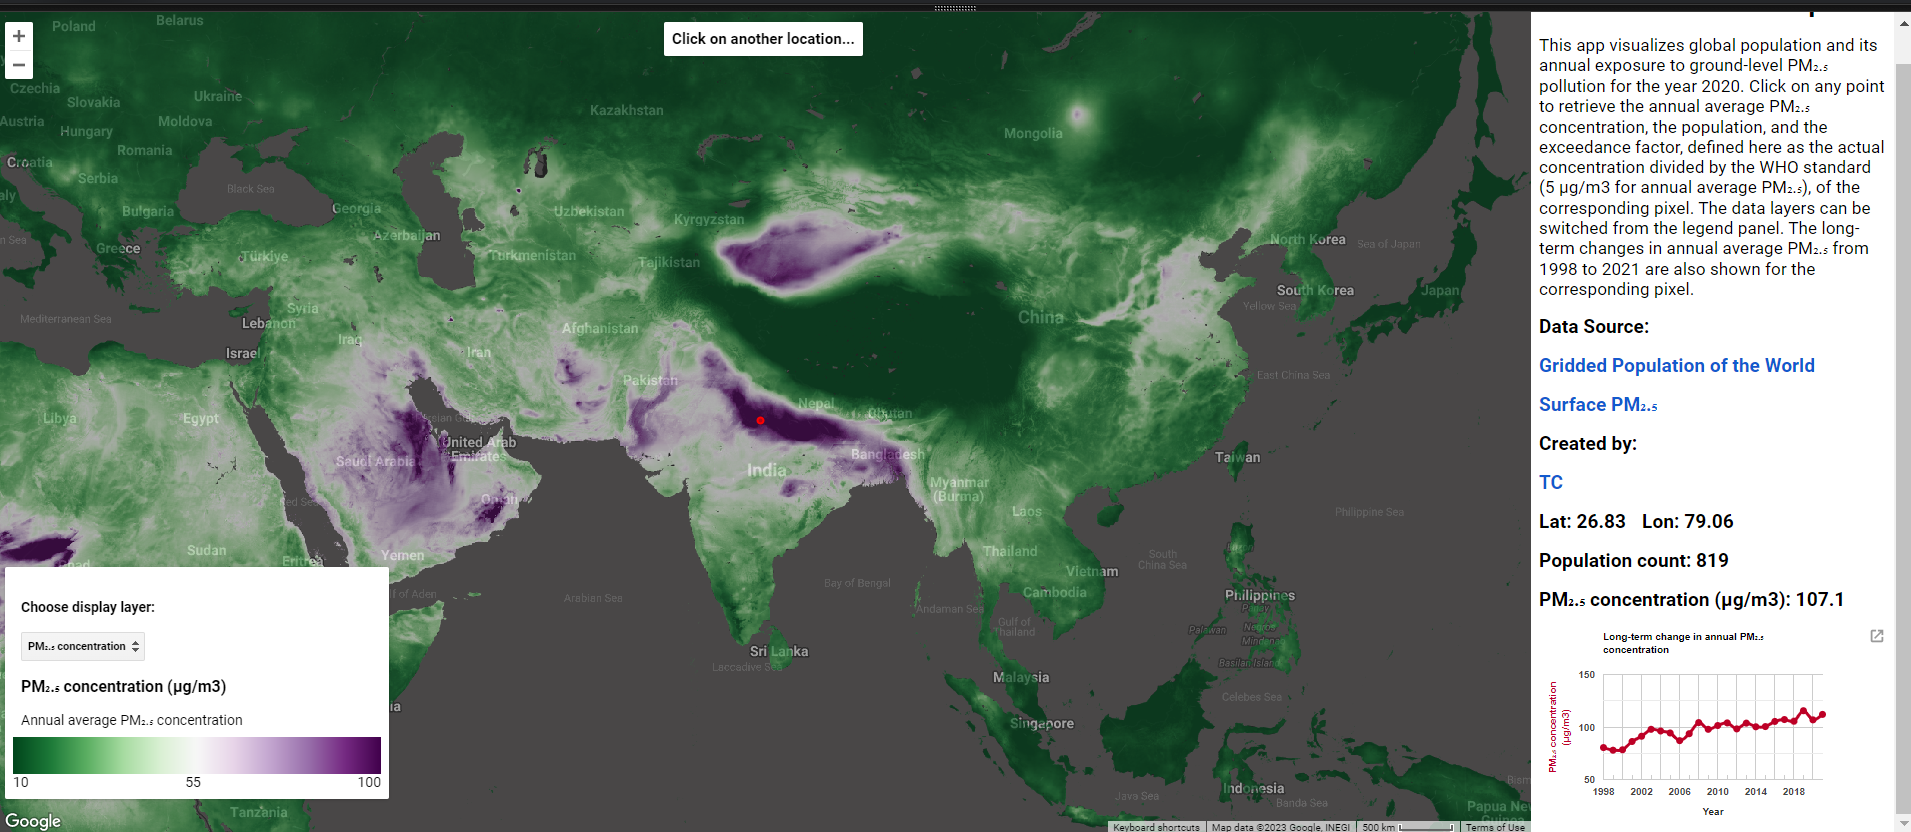
The script now has all the functionality through the Code Editor.

Publishing your web app
To publish the web app, we just need to go to the manage app option on the Javascript Code Editor and follow the UI prompts. See below:
