
This codelab is part of the Android Kotlin Fundamentals course. You'll get the most value out of this course if you work through the codelabs in sequence. All the course codelabs are listed on the Android Kotlin Fundamentals codelabs landing page.
Introduction
Most apps have data that needs to be kept, even after the user closes the app. For example, the app might store a playlist, an inventory of game items, records of expenses and income, a catalog of constellations, or sleep data over time. Commonly, you would use a database to store persistent data.
Room is a database library that's part of Android Jetpack. Room takes care of many of the chores of setting up and configuring a database, and makes it possible for your app to interact with the database using ordinary function calls. Under the hood, Room is an abstraction layer on top of an SQLite database. Room's terminology, and the query syntax for more complex queries, follow the SQLite model.
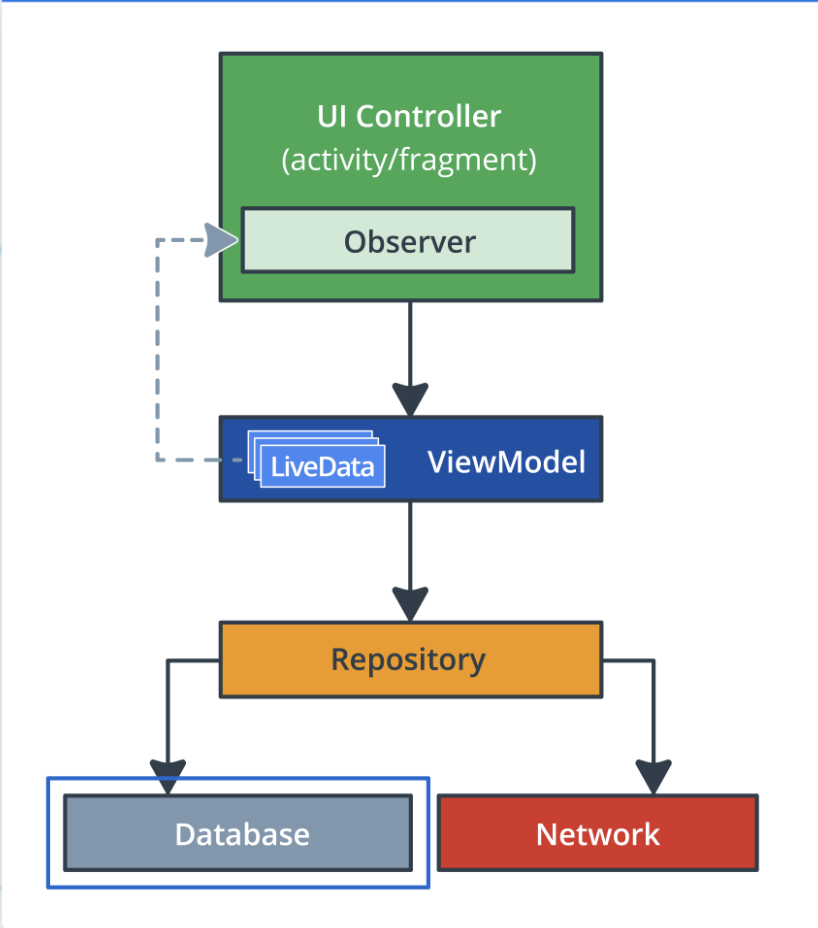
The image below shows how the Room database fits in with the overall architecture recommended in this course.
What you should already know
You should be familiar with:
- Building a basic user interface (UI) for an Android app
- Using activities, fragments, and views.
- Navigating between fragments and using Safe Args (a Gradle plugin) to pass data between fragments.
- View models, view-model factories, and
LiveDataand its observers. These Architecture Components topics are covered in an earlier codelab in this course. - A basic understanding of SQL databases and the SQLite language. See the SQLite Primer for a quick overview or refresher.
What you'll learn
- How to create and interact with a
Roomdatabase to persist data. - How to create a data class that defines a table in the database.
- How to use a data access object (DAO) to map Kotlin functions to SQL queries.
- How to test whether your database is working.
What you'll do
- Create a
Roomdatabase with an interface for nightly sleep data. - Test the database using the provided tests.
In this codelab, you build the database portion of an app that tracks sleep quality. The app uses a database to store sleep data over time.
The app has two screens, represented by fragments, as shown in the figure below.

The first screen, shown on the left, has buttons to start and stop tracking. The screen shows all the user's sleep data. The Clear button permanently deletes all the data that the app has collected for the user.
The second screen, shown on the right, is for selecting a sleep-quality rating. In the app, the rating is represented numerically. For development purposes, the app shows both the face icons and their numerical equivalents.
The user's flow is as follows:
- User opens the app and is presented with the sleep-tracking screen.
- User taps the Start button. This records the starting time and displays it. The Start button is disabled, and the Stop button is enabled.
- User taps the Stop button. This records the ending time and opens the sleep-quality screen.
- User selects a sleep-quality icon. The screen closes, and the tracking screen displays the sleep-ending time and sleep quality. The Stop button is disabled and the Start button is enabled. The app is ready for another night.
- The Clear button is enabled whenever there is data in the database. When the user taps the Clear button, all their data is erased without recourse—there is no "Are you sure?" message.
This app uses a simplified architecture, as shown below in the context of the full architecture. The app uses only the following components:
- UI controller
- View model and
LiveData - A Room database

Step 1: Download and run the starter app
- Download the TrackMySleepQuality-Starter app from GitHub.
- Build and run the app. The app shows the UI for the
SleepTrackerFragmentfragment, but no data. The buttons do not respond to taps.
Step 2: Inspect the starter app
- Take a look at the Gradle files:
- The project Gradle file
In the project-levelbuild.gradlefile, notice the variables that specify library versions. The versions used in the starter app work well together, and work well with this app. By the time you finish this codelab, Android Studio might prompt you to update some of the versions. It's up to you whether you want to update or stay with the versions that are in the app. If you run into "strange" compilation errors, try using the combination of library versions that the final solution app uses. - The module Gradle file. Notice the provided dependencies for all the Android Jetpack libraries, including
Room, and the dependencies for coroutines.
- Take a look at the packages and UI. The app is structured by functionality. The package contains placeholder files where you will add code throughout this series of codelabs.
- The
databasepackage, for all code relating to theRoomdatabase. - The
sleepqualityandsleeptrackerpackages contain the fragment, view model, and view model factory for each screen.
- Take a look at the
Util.ktfile, which contains functions to help display sleep-quality data. Some code is commented out because it references a view model that you create later. - Take a look at the androidTest folder (
SleepDatabaseTest.kt). You will use this test to verify that the database works as intended.
In Android, data is represented in data classes, and the data is accessed and modified using function calls. However, in the database world, you need entities and queries.
- An entity represents an object or concept, and its properties, to store in the database. An entity class defines a table, and each instance of that class represents a row in the table. Each property defines a column. In your app, the entity is going to hold information about a night of sleep.
- A query is a request for data or information from a database table or combination of tables, or a request to perform an action on the data. Common queries are for getting, inserting, and updating entities. For example, you could query for all the sleep nights on record, sorted by start time.
Room does all the hard work for you to get from Kotlin data classes to entities that can be stored in SQLite tables, and from function declarations to SQL queries.
You must define each entity as an annotated data class, and the interactions as an annotated interface, a data access object (DAO). Room uses these annotated classes to create tables in the database, and queries that act on the database.

Step 1: Create the SleepNight entity
In this task, you define one night of sleep as an annotated data class.
For one night of sleep, you need to record the start time, end time, and a quality rating.
And you need an ID to uniquely identify the night.
- In the
databasepackage, find and open theSleepNight.ktfile. - Create the
SleepNightdata class with parameters for an ID, a start time (in milliseconds), an end time (in milliseconds), and a numerical sleep-quality rating.
- You have to initialize the
sleepQuality, so set it to-1, indicating that no quality data has been collected. - You also have to initialize the end time. Set it to the start time to signal that no end time has been recorded yet.
data class SleepNight(
       var nightId: Long = 0L,
       val startTimeMilli: Long = System.currentTimeMillis(),
       var endTimeMilli: Long = startTimeMilli,
       var sleepQuality: Int = -1
)- Before the class declaration, annotate the data class with
@Entity. Name the tabledaily_sleep_quality_table. The argument for thetableNameis optional, but recommended. You can look up other arguments in the documentation.
If prompted, importEntityand all other annotations from theandroidxlibrary.
@Entity(tableName = "daily_sleep_quality_table")
data class SleepNight(...)- To identify the
nightIdas the primary key, annotate thenightIdproperty with@PrimaryKey. Set the parameterautoGeneratetotrueso thatRoomgenerates the ID for each entity. This guarantees that the ID for each night is unique.
@PrimaryKey(autoGenerate = true)
var nightId: Long = 0L,...- Annotate the remaining properties with
@ColumnInfo. Customize the property names using parameters as shown below.
import androidx.room.ColumnInfo
import androidx.room.Entity
import androidx.room.PrimaryKey

@Entity(tableName = "daily_sleep_quality_table")
data class SleepNight(
       @PrimaryKey(autoGenerate = true)
       var nightId: Long = 0L,

       @ColumnInfo(name = "start_time_milli")
       val startTimeMilli: Long = System.currentTimeMillis(),

       @ColumnInfo(name = "end_time_milli")
       var endTimeMilli: Long = startTimeMilli,

       @ColumnInfo(name = "quality_rating")
       var sleepQuality: Int = -1
)- Build and run your code to make sure it has no errors.
In this task, you define a data access object (DAO). On Android, the DAO provides convenience methods for inserting, deleting, and updating the database.
When you use a Room database, you query the database by defining and calling Kotlin functions in your code. These Kotlin functions map to SQL queries. You define those mappings in a DAO using annotations, and Room creates the necessary code.
Think of a DAO as defining a custom interface for accessing your database.
For common database operations, the Room library provides convenience annotations, such as @Insert, @Delete, and @Update. For everything else, there is the @Query annotation. You can write any query that's supported by SQLite.
As an added bonus, as you create your queries in Android Studio, the compiler checks your SQL queries for syntax errors.
For the sleep-tracker database of sleep nights, you need to be able to do the following:
- Insert new nights.
- Update an existing night to update an end time and a quality rating.
- Get a specific night based on its key.
- Get all nights, so you can display them.
- Get the most recent night.
- Delete all entries in the database.
Step 1: Create the SleepDatabase DAO
- In the
databasepackage, openSleepDatabaseDao.kt. - Notice that
interfaceSleepDatabaseDaois annotated with@Dao. All DAOs need to be annotated with the@Daokeyword.
@Dao
interface SleepDatabaseDao {}- Inside the body of the interface, add an
@Insertannotation. Below the@Insert, add aninsert()function that takes an instance of theEntityclassSleepNightas its argument.
That's it.Roomwill generate all the necessary code to insert theSleepNightinto the database. When you callinsert()from your Kotlin code,Roomexecutes a SQL query to insert the entity into the database. (Note: You can call the function anything you want.)
@Insert
fun insert(night: SleepNight)- Add an
@Updateannotation with anupdate()function for oneSleepNight. The entity that's updated is the entity that has the same key as the one that's passed in. You can update some or all of the entity's other properties.
@Update
fun update(night: SleepNight)
There is no convenience annotation for the remaining functionality, so you have to use the @Query annotation and supply SQLite queries.
- Add a
@Queryannotation with aget()function that takes aLongkeyargument and returns a nullableSleepNight. You'll see an error for a missing parameter.
@Query
fun get(key: Long): SleepNight?- The query is supplied as a string parameter to the annotation. Add a parameter to
@Query. Make it aStringthat is a SQLite query.
- Select all columns from the
daily_sleep_quality_table WHEREthenightIdmatches the :keyargument.
Notice the:key. You use the colon notation in the query to reference arguments in the function.
("SELECT * from daily_sleep_quality_table WHERE nightId = :key")- Add another
@Querywith aclear()function and a SQLite query toDELETEeverything from thedaily_sleep_quality_table. This query does not delete the table itself.
The@Deleteannotation deletes one item, and you could use@Deleteand supply a list of nights to delete. The drawback is that you need to fetch or know what's in the table. The@Deleteannotation is great for deleting specific entries, but not efficient for clearing all entries from a table.
@Query("DELETE FROM daily_sleep_quality_table")
fun clear()- Add a
@Querywith agetTonight()function. Make theSleepNightreturned bygetTonight()nullable, so that the function can handle the case where the table is empty. (The table is empty at the beginning, and after the data is cleared.)
To get "tonight" from the database, write a SQLite query that returns the first element of a list of results ordered bynightIdin descending order. UseLIMIT 1to return only one element.
@Query("SELECT * FROM daily_sleep_quality_table ORDER BY nightId DESC LIMIT 1")
fun getTonight(): SleepNight?- Add a
@Querywith agetAllNights()function:
- Have the SQLite query return all columns from the
daily_sleep_quality_table, ordered in descending order. - Have
getAllNights()return a list ofSleepNightentities asLiveData.Roomkeeps thisLiveDataupdated for you, which means you only need to explicitly get the data once. - You may need to import
LiveDatafromandroidx.lifecycle.LiveData.
@Query("SELECT * FROM daily_sleep_quality_table ORDER BY nightId DESC")
fun getAllNights(): LiveData<List<SleepNight>>- Though you won't see any visible changes, run your app to make sure it has no errors.
In this task, you create a Room database that uses the Entity and DAO that you created in the previous task.
You need to create an abstract database holder class, annotated with @Database. This class has one method that either creates an instance of the database if the database doesn't exist, or returns a reference to an existing database.
Getting a Room database is a bit involved, so here's the general process before you start with the code:
- Create a
public abstractclass thatextends RoomDatabase. This class is to act as a database holder. The class is abstract, becauseRoomcreates the implementation for you. - Annotate the class with
@Database. In the arguments, declare the entities for the database and set the version number. - Inside a
companionobject, define an abstract method or property that returns aSleepDatabaseDao.Roomwill generate the body for you. - You only need one instance of the
Roomdatabase for the whole app, so make theRoomDatabasea singleton. - Use
Room's database builder to create the database only if the database doesn't exist. Otherwise, return the existing database.
Step 1: Create the database
- In the
databasepackage, openSleepDatabase.kt. - In the file, create an
abstractclass calledSleepDatabasethat extendsRoomDatabase.
Annotate the class with@Database.
@Database()
abstract class SleepDatabase : RoomDatabase() {}- You'll see an error for missing entities and version parameters. The
@Databaseannotation requires several arguments, so thatRoomcan build the database.
- Supply the
SleepNightas the only item with the list ofentities. - Set the
versionas1. Whenever you change the schema, you'll have to increase the version number. - Set
exportSchematofalse, so as not to keep schema version history backups.
entities = [SleepNight::class], version = 1, exportSchema = false- The database needs to know about the DAO. Inside the body of the class, declare an abstract value that returns the
SleepDatabaseDao. You can have multiple DAOs.
abstract val sleepDatabaseDao: SleepDatabaseDao- Below that, define a
companionobject. The companion object allows clients to access the methods for creating or getting the database without instantiating the class. Since the only purpose of this class is to provide a database, there is no reason to ever instantiate it.
companion object {}- Inside the
companionobject, declare a private nullable variableINSTANCEfor the database and initialize it tonull. TheINSTANCEvariable will keep a reference to the database, once one has been created. This helps you avoid repeatedly opening connections to the database, which is expensive.
Annotate INSTANCE with @Volatile. The value of a volatile variable will never be cached, and all writes and reads will be done to and from the main memory. This helps make sure the value of INSTANCE is always up-to-date and the same to all execution threads. It means that changes made by one thread to INSTANCE are visible to all other threads immediately, and you don't get a situation where, say, two threads each update the same entity in a cache, which would create a problem.
@Volatile
private var INSTANCE: SleepDatabase? = null- Below
INSTANCE, still inside thecompanionobject, define agetInstance()method with aContextparameter that the database builder will need. Return a typeSleepDatabase. You'll see an error becausegetInstance()isn't returning anything yet.
fun getInstance(context: Context): SleepDatabase {}- Inside
getInstance(), add asynchronized{}block. Pass inthisso that you can access the context.
Multiple threads can potentially ask for a database instance at the same time, resulting in two databases instead of one. This problem is not likely to happen in this sample app, but it's possible for a more complex app. Wrapping the code to get the database intosynchronizedmeans that only one thread of execution at a time can enter this block of code, which makes sure the database only gets initialized once.
synchronized(this) {}- Inside the synchronized block, copy the current value of
INSTANCEto a local variableinstance. This is to take advantage of smart cast, which is only available to local variables.
var instance = INSTANCE- Inside the
synchronizedblock,return instanceat the end of thesynchronizedblock. Ignore the return type mismatch error; you won't ever return null once you are done.
return instance- Above the
returnstatement, add anifstatement to check whetherinstanceis null, that is, there is no database yet.
if (instance == null) {}- If
instanceisnull, use the database builder to get a database. In the body of theifstatement, invokeRoom.databaseBuilderand supply the context that you passed in, the database class, and a name for the database,sleep_history_database. To remove the error, you'll have to add a migration strategy andbuild()in the following steps.
instance = Room.databaseBuilder(
                           context.applicationContext,
                           SleepDatabase::class.java,
"sleep_history_database")- Add the required migration strategy to the builder. Use
.fallbackToDestructiveMigration().
Normally, you would have to provide a migration object with a migration strategy for when the schema changes. A migration object is an object that defines how you take all rows with the old schema and convert them to rows in the new schema, so that no data is lost. Migration is beyond the scope of this codelab. A simple solution is to destroy and rebuild the database, which means that the data is lost.
.fallbackToDestructiveMigration()- Finally, call
.build().
.build()- Assign
INSTANCE = instanceas the final step inside theifstatement.
INSTANCE = instance- Your final code should look like this:
@Database(entities = [SleepNight::class], version = 1, exportSchema = false)
abstract class SleepDatabase : RoomDatabase() {

   abstract val sleepDatabaseDao: SleepDatabaseDao

   companion object {

       @Volatile
       private var INSTANCE: SleepDatabase? = null

       fun getInstance(context: Context): SleepDatabase {
           synchronized(this) {
               var instance = INSTANCE

               if (instance == null) {
                   instance = Room.databaseBuilder(
                           context.applicationContext,
                           SleepDatabase::class.java,
                           "sleep_history_database"
                   )
                           .fallbackToDestructiveMigration()
                           .build()
                   INSTANCE = instance
               }
               return instance
           }
       }
   }
}- Build and run your code.
You now have all the building blocks for working with your Room database. This code compiles and runs, but you have no way of telling if it actually works. So, this is a good time to add some basic tests.
Step 2: Test the SleepDatabase
In this step, you run provided tests to verify that your database works. This helps ensure that the database works before you build onto it. The provided tests are basic. For a production app, you would exercise all of the functions and queries in all the DAOs.
The starter app contains an androidTest folder. This androidTest folder contains unit tests that involve Android instrumentation, which is a fancy way of saying that the tests need the Android framework, so you need to run the tests on a physical or virtual device. Of course, you can also create and run pure unit tests that do not involve the Android framework.
- In Android Studio, in the androidTest folder, open the SleepDatabaseTest file.
- To uncomment the code, select all the commented code and press the
Cmd+/orControl+/keyboard shortcut. - Take a look at the file.
Here's a quick run-through of the testing code, because it's another piece of code that you can reuse:
SleepDabaseTestis a test class.- The
@RunWithannotation identifies the test runner, which is the program that sets up and executes the tests. - During setup, the function annotated with
@Beforeis executed, and it creates an in-memorySleepDatabasewith theSleepDatabaseDao. "In-memory" means that this database is not saved on the file system and will be deleted after the tests run. - Also when building the in-memory database, the code calls another test-specific method,
allowMainThreadQueries. By default, you get an error if you try to run queries on the main thread. This method allows you to run tests on the main thread, which you should only do during testing. - In a test method annotated with
@Test, you create, insert, and retrieve aSleepNight, and assert that they are the same. If anything goes wrong, throw an exception. In a real test, you would have multiple@Testmethods. - When testing is done, the function annotated with
@Afterexecutes to close the database.
- Right-click on the test file in the Project pane and select Run 'SleepDatabaseTest'.
- After the tests run, verify in the SleepDatabaseTest pane that all the tests have passed.
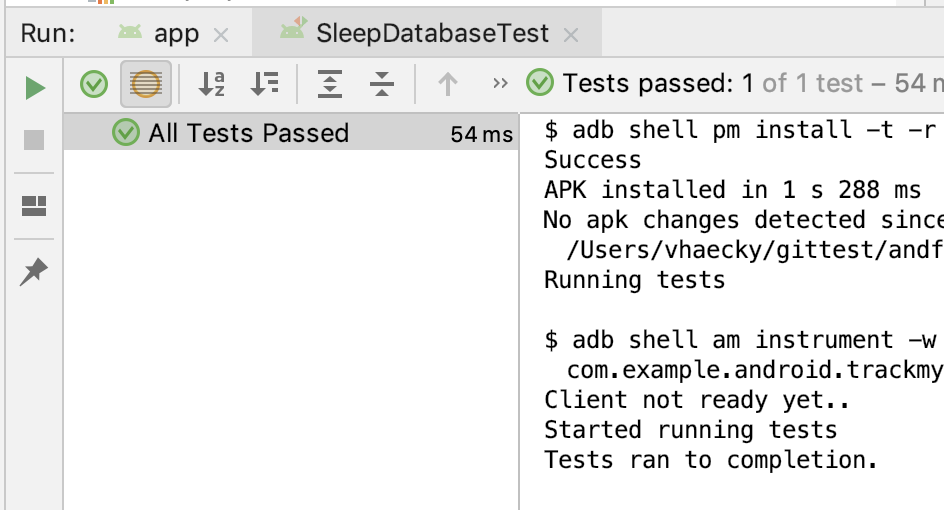
Because all the tests passed, you now know several things:
- The database gets created correctly.
- You can insert a
SleepNightinto the database. - You can get back the
SleepNight. - The
SleepNighthas the correct value for the quality.
Android Studio project: TrackMySleepQualityRoomAndTesting
When testing a database, you need to exercise all the methods defined in the DAO. To complete testing, add and execute tests to exercise the other DAO methods.
- Define your tables as data classes annotated with
@Entity. Define properties annotated with@ColumnInfoas columns in the tables. - Define a data access object (DAO) as an interface annotated with
@Dao. The DAO maps Kotlin functions to database queries. - Use annotations to define
@Insert,@Delete, and@Updatefunctions. - Use the
@Queryannotation with an SQLite query string as a parameter for any other queries. - Create an abstract class that has a
getInstance()function that returns a database. - Use instrumented tests to test that your database and DAO are working as expected. You can use the provided tests as a template.
Udacity course:
Android Developer Documentation:
RoomDatabaseDatabase(annotations)- You can use raw queries with
Room Roomdatabase.Builder- Testing training
SQLiteDatabaseclassDaoRoompersistence library
Other documentation and articles:
This section lists possible homework assignments for students who are working through this codelab as part of a course led by an instructor. It's up to the instructor to do the following:
- Assign homework if required.
- Communicate to students how to submit homework assignments.
- Grade the homework assignments.
Instructors can use these suggestions as little or as much as they want, and should feel free to assign any other homework they feel is appropriate.
If you're working through this codelab on your own, feel free to use these homework assignments to test your knowledge.
Answer these questions
Question 1
How do you indicate that a class represents an entity to store in a Room database?
- Make the class extend
DatabaseEntity. - Annotate the class with
@Entity. - Annotate the class with
@Database. - Make the class extend
RoomEntityand also annotate the class with@Room.
Question 2
The DAO (data access object) is an interface that Room uses to map Kotlin functions to database queries.
How do you indicate that an interface represents a DAO for a Room database?
- Make the interface extend
RoomDAO. - Make the interface extend
EntityDao, then implement theDaoConnection()method. - Annotate the interface with
@Dao. - Annotate the interface with
@RoomConnection.
Question 3
Which of the following statements are true about the Room database? Choose all that apply.
- You can define tables for a
Roomdatabase as annotated data classes. - If you return
LiveDatafrom a query,Roomwill keep theLiveDataupdated for you if theLiveDatachanges. - Each
Roomdatabase must have one, and only one, DAO. - To identify a class as a
Roomdatabase, make it a subclass ofRoomDatabaseand annotate it with@Database.
Question 4
Which of the following annotations can you use in your @Dao interface? Choose all that apply.
@Get@Update@Insert@Query
Question 5
How can you verify that your database is working? Select all that apply.
- Write instrumented tests.
- Continue writing and running the app until it displays the data.
- Replace the calls to the methods in the DAO interface by calls to equivalent methods in the
Entityclass. - Run the
verifyDatabase()function provided by theRoomlibrary.
Start to the next lesson:
For links to other codelabs in this course, see the Android Kotlin Fundamentals codelabs landing page.