
This codelab is part of the Android Kotlin Fundamentals course. You'll get the most value out of this course if you work through the codelabs in sequence. All the course codelabs are listed on the Android Kotlin Fundamentals codelabs landing page.
Introduction
This codelab teaches you how to use a RecyclerView to display lists of items. Building on the sleep-tracker app from the previous series of codelabs, you learn a better and more versatile way to display data, using a RecyclerView with a recommended architecture.
What you should already know
You should be familiar with:
- Building a basic user interface (UI) using an activity, fragments, and views.
- Navigating between fragments, and using
safeArgsto pass data between fragments. - Using view models, view model factories, transformations, and
LiveDataand their observers. - Creating a
Roomdatabase, creating a DAO, and defining entities. - Using coroutines for database tasks and other long-running tasks.
What you'll learn
- How to use a
RecyclerViewwith anAdapterand aViewHolderto display a list of items.
What you'll do
- Change the TrackMySleepQuality app from the previous lesson to use a
RecyclerViewto display sleep-quality data.
In this codelab, you build the RecyclerView portion of an app that tracks sleep quality. The app uses a Room database to store sleep data over time.
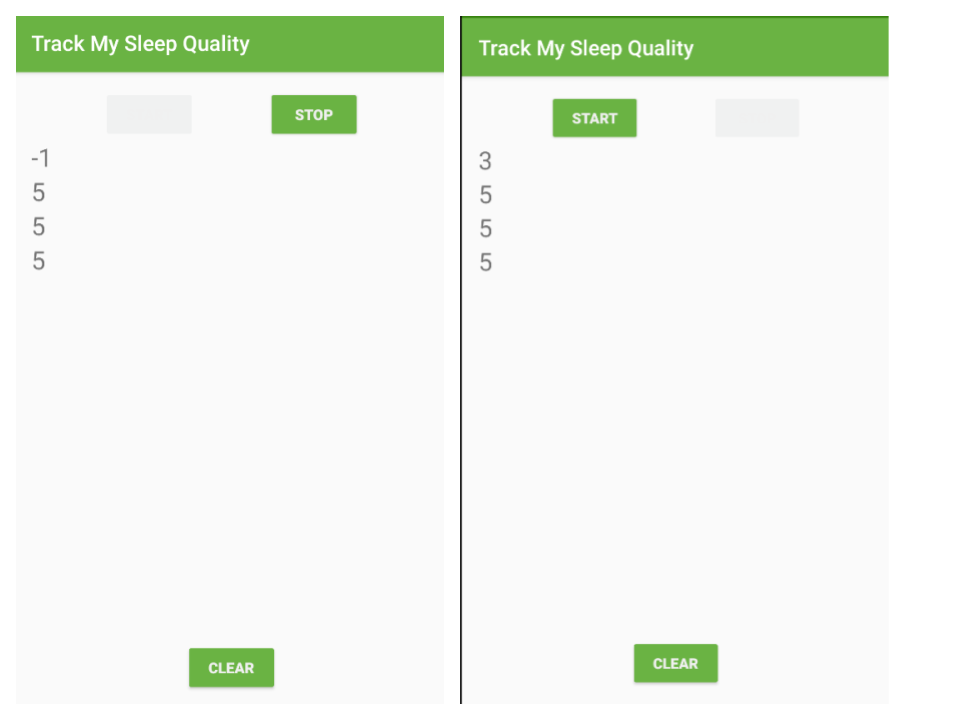
The starter sleep-tracker app has two screens, represented by fragments, as shown in the figure below.
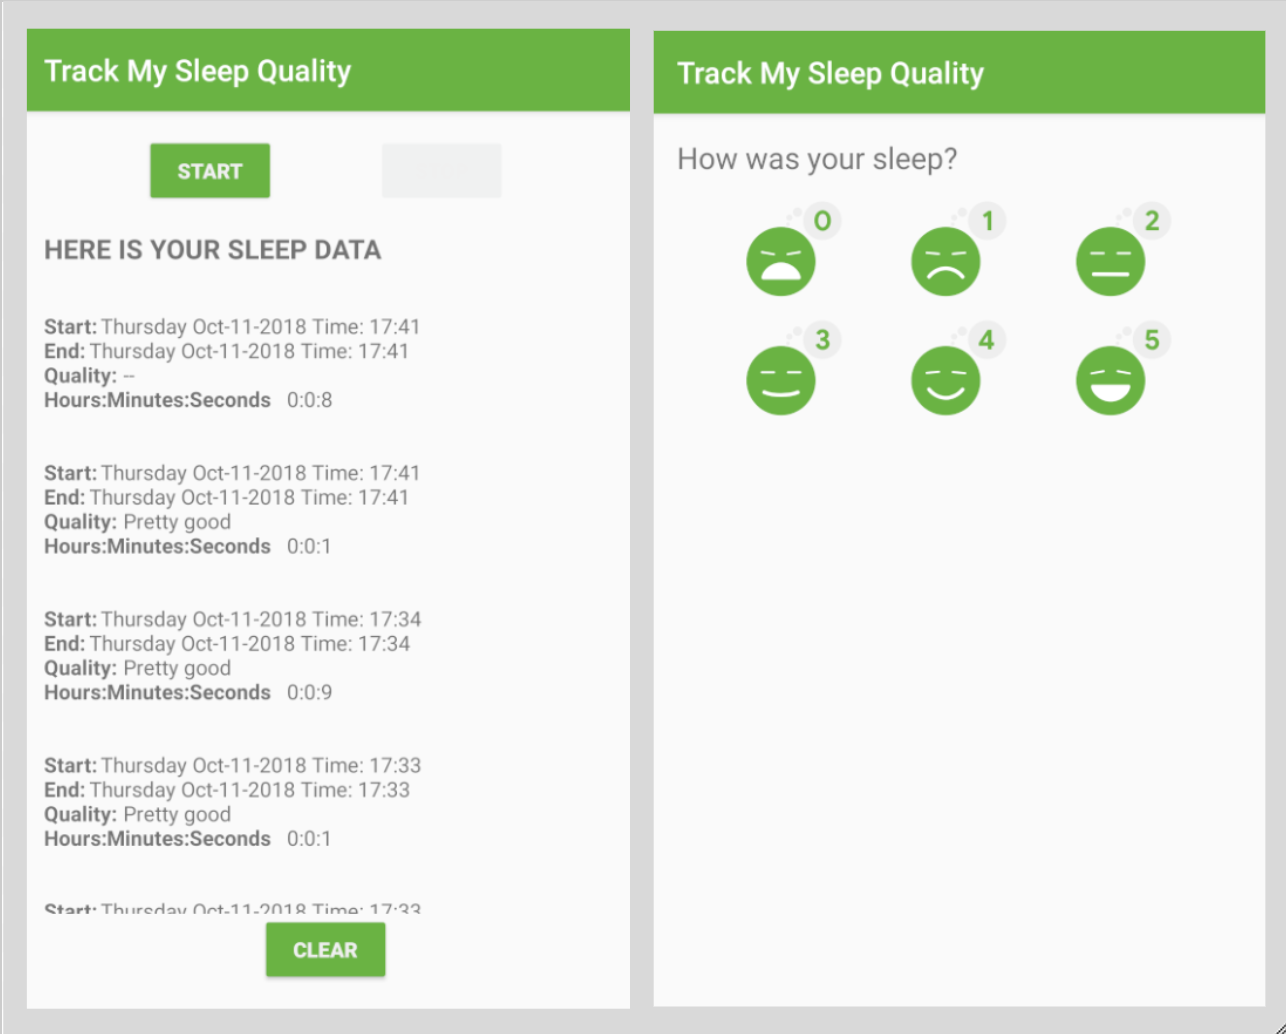
The first screen, shown on the left, has buttons to start and stop tracking. This screen also shows all the user's sleep data. The Clear button permanently deletes all the data that the app has collected for the user. The second screen, shown on the right, is for selecting a sleep-quality rating.
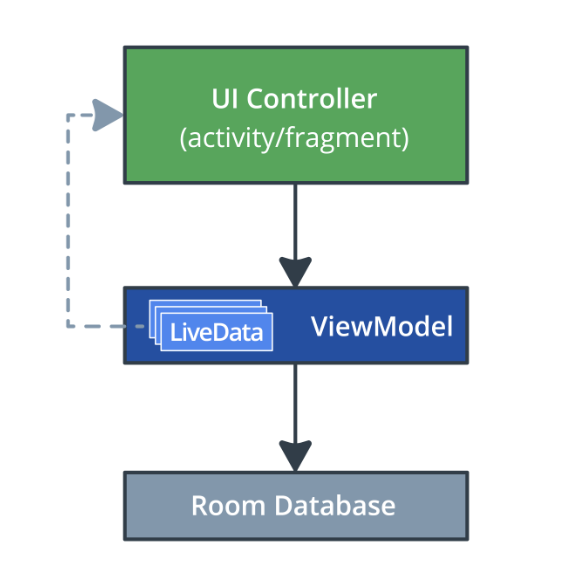
This app uses a simplified architecture with a UI controller, ViewModel, and LiveData. The app also uses a Room database to make sleep data persistent.
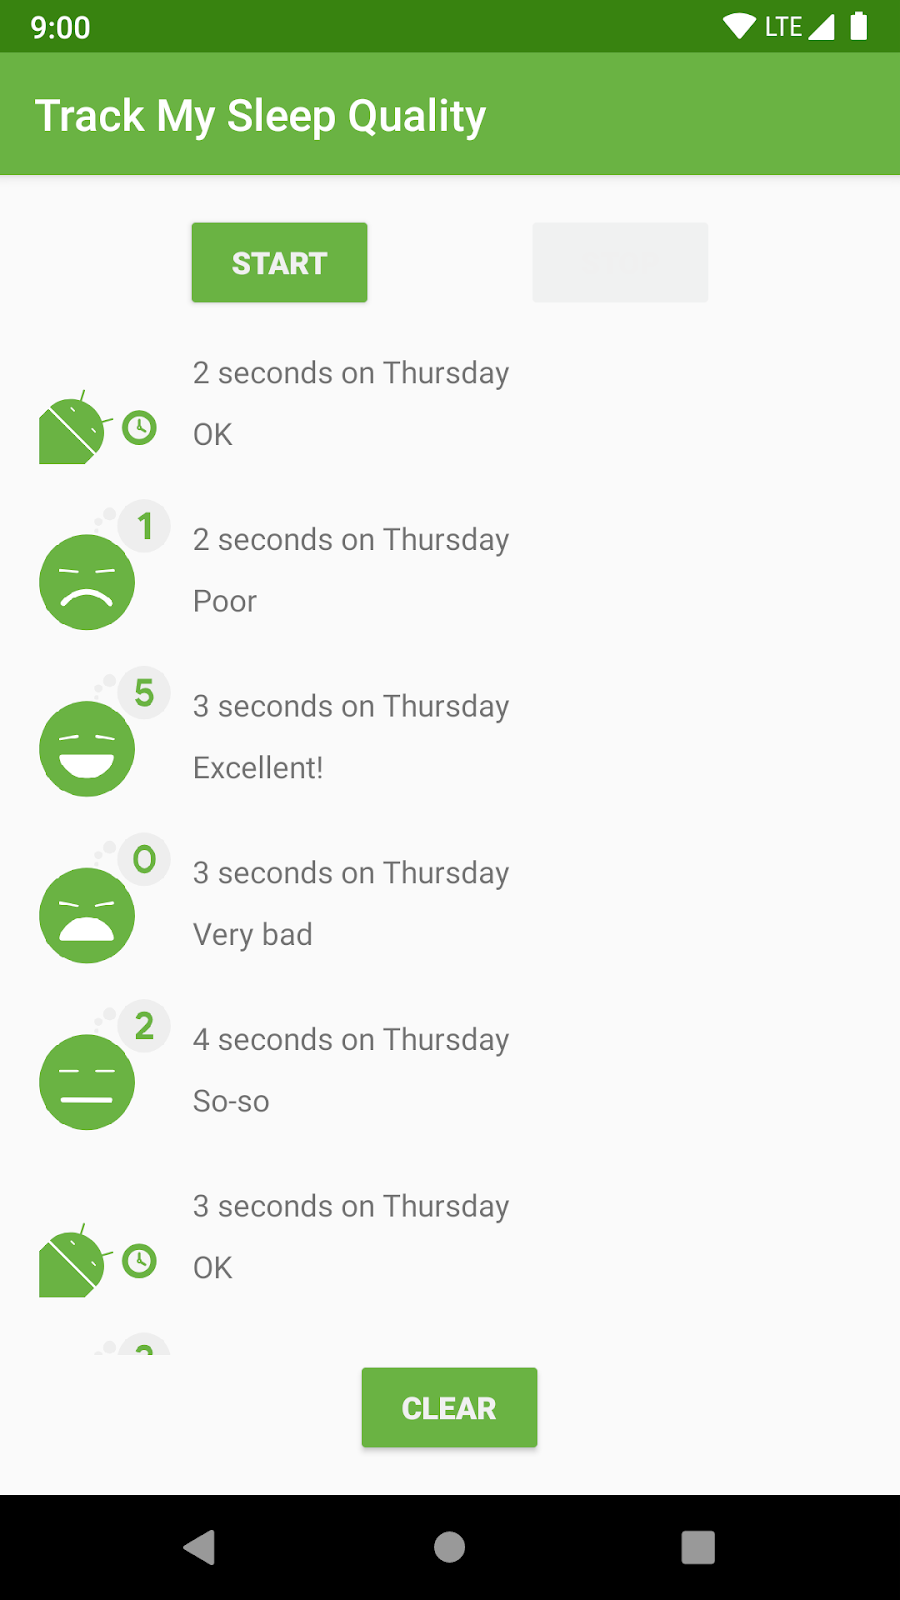
The list of sleep nights displayed in the first screen is functional, but not pretty. The app uses a complex formatter to create text strings for the text view and numbers for the quality. Also, this design does not scale. After you fix all these problems in this codelab, the final app has the same functionality, and the main screen looks like this:
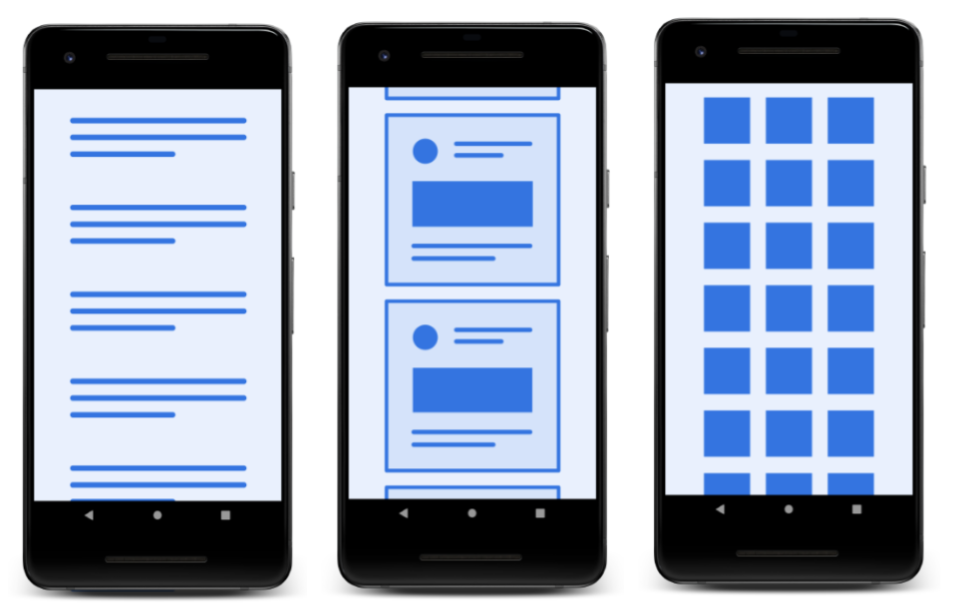
Displaying a list or grid of data is one of the most common UI tasks in Android. Lists vary from simple to very complex. A list of text views might show simple data, such as a shopping list. A complex list, such as an annotated list of vacation destinations, might show the user many details inside a scrolling grid with headers.
To support all these use cases, Android provides the RecyclerView widget.
The greatest benefit of RecyclerView is that it is very efficient for large lists:
- By default,
RecyclerViewonly does work to process or draw items that are currently visible on the screen. For example, if your list has a thousand elements but only 10 elements are visible,RecyclerViewdoes only enough work to draw 10 items on the screen. When the user scrolls,RecyclerViewfigures out what new items should be on the screen and does just enough work to display those items. - When an item scrolls off the screen, the item's views are recycled. That means the item is filled with new content that scrolls onto the screen. This
RecyclerViewbehavior saves a lot of processing time and helps lists scroll fluidly. - When an item changes, instead of redrawing the entire list,
RecyclerViewcan update that one item. This is a huge efficiency gain when displaying lists of complex items!
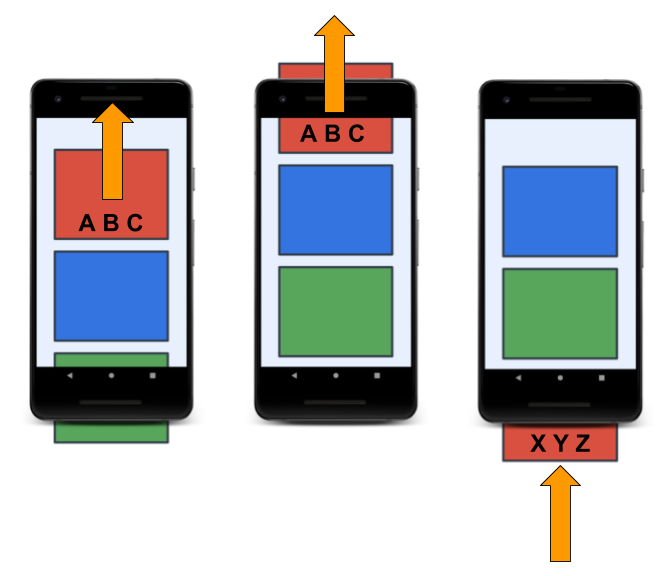
In the sequence shown below, you can see that one view has been filled with data, ABC. After that view scrolls off the screen, RecyclerView reuses the view for new data, XYZ.
The adapter pattern
If you ever travel between countries that use different electric sockets, you probably know how you can plug your devices into outlets by using an adapter. The adapter lets you convert one type of plug to another, which is really converting one interface into another.
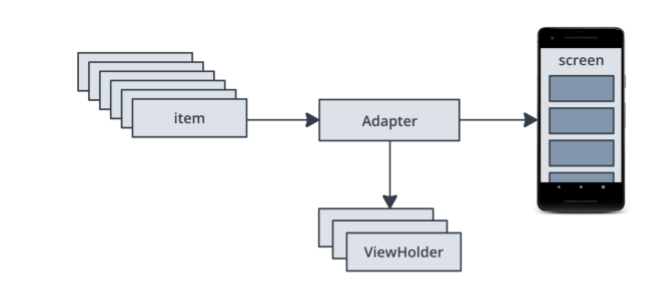
The adapter pattern in software engineering helps an object to work with another API. RecyclerView uses an adapter to transform app data into something the RecyclerView can display, without changing how the app stores and processes the data. For the sleep-tracker app, you build an adapter that adapts data from the Room database into something that RecyclerView knows how to display, without changing the ViewModel.
Implementing a RecyclerView
To display your data in a RecyclerView, you need the following parts:
- Data to display.
- A
RecyclerViewinstance defined in your layout file, to act as the container for the views. - A layout for one item of data.
If all the list items look the same, you can use the same layout for all of them, but that is not mandatory. The item layout has to be created separately from the fragment's layout, so that one item view at a time can be created and filled with data. - A layout manager.
The layout manager handles the organization (the layout) of UI components in a view. - A view holder.
The view holder extends theViewHolderclass. It contains the view information for displaying one item from the item's layout. View holders also add information thatRecyclerViewuses to efficiently move views around the screen. - An adapter.
The adapter connects your data to theRecyclerView. It adapts the data so that it can be displayed in aViewHolder. ARecyclerViewuses the adapter to figure out how to display the data on the screen.
In this task, you add a RecyclerView to your layout file and set up an Adapter to expose sleep data to the RecyclerView.
Step 1: Add RecyclerView with LayoutManager
In this step, you replace the ScrollView with a RecyclerView in the fragment_sleep_tracker.xml file.
- Download the RecyclerViewFundamentals-Starter app from GitHub.
- Build and run the app. Notice how the data is displayed as simple text.
- Open the
fragment_sleep_tracker.xmllayout file in the Design tab in Android Studio. - In the Component Tree pane, delete the
ScrollView. This action also deletes theTextViewthat's inside theScrollView. - In the Palette pane, scroll through the list of component types on the left to find Containers, then select it.
- Drag a
RecyclerViewfrom the Palette pane to the Component Tree pane. Place theRecyclerViewinside theConstraintLayout.

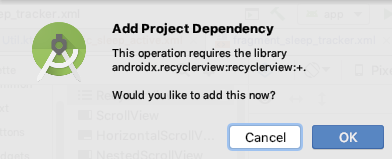
- If a dialog opens asking whether you want to add a dependency, click OK to let Android Studio add the
recyclerviewdependency to your Gradle file. It may take a few seconds, and then your app syncs.
- Open the module
build.gradlefile, scroll to the end, and take note of the new dependency, which looks similar to the code below:
implementation 'androidx.recyclerview:recyclerview:1.0.0'
- Switch back to
fragment_sleep_tracker.xml. - In the Text tab, look for the
RecyclerViewcode shown below:
<androidx.recyclerview.widget.RecyclerView
   android:layout_width="match_parent"
android:layout_height="match_parent" />- Give the
RecyclerViewanidofsleep_list.
android:id="@+id/sleep_list"- Position the
RecyclerViewto take up the remaining portion of the screen inside theConstraintLayout. To do this, constrain the top of theRecyclerViewto the Start button, the bottom to the Clear button, and each side to the parent. Set the layout width and height to 0 dp in the Layout Editor or in XML, using the following code:
    android:layout_width="0dp"
    android:layout_height="0dp"
    app:layout_constraintBottom_toTopOf="@+id/clear_button"
    app:layout_constraintEnd_toEndOf="parent"
    app:layout_constraintStart_toStartOf="parent"
app:layout_constraintTop_toBottomOf="@+id/stop_button"- Add a layout manager to the
RecyclerViewXML. EveryRecyclerViewneeds a layout manager that tells it how to position items in the list. Android provides aLinearLayoutManager, which by default lays out the items in a vertical list of full width rows.
app:layoutManager="androidx.recyclerview.widget.LinearLayoutManager"- Switch to the Design tab and notice that the added constraints have caused the
RecyclerViewto expand to fill the available space.
Step 2: Create the list item layout and text view holder
The RecyclerView is only a container. In this step, you create the layout and infrastructure for the items to be displayed inside the RecyclerView.
To get to a working RecyclerView as quickly as possible, at first you use a simplistic list item that only displays the sleep quality as a number. For this, you need a view holder, TextItemViewHolder. You also need a view, a TextView, for the data. (In a later step, you learn more about view holders and how to lay out all the sleep data.)
- Create a layout file called
text_item_view.xml. It doesn't matter what you use as the root element, because you'll replace the template code. - In
text_item_view.xml, delete all the given code. - Add a
TextViewwith16dppadding at the start and end, and a text size of24sp. Let the width match the parent, and the height wrap the content. Because this view is displayed inside theRecyclerView, you don't have to place the view inside aViewGroup.
<?xml version="1.0" encoding="utf-8"?>
<TextView xmlns:android="http://schemas.android.com/apk/res/android"
    android:textSize="24sp"
    android:paddingStart="16dp"
    android:paddingEnd="16dp"
    android:layout_width="match_parent"
android:layout_height="wrap_content" />- Open
Util.kt. Scroll to the end and add the definition that's shown below, which creates theTextItemViewHolderclass. Put the code at the bottom of the file, after the last closing brace. The code goes inUtil.ktbecause this view holder is temporary, and you replace it later.
class TextItemViewHolder(val textView: TextView): RecyclerView.ViewHolder(textView)- If you are prompted, import
android.widget.TextViewandandroidx.recyclerview.widget.RecyclerView.
Step 3: Create SleepNightAdapter
The core task in implementing a RecyclerView is creating the adapter. You have a simple view holder for the item view, and a layout for each item. You can now create an adapter. The adapter creates a view holder and fills it with data for the RecyclerView to display.
- In the
sleeptrackerpackage, create a new Kotlin class calledSleepNightAdapter. - Make the
SleepNightAdapterclass extendRecyclerView.Adapter. The class is calledSleepNightAdapterbecause it adapts aSleepNightobject into something thatRecyclerViewcan use. The adapter needs to know what view holder to use, so pass inTextItemViewHolder. Import necessary components when prompted, and then you'll see an error, because there are mandatory methods to implement.
class SleepNightAdapter: RecyclerView.Adapter<TextItemViewHolder>() {}- At the top level of
SleepNightAdapter, create alistOfSleepNightvariable to hold the data.
var data = listOf<SleepNight>()- In
SleepNightAdapter, overridegetItemCount()to return the size of the list of sleep nights indata. TheRecyclerViewneeds to know how many items the adapter has for it to display, and it does that by callinggetItemCount().
override fun getItemCount() = data.size- In
SleepNightAdapter, override theonBindViewHolder()function, as shown below.
TheonBindViewHolder()function is called byRecyclerViewto display the data for one list item at the specified position. So theonBindViewHolder()method takes two arguments: a view holder, and a position of the data to bind. For this app, the holder is theTextItemViewHolder, and the position is the position in the list.
override fun onBindViewHolder(holder: TextItemViewHolder, position: Int) {
}- Inside
onBindViewHolder(), create a variable for one item at a given position in the data.
val item = data[position]- The
ViewHolderyou created has a property calledtextView. InsideonBindViewHolder(), set thetextof thetextViewto the sleep-quality number. This code displays only a list of numbers, but this simple example lets you see how the adapter gets the data into the view holder and onto the screen.
holder.textView.text = item.sleepQuality.toString()- In
SleepNightAdapter, override and implementonCreateViewHolder(), which is called when theRecyclerViewneeds a view holder to represent an item.
This function takes two parameters and returns aViewHolder. Theparentparameter, which is the view group that holds the view holder, is always theRecyclerView. TheviewTypeparameter is used when there are multiple views in the sameRecyclerView. For example, if you put a list of text views, an image, and a video all in the sameRecyclerView, theonCreateViewHolder()function would need to know what type of view to use.
override fun onCreateViewHolder(parent: ViewGroup, viewType: Int): TextItemViewHolder {
}- In
onCreateViewHolder(), create an instance ofLayoutInflater.
The layout inflater knows how to create views from XML layouts. Thecontextcontains information on how to correctly inflate the view. In an adapter for a recycler view, you always pass in the context of theparentview group, which is theRecyclerView.
val layoutInflater = LayoutInflater.from(parent.context)- In
onCreateViewHolder(), create theviewby asking thelayoutinflaterto inflate it.
Pass in the XML layout for the view, and theparentview group for the view. The third, boolean, argument isattachToRoot. This argument needs to befalse, becauseRecyclerViewadds this item to the view hierarchy for you when it's time.
val view = layoutInflater
.inflate(R.layout.text_item_view, parent, false) as TextView- In
onCreateViewHolder(), return aTextItemViewHoldermade withview.
return TextItemViewHolder(view)- The adapter needs to let the
RecyclerViewknow when thedatahas changed, because theRecyclerViewknows nothing about the data. It only knows about the view holders that the adapter gives to it.
To tell theRecyclerViewwhen the data that it's displaying has changed, add a custom setter to thedatavariable that's at the top of theSleepNightAdapterclass. In the setter, givedataa new value, then callnotifyDataSetChanged()to trigger redrawing the list with the new data.
var data =  listOf<SleepNight>()
   set(value) {
       field = value
       notifyDataSetChanged()
}Step 4: Tell RecyclerView about the Adapter
The RecyclerView needs to know about the adapter to use to get view holders.
- Open
SleepTrackerFragment.kt. - In
onCreateview(), create an adapter. Put this code after the creation of theViewModelmodel, and before thereturnstatement.
val adapter = SleepNightAdapter()- Associate the
adapterwith theRecyclerView.
binding.sleepList.adapter = adapter- Clean and rebuild your project to update the
bindingobject.
If you still see errors aroundbinding.sleepListorbinding.FragmentSleepTrackerBinding, invalidate caches and restart. (Select File > Invalidate Caches / Restart.)
If you run the app now, there are no errors, but you won't see any data displayed when you tap Start, then Stop.
Step 5: Get data into the adapter
So far you have an adapter, and a way to get data from the adapter into the RecyclerView. Now you need to get data into the adapter from the ViewModel.
- Open
SleepTrackerViewModel. - Find the
nightsvariable, which stores all the sleep nights, which is the data to display. Thenightsvariable is set by callinggetAllNights()on the database. - Remove
privatefromnights, because you will create an observer that needs to access this variable. Your declaration should look like this:
val nights = database.getAllNights()- In the
databasepackage, open theSleepDatabaseDao. - Find the
getAllNights()function. Notice that this function returns a list ofSleepNightvalues asLiveData. This means that thenightsvariable containsLiveDatathat is kept updated byRoom, and you can observenightsto know when it changes. - Open
SleepTrackerFragment. - In
onCreateView(), below the creation of theadapter, create an observer on thenightsvariable.
By supplying the fragment'sviewLifecycleOwneras the lifecycle owner, you can make sure this observer is only active when theRecyclerViewis on the screen.
sleepTrackerViewModel.nights.observe(viewLifecycleOwner, Observer {
})- Inside the observer, whenever you get a non-null value (for
nights), assign the value to the adapter'sdata. This is the completed code for the observer and setting the data:
sleepTrackerViewModel.nights.observe(viewLifecycleOwner, Observer {
   it?.let {
       adapter.data = it
   }
})- Build and run your code.
You'll see the sleep-quality numbers as a list, if your adapter is working. The screenshot on the left shows -1 after you tap Start. The screenshot on the right shows the updated sleep-quality number after you tap Stop and select a quality rating.
Step 6: Explore how view holders are recycled
RecyclerView recycles view holders, which means that it reuses them. As a view scrolls off the screen, RecyclerView reuses the view for the view that's about to scroll onto the screen.
Because these view holders are recycled, make sure onBindViewHolder() sets or resets any customizations that previous items might have set on a view holder.
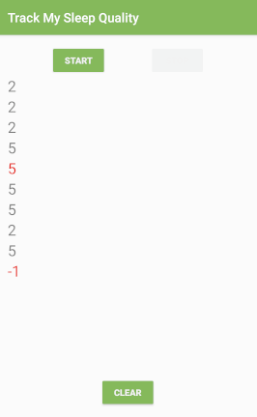
For example, you could set the text color to red in view holders that hold quality ratings that are less than or equal to 1 and represent poor sleep.
- In the
SleepNightAdapterclass, add the following code to at the end ofonBindViewHolder().
if (item.sleepQuality <= 1) {
   holder.textView.setTextColor(Color.RED) // red
}- Run the app.
- Add some low sleep-quality data, and the number is red.
- Add high ratings for sleep quality until you see a red high number on the screen.
AsRecyclerViewreuses view holders, it eventually reuses one of the red view holders for a high quality rating. The high rating is erroneously displayed in red.
- To fix this, add an
elsestatement to set the color to black if the quality is not less than or equal to one.
With both conditions explicit, the view holder will use the correct text color for each item.
if (item.sleepQuality <= 1) {
   holder.textView.setTextColor(Color.RED) // red
} else {
   // reset
   holder.textView.setTextColor(Color.BLACK) // black
}- Run the app, and the numbers should always have the correct color.
Congratulations! You now have a fully functional basic RecyclerView.
In this task, you replace the simple view holder with one that can display more data for a sleep night.
The simple ViewHolder that you added to Util.kt just wraps a TextView in a TextItemViewHolder.
class TextItemViewHolder(val textView: TextView): RecyclerView.ViewHolder(textView)So why does RecyclerView not just use a TextView directly? This one line of code provides a lot of functionality. A ViewHolder describes an item view and metadata about its place within the RecyclerView. RecyclerView relies on this functionality to correctly position the view as the list scrolls, and to do interesting things like animate views when items are added or removed in the Adapter.
If RecyclerView does need to access the views stored in the ViewHolder, it can do so using the view holder's itemView property. RecyclerView uses itemView when it's binding an item to display on the screen, when drawing decorations around a view like a border, and for implementing accessibility.
Step 1: Create the item layout
In this step, you create the layout file for one item. The layout consists of a ConstraintLayout with an ImageView for the sleep quality, a TextView for the sleep length, and a TextView for the quality as text. Because you've done layouts before, copy and paste the provided XML code.
- Create a new layout resource file and name it
list_item_sleep_night. - Replace all the code in the file with the code below. Then familiarize yourself with the layout you just created.
<?xml version="1.0" encoding="utf-8"?>
<androidx.constraintlayout.widget.ConstraintLayout xmlns:android="http://schemas.android.com/apk/res/android"
   xmlns:app="http://schemas.android.com/apk/res-auto"
   xmlns:tools="http://schemas.android.com/tools"
   android:layout_width="match_parent"
   android:layout_height="wrap_content">

   <ImageView
       android:id="@+id/quality_image"
       android:layout_width="@dimen/icon_size"
       android:layout_height="60dp"
       android:layout_marginStart="16dp"
       android:layout_marginTop="8dp"
       android:layout_marginBottom="8dp"
       app:layout_constraintBottom_toBottomOf="parent"
       app:layout_constraintStart_toStartOf="parent"
       app:layout_constraintTop_toTopOf="parent"
       tools:srcCompat="@drawable/ic_sleep_5" />

   <TextView
       android:id="@+id/sleep_length"
       android:layout_width="0dp"
       android:layout_height="20dp"
       android:layout_marginStart="8dp"
       android:layout_marginTop="8dp"
       android:layout_marginEnd="16dp"
       app:layout_constraintEnd_toEndOf="parent"
       app:layout_constraintStart_toEndOf="@+id/quality_image"
       app:layout_constraintTop_toTopOf="@+id/quality_image"
       tools:text="Wednesday" />

   <TextView
       android:id="@+id/quality_string"
       android:layout_width="0dp"
       android:layout_height="20dp"
       android:layout_marginTop="8dp"
       app:layout_constraintEnd_toEndOf="@+id/sleep_length"
       app:layout_constraintHorizontal_bias="0.0"
       app:layout_constraintStart_toStartOf="@+id/sleep_length"
       app:layout_constraintTop_toBottomOf="@+id/sleep_length"
       tools:text="Excellent!!!" />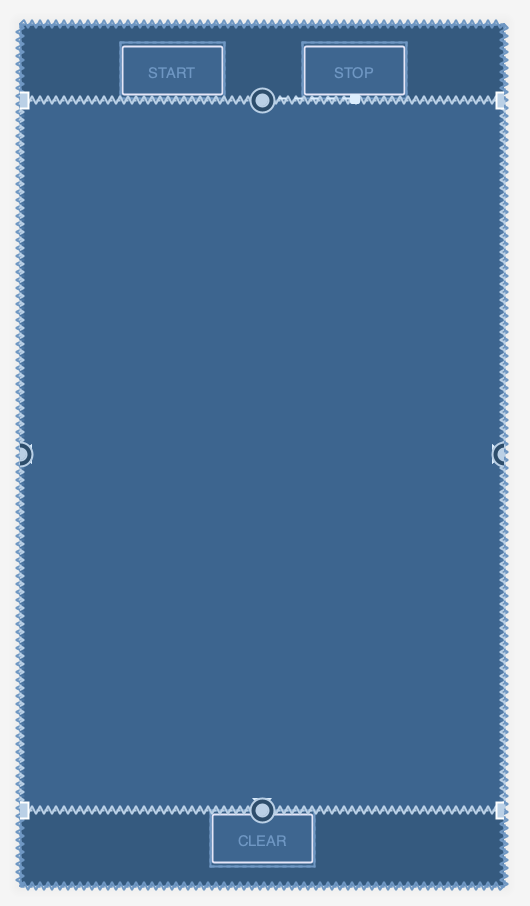
</androidx.constraintlayout.widget.ConstraintLayout>- Switch to the Design tab in Android Studio. In design view, your layout looks like the screenshot on the left below. In blueprint view, it looks like the screenshot on the right.

Step 2: Create ViewHolder
- Open
SleepNightAdapter.kt. - Make a class inside the
SleepNightAdaptercalledViewHolderand make it extendRecyclerView.ViewHolder.
class ViewHolder(itemView: View) : RecyclerView.ViewHolder(itemView){}- Inside
ViewHolder, get references to the views. You need a reference to the views that thisViewHolderwill update. Every time you bind thisViewHolder, you need to access the image and both text views. (You convert this code to use data binding later.)
val sleepLength: TextView = itemView.findViewById(R.id.sleep_length)
val quality: TextView = itemView.findViewById(R.id.quality_string)
val qualityImage: ImageView = itemView.findViewById(R.id.quality_image)
Step 3: Use the ViewHolder in SleepNightAdapter
- In the
SleepNightAdapterdefinition, instead ofTextItemViewHolder, use theSleepNightAdapter.ViewHolderthat you just created.
class SleepNightAdapter: RecyclerView.Adapter<SleepNightAdapter.ViewHolder>() {Update onCreateViewHolder():
- Change the signature of
onCreateViewHolder()to return theViewHolder. - Change the layout inflator to use the correct layout resource,
list_item_sleep_night. - Remove the cast to
TextView. - Instead of returning a
TextItemViewHolder, return aViewHolder.
Here is the finished updatedonCreateViewHolder()function:
    override fun onCreateViewHolder(
            parent: ViewGroup, viewType: Int): ViewHolder {
        val layoutInflater =
            LayoutInflater.from(parent.context)
        val view = layoutInflater
                .inflate(R.layout.list_item_sleep_night,
                         parent, false)
        return ViewHolder(view)
    }
Update onBindViewHolder():
- Change the signature of
onBindViewHolder()so that theholderparameter is aViewHolderinstead of aTextItemViewHolder. - Inside
onBindViewHolder(), delete all the code, except for the definition ofitem. - Define a
valresthat holds a reference to theresourcesfor this view.
val res = holder.itemView.context.resources- Set the text of the
sleepLengthtext view to the duration. Copy the code below, which calls a formatting function that's provided with the starter code.
holder.sleepLength.text = convertDurationToFormatted(item.startTimeMilli, item.endTimeMilli, res)- This gives an error, because
convertDurationToFormatted()needs to be defined. OpenUtil.ktand uncomment the code and associated imports for it. (Select Code > Comment with Line comments.) - Back in
onBindViewHolder(), useconvertNumericQualityToString()to set the quality.
holder.quality.text= convertNumericQualityToString(item.sleepQuality, res)- You may need to manually import these functions.
import com.example.android.trackmysleepquality.convertDurationToFormatted
import com.example.android.trackmysleepquality.convertNumericQualityToString- Set the correct icon for the quality. The new
ic_sleep_activeicon is provided for you in the starter code.
holder.qualityImage.setImageResource(when (item.sleepQuality) {
   0 -> R.drawable.ic_sleep_0
   1 -> R.drawable.ic_sleep_1
   2 -> R.drawable.ic_sleep_2
   3 -> R.drawable.ic_sleep_3
   4 -> R.drawable.ic_sleep_4
   5 -> R.drawable.ic_sleep_5
   else -> R.drawable.ic_sleep_active
})- Here is the finished updated
onBindViewHolder()function, setting all the data for theViewHolder:
   override fun onBindViewHolder(holder: ViewHolder, position: Int) {
        val item = data[position]
        val res = holder.itemView.context.resources
        holder.sleepLength.text = convertDurationToFormatted(item.startTimeMilli, item.endTimeMilli, res)
        holder.quality.text= convertNumericQualityToString(item.sleepQuality, res)
        holder.qualityImage.setImageResource(when (item.sleepQuality) {
            0 -> R.drawable.ic_sleep_0
            1 -> R.drawable.ic_sleep_1
            2 -> R.drawable.ic_sleep_2
            3 -> R.drawable.ic_sleep_3
            4 -> R.drawable.ic_sleep_4
            5 -> R.drawable.ic_sleep_5
            else -> R.drawable.ic_sleep_active
        })
}- Run your app. Your display should look like the screenshot below, showing the sleep-quality icon, along with text for the sleep duration and the sleep quality.

Your RecyclerView is now complete! You learned how to implement an Adapter and a ViewHolder, and you put them together to display a list with a RecyclerView Adapter.
Your code so far shows the process of creating an adapter and view holder. However, you can improve this code. The code to display and the code to manage view holders is mixed up, and onBindViewHolder() knows details about how to update the ViewHolder.
In a production app, you might have multiple view holders, more complex adapters, and multiple developers making changes. You should structure your code so that everything related to a view holder is only in the view holder.
Step 1: Refactor onBindViewHolder()
In this step, you refactor the code and move all the view holder functionality into the ViewHolder. The purpose of this refactoring is not to change how the app looks to the user, but make it easier and safer for developers to work on the code. Fortunately, Android Studio has tools to help.
- In
SleepNightAdapter, inonBindViewHolder(), select everything except the statement to declare the variableitem. - Right-click, then select Refactor > Extract > Function.
- Name the function
bindand accept the suggested parameters. Click OK.
Thebind()function is placed belowonBindViewHolder().
    private fun bind(holder: ViewHolder, item: SleepNight) {
        val res = holder.itemView.context.resources
        holder.sleepLength.text = convertDurationToFormatted(item.startTimeMilli, item.endTimeMilli, res)
        holder.quality.text = convertNumericQualityToString(item.sleepQuality, res)
        holder.qualityImage.setImageResource(when (item.sleepQuality) {
            0 -> R.drawable.ic_sleep_0
            1 -> R.drawable.ic_sleep_1
            2 -> R.drawable.ic_sleep_2
            3 -> R.drawable.ic_sleep_3
            4 -> R.drawable.ic_sleep_4
            5 -> R.drawable.ic_sleep_5
            else -> R.drawable.ic_sleep_active
        })
}- Put the cursor on the word
holderof theholderparameter ofbind(). PressAlt+Enter(Option+Enteron a Mac) to open the intention menu. Select Convert parameter to receiver to convert this to an extension function that has the following signature:
private fun ViewHolder.bind(item: SleepNight) {...}- Cut and paste the
bind()function into theViewHolder. - Make
bind()public. - Import
bind()into the adapter, if necessary. - Because it's now in the
ViewHolder, you can remove theViewHolderpart of the signature. Here is the final code for thebind()function in theViewHolderclass.
fun bind(item: SleepNight) {
   val res = itemView.context.resources
   sleepLength.text = convertDurationToFormatted(
           item.startTimeMilli, item.endTimeMilli, res)
   quality.text = convertNumericQualityToString(
           item.sleepQuality, res)
   qualityImage.setImageResource(when (item.sleepQuality) {
       0 -> R.drawable.ic_sleep_0
       1 -> R.drawable.ic_sleep_1
       2 -> R.drawable.ic_sleep_2
       3 -> R.drawable.ic_sleep_3
       4 -> R.drawable.ic_sleep_4
       5 -> R.drawable.ic_sleep_5
       else -> R.drawable.ic_sleep_active
   })
}
Step 2: Refactor onCreateViewHolder
The onCreateViewHolder() method in the adapter currently inflates the view from the layout resource for the ViewHolder. However, inflation has nothing to do with the adapter, and everything to do with the ViewHolder. Inflation should happen in the ViewHolder.
- In
onCreateViewHolder(), select all the code in the body of the function. - Right-click, then select Refactor > Extract > Function.
- Name the function
fromand accept the suggested parameters. Click OK. - Put the cursor on the function name
from. PressAlt+Enter(Option+Enteron a Mac) to open the intention menu. - Select Move to companion object. The
from()function needs to be in a companion object so it can be called on theViewHolderclass, not called on aViewHolderinstance. - Move the
companionobject into theViewHolderclass. - Make
from()public. - In
onCreateViewHolder(), change thereturnstatement to return the result of callingfrom()in theViewHolderclass.
Your completedonCreateViewHolder()andfrom()methods should look like the code below, and your code should build and run without errors.
    override fun onCreateViewHolder(parent: ViewGroup, viewType:
Int): ViewHolder {
        return ViewHolder.from(parent)
    }
companion object {
fun from(parent: ViewGroup): ViewHolder {
val layoutInflater = LayoutInflater.from(parent.context)
val view = layoutInflater
.inflate(R.layout.list_item_sleep_night, parent, false)
return ViewHolder(view)
}
}- Change the signature of the
ViewHolderclass so that the constructor is private. Becausefrom()is now a method that returns a newViewHolderinstance, there's no reason for anyone to call the constructor ofViewHolderanymore.
class ViewHolder private constructor(itemView: View) : RecyclerView.ViewHolder(itemView){- Run the app. Your app should build and run the same as before, which is the desired result after refactoring.
Android Studio project: RecyclerViewFundamentals
- Displaying a list or grid of data is one of the most common UI tasks in Android.
RecyclerViewis designed to be efficient even when displaying extremely large lists. RecyclerViewdoes only the work necessary to process or draw items that are currently visible on the screen.- When an item scrolls off the screen, its views are recycled. That means the item is filled with new content that scrolls onto the screen.
- The adapter pattern in software engineering helps an object work together with another API.
RecyclerViewuses an adapter to transform app data into something it can display, without the need for changing how the app stores and processes data.
To display your data in a RecyclerView, you need the following parts:
- RecyclerView
To create an instance ofRecyclerView, define a<RecyclerView>element in the layout file. - LayoutManager
ARecyclerViewuses aLayoutManagerto organize the layout of the items in theRecyclerView, such as laying them out in a grid or in a linear list.
In the<RecyclerView>in the layout file, set theapp:layoutManagerattribute to the layout manager (such asLinearLayoutManagerorGridLayoutManager).
You can also set theLayoutManagerfor aRecyclerViewprogrammatically. (This technique is covered in a later codelab.) - Layout for each item
Create a layout for one item of data in an XML layout file. - Adapter
Create an adapter that prepares the data and how it will be displayed in aViewHolder. Associate the adapter with theRecyclerView.
WhenRecyclerViewruns, it will use the adapter to figure out how to display the data on the screen.
The adapter requires you to implement the following methods:
–getItemCount()to return the number of items.
–onCreateViewHolder()to return theViewHolderfor an item in the list.
–onBindViewHolder()to adapt the data to the views for an item in the list. - ViewHolder
AViewHoldercontains the view information for displaying one item from the item's layout. - The
onBindViewHolder()method in the adapter adapts the data to the views. You always override this method. Typically,onBindViewHolder()inflates the layout for an item, and puts the data in the views in the layout. - Because the
RecyclerViewknows nothing about the data, theAdapterneeds to inform theRecyclerViewwhen that data changes. UsenotifyDataSetChanged()to notify theAdapterthat the data has changed.
Udacity course:
Android developer documentation:
This section lists possible homework assignments for students who are working through this codelab as part of a course led by an instructor. It's up to the instructor to do the following:
- Assign homework if required.
- Communicate to students how to submit homework assignments.
- Grade the homework assignments.
Instructors can use these suggestions as little or as much as they want, and should feel free to assign any other homework they feel is appropriate.
If you're working through this codelab on your own, feel free to use these homework assignments to test your knowledge.
Answer these questions
Question 1
How does RecyclerView display items? Select all that apply.
▢ Displays items in a list or a grid.
▢ Scrolls vertically or horizontally.
▢ Scrolls diagonally on larger devices such as tablets.
▢ Allows custom layouts when a list or a grid is not enough for the use case.
Question 2
What are the benefits of using RecyclerView? Select all that apply.
▢ Efficiently displays large lists.
▢ Automatically updates the data.
▢ Minimizes the need for refreshes when an item is updated, deleted, or added to the list.
▢ Reuses view that scrolls off screen to display the next item that scrolls on screen.
Question 3
What are some of the reasons for using adapters? Select all that apply.
▢ Separation of concerns makes it easier to change and test code.
▢ RecyclerView is agnostic to the data that is being displayed.
▢ Data processing layers do not have to concern themselves with how data will be displayed.
▢ The app will run faster.
Question 4
Which of the following are true of ViewHolder? Select all that apply.
▢ The ViewHolder layout is defined in XML layout files.
▢ There is one ViewHolder for each unit of data in the dataset.
▢ You can have more than one ViewHolder in a RecyclerView.
▢ The Adapter binds data to the ViewHolder.
Start the next lesson: