
This codelab is part of the Android Kotlin Fundamentals course. You'll get the most value out of this course if you work through the codelabs in sequence. All the course codelabs are listed on the Android Kotlin Fundamentals codelabs landing page.
Introduction
This codelab recaps how to use ViewModel and fragments together to implement navigation. Remember that the goal is to put the logic of when to navigate into the ViewModel, but define the paths in the fragments and the navigation file. To achieve this goal, you use view models, fragments, LiveData, and observers.
The codelab concludes by showing a clever way to track button states with minimal code, so that each button is enabled and clickable only when it makes sense for the user to tap that button.
What you should already know
You should be familiar with:
- Building a basic user interface (UI) using an activity, fragments, and views.
- Navigating between fragments and using
safeArgsto pass data between fragments. - View models, view model factories, transformations, and
LiveDataand their observers. - How to create a
Roomdatabase, create a data access object (DAO), and define entities. - How to use coroutines for database interactions and other long-running tasks.
What you'll learn
- How to update an existing sleep-quality record in the database.
- How to use
LiveDatato track button states. - How to display a snackbar in response to an event.
What you'll do
- Extend the TrackMySleepQuality app to collect a quality rating, add the rating to the database, and display the result.
- Use
LiveDatato trigger the display of a snackbar. - Use
LiveDatato enable and disable buttons.
In this codelab, you build the sleep-quality recording and finalized UI of the TrackMySleepQuality app.
The app has two screens, represented by fragments, as shown in the figure below.

The first screen, shown on the left, has buttons to start and stop tracking. The screen shows all the user's sleep data. The Clear button permanently deletes all the data that the app has collected for the user.
The second screen, shown on the right, is for selecting a sleep-quality rating. In the app, the rating is represented numerically. For development purposes, the app shows both the face icons and their numerical equivalents.
The user's flow is as follows:
- User opens the app and is presented with the sleep-tracking screen.
- User taps the Start button. This records the starting time and displays it. The Start button is disabled, and the Stop button is enabled.
- User taps the Stop button. This records the ending time and opens the sleep-quality screen.
- User selects a sleep-quality icon. The screen closes, and the tracking screen displays the sleep-ending time and sleep quality. The Stop button is disabled and the Start button is enabled. The app is ready for another night.
- The Clear button is enabled whenever there is data in the database. When the user taps the Clear button, all their data is erased without recourse—there is no "Are you sure?" message.
This app uses a simplified architecture, as shown below in the context of the full architecture. The app uses only the following components:
- UI controller
- View model and
LiveData - A Room database

This codelab assumes that you know how to implement navigation using fragments and the navigation file. To save you work, a good deal of this code is provided.
Step 1: Inspect the code
- To get started, continue with your own code from the end of the last codelab, or download the starter code.
- In your starter code, inspect the
SleepQualityFragment. This class inflates the layout, gets the application, and returnsbinding.root. - Open navigation.xml in the design editor. You see that there is a navigation path from
SleepTrackerFragmenttoSleepQualityFragment, and back again fromSleepQualityFragmenttoSleepTrackerFragment.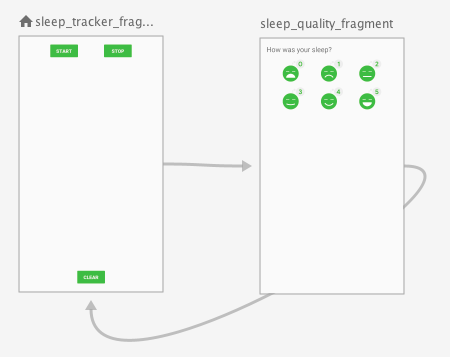
- Inspect the code for navigation.xml. In particular, look for the
<argument>namedsleepNightKey.
When the user goes from theSleepTrackerFragmentto theSleepQualityFragment,the app will pass asleepNightKeyto theSleepQualityFragmentfor the night that needs to be updated.
Step 2: Add navigation for sleep-quality tracking
The navigation graph already includes the paths from the SleepTrackerFragment to the SleepQualityFragment and back again. However, the click handlers that implement the navigation from one fragment to the next are not coded yet. You add that code now in the ViewModel.
In the click handler, you set a LiveData that changes when you want the app to navigate to a different destination. The fragment observes this LiveData. When the data changes, the fragment navigates to the destination and tells the view model that it's done, which resets the state variable.
- Open
SleepTrackerViewModel. You need to add navigation so that when the user taps the Stop button, the app navigates to theSleepQualityFragmentto collect a quality rating. - In
SleepTrackerViewModel, create aLiveDatathat changes when you want the app to navigate to theSleepQualityFragment. Use encapsulation to only expose a gettable version of theLiveDatato theViewModel.
You can put this code anywhere at the top level of the class body.
private val _navigateToSleepQuality = MutableLiveData<SleepNight>()

val navigateToSleepQuality: LiveData<SleepNight>
get() = _navigateToSleepQuality- Add a
doneNavigating()function that resets the variable that triggers navigation.
fun doneNavigating() {
   _navigateToSleepQuality.value = null
}- In the click handler for the Stop button,
onStopTracking(), trigger the navigation to theSleepQualityFragment. Set the _navigateToSleepQualityvariable at the end of the function as the last thing inside thelaunch{}block. Note that this variable is set to thenight. When this variable has a value, the app navigates to theSleepQualityFragment, passing along the night.
_navigateToSleepQuality.value = oldNight- The
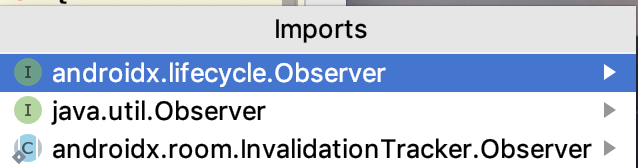
SleepTrackerFragmentneeds to observe _navigateToSleepQualityso that the app knows when to navigate. In theSleepTrackerFragment, inonCreateView(), add an observer fornavigateToSleepQuality(). Note that the import for this is ambiguous and you need to importandroidx.lifecycle.Observer.
sleepTrackerViewModel.navigateToSleepQuality.observe(this, Observer {
})
- Inside the observer block, navigate and pass along the ID of the current night, and then call
doneNavigating(). If your import is ambiguous, importandroidx.navigation.fragment.findNavController.
night ->
night?.let {
   this.findNavController().navigate(
           SleepTrackerFragmentDirections
                   .actionSleepTrackerFragmentToSleepQualityFragment(night.nightId))
   sleepTrackerViewModel.doneNavigating()
}- Build and run your app. Tap Start, then tap Stop, which takes you to the
SleepQualityFragmentscreen. To get back, use the system Back button.
In this task, you record the sleep quality and navigate back to the sleep tracker fragment. The display should update automatically to show the updated value to the user. You need to create a ViewModel and a ViewModelFactory, and you need to update the SleepQualityFragment.
Step 1: Create a ViewModel and a ViewModelFactory
- In the
sleepqualitypackage, create or open SleepQualityViewModel.kt. - Create a
SleepQualityViewModelclass that takes asleepNightKeyand database as arguments. Just as you did for theSleepTrackerViewModel, you need to pass in thedatabasefrom the factory. You also need to pass in thesleepNightKeyfrom the navigation.
class SleepQualityViewModel(
       private val sleepNightKey: Long = 0L,
       val database: SleepDatabaseDao) : ViewModel() {
}- Inside the
SleepQualityViewModelclass, define aJobanduiScope, and overrideonCleared().
private val viewModelJob = Job()
private val uiScope = CoroutineScope(Dispatchers.Main + viewModelJob)

override fun onCleared() {
   super.onCleared()
   viewModelJob.cancel()
}- To navigate back to the
SleepTrackerFragmentusing the same pattern as above, declare_navigateToSleepTracker. ImplementnavigateToSleepTrackeranddoneNavigating().
private val _navigateToSleepTracker = MutableLiveData<Boolean?>()

val navigateToSleepTracker: LiveData<Boolean?>
   get() = _navigateToSleepTracker

fun doneNavigating() {
   _navigateToSleepTracker.value = null
}- Create one click handler,
onSetSleepQuality(), for all the sleep-quality images to use.
Use the same coroutine pattern as in the previous codelab:
- Launch a coroutine in the
uiScope, and switch to the I/O dispatcher. - Get
tonightusing thesleepNightKey. - Set the sleep quality.
- Update the database.
- Trigger navigation.
Notice that the code sample below does all the work in the click handler, instead of factoring out the database operation in the different context.
fun onSetSleepQuality(quality: Int) {
        uiScope.launch {
            // IO is a thread pool for running operations that access the disk, such as
            // our Room database.
            withContext(Dispatchers.IO) {
                val tonight = database.get(sleepNightKey) ?: return@withContext
                tonight.sleepQuality = quality
                database.update(tonight)
            }

            // Setting this state variable to true will alert the observer and trigger navigation.
            _navigateToSleepTracker.value = true
        }
}- In the
sleepqualitypackage, create or openSleepQualityViewModelFactory.ktand add theSleepQualityViewModelFactoryclass, as shown below. This class uses a version of the same boilerplate code you've seen before. Inspect the code before you move on.
class SleepQualityViewModelFactory(
       private val sleepNightKey: Long,
       private val dataSource: SleepDatabaseDao) : ViewModelProvider.Factory {
   @Suppress("unchecked_cast")
   override fun <T : ViewModel?> create(modelClass: Class<T>): T {
       if (modelClass.isAssignableFrom(SleepQualityViewModel::class.java)) {
           return SleepQualityViewModel(sleepNightKey, dataSource) as T
       }
       throw IllegalArgumentException("Unknown ViewModel class")
   }
}
Step 2: Update the SleepQualityFragment
- Open
SleepQualityFragment.kt. - In
onCreateView(), after you get theapplication, you need to get theargumentsthat came with the navigation. These arguments are inSleepQualityFragmentArgs. You need to extract them from the bundle.
val arguments = SleepQualityFragmentArgs.fromBundle(arguments!!)- Next, get the
dataSource.
val dataSource = SleepDatabase.getInstance(application).sleepDatabaseDao- Create a factory, passing in the
dataSourceand thesleepNightKey.
val viewModelFactory = SleepQualityViewModelFactory(arguments.sleepNightKey, dataSource)- Get a
ViewModelreference.
val sleepQualityViewModel =
       ViewModelProviders.of(
this, viewModelFactory).get(SleepQualityViewModel::class.java)- Add the
ViewModelto the binding object. (If you see an error with the binding object, ignore it for now.)
binding.sleepQualityViewModel = sleepQualityViewModel- Add the observer. When prompted, import
androidx.lifecycle.Observer.
sleepQualityViewModel.navigateToSleepTracker.observe(this, Observer {
   if (it == true) { // Observed state is true.
       this.findNavController().navigate(
               SleepQualityFragmentDirections.actionSleepQualityFragmentToSleepTrackerFragment())
       sleepQualityViewModel.doneNavigating()
   }
})
Step 3: Update the layout file and run the app
- Open the
fragment_sleep_quality.xmllayout file. In the<data>block, add a variable for theSleepQualityViewModel.
 <data>
       <variable
           name="sleepQualityViewModel"
           type="com.example.android.trackmysleepquality.sleepquality.SleepQualityViewModel" />
</data>- For each of the six sleep-quality images, add a click handler like the one below. Match the quality rating to the image.
android:onClick="@{() -> sleepQualityViewModel.onSetSleepQuality(5)}"- Clean and rebuild your project. This should resolve any errors with the binding object. Otherwise, clear the cache (File > Invalidate Caches / Restart) and rebuild your app.
Congratulations! You just built a complete Room database app using coroutines.
Now your app works great. The user can tap Start and Stop as many times as they want. When the user taps Stop, they can enter a sleep quality. When the user taps Clear, all the data is cleared silently in the background. However, all the buttons are always enabled and clickable, which does not break the app, but it does allow users to create incomplete sleep nights.
In this last task, you learn how to use transformation maps to manage button visibility so that users can only make the right choice. You can use a similar method to display a friendly message after all data has been cleared.
Step 1: Update button states
The idea is to set the button state so that in the beginning, only the Start button is enabled, which means it is clickable.
After the user taps Start, the Stop button becomes enabled and Start is not. The Clear button is only enabled when there is data in the database.
- Open the
fragment_sleep_tracker.xmllayout file. - Add the
android:enabledproperty to each button. Theandroid:enabledproperty is a boolean value that indicates whether or not the button is enabled. (An enabled button can be tapped; a disabled button can't.) Give the property the value of a state variable that you'll define in a moment.
start_button:
android:enabled="@{sleepTrackerViewModel.startButtonVisible}"stop_button:
android:enabled="@{sleepTrackerViewModel.stopButtonVisible}"clear_button:
android:enabled="@{sleepTrackerViewModel.clearButtonVisible}"- Open
SleepTrackerViewModeland create three corresponding variables. Assign each variable a transformation that tests it.
- The Start button should be enabled when
tonightisnull. - The Stop button should be enabled when
tonightis notnull. - The Clear button should only be enabled if
nights, and thus the database, contains sleep nights.
val startButtonVisible = Transformations.map(tonight) {
   it == null
}
val stopButtonVisible = Transformations.map(tonight) {
   it != null
}
val clearButtonVisible = Transformations.map(nights) {
   it?.isNotEmpty()
}- Run your app, and experiment with the buttons.
Step 2: Use a snackbar to notify the user
After the user clears the database, show the user a confirmation using the Snackbar widget. A snackbar provides brief feedback about an operation through a message at the bottom of the screen. A snackbar disappears after a timeout, after a user interaction elsewhere on the screen, or after the user swipes the snackbar off the screen.
Showing the snackbar is a UI task, and it should happen in the fragment. Deciding to show the snackbar happens in the ViewModel. To set up and trigger a snackbar when the data is cleared, you can use the same technique as for triggering navigation.
- In the
SleepTrackerViewModel, create the encapsulated event.
private var _showSnackbarEvent = MutableLiveData<Boolean>()

val showSnackBarEvent: LiveData<Boolean>
get() = _showSnackbarEvent- Then implement
doneShowingSnackbar().
fun doneShowingSnackbar() {
   _showSnackbarEvent.value = false
}- In the
SleepTrackerFragment, inonCreateView(), add an observer:
sleepTrackerViewModel.showSnackBarEvent.observe(this, Observer { })- Inside the observer block, display the snackbar and immediately reset the event.
   if (it == true) { // Observed state is true.
       Snackbar.make(
               activity!!.findViewById(android.R.id.content),
               getString(R.string.cleared_message),
               Snackbar.LENGTH_SHORT // How long to display the message.
       ).show()
       sleepTrackerViewModel.doneShowingSnackbar()
}- In
SleepTrackerViewModel, trigger the event in theonClear()method. To do this, set the event value totrueinside thelaunchblock:
_showSnackbarEvent.value = true- Build and run your app!
Android Studio project: TrackMySleepQualityFinal
Implementing sleep quality tracking in this app is like playing a familiar piece of music in a new key. While details change, the underlying pattern of what you did in previous codelabs in this lesson remains the same. Being aware of these patterns makes coding much faster, because you can reuse code from existing apps. Here are some of the patterns used in this course so far:
- Create a
ViewModeland aViewModelFactoryand set up a data source. - Trigger navigation. To separate concerns, put the click handler in the view model and the navigation in the fragment.
- Use encapsulation with
LiveDatato track and respond to state changes. - Use transformations with
LiveData. - Create a singleton database.
- Set up coroutines for database operations.
Triggering navigation
You define possible navigation paths between fragments in a navigation file. There are some different ways to trigger navigation from one fragment to the next. These include:
- Define
onClickhandlers to trigger navigation to a destination fragment. - Alternatively, to enable navigation from one fragment to the next:
- Define a
LiveDatavalue to record if navigation should occur. - Attach an observer to that
LiveDatavalue. - Your code then changes that value whenever navigation needs to be triggered or is complete.
Setting the android:enabled attribute
- The
android:enabledattribute is defined inTextViewand inherited by all subclasses, includingButton. - The
android:enabledattribute determines whether or not aViewis enabled. The meaning of "enabled" varies by subclass. For example, a non-enabledEditTextprevents the user from editing the contained text, and a non-enabledButtonprevents the user from tapping the button. - The
enabledattribute is not the same as thevisibilityattribute. - You can use transformation maps to set the value of the
enabledattribute of buttons based on the state of another object or variable.
Other points covered in this codelab:
- To trigger notifications to the user, you can use the same technique as you use to trigger navigation.
- You can use a
Snackbarto notify the user.
Udacity course:
Android developer documentation:
This section lists possible homework assignments for students who are working through this codelab as part of a course led by an instructor. It's up to the instructor to do the following:
- Assign homework if required.
- Communicate to students how to submit homework assignments.
- Grade the homework assignments.
Instructors can use these suggestions as little or as much as they want, and should feel free to assign any other homework they feel is appropriate.
If you're working through this codelab on your own, feel free to use these homework assignments to test your knowledge.
Answer these questions
Question 1
One way to enable your app to trigger navigation from one fragment to the next is to use a LiveData value to indicate whether or not to trigger navigation.
What are the steps for using a LiveData value, called gotoBlueFragment, to trigger navigation from the red fragment to the blue fragment? Select all that apply:
- In the
ViewModel, define theLiveDatavaluegotoBlueFragment. - In the
RedFragment, observe thegotoBlueFragmentvalue. Implement theobserve{}code to navigate toBlueFragmentwhen appropriate, and then reset the value ofgotoBlueFragmentto indicate that navigation is complete. - Make sure your code sets the
gotoBlueFragmentvariable to the value that triggers navigation whenever the app needs to go fromRedFragmenttoBlueFragment. - Make sure your code defines an
onClickhandler for theViewthat the user clicks to navigate toBlueFragment, where theonClickhandler observes thegoToBlueFragmentvalue.
Question 2
You can change whether a Button is enabled (clickable) or not by using LiveData. How would you ensure that your app changes the UpdateNumber button so that:
- The button is enabled if
myNumberhas a value greater than 5. - The button is not enabled if
myNumberis equal to or less than 5.
Assume that the layout that contains the UpdateNumber button includes the <data> variable for the NumbersViewModel as shown here:
<data>
   <variable
       name="NumbersViewModel"
       type="com.example.android.numbersapp.NumbersViewModel" />
</data>
Assume that the ID of the button in the layout file is the following:
android:id="@+id/update_number_button"
What else do you need to do? Select all that apply.
- In the
NumbersViewModelclass, define aLiveDatavariable,myNumber, that represents the number. Also define a variable whose value is set by callingTransform.map()on themyNumbervariable, which returns a boolean indicating whether or not the number is greater than 5.
Specifically, in theViewModel, add the following code:
val myNumber: LiveData<Int>

val enableUpdateNumberButton = Transformations.map(myNumber) {
   myNumber > 5
}- In the XML layout, set the
android:enabledattribute of theupdate_number_button buttontoNumberViewModel.enableUpdateNumbersButton.
android:enabled="@{NumbersViewModel.enableUpdateNumberButton}"- In the
Fragmentthat uses theNumbersViewModelclass, add an observer to theenabledattribute of the button.
Specifically, in theFragment, add the following code:
// Observer for the enabled attribute
viewModel.enabled.observe(this, Observer<Boolean> { isEnabled ->
   myNumber > 5
})- In the layout file, set the
android:enabledattribute of theupdate_number_button buttonto"Observable".
Start to the next lesson:
For links to other codelabs in this course, see the Android Kotlin Fundamentals codelabs landing page.