
This codelab is part of the Android Kotlin Fundamentals course. You'll get the most value out of this course if you work through the codelabs in sequence. All the course codelabs are listed on the Android Kotlin Fundamentals codelabs landing page.
Introduction
In this codelab, you learn how to add a header that spans the width of the list displayed in a RecyclerView. You build on the sleep-tracker app from previous codelabs.
What you should already know
- How to build a basic user interface using an activity, fragments, and views.
- How to navigate between fragments, and how to use
safeArgsto pass data between fragments. - View models, view model factories, transformations, and
LiveDataand their observers. - How to create a
Roomdatabase, create a DAO, and define entities. - How to use coroutines for database interactions and other long-running tasks.
- How to implement a basic
RecyclerViewwith anAdapter,ViewHolder, and item layout. - How to implement data binding for
RecyclerView. - How to create and use binding adapters to transform data.
- How to use
GridLayoutManager. - How capture and handle clicks on items in a
RecyclerView.
What you'll learn
- How to use more than one
ViewHolderwith aRecyclerViewto add items with a different layout. Specifically, how to use a secondViewHolderto add a header above the items displayed inRecyclerView.
What you'll do
- Build on the TrackMySleepQuality app from the previous codelab in this series.
- Add a header that spans the width of the screen above the sleep nights displayed in the
RecyclerView.
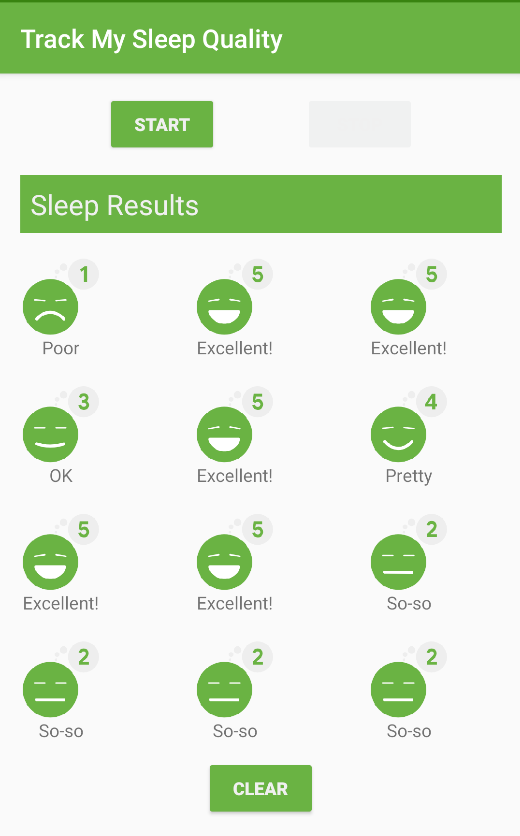
The sleep-tracker app you start with has three screens, represented by fragments, as shown in the figure below.
|
|
|
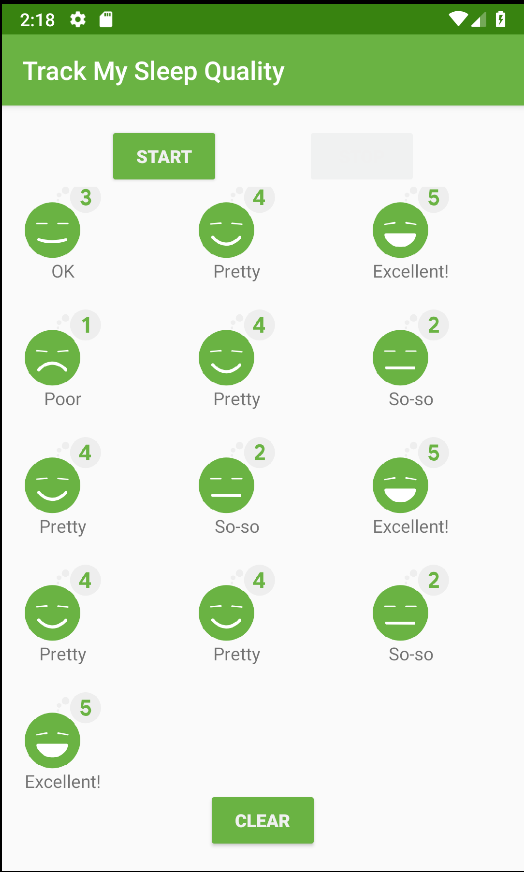
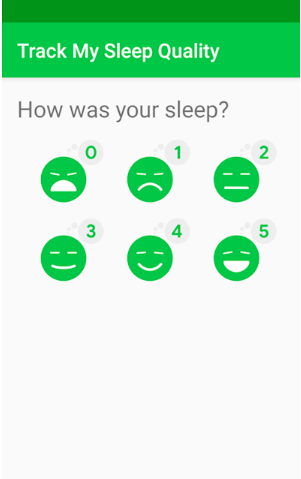
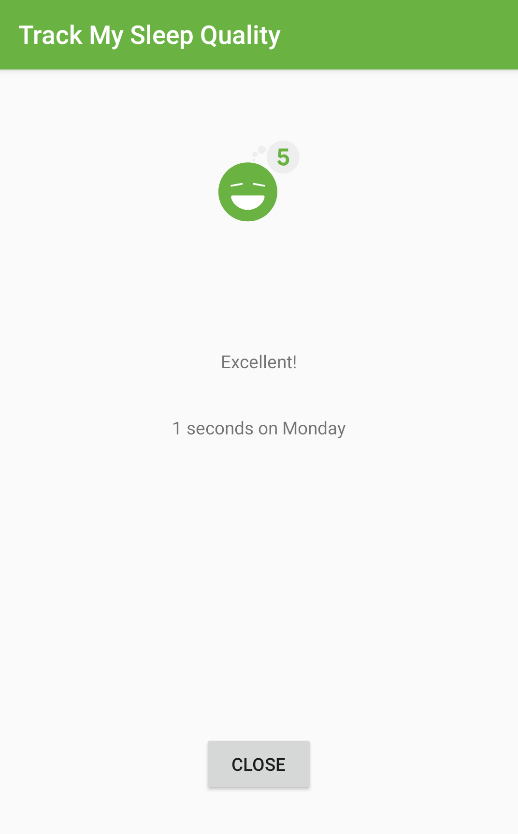
The first screen, shown on the left, has buttons for starting and stopping tracking. The screen shows some of the user's sleep data. The Clear button permanently deletes all the data that the app has collected for the user. The second screen, shown in the middle, is for selecting a sleep-quality rating. The third screen is a detail view that opens when the user taps an item in the grid.
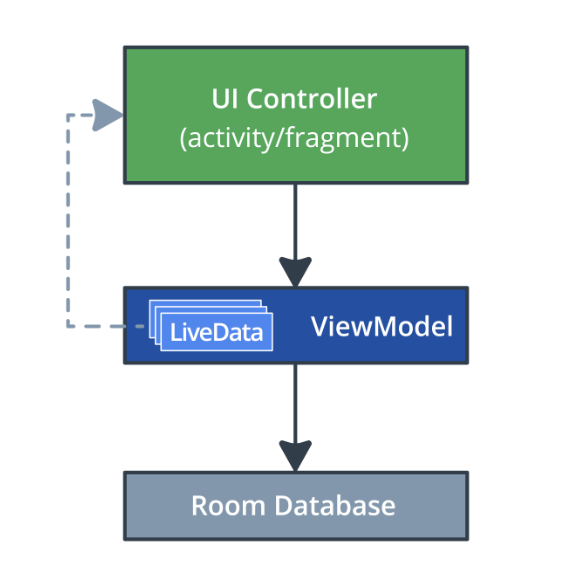
This app uses a simplified architecture with a UI controller, view model and LiveData, and a Room database to persist sleep data.
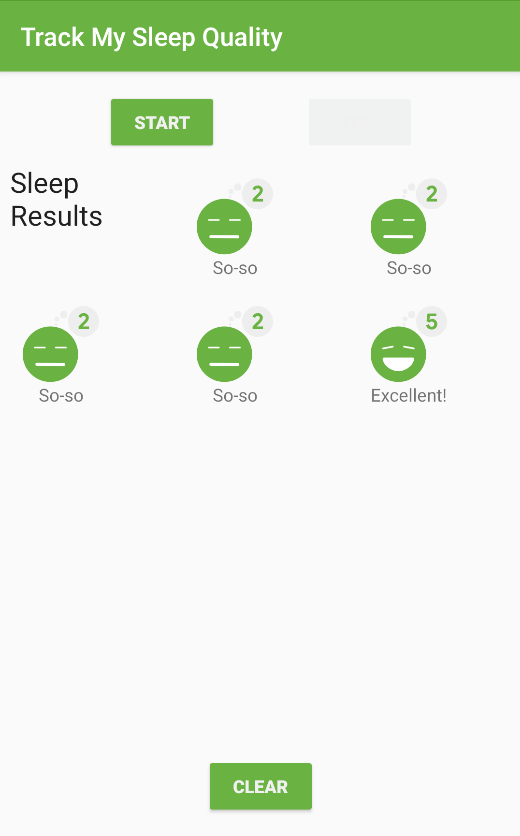
In this codelab, you add a header to the grid of items displayed. Your final main screen will look like this:
This codelab teaches the general principle of including items that use different layouts in a RecyclerView. One common example is having headers in your list or grid. A list can have a single header to describe the item content. A list can also have multiple headers to group and separate items in a single list.
RecyclerView doesn't know anything about your data or what type of layout each item has. The LayoutManager arranges the items on the screen, but the adapter adapts the data to be displayed and passes view holders to the RecyclerView. So you will add the code to create headers in the adapter.
Two ways of adding headers
In RecyclerView, every item in the list corresponds to an index number starting from 0. For example:
[Actual Data] -> [Adapter Views]
[0: SleepNight] -> [0: SleepNight]
[1: SleepNight] -> [1: SleepNight]
[2: SleepNight] -> [2: SleepNight]
One way to add headers to a list is to modify your adapter to use a different ViewHolder by checking indexes where your header needs to be shown. The Adapter will be responsible for keeping track of the header. For example, to show a header at the top of the table, you need to return a different ViewHolder for the header while laying out the zero-indexed item. Then all the other items would be mapped with the header offset, as shown below.
[Actual Data] -> [Adapter Views]
[0: Header]
[0: SleepNight] -> [1: SleepNight]
[1: SleepNight] -> [2: SleepNight]
[2: SleepNight] -> [3: SleepNight.
Another way to add headers is to modify the backing dataset for your data grid. Since all the data that needs to be displayed is stored in a list, you can modify the list to include items to represent a header. This is a bit simpler to understand, but it requires you to think about how you design your objects, so you can combine the different item types into a single list. Implemented this way, the adapter will display the items passed to it. So the item at position 0 is a header, and the item at position 1 is a SleepNight, which maps directly to what's on the screen.
[Actual Data] -> [Adapter Views]
[0: Header] -> [0: Header]
[1: SleepNight] -> [1: SleepNight]
[2: SleepNight] -> [2: SleepNight]
[3: SleepNight] -> [3: SleepNight]
Each methodology has benefits and drawbacks. Changing the dataset doesn't introduce much change to the rest of the adapter code, and you can add header logic by manipulating the list of data. On the other hand, using a different ViewHolder by checking indexes for headers gives more freedom on the layout of the header. It also lets the adapter handle how data is adapted to the view without modifying the backing data.
In this codelab, you update your RecyclerView to display a header at the start of the list. In this case, your app will use a different ViewHolder for the header than for data items. The app will check the index of the list to determine which ViewHolder to use.
Step 1: Create a DataItem class
To abstract the type of item and let the adapter just deal with "items", you can create a data holder class that represents either a SleepNight or a Header. Your dataset will then be a list of data holder items.
You can either get the starter app from GitHub, or continue using the SleepTracker app you built in the previous codelab.
- Download the RecyclerViewHeaders-Starter code from GitHub. The RecyclerViewHeaders-Starter directory contains the starter version of the SleepTracker app needed for this codelab. You can also continue with your finished app from the previous codelab if you prefer.
- Open SleepNightAdapter.kt.
- Below the
SleepNightListenerclass, at the top level, define asealedclass calledDataItemthat represents an item of data.
Asealedclass defines a closed type, which means that all subclasses ofDataItemmust be defined in this file. As a result, the number of subclasses is known to the compiler. It's not possible for another part of your code to define a new type ofDataItemthat could break your adapter.
sealed class DataItem {

}- Inside the body of the
DataItemclass, define two classes that represent the different types of data items. The first is aSleepNightItem, which is a wrapper around aSleepNight, so it takes a single value calledsleepNight. To make it part of the sealed class, have it extendDataItem.
data class SleepNightItem(val sleepNight: SleepNight): DataItem()- The second class is
Header, to represent a header. Since a header has no actual data, you can declare it as anobject. That means there will only ever be one instance ofHeader. Again, have it extendDataItem.
object Header: DataItem()- Inside
DataItem, at the class level, define anabstractLongproperty namedid. When the adapter usesDiffUtilto determine whether and how an item has changed, theDiffItemCallbackneeds to know the id of each item. You will see an error, becauseSleepNightItemandHeaderneed to override the abstract propertyid.
abstract val id: Long- In
SleepNightItem, overrideidto return thenightId.
override val id = sleepNight.nightId- In
Header, overrideidto returnLong.MIN_VALUE, which is a very, very small number (literally, -2 to the power of 63). So, this will never conflict with anynightIdin existence.
override val id = Long.MIN_VALUE- Your finished code should look like this, and your app should build without errors.
sealed class DataItem {
    abstract val id: Long
    data class SleepNightItem(val sleepNight: SleepNight): DataItem()      {
        override val id = sleepNight.nightId
    }

    object Header: DataItem() {
        override val id = Long.MIN_VALUE
    }
}
Step 2: Create a ViewHolder for the Header
- Create the layout for the header in a new layout resource file called header.xml that displays a
TextView. There is nothing exciting about this, so here is the code.
<?xml version="1.0" encoding="utf-8"?>
<TextView xmlns:android="http://schemas.android.com/apk/res/android"
    android:id="@+id/text"
    android:layout_width="match_parent"
    android:layout_height="wrap_content"
    android:textAppearance="?android:attr/textAppearanceLarge"
    android:text="Sleep Results"
android:padding="8dp" />- Extract
"Sleep Results"into a string resource and call itheader_text.
<string name="header_text">Sleep Results</string>- In SleepNightAdapter.kt, inside
SleepNightAdapter, above theViewHolderclass, create a newTextViewHolderclass. This class inflates the textview.xml layout, and returns aTextViewHolderinstance. Since you've done this before, here is the code, and you'll have to importViewandR:
    class TextViewHolder(view: View): RecyclerView.ViewHolder(view) {
        companion object {
            fun from(parent: ViewGroup): TextViewHolder {
                val layoutInflater = LayoutInflater.from(parent.context)
                val view = layoutInflater.inflate(R.layout.header, parent, false)
                return TextViewHolder(view)
            }
        }
    }
Step 3: Update SleepNightAdapter
Next you need to update the declaration of SleepNightAdapter. Instead of only supporting one type of ViewHolder, it needs to be able to use any type of view holder.
Define the types of items
- In
SleepNightAdapter.kt, at the top level, below theimportstatements and aboveSleepNightAdapter, define two constants for the view types.
TheRecyclerViewwill need to distinguish each item's view type, so that it can correctly assign a view holder to it.
    private val ITEM_VIEW_TYPE_HEADER = 0
private val ITEM_VIEW_TYPE_ITEM = 1- Inside the
SleepNightAdapter, create a function to overridegetItemViewType()to return the right header or item constant depending on the type of the current item.
override fun getItemViewType(position: Int): Int {
        return when (getItem(position)) {
            is DataItem.Header -> ITEM_VIEW_TYPE_HEADER
            is DataItem.SleepNightItem -> ITEM_VIEW_TYPE_ITEM
        }
    }
Update the SleepNightAdapter definition
- In the definition of
SleepNightAdapter, update the first argument for theListAdapterfromSleepNighttoDataItem. - In the definition of
SleepNightAdapter, change the second generic argument for theListAdapterfromSleepNightAdapter.ViewHoldertoRecyclerView.ViewHolder. You will see some errors for necessary updates, and your class header should look like shown below.
class SleepNightAdapter(val clickListener: SleepNightListener):
       ListAdapter<DataItem, RecyclerView.ViewHolder>(SleepNightDiffCallback()) {
Update onCreateViewHolder()
- Change the signature of
onCreateViewHolder()to return aRecyclerView.ViewHolder.
override fun onCreateViewHolder(parent: ViewGroup, viewType: Int): RecyclerView.ViewHolder- Expand the implementation of the
onCreateViewHolder()method to test for and return the appropriate view holder for each item type. Your updated method should look like the code below.
override fun onCreateViewHolder(parent: ViewGroup, viewType: Int): RecyclerView.ViewHolder {
        return when (viewType) {
            ITEM_VIEW_TYPE_HEADER -> TextViewHolder.from(parent)
            ITEM_VIEW_TYPE_ITEM -> ViewHolder.from(parent)
            else -> throw ClassCastException("Unknown viewType ${viewType}")
        }
    }
Update onBindViewHolder()
- Change the parameter type of
onBindViewHolder()fromViewHoldertoRecyclerView.ViewHolder.
override fun onBindViewHolder(holder: RecyclerView.ViewHolder, position: Int)- Add a condition to only assign data to the view holder if the holder is a
ViewHolder.
        when (holder) {
is ViewHolder -> {...}- Cast the object type returned by
getItem()toDataItem.SleepNightItem. Your finishedonBindViewHolder()function should look like this.
  override fun onBindViewHolder(holder: RecyclerView.ViewHolder, position: Int) {
        when (holder) {
            is ViewHolder -> {
                val nightItem = getItem(position) as DataItem.SleepNightItem
                holder.bind(nightItem.sleepNight, clickListener)
            }
        }
    }
Update the diffUtil callbacks
- Change the methods in
SleepNightDiffCallbackto use your newDataItemclass instead of theSleepNight. Suppress the lint warning as shown in the code below.
class SleepNightDiffCallback : DiffUtil.ItemCallback<DataItem>() {
    override fun areItemsTheSame(oldItem: DataItem, newItem: DataItem): Boolean {
        return oldItem.id == newItem.id
    }
    @SuppressLint("DiffUtilEquals")
    override fun areContentsTheSame(oldItem: DataItem, newItem: DataItem): Boolean {
        return oldItem == newItem
    }
}
Add and submit the header
- Inside the
SleepNightAdapter, belowonCreateViewHolder(), define a functionaddHeaderAndSubmitList()as shown below. This function takes a list ofSleepNight. Instead of usingsubmitList(), provided by theListAdapter, to submit your list, you will use this function to add a header and then submit the list.
fun addHeaderAndSubmitList(list: List<SleepNight>?) {}- Inside
addHeaderAndSubmitList(), if the passed in list isnull, return just a header, otherwise, attach the header to the head of the list, and then submit the list.
val items = when (list) {
                null -> listOf(DataItem.Header)
                else -> listOf(DataItem.Header) + list.map { DataItem.SleepNightItem(it) }
            }
submitList(items)- Open SleepTrackerFragment.kt and change the call to
submitList()toaddHeaderAndSubmitList().
- Run your app and observe how your header is displayed as the first item in the list of sleep items.
There are two things that need to be fixed for this app. One is visible, and one is not.
- The header shows up in the top-left corner, and is not easily distinguishable.
- It doesn't matter much for a short list with one header, but you should not do list manipulation in
addHeaderAndSubmitList()on the UI thread. Imagine a list with hundreds of items, multiple headers, and logic to decide where items need to be inserted. This work belongs in a coroutine.
Change addHeaderAndSubmitList() to use coroutines:
- At the top level inside the
SleepNightAdapterclass, define aCoroutineScopewithDispatchers.Default.
private val adapterScope = CoroutineScope(Dispatchers.Default)- In
addHeaderAndSubmitList(), launch a coroutine in theadapterScopeto manipulate the list. Then switch to theDispatchers.Maincontext to submit the list, as shown in the code below.
 fun addHeaderAndSubmitList(list: List<SleepNight>?) {
        adapterScope.launch {
            val items = when (list) {
                null -> listOf(DataItem.Header)
                else -> listOf(DataItem.Header) + list.map { DataItem.SleepNightItem(it) }
            }
            withContext(Dispatchers.Main) {
                submitList(items)
            }
        }
}- Your code should build and run, and you won't see any difference.
Currently, the header is the same width as the other items on the grid, taking up one span horizontally and vertically. The whole grid fits three items of one span width horizontally, so the header should use three spans horizontally.
To fix the header width, you need to tell the GridLayoutManager when to span the data across all the columns. You can do this by configuring the SpanSizeLookup on a GridLayoutManager. This is a configuration object that the GridLayoutManager uses to determine how many spans to use for each item in the list.
- Open SleepTrackerFragment.kt.
- Find the code where you define
manager, towards the end ofonCreateView().
val manager = GridLayoutManager(activity, 3)- Below
manager, definemanager.spanSizeLookup, as shown. You need to make anobjectbecausesetSpanSizeLookupdoesn't take a lambda. To make anobjectin Kotlin, typeobject : classname, in this caseGridLayoutManager.SpanSizeLookup.
manager.spanSizeLookup = object : GridLayoutManager.SpanSizeLookup() {
}- You might get a compiler error to call the constructor. If you do, open the intention menu with
Option+Enter(Mac) orAlt+Enter(Windows) to apply the constructor call.
- Then you'll get an error on
objectsaying you need to override methods. Put the cursor onobject, pressOption+Enter(Mac) orAlt+Enter(Windows) to open the intentions menu, then override the methodgetSpanSize().
- In the body of
getSpanSize(), return the right span size for each position. Position 0 has a span size of 3, and the other positions have a span size of 1. Your completed code should look like the code below:
    manager.spanSizeLookup = object : GridLayoutManager.SpanSizeLookup() {
            override fun getSpanSize(position: Int) =  when (position) {
                0 -> 3
                else -> 1
            }
}- To improve how your header looks, open header.xml and add this code to the layout file header.xml.
android:textColor="@color/white_text_color"
android:layout_marginStart="16dp"
android:layout_marginTop="16dp"
android:layout_marginEnd="16dp"
android:background="@color/colorAccent"- Run your app. It should look like the screenshot below.
Congratulations! You are done.
Android Studio project: RecyclerViewHeaders
- A header is generally an item that spans the width of a list and acts as a title or separator. A list can have a single header to describe the item content, or multiple headers to group items and separate items from each other.
- A
RecyclerViewcan use multiple view holders to accommodate a heterogeneous set of items; for example, headers and list items. - One way to add headers is to modify your adapter to use a different
ViewHolderby checking indexes where your header needs to be shown. TheAdapteris responsible for keeping track of the header. - Another way to add headers is to modify the backing dataset (the list) for your data grid, which is what you did in this codelab.
These are the major steps for adding a header:
- Abstract the data in your list by creating a
DataItemthat can hold a header or data. - Create a view holder with a layout for the header in the adapter.
- Update the adapter and its methods to use any kind of
RecyclerView.ViewHolder. - In
onCreateViewHolder(), return the correct type of view holder for the data item. - Update
SleepNightDiffCallbackto work with theDataItemclass. - Create a
addHeaderAndSubmitList()function that uses coroutines to add the header to the dataset and then callssubmitList(). - Implement
GridLayoutManager.SpanSizeLookup()to make only the header three spans wide.
Udacity course:
Android developer documentation:
This section lists possible homework assignments for students who are working through this codelab as part of a course led by an instructor. It's up to the instructor to do the following:
- Assign homework if required.
- Communicate to students how to submit homework assignments.
- Grade the homework assignments.
Instructors can use these suggestions as little or as much as they want, and should feel free to assign any other homework they feel is appropriate.
If you're working through this codelab on your own, feel free to use these homework assignments to test your knowledge.
Answer these questions
Question 1
Which of the following statements is true about ViewHolder?
▢ An adapter can use multiple ViewHolder classes to hold headers and various types of data.
▢ You can have exactly one view holder for data, and one view holder for a header.
▢ A RecyclerView supports multiple types of headers, but the data has to be uniform.
▢ When adding a header, you subclass RecyclerView to insert the header at the correct position.
Question 2
When should you use coroutines with a RecyclerView? Select all the statements that are true.
▢ Never. A RecyclerView is a UI element and should not use coroutines.
▢ Use coroutines for long-running tasks that could slow the UI.
▢ List manipulations can take a long time, and you should always do them using coroutines.
▢ Use coroutines with suspend functions to avoid blocking the main thread.
Question 3
Which of the following do you NOT have to do when using more than one ViewHolder?
▢ In the ViewHolder, provide multiple layout files to inflate as needed.
▢ In onCreateViewHolder(), return the correct type of view holder for the data item.
▢ In onBindViewHolder(), only bind data if the view holder is the correct type of view holder for the data item.
▢ Generalize the adapter class signature to accept any RecyclerView.ViewHolder.
Start the next lesson:
For links to other codelabs in this course, see the Android Kotlin Fundamentals codelabs landing page.